
Setup Cloud & Remote Productions

Welcome to the Playdeck Cloud & Remote Productions guide. This central guide helps you transition from a local studio environment to a decentralized or cloud-hosted setup. Rather than detailing specific commercial cloud providers, this page gives you the exact blueprint to deploy Playdeck on any online server or headless machine, feed remote streams into your playlists, and configure network triggers for total remote automation.

In this article:
Why Choose Remote Deployment? (Production Use Cases)
System Requirements & Network Architecture
Remote Inputs
Remote Outputs
Remote Control & Automation


Why Choose Remote Deployment? (Production Use Cases)

Installing Playdeck on an online remote server or data center computer instead of a local office machine provides critical architectural advantages. Below is why professional workflows utilize remote deployments:

Scenario A: High-Pressure Corporate Events & Galas

  • The Problem with Local Office Setup: Running a live event playout from an office or venue laptop exposes you to local network drops, accidental Windows update reboots, or personnel accidentally messing with the local machine.
  • Why Remote PC Deployment: By moving Playdeck to a dedicated online server, you isolate the playout engine entirely. Even if your local office internet goes down completely, Playdeck continues to run safely in the data center. Its dedicated HDMI/SDI output automatically isolates the feed—guaranteeing that the operating system desktop, mouse cursors, or other running applications are never displayed on the program feed, maintaining a clean look even if a remote operator disconnects.


Scenario B: 24/7 Fixed Installations & Automated Playout

  • The Problem with Local Office Setup: Office computers are vulnerable to local power outages, hardware tampering, and standard consumer network interruptions, making them highly unreliable for around-the-clock broadcasting.
  • Why Remote PC Deployment: A remote data center computer offers enterprise-grade power redundancy (UPS) and climate control. You can manage a completely headless system from anywhere via RDP. Because you have full remote access, you can update, reorder, or completely replace the active playlist remotely via the web interface or API commands from any device worldwide, ensuring instant schedule adjustments on a headless system without interrupting the active stream.


Scenario C: Multi-Destination Cloud Distribution & Monitoring

  • The Problem with Local Office Setup: Standard office DSL or Wi-Fi connections simply lack the upload bandwidth required to output multiple high-quality video streams simultaneously, causing massive packet loss and stuttering.
  • Why Remote PC Deployment: Data center servers are hooked directly into massive internet backbones with symmetrical gigabit speeds. This allows you to output your main playout signal to a high-quality master SRT destination while simultaneously pushing multiple lower-bitrate RTMP feeds to social platforms—completely bypassing local office bandwidth bottlenecks. Furthermore, production assistants or clients can monitor the active playlist, clip countdowns, and system health status globally via the Web UI interface, ensuring zero performance impact on the primary hardware-accelerated video rendering engine.

System Requirements & Network Architecture

You can run Playdeck in the cloud or data centers on almost any modern virtualized or physical machine. This provides massive internet bandwidth for handling multiple parallel stream outputs and high-bitrate ingests compared to typical office DSL or Wi-Fi connections.

  • Operating System: Any standard Windows 11 (64-bit) environment.
  • Remote Management: The system can run completely “headless” (without a physical monitor attached). You can connect and manage the interface entirely via Remote Desktop Protocol (RDP).
  • Hardware & GPU: While standard hardware requirements apply, a dedicated GPU (e.g., NVIDIA) is highly recommended to handle hardware decoding for common codecs like H.264.
  • Base Specifications: For a detailed breakdown of recommended components, check out our Playdeck PC Build Guide.


Remote Inputs

Playdeck features an intelligent ingest engine that automatically detects your input source type. A major technical advantage: Playdeck does not constantly consume bandwidth for all streams. It initiates the stream network pull dynamically right before the clip is scheduled to air (one clip ahead in the playlist), allowing you to queue an infinite number of remote cameras or feeds without overloading your network.

  • Adding a Stream: Drag and drop the Stream Icon (located between the two playlists) directly into your playlist, then enter your ingest URL.
  • SRT & Live Feeds: Feed low-latency Secure Reliable Transport (SRT) or generic stream links directly into your timeline. For detailed stream configuration, see our Input Streams Guide.
  • YouTube Ingest: Paste any YouTube video or livestream URL. After Playdeck scans the link, right-click the item in your playlist and navigate to Video Tracks or Audio Tracks to manually select your preferred stream quality. Learn more in our YouTube Integration Guide.

Remote Outputs

Distribute your playout signal from your cloud server or studio to any remote destination with maximum efficiency:

  • Direct Cloud Streaming: Use the native streaming options to push your output directly to major cloud platforms (YouTube Live, Twitch, Facebook Live) or custom RTMP/SRT media servers.
  • Low-Latency Master Control: Deliver high-quality SRT output feeds to enterprise cloud switchers or decentralized broadcast facilities.
  • Virtual Monitoring: Map Playdeck’s output to virtual camera and audio drivers to route the live feed directly into video conferencing tools (Zoom, Microsoft Teams) for instant client approval or remote monitoring.

Remote Control & Automation

Playdeck offers a deep matrix of network commands, remote interfaces, and hardware trigger support divided cleanly within the settings menu.

Network > Remote Control

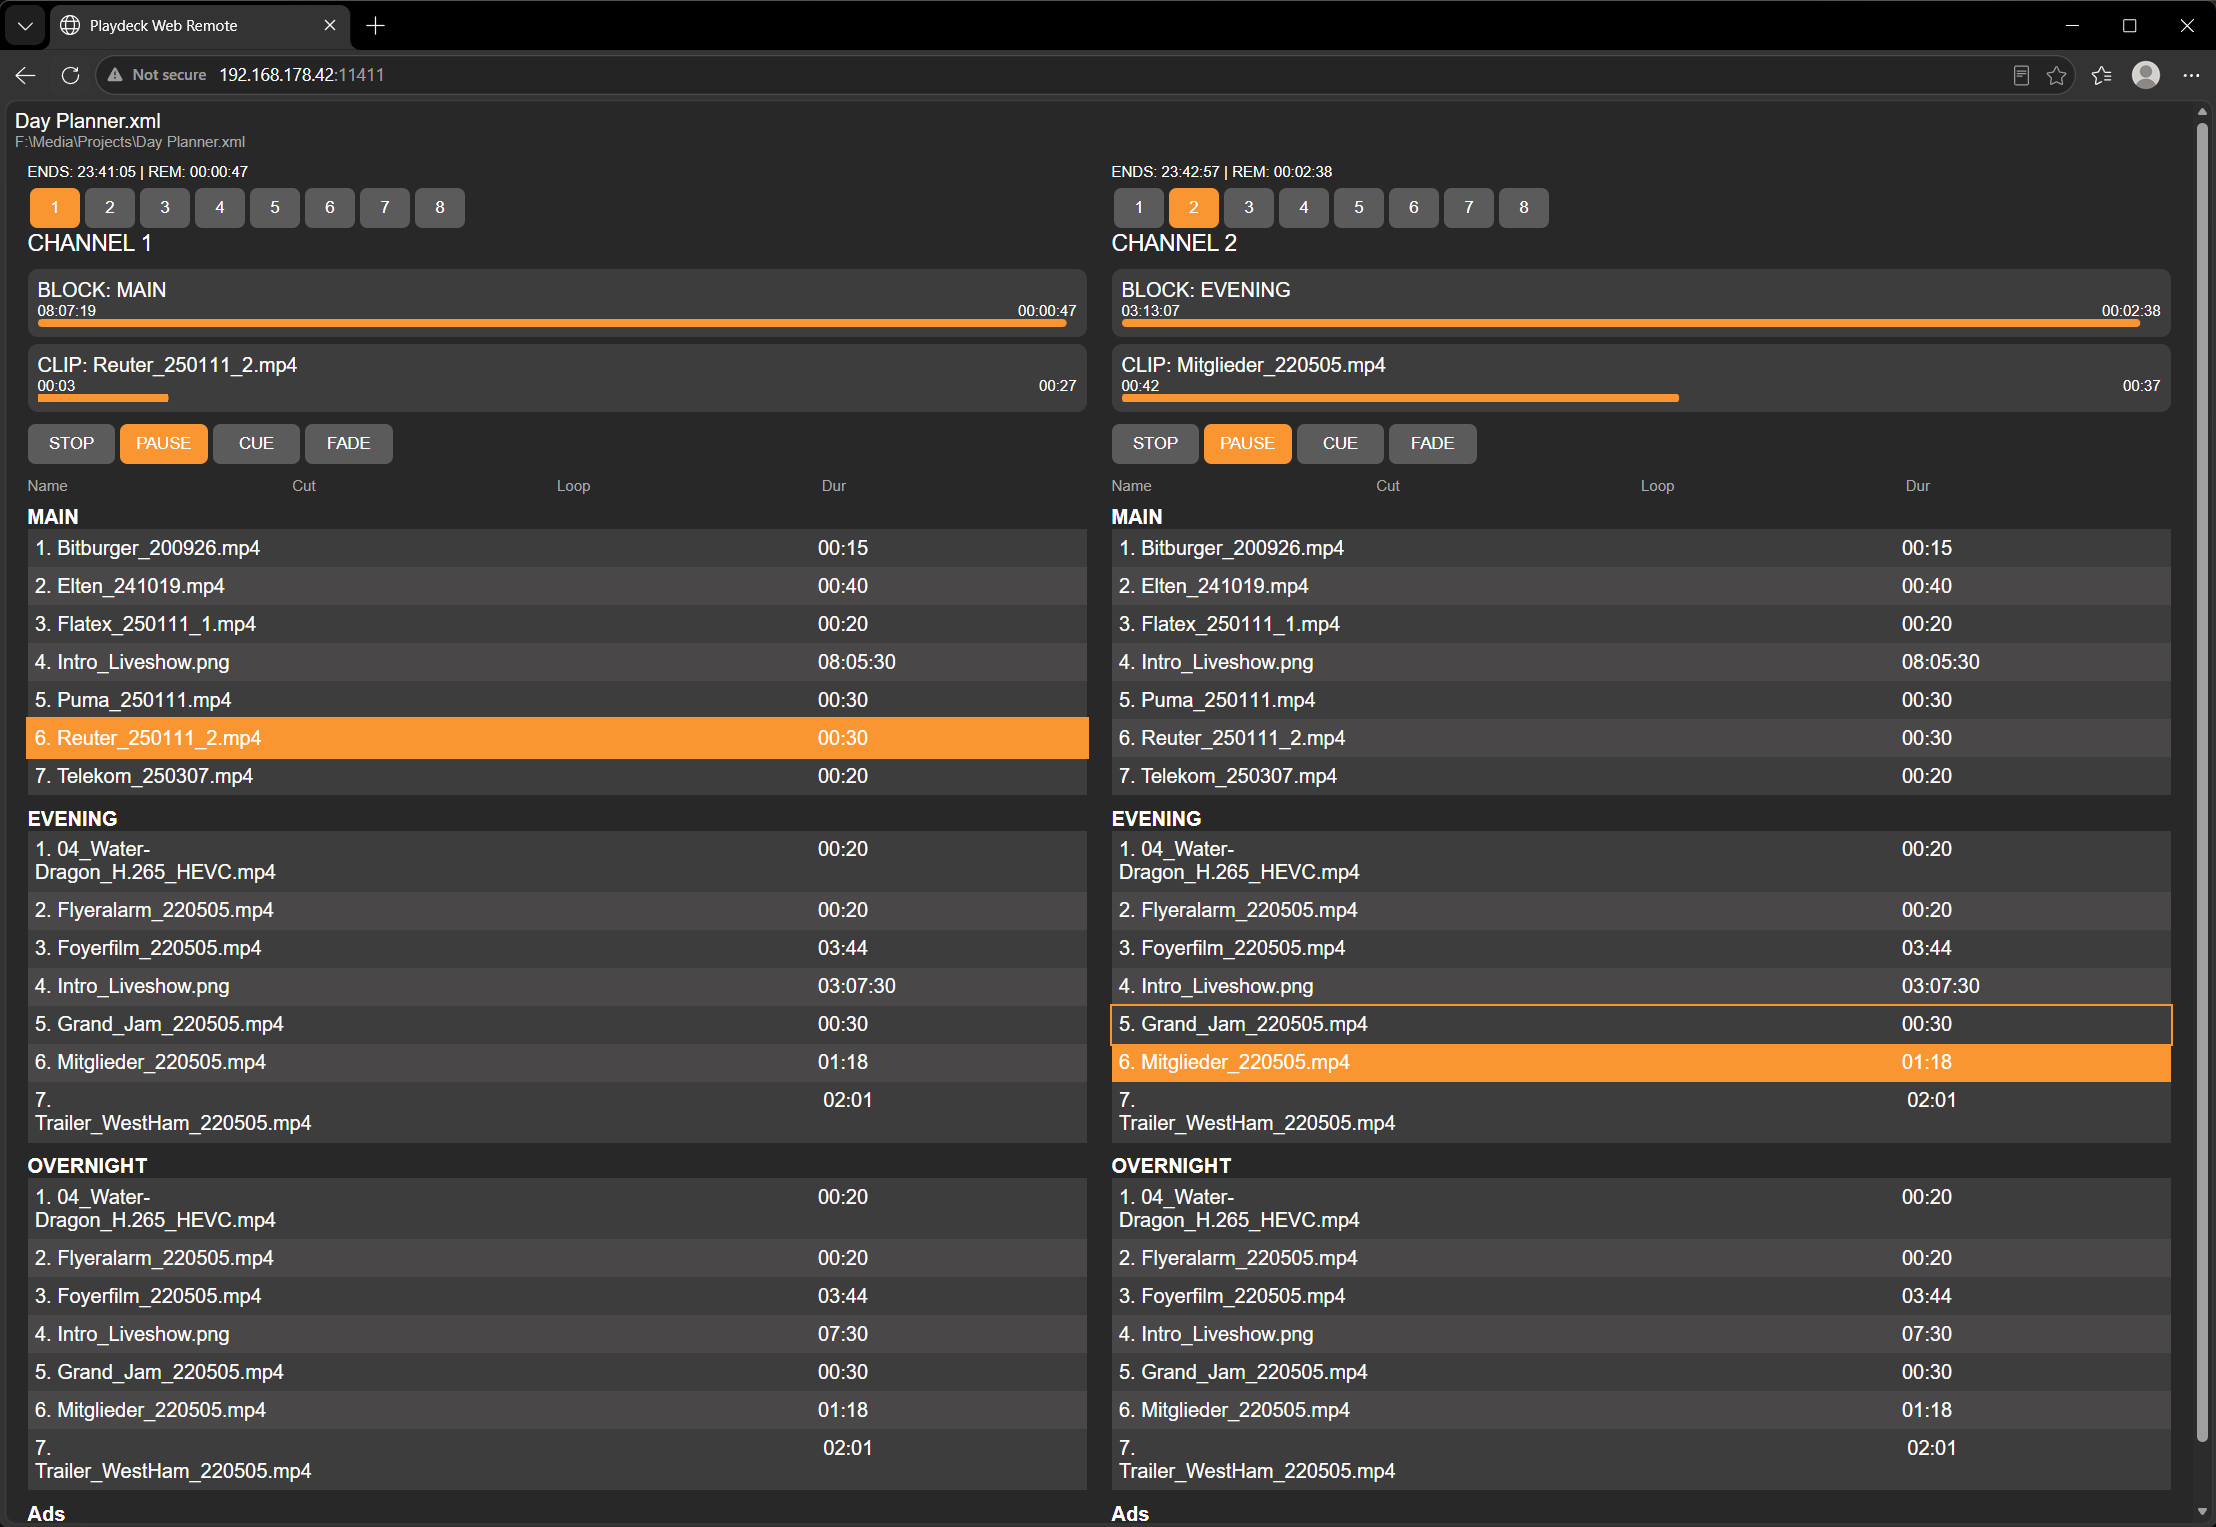
  • Web User Interface: Access a dedicated, mobile-friendly remote layout from any smartphone, tablet, or external browser. Simply scan the QR Code displayed in this menu section to launch it instantly without manual activation steps.
  • Bitfocus Companion: Control your playout from anywhere via a physical Stream Deck or virtual buttons. Review the integration steps in the Companion Documentation.
  • Playdeck API: Connect via WebSockets (REST API planned) to send commands or read live playlists, playout statuses, and events. This API forms the exact foundation of our own Web UI Remote Control. Read the technical syntax in the Playdeck API Reference.


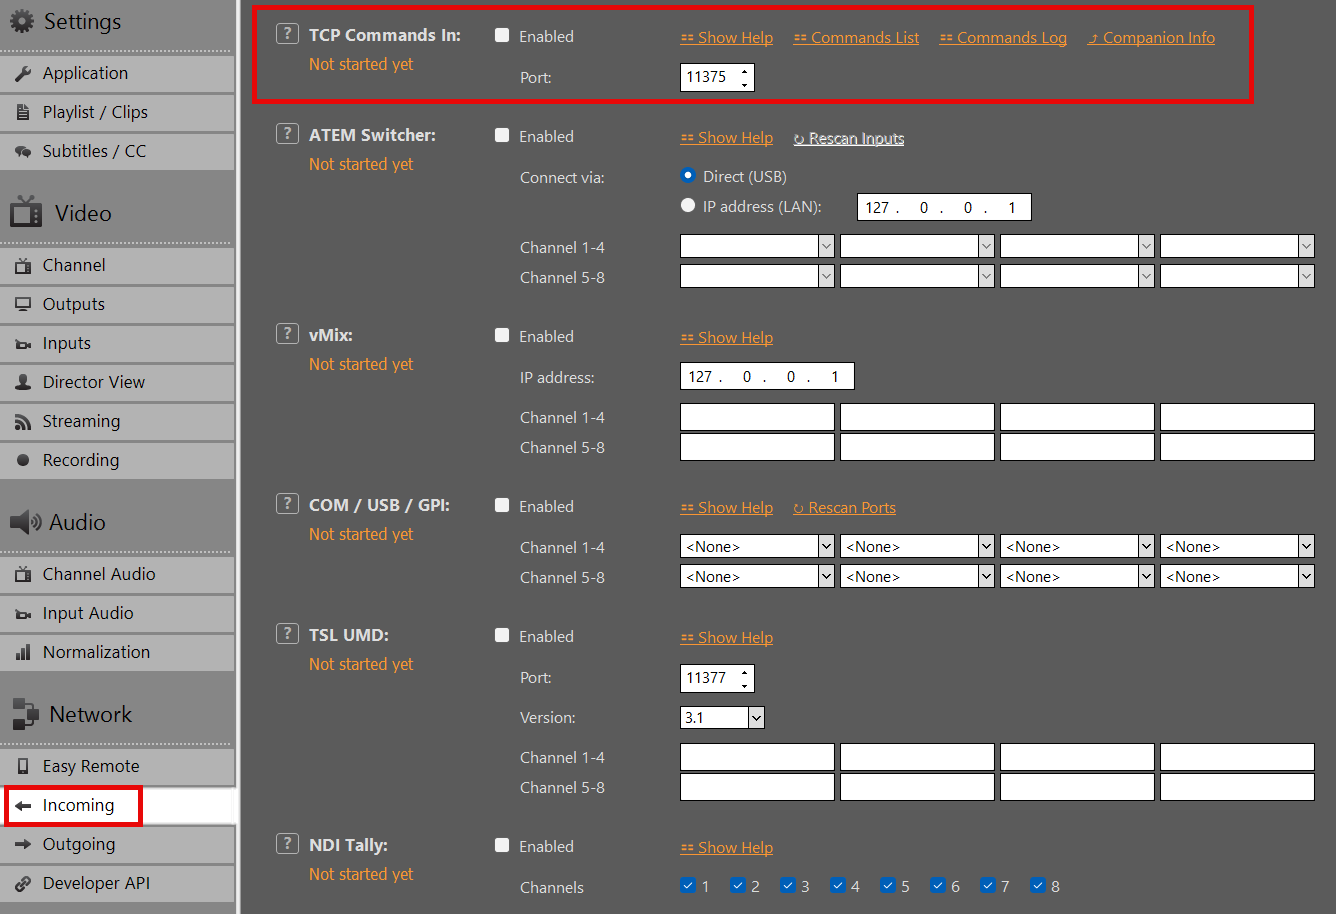
Network > Incoming

  • TCP Commands: An open, versatile interface used to fully remote-control Playdeck using third-party apps, including dynamically inserting new clips or initiating streams. See the complete command list in our TCP Commands Guide.
  • ATEM & vMix Integration: Map local or LAN-based ATEM Switchers (via USB/Network) and vMix instances to act as automatic CUE+PLAY triggers the exact moment a designated input goes live.
  • Hardware Triggers (COM/USB): Connect older or highly customized physical hardware devices utilizing a closed-circuit setup for instant CUE+PLAY actions.
  • Broadcast Standards (TSL UMD & NDI Tally): Trigger automated CUE+PLAY via TSL UMD (versions 3.1 and 5.0, e.g. Ross mixer tally) or via NDI Tally when an assigned NDI input goes live.
  • AMP Video Server (Generic DDR): PLAYDECK acts as an AMP server. Switchers such as Ross Carbonite connect as client, browse playlist clips, and control cue, play, stop and pause. Video is routed separately (SDI/NDI/HDMI). See our AMP Video Server Guide.


Network > Outgoing

  • TCP Commands: Instruct Playdeck to automatically send custom, individual strings to external third-party hardware or software whenever specific events occur (e.g., Clip/Block Start, Action Buttons, or Overlay triggers).
  • TCP Events: Broadcast predefined, automated system status changes from Playdeck to keep external control systems perfectly in sync with your active playout timeline.

HDR Output and Recording

PLAYDECK supports HDR playback, SDI output (via Blackmagic DeckLink) and HDR recording.

Prerequisites in Hardware
Enabling HDR Mode
Setting up SDI Output
Setting up Recording
Monitoring & Controlling
Troubleshooting


Prerequisites in Hardware

Graphics card
NVIDIA GPU with at least Turing architecture (GTX 16xx / RTX 20xx or newer).
Recommended: RTX 30xx / 40xx series (e.g. RTX 3080, 4070, 4080).
→ Required for 10-bit decoding/processing/encoding.

SDI output card
Blackmagic Design DeckLink with 10-bit and HDR metadata support:
– DeckLink 8K Pro
– DeckLink 12G Extreme
– DeckLink 6G / 12G models (Quad 2 / Duo 2 / Mini Recorder 4K etc.)
→ Older models (e.g. DeckLink 4K Extreme without 12G) may be limited to 4K 30p or no HDR metadata.

You can check your Graphics card in PLAYDECK:


Enabling HDR Mode

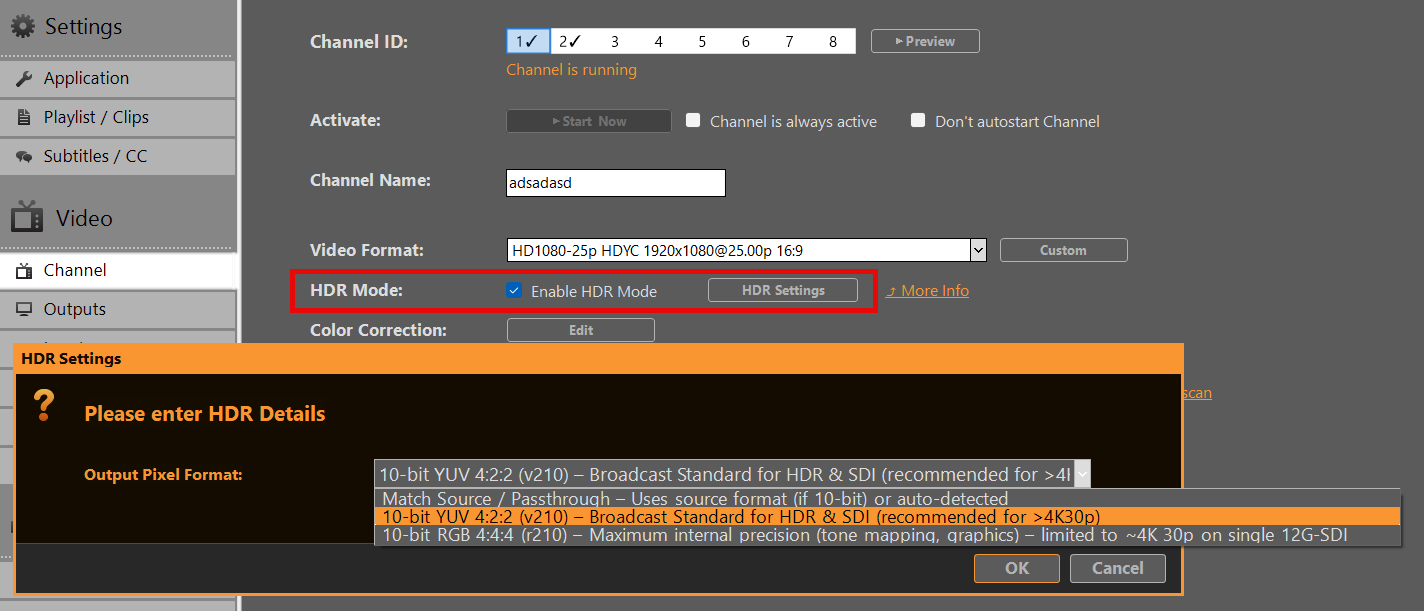
HDR Mode needs to be enabled in the Channel Settings. In HDR Settings, choose one of the following Output Pixel Format. Start with v210 unless you specifically need RGB processing.

Match Source / Passthrough
Uses the source pixel format (if 10-bit) or auto-detected
→ May default to r210 on HLG/PQ content.

10-bit YUV 4:2:2 (v210) – Broadcast Standard for HDR & SDI (recommended)
→ Preferred choice for most SDI workflows.
→ Full compatibility up to 8K 60p on single-link 12G-SDI.
→ Recommended when frame rate > 4K 30p.

10-bit RGB 4:4:4 (r210) – Maximum internal precision
→ Best for tone mapping, keying or heavy internal processing.
Limitation: On many DeckLink cards limited to ~4K 30p (bandwidth constraint on single 12G-SDI link).
→ Use with caution at higher frame rates.


Setting up SDI Output

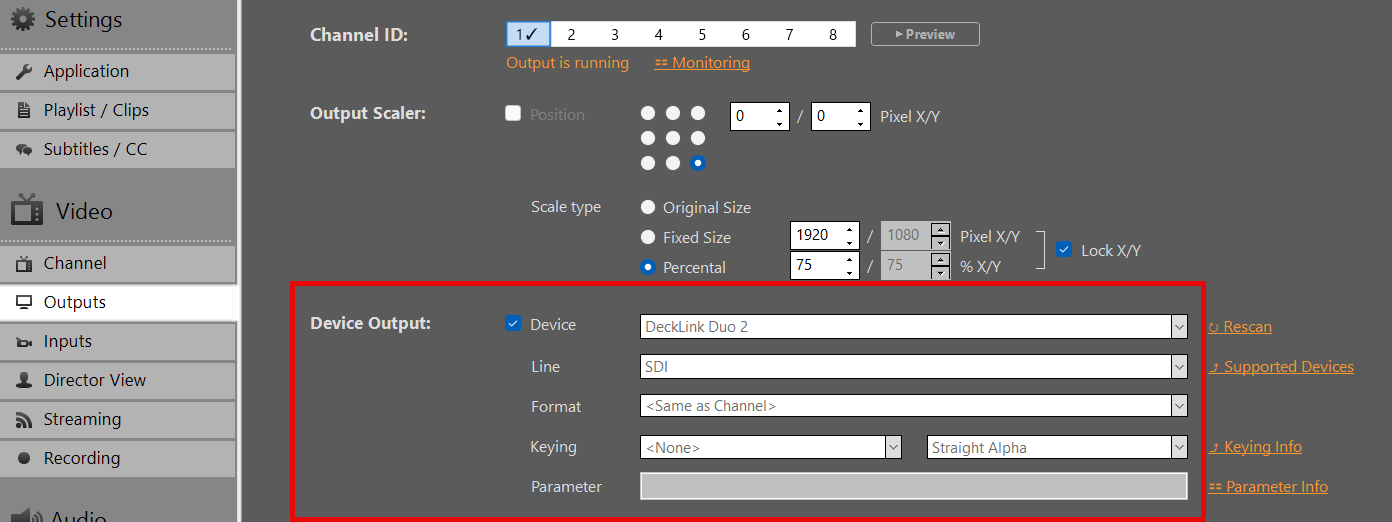
In Output Settings, select your DeckLink card as the output device. 10-bit Output will be activated automatically. If the Card doesn’t support it, it will fall back to SDR.

Important:
HDR metadata (PQ/HLG) is carried in VANC (Vertical Ancillary Data) on SDI.
Most modern DeckLink cards and downstream devices (monitors, switchers) detect this automatically when 10-bit signal is present.
You need to re-enable your Device, if you changed Output Pixel Format in HDR Settings.


Setting up Recording

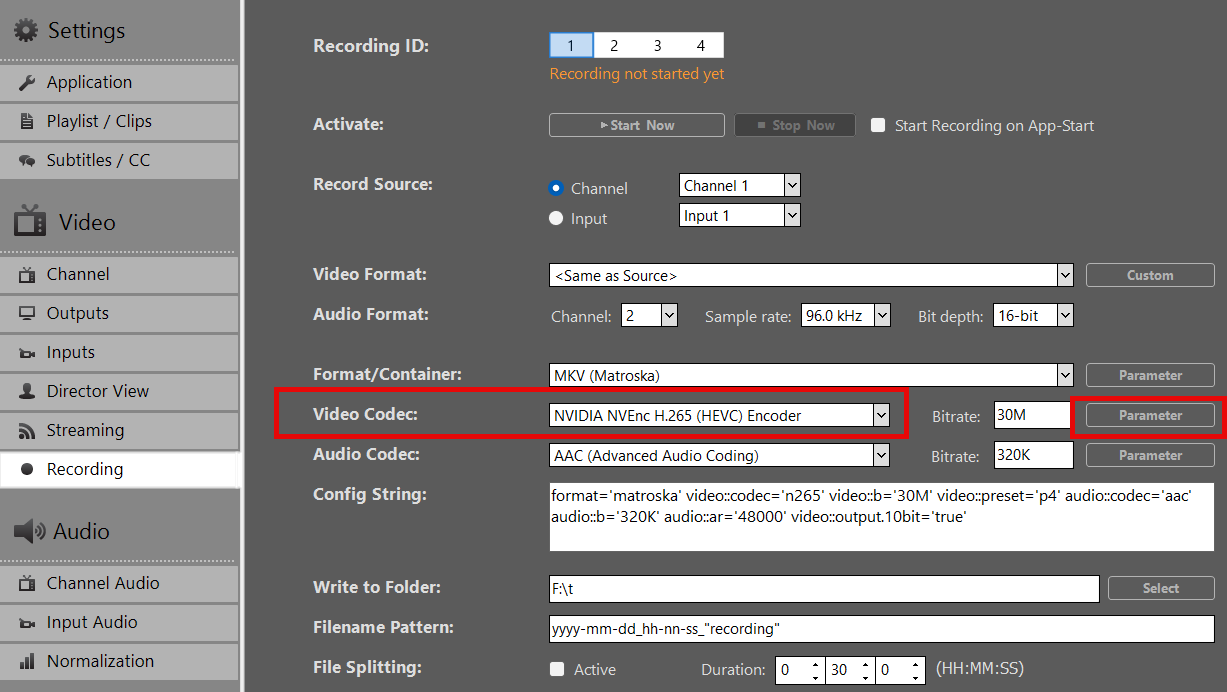
  1. Select a Format/Container (recommended: MOV or MKV).
  2. Pick NVIDIA H265 HEVC as Video Codec. Currently, no other Video Codecs are supported for HDR.
  3. Apply your preferred bitrate (50–100 Mbps recommended for 4K HDR)
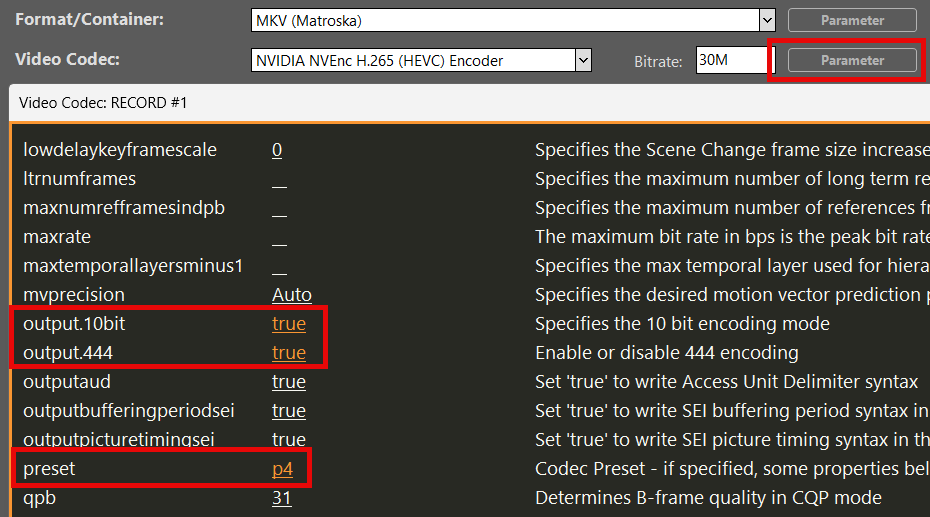
  4. Click on Parameter behind Video Codec and set these options:
    output.10bit = true
    output.444 = true (! Only is “10-bit RGB 4:4:4 (r210)” selected in HDR Settings)
    preset = p4

Result: Recorded file contains BT.2020 + HLG/PQ metadata when source was HDR.


Monitoring & Controlling

Play a HDR Clip in the Playlist. You can download this HDR HLG BT2020 Test Video.

Note: Preview on standard HDMI SDR monitors may appear washed-out or flat for HDR content — this is expected behavior.

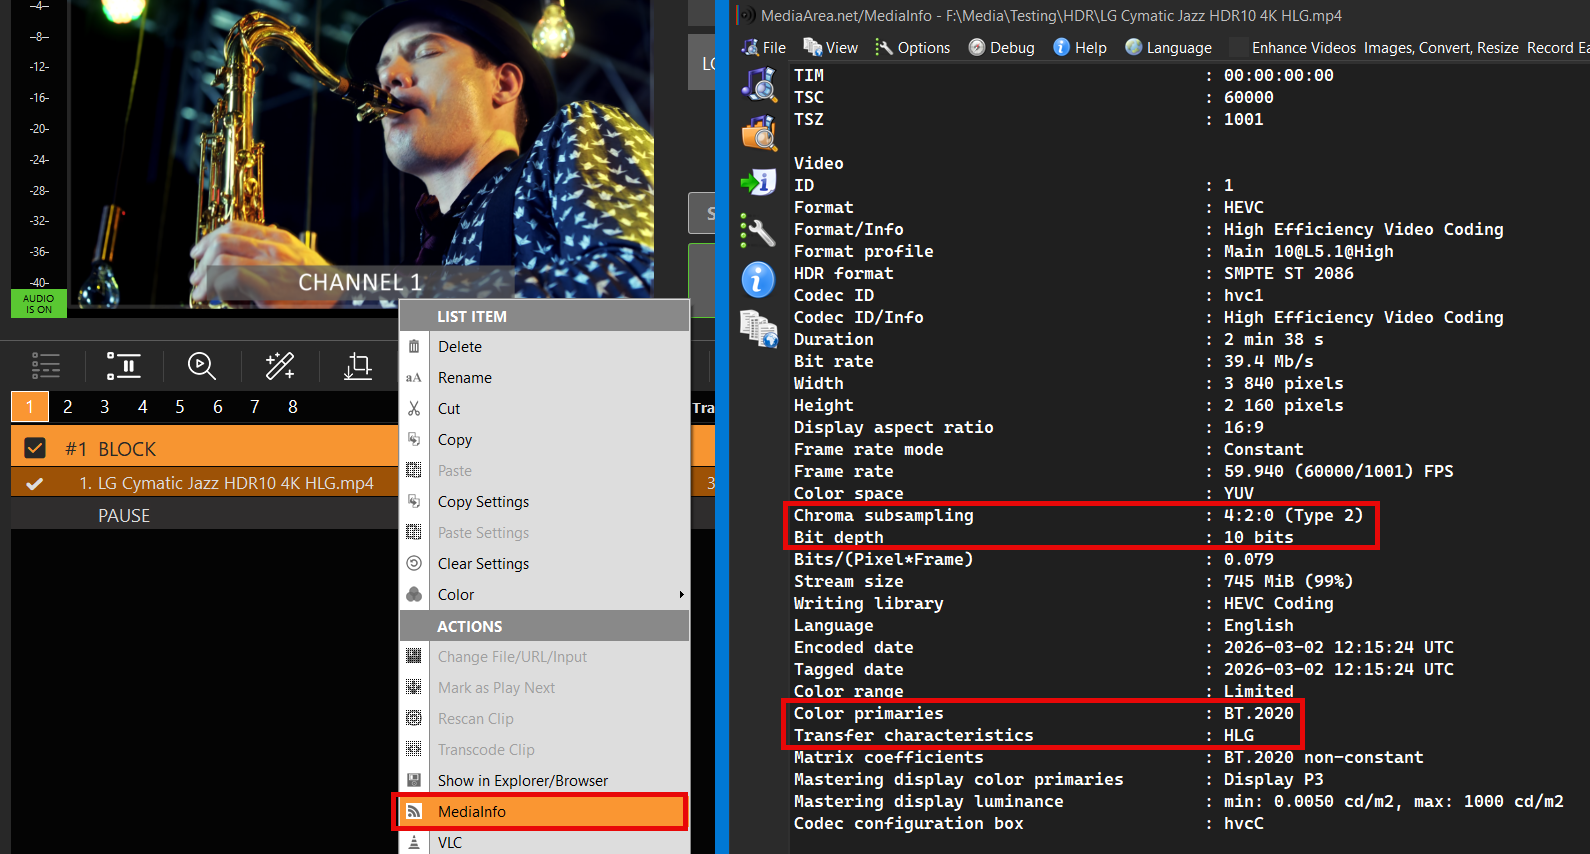
You can check on the Clip’s HDR properties by right-clicking the Clip and selecting MediaInfo:

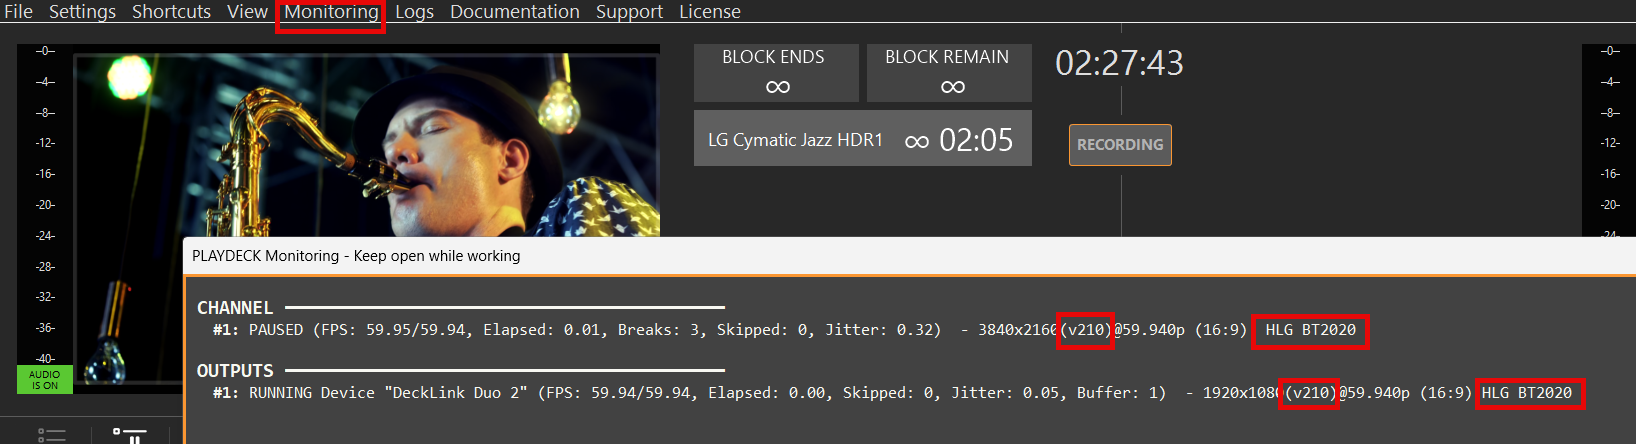
To verify, if PLAYDECK is correctly processing your HDR File, open Monitoring from the Main Menu and check these properties:
Pixel Format (v210 or r210)
Transfer characteristics (HLG or PQ)
Color primaries (BT2020)

This allows you to check, if your SDI Card is sending HDR without a SDI HDR Monitor.

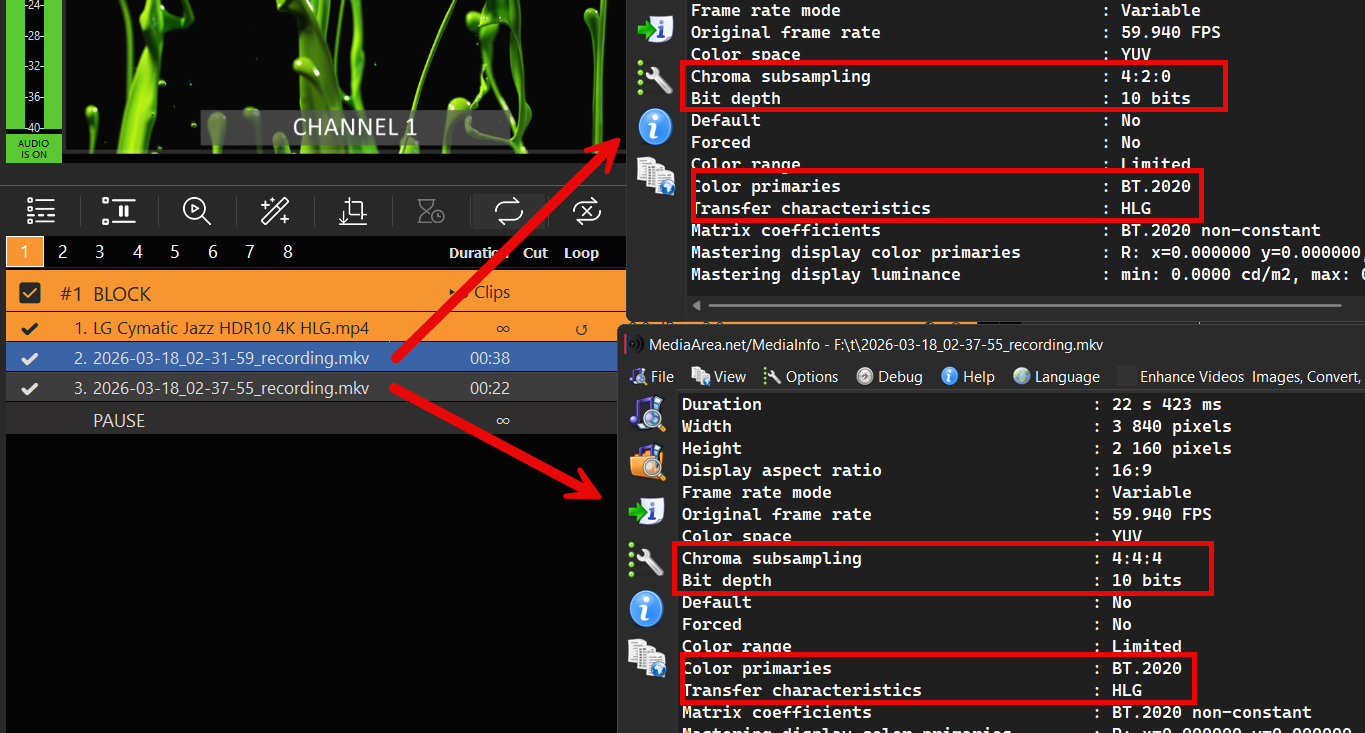
To verify your Recording, open the Recording Folder and Drag Drop your new File into the Playlist.

It should show the same HDR Meta Data as your Original (or your HDR Settings):


Troubleshooting

Working with HDR requires sufficient system bandwidth to handle increased pixel data and frame sizes, which can be tested using Blackmagic’s SignalGenHDR.exe tool. Users can stress-test their setup by running4 simultaneous instances to output 4K signals and verify 12G-SDI throughput capacity.

Download the Tool here:
https://downloads.playdeck.tv/assets/SignalGenHDR.zip

Color Correction for Inputs and Channel

This article will show how to use Color Correction Tools for your Broadcasts.

Video Range (16-235) vs. Full Range (0-255)
Color Adjustment Controls
Tools: Waveform, Vectorscope & Histogram
Why is CPU Processing required?


Video Range (16-235) vs. Full Range (0-255)

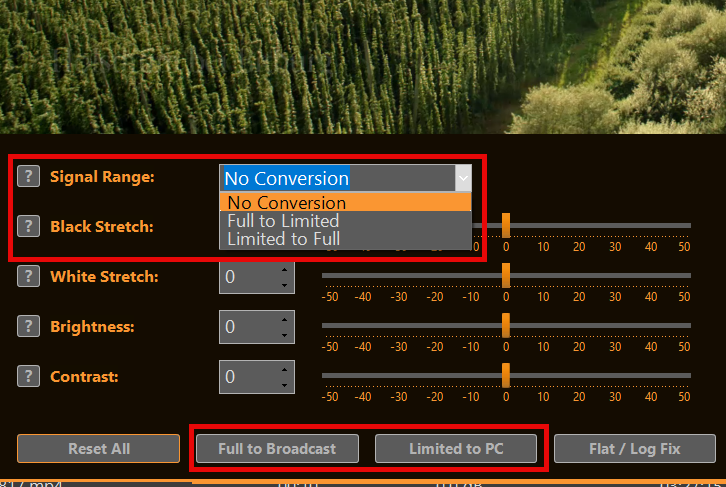
Video Range (Limited / Broadcast): Uses 16–235 (8-bit). Black = 16, white = 235. Standard for TV, broadcast, streaming — preserves headroom.
Full Range (PC / Data): Uses full 0–255. Black = 0, white = 255. Native for computer monitors, graphics, photos.
Color Range Expansion converts Video → Full Range (lifting blacks, expanding whites) to avoid washed-out appearance on PC displays. Mismatches cause crushed blacks, blown whites, or grayish/milky picture.

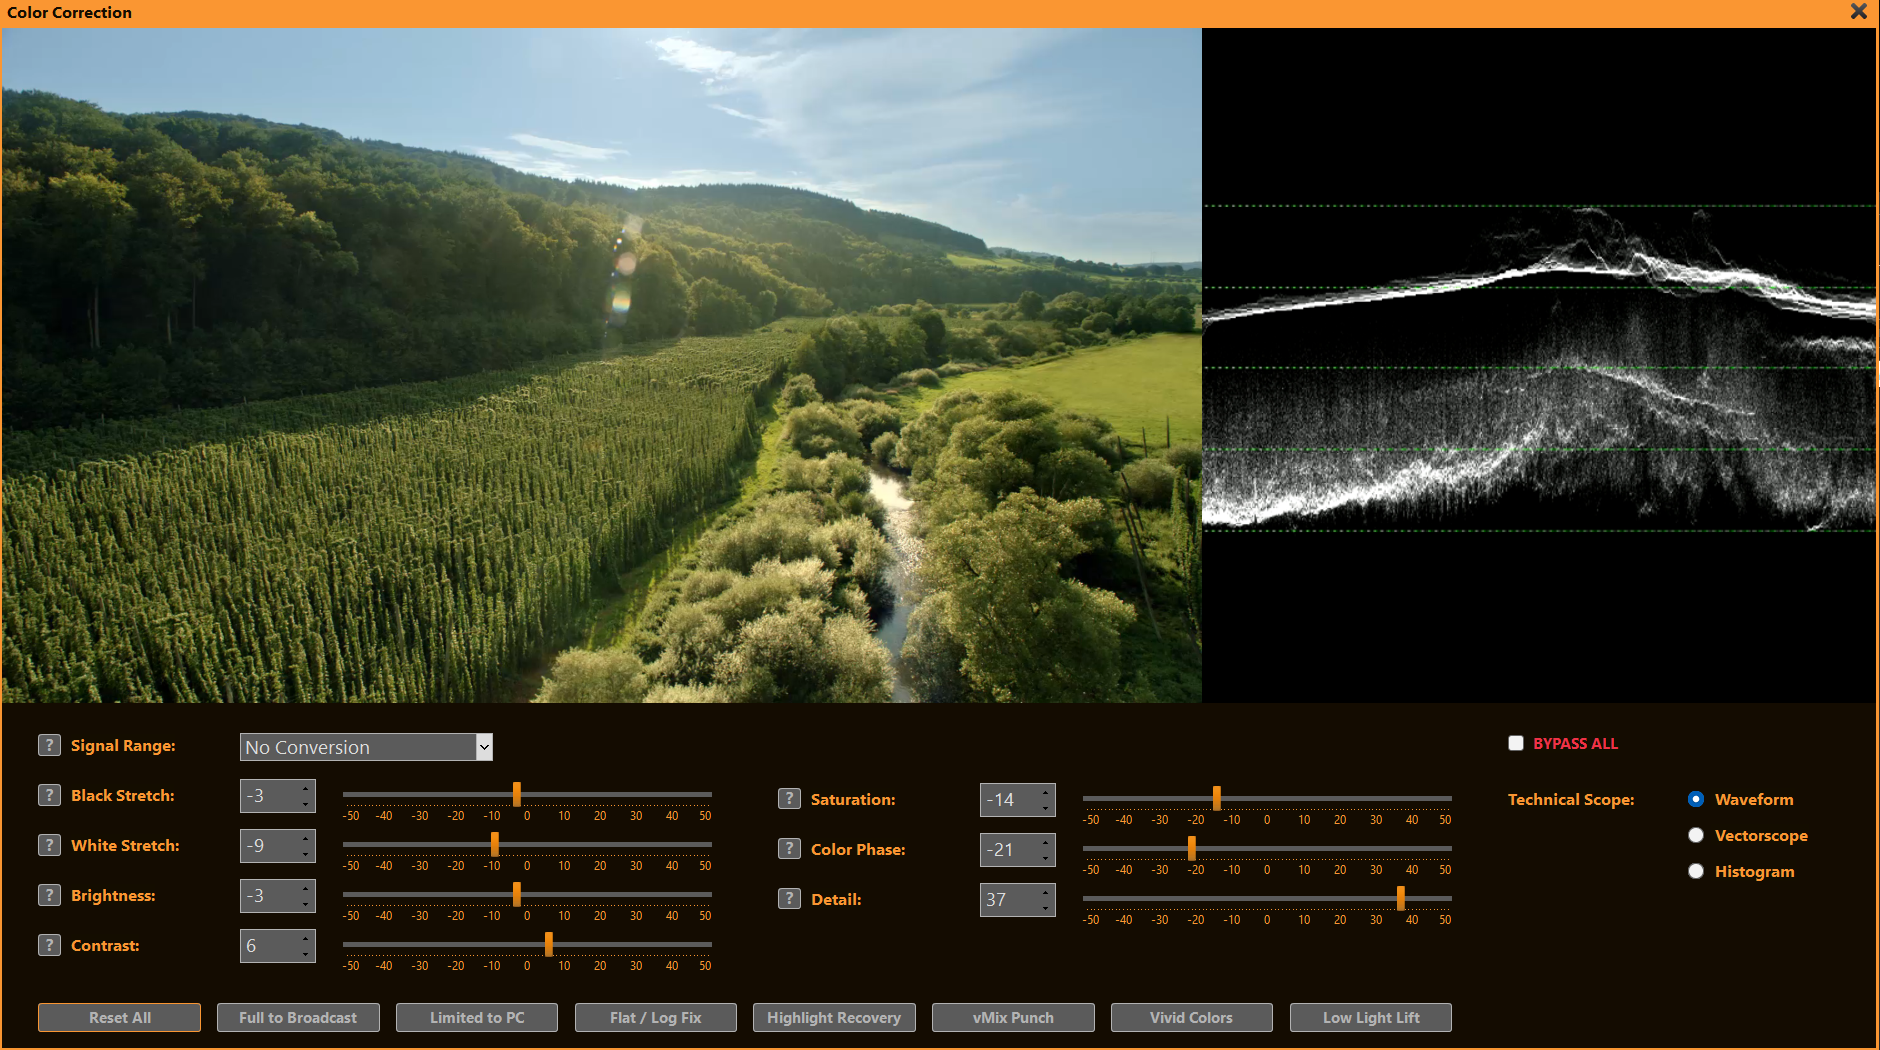
With PLAYDECK you can quickly convert between both modes by selecting the signal range or one of the preset buttons:


Color Adjustment Controls

PLAYDECK’s sliders help solve common broadcast and live-production challenges quickly:

  • Black Stretch Recover lost shadow detail in underexposed footage or create deeper, more cinematic blacks for dramatic looks.
  • White Stretch Bring back highlight detail in overexposed shots (e.g. skies, lights) or add punch to flat, washed-out highlights.
  • Brightness Correct overall too-dark or too-bright sources without changing contrast — ideal for matching multiple cameras.
  • Contrast Make flat, low-energy pictures pop for sports/news or reduce harsh contrast on harsh studio lighting.
  • Saturation Boost dull, desaturated camera feeds (e.g. ENG cameras) or tone down overly vivid graphics/logos for broadcast-safe output.
  • Color Phase Fix green/magenta casts from mismatched lighting, warm up cool skin tones, or match color temperature between sources.
  • Detail Sharpen soft, low-resolution streams or reduce noise in low-light footage without introducing artifacts.


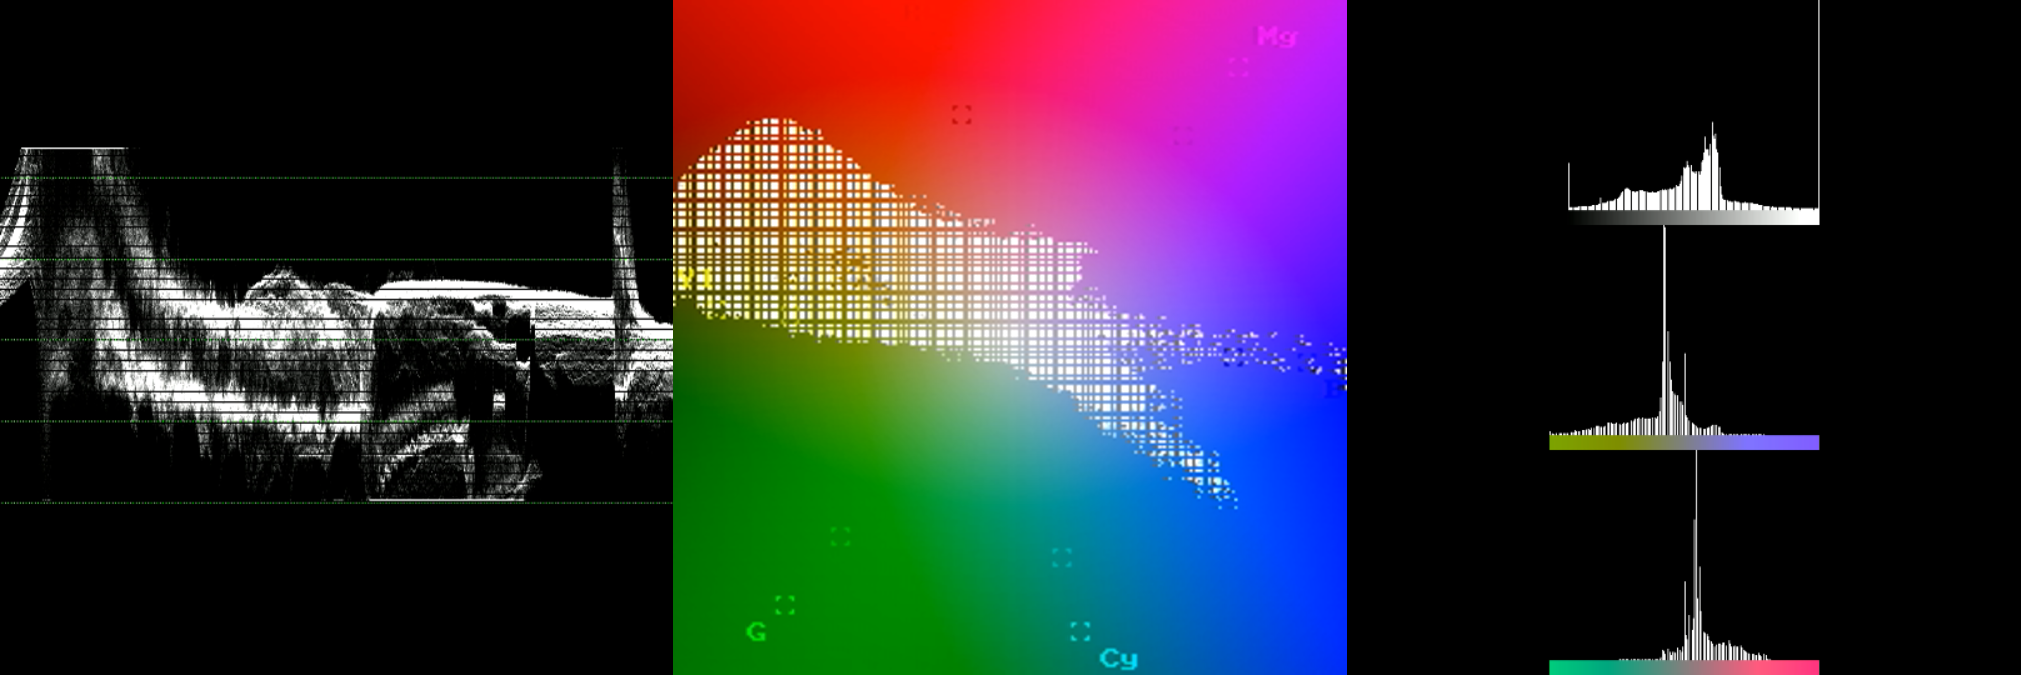
Tools: Waveform, Vectorscope & Histogram

hese professional monitoring tools appear in a dedicated panel next to the video preview — perfect for precise color and exposure control during live production or playback.

  • Waveform: Check overall exposure and luminance levels quickly. Spot clipped highlights (flat at 100 IRE), crushed blacks (piled at 0 IRE), or mismatched camera levels so you can adjust brightness/black/white stretch before broadcast.
  • Vectorscope: Verify and correct color balance and saturation. Ensure skin tones stay in the correct flesh-tone line, detect unwanted color casts (e.g. green from LED lights), and confirm broadcast-legal saturation without over-the-top vividness.
  • Histogram: Analyze tonal distribution across the image. Identify if shadows/midtones/highlights are evenly spread or if detail is lost in dark/bright areas — ideal for fine-tuning contrast and stretch sliders to achieve a balanced, professional picture.


Why is CPU Processing required?

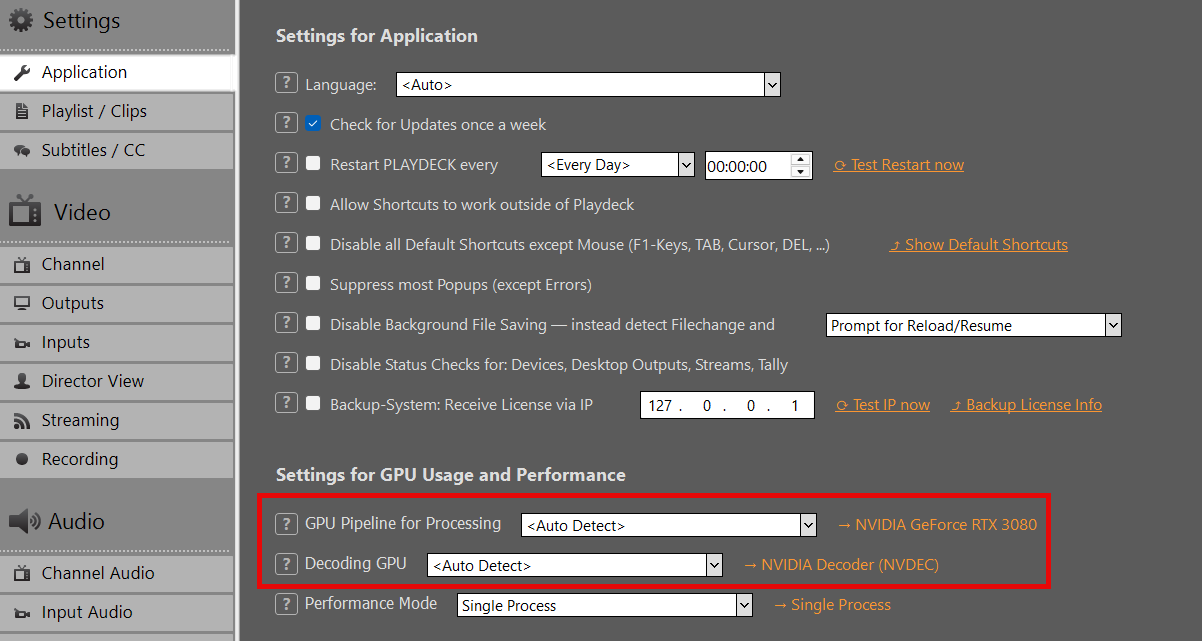
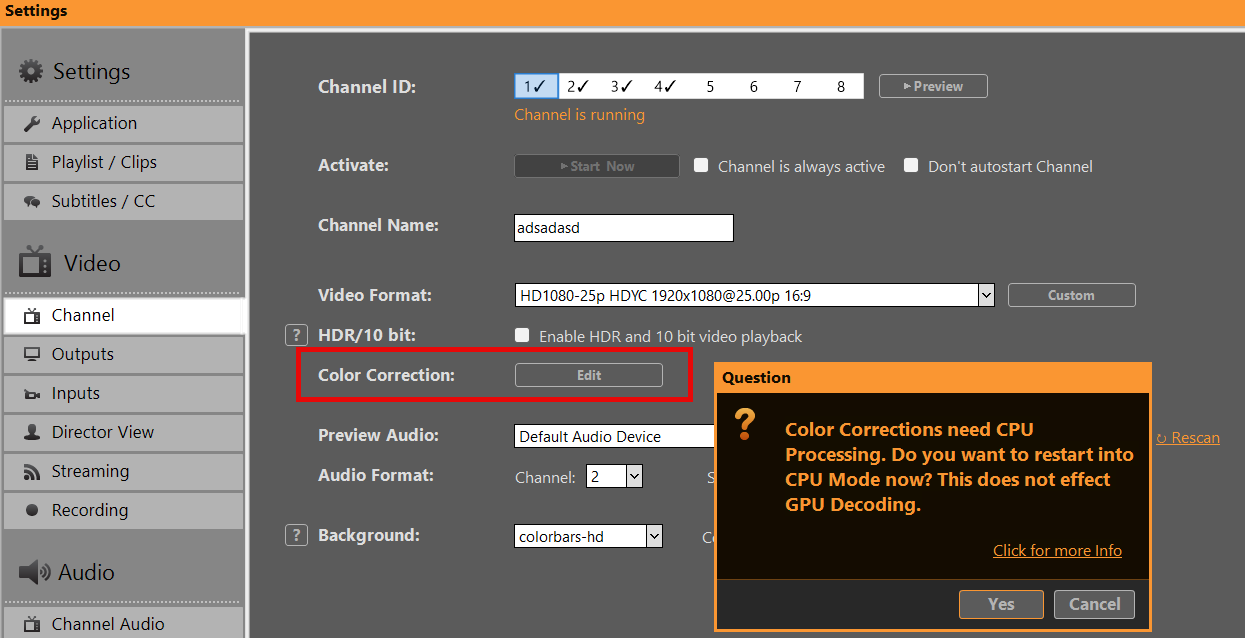
When using Color Correction (or certain other video filters) for the first time, PLAYDECK may prompt you to switch to CPU Processing:


Reason: Certain video filters (vfilters) on inputs and playlists rely on FFmpeg processing, which runs only on the CPU. The GPU pipeline does not support these standard filters, so CPU mode is required for them to work correctly — ensuring reliable playback and effects.

GPU Processing handles: Scaling, Mixing, Overlays, Format Conversion, and many Effects.

Switching to CPU mode keeps all features working normally — the only difference is higher CPU usage (and lower GPU load).

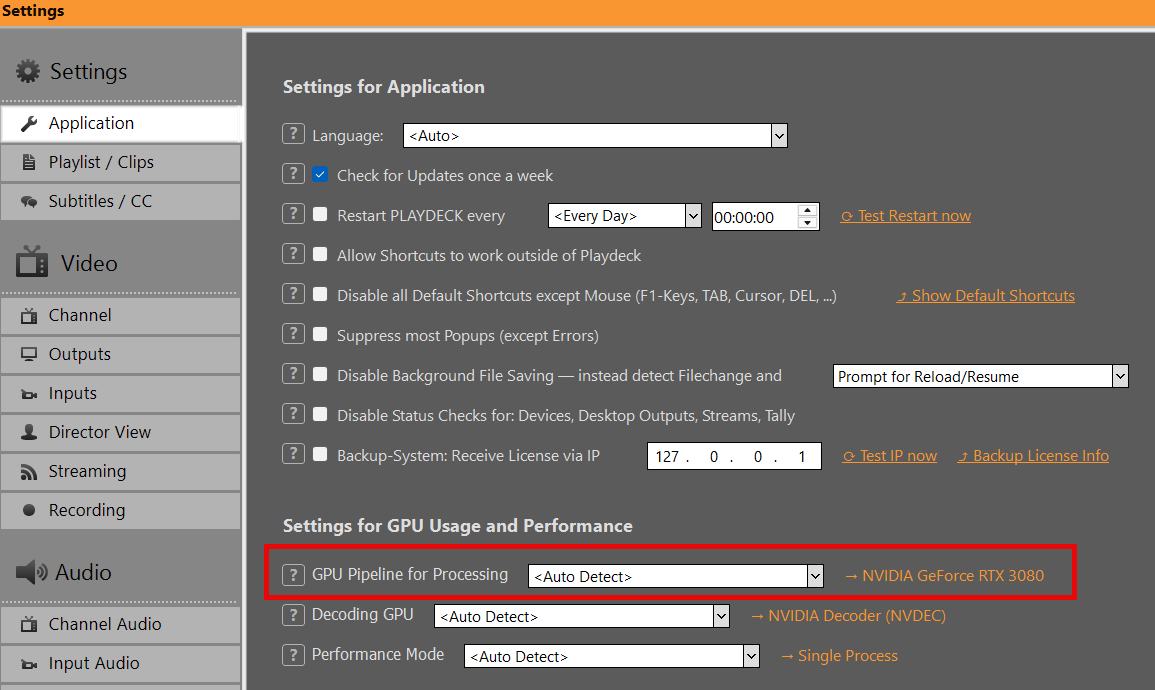
You can switch back to GPU Processing anytime in the application settings:

PLAYDECK License Options

Simple, Flexible & Transparent:
PLAYDECK is available in three editions and multiple license models to fit your production needs. All prices exclude VAT and can be processed in your preferred currency via our global shop. Choose the plan that matches your independent playout channels and workflow requirements.

PLAYDECK Editions
Choose Your License Model
Free Trial Edition (incl. Limitations)
License Activation
Support Options
License Portability & Backup
Special Conditions & Discounts
Upgrades, Downgrades & Cancellations
Dongle Details
Reseller Conditions


PLAYDECK Editions

We offer three editions tailored to your production scale, primarily differing in the number of independent main playout channels you can control simultaneously:

  • LITE: 1 independent playout channel – €190.80 per year (≈ €15.90/month, save €132 vs. monthly billing)
  • PLUS: 2 independent playout channels – €430.80 per year (≈ €35.90/month, save €288 vs. monthly billing)
  • STUDIO: 8 independent playout channels – €994.80 per year (≈ €82.90/month, save €684 vs. monthly billing)

All editions share the same powerful, rock-solid core: native support for virtually every codec and container format, low-latency GPU decoding, professional hardware I/O (SDI/HDMI via Blackmagic, AJA, Deltacast), IP streaming (NDI®, SRT, RTMP), graphics overlays, and automated failsafes.

For a full, detailed feature comparison chart (audio channel routing, recording channels, advanced scheduling, etc.), visit our official Plans & Pricing page: https://playdeck.tv/plans-pricing/


Choose Your License Model

PLAYDECK offers flexible licensing to match different workflows:

Online Shop License (most popular): Tied to your email in a personal License Pool. Requires internet for transfers/check-in/out. Easy portability.

USB Dongle License: Hardware-based (USB stick). No internet needed for daily use/activation. Portable by moving the dongle.

Offline License (special cases): Permanently bound to one specific PC (System ID). No internet ever required. Not portable without re-issuance.


Free Trial Edition (incl. Limitations)

Download and test PLAYDECK completely free—no time limit, no credit card required. Switch editions instantly inside the software via Menu → License → Change Trial Edition.

Limitations:
— Watermark on all video outputs.
— Occasional random short audio mutes (clearly signaled on screen).

All other production features are fully unlocked—ideal for comprehensive real-world testing of your local or cloud setup before purchase.


License Activation

Activation is quick and simple. Access our detailed activation guide here: https://playdeck.tv/activate-license/

Quick Steps:
Shop / Online Pool: Open the License Manager inside PLAYDECK, log in with your purchase email, and instantly check out your seat from your personal pool.
Dongle: Simply plug the physical USB security key into the machine—the software auto-detects the license immediately.
Offline: Paste the machine-bound activation key provided by our support desk into the License Manager.


Support Options

[email protected] – available nearly 24/7, even for trial users or pre-purchase questions.

No forced onboarding. PLAYDECK is built to run easily out-of-the-box. If needed (rare), we can remote-connect via RustDesk to fix issues fast.


License Portability & Backup

PLAYDECK commercial licenses are highly flexible and designed to move seamlessly between production systems:

License TypeHow to TransferInternet Required for Move?Lost / Crash Handling
Shop License (Pool)Check-in/out via internal License Manager (tied to email)YesFree instant pool reset—simply email our desk.
Dongle LicenseUnplug and connect the physical USB stick to the new computerNoHardware replacement options available upon verification.
Offline LicenseBound to one PC—email your new System ID for secure re-issuanceNoSystem ID re-issue possible for hardware upgrades.

Perfect for freelancers, technical rental fleets, and dynamic multi-PC staging environments.

Detailed guide for transfering: https://playdeck.tv/move-license/

Detailed guide for recovery: https://playdeck.tv/recover-license/


Special Conditions & Discounts

  • NGO / Educational / Non-Profit: 25% discount on all licenses (any edition/duration). Email [email protected] with proof (e.g., official email/certificate) → we send discount code or invoice.
  • Multi-Year Pre-Pay: Up to 5 years with 25% discount on total. Contact support for quote.
  • No Lifetime License: We release regular updates for driver/OS/codec compatibility and third-party fees. Lifetime would mean missing critical improvements.


If you like to purchase a larger number of licenses, we can discuss special options – please contact us.


Upgrades, Downgrades & Cancellations

Upgrades & Downgrades: Possible at any time. We issue a pro-rata refund or store credit for your remaining license runtime, allowing you to seamlessly purchase your new tier. Due to automated shop infrastructure, direct mid-term upgrades cannot be processed automatically.

Cancellations: Cancel your subscription at any time via your user account at playdeck.tv or by emailing [email protected]. You will retain full commercial access until the exact end of your current paid billing period. No cancellation penalties apply.


Dongle Details

Dongle licenses share the exact same pricing structure as our annual online plans (minimum 1-year duration required). Extensions and renewals are processed remotely via network updates—no new hardware shipping is required for renewals.

One-Time Hardware Fee: €15 for the rugged USB security key (plus standard local shipping and handling costs).

Key Operational Advantages:
100% Air-Gapped Security: Completely offline activation and continuous validation. No internet connection is ever required for daily deployment.
Instant Physical Portability: Move your license between production rigs instantly by simply plugging the USB key into the active machine.

Financial Example: A PLAYDECK Plus Dongle costs €430.80 per year plus a one-time €15 hardware fee.


Reseller Conditions

Interested in reselling PLAYDECK in your region or integrating it into your media staging catalog? We welcome international B2B partners and keep our referral process straightforward:

— Full authorization to market, promote, and sell PLAYDECK via your digital platforms.
25% standard commission per referred sales transaction (processed via custom customer discount codes or direct payout architecture).
— Fast commission claims backed by simple verification of prior customer interaction (e.g., email trail copy).
— Access our unified digital asset deployment kit containing official logos, brand typography, and promotional banners: Download deployment kit.

Email [email protected] to launch your partnership—we keep our partner onboarding highly efficient.

Create Pre-Show Waiting Loop

This article will show how to create a Audio Playlist and combine this with a looping video, perfect for pre-show waiting Loops.


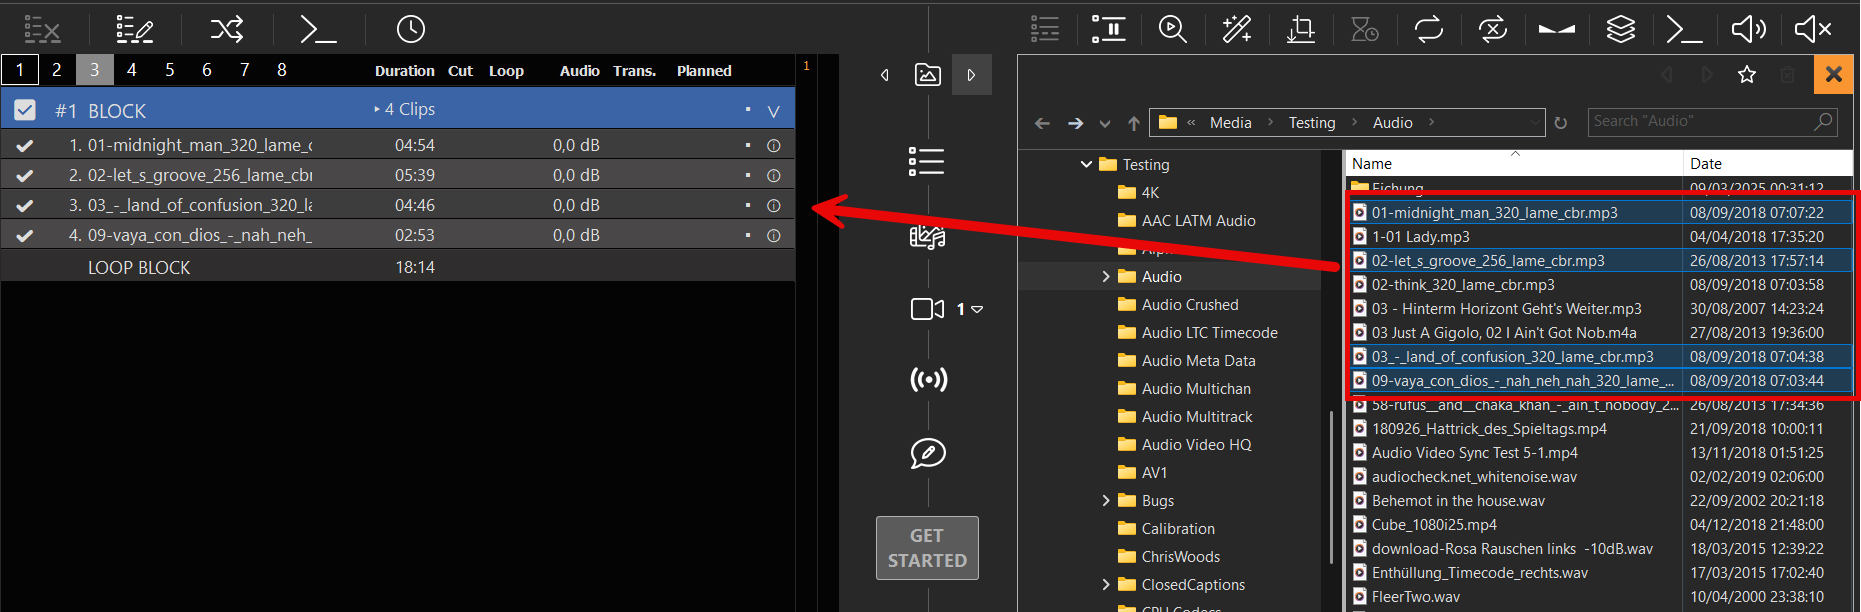
We start by creating a loop block and insert some mp3 audio file to the block:

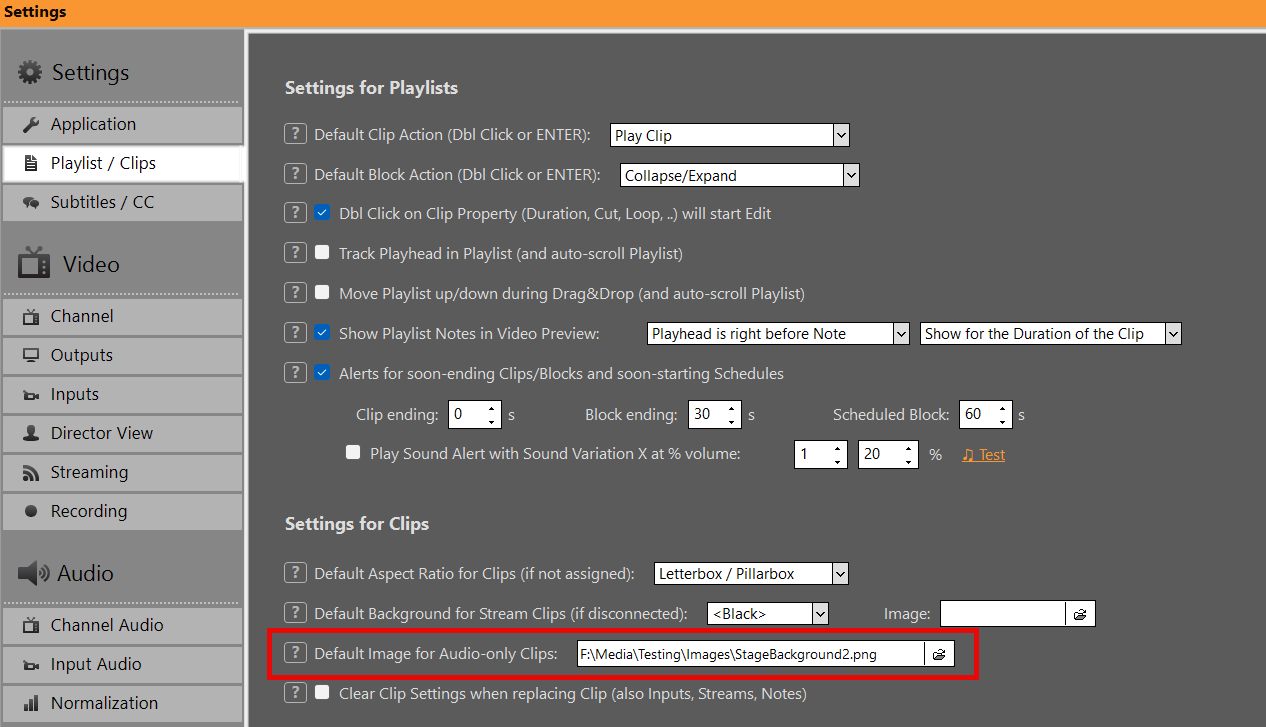
Now we add a default image, which is shown, whenever audio-only clips are playing:

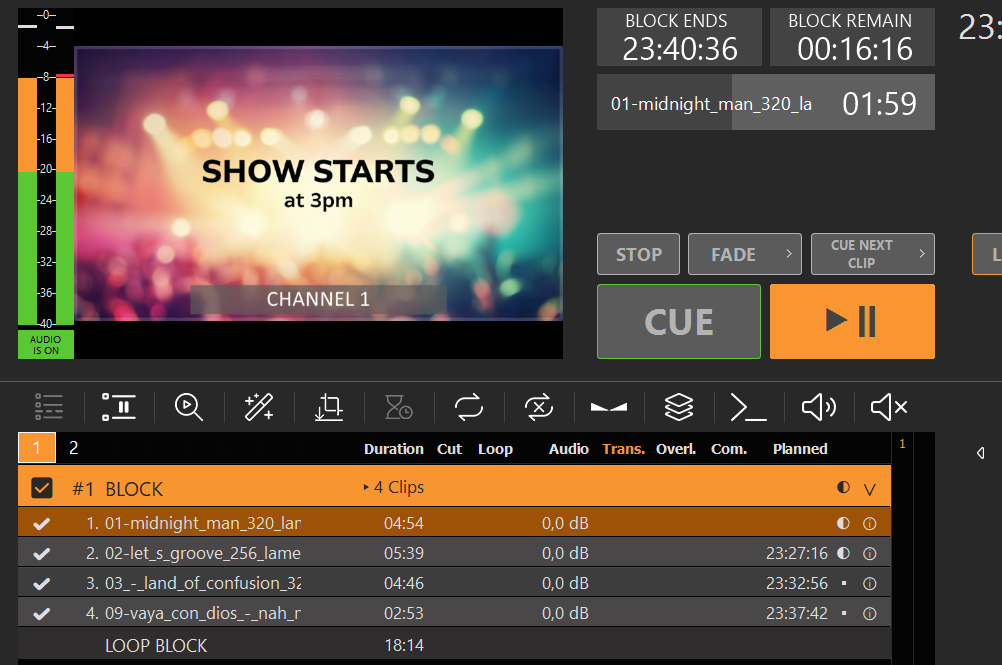
And voila, we have a pre-show waiting loop:

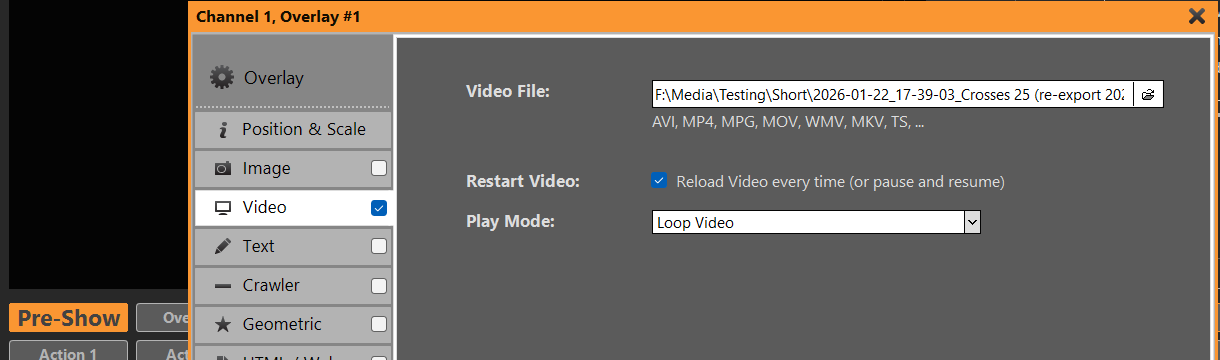
But that’s not all. We can also use a video loop instead of a still image. For this we add the video as overlay with a loop setting. The video will be shown in fullscreen, if it has the same size, otherwise we can scale it in the overlay settings:

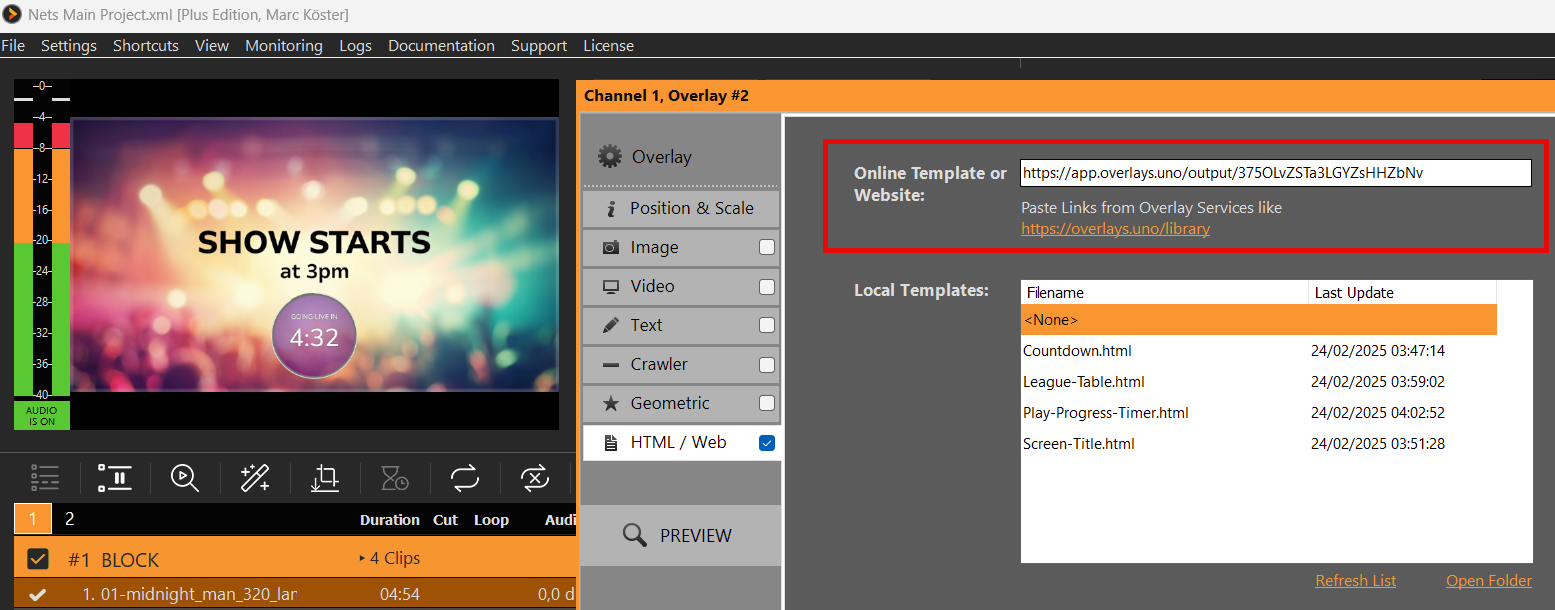
We could also add an Countdown via overlays.uno. Quick and easy:


PLAYDECK API

Integrate PLAYDECK into scripts, automation systems, and custom user interfaces using our standard REST API (OpenAPI 3) and WebSocket interface for real-time control on a single port.

In this article:
→ Which interface do I need?
→ REST API quickstart
→ Interactive API Reference
→ WebSocket real-time channel
→ Legacy TCP Commands Input
→ Integration Examples


Which interface do I need?

PLAYDECK offers different interfaces depending on your integration requirements. Use the following overview to select the correct protocol and port:

Use CaseRecommended InterfacePort
Scripts, cURL, Postman, Custom HTTP IntegrationsREST API /api/v1 (OpenAPI 3)11411
Live Status, Events, HTML Overlays, Bitfocus CompanionWebSocket Channel11411
Ready-made Control SurfacesBitfocus Companion (via WebSocket)11411
Legacy TCP Clients / Existing Automation PipelinesTCP Commands In11375

Recommendation: Most new integration projects should start with the REST API. Switch to or combine it with WebSocket only if you require continuous, low-latency status updates or real-time event triggers.


REST API quickstart

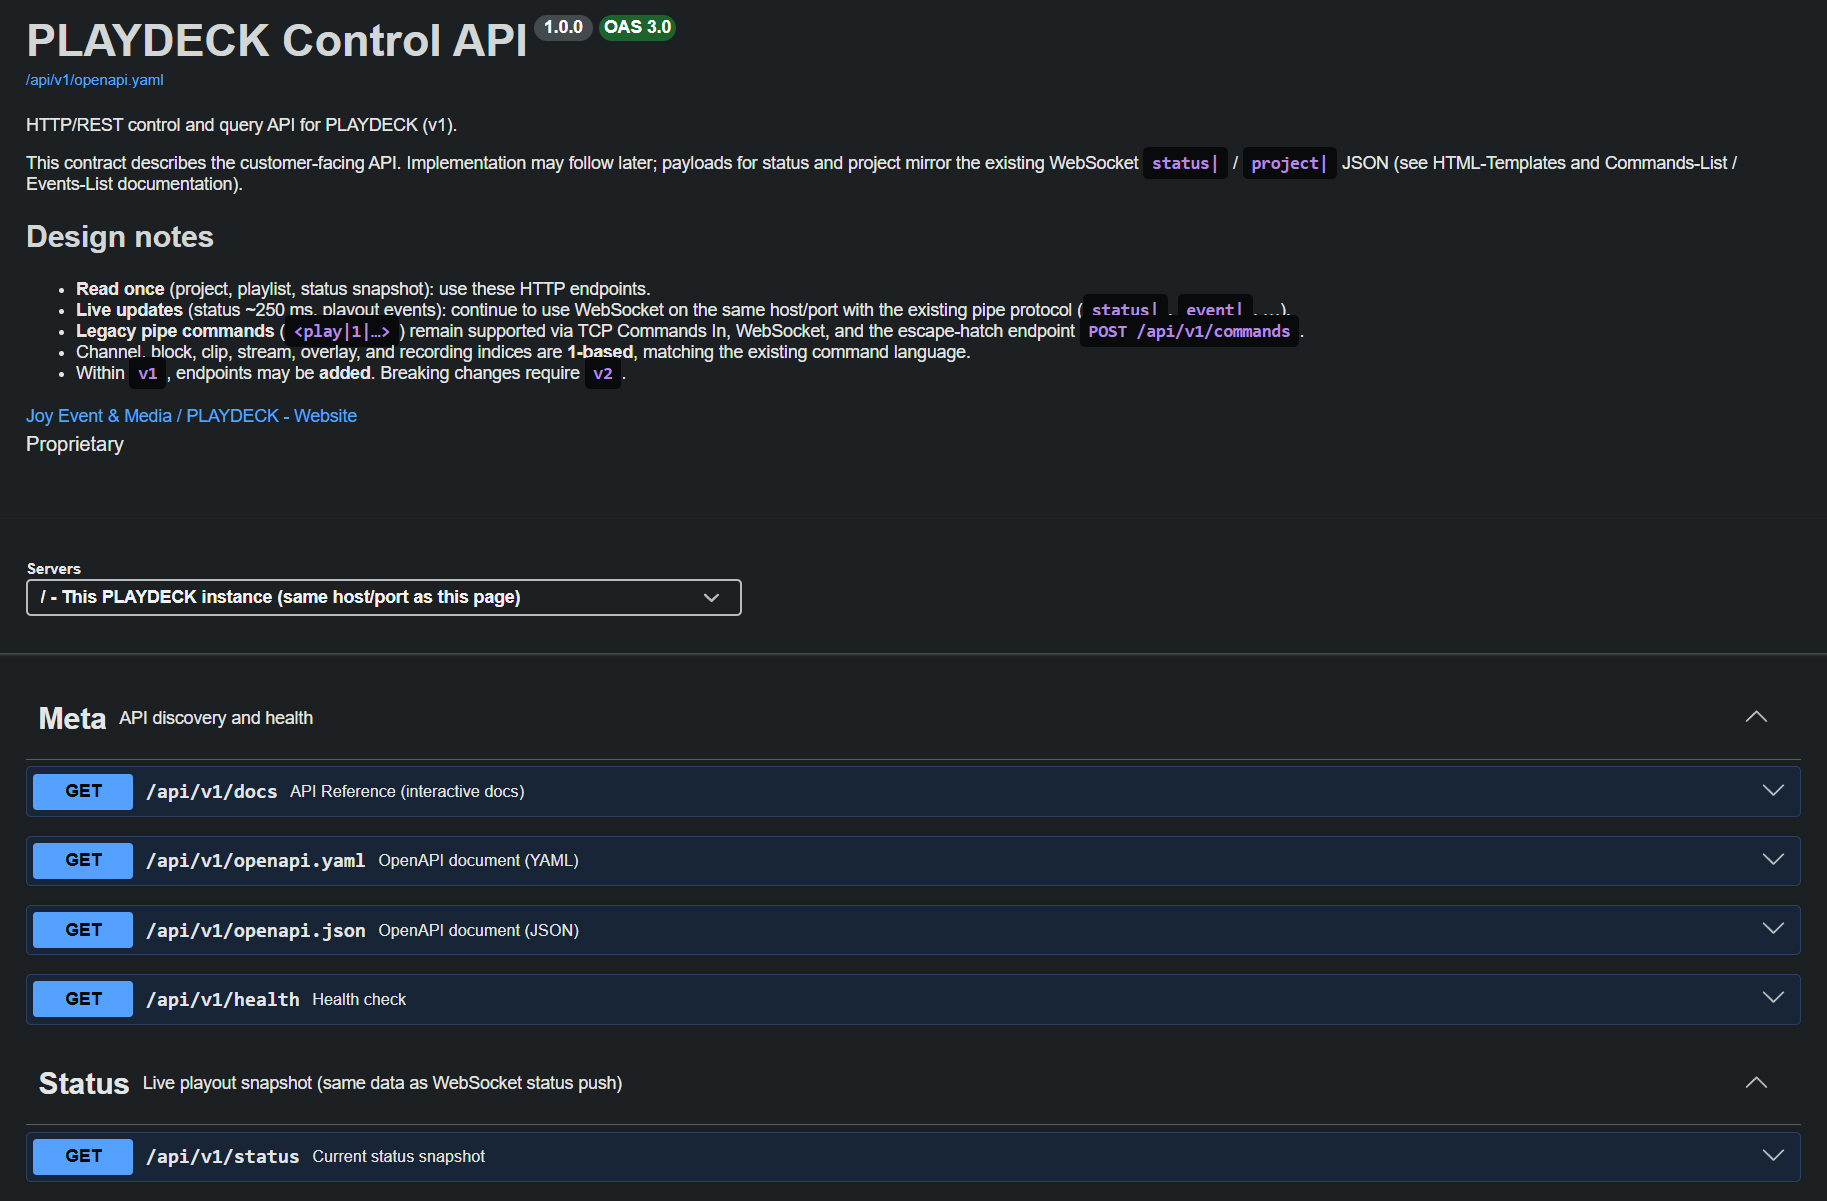
While PLAYDECK is running, the HTTP REST API is automatically available on port 11411 (sharing the same service as the built-in Web Remote).

Base URL

http://HOST:11411/api/v1


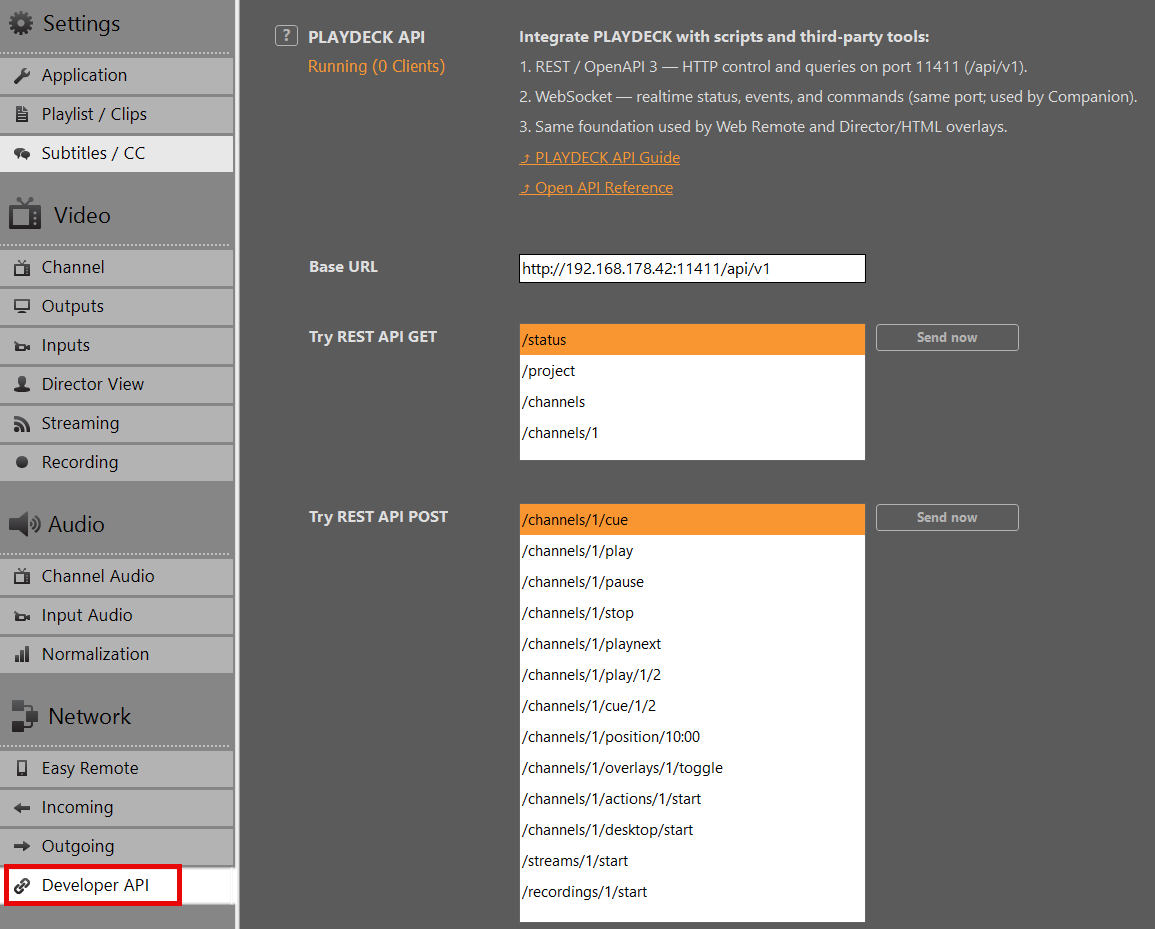
Replace HOST with the actual IP address of your PLAYDECK machine, found under Settings ➔ Network ➔ Developer API.

Testing inside PLAYDECK

You do not need external tools to start testing. Open Settings ➔ Network ➔ Developer API within the software application to send sample requests directly from the UI or launch the interactive documentation.

HTTP Request Examples

1. Service Health Check:

GET /api/v1/health HTTP/1.1
Host: HOST:11411


2. Retrieve Playout Status (JSON response):

GET /api/v1/status HTTP/1.1
Host: HOST:11411


3. Trigger Play on Playout Channel 1:

POST /api/v1/channels/1/play HTTP/1.1
Host: HOST:11411


4. Play Block 1, Clip 2 on Playout Channel 1:

POST /api/v1/channels/1/play/1/2 HTTP/1.1
Host: HOST:11411


Many actions accept optional path parameters for targeted control (such as block/clip IDs, timecode offsets, or overlay IDs).

Legacy Command Escape Hatch

If you need full coverage of the classic PLAYDECK command language via HTTP, you can pass pipe-formatted commands into the dedicated commands endpoint:

POST /api/v1/commands HTTP/1.1
Host: HOST:11411
Content-Type: application/json

{
  "command": "play",
  "args": ["1", "1", "2"]
}


Note: No API key or authentication token is required for local area network (LAN) operations in the current version.


Interactive API Reference

The complete machine-readable contract for this interface is provided as an OpenAPI 3 specification document.

Download: OpenAPI Specification (YAML)

For interactive browsing, payload inspection, and direct “Try it out” testing against your active PLAYDECK instance:

  1. Launch PLAYDECK.
  2. Navigate to Settings ➔ Network ➔ Developer API and click Open API Reference.
  3. Alternatively, open a web browser on any machine within the same network and navigate to: http://HOST:11411/api/v1/docs

This documentation page dynamically lists all available REST endpoints, required parameters, schema definitions, and expected response payloads.


    WebSocket real-time channel

    Port 11411 simultaneously handles WebSocket connections. This bi-directional channel is engineered specifically for operations requiring sustained data streaming:

    • Continuous Playout Status: High-frequency playback position tracking and timecode updates.
    • Event Triggers: Immediate notifications when a clip, block, or playlist starts, stops, or loops.
    • Classic Pipe Commands: Direct processing of native control commands formatted as <play|1|...>.

    The official Bitfocus Companion PLAYDECK module, the Web Remote UI, custom HTML graphics overlays, and Director View templates utilize this specific real-time channel. Complete syntax documentation for commands and event types can be found directly within the application package or within your local template directory:

    Web Remote UI:
    c:\Program Files\JoyEventMedia\Playdeck\html\webremote.html
    
    HTML-Templates:
    C:\Users\Public\Documents\JoyEventMedia\Playdeck\HTML-Templates\
    or
    c:\Users\<user>\AppData\Local

    Legacy TCP Commands Input

    To maintain backwards compatibility with existing broadcast automation infrastructure, PLAYDECK continues to accept incoming raw TCP connections on port 11375.

    This setting is managed under Settings ➔ Network ➔ Incoming ➔ TCP Commands In. The payload syntax matches the pipe-delimited format used by the WebSocket channel and the REST /api/v1/commands endpoint.

    • Developer Note: For all clean-sheet development projects and new script integrations, we highly recommend utilizing the REST API instead of raw TCP sockets.

    Integration Examples

    • Bitfocus Companion: Rapid deployment of physical hardware control surfaces using our production-ready native module over WebSockets.
    • Web Remote: Full-featured production control interface accessible through any browser on port 11411.
    • Director View & HTML Overlays: Built-in web templates showcasing live status binding.
    • Custom Software Tools: Rapid application development using standard HTTP clients generated from our OpenAPI specification, optionally backed by WebSockets for telemetry.

    Questions or custom workflow requirements? Contact our engineering team at [email protected].


    Translation

    This article will show how to work on translations for PLAYDECK.


    Introduction

    The existing Languages are pre-translated via Online Tools. We use DeepL for this. This works very well for longer sentences (e.g. Settings), but it works also very poorly for single words (e.g. “Input”).

    In addition, some translations use more or less space (number of character). This could lead to certain words not “fitting” into a certain Button. If the translation can’t be shortend, we can also make the button wider.

    For these reasons, every language needs fine-tuning.


    Workflow

    The translations are being edited via an external tool called “SIL Editor”, where you can load and edit our language. You can then preview your edits directly in PLAYDECK.

    One your Editing is done, you send use the Language File and we import your changes into the App.


    Downloads and Installation

    You need PLAYDECK in Version 4.2b6, which you can download here:
    https://downloads.playdeck.tv/4.2b6/PlaydeckSetup.exe

    You need the SIL Editor, which you can find here (only download “SIL Editor”):
    https://www.sicomponents.com/download/

    And you need the Language File with the Translations:
    https://downloads.playdeck.tv/4.2b6/PLAYDECK.sib

    —————-

    Install PLAYDECK and the SIL Editor, then save the SIB File here:
    c:\Users\Public\Documents\JoyEventMedia\Playdeck\PLAYDECK.sib

    If PLAYDECK detects a SIB File in this location, it will PREFER to use it over the internal translation.


    Testrun

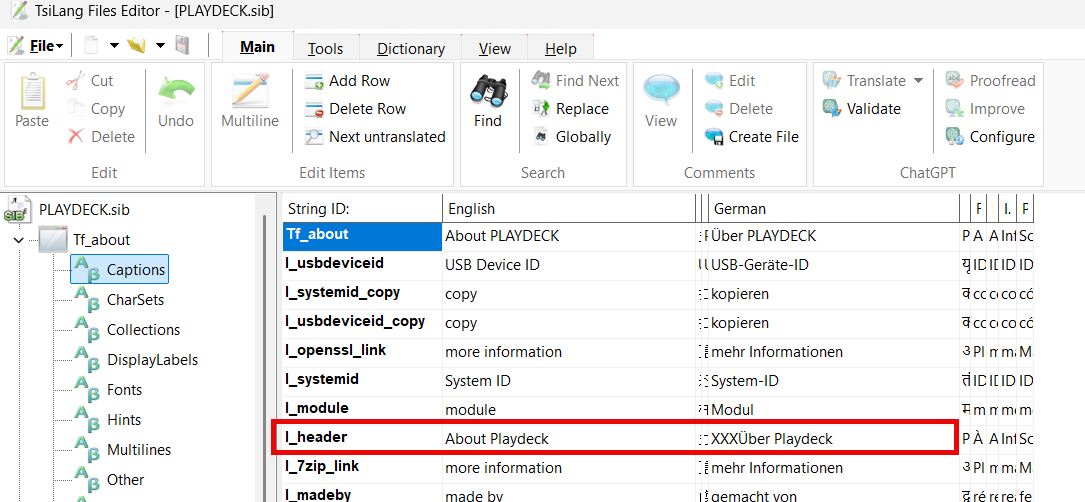
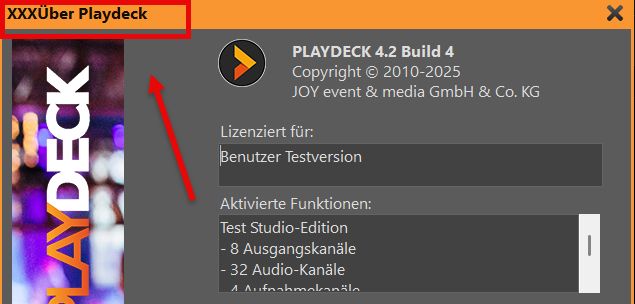
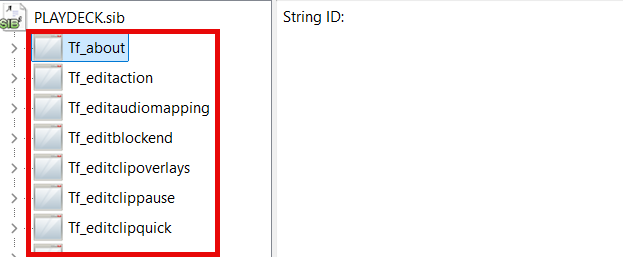
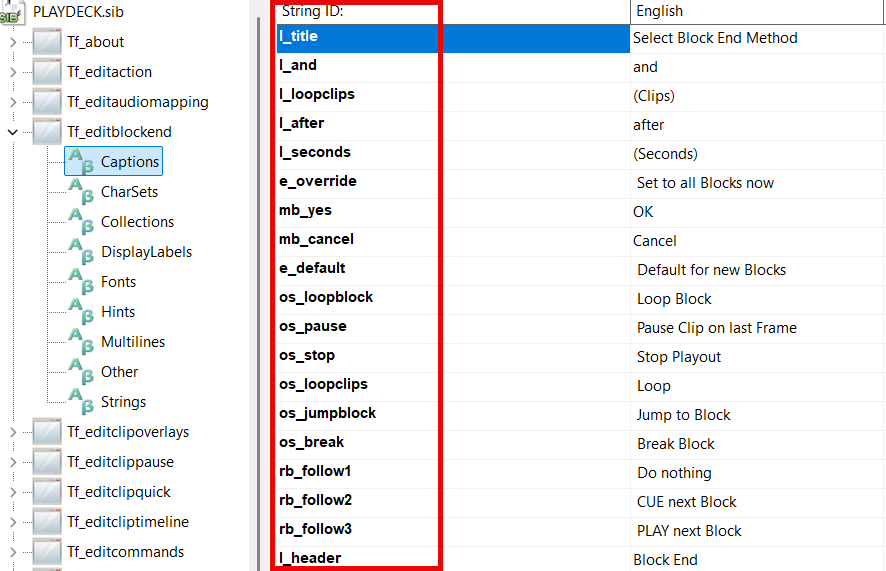
    Let’s try to edit something and check, if PLAYDECK updates the translation. Double click the SIB File, which will open the SIL Editor. Open the first branch “Tf_about”, which represents the ABOUT Popup in PLAYDECK. Click on “Captions”, which represents all static text fields in the popup. You can minimize all language columns, that don’t concern you – in this example I focus on GERMAN (can be any other language). Now for “l_header” change the translation to something noticable – in this case I simply add “XXX” infront of the text for testing.

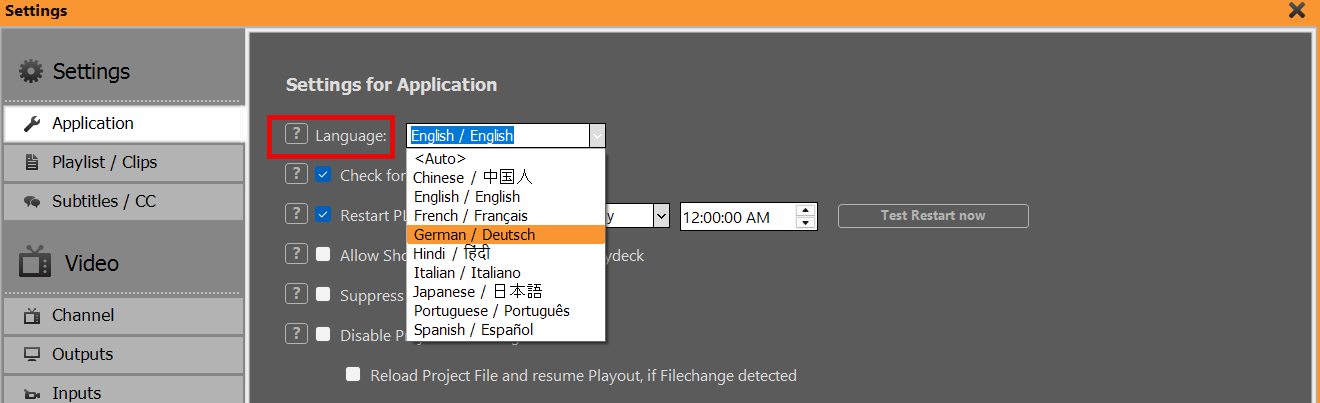
    Save the SIB File (or press CTRL+S). In PLAYDECK switch to GERMAN in the App Settings:

    After restarting PLAYDECK, open the About Popup via “License > PLAYDECK”. It now should reflect your text editing change. Don’t forget to change back after testing. Should this not work, please contact us.


    Where to start

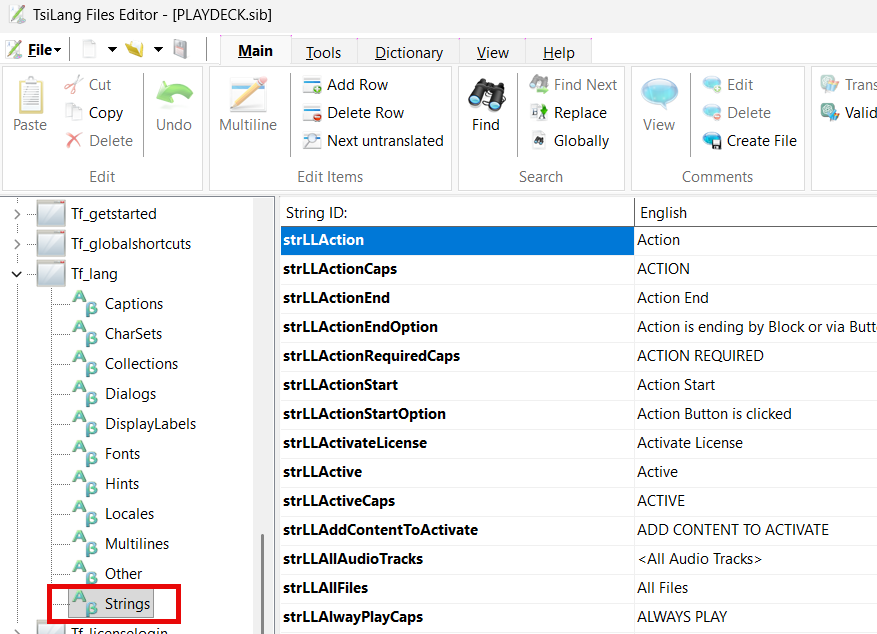
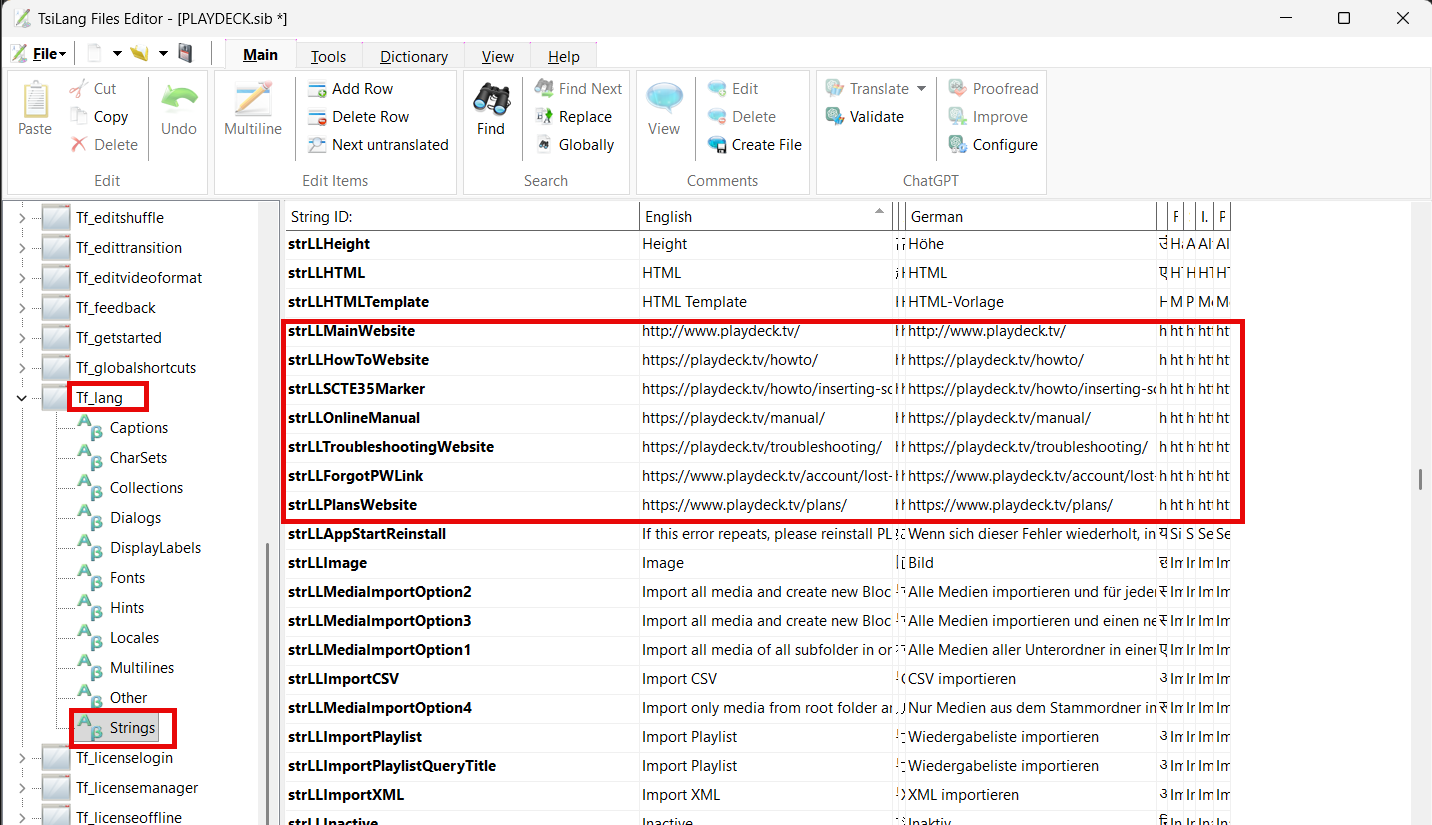
    We recommend to edit all dynamic texts first, as they are used repeatedly in PLAYDECK and therefor form the “base translation”. You can find them under “Tf_lang > Strings”:

    Once that’s done, you can decide for yourself: You can either search PLAYDECK for needed edits by walking through all Settings and Popups. Or you can walk through all Popups directly in the SIL Editor.


    Orientation and Editing

    The left Side in the Editor represents all possible Popups in PLAYDECK.

    Noticable are “main” (Main UI) and “settings” (all settings). These are further devided into groups:

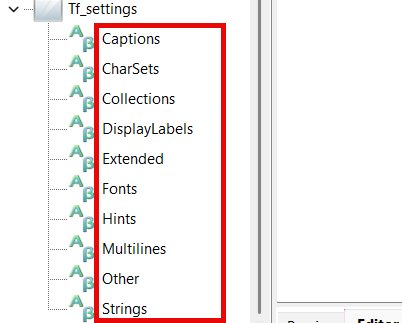
    The Groups have the following meaning (only mentioning the onces you need):

    Captions: All static texts visible in the Popup, mostly Labels, Buttons, Menus
    Collections: Rarely used. Only some Dialog Options.
    Extended: Also static texts, but mostly Headlines
    Hints: Texts that appear under the Mouse, eg. the “?” Button or Toolbar Icons
    Multilines: Table Headers and Drop-Down fields with multiple selection. Edited by Double-Clicking.
    Other: Rarely used. Only some Dialog Options.
    Strings: Dynamic Text Blocks. Only used in “Tf_lang”

    In the huge middle table, where you edit your texts, there is also a column called “String ID”, which represents the internal name of the corresponding element in PLAYDECK. This “can” be of help in some cases you might be searching for something.

    Here are some information on the choice of name:
    l_: Static Text Labels
    b_ or mb_: Buttons
    cb_: Checkbox with Text
    rb_: Radio Button with Text
    pm_: Popup or Right-Click Menu
    os_ or op_: Drop Down Boxes


    Tips for Editing

    1) Please note, that there are several redundancies (same text over and over), which can’t be avoided, if for example the same text appears several times in PLAYDECK (e.g. Settings).

    2) Some Texts also can’t be translated at all, since they are deeply nested within the System or the Video Engine, which are also Settings typically (Drop Down Edits).

    3) You can search for any Text in the Editor or click on the Column Header for sorting. This can help to locate the English Original to find your Text Fields for Editing.

    4) Any translation not given (empty field) will automatically use the English Original. So you can DELETE the translation to force PLAYDECK to use the English Original

    5) All Multiline Translations need to have the same amount of Lines, otherwise PLAYDECK may fail to start or function correctly. Multiline Edits are edited by Double-Clicking the Translation.

    6) Some Text Fields have very specific characters, which help formatting and readability in PLAYDECK. These are “<br>” (Linebreak), or ” ” (Empty Space) or “:” or some UTF8-Icons. Just be aware of them and that removing them can cause loss of readability.

    7) Most Languages have “lower” and “UPPER” case and some Translations (“Strings” in “Tf_lang”) provide both cases, if needed. For languages that don’t have “case”, use the same translation in both fields.


    External Links

    You are able to change most of the Links in PLAYDECK to a different location, e.g. the Support Email-Address as well as Links to Online Documentation and other Website.

    You are 100% allowed to do so. We only ask to make sure, that emails are responded to and website links are working and updated regularly.


    External Contents

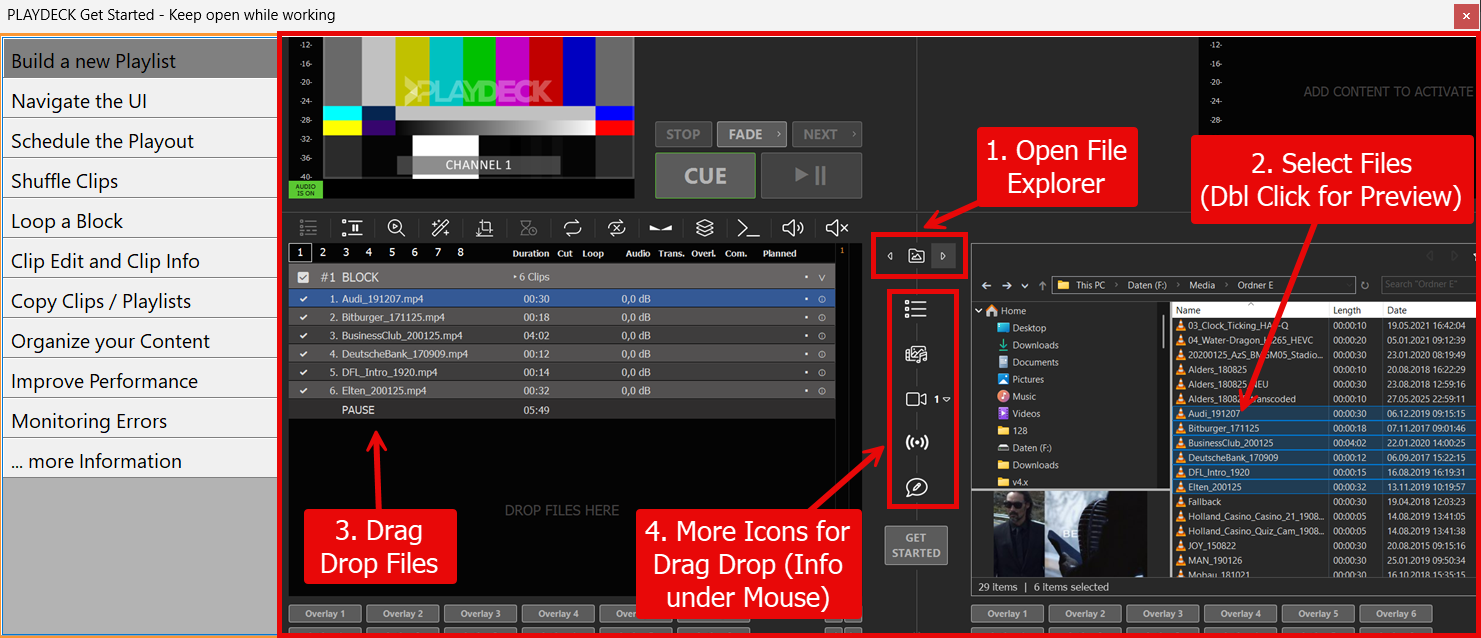
    All images in “GET STARTED” and all Documentation Files have also been translated. You can find them here:
    c:\Program Files(x86)\JoyEventMedia\Playdeck\lang

    While there is no absolute urgency to replace or update those files, you can if you want to.

    The “GetStarted” Folder contains all PNG images, that are shown in the Get-Started Dialogue:


    The “Documentation” Folder contain all TXT Files, that are being opened as expert help on several occasions in PLAYDECK:

    Should you decide to update these Files, please don’t rename them and send them to use in the same format as the original (PNG with same dimensions and TXT with similar structure).

    Growing Files in Playlist

    This article will show how to insert growing files into a playlist.

    Definition
    A growing file is a file that is still being recorded – it is therefore growing in size.

    Recommended Setting
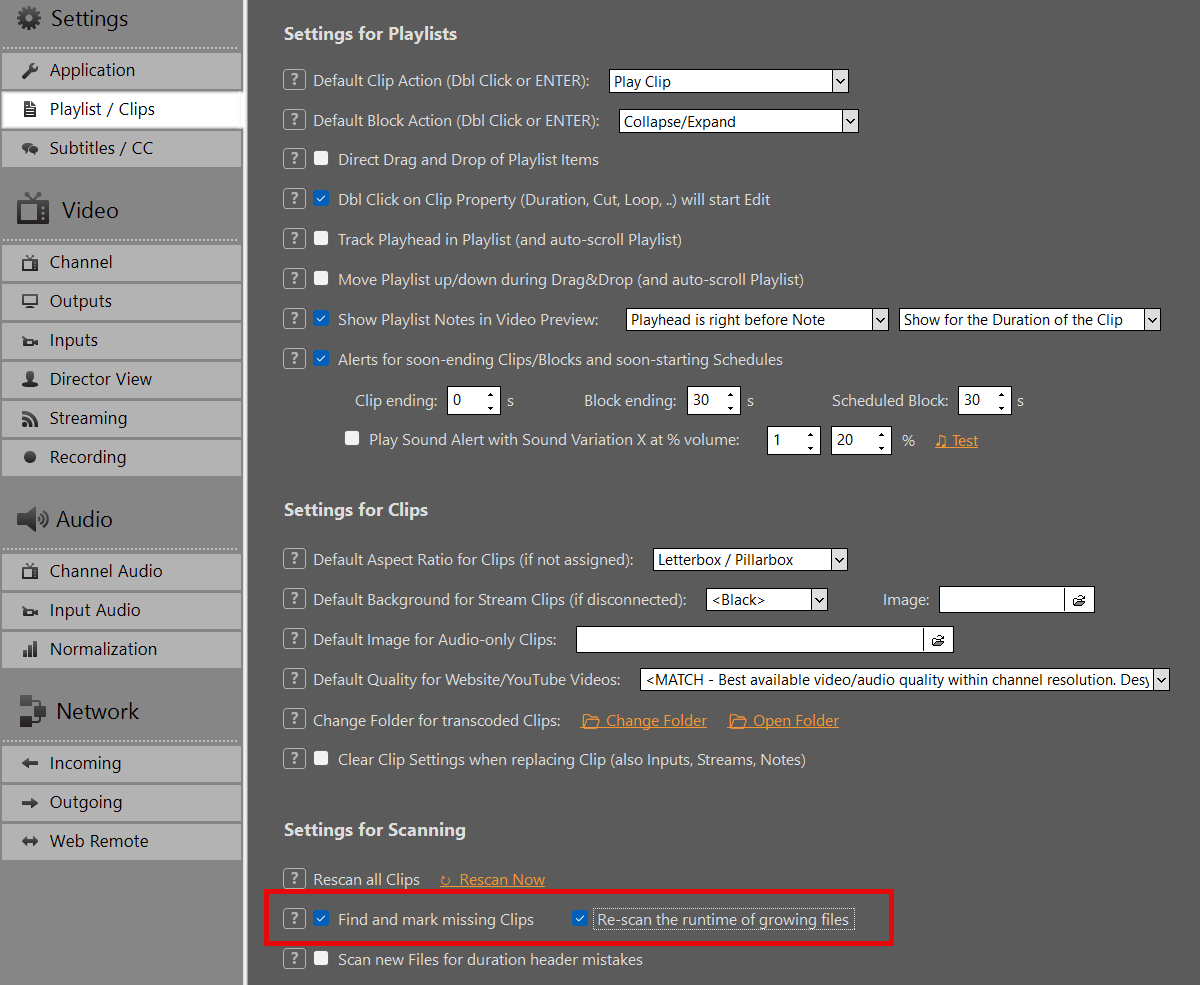
    When working with growing Files, we recommend you enabling the Settings “Re-scan the runtime of growing files” to make sure the duration is updated every 5 seconds in your playlist view:


    Insert to Playlist
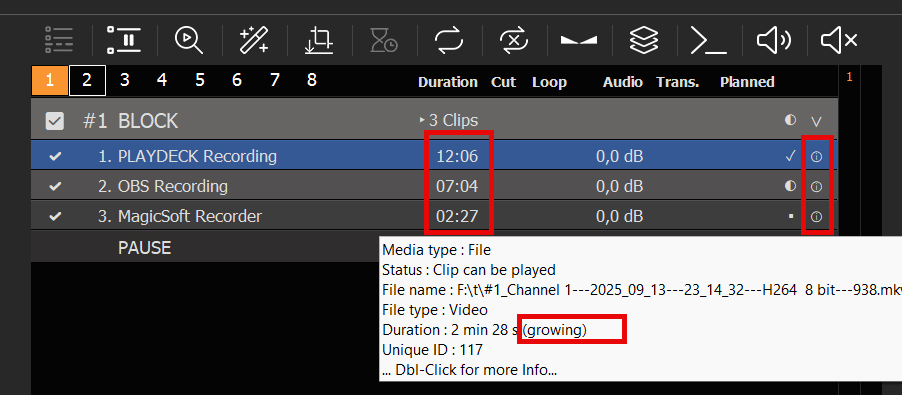
    Growing files can be inserted to the playlist like any other file: By Drag Drop from outside of PLAYDECK or using the integrated file explorer. They will be detected as “growing”, which can be verified in the info column. The clip duration will be updated every 5 seconds:

    Possible Sources
    The files can be recorded anywhere, they don’t need to be recorded in PLAYDECK. In the above screenshot we are using one PLAYDECK recording, another from OBS Studio and another from MagicSoft Recorder.

    Possible Formats
    Only the following file container formats are supported. But within that container you can use any video codec:
    – MKV
    – AVI
    – MPEG

    Cutting and Editing
    You can cut and edit growing files the same way as regular files. For example: You can set an OUT point to the file and loop it, while it is still being recorded.

    Recover lost license

    This article explains, how to recover a lost license.

    Shop license
    If you still can access the PC system with the license, you might be able to recover and move the license by yourself:
    https://playdeck.tv/howto/move-license/

    But if that PC system has crashed, is lost or you had to re-install windows, you will not be able to recover your license by yourself. In this case, please contact us at [email protected]. We are happy to release the license for you, so it can be checked out again with the license manager.

    USB Dongle license
    If the USB device is broken or lost, we can replace your Dongle and provide you with a temporary offline license during the delivery time. If the Dongle is still working, we can update the Dongle remotely with an updater-file. Please also contact us at [email protected].


    Offline license
    The offline license can’t be moved to another PC by default. Please also contact us at [email protected] to receive a new offline license from us.

    Broadcast your Video Feed

    This article will show how to send your channel video feed to any desired target and audience.

    In this article:
    Single-Monitor Output
    HDMI via Extended Desktop
    SDI / HDMI Output Card
    SMTP ST 2110 / IP Output Card
    NDI (Network Device Interface)
    Streaming (UDP, RTMP, SRT, DVB, …)
    Dante Virtual Soundcard (DVS)
    Director View


    Single-Monitor Output

    The most simple way to show your Video Feed, is to output your Channel in Fullscreen. Enable Fullscreen by Double-Clicking the Preview or Right-Click and select “Fullscreen”:

    The Fullscreen Output will use a much higher quality and FPS as the regular Preview. You can exit the Fullscreen by pressing any Mouse Button or the ESC Key.

    This Mode is best suited for quick private Slideshows. Here is an example on how to setup a Slideshow with PLAYDECK:
    https://playdeck.tv/howto/slideshow/


    HDMI via Extended Desktop

    Another simple way to send your video feed is to use your HDMI outputs of your PC or your Graphics Card. To make the HDMI Output visible to PLAYDECK, you need to setup a new “Extended Desktop Output”, like you would do, if you added a secondary Monitor:

    1. Connect in Windows
    Connect your HDMI Device to your PC physically and turn the HDMI on, so Windows can find it. Connect it to your Graphics Card (preferred) or your Mainboard. Right-Click anywhere on your Desktop and select “Display settings”. You should see your new Monitor and it should say “Display is extended” (That’s why it’s called “Extended Desktop”). If you don’t have access to your HDMI Output Device yet (e.g. LED Screen), you can use any Dummy PC Monitor for Setup. PLAYDECK will later scale your (other) output automatically, if you use the same HDMI Port. Please also make sure, your Monitor uses 60 FPS and not 120 or 144, as this might lead to lag.


    2. Assign in PLAYDECK
    Start PLAYDECK and select your new Monitor as “Desktop Output” for your Channel. Once activated, PLAYDECK will “overlay” its output on the Monitor. It will be On-Top of all other Windows Apps and the Mouse Pointer will be disabled. Should you accidently activate this on your PRIMARY Display, press ALT+F4 to close it, as you cant access Windows or PLAYDECK otherwise.

    PLAYDECK is able to re-connect to your Desktop Output, should it disconnect or on a power-loss or if the HDMI Device is receiving power after PLAYDECK has been started already.

    This Mode is best suited for local transmission to a TV or LED Screen, e.g. during exhibitions or events.


    SDI / HDMI Output Card

    Output Cards have a huge advantage over Desktop Output:

    – Stronger Video Signal for longer cable transport
    – Much less CPU/GPU Usage, as Card will offload resources
    – No Frame Drops, as Cards have integrated Frame Rate Control and Conversion
    – Much higher picture quality, especially Colors

    Output Cards are almost always worth the costs and are highly recommended. They provide a much more stable video transport solution compared to Desktop Output and an overall better experience.

    Find a list of all supported Output Cards:
    https://playdeck.tv/howto/supporteddevices/

    If you need a recommendation, we mostly use BlackMagic DeckLink Cards. They are available for SDI and HDMI:
    https://www.blackmagicdesign.com/products/decklink


    1. Install the Output Card into your PC
    You would need a separate PCIe Slot on your Mainboard. Imagine this Card as “Secondary Graphics Card”. Prefer a PCIe slot wired to the CPU (motherboard manual: CPU, not Chipset). Shared/chipset slots often stutter even when bandwidth looks fine. Details: Troubleshooting.
    You can also “host” your Card in an external housing for mobile production, like the “Sonnet Echo Express” and connect it via Thunderbolt, but please be aware that bandwidth available via Thunderbolt is lower than the PCIe bandwidth required for some some Cards like the “DeckLink 8K Pro”.

    2. Install Driver for Windows
    Most Cards need a specific Driver installed for Windows to operate. Those Driver also deliver Tools to test the Card before using it in PLAYDECK.

    Make sure, you always have the latest Version of the Driver installed in your System for maximum stability and quality. For BlackMagic Card, PLAYDECK needs at least “Desktop Video 14.5” as Driver, otherwise the Card will not work as intended:
    https://www.blackmagicdesign.com/support/family/capture-and-playback

    3. Activate in PLAYDECK
    Select your Output Cards and Line in PLAYDECK and activate the Device Output. Unlike Desktop Outputs, these Output Cards don’t need a connected display via SDI or HDMI, they will activate right away:


    SMTP ST 2110 / IP Output Card

    These Cards are very similar to SDI/HDMI Cards described above. Please read there for Installation.

    The difference between 2110 and SDI Cards is, that 2110 Cards send the signal via LAN (local area network). This is a modern and growing standard for Studios to transport video signals within the company. While it is theoretically possible to use existing LAN for ST 2110, it is recommended to use a separate LAN with specific PTP-aware switches (precision time protocol). Once setup, the main advantage is, the multiple receiver can easily access the video feed generated by PLAYDECK.

    We provide a separate article for 2110 Devices and their Network setup options:
    https://playdeck.tv/howto/2110-device-setup/


    NDI (Network Device Interface)

    NDI is another Network Transport Option for your video feeds. It can be used with the existing LAN (local area network) and doesn’t need specific network configuration. It provides its own “discovery system”, meaning: You send your NDI signal into the network and it will be automatically detected by any NDI receiver.

    NDI is the preferred method to exchange video feeds with other Applications. Here are some examples:
    https://playdeck.tv/howto/obs-studio/
    https://playdeck.tv/howto/vmix/

    NDI can also be used in a Cloud Setup, e.g. Amazon EC2 instances, to transport between server:
    https://playdeck.tv/howto/amazon-ec2/

    You can use NDI to “loop” the Signal within PLAYDECK for specific Tasks, like this Picture-In-Picture:
    https://playdeck.tv/howto/pip/

    There are many tools available to help you setup NDI in your environment:
    https://ndi.video/tools/

    If you need to setup a NDI Discovery Server, this will help you:
    https://ndi.video/tools/access-manager/
    https://docs.ndi.video/all/using-ndi/ndi-tools/ndi-tools-for-windows/access-manager

    Note: There has been a problem with NDI causing stuttering after a window update. Here is the solution:
    https://www.vmix.com/knowledgebase/article.aspx/376/windows-update-affecting-ndi-stability


    Streaming (UDP, RTMP, SRT, DVB, …)

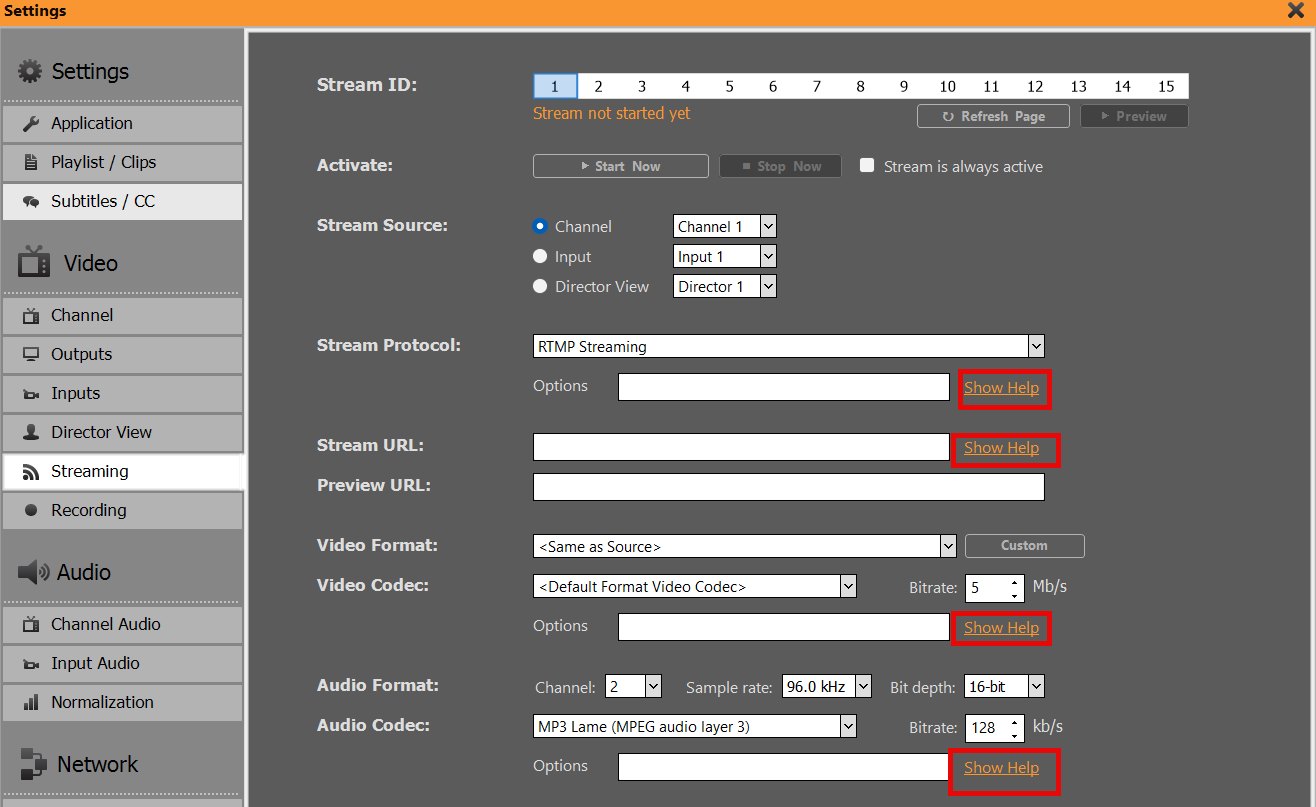
    You can pick out of several Streaming Protocols, which all serve a different purpose.

    UDP/RTMP Streaming: Low-latency Live Streaming
    SRT: High-reliability Broadcasts
    DVB: Traditional Broadcasting
    – And many more (RTP, RIST, Icecast, HLS


    We provided a more in-depth article for streaming:
    https://playdeck.tv/howto/output-streams/


    Dante Virtual Soundcard (DVS)

    This is strictly speaking not a video feed, as DVS is audio-only. This is yet another Network (LAN) Option. The use case for DVS is, if you need to send your audio feed SEPARATE or ADDITIONAL to your video feeds, or in audio-only productions. The most common use case is, that in live events, the audio mixer needs ALL audio feeds of ALL PLAYDECK channel, meaning: He wants to receive 8 audio channel in stereo pairs of your 4 video channel.

    We are providing an article to setup and use Dante:
    https://playdeck.tv/howto/dante/


    Director View

    This is a specific Output option PLAYDECK provides, to inform your crew of the state of affairs: This will mix several different video feeds into one video feed and overlay information about remaining time. This is meant to provide assistance in a multi-room or multi-person environment.

    This video feed works like a separate channel: You can send it parallel to your other outputs. You can setup and send up to 4 different Director Views. You can pick how many and which channel should be included:

    In addition, you can modify the overlay to fit your own company, e.g. integrate your own logo or change fonts.

    1 2 3 4 5 6