
Your PLAYDECK PC Build & Hardware Requirements

Please use these guidelines to choose or build the right hardware for your PLAYDECK system. While PLAYDECK can play virtually any codec on any Windows machine, professional video playout requires robust hardware to guarantee zero frame drops.

Mac desks: PLAYDECK runs on Windows. Use a Windows VM on your Mac (e.g. Parallels) or a dedicated Windows machine. Choose GPU and output hardware for that Windows system using the archetypes below.

In this article:
System Configuration Archetypes
Legacy Systems & The CPU-Only Safety Net
Technical Performance Metrics (For Professionals)
Hardware Output Cards
Pre-Flight Troubleshooting Checklist


System Configuration Archetypes

Choose the production archetype below that aligns with your upcoming project requirements.

1. The “Set-and-Forget” Fixed Installation

Designed for: Stationary installations, corporate showrooms, medical facilities, schools, and digital signage.

If you need a compact, dedicated unit to seamlessly manage 1 or 2 channels of standard H.264 playback, look for small form-factor builds that do not compromise on hardware decoding.

  • Our Recommendation: A performance-tier mini PC like the ASUS NUC 14 Performance or ASUS ROG NUC. Avoid the standard baseline office NUC models. Ensure your chosen mini PC configuration specifically includes a discrete NVIDIA RTX GPU (such as an RTX 4060 or 4070 laptop chip) to guarantee stutter-free H.264 timeline performance.


2. The Mobile Video Director

Designed for: Event tech providers, traveling AV crews, festivals, and remote live streaming.

If you deploy temporary live setups, push video to regional LED walls, or broadcast from mobile command stations, a thermal-efficient mobile rig is mandatory.

  • Our Recommendation: High-performance, current-generation workstation or gaming laptops engineered for continuous maximum thermal load (such as the XMG ULTRA or Lenovo Legion Pro series). For broadcast environments, scale the laptop’s connectivity by pairing it with a Blackmagic UltraStudio capture and playback device via a high-bandwidth Thunderbolt interface.


3. The Broadcast & Studio Professional

Designed for: TV stations, multi-screen matrix setups, and 24/7 master control environments.

When your infrastructure handles simultaneous UHD/4K master outputs, heavily utilizes network protocols like NDI®, or handles deep layers of graphic lower-thirds, you require raw hardware overhead.

  • Our Recommendation: A custom-built rackmount or tower workstation pairing a multi-core processor with a desktop NVIDIA RTX 4070 / 4080 GPU or higher, paired with hardware-locked internal SDI I/O cards (such as the Blackmagic DeckLink series).


Legacy Systems & The CPU-Only Safety Net

If your team is working with an existing office computer or an older laptop running basic integrated graphics (like Intel UHD Graphics), you do not necessarily have a hopeless case. PLAYDECK can adapt to older architectures if you configure the processing pipeline correctly.

If you encounter stuttering, timeline lag, or stability problems on older office hardware, apply this configuration fallback inside the application settings:

  • Open your PLAYDECK settings.
  • Locate the Application configuration settings.
  • Switch the GPU Pipeline parameter to <CPU only>.
  • Switch the Decoding GPU parameter to <CPU only>.


Important Deployment Caveats for Legacy Hardware:
When fallback mode is active, your system CPU takes over the entire workload. To ensure successful execution without frame drops, you must limit your project scope: restrict your playout to a single channel, downscale your timeline target to standard 1080p Full HD, and ensure your playback clips match a highly optimized, lightweight playback format.


Technical Performance Metrics (For Professionals)

If your engineering department is evaluating existing inventory or sourcing custom parts, use these performance baselines.

1. The GPU Decoding Hierarchy

While alternative graphics options exist, they are not architecturally identical for live broadcast workloads:

NVIDIA RTX Architecture (Industry Standard): Highly recommended. NVIDIA’s dedicated NVDEC/NVENC blocks provide optimal hardware decoding throughput for standard broadcast clip formats, specifically H.264 and HEVC video streams.

Intel ARC Systems: Suitable for secondary deployments. They handle modern AV1 streams effectively and offer competent DVB 4:2:2 encoding, but do not match the overall parallel decoding capacity of an NVIDIA workstation chip under multi-channel production loads.

Intel UHD Onboard Graphics: Strictly intended for lightweight, single-channel legacy fallback usage using the CPU-only adjustments outlined above.

AMD Radeon Platforms: Hardware-accelerated video decoding via AMD is not officially supported inside PLAYDECK.


2. Target PassMark Benchmarks

If you are unsure of your current hardware performance levels, you can check your system components directly on the official PassMark Software Benchmark Database.

Playout ScaleTarget CPU PassMark ScoreTarget GPU PassMark Score
Single-Channel25,000+9,000+ (e.g., Dedicated NVIDIA RTX)
Dual-Channel35,000+12,000+ (e.g., Station-class Workstation)
4 to 8 Channels50,000+15,000+ (High-Tier Desktop RTX)


3. When to Provision an Advanced CPU

Your system’s central processor handles severe system strain if your workflow requires any of the following processing types:

  • High-bitrate master formats that bypass GPU decoding pipelines entirely (e.g., Apple ProRes, HAP, or Avid DNxHD).
  • Multi-destination network routing using NDI® outputs, as these matrix encoders rely purely on your host processor.
  • Intense deployment of live-rendered HTML graphics, data-driven lower-thirds, or real-time alpha-channel video overlays.

Hardware Output Cards

To bypass operating system desktop layer interference, maximize color accuracy, and maintain a strict hardware-locked framerate control signal, offload your primary feeds to a dedicated PCIe or Thunderbolt video interface.

PLAYDECK maintains native compatibility with major broadcast hardware lines, including:

  • Blackmagic Design (DeckLink / UltraStudio)
  • AJA Video Systems
  • Deltacast & Bluefish444
  • Magewell, Osprey, and Stream Labs
  • ASIO & Dante Virtual Soundcard audio endpoints

Pre-Flight Troubleshooting Checklist

If you experience playback stutter, audio sync issues, or unexpected lag during configuration, run through this quick self-diagnostic checklist before contacting support.

  • Check the <CPU only> toggle: If running on an office laptop with integrated Intel graphics, ensure both GPU Pipeline and Decoding GPU are set to <CPU only> in the settings menu.
  • Verify Windows Power Plans: Laptops often throttle performance on battery. Connect your device to a power outlet and change your Windows power plan to High Performance or Best Performance.

  • Monitor the Playback Clock: Look at the integrated performance monitor in PLAYDECK during playback. If the frame counter drops or turns red, your hardware is hitting a performance bottleneck.
  • Match Output Refresh Rates: Ensure the refresh rate of your Windows display settings (e.g., 50Hz or 60Hz) exactly matches the output frame rate of your project settings in PLAYDECK.

  • Inspect the Clip Codec: If a specific video causes issues, verify its properties. High-bitrate 4K files or uncompressed formats will overwhelm basic system processors. Use an H.264 MP4 file for the safest baseline test.
  • Update the I/O Drivers: If using Blackmagic DeckLink or UltraStudio hardware, ensure you have the latest version of Desktop Video installed via the Blackmagic Design support page.

User Manual & Guide


Welcome to the official PLAYDECK documentation. This comprehensive user guide is engineered to help you configure, automate, and operate your playout system flawlessly—whether you deploy on-site or in cloud-based remote production environments.

💡 Localized Production Workflows: To ensure flawless operation in high-pressure environments worldwide, the entire PLAYDECK software user interface natively supports 9 international languages.


Quick Start: System Architecture

PLAYDECK scales from simple single-channel setups to complex broadcast infrastructures. Before diving into the specific configuration chapters below, ensure you understand the core capabilities of your edition:

  • Multi-Channel Playout: Manage and route up to 8 completely independent output channels simultaneously. Organize your videos, graphics, audio tracks, live inputs, or IP streams instantly via our high-speed drag-and-drop playlist interface.
  • Real-Time Transcoding: Feed your playlist with almost any common video codec or container. The internal PLAYDECK engine automatically scales, converts, and transcodes all assets to match your global hardware output format in real time.
  • Flexible Signal Routing: Output your pristine feeds via professional hardware I/O cards (Blackmagic Design, AJA, Deltacast, etc.), native low-latency NDI® streams, secure SRT feeds, or the Windows extended desktop.
  • Advanced Control & Automation: Take absolute command of your production flow using rapid physical keyboard shortcuts, automated Tally interfaces, standardized network TCP/IP commands, or our native module built for Bitfocus Companion and Elgato Stream Deck systems. AMP Video Server: Native Generic DDR integration for Ross Carbonite and compatible switchers — browse clips and control playout from the switcher panel.


Studio Edition: Real-Time Ingest & Audio Power

If you are operating the PLAYDECK Studio Edition, you have access to expanded broadcast-grade workflows:

  • 4-Channel Recording & Focused Edit-While-Ingest: Capture up to 4 dedicated recording streams simultaneously. One designated master channel can be utilized for active Edit-While-Ingest clip generation, allowing you to use high-speed keyboard shortcuts to trim, cut, and push highlight clips to your playlist instantly while the background recording continues uninterrupted.
  • Native ASIO & Dante Support: Route complex multichannel audio effortlessly with native, high-performance integration for ASIO devices and Dante Virtual Soundcard (DVS) managing up to 32 independent audio channels.


How to Navigate This Documentation

Please use the navigation menu in the left sidebar to access specific technical chapters. The menu automatically expands to guide you through our step-by-step guides on Hardware, Playlists, Routing, and Automation.

Audio Delay / Filter

Sometimes, in Live Productions, you have to send the Audio delayed compared to the Video, to compensate for the processing Lag of huge LCD Screens (Lipsync). Or add a Limiter/Gate to the Microphone Input Audio.

In this article:
Simple Audio Delay
Copy Audio and Delay
More Audio Filter


Simple Audio Delay

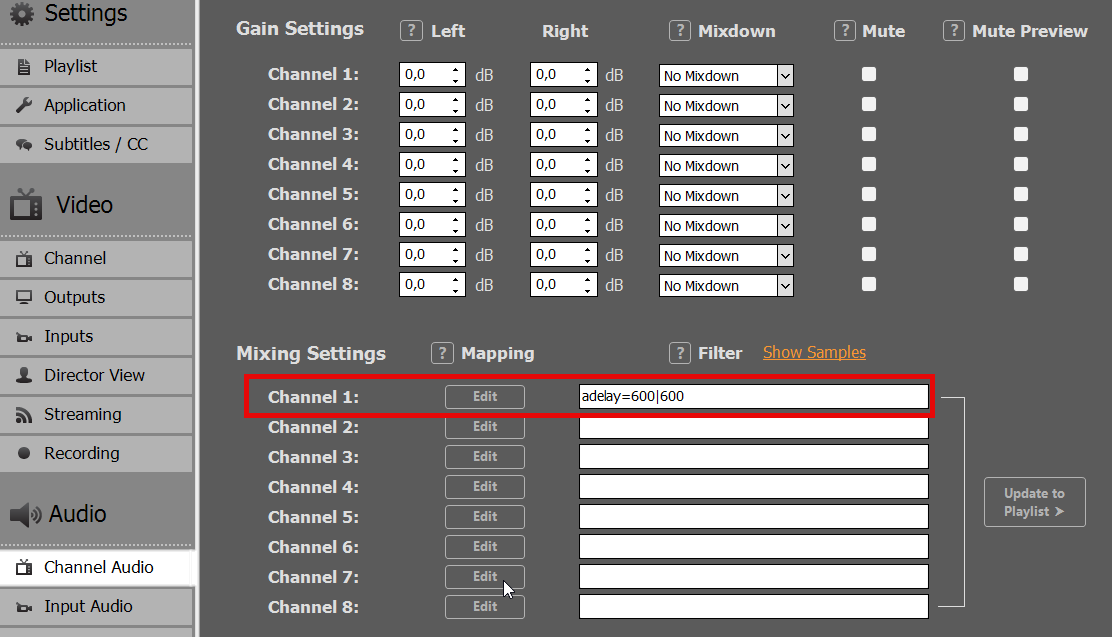
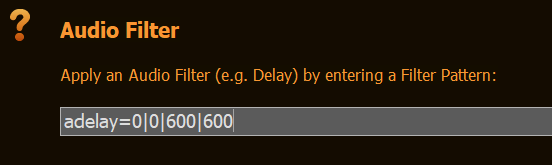
This is actually pretty fast to implement in PLAYDECK. You add the ADELAY Audio Filter to the Channel like this. In this example we set 600ms Delay for Audio Channel 1 and 2:

This can also be set to INPUTS to compensate for any incoming Lipsync Issue.


Copy Audio and Delay

You can also COPY the Audio Channel 1 and 2 to Audio Channel 3 and 4 and delay those. The use case here is, that the Audio Mixer Person has Live Preview Audio.

This needs to be done on the Playlist Level, so clear any Audio Filter in the Settings.

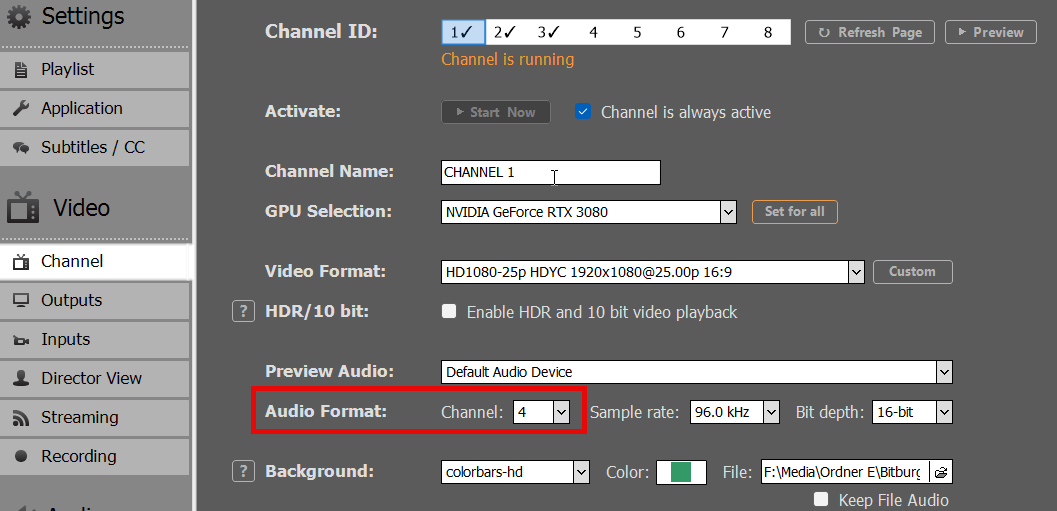
First, make sure to increase the Audio Channel for your Output Channel, otherwise all Audio Channel above 2 will not be processed:

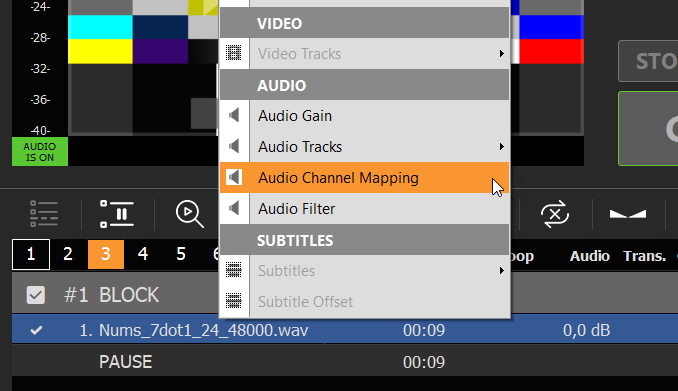
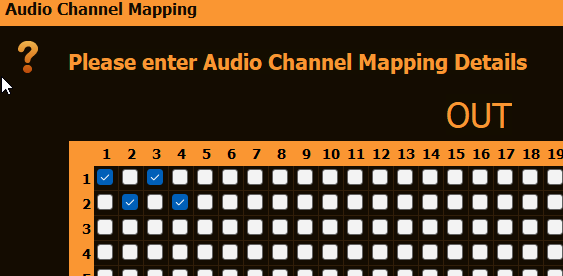
The Right-Click any Playlist Item and select AUDIO CHANNEL MAPPING:

This will copy Audio Channel 1 and 2 to Audio Channel 3 and 4:

Now right-click the Playlist Item again, select AUDIO FILTER and add the ADELAY Filter, but only for Audio Channel 3 and 4:


More Audio Filter

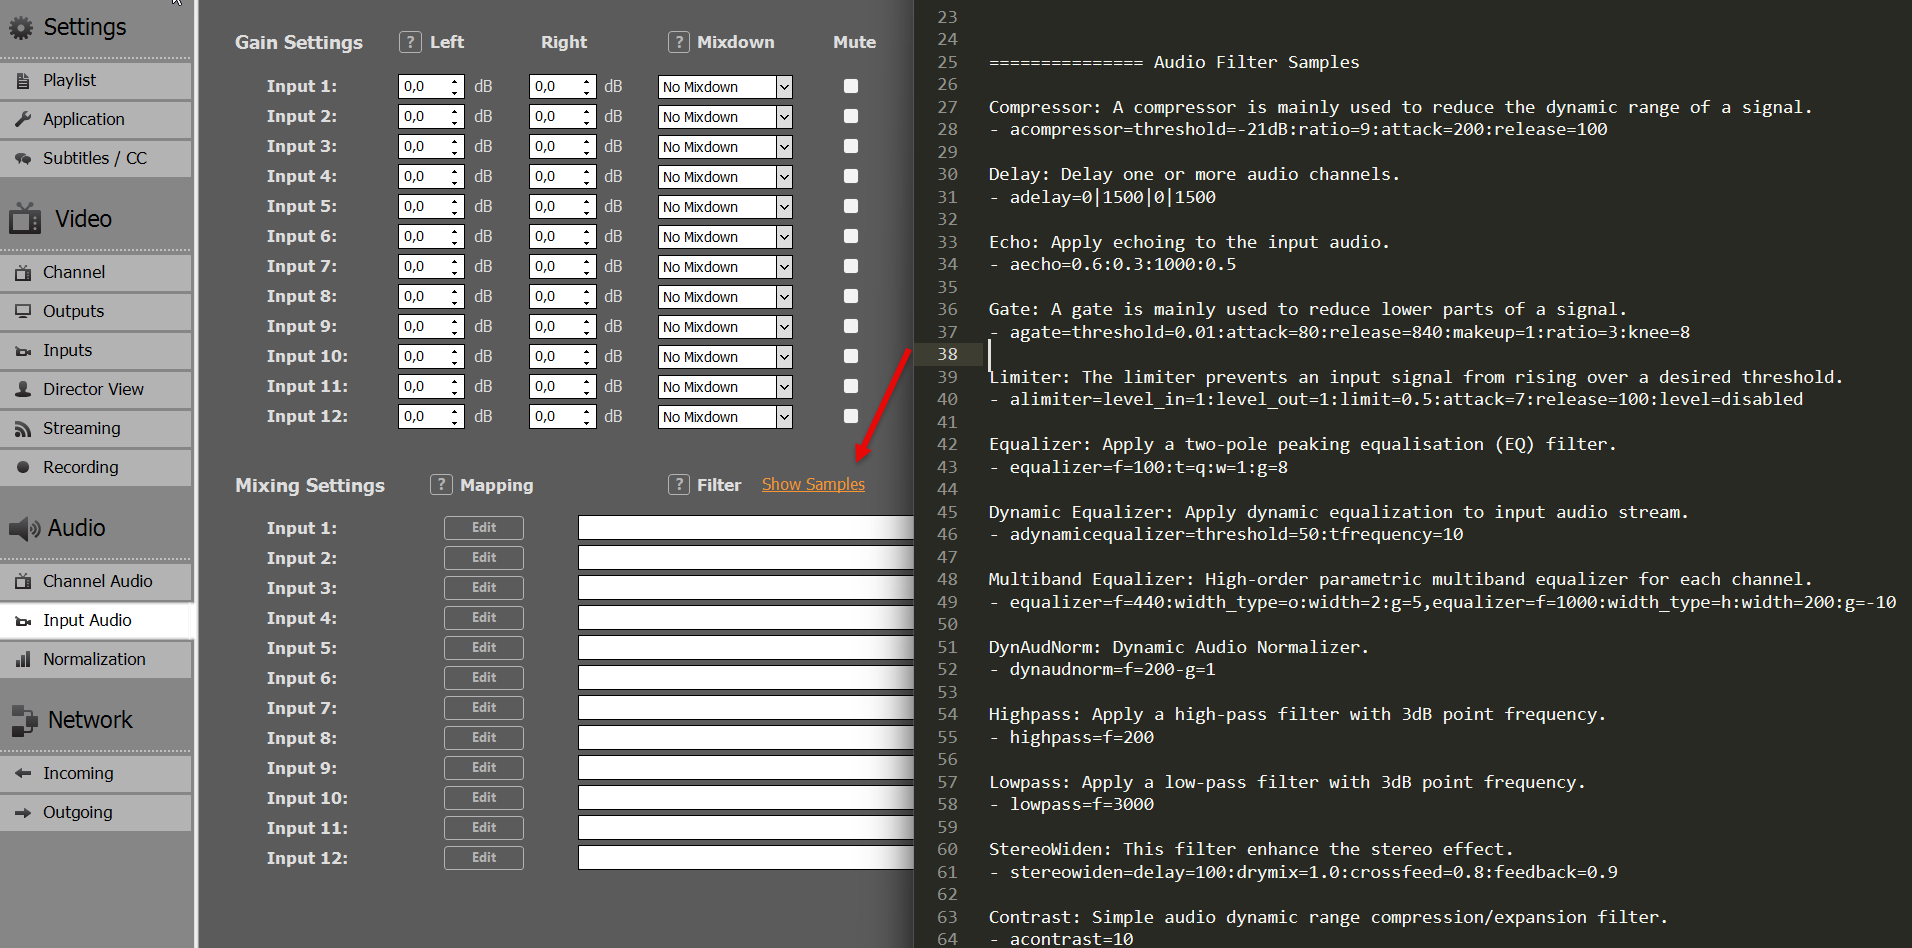
For a complete List of all Audio Filter, click SHOW SAMPLES. This will open a TEXT FILE with Examples.

Video Engine Logging

This article will show how to setup Video Engine Logging.


1. Setup Logging

Start PLAYDECK, open Settings, and select the APPLICATION tab. At the bottom of the page, you will find the configuration options.

Output Folder: Choose your destination directory. This can also be a shared network folder.

Storage Warning: Logs can easily consume up to 1 GB per minute (at Verbosity 0 with all modules enabled). Ensure you have sufficient free disk space based on how long it might take for the issue to occur.

Verbosity: Always start logging with 0 – trace. This ensures the Video Engine developers receive all necessary information.

Modules: Select all to begin with. If the log files become too large, you can reduce their size by focusing on specific modules:

The first thing to setup is your Output Folder for the Log Files. This can be a shared Folder on your Network. Logs can easily consume up to 1 GB per Minute (on Verbosity 0 and all Modules). Plan enough free disc space, depending on the estimated time until Bug occurrence.

The next setup is Verbosity: Please always start Logging with 0 – trace, so the Video Engine Devs have ALL information.

With the Modules setting we pick all to begin with. If Log Files get to big, we can reduce the size by focussing on specific modules:

  • all: Logs everything.
  • playlist,file,codecs: Covers playout, file decoding, and clip loading/playing errors.
  • writer: Covers streams, recordings, and encoding.
  • network: Covers streaming protocols.
  • renderer: Covers device output and NDI.
  • live: Covers live inputs.
  • device: Everything related to hardware devices.
  • blackmagic: Everything related to Blackmagic Design hardware.


Split Option: This depends on how many channels you are running, as every channel operates on its own process. If you use more than 2 channels, we highly recommend enabling the Split option.


2. Start / Stop Logging

To catch a bug on the fly, you will need to start logging, reproduce the issue, stop logging, and then send the files to the development team.

Timing: You can START and STOP logging at any time. This allows you to prepare your playlist or devices beforehand. Minimize the time between starting and stopping to keep the overall file size manageable.

Session Folder: Once you click START, a new subfolder named after the current timestamp (e.g., 2026-05-16__01-20-00) will be created in your designated logging path.

Stopping: Once the bug occurs, click STOP. Wait at least 10 seconds to ensure all active log processes finish writing to the disk.

Compression: Open your logging path and locate the session folder. Right-click the folder, select Compress to…, and choose 7z (preferred) or ZIP. Compression may take some time depending on the file size.

Now we need to ZIP the contents of the session folder. Identify your session folder by START time. Then right-click your session folder, select Compress to and pick 7z File (if available) or ZIP File. Now lean back, compression could take some time.


3. Uploading Logs

Please upload your compressed log files using our official download portal:

https://download.joy-event-media.de

  1. Drag and drop your ZIP/7z file into the browser window or use the file browser.
  2. Click UPLOAD.
  3. Once complete, click COPY to copy the generated download link to your clipboard.
  4. Send an email to [email protected] and paste the download link into the message.

Note: Without this specific download link, our team cannot access your files due to data protection policies.


4. Cleanup

Make sure to delete the original log files and session folders after successful compression and upload to free up disk space. PLAYDECK does not automatically delete or clean up old log files.


Sending SCTE-35 to Streams & Servers

SCTE-35 markers travel in MPEG transport streams. In PLAYDECK that means UDP, SRT, DVB-compatible streaming, MPEG-TS recordings, and HLS segments — not SDI and not MKV/RTMP.

On SDI, use SCTE-104 instead: Using SCTE-104 on SDI.

Full from→to matrix: Closed Captions & SCTE — Overview.

PLAYDECK lets you author your own SCTE-35 XML (flexible for any receiver). Placeholders fill in clip/block timing and IDs.

In this article:
Enable SCTE-35
Where to attach markers
XML examples & placeholders
Local stream loop test
Forwarding between streams
HLS output
Test with Nimble Streamer
Logging & tools
Related


Enable SCTE-35

SCTE-35 is not on by default for streams/recordings. Open Parameter and set:

embed_scte35='true'

Works withDoes not apply
UDP, SRT, DVB-compatible (format mpegts/dvb), MPEG-TS file record, HLS segmentsSDI, NDI, MKV, RTMP/FLV

The video codec does not matter for SCTE-35 (unlike Closed Captions / embed_cc).

UDP URL tip: use your LAN IP (e.g. udp://192.168.x.x:5000?pkt_size=1316). Prefer not 127.0.0.1.

You can combine with captions when needed:

embed_scte35='true' embed_cc='true'


No conflict was found between SCTE-35 and embed_cc on MPEG-TS streams (unlike SCTE-104 + active CC/ASS track on SDI — see overview limits).


Where to attach markers

Attach SCTE commands to:

  • Clips (any play position)
  • Blocks (start / end)
  • Overlays (show / hide)
  • Action buttons

Set the command type to SCTE-35 (not SCTE-104) when the target is a stream or TS file.


XML examples & placeholders

Formats vary by receiver. The samples below match the SCTE-35 Out / In buttons in the Commands dialog and work for typical splice_insert / SSAI workflows (including Nimble). Ask your provider if they need a different XML shape.

One ad break airing = one spliceEventId. The marker that opens the break ({eventid}) and the marker that closes it ({eventlastid}) must carry the same number. The next break gets a new ID. PLAYDECK increments a per-channel counter when {eventid} / {eventidhex} is in the XML; {eventlastid} / {eventlastidhex} reuse the last value and do not increment. The counter is not stored on the playlist row (a loop or the next day must not reuse yesterday’s ID). It resets when PLAYDECK restarts.

Do not put {timestamp} into spliceEventId — parsers often read the year (e.g. 2026) as the event ID.

Duration placeholders fill only while the channel is playing. For a block break use {blockduration} (90 kHz ticks: seconds × 90000). {clipduration} is the current clip, not the whole break.

Splice with duration (auto-return)

Use on block start (or an Action that opens the break). autoReturn="1" lets the receiver return after the duration; you can still fire an In with {eventlastid} if your chain wants an explicit CUE-IN.

<SpliceInfoSection>
  <SpliceInsert
    spliceEventId="{eventid}"
    outOfNetworkIndicator="1"
    spliceImmediateFlag="1">
    <Program />
    <BreakDuration
      autoReturn="1"
      duration="{blockduration}" />
  </SpliceInsert>
</SpliceInfoSection>

Splice In (return)

Same break, block end (or a second Action). No duration. Same ID via {eventlastid}.

<SpliceInfoSection>
  <SpliceInsert
    spliceEventId="{eventlastid}"
    outOfNetworkIndicator="0"
    spliceImmediateFlag="1">
    <Program />
  </SpliceInsert>
</SpliceInfoSection>


outOfNetworkIndicator 1 = leave program (CUE-OUT), 0 = return (CUE-IN). Close </SpliceInsert> — missing end tags break many parsers.


Placeholders
TokenWhat you get
{eventid}New event ID (decimal). Increments once per command that contains {eventid} / {eventidhex}.
{eventlastid}Last event ID, no increment. Use on In.
{eventidhex} / {eventlastidhex}Same IDs as 8-digit hex (SCTE-104 <data>).
{blockduration}Block length, 90 kHz decimal (SCTE-35).
{clipduration}Current clip length, 90 kHz.
{blockduration10} / {clipduration10}Same length in tenths of a second (SCTE-104).
{blockduration10hex}Tenths as 4-digit hex, max FFFF.
{blockduration+6} / {blockduration10hex+6}Add/subtract whole seconds (e.g. opener/closer). Spaces allowed inside { }.
{timestamp} {timestampunix} {airtimenext} {plannednext} {clipid} {blockid}Timing / playlist IDs — not for spliceEventId.

Command type must be SCTE-35 (not SCTE-104) when the target is a stream or TS file.


Local stream loop test

  1. Channel 1: start UDP or SRT with embed_scte35='true'.
  2. Channel 2: play the same URL as a stream clip.
  3. Action on Ch1 with SCTE-35 XML → Event Log: >> on Ch1, << SCTE-35 on Ch2.

Optional: record to a .ts file with embed_scte35='true', fire markers while recording, then confirm in DVB Inspector and by playing the file in PLAYDECK (<<). See Recording CC & SCTE.


Forwarding between streams

PLAYDECK can forward SCTE-35 across stream inputs/outputs (e.g. SRT → UDP or Ch1 → Ch2 → Ch3 over UDP).
Receivers show << on each hop when embed_scte35 is enabled on each outgoing MPEG-TS stream.

Not supported: automatic SCTE-104 → SCTE-35 when an SDI source is streamed to IP. Send SCTE-35 on the streaming channel instead.


HLS output

If you select Apple HLS, PLAYDECK writes a local .m3u8 (+ segments), not a live CDN publish by itself.

  • PLAYDECK does not write SCTE/CUE tags into the .m3u8 manifest.
  • SCTE-35 / CC can still be present in segments. Playing the m3u8 in PLAYDECK can show CC and << SCTE-35.
  • For manifest-based ad markers (e.g. #EXT-X-CUE-OUT), use a server such as Nimble (below) or another packager that converts SCTE-35 → HLS cues.

Test with Nimble Streamer

Typical path: PLAYDECK UDP embed_scte35 → Nimble → HLS with cue tags.

  1. Install Nimble; enable SCTE in nimble.conf (example):

Restart the Nimble service after editing.

scte35_processing_enabled = true
scte35_forwarding_enabled = true
hls_ad_scte35_forwarding_enabled = true
hls_ad_marker_format = cue
hls_ad_splice_out_cont_marker_enabled = true

  1. In WMSPanel: MPEG-TS In (UDP) matching PLAYDECK’s target; MPEG-TS Out / HLS as needed.
  2. PLAYDECK stream URL → that UDP port; video codec free (e.g. H.264); embed_scte35='true'.
  3. Attach SCTE-35 to clip start (or Action); start stream; verify cues in Nimble logs and in HLS chunk playlists (browser Network tab).

Logging & tools

  • PLAYDECK SCTE Event Log>> sent, << received.
  • DVB Inspector / TSDuck: inspect SCTE-35 inside .ts files or captures.
  • MediaInfo: great for CC tracks; often does not list SCTE-35 clearly.

Related

ArticleTopic
Closed Captions & SCTE — OverviewFull matrix, domains, limits
Using SCTE-104 on SDISDI VANC markers
Closed Captions & SubtitlesCC burn-in / pass-through
Recording CC & SCTEMKV vs TS, sidecars, playback checks

ASIO / Dante Virtual Soundcard

This article explains how to setup ASIO audio interface and devices with PLAYDECK.

In this article:
Setup ASIO
Dante Virtual Soundcard (DVS)
Troubleshooting


Setup ASIO

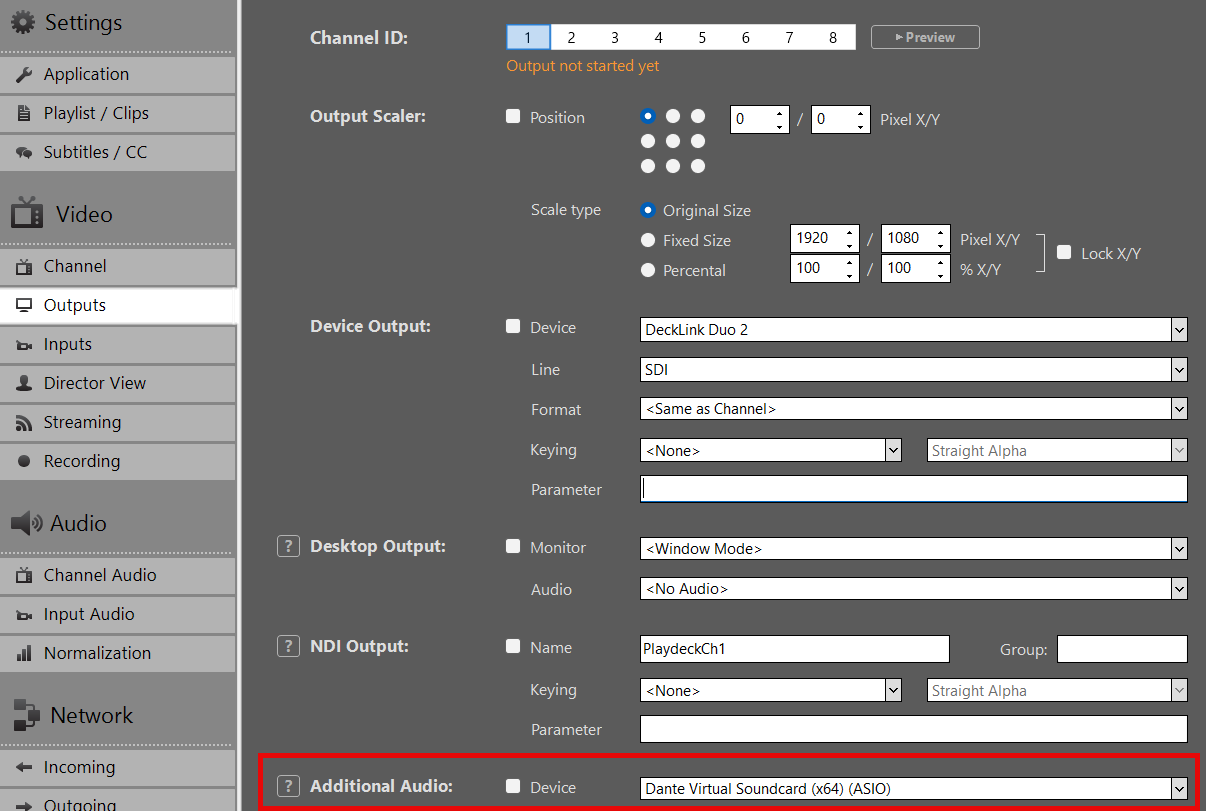
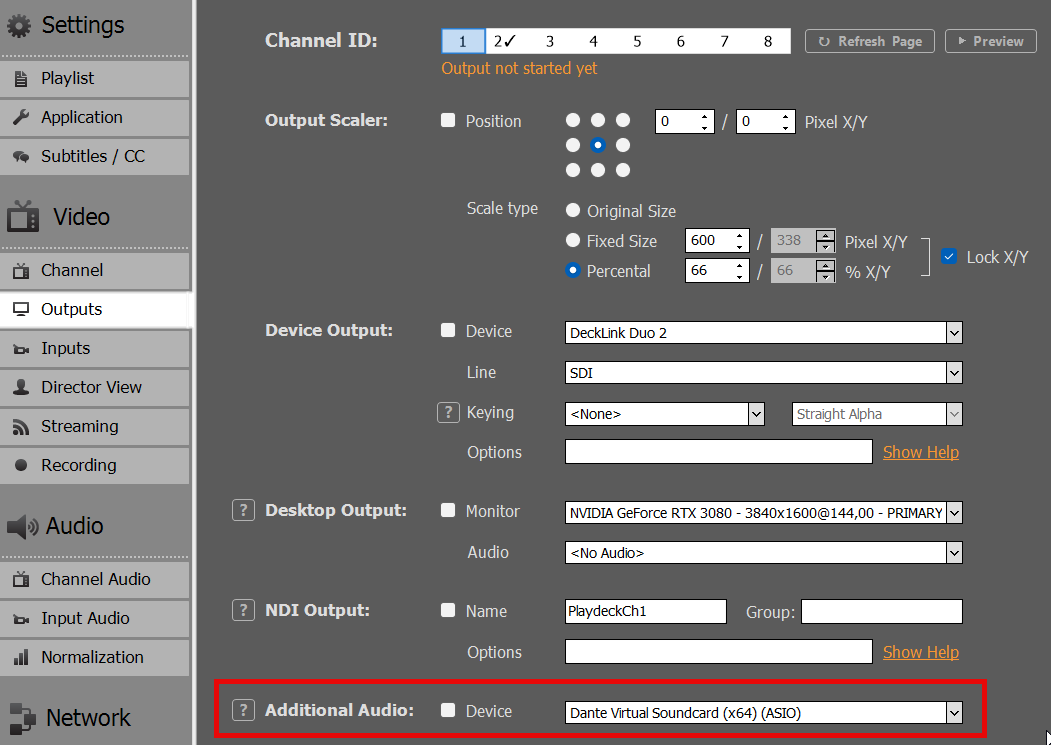
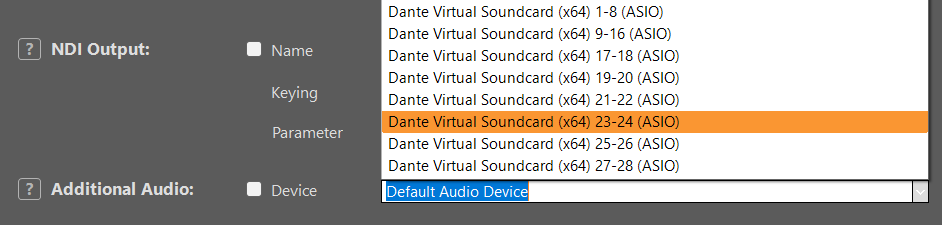
Enable the “Additional Audio Output” setting to output audio via ASIO.

Important: As a real-time playout solution, PLAYDECK requires a stable synchronization clock from the ASIO device. Without this clock signal, frames cannot be processed correctly, resulting in severe stuttering.


Dante Virtual Soundcard (DVS)

Dante Virtual Soundcard (DVS) is a software solution that turns your computer into a Dante-enabled workstation, allowing you to transmit and receive high-quality audio over a standard Ethernet (LAN) network.
https://www.getdante.com/products/software-essentials/dante-virtual-soundcard/

You can interface DVS with PLAYDECK using either ASIO or WDM mode:

  • ASIO (Recommended): Transmit up to 64 audio channels across all PLAYDECK outputs. This provides the lowest latency and highest channel count for professional workflows.
  • WDM: Limited to 16 audio channels, restricted to one stereo pair per PLAYDECK output channel.


Configuration Steps

1. Start the DVS Engine:
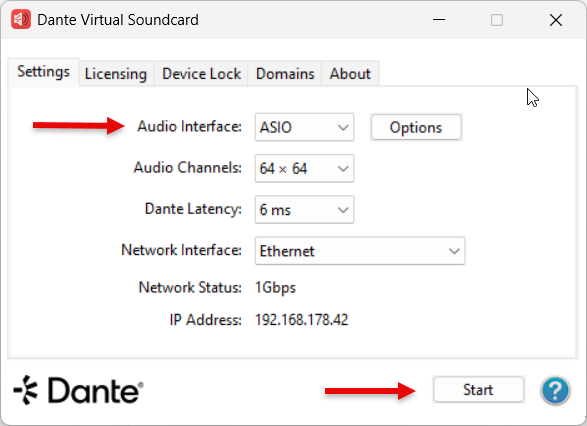
Open the Dante Virtual Soundcard control panel, set the interface to ASIO, and click Start.


2. Select the Device in PLAYDECK:
You can now select “Dante Virtual Soundcard” as your ASIO device within the PLAYDECK settings.


3. Channel Mapping:
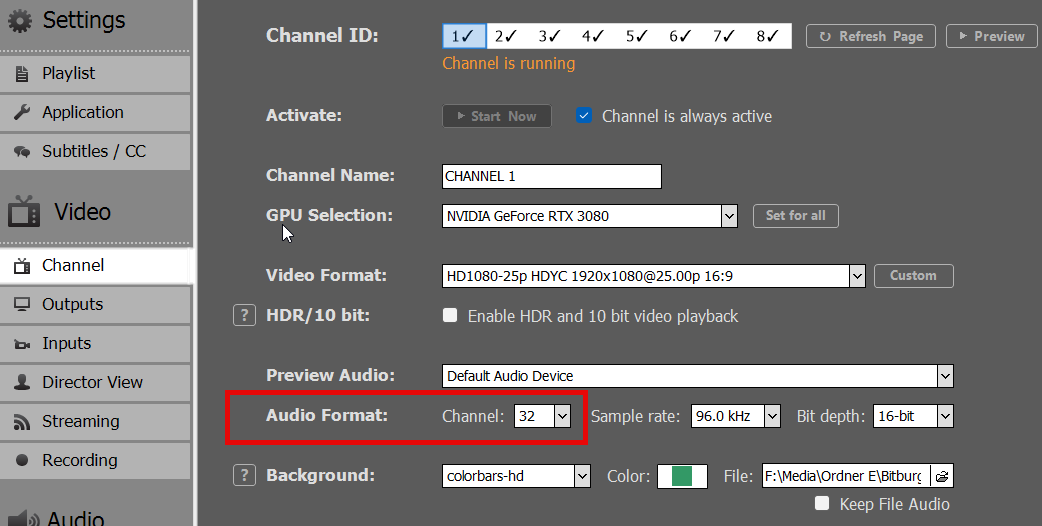
PLAYDECK will automatically begin routing the audio channels assigned to that specific output. A single output can support up to 32 audio channels.


4. ASIO Device Splitting:
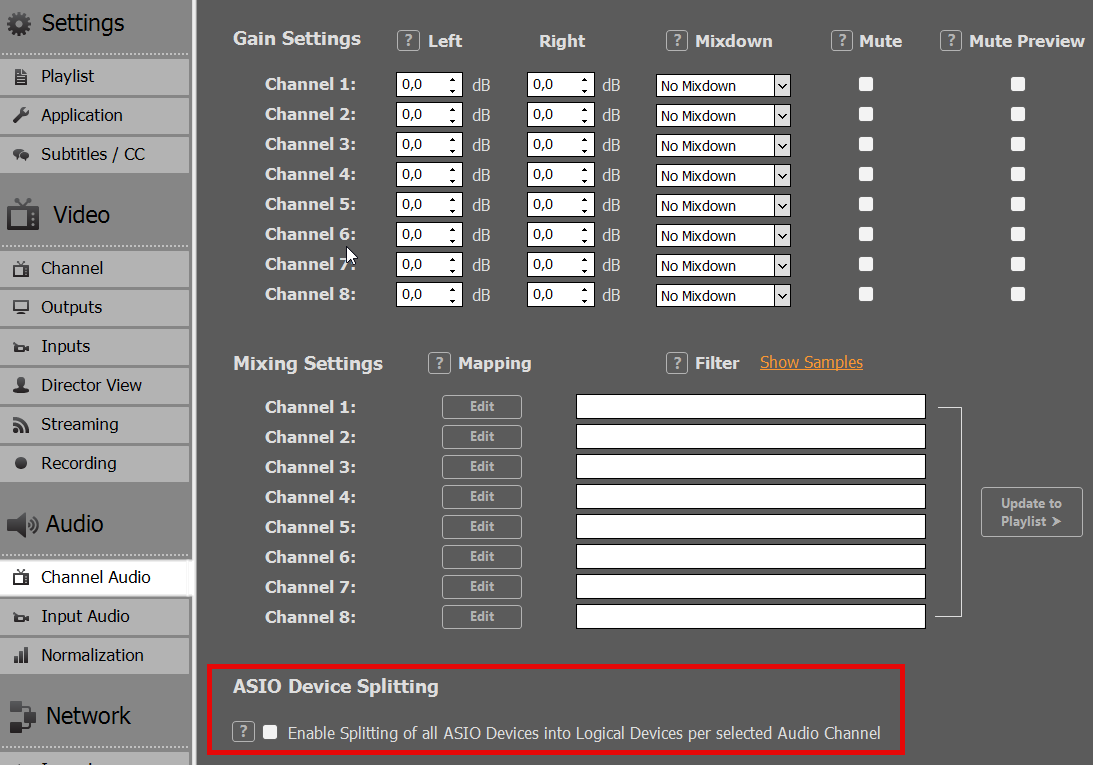
To use the ASIO driver across multiple PLAYDECK output channels simultaneously, enable ASIO Device Splitting.


5. Assigning Multiple Outputs:
Once splitting is active, DVS will appear as multiple sub-devices. This allows you to assign a dedicated ASIO device to each individual PLAYDECK output channel.

Note on Splitting Logic: The channel allocation is determined by the “Audio Channels” setting for each output. For example, if Output 1 and 2 are set to 8 channels each, and others are set to 2 channels, the ASIO driver will split the stream accordingly to accommodate those specific requirements.


Troubleshooting

Slow Playback (Frame by Frame)

This occurs if PLAYDECK cannot synchronize with the clock signal from the ASIO device. Because PLAYDECK is a real-time playout engine, it requires a stable clock to process frames.

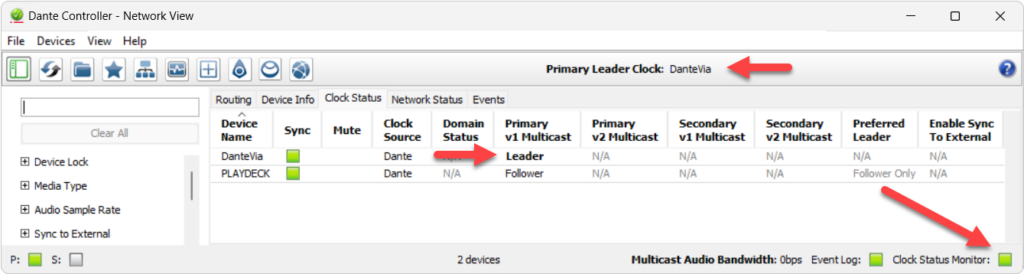
Solution: Ensure a Clock Leader (formerly Master Clock) is active on your network. This can be provided by hardware (e.g., a Dante-enabled mixer), a software driver, or a dedicated clock generator.

If you are using Dante, you may need additional tools to verify your workflow. Follow these steps to set up a local test environment:

  1. PC 1: Install PLAYDECK and Dante Virtual Soundcard (DVS). Start DVS in ASIO mode and select it within PLAYDECK.
  2. PC 2: Install Dante Via and Dante Controller.
  3. In both Dante Via and Controller, ensure the correct Ethernet Interface is selected.
  4. In Dante Via, enable at least one output device.


Once configured, open Dante Controller. You should see “Dante Via” acting as the Clock Leader with your PLAYDECK system successfully connected.

View this screen capture of the test setup:
https://downloads.playdeck.tv/assets/DanteClockTest.mkv

Note: In some cases, installing ASIO4ALL can help stabilize the “handshake” between PLAYDECK and specific audio interfaces. (https://asio4all.org/)


Poor Audio Quality

Distorted or “glitchy” audio is usually caused by a sample rate mismatch. Ensure the Sample Rate (e.g., 48 kHz) is identical across all of the following:

  • Windows Sound Settings (Advanced properties)
  • PLAYDECK settings
  • ASIO Device / DVS control panel


Audio Channel Mixing and Routing

When working with multichannel audio, you may need to downmix your channels for specific outputs. Please refer to this article for detailed instructions on managing multichannel routing.

Internal and External Keying

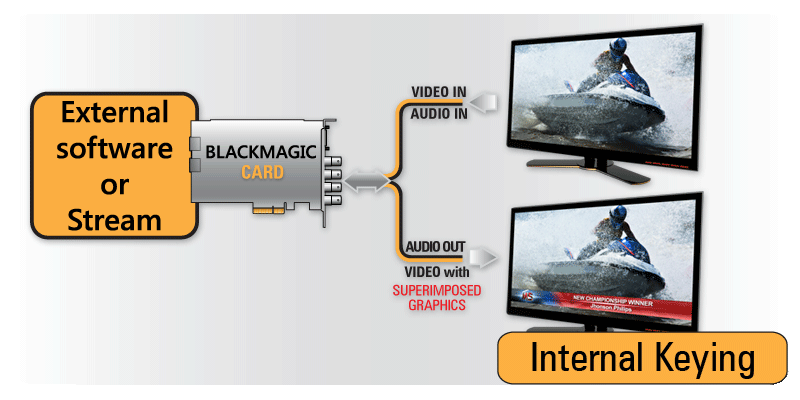
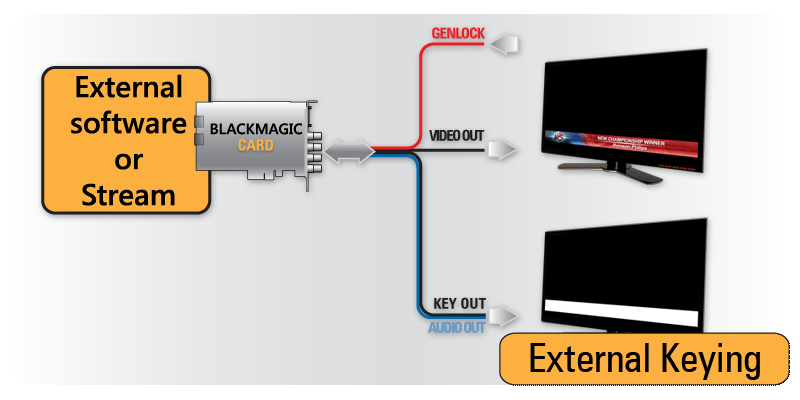
PLAYDECK supports both Internal (Superimposed Graphics over Incoming Signal) and External (Generating Video Fill and Key Signal) Keying, given that the Output card supports it too. You can also output the key or fill signal separately.

You can also use NDI to send your Key or Fill Signal with Alpha Channel Support.


Internal Keying

In Internal Keying mode, PLAYDECK will superimpose the video over an incoming signal on the same card:

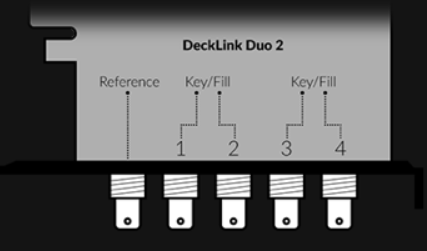
Lets take the Decklink Duo 2 for example: It has 4 SDI Ports. We need to tell the Card, which 2 Ports will be used for Internal Keying with the help of Desktop Video Setup (Blackmagic’s own Setup-App):

The Decklink will now operate like this:

If we start PLAYDECK now, the INTERNAL Option becomes selectable as Device Output:

Once you activate the Device for Keying, PLAYDECK will automatically change your Background to TRANSPARENT and your Color Space to ARGB32 (to support Alpha Channel):

The Image shows PLAYDECK Overlays Sample: Create Overlay > HTML > Screen-Title.html.


External Keying

In External Keying mode, PLAYDECK generates both Fill and Key signals and the keying is made by an external keyer:

Lets take the Decklink Duo 2 for example: It has 4 SDI Ports. We need to tell the Card, which 2 Ports will be used for External Keying with the help of Desktop Video Setup (Blackmagic’s own Setup-App):

The Decklink will now operate like this:

If we start PLAYDECK now, the EXTERNAL Option becomes selectable as Device Output:

Once you activate the Device for Keying, PLAYDECK will automatically change your Background to TRANSPARENT and your Color Space to ARGB32 (to support Alpha Channel):

The Image shows PLAYDECK Overlays Sample: Create Overlay > HTML > Screen-Title.html.

Supported Input/Output Devices


We basically support all cards of the following manufacturers, since we always include the latest drivers. But because of the vast amount of cards out there, we only tested the most common ones.


Blackmagic Design

Important: Needs Version 14.5+ of Blackmagic Desktop Video Setup.

  • DeckLink 4K Extreme 12G
  • DeckLink 8K Pro
  • DeckLink Duo 2
  • Intensity Pro 4K
  • DeckLink Mini Monitor / Mini Recorder
  • DeckLink Quad 1 / 2 / HDMI Recorder
  • DeckLink SDI 4K
  • DeckLink Studio 2 / 4K
  • Ultra Studio HD Mini / 4K Mini / 4K Extreme 3 / Monitor 3G
  • DeckLink IP/SDI HD

AJA

  • Corvid 24 R1
  • Corvid 44
  • Corvid 88
  • KONA LHi
  • KONA IP

Deltacast

  • DELTA-3G-e 22
  • DELTA-3G-elp-d 8c
  • DELTA-3G-elp-key 11
  • DELTA-ip-ST2110

Bluefish444

  • Epoch 4K Neutron
  • Epoch 4K Supernova S+
  • Epoch Neutron
  • Epoch Supernova CG
  • KRONOS K8

DekTec

  • DTA-2144B

Magewell

  • Pro Capture Quad HDMI
  • Pro Capture Quad SDI

Osprey

  • Osprey 915
  • Osprey 925
  • Osprey 927
  • Osprey 935
  • Osprey 945
  • Osprey 914
  • Osprey 924
  • Osprey 944
  • Osprey 1214
  • Osprey 1215
  • Osprey 1225
  • Osprey 1227
  • Osprey 1245
  • Osprey 1285
  • Osprey M15
  • Osprey M14
  • Osprey M24
  • Osprey M25

Stream Labs

  • Alpha HD
  • MH4LM
  • MS4
  • MSP2

Yuan

  • SC550N1

Setup RustDesk unattended Access for Remote Support


RustDesk is a free Remote Destop Software, which we use to login to remote systems. The main advantage of RustDesk over other Remote Desktop Connections is, that is does interfere with installed GPUs (eg. installing a Virtual GPU), therefore not interfering with PLAYDECK during Remote Access.


1. To get started, download our customized RustDesk from our website. This version will use our private RustDesk server (and not the public server) to protect your data and improve the connection speed.
https://get.remote-joy-event-media.de/rustdesk.exe

2. Once you start RustDesk for the first time, you will need to install it. Please deactivate “Install virtual display driver”, which might interfere with PLAYDECK.


3. After re-starting RustDesk, you will not need to activate “Start Service”. This is important to elevate priviliges to e.g. open the device manager. After that you need to setup a permanent password: Click on the Edit Icon next to “One-time Password”.


4. Then click on “Unlock Security Settings” and scroll down.


5. Please send us your ID together with your permanent password to [email protected]


6. (Optional) If possible, please start RustDesk on a secondary PC (No need to install) and test the connection to the System you have setup for remote support. Now thru this remote connection, on the secondary system, please try to:

– Open Device Manager
– Open Task Manager
– Open NVidia Panel
– Copy any File to this Folder: c:\Program Files(x86)\JoyEventMedia\Playdeck\

These tests make sure, that all needed support actions can be done remotely. If is likely, that any Anti-Malware or other Protection software breaks the connection. In that case please de-activate those Tools temporarily for the remote support session.

Multichannel Audio and Mixing

PLAYDECK support 32 Audio Channel per Output Channel. You can pass-thru Audio Channel (via SDI, NDI, Streams, ASIO), Mix-down to Stereo/Mono or Mix-up to Multichannel. Please note, that we have a sperate Post for Dante Virtual Soundcard.


Pass-thru

Enable Multichannel Audio by simply setting more than 2 Audio Channel in your Output Channel Settings. In this example we set 16 Audio Channel, as this is the native number of Audio Channel for SDI Output Cards:

Now you are good to go already. Your VU Meter will switch automatically to 16 Audio Channel:

Multichannel Audio is not also active for all Inputs and Outputs: SDI, NDI, Streams. You can check, if you click PREVIEW after activating your Device. All Previews have VU Meter as Overlays:

Here is another Example for Input Preview:


Mix-down

If you have Multichannel-Audio Content (or SDI Inputs) and want to Mix-down your Audio to MONO/STEREO, you would also need to increase the Audio Channel. In this case we use 16. This is important to tell PLAYDECK to process 16 Audio Channel (from Source eg SDI), otherwise all Audio Channel above 2 would be CUT/SILENT:

You can now select different ways to Mix-down your Audio. Please note, that there are seperate Settings for CHANNEL (Clips, Input Streams) and INPUTS (Device Input):


Multiple Audio Tracks

If your File has more than one Audio Tracks, you can switch the Audio Tracks by right-clicking the File and selecting AUDIO TRACKS:

To play ALL Audio Tracks at once, select ALL AUDIO TRACKS. Alle Audio Channel will be concatenated. In our example this would result in 6 Audio Channel for Output. So make sure to set your Channel to 8 Audio Channels, otherwise everything above 2 Channel will not be processed:

Note: Use any of the other Mixing Options to Mix-down to STEREO or similar.


Custom Mixing

For more advanced Mixing, you can click EDIT under MIXING SETTINGS. In this example we Mix-down 16 incoming Audio Channel to 4 outgoing Audio Channel. Please note, that there are seperate Settings for CHANNEL (Clips, Input Streams) and INPUTS (Device Input):

You can refine your Mixing even more by moving to the Content Level: Right-click any Playlist Item and select AUDIO CHANNEL MAPPING:

1 2 3 4 5 6