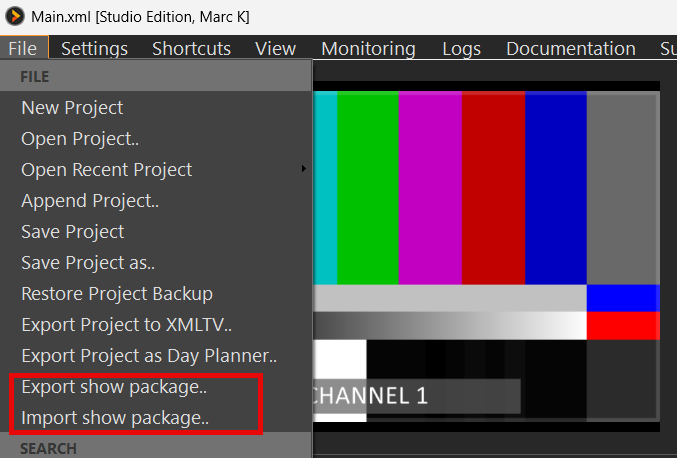
Export show package puts your current show into one .7z file: project, media, and the background settings that belong with it. Typical use: prep on a laptop, copy the package to a stick, Import show package on the show PC — without relying on the same drive letters or shared storage.
Export
BBuild and save your project as usual, then:
File → Export show package…
Choose where to save the .7z. The suggested name is your project name plus _pack (for example MyShow_pack.7z).
Confirm overwrite if that file already exists.
PLAYDECK collects the media, writes a copy of your project XML under its original name, and builds the archive. Large shows take a moment; there is no “done” popup when the export succeeds. Missing media files are reported and skipped.
Import
On the show PC (or any machine that should run the show):
File → Import show package…
Select the .7z.
Choose the destination folder.
When asked, confirm whether to load the project now.
PLAYDECK extracts the files into the destination folder. Paths inside the project XML stay as they were when exported. If you load the project, PLAYDECK checks for missing media next to the XML and under the last Locate folder you used. You can Locate a media root if anything is still missing. Channel background settings from the package are applied when you load. Again, no success popup.
Confirm dialog
Confirm dialog (only if the exported settings file is present — a hand-made .7z without it skips this and only extracts):
When the package contains a project XML → Apply channel backgrounds (and related settings) now and load this project? Yes: load the project, then overwrite channel backgrounds (and related exported settings) on this PC.
If the package has no project XML → Apply channel backgrounds (and related settings) now? Yes: overwrite channel backgrounds (and related exported settings) only.
What is included
Playlist file clips and overlay media (graphics, video overlays, text/crawler sources, HTML templates)
Your project XML with the same filename you exported from
Channel backgrounds — exported and, on import + load, written over your current channel background settings (type, color, file, keep-audio). Defaults for stream / audio-only clips are updated the same way when they were part of the export.
Input device background files are copied into the package only; import does not change your input background settings
Website / YouTube entries and live sources stay as references — they are not downloaded into the package.
PLAYDECK can send SCTE markers with clip and block commands. It can also listen for incoming SCTE-35 or SCTE-104 and jump into a Break Block when a marker matches.
That is useful when an upstream encoder, automation, or another PLAYDECK channel fires the OUT cue — and you want your ad block to start automatically, then return when the break is over.
You need an SCTE license. The block must be a Break Block (Block End → Break), so PLAYDECK knows where to return after the ads.
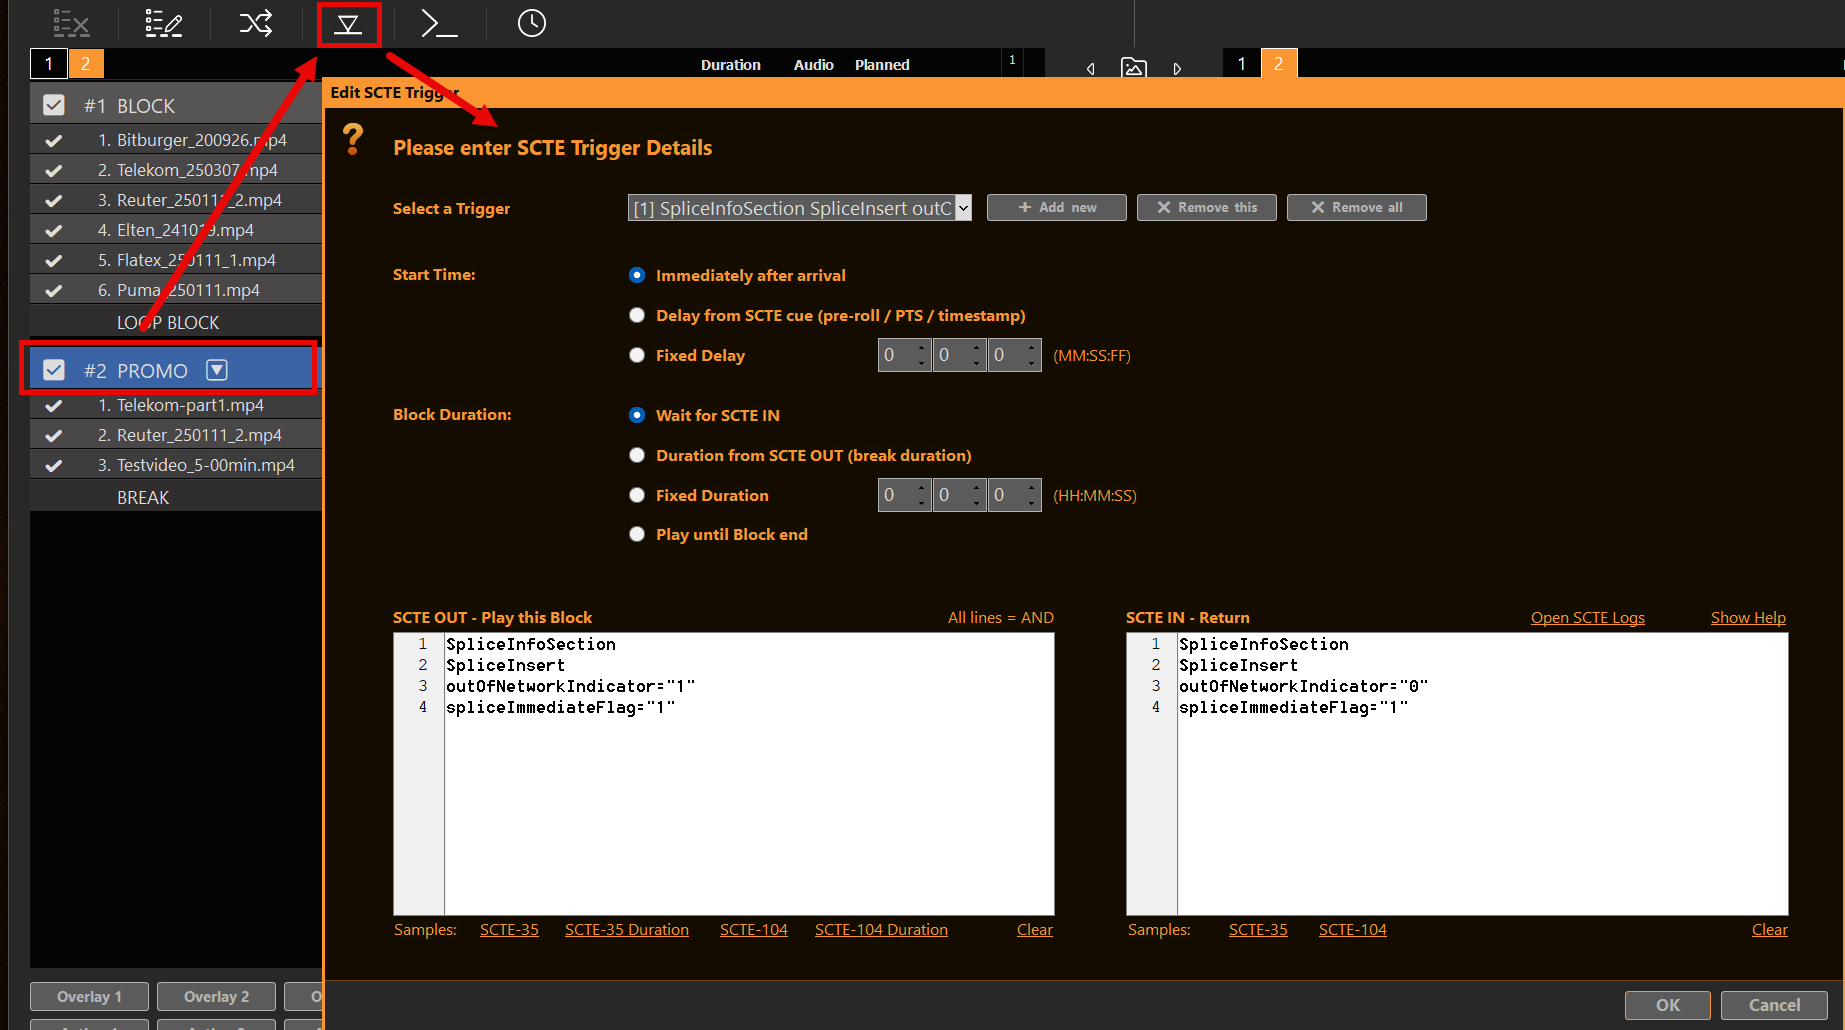
Select the Break Block header and open Edit SCTE Trigger (playlist shows a small SCTE hint when triggers are saved).
Each trigger has:
SCTE OUT — Play this Block — pattern(s) that start the Break
SCTE IN — Return — optional pattern(s) that end the Break early (depending on duration mode)
Start Time — when the Break starts after an OUT match
Block Duration — how long the Break runs before return
Use SCTE Logs in the dialog (or Logs → SCTE) while testing.
How matching works
Put one match string per line in the OUT and IN memos. Every non-empty line must appear in the incoming marker text (All lines = AND). Spaces and quotes are ignored. Samples for SCTE-35 / SCTE-104 (and duration variants) are in the dialog — use them as a starting point, then trim to what your feed really sends.
The OUT pattern must match what PLAYDECK actually receives. Open Logs → SCTE while testing. Lines starting with << show the inbound cue — copy distinctive fragments into your match lines.
SCTE-104 OUT (decoded inbound, not raw hex data): SCTE-104, multiple_operation_message, opID 257, splice_insert_type 2
SCTE-35 timed start with ptsTime (for example TimeSignal): SpliceInfoSection, TimeSignal, ptsTime
If your OUT pattern still requires spliceImmediateFlag="1", a cue with Flag="0" or a TimeSignal-only marker will never fire. Always align the pattern with a real << line from your log.
Triggers react only to inbound << cues, not to >> send lines alone. For a loopback test, the listening input must see the stream that carries the marker.
Start Time
When the OUT pattern matches, Start Time decides when the Break Block actually starts.
Mode
What happens
Immediately after arrival
Start the Break as soon as the OUT pattern matches (default).
Delay from SCTE cue (pre-roll / PTS / timestamp)
Read a start delay from the cue (see below). If nothing usable is found, PLAYDECK starts now and writes a note in the SCTE log.
Fixed Delay (MM:SS:FF)
Wait this long after the match, then start. FF is handled like show duration, then applied using the channel frame rate.
Effective delay = time until that moment (if still in the future) plus pre-roll
SCTE-35
spliceImmediateFlag="1" → delay 0 (same as immediate for start)
otherwise ptsTime / pts_time (90 kHz program clock), compared to the stream clock on the same frame that carried the cue → delay until that point (with a safety cap)
If the target time is already in the past (VITC or PTS), the Break starts immediately.
Not every send path preserves ptsTime on every cue type. What matters in production is whether your << inbound log still contains ptsTime (or 104 pre-roll / timestamp). TimeSignal markers that include ptsTime are a common case for timed SCTE-35 starts.
Block Duration modes
Mode
What happens
Wait for SCTE IN
OUT starts the Break (after Start Time). Return when an IN pattern matches. You must set Pattern IN.
Duration from SCTE OUT (break duration)
OUT starts the Break. Return after the break duration carried in that OUT marker: SCTE-35 BreakDuration / duration (90 kHz ticks), or SCTE-104 break_duration (tenths of a second). If no duration is found, PLAYDECK falls back to waiting for IN (if you set one).
Fixed Duration
OUT starts the Break. Return after the time you enter (HH:MM:SS).
Play until Block end
OUT starts the Break. Return when the Break Block finishes normally (same idea as a scheduled/action Break reaching its end).
An IN match always returns early and cancels a running timer.
Cues without a break duration (for example many TimeSignal-only markers) need Fixed Duration, Wait for SCTE IN, or Play until Block end — otherwise PLAYDECK has no return path and will log that.
When OUT fires, PLAYDECK remembers the clip that was playing and jumps into the Break. Return uses that saved position (via the Break’s After Break setting / normal return path).
Quick recipe (typical FAST / server cue)
Commands on clips/blocks/Actions = send SCTE (>> in the log). See SCTE-35 / SCTE-104 articles.
SCTE Triggers on a Break Block = react to incoming markers (<<) and drive playout.
Both can live in the same project. A Break can still carry outbound SCTE commands at start/end if your packager also needs markers from PLAYDECK.
For live ingest that must survive the Break, use a permanent Channel Input (not a playlist stream URL) — see Ad Breaks.
Typical setups
Server sends immediate SCTE-35 OUT → Start Time: Immediately after arrival; Duration: from SCTE OUT, or Fixed / Wait for IN
SCTE-104 with pre-roll or timestamp → Start Time: Delay from SCTE cue; Duration as needed
SCTE-35 with ptsTime in the inbound cue → Start Time: Delay from SCTE cue; OUT pattern must match that cue (not only Flag="1"); Duration often Fixed or Wait for IN if the marker has no break duration
Your iPhone can be a wireless camera for PLAYDECK. Install the free Blackmagic Camera app, send an SRT stream over Wi‑Fi, and drop it into the playlist like any other live source. Optional: pull focus from the PLAYDECK desk without walking to the phone.
This is Wi‑Fi, not SDI. Fine for IMAG, a backup cam, or a room you cannot cable. Not a substitute for a locked studio camera.
Leave the phone on that Wi‑Fi. Write down the iPhone IP: iOS Settings → Wi‑Fi → tap the network → IP Address.
The stock iOS Camera app cannot do this. You need Blackmagic Camera (manual focus, SRT, REST). An NDI HX camera app is a different product — PLAYDECK can take that as an NDI Live Input, but you lose Blackmagic’s cinema controls.
PLAYDECK listens (SRT)
PLAYDECK is the listener (started first). The iPhone is the caller (connects to the PC).
On the PLAYDECK PC, open a command prompt and run ipconfig. Use the IPv4 address of the LAN/Wi‑Fi adapter the iPhone can actually reach (example below: 192.168.1.50).
AirDrop the file to the iPhone (or Files / iCloud).
Open it → Share → Blackmagic Camera.
In the app: Settings → Live Stream → platform PLAYDECK → profile HD low latency.
Start the live stream after the PLAYDECK clip is already playing.
HD at ~6 Mbps is the sensible default. 4K needs a strong 5 GHz link and resolution="4K" with a higher bitrate (iPhone 15 Pro+).
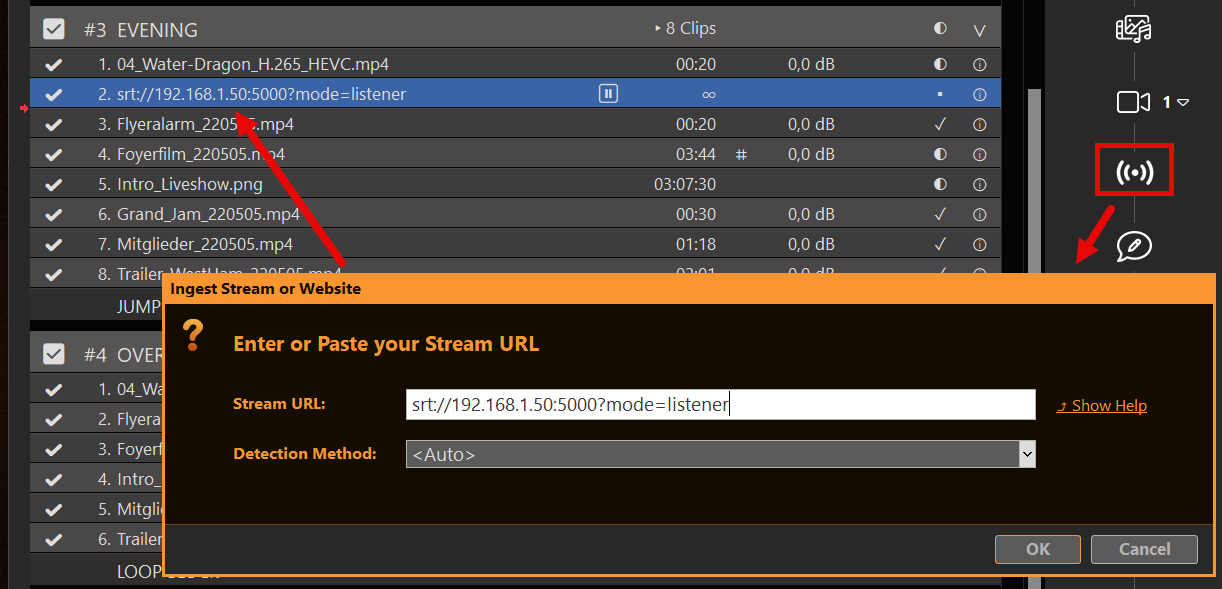
Play it in the playlist
If PLAYDECK connected, the stream name is white. Red = no connection. Double-click the info icon for format/codec. A typo: right-click → Change URL.
Treat it like a live camera clip: play it when you need the shot. A stream has no file end, so it stays up until you stop it or the phone drops Wi‑Fi.
Do not send the iPhone to YouTube/Twitch “and then into PLAYDECK”. That is the wrong direction. PLAYDECK must be the SRT listener on your LAN.mote is for.
Remote focus (no code)
Picture and focus are two different paths. The stream only carries video. Focus is camera control.
Without writing anything:
Apple Watch — Blackmagic Camera companion app: framing, record, exposure, focus, zoom.
iPad / second iPhone / Mac — same Blackmagic Camera app on the same Wi‑Fi, set that device as the controller. You get the full HUD, including focus.
Use that when someone can hold a Watch or an iPad. The next section is for the operator who wants a focus knob on the PLAYDECK PC.
Remote focus with AI
Blackmagic Camera 3.4+ speaks the Camera REST API on the phone: HTTPS port 4444, self-signed certificate. PLAYDECK does not talk to that API. You (or ChatGPT) send a tiny HTTP PUT from the PC.
Enable Remote Control in the Blackmagic Camera settings so the API is on. Then on the PLAYDECK PC open:
Invoke-WebRequest -Method Put -Uri "https://${ip}:4444/control/api/v1/lens/focus/doAutoFocus" -ContentType "application/json" -Body "{}" -UseBasicParsing
Prompt to paste into ChatGPT / Claude / Gemini
Copy this, put your iPhone IP in, paste it into any AI. You should get a small PowerShell window with a slider.
Write a Windows PowerShell 5.1 script. No extra modules.

At the top: $IphoneIp = "192.168.1.20"

The Blackmagic Camera app on that iPhone exposes a REST API:
https://IP:4444/control/api/v1
Self-signed TLS — skip certificate validation.

PUT /lens/focus with JSON {"normalised": N} where N is 0.0 to 1.0
PUT /lens/focus/doAutoFocus with JSON {}
GET /lens/focus to read the current value

Open a small WinForms window titled "iPhone Focus":
- a trackbar 0–100 mapped to normalised
- send focus on mouse-up (do not spam every tick)
- a button "Auto Focus"
- a status label for errors

If GET returns different JSON keys than normalised, print the JSON and still send {"normalised": N}.
Use Invoke-WebRequest. Ignore empty 204 responses.
Working script (if you do not want to wait for the AI)
Save as iphone-focus.ps1, set $IphoneIp, right-click → Run with PowerShell. If Windows blocks it: Set-ExecutionPolicy -Scope Process Bypass then .\iphone-focus.ps1.
Drag the slider, watch the lens on the phone. If PUT returns 403, focus is locked (external lens / AF lock in the app).
Companion
If you already run Bitfocus Companion for PLAYDECK, add a second connection: Blackmagic Cameras API (https://bitfocus.io/connections/bmd-cameras). Host = iPhone IP, HTTPS on, port 4444, allow insecure HTTPS (self-signed). Companion reads the phone’s own API list and builds Focus / Auto Focus actions. Put those buttons next to PLAYDECK Play/Pause. See https://playdeck.tv/companion/.
If it stays red
Start order — PLAYDECK listener clip playing first, then iPhone Live Stream.
Guest Wi‑Fi — phones cannot see PCs. Use the production SSID.
Wrong IP — XML URL is the PLAYDECK PC. REST URL is the iPhone.
Firewall — UDP 5000 inbound on the PC. TCP 4444 is outbound from the PC to the phone.
Plus license — SRT input needs Plus. Without it the clip will not connect.
Certificate popup — expected on port 4444. Accept it. The PowerShell script skips the check.
Latency — a few hundred ms on a good 5 GHz AP is normal. Do not expect SDI timing.
Wired studio option: Blackmagic Camera ProDock → HDMI → a capture card as a PLAYDECK Live Input. That is a cable, not this Wi‑Fi path.
PLAYDECK already gives you two comfortable remotes: Bitfocus Companion if you have a Stream Deck or an ATEM, and the built-in Web Remote if you just want a browser on the same Wi‑Fi.
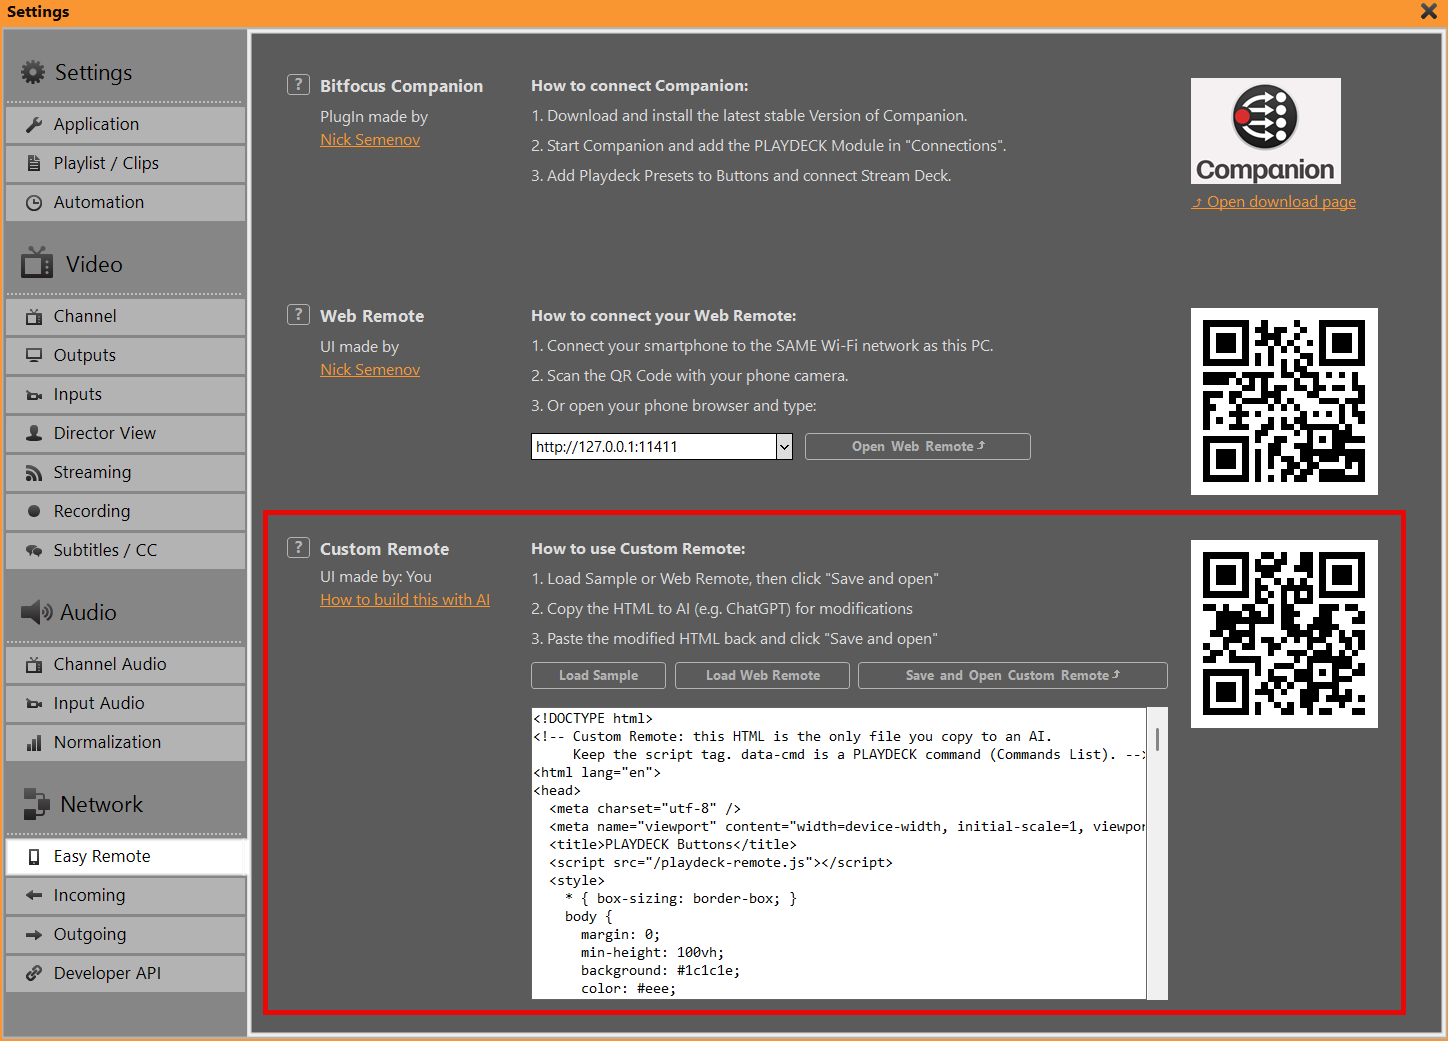
Custom Remote is the third path. You paste one HTML file, PLAYDECK serves it on this PC, and your phone opens it with a QR code. ChatGPT, Gemini or Claude only rewrite that file. PLAYDECK never talks to the AI, and you never install a chatbot inside the playout machine.
This is for the job Web Remote is not shaped for: a floor manager who only needs three huge buttons, a producer who wants remaining time the size of a truck, a show that needs one extra command the stock UI does not show. You describe the job in plain language. The AI returns HTML. You paste it back.
Do not edit files inside the PLAYDECK program folder. Updates overwrite them. Custom Remote is the fork that survives an update.
PLAYDECK stores your HTML and serves it at a stable address:
http://YOUR-PC:11411/custom
The URL does not change when you paste a new layout. The QR next to the box encodes that same address. Phone and PLAYDECK PC must be on the same Wi‑Fi. If the page stays empty, allow TCP port 11411 in the firewall (the same port Companion and Web Remote already use).
There is always only one Custom Remote. One box, one file, one QR. That is on purpose. You are not building a website host. You are building the remote for this show.
The built-in Web Remote stays at / (the root of port 11411). Companion stays Companion. Overlays and Director View stay their own templates. Custom Remote does not replace them.
Use the Sample (start here)
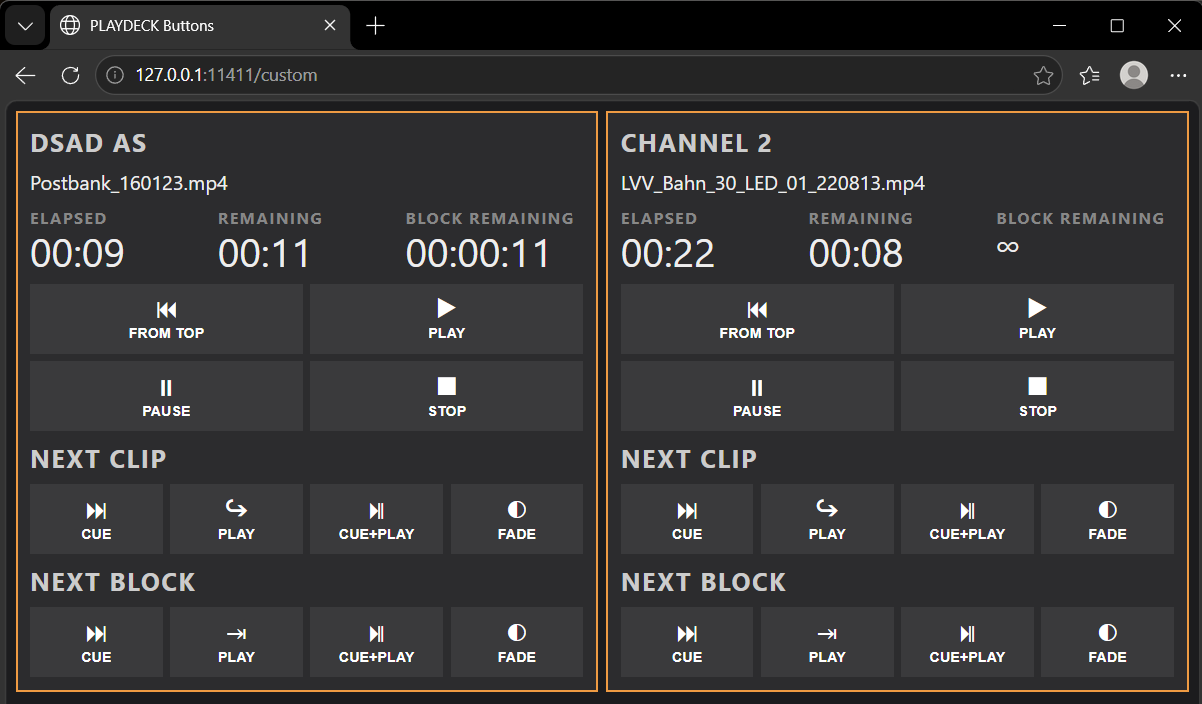
If you have never done this, do not start from an empty page and do not start from Web Remote. Start from the Sample. It is a phone-first button board: two channels, fat transport keys, next clip / next block in the same modes Companion uses (Cue, Play, Cue+Play, Fade). It shows clip name, elapsed, remaining, and block remaining. Infinite clips and blocks show ∞ (sometimes ∞ plus a loop time). That is the same text PLAYDECK shows in the progress bar. We do not invent a fake countdown.
Settings → Remote Control → Custom Remote.
Click Load Sample.
Click Save and Open Custom Remote.
Scan the QR with your phone camera, or open the address in the phone browser.
You should be able to cue, play, pause, stop, jump from the top of the playlist, and walk clip by clip / block by block — without reading a command list first.
That Sample is also the file you hand to the AI. It already contains the only technical contract that matters: one script tag, and PLAYDECK commands written on the buttons.
Let AI change it
Copy everything in the HTML box. Paste it into ChatGPT (or Gemini / Claude). Say what the remote is for, not which JavaScript library to use.
Keep this in every prompt:
Keep the line <script src="/playdeck-remote.js"></script>. Do not open your own WebSocket. Do not rewrite playdeck-remote.js. data-cmd is a PLAYDECK command from the Commands List. data-bind shows live status.
Then add the job, for example:
Floor manager, Channel 1 only
Make this a floor-manager iPad. Channel 1 only. Remaining time huge. Three buttons: PLAY, PAUSE, PLAY NEXT CLIP. Dark background, no gold borders, large tap targets.
Restyle, keep the buttons
Keep all existing buttons and commands. Change only colors, spacing and type so it looks like a broadcast panel. Playing channel should stay obvious.
Add one extra action
Keep the Sample as it is. Add a button under Channel 1 that sends startoverlay|1|1. Label it OVERLAY 1.
Paste the HTML the AI returns back into the box → Save and Open → reload the phone. If the AI dropped the script tag, PLAYDECK puts it back when you save. If the AI invented button names like fromtop or next instead of real commands, those keys will do nothing — put the Commands List command back on data-cmd.
You can paste into the box with Ctrl+V. There is no separate Paste button. Load Sample / Load Web Remote replace the box and save. Typing in the box without Save and Open does not update the phone.
Commands and live status
The helper script /playdeck-remote.js only talks WebSocket. You do not copy that file to the AI. You do not rewrite it. The HTML is the only file in the conversation.
A button is a PLAYDECK command, the same family Companion’s Custom Command uses:
<button data-cmd="play|1">PLAY</button>
<button data-cmd="cueandplay|1|1|1">FROM TOP</button>
<button data-cmd="playnext|1">PLAY NEXT CLIP</button>
<button data-cmd="cuenextblock|1">CUE NEXT BLOCK</button>
Elapsed and remaining are clip time. Block remaining is the block. Infinite shows ∞.
The full command list is in PLAYDECK: Main Menu → Documentation. If you can send it from Companion as a custom command, you can put it on data-cmd.
If a page needs logic the attributes cannot do (a spot counter, a rundown table), that extra JavaScript belongs in the same HTML file. Use PlaydeckRemote.send('play|1') and PlaydeckRemote.onStatus(...). Still one file, still no second WebSocket.
Using Web Remote as a base
The Sample is the path that works well with AI: few buttons, little code.
Sometimes you really want Nick’s Web Remote — the clip list, progress bars, channel tabs — but orange instead of grey, or a bigger clock, or hidden tabs. Then:
Custom Remote → Load Web Remote → Save and Open.
You now have a copy of the built-in Web Remote under /custom. The original Web Remote at / is unchanged.
Copy that HTML to the AI with a strict rule:
This page is PLAYDECK Web Remote. Change CSS and labels only. Do not rewrite the JavaScript that builds the playlist, progress bars, or channel tabs. Keep <script src="/playdeck-remote.js"></script>.
If the AI “simplifies” that JavaScript, the clip list usually dies. Load Web Remote again and retry with a smaller ask (colors only).
Never tell people to edit webremote.html on disk and keep a backup for the next reinstall. That is what Custom Remote is for.
If something does not work
Blank phone page. Same Wi‑Fi as the PLAYDECK PC? TCP 11411 allowed? Try Save and Open on the PC first. The address is http://IP:11411/custom — not https, not another port.
Buttons do nothing. The script tag must stay. data-cmd must be a real command (play|1, not play). Reload after Save and Open.
Times stuck or list stale. Reload the phone. For a Web Remote copy, wait a few seconds — that page refreshes playlist data on a short interval.
∞ instead of a clock. The clip or block has infinite duration (live, loop, clock). PLAYDECK shows the same.
I wanted to change the normal Web Remote. You did: Load Web Remote is that page, served as Custom Remote. Leave / for everyone who still wants the stock UI.
Companion / Stream Deck. Keep using Companion for hardware. Custom Remote is HTML on a phone or tablet, not a replacement for the module.
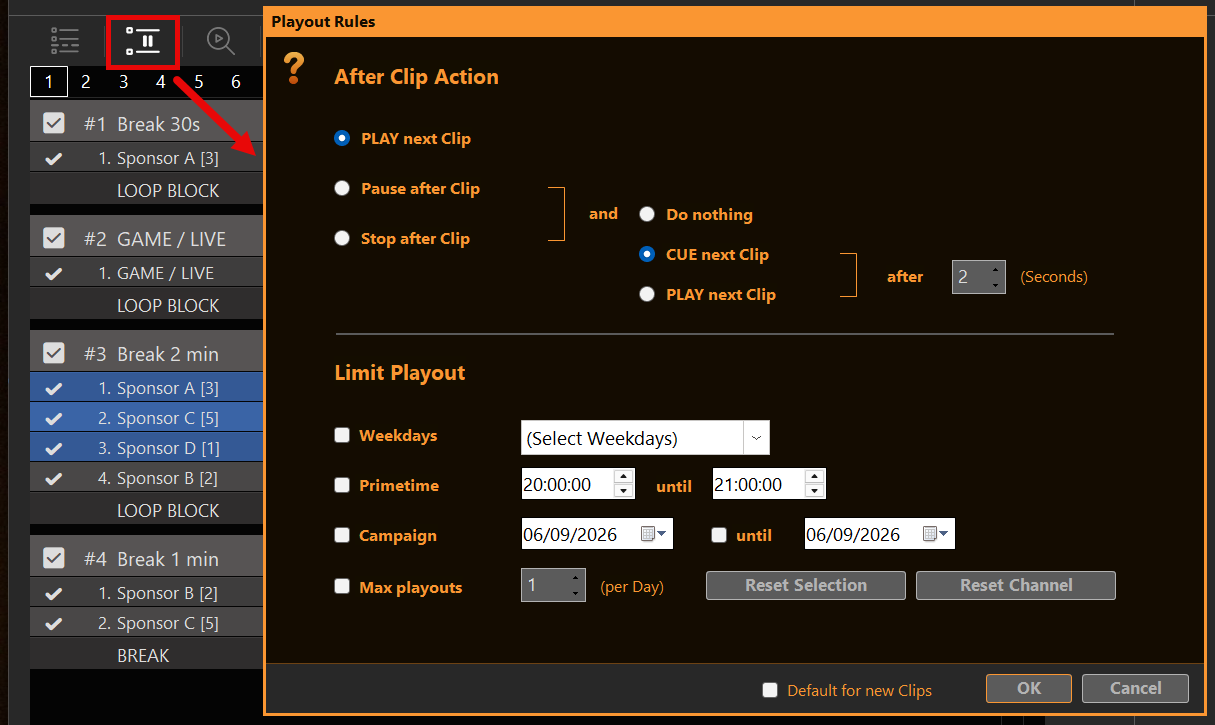
Select one or more clips and click the pause / end icon on the clip (same place as the old Clip Pause). The dialog title is Playout Rules.
The top of the dialog is After Clip Action (pause / stop / continue). Below that is Limit Playout. Default for new Clips in the footer stores both for clips you add later.
After Clip Action
This is the former Clip Pause. It only runs when the clip actually reaches its end.
PLAY next Clip — the playlist continues as usual.
Pause after Clip — hold on the last frame and wait, or continue after a delay.
Stop after Clip — stop playout at the end of this clip.
On the right you choose what follows: PLAY next Clip, CUE next Clip, or Do nothing, optionally after a number of seconds.
Limit Playout
Each checked rule must match now. Unchecked rules are ignored.
Weekdays — only on the selected days.
Primetime — time of day. From is included, until is not (18:00–20:00 means until 19:59:59). If From is later than Until (e.g. 22:00–06:00), the window wraps overnight.
Campaign — calendar dates. Until included. If Until is off, the clip is limited to the From day only.
Max playouts (per Day) — how often this clip may play on the current calendar day. The counter resets at the next check after midnight (no extra timer). A play counts when the clip finished and the playhead left it. Looping the same clip does not add extra counts. A manual start does count if that clip played through.
Several rules together are AND: weekday and primetime and campaign and max playouts, if they are all on.
Reset Selection / Reset Channel in this dialog zero the daily counters. File → Reset Clip Played Status does the same for played marks and counts.
Gray vs Inactive
Two different skips:
First-column checkbox off — the clip is inactive. Automation will not take it, and you cannot start it with CUE / PLAY / Fade.
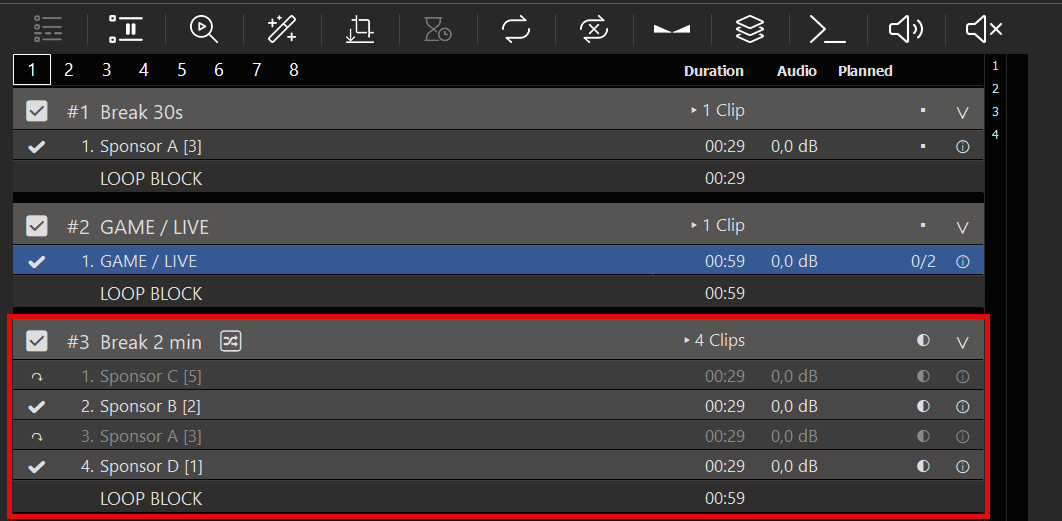
Gray name + ↷ — the clip is out of this take (Limit Playout, or leftover after Shuffle). Automation, Follow, Planned duration and Get Next skip it. You can still start it by hand. That un-greys that clip only; it does not deal a new Shuffle take.
Block headers still show the count of clips that can actually play in this take (▸ 3 Clips), not every file in the block.
Clip Shuffle / Sync
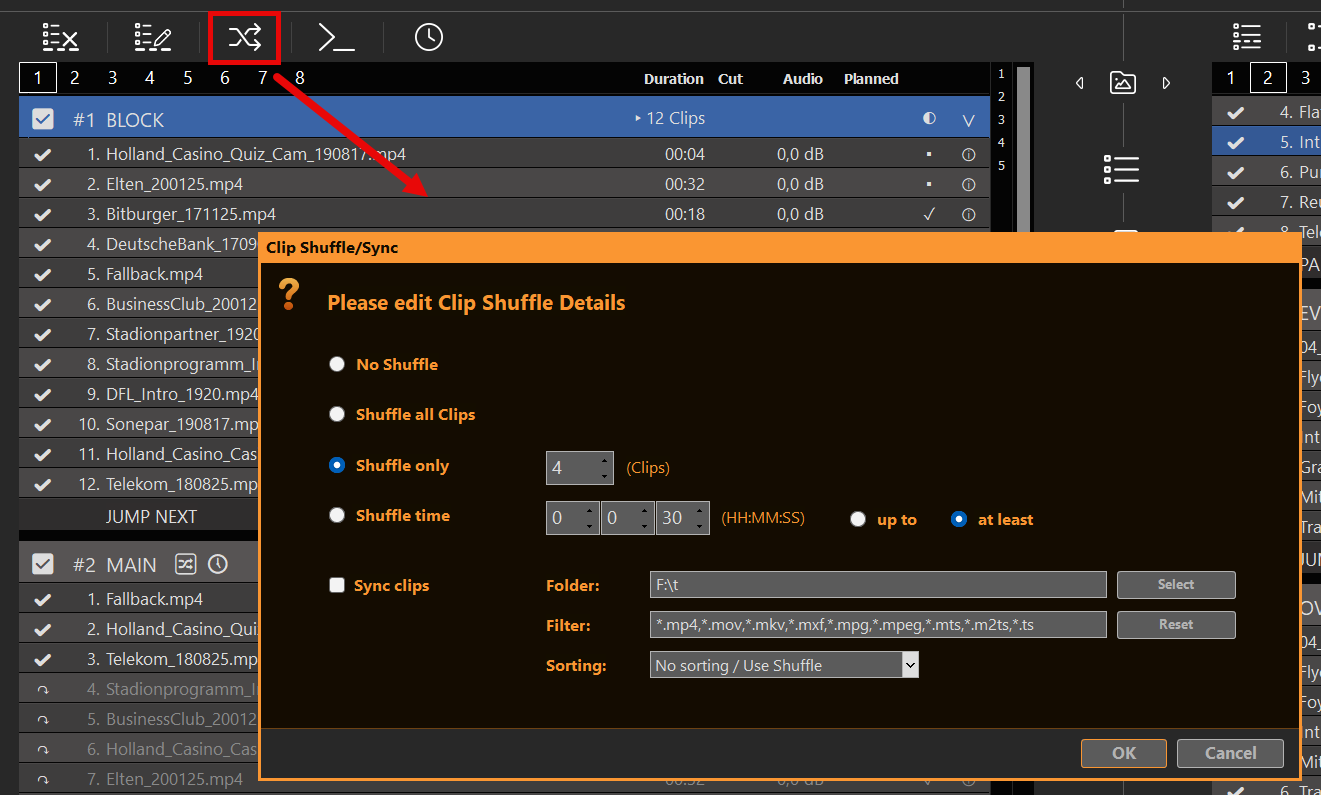
Open Clip Shuffle / Sync from the Block (shuffle icon on the block header). Dialog title: Clip Shuffle/Sync.
Shuffle methods
No Shuffle — normal order. Use this when you want only Folder Sync (and optional Sorting), without any shuffle take.
Shuffle all Clips — random order for the whole block. Every active clip is in the take.
Shuffle only N — pick N clips for this take; the rest go gray (↷). Over many deals, PLAYDECK prefers clips that have waited longest (fair rotation), not “last played”.
Shuffle time — shuffle first, then keep clips until the take reaches your duration:
up to HH:MM:SS — fill as much as possible without going over; clips that do not fit go gray.
at least HH:MM:SS — keep adding until the sum is ≥ the target; then gray the rest.
Sorting and Shuffle are mutually exclusive: a real sort (Name A–Z / Z–A, File date newest / oldest) turns Shuffle off; choosing a Shuffle method sets Sorting to No sorting / Use Shuffle.
When PLAYDECK deals a take
A new take is dealt when you enter the Block from the outside:
CUE / PLAY / Fade on the block header — deals.
CUE / PLAY on a clip inside the Block (including the first clip of the take) — plays that clip as-is. It does not reshuffle. If the clip was gray, it is un-greyed for this start only.
When the Block becomes Next (jump to next Block, jump to Block, stop/pause follow, …) — deals once for that pending entry.
Scheduled Block — when the schedule fires (or the next cache prepares that Block), PLAYDECK deals once, then starts the first take clip. If you are already playing inside that Block, the schedule does not deal again.
Break Block — same when the Break is entered (interrupt or after clip end). Returning from the Break to the previous clip/position does not deal a new take on the return target.
Loop Block — each new loop cycle deals a fresh take when that lap starts (the clip that just became Current stays put; the rest of the block is reshuffled). While the last clip of the old lap is still playing, Next already points at the first clip of the current order — PLAYDECK does not reshuffle under the playhead.
Loop Clips — keeps the same take for the looped clip range.
Leaving the Block (non-loop Block End) clears the take so the next entry can deal fresh.
Clips not in the take go gray (↷). Automation, Follow, Planned duration and Get Next skip them. You can still start a gray clip by hand — that un-greys that clip only; it does not deal a new take.
Blocks with Shuffle and/or Folder Sync show 🔀 on the header.
PLAYDECK deals a take when the Block is played from the beginning: CUE / PLAY / Fade on the block header, on the first take clip, or when the Block becomes next in playout (Block End, command, action, schedule). Clips not in the take go gray (↷).
Looping the Block keeps the same take. It does not shuffle again. To deal a new take, start the Block from the beginning.
CUE / double-click on any other clip in the Block plays that clip (and un-greys it if it was gray). It does not reshuffle the rest.
Folder Sync
You can use Folder Sync alone — leave Shuffle on No Shuffle. Sync still adds/removes/re-scans files; optional Sorting orders them. Shuffle is optional on top. In the same Clip Shuffle / Sync dialog:
Check Sync clips.
Set Folder (browse or path).
Optional Filter — comma-separated patterns. Extensions (*.mp4, mp4, .mov) and filenames: substring without * (e.g. promo matches any name containing “promo”), or wildcards (promo*, *_final.mp4, *spot*). Mix both, e.g. *.mp4,promo*,*_de.mov. Reset restores the default extension list. Empty filter = all playlist file types.
Optional Sorting — order file clips in the block to match the folder (only when Shuffle is off).
What sync does
Adds new files from the folder as clips.
Removes file clips that are no longer in the folder.
Re-scans a clip if the file was replaced (same path, new size/date) — same as Rescan Clip.
Does not touch non-file clips (inputs, notes, …).
When it runs
In the background, while that Block is not Current and not Next (so live playout is not rewritten under you).
Also once when you OK the dialog, if the Block is idle (not Current/Next).
After each sync pass, PLAYDECK waits before the next background sync on that Block: about 10 seconds normally, about 30 seconds if new clips were added. Manual OK in the dialog (while idle) still runs sync immediately.
If background checks feel wrong in a live show: Settings → Disable background file checks (replace, growing files, folder sync). Leave it unchecked for normal use. New clips are still scanned when first added.
Duration, Follow and Schedule
Planned time, block duration, Follow-after-clip, and Get Next only use clips that can play now (active, not gray, Limit allowed).
A scheduled Block with no take clip at fire time is skipped. Limit Playout lives on the clip, not on Schedule Block.
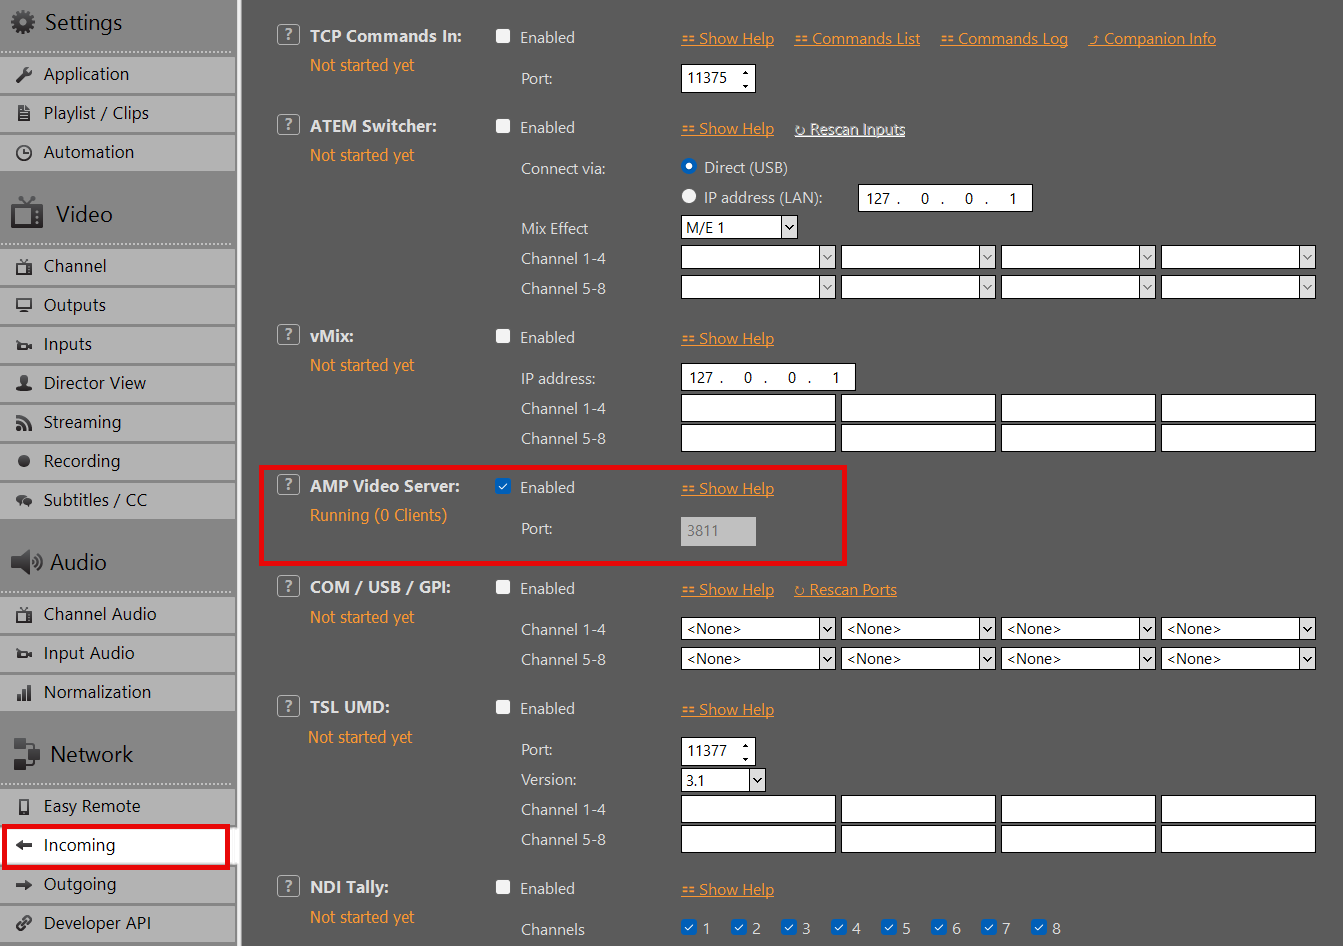
This article shows how to connect a broadcast switcher such as Ross Ultrix Carbonite to PLAYDECK using AMP (Advanced Media Protocol). PLAYDECK acts as a Generic DDR. The switcher lists clips and sends cue, play, stop, eject, jog, loop and record.
AMP is control only — it does not carry video. Route PLAYDECK program out to the switcher separately via SDI, NDI or HDMI.
Assign that source to the switcher input you use for the AMP device (e.g. BNC or NDI source from the PLAYDECK PC).
Configure the switcher (Carbonite)
On the Ross switcher (Ultrix Carbonite or compatible panel):
Device Config → Add Server → AMP
IP = PLAYDECK PC on the LAN
Port = as set in PLAYDECK (default 3811)
Protocol / server type: Generic DDR
Enable Allow playlist control on the server side if the switcher asks for it
Ross Tria/Mira AMP documentation applies (driver AMP_0.2, Protocol ID Generic DDR).
Pick a VTR on the panel (e.g. Vtr1). Each AMP connection uses one VTR channel on the switcher.
Channel mapping
Switcher
PLAYDECK
Vtr1 … Vtr8
Channel 1 … 8
PGM1 … PGM8
Channel 1 … 8 (accepted too)
One Carbonite AMP connection = one VTR. For multiple channels, add multiple AMP servers or VTR assignments as your switcher allows.
Panel commands
Switcher
PLAYDECK
Play
Play
Stop
Pause (still). Play continues.
Eject
Stop the channel (background)
Cue
Cue that clip at Cut In
Jog / shuttle
Field/frame scrub (speed = how fast the panel sends steps; a firm twist is often only about play speed). Shuttle rate commands (if the panel sends them) = slow-mo to fast fwd/rev. Release = still. Play = 1×. Scrub feels smoother with more keyframes; reverse is heavier.
Loop on / off
Infinite loop / no loop on the current clip
Record
Start/stop the PLAYDECK recording whose source is this channel (not Always-on). Map that recording slot to the same playlist channel as the VTR.
Status and logging
Status on the switcher follows PLAYDECK: Play, Pause, Cue.
This article shows how to run PLAYDECK without an operator: daily project files from a traffic or scheduling system, reload when a file is overwritten, and a scheduled application restart.
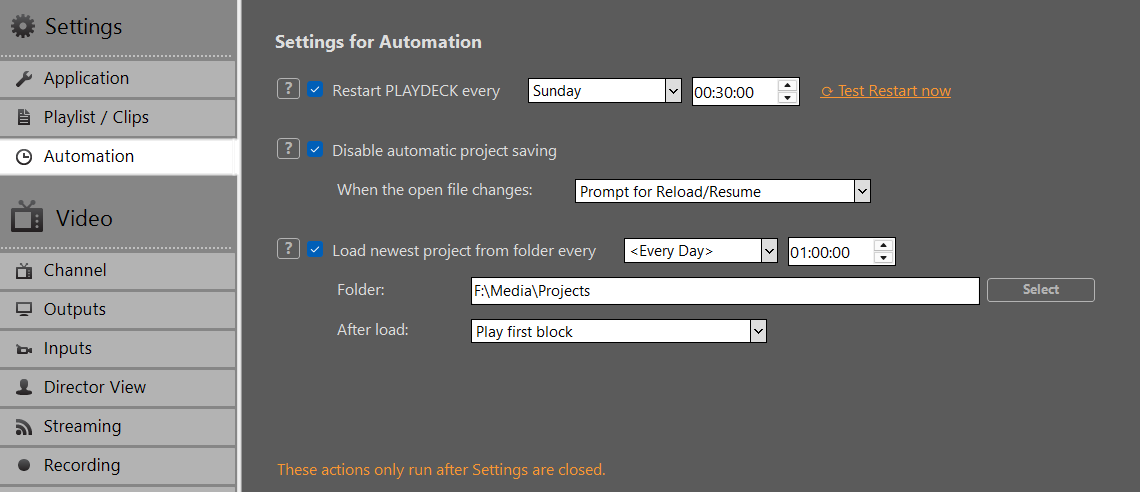
Settings → Automation is easy to miss. A checkbox named “Disable automatic project saving” does not sound like 24/7 playout — but together with “Load newest project from folder” it is the typical unattended workflow.
Open Settings → Automation (last item in the Settings group).
Three independent functions live on this page:
Restart PLAYDECK every — daily or weekly clean start
Disable automatic project saving — PLAYDECK does not write the open project in the background; optional reload when that file changes
Load newest project from folder — at a clock time, load the newest .xml in a folder (once per day)
Note: Scheduled Restart, Load newest, and reload-on-file-change do not run while Settings are open. Configure the time, folder and options, then close Settings. Otherwise the scheduled time can pass with nothing happening. Test Restart now still runs immediately from Settings — that is the only exception.
Typical use cases
These are the situations where Automation matters — they are not obvious from the labels alone.
Traffic / scheduling system writes a new XML every day A planner drops files such as 13-08-26_Playdeck.xml, 14-08-26_Playdeck.xml into a shared folder. At midnight PLAYDECK should pick the newest file and continue unattended. That is Load newest, usually together with Disable automatic project saving.
The same project file is overwritten during the day An editor or a 3rd-party app overwrites the file that is currently open. PLAYDECK should detect that and reload. That is Disable Saving + When the open file changes → Reload/Resume. Details: Prepare/Import Playlists externally.
Both on the same machine New dated file at 00:00, then the same day’s file overwritten again at 14:00. Enable Load newestand reload-on-change. They are not either/or.
Overnight clean start 24/7 boxes that should restart PLAYDECK once a day, even during playout. That is Restart PLAYDECK every.
Disable Saving and Load newest
Disable automatic project saving If enabled, PLAYDECK will not save the project file in the background (the usual auto-save, and also the silent save on quit). File → Save / Save As still works.
Use this when an external system owns the XML. Otherwise PLAYDECK writes its in-memory playlist back to disk and overwrites the scheduler’s file.
When the open file changes:
Do nothing — ignore external overwrites
Reload/Resume immediately — reload and try to resume the same clip (by Unique ID)
Prompt for Reload/Resume — ask first
Note: Resume only works if the currently playing clip still exists in the reloaded project. If not, that channel stops. This reload is for the same file that is already open. It is not a substitute for Load newest.
Load newest project from folder If enabled, PLAYDECK looks in the selected folder after the selected weekday and time and loads the newest .xmlonce per day.
Newest means file date (last write time), not the file name. 13-08-26 vs 01-09-26 in the name does not matter.
Only valid PLAYDECK project files (other XML, e.g. XMLTV exports, are skipped).
Files that are still being written (in use) are skipped.
The currently open file is ignored. PLAYDECK will not load the same playlist again. You do not need Disable Saving just to make Load newest work.
After a successful load, the same day will not load again.
Why combine them anyway Load newest does not require Disable Saving — the open file is already excluded from the “newest” pick. For a traffic system you usually want both: without Disable Saving, PLAYDECK auto-saves the open project, that file’s date keeps moving, and tomorrow’s drop may look “older” than PLAYDECK’s own save. If the scheduler overwrites today’s file while it is open, PLAYDECK can also save on top of that overwrite.
Recommended 24/7 setup
Enable Disable automatic project saving.
When the open file changes: Reload/Resume immediately — if the same day’s file can be overwritten later; otherwise Do nothing.
Enable Load newest project from folder every<Every Day> at e.g. 00:00:00.
Folder = the drop folder of the scheduler. Keep only PLAYDECK project XML in that folder.
After load:
Play first block — start playout (typical unattended switch)
Cue first block — load the first block, wait for a later Play
Follow block schedules — do not auto-play; blocks fire by their own clock times (Program Flow). If you test with this option and nothing starts, that is expected.
Close Settings.
The project switch is seamless. Output stays up; only a few frames drop during the load. Set the channel background to black — if a few frames of the previous picture would flash, black is the least visible fill. This is a hard cut to the new project, not a mix. Time the file drop and the Load time (often midnight) so the cut sits in a safe gap, or use Follow block schedules in the new file.
Restart PLAYDECK
If enabled, PLAYDECK closes and starts again at the selected weekday and time, even during playout. Use this for a daily clean start on unattended machines.
Test Restart now runs the same restart immediately. The scheduled restart only runs after Settings are closed.
Same base name and folder as the video. On playback, PLAYDECK can use embedded CC and/or these sidecars (see also Closed Captions & Subtitles).
Verify playback
Closed Captions
Add the recorded file to a playlist.
Select the CC track if offered.
Confirm CC in the channel preview (pass-through or burn-in as configured).
For TS, MediaInfo often lists Text tracks (EIA-608 / EIA-708) muxed into the video.
SCTE-35 (TS only)
During record, send SCTE-35 from an Action (or clip command).
Open the .ts in DVB Inspector (or TSDuck) and confirm splice/SCTE-35 cues.
Play the same .ts in PLAYDECK → SCTE Event Log should show <<SCTE-35.
Note: Playing an MKV recording will not show SCTE-35 in the log — the container does not carry it. MediaInfo also often omits SCTE-35 even when DVB Inspector shows cues; prefer DVB Inspector / PLAYDECK << for SCTE checks.
PLAYDECK does not convert SCTE-104 ↔ SCTE-35 automatically. If you go SDI → IP stream, SCTE-104 will not appear as SCTE-35 on the stream. Fire SCTE-35 on the channel that owns the stream output (see overview and SCTE-35).
Enable SCTE-104 on SDI
Input
On the SDI input, enable VANC Data → Enable Closed Captions and SCTE-104 Triggers.
Same checkbox as Closed Captions capture. It is opt-in because VANC capture adds processing load.
Output
With a license that includes SCTE / CC, SDI output can carry VANC including SCTE-104 when markers are present on the channel.
Send SCTE-104
Attach SCTE commands to clips, blocks, overlays, or Action buttons. Set the command type to SCTE-104 and paste XML your SDI gear expects.
PLAYDECK does not convert SCTE-104 ↔ SCTE-35. If the same break must hit SDI and an IP stream, fire two commands (104 on SDI, 35 on the stream channel).
The Commands dialog has SCTE-104 Out / In samples. One break = one ID: Out uses {eventidhex}, In uses {eventlastidhex}. Duration in 104 is tenths of a second as 4-digit hex ({blockduration10hex}), not the 90 kHz number from SCTE-35.
<SCTE35_protocol_version>0</SCTE35_protocol_version> is a normal field in a 104 multiple_operation_message (the splice op is SCTE-35 protocol version 0). It does not mean PLAYDECK is sending SCTE-35 on SDI. <protocol_version>1</protocol_version> is the 104 message version.
SCTE-104 Out (splice request, opID 257)
Typical on block start. time_type 0 = immediate (no pre-roll clock).
Adjust line=, AS_index, DPI_PID_index and the <data> layout to whatever your inserter documents. Placeholders are listed on Sending SCTE-35 to Streams & Servers.
Detect and log
Open the SCTE Event Log (Logs → SCTE).
>> = marker sent on that channel
<< = marker detected on a receiving playlist (e.g. SDI input playing in another channel)
Logging both directions is the fastest way to verify a loop without external analyzers.
Incoming SCTE-104 is not only for logging and forwarding. You can match markers on a Break Block (Edit SCTE Trigger) so PLAYDECK jumps into ads when the OUT cue arrives, then returns on IN, after a fixed time, or at Block end. See Start Ad Breaks from Incoming SCTE.
SDI loop test
Channel 1: SDI output active.
Physical loop (or second port) into an SDI input; enable VANC Data on that input.
Channel 2: play that input in the playlist.
Channel 1: Action button with SCTE-104 sample; both channels playing.
Event Log: >> on Ch1 and << SCTE-104 on Ch2.
You can add a second SDI hop (Ch2 → Ch3) to confirm forwarding on SDI.
Forwarding
PLAYDECK can forward incoming SCTE-104 from an SDI input to an SDI output when that input is played through a channel that drives SDI out.
Forwarding SDI (104) → UDP/SRT (35) does not happen automatically. Use SCTE-35 on the streaming channel instead.
Important limit (CC / ASS track)
If Channel 1 is playing a clip with an active Closed Caption or ASS text track, SCTE-104 on SDI may only be received intermittently (>> still looks fine; << on the loop is unreliable).
Workaround: turn the text track off when SCTE-104 on SDI must be reliable.
This conflict was not observed for SCTE-35 on MPEG-TS streams in the same way.
Subtitles can only come from video files and are always burned onto the frames.
Add the clip to a playlist.
Right-click the clip and select the subtitle track (disabled by default).
Embedded: shown as ASS Embedded. External SRT: same base filename as the video (.srt), in the same folder or in a Subs / Subtitles subfolder.
Wherever you send the channel (SDI, NDI, stream, desktop), the subtitle text is already in the image. Adjust font and related options in settings.
PLAYDECK does not include an editor to type new subtitle/CC text into files. Use an external tool if you need to author captions.
Closed Captions sources
From files
Right-click the clip → select the CC track (e.g. CC Embedded).
Also supported as sidecars (same base name, same folder): SCC, MCC, ANC.
When recording with scc_capture / anc_capture, PLAYDECK can write .scc / .anc next to the media file; playback can pick them up again. See the overview recording notes.
From live inputs / streams
PLAYDECK can read, preview, and forward CC with:
SDI (if the device supports VANC; enable VANC Data on the input)
Streams with MPEG-2 or H.264 (also MPEG-4 Part 2 in our tests) — UDP, SRT, DVB-compatible, etc., with embed_cc='true' on the sender
NDI in a PLAYDECK ↔ PLAYDECK loop (many third-party NDI tools do not show CC)
RTMP to YouTube with embed_cc='true' (YouTube can display CC)
Not for CC pass-through: HEVC with embed_cc (no usable pass-through in our tests).
Burn-in vs Pass-Through
In settings (Closed Captions):
Burn-in (default): CC text is rendered onto the channel output frames. Every destination sees the text in the picture (including Desktop Output).
Pass-Through (always active): CC is not burned into the output picture. PLAYDECK still shows CC in the channel preview. Downstream players/decoders (YouTube, another PLAYDECK, etc.) are responsible for displaying the captions.
Use Desktop Output (window mode) to check whether text is in the picture or only in the preview.
Tip: If you loop a burn-in channel into a second channel that also pass-through-previews CC, you can see double text (pixels + overlay). Switch the first channel to Pass-Through to avoid that.
CC data often includes fixed position and mode (e.g. roll-up / pop-on). PLAYDECK does not restyle that for preview/burn-in beyond its CC display settings.
Enable VANC Data → Enable Closed Captions and SCTE-104 Triggers. Required to capture CC (and SCTE-104) from SDI. Opt-in because VANC capture adds processing.
SDI / NDI output
With a Closed Captions license, SDI/NDI output is prepared to carry CC when present in the channel pipeline.
Streams + Recordings
In Parameter, add:
embed_cc='true'
Without this, pass-through CC will not be embedded in the outgoing elementary stream (burn-in still works if enabled).
UDP target: use your LAN IP, not 127.0.0.1.
Quick test
Load a sample clip with embedded CC; select the CC track; loop the block. Confirm CC in the channel preview.
Enable SDI and/or NDI output; optionally loop SDI/NDI back into an input (VANC on for SDI).
Add a UDP (or SRT) stream with H.264 and embed_cc='true'; play that URL on another channel.