
ASIO / Dante Virtual Soundcard

This article explains how to setup ASIO audio interface and devices with PLAYDECK.

In this article:
Setup ASIO
Dante Virtual Soundcard (DVS)
Troubleshooting


Setup ASIO

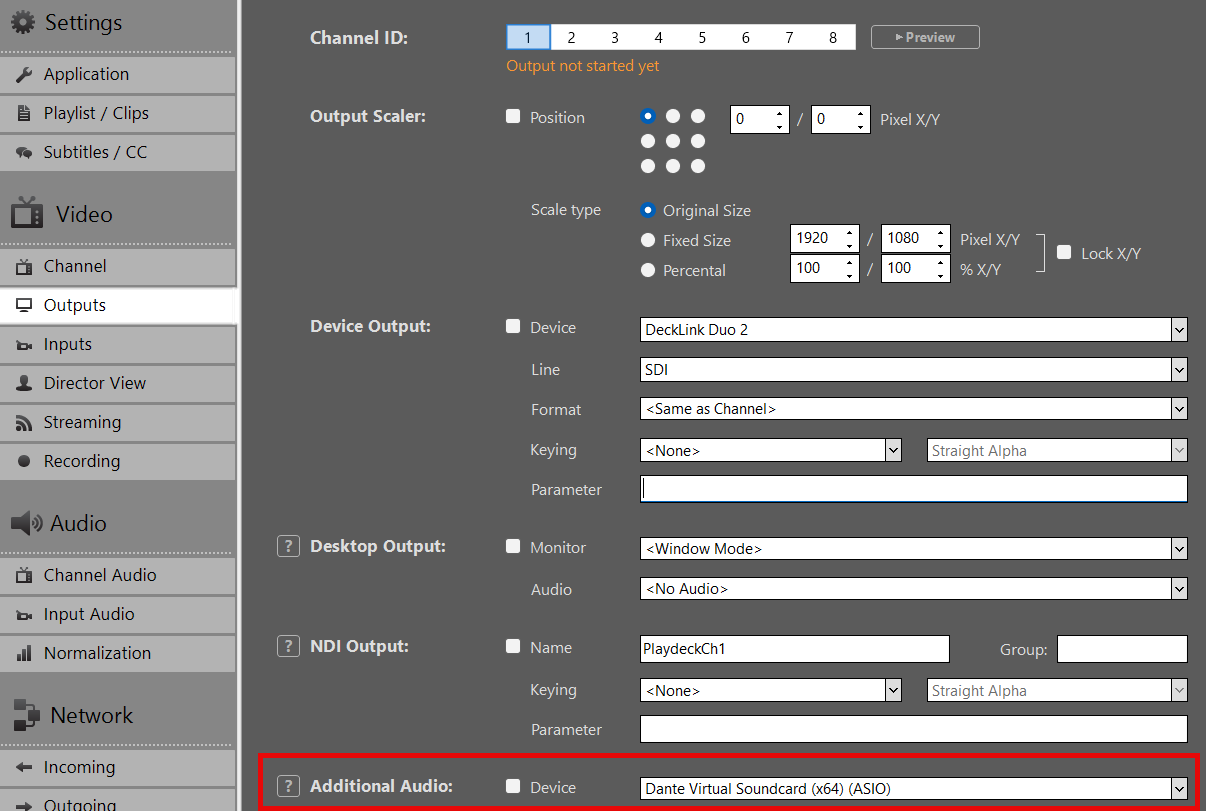
Enable the “Additional Audio Output” setting to output audio via ASIO.

Important: As a real-time playout solution, PLAYDECK requires a stable synchronization clock from the ASIO device. Without this clock signal, frames cannot be processed correctly, resulting in severe stuttering.


Dante Virtual Soundcard (DVS)

Dante Virtual Soundcard (DVS) is a software solution that turns your computer into a Dante-enabled workstation, allowing you to transmit and receive high-quality audio over a standard Ethernet (LAN) network.
https://www.getdante.com/products/software-essentials/dante-virtual-soundcard/

You can interface DVS with PLAYDECK using either ASIO or WDM mode:

  • ASIO (Recommended): Transmit up to 64 audio channels across all PLAYDECK outputs. This provides the lowest latency and highest channel count for professional workflows.
  • WDM: Limited to 16 audio channels, restricted to one stereo pair per PLAYDECK output channel.


Configuration Steps

1. Start the DVS Engine:
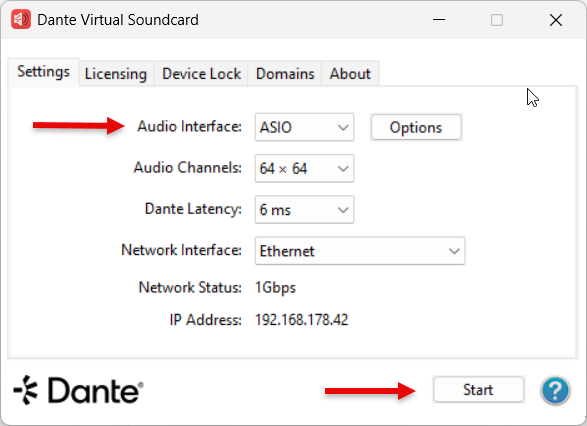
Open the Dante Virtual Soundcard control panel, set the interface to ASIO, and click Start.


2. Select the Device in PLAYDECK:
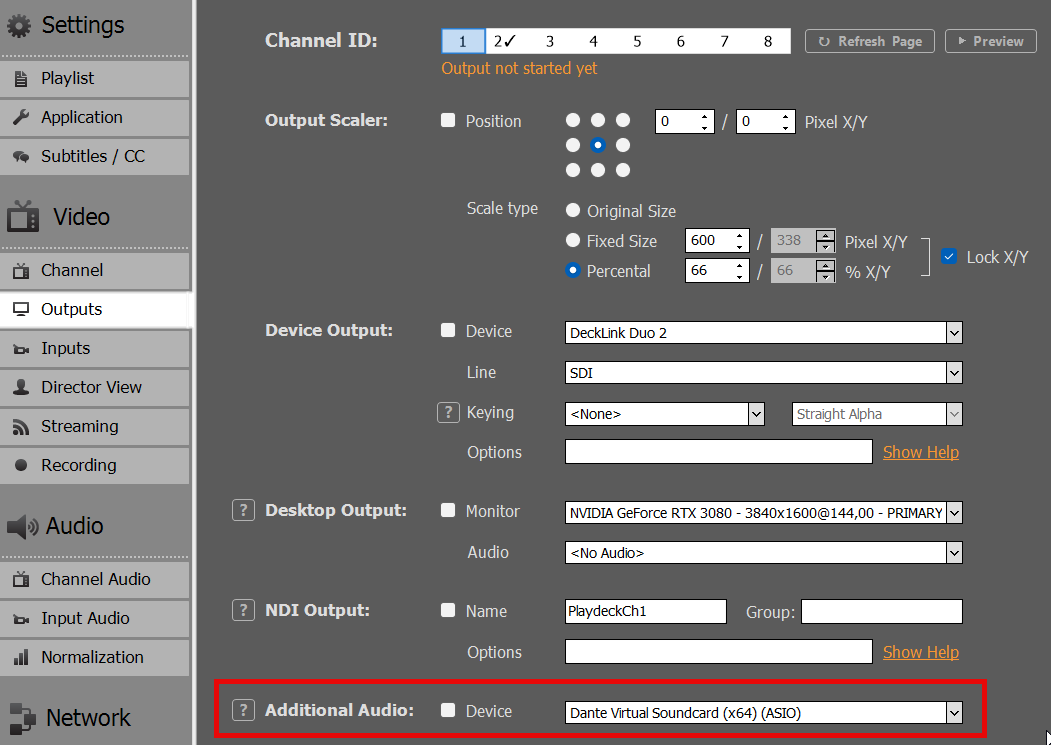
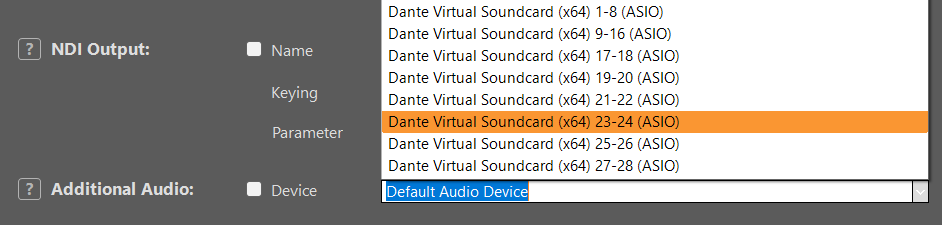
You can now select “Dante Virtual Soundcard” as your ASIO device within the PLAYDECK settings.


3. Channel Mapping:
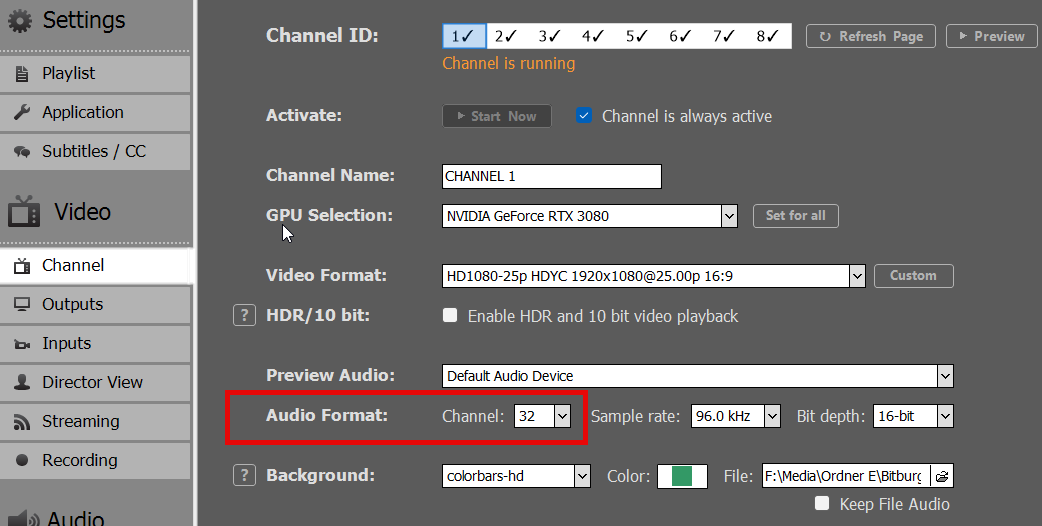
PLAYDECK will automatically begin routing the audio channels assigned to that specific output. A single output can support up to 32 audio channels.


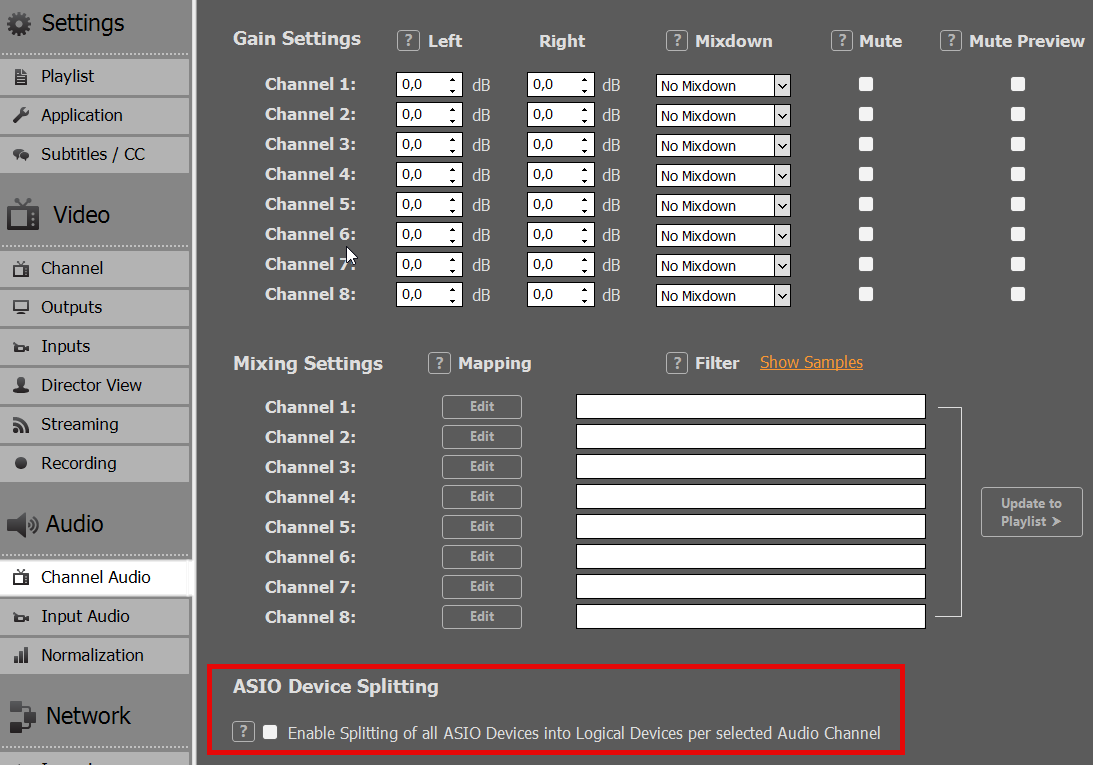
4. ASIO Device Splitting:
To use the ASIO driver across multiple PLAYDECK output channels simultaneously, enable ASIO Device Splitting.


5. Assigning Multiple Outputs:
Once splitting is active, DVS will appear as multiple sub-devices. This allows you to assign a dedicated ASIO device to each individual PLAYDECK output channel.
Note on Splitting Logic: The channel allocation is determined by the “Audio Channels” setting for each output. For example, if Output 1 and 2 are set to 8 channels each, and others are set to 2 channels, the ASIO driver will split the stream accordingly to accommodate those specific requirements.

Troubleshooting

Slow Playback (Frame by Frame)

This occurs if PLAYDECK cannot synchronize with the clock signal from the ASIO device. Because PLAYDECK is a real-time playout engine, it requires a stable clock to process frames.
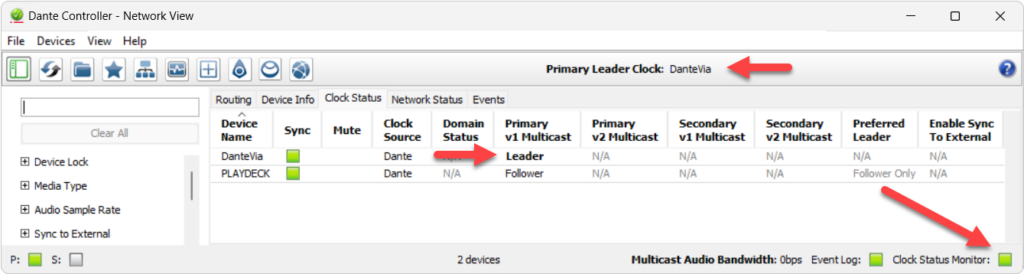
Solution: Ensure a Clock Leader (formerly Master Clock) is active on your network. This can be provided by hardware (e.g., a Dante-enabled mixer), a software driver, or a dedicated clock generator.

If you are using Dante, you may need additional tools to verify your workflow. Follow these steps to set up a local test environment:

  1. PC 1: Install PLAYDECK and Dante Virtual Soundcard (DVS). Start DVS in ASIO mode and select it within PLAYDECK.
  2. PC 2: Install Dante Via and Dante Controller.
  3. In both Dante Via and Controller, ensure the correct Ethernet Interface is selected.
  4. In Dante Via, enable at least one output device.


Once configured, open Dante Controller. You should see “Dante Via” acting as the Clock Leader with your PLAYDECK system successfully connected.

View this screen capture of the test setup:
https://downloads.playdeck.tv/assets/DanteClockTest.mkv

Note: In some cases, installing ASIO4ALL can help stabilize the “handshake” between PLAYDECK and specific audio interfaces. (https://asio4all.org/)


Poor Audio Quality

Distorted or “glitchy” audio is usually caused by a sample rate mismatch. Ensure the Sample Rate (e.g., 48 kHz) is identical across all of the following:

  • Windows Sound Settings (Advanced properties)
  • PLAYDECK settings
  • ASIO Device / DVS control panel


Audio Channel Mixing and Routing

When working with multichannel audio, you may need to downmix your channels for specific outputs. Please refer to this article for detailed instructions on managing multichannel routing.

Internal and External Keying

PLAYDECK supports both Internal (Superimposed Graphics over Incoming Signal) and External (Generating Video Fill and Key Signal) Keying, given that the Output card supports it too. You can also output the key or fill signal separately.

You can also use NDI to send your Key or Fill Signal with Alpha Channel Support.


Internal Keying

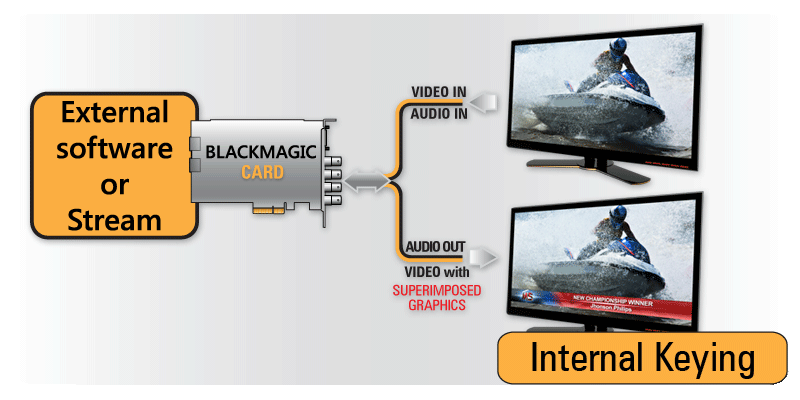
In Internal Keying mode, PLAYDECK will superimpose the video over an incoming signal on the same card:

Lets take the Decklink Duo 2 for example: It has 4 SDI Ports. We need to tell the Card, which 2 Ports will be used for Internal Keying with the help of Desktop Video Setup (Blackmagic’s own Setup-App):

The Decklink will now operate like this:

If we start PLAYDECK now, the INTERNAL Option becomes selectable as Device Output:

Once you activate the Device for Keying, PLAYDECK will automatically change your Background to TRANSPARENT and your Color Space to ARGB32 (to support Alpha Channel):

The Image shows PLAYDECK Overlays Sample: Create Overlay > HTML > Screen-Title.html.


External Keying

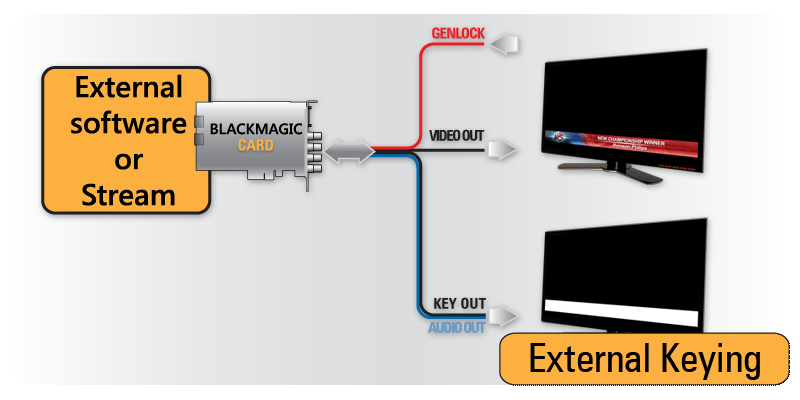
In External Keying mode, PLAYDECK generates both Fill and Key signals and the keying is made by an external keyer:

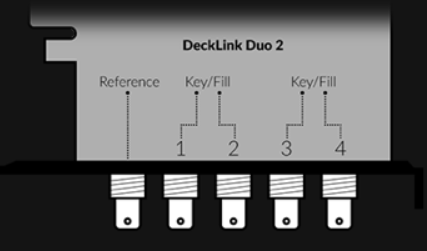
Lets take the Decklink Duo 2 for example: It has 4 SDI Ports. We need to tell the Card, which 2 Ports will be used for External Keying with the help of Desktop Video Setup (Blackmagic’s own Setup-App):

The Decklink will now operate like this:

If we start PLAYDECK now, the EXTERNAL Option becomes selectable as Device Output:

Once you activate the Device for Keying, PLAYDECK will automatically change your Background to TRANSPARENT and your Color Space to ARGB32 (to support Alpha Channel):

The Image shows PLAYDECK Overlays Sample: Create Overlay > HTML > Screen-Title.html.

Supported Input/Output Devices


We basically support all cards of the following manufacturers, since we always include the latest drivers. But because of the vast amount of cards out there, we only tested the most common ones.


Blackmagic Design

Important: Needs Version 14.5+ of Blackmagic Desktop Video Setup.

  • DeckLink 4K Extreme 12G
  • DeckLink 8K Pro
  • DeckLink Duo 2
  • Intensity Pro 4K
  • DeckLink Mini Monitor / Mini Recorder
  • DeckLink Quad 1 / 2 / HDMI Recorder
  • DeckLink SDI 4K
  • DeckLink Studio 2 / 4K
  • Ultra Studio HD Mini / 4K Mini / 4K Extreme 3 / Monitor 3G
  • DeckLink IP/SDI HD

AJA

  • Corvid 24 R1
  • Corvid 44
  • Corvid 88
  • KONA LHi
  • KONA IP

Deltacast

  • DELTA-3G-e 22
  • DELTA-3G-elp-d 8c
  • DELTA-3G-elp-key 11
  • DELTA-ip-ST2110

Bluefish444

  • Epoch 4K Neutron
  • Epoch 4K Supernova S+
  • Epoch Neutron
  • Epoch Supernova CG
  • KRONOS K8

DekTec

  • DTA-2144B

Magewell

  • Pro Capture Quad HDMI
  • Pro Capture Quad SDI

Osprey

  • Osprey 915
  • Osprey 925
  • Osprey 927
  • Osprey 935
  • Osprey 945
  • Osprey 914
  • Osprey 924
  • Osprey 944
  • Osprey 1214
  • Osprey 1215
  • Osprey 1225
  • Osprey 1227
  • Osprey 1245
  • Osprey 1285
  • Osprey M15
  • Osprey M14
  • Osprey M24
  • Osprey M25

Stream Labs

  • Alpha HD
  • MH4LM
  • MS4
  • MSP2

Yuan

  • SC550N1

Setup RustDesk unattended Access for Remote Support


RustDesk is a free Remote Destop Software, which we use to login to remote systems. The main advantage of RustDesk over other Remote Desktop Connections is, that is does interfere with installed GPUs (eg. installing a Virtual GPU), therefore not interfering with PLAYDECK during Remote Access.


1. To get started, download our customized RustDesk from our website. This version will use our private RustDesk server (and not the public server) to protect your data and improve the connection speed.
https://get.remote-joy-event-media.de/rustdesk.exe

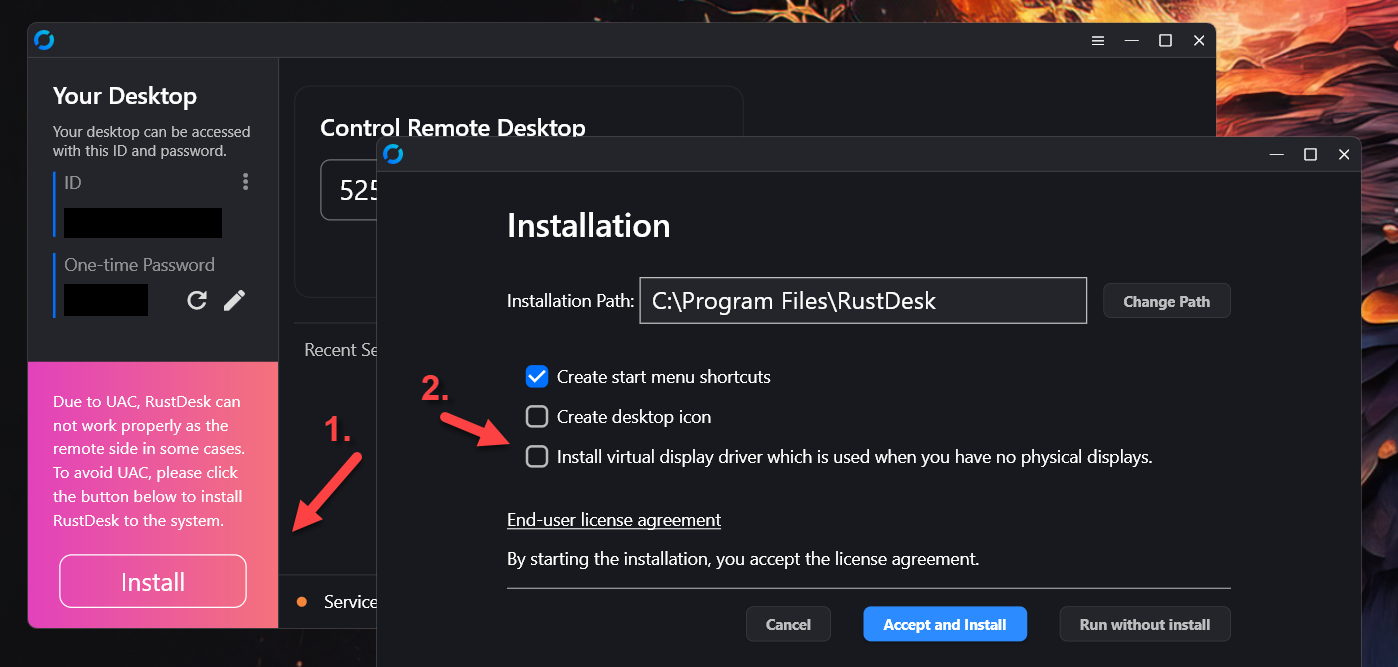
2. Once you start RustDesk for the first time, you will need to install it. Please deactivate “Install virtual display driver”, which might interfere with PLAYDECK.


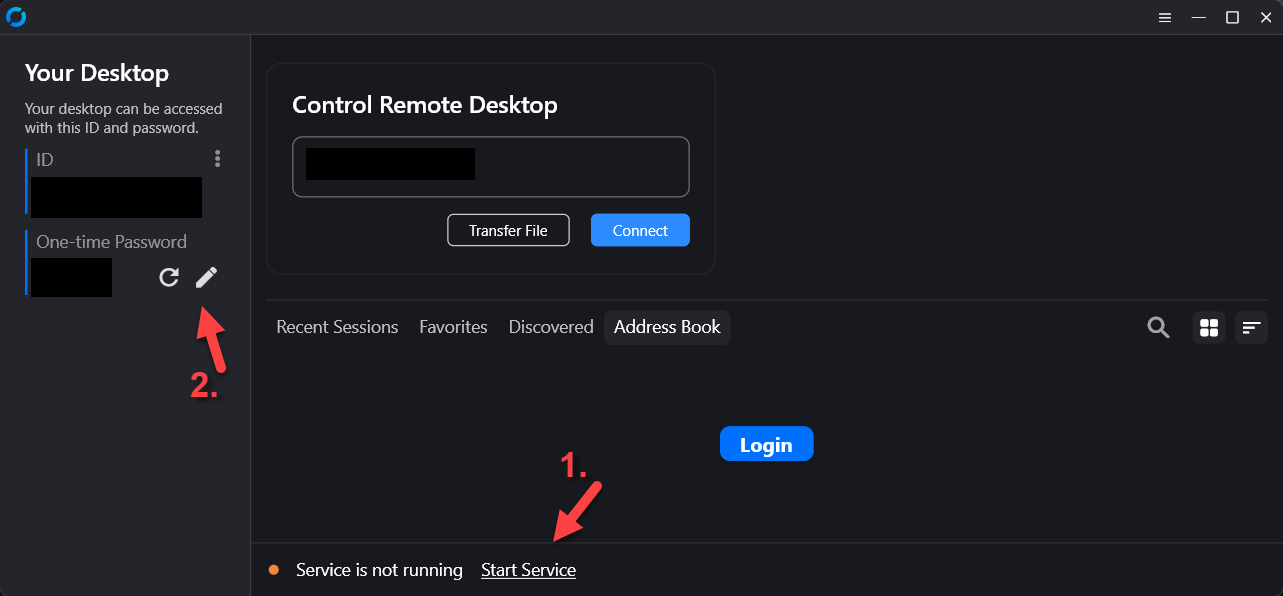
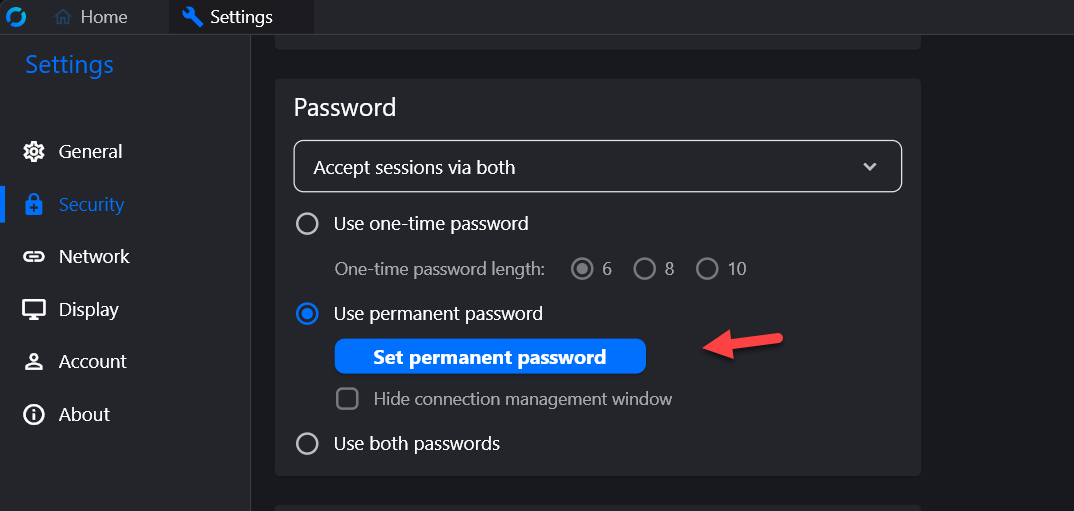
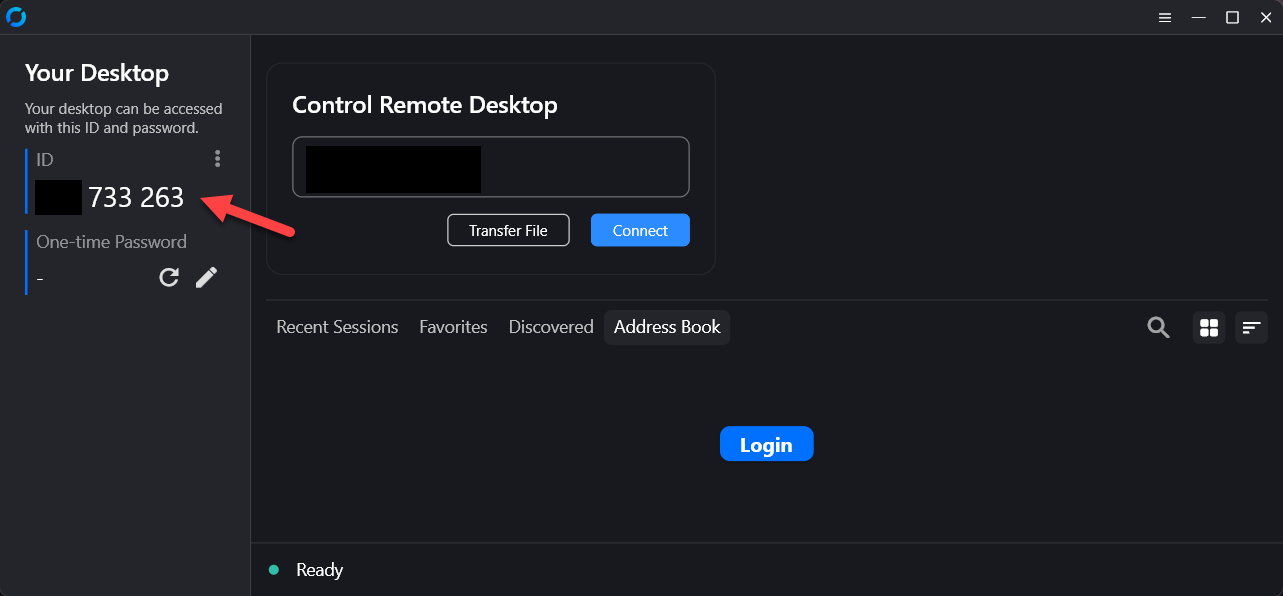
3. After re-starting RustDesk, you will not need to activate “Start Service”. This is important to elevate priviliges to e.g. open the device manager. After that you need to setup a permanent password: Click on the Edit Icon next to “One-time Password”.


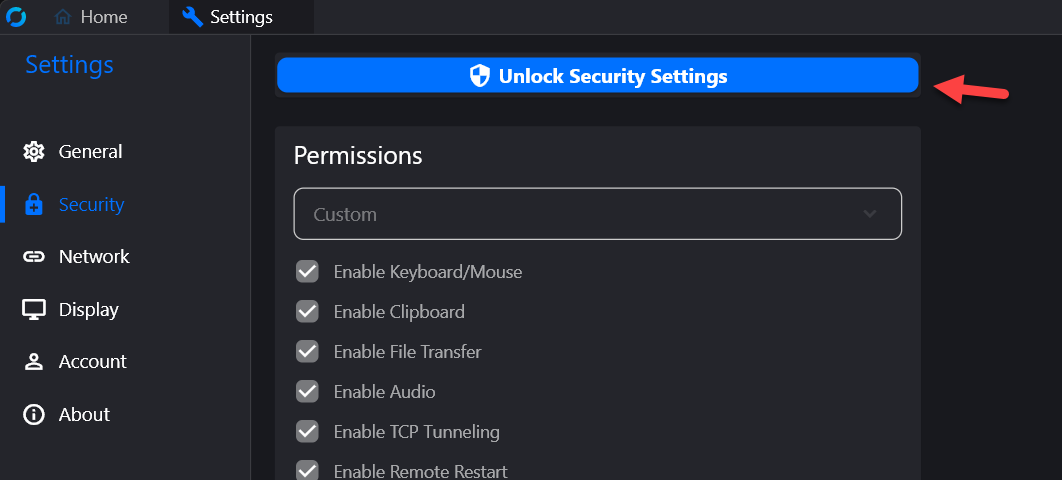
4. Then click on “Unlock Security Settings” and scroll down.


5. Please send us your ID together with your permanent password to [email protected]


6. (Optional) If possible, please start RustDesk on a secondary PC (No need to install) and test the connection to the System you have setup for remote support. Now thru this remote connection, on the secondary system, please try to:

– Open Device Manager
– Open Task Manager
– Open NVidia Panel
– Copy any File to this Folder: c:\Program Files(x86)\JoyEventMedia\Playdeck\

These tests make sure, that all needed support actions can be done remotely. If is likely, that any Anti-Malware or other Protection software breaks the connection. In that case please de-activate those Tools temporarily for the remote support session.

Multichannel Audio and Mixing

PLAYDECK support 32 Audio Channel per Output Channel. You can pass-thru Audio Channel (via SDI, NDI, Streams, ASIO), Mix-down to Stereo/Mono or Mix-up to Multichannel. Please note, that we have a sperate Post for Dante Virtual Soundcard.


Pass-thru

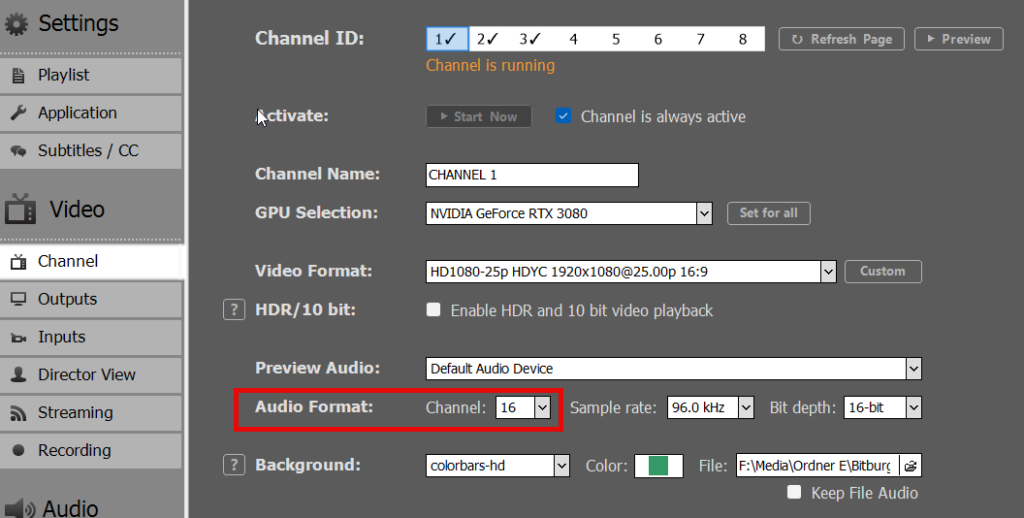
Enable Multichannel Audio by simply setting more than 2 Audio Channel in your Output Channel Settings. In this example we set 16 Audio Channel, as this is the native number of Audio Channel for SDI Output Cards:

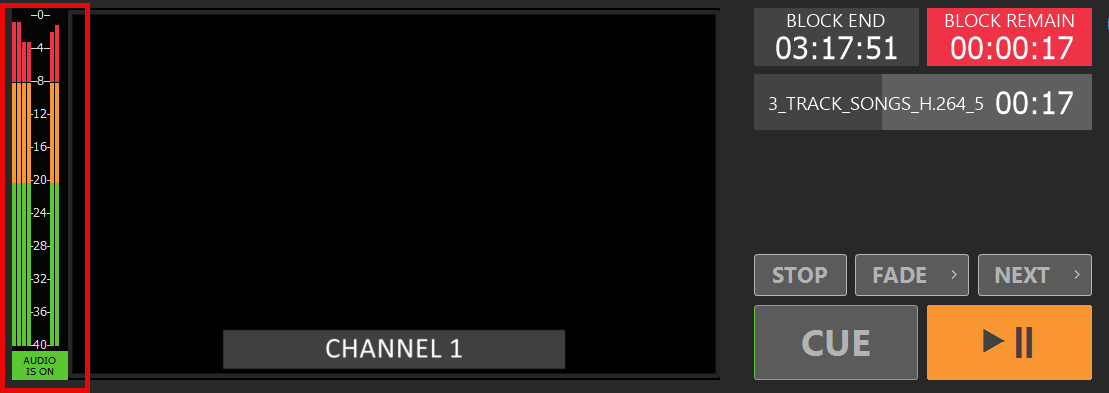
Now you are good to go already. Your VU Meter will switch automatically to 16 Audio Channel:

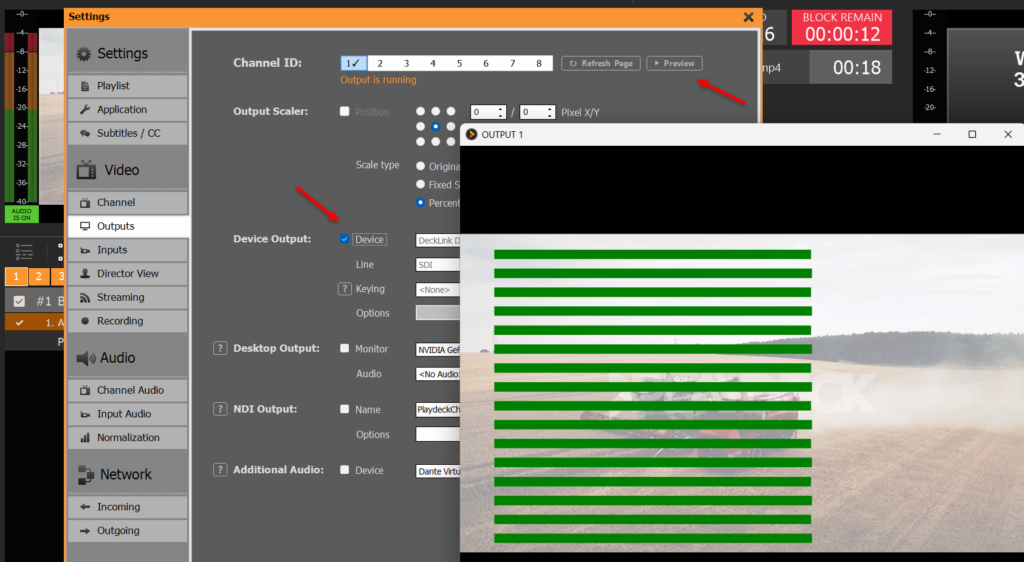
Multichannel Audio is not also active for all Inputs and Outputs: SDI, NDI, Streams. You can check, if you click PREVIEW after activating your Device. All Previews have VU Meter as Overlays:

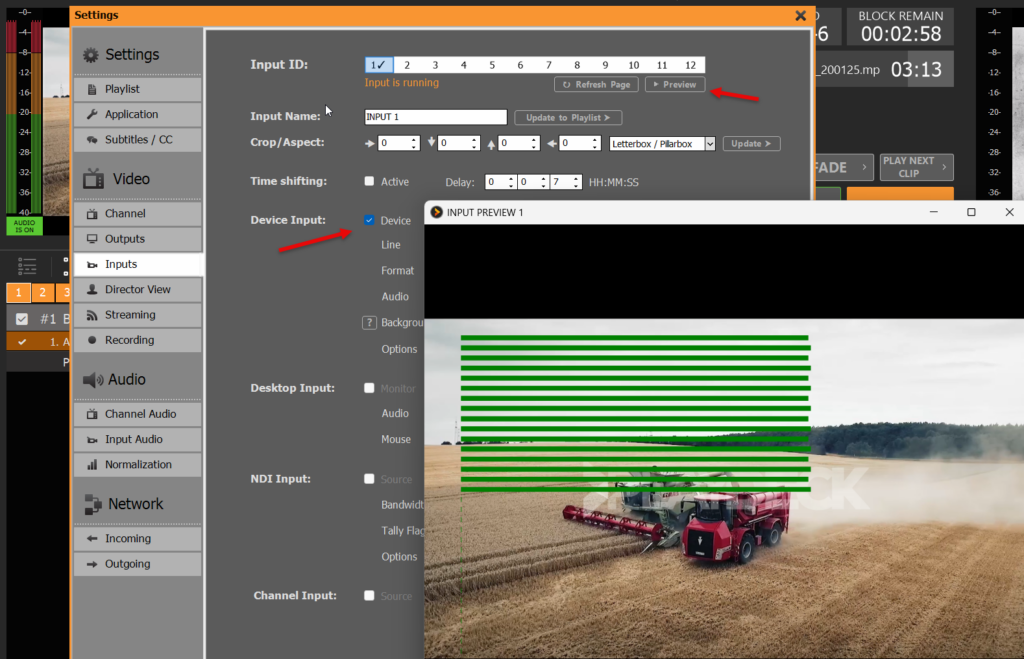
Here is another Example for Input Preview:


Mix-down

If you have Multichannel-Audio Content (or SDI Inputs) and want to Mix-down your Audio to MONO/STEREO, you would also need to increase the Audio Channel. In this case we use 16. This is important to tell PLAYDECK to process 16 Audio Channel (from Source eg SDI), otherwise all Audio Channel above 2 would be CUT/SILENT:

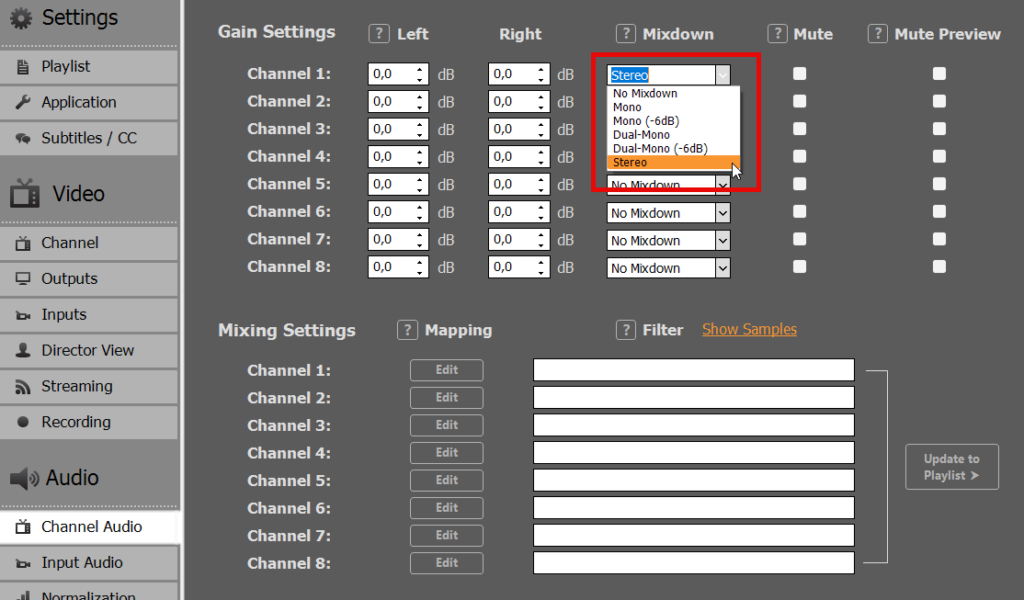
You can now select different ways to Mix-down your Audio. Please note, that there are seperate Settings for CHANNEL (Clips, Input Streams) and INPUTS (Device Input):


Multiple Audio Tracks

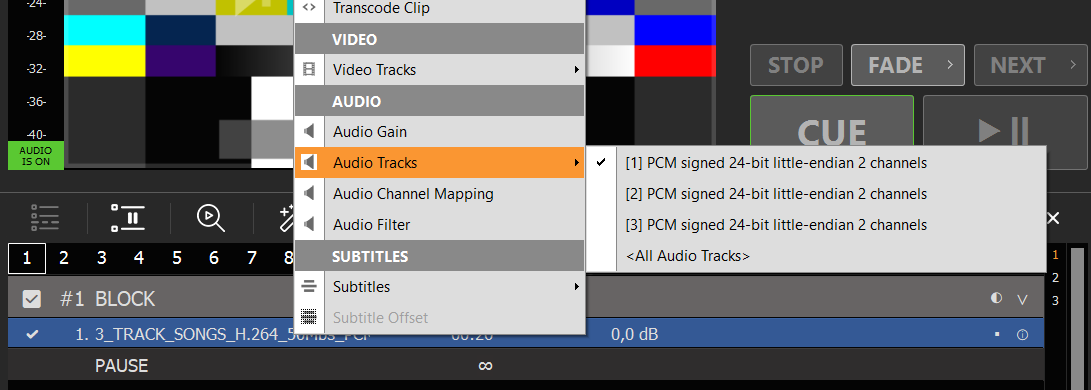
If your File has more than one Audio Tracks, you can switch the Audio Tracks by right-clicking the File and selecting AUDIO TRACKS:

To play ALL Audio Tracks at once, select ALL AUDIO TRACKS. Alle Audio Channel will be concatenated. In our example this would result in 6 Audio Channel for Output. So make sure to set your Channel to 8 Audio Channels, otherwise everything above 2 Channel will not be processed:

Note: Use any of the other Mixing Options to Mix-down to STEREO or similar.


Custom Mixing

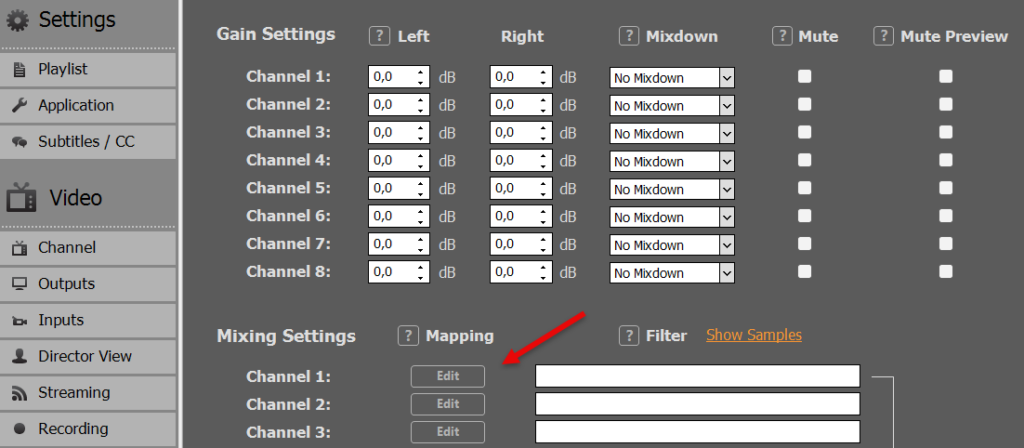
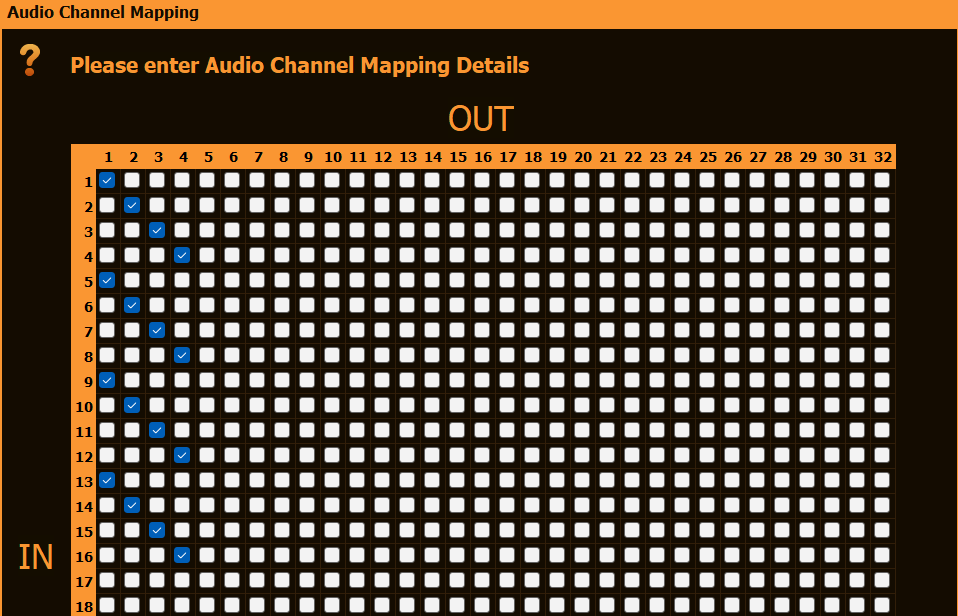
For more advanced Mixing, you can click EDIT under MIXING SETTINGS. In this example we Mix-down 16 incoming Audio Channel to 4 outgoing Audio Channel. Please note, that there are seperate Settings for CHANNEL (Clips, Input Streams) and INPUTS (Device Input):

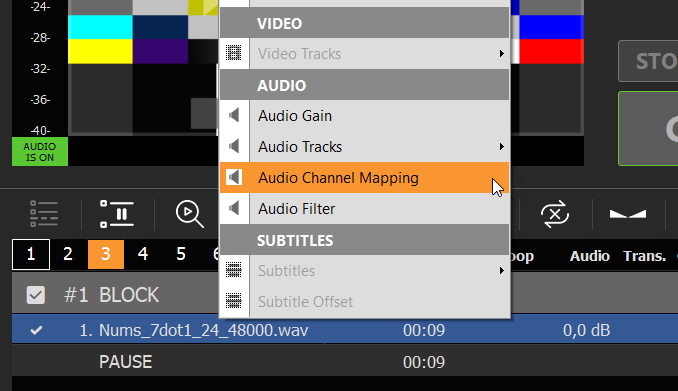
You can refine your Mixing even more by moving to the Content Level: Right-click any Playlist Item and select AUDIO CHANNEL MAPPING:

Video from/to vMix

The best way to connect vMix with PLAYDECK (both ways) is NDI. Multichannel Audio is also fully supported as well as Keying.


Send Video from vMix to PLAYDECK

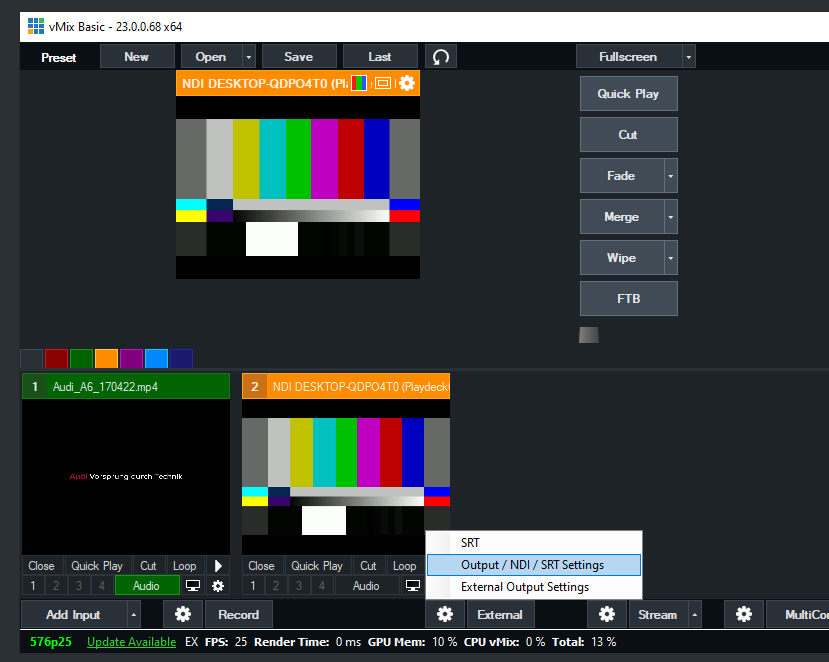
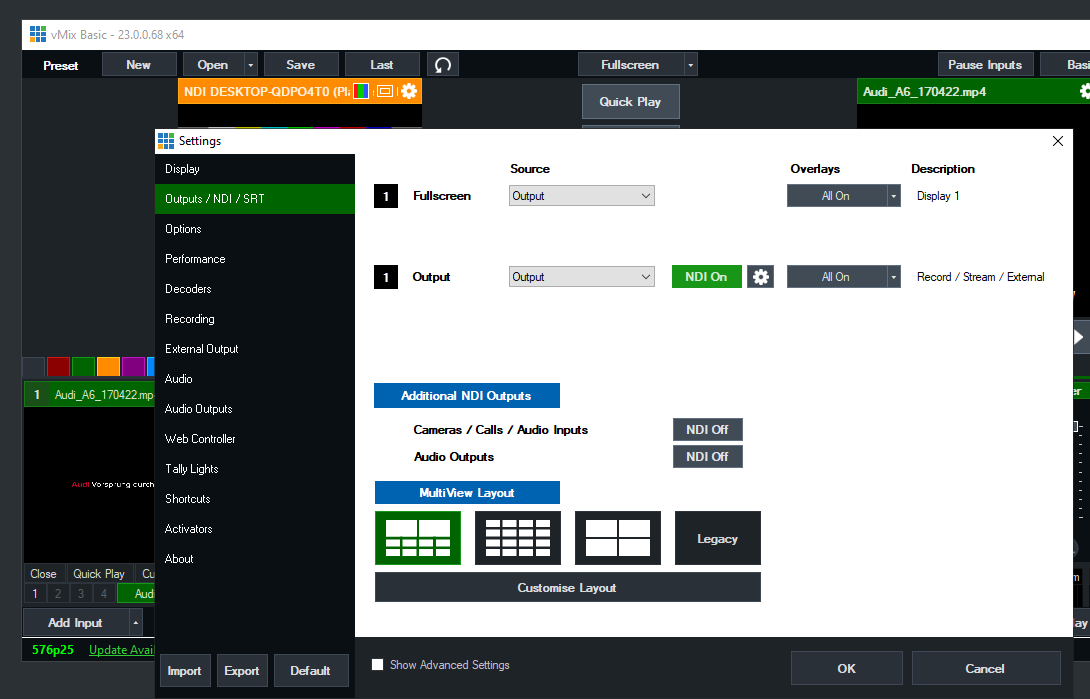
You only need to activate NDI as External Output like this:

PLAYDECK Professional Video Playback Playout Software for Windows * Send and Receive Video to and from vMix


Send Video from PLAYDECK to vMix

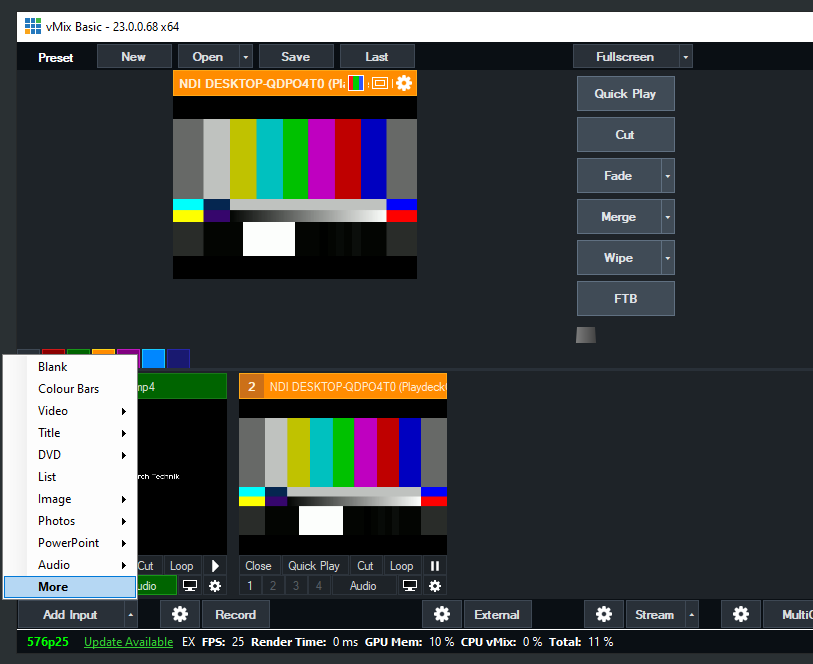
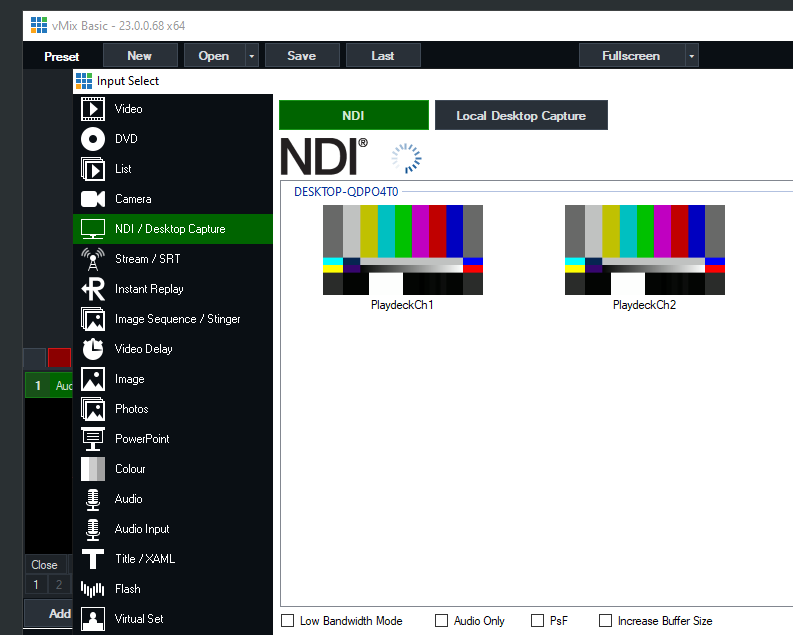
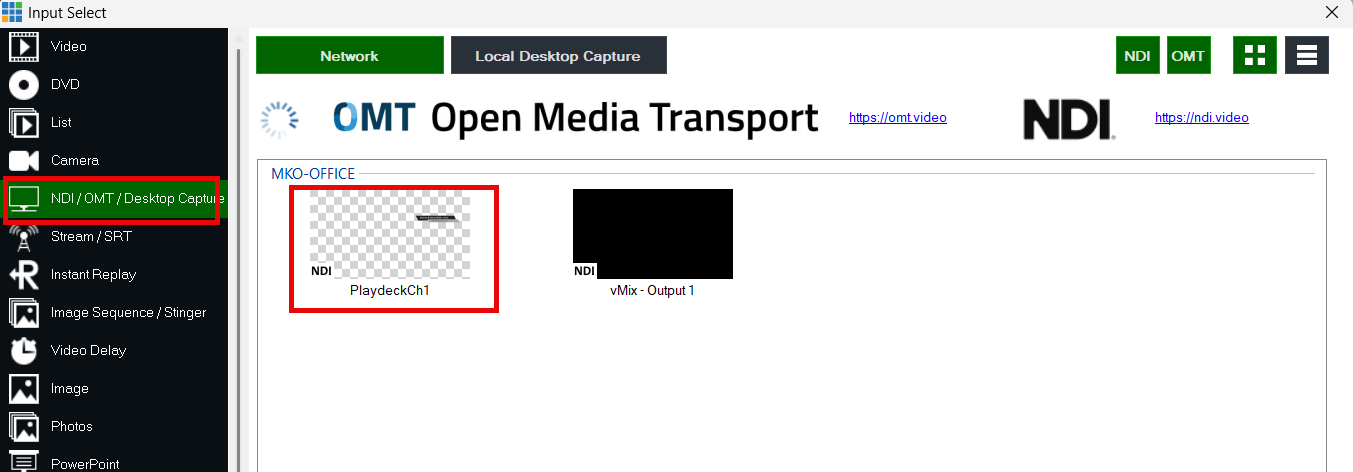
Activate NDI Output in PLAYDECK and add the NDI as new Source in vMix like this:

PLAYDECK Professional Video Playback Playout Software for Windows * Send and Receive Video to and from vMix


Send Fill Signal with Alpha Channel from PLAYDECK to vMix

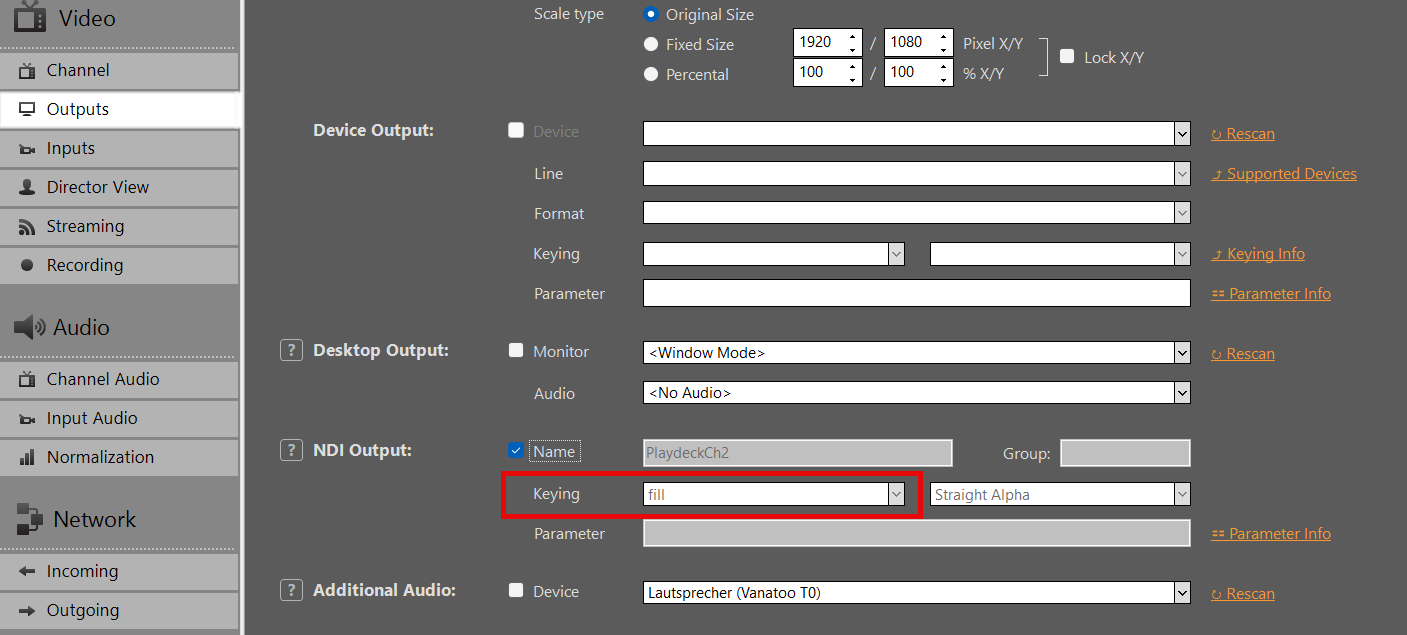
Activate NDI Output in PLAYDECK, but this time also activate Keying:

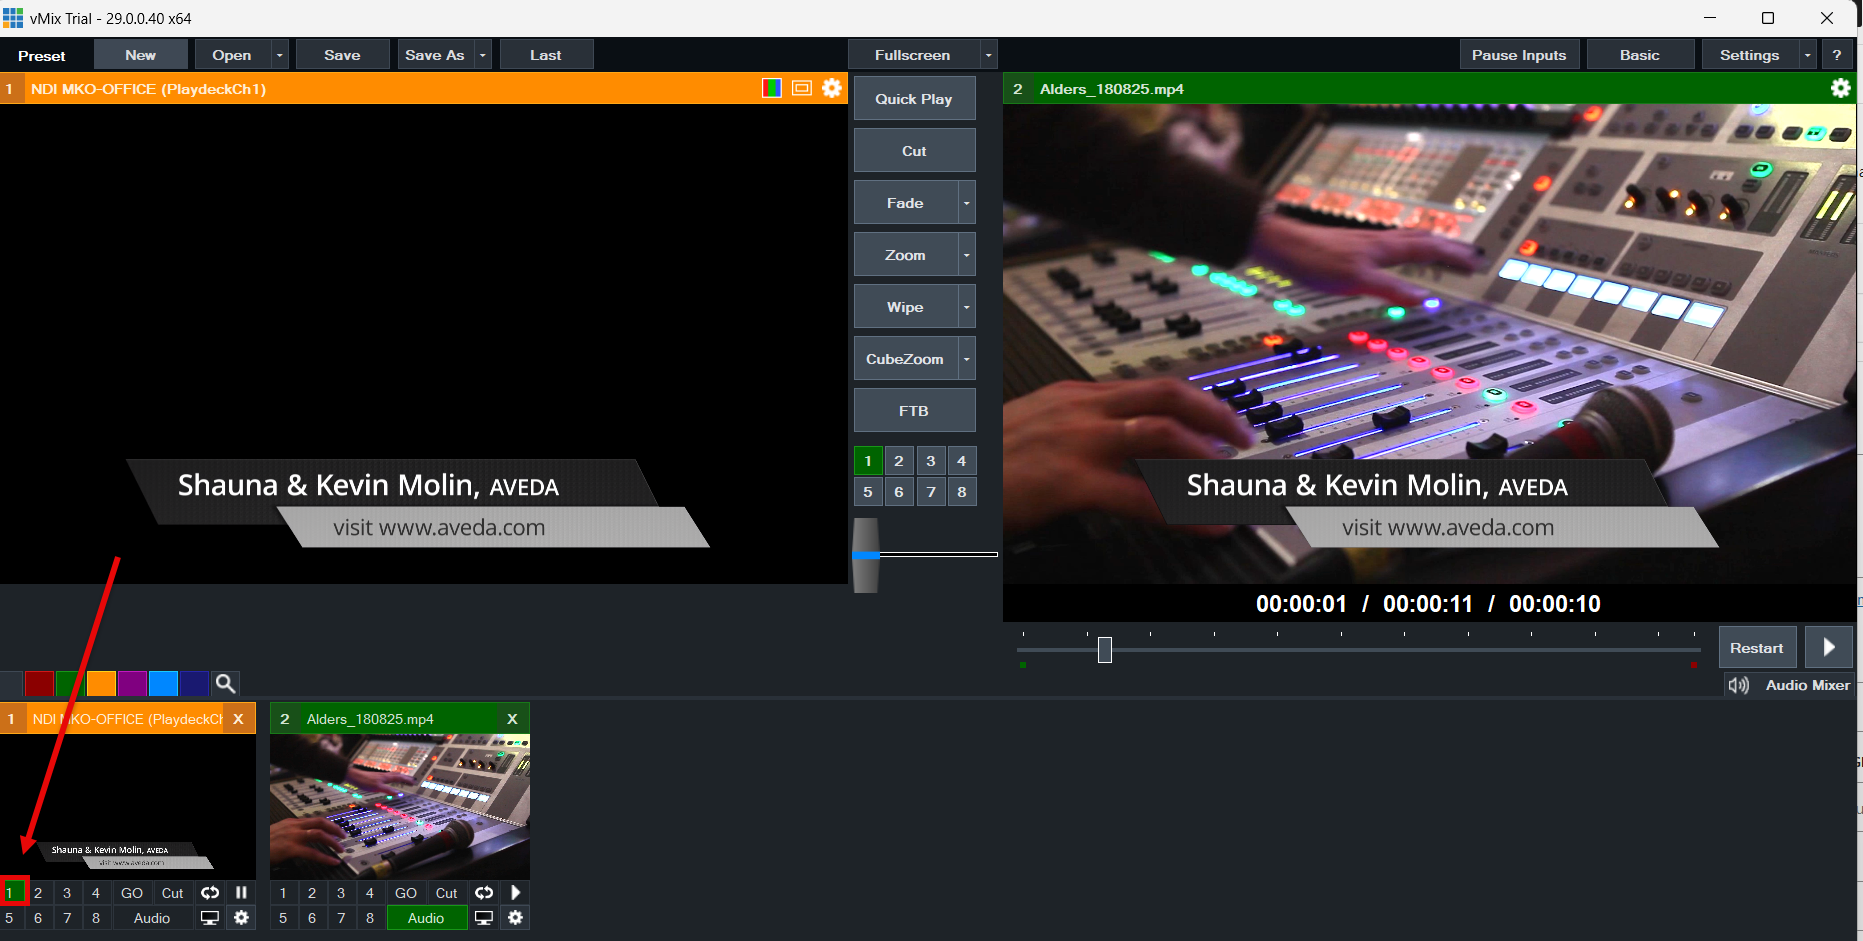
Add your NDI as Input in vMIX:

Use the Overlay Buttons to place the Video ontop of the current Video signal in vMIX:

Video from/to OBS Studio

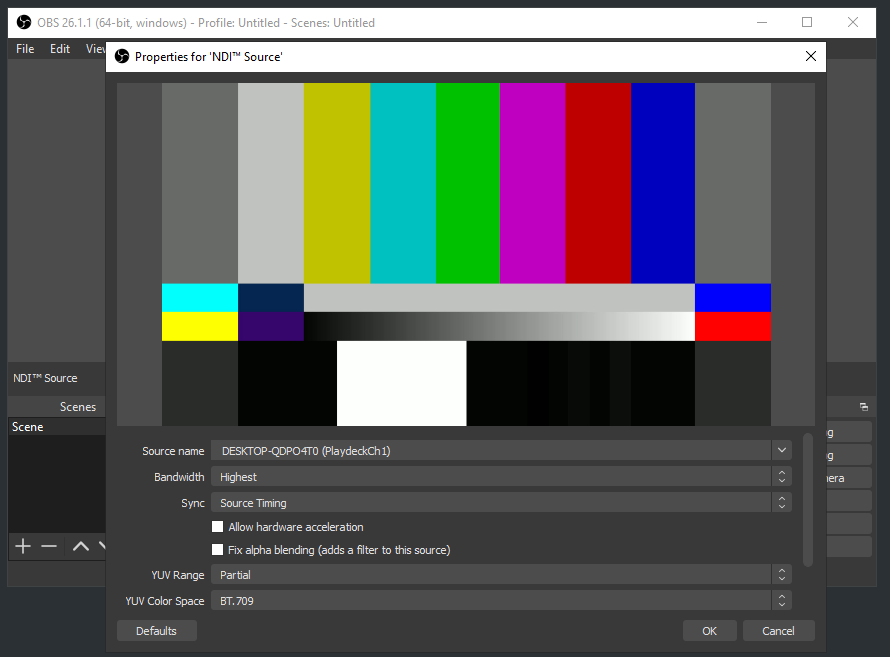
The best way to connect OBS with PLAYDECK (both ways) is NDI. Multichannel Audio is also fully supported.

Since OBS does does not deliver NDI out of the box, you need to install an additional PlugIn, which is a quick and easy process. Download the PlugIn here (scroll down and click on “distroav-6.0.0-windows-x64-Installer.exe”). It is installed like any other Windows application via Installer.


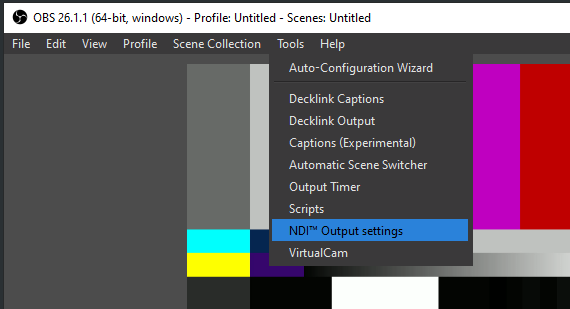
Send Video from OBS to PLAYDECK

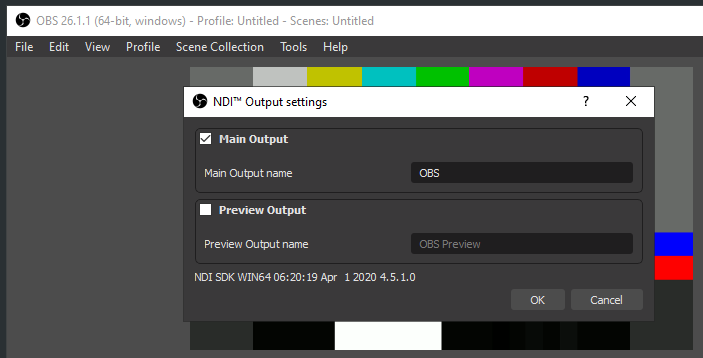
The NDI PlugIn inserts a new Option into the Tools Menu. Pick NDI Output and activate it:

PLAYDECK Professional Video Playback Playout Software for Windows * Send and Receive Video to and from OBS


Send Video from PLAYDECK to OBS

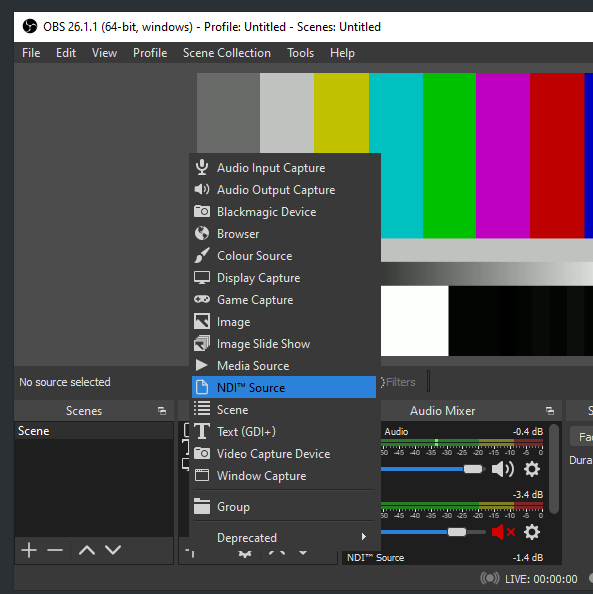
Activate NDI Output in PLAYDECK. The OBS NDI PlugIn inserts a new NDI Source, which you can add to your OBS Scene like this:

PLAYDECK Professional Video Playback Playout Software for Windows * Send and Receive Video to and from OBS

Amazon EC2 Installation

PLAYDECK supports most Amazon EC2 server instances and the NVidia GPU Power they provide. This allows you to setup a cloud based infrastructure for NDI transport or other purposes.

We assume, you have a Amazon AWS Account and basic knowledge of EC2.

First, you pick a new EC2 instance, which supports a PLAYDECK installation:
Windows Server with a virtual NVIDIA GPU and pre-installed NVIDIA driver:
https://docs.aws.amazon.com/AWSEC2/latest/UserGuide/install-nvidia-driver.html#preinstalled-nvidia-driver

A typical instance would be “Windows 2019 / g4dn.xlarge” – It has a Tesla virtual NVIDIA GPU and good enough Specs to run PLAYDECK: 16 vCPUs (Intel Xeon), 64GB RAM, 1 vGPU (NVidia T4) with 16GB GPU RAM.

Now install the Instance via those Links or your EC2 Management Console.

To connect to the instance via RDP you first have to open Port 3389 in the Instance Security Settings.

Once connected, you find yourself unable to download anything via the Browser. Therefore enable Downloads like this: START Menu > Server Manager > Local Server > IE Enhanced Security Configuration > Off

Now download and install PLAYDECK as usual:
https://playdeck.tv/download/

1 2 3 4 5