
Same base name and folder as the video. On playback, PLAYDECK can use embedded CC and/or these sidecars (see also Closed Captions & Subtitles).
Verify playback
Closed Captions
Add the recorded file to a playlist.
Select the CC track if offered.
Confirm CC in the channel preview (pass-through or burn-in as configured).
For TS, MediaInfo often lists Text tracks (EIA-608 / EIA-708) muxed into the video.
SCTE-35 (TS only)
During record, send SCTE-35 from an Action (or clip command).
Open the .ts in DVB Inspector (or TSDuck) and confirm splice/SCTE-35 cues.
Play the same .ts in PLAYDECK → SCTE Event Log should show <<SCTE-35.
Note: Playing an MKV recording will not show SCTE-35 in the log — the container does not carry it. MediaInfo also often omits SCTE-35 even when DVB Inspector shows cues; prefer DVB Inspector / PLAYDECK << for SCTE checks.
PLAYDECK does not convert SCTE-104 ↔ SCTE-35 automatically. If you go SDI → IP stream, SCTE-104 will not appear as SCTE-35 on the stream. Fire SCTE-35 on the channel that owns the stream output (see overview and SCTE-35).
Enable SCTE-104 on SDI
Input
On the SDI input, enable VANC Data → Enable Closed Captions and SCTE-104 Triggers.
Same checkbox as Closed Captions capture. It is opt-in because VANC capture adds processing load.
Output
With a license that includes SCTE / CC, SDI output can carry VANC including SCTE-104 when markers are present on the channel.
Send SCTE-104
You can attach SCTE commands to:
Clips (any position)
Blocks (start / end)
Overlays (show / hide)
Action buttons
Select command type SCTE-104 and paste a valid SCTE-104 XML payload.
PLAYDECK does not ship a fixed library of “product” markers — you define the XML your downstream gear expects. Placeholders such as {clipduration} are documented for SCTE-35 workflows; use the same command UI where applicable.
Use SCTE-104 (not SCTE-35) as the command type when this should go out on SDI.
Detect and log
Open the SCTE Event Log (Logs → SCTE).
>> = marker sent on that channel
<< = marker detected on a receiving playlist (e.g. SDI input playing in another channel)
Logging both directions is the fastest way to verify a loop without external analyzers.
SDI loop test
Channel 1: SDI output active.
Physical loop (or second port) into an SDI input; enable VANC Data on that input.
Channel 2: play that input in the playlist.
Channel 1: Action button with SCTE-104 sample; both channels playing.
Event Log: >> on Ch1 and << SCTE-104 on Ch2.
You can add a second SDI hop (Ch2 → Ch3) to confirm forwarding on SDI.
Forwarding
PLAYDECK can forward incoming SCTE-104 from an SDI input to an SDI output when that input is played through a channel that drives SDI out.
Forwarding SDI (104) → UDP/SRT (35) does not happen automatically. Use SCTE-35 on the streaming channel instead.
Important limit (CC / ASS track)
If Channel 1 is playing a clip with an active Closed Caption or ASS text track, SCTE-104 on SDI may only be received intermittently (>> still looks fine; << on the loop is unreliable).
Workaround: turn the text track off when SCTE-104 on SDI must be reliable.
This conflict was not observed for SCTE-35 on MPEG-TS streams in the same way.
Subtitles can only come from video files and are always burned onto the frames.
Add the clip to a playlist.
Right-click the clip and select the subtitle track (disabled by default).
Embedded: shown as ASS Embedded. External SRT: same base filename as the video (.srt), in the same folder or in a Subs / Subtitles subfolder.
Wherever you send the channel (SDI, NDI, stream, desktop), the subtitle text is already in the image. Adjust font and related options in settings.
PLAYDECK does not include an editor to type new subtitle/CC text into files. Use an external tool if you need to author captions.
Closed Captions sources
From files
Right-click the clip → select the CC track (e.g. CC Embedded).
Also supported as sidecars (same base name, same folder): SCC, MCC, ANC.
When recording with scc_capture / anc_capture, PLAYDECK can write .scc / .anc next to the media file; playback can pick them up again. See the overview recording notes.
From live inputs / streams
PLAYDECK can read, preview, and forward CC with:
SDI (if the device supports VANC; enable VANC Data on the input)
Streams with MPEG-2 or H.264 (also MPEG-4 Part 2 in our tests) — UDP, SRT, DVB-compatible, etc., with embed_cc='true' on the sender
NDI in a PLAYDECK ↔ PLAYDECK loop (many third-party NDI tools do not show CC)
RTMP to YouTube with embed_cc='true' (YouTube can display CC)
Not for CC pass-through: HEVC with embed_cc (no usable pass-through in our tests).
Burn-in vs Pass-Through
In settings (Closed Captions):
Burn-in (default): CC text is rendered onto the channel output frames. Every destination sees the text in the picture (including Desktop Output).
Pass-Through (always active): CC is not burned into the output picture. PLAYDECK still shows CC in the channel preview. Downstream players/decoders (YouTube, another PLAYDECK, etc.) are responsible for displaying the captions.
Use Desktop Output (window mode) to check whether text is in the picture or only in the preview.
Tip: If you loop a burn-in channel into a second channel that also pass-through-previews CC, you can see double text (pixels + overlay). Switch the first channel to Pass-Through to avoid that.
CC data often includes fixed position and mode (e.g. roll-up / pop-on). PLAYDECK does not restyle that for preview/burn-in beyond its CC display settings.
Enable VANC Data → Enable Closed Captions and SCTE-104 Triggers. Required to capture CC (and SCTE-104) from SDI. Opt-in because VANC capture adds processing.
SDI / NDI output
With a Closed Captions license, SDI/NDI output is prepared to carry CC when present in the channel pipeline.
Streams + Recordings
In Parameter, add:
embed_cc='true'
Without this, pass-through CC will not be embedded in the outgoing elementary stream (burn-in still works if enabled).
UDP target: use your LAN IP, not 127.0.0.1.
Quick test
Load a sample clip with embedded CC; select the CC track; loop the block. Confirm CC in the channel preview.
Enable SDI and/or NDI output; optionally loop SDI/NDI back into an input (VANC on for SDI).
Add a UDP (or SRT) stream with H.264 and embed_cc='true'; play that URL on another channel.
PLAYDECK can carry Closed Captions (CEA-608 / CEA-708) and SCTE ad/splice markers through many inputs and outputs. They are different signals:
Closed Captions travel with the video (SDI VANC, or embedded in MPEG-2 / MPEG-4 / H.264 elementary streams).
SCTE-104 is used on SDI (VANC).
SCTE-35 is used in MPEG-TS (UDP, SRT, DVB-compatible streams, TS recordings, HLS segments).
This page is the map: what works from where to where, what you must enable, and where the limits are. Step-by-step setup lives in the linked articles below.
Note: Soft Subtitles (SRT / ASS) are always burned into the picture. They are not the same as Closed Captions. See Closed Captions & Subtitles.
SDI ↔ IP are different SCTE worlds SDI = SCTE-104. Streams / TS files = SCTE-35. PLAYDECK does not convert 104 ↔ 35 automatically.
Streams need embed flags Unlike the SDI “VANC Data” checkbox for Inputs, stream and recording options are easy to miss. You must set them in the stream/recording Parameter / config string (embed_cc, embed_scte35).
Codec vs protocol
CC pass-through (embed_cc): depends on video codec (MPEG-2, MPEG-4 Part 2, H.264 — not HEVC).
SCTE-35 (embed_scte35): depends on MPEG-TS transport, not on the video codec.
Pass-through vs burn-in (CC)
Pass-through: caption data stays in the signal; PLAYDECK can preview it; downstream devices decode it. Needs VANC / embed_cc as applicable.
Burn-in: text is drawn into the video pixels; no embed flag required for the text to be visible on outputs.
UDP loopback Prefer your machine’s LAN IP (e.g. udp://192.168.x.x:5000?pkt_size=1316). udp://127.0.0.1:… is unreliable in current setups.
How to enable CC and SCTE
SDI
Direction
What to do
Input
Enable VANC Data → Enable Closed Captions and SCTE-104 Triggers on that input. This turns on VANC/CC/ANC capture (there is some processing cost — that is why it is opt-in).
Output
With a Closed Captions license, PLAYDECK enables CC/VANC on the SDI renderer automatically.
Streams and Recordings
Open Parameter on the stream or recording and set the flags in the config string (examples):
embed_cc='true'
embed_scte35='true'
Flag
Use for
embed_cc='true'
CC pass-through into MPEG-2 / MPEG-4 / H.264 (UDP, SRT, DVB, HLS segments, TS/MKV record, RTMP/FLV, etc.)
embed_scte35='true'
SCTE-35 into MPEG-TS only (UDP, SRT, DVB, TS file record, HLS segments). Not for MKV or RTMP/FLV.
Without these flags, pass-through CC / SCTE-35 will not leave PLAYDECK on that output — even if the UI looks “ready”.
Injecting SCTE
Attach SCTE commands to clips, blocks, overlays, or Action buttons. Choose SCTE-104 when targeting SDI, SCTE-35 when targeting MPEG-TS streams or TS files. Details and XML samples: SCTE-104 on SDI · SCTE-35 to servers.
Requires embed_scte35='true'. Codec does not matter.
SCTE-35 stream → stream forward
Yes
e.g. Ch1 → UDP → Ch2 → UDP → Ch3; << on both receivers.
SCTE-104 on SDI, then stream that channel to IP
104 on SDI yes; not on IP
No automatic 104→35. Fire SCTE-35 on the stream-sending channel if the IP side needs markers.
SCTE-35 toward SDI output
No
Wrong domain for SDI.
SCTE-104 toward UDP/SRT/DVB
No
Wrong domain for MPEG-TS.
NDI loop (104 or 35)
No
No << on NDI receive in PLAYDECK.
Record MPEG-TS + SCTE-35 while recording
Yes
Visible in DVB Inspector; PLAYDECK playback shows << SCTE-35.
Record / play MKV
No SCTE
MKV has no embed_scte35.
HLS
Partial
No SCTE/CUE tags in the .m3u8. PLAYDECK playback of the m3u8 can still show << SCTE-35 from segments. External packagers that only read manifest cues need another tool (e.g. Nimble).
DVB-compatible streaming in PLAYDECK behaves like UDP/SRT for CC and SCTE-35 once the embed flags are set (format='dvb', still udp:// or SRT URL).
Known limits
SCTE-104 together with an active CC/ASS track (SDI)
If a clip is playing with an active Closed Caption or ASS text track, SCTE-104 may only arrive intermittently on an SDI loop (>> send is stable, << receive is not). Disable the text track if SCTE-104 reliability on SDI is critical. This conflict was not seen on MPEG-TS streams when using SCTE-35 (with or without embed_cc).
NDI
CC: works in a PLAYDECK↔PLAYDECK loop; not shown in NDI Studio Monitor or vMix.
SCTE: not received back over NDI in PLAYDECK.
HEVC
embed_cc does not deliver usable CC pass-through with HEVC in our tests. Use MPEG-2, MPEG-4 Part 2, or H.264 for CC pass-through.
HLS manifests
PLAYDECK does not write SCTE/CUE tags into the .m3u8. Caption and SCTE-35 data can still be present in the underlying segments.
Welcome to the PLAYDECK Playlist Automation and Program Flow guide. While PLAYDECK serves as an excellent manual clip player for live operators, it also features a highly advanced automation engine for continuous broadcasting and structured event schedules. This guide will show you how to transition from basic manual playout to sophisticated automation—allowing you to control precise playback down to the exact second, keep your timeline perfectly readable, and build self-running, smart playlist logic.
Many broadcasting environments, corporate events, and digital signage installations require strict compliance with real-world clock times. PLAYDECK solves this through individual block schedules.
The Concept: Instead of scheduling single clips, you organize your media into Playback Blocks and apply an absolute time constraint to the entire block.
The Setup:
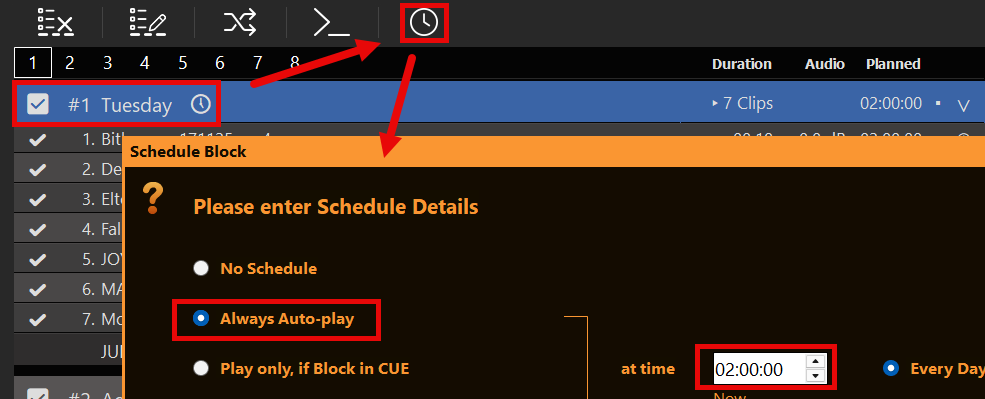
Select your target Playback Block in the timeline.
Click the Clock Icon on the block header toolbar.
Enter your target start time down to the exact second (e.g., 11:02:48 AM).
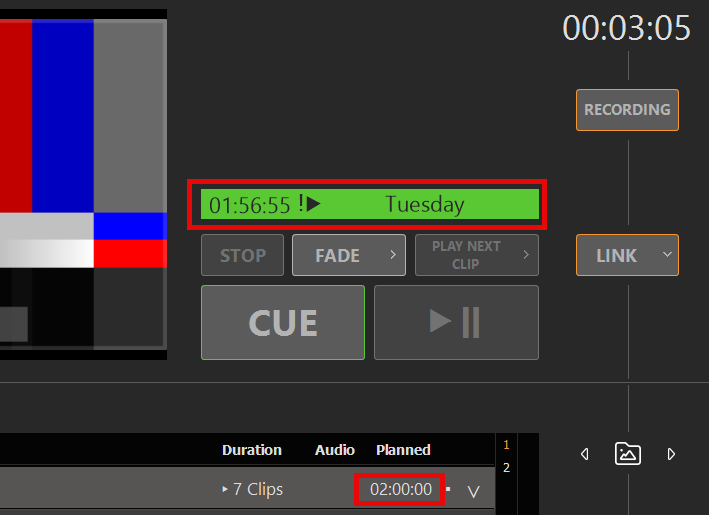
Auto-Trigger Engine: Once you enable the auto-trigger flag, PLAYDECK continuously checks the system clock. The moment the scheduled time arrives, the block fires automatically. To keep operators perfectly prepared, a live, frame-accurate countdown timer to the next (earliest) upcoming scheduled block is displayed right at the top of the interface next to the Preview window.
The Smart “Planned” Column: Predictive vs. Real Playout
One of PLAYDECK’s most powerful features is its real-time mathematical timeline engine, visible in the Planned column of your playlist view.
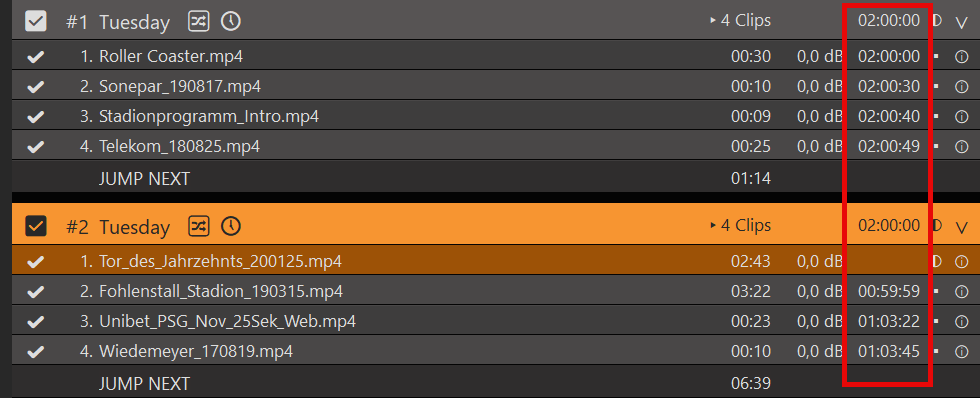
Predictive Calculation: The moment you assign a schedule to a block, PLAYDECK instantly calculates the exact airtime for every single clip within that block. This engine is highly intelligent: it automatically factors in custom clip trims (In/Out points), loop configurations, and transition durations. You will see exactly when Clip #5 will go on air before the block even starts.
Dynamic Reality Update: The moment the block goes LIVE, the “Planned” column instantly adapts. If a live event ran long and your block started 45 seconds later than scheduled, the column dynamically stops showing the theoretical schedule. Instead, it instantly updates to reflect the actual, real-world execution times for all remaining clips based on the current playout reality.
Structuring Program Flow (Block End Methods & Auto-Shuffle)
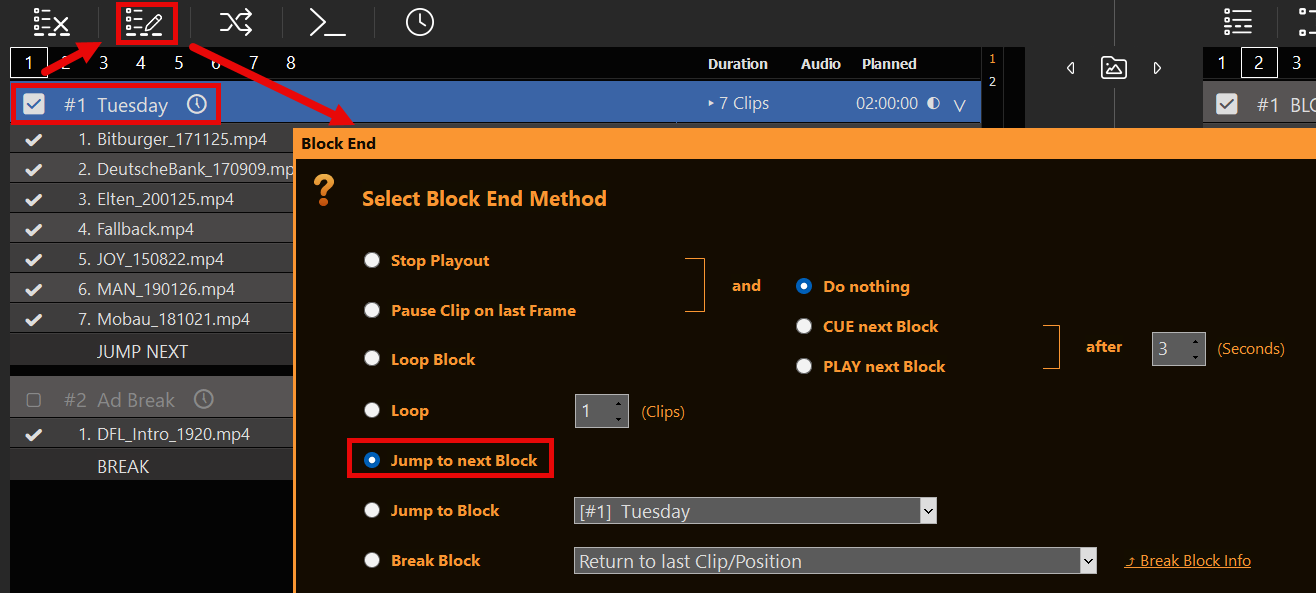
Automation is not just about when a block starts, but how PLAYDECK behaves after a block finishes playing. By opening the Block End behavior settings (the list icon on the block header), you define the automatic transition logic between different program segments.
Jump to next Block & PLAY next Block: This is the standard linear broadcasting rule. Once the current block finishes its last clip, PLAYDECK automatically skips to the next block in the list and immediately triggers playback. You can even define a custom delay in seconds before the next block fires off.
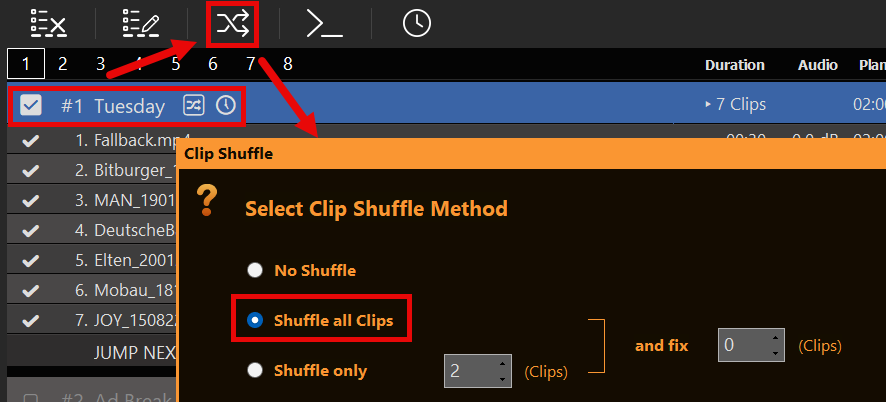
Loop Block & Auto-Shuffle: The block will repeat all its nested clips indefinitely until a manual command or a different time-scheduled block overrides it. For studio backgrounds or 24/7 music video loops, you can enable the Auto-Shuffle option. PLAYDECK will automatically shuffle the order of the clips with every new loop cycle so the content layout never looks repetitive.
For advanced show control and complex broadcasting logic, PLAYDECK provides internal triggers that extend far beyond standard linear video playback.
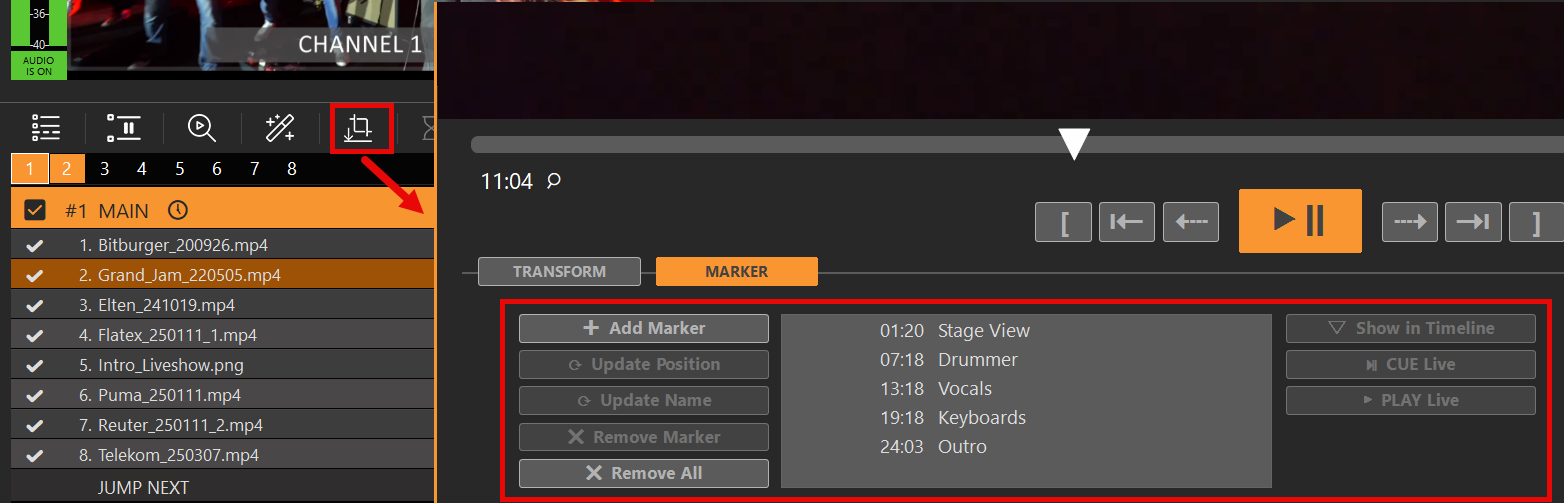
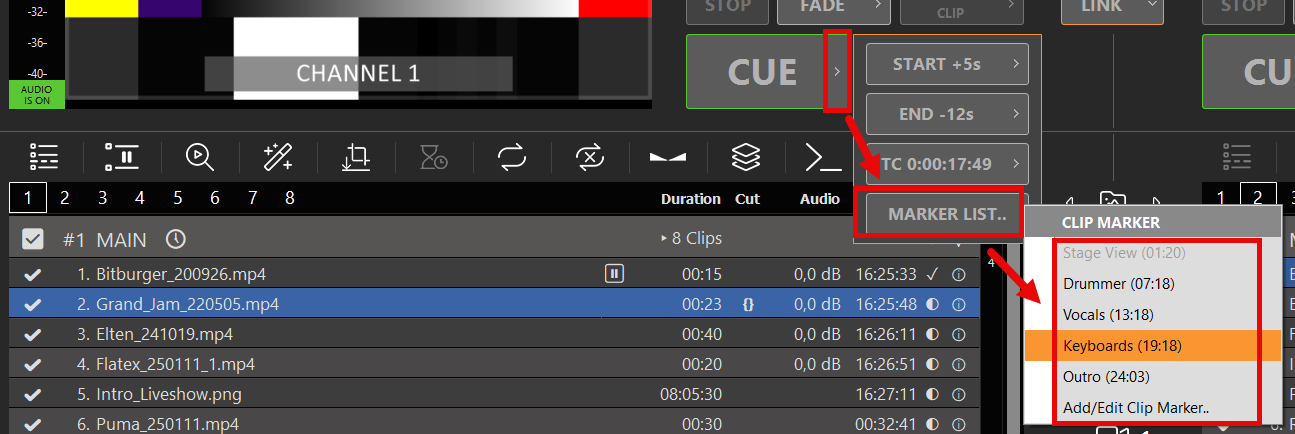
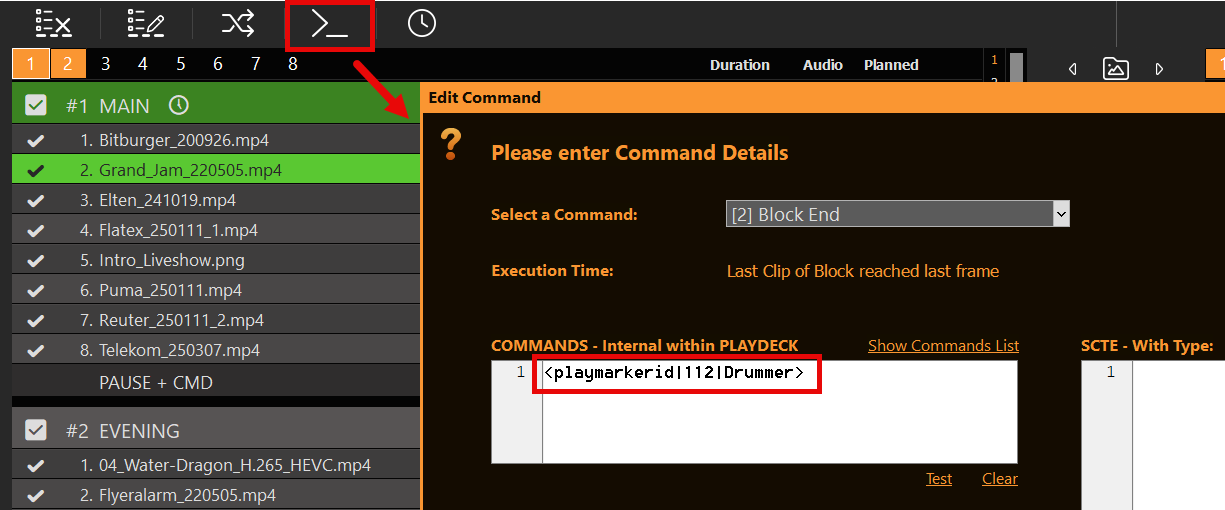
Clip Timeline Markers: Within the individual clip timeline, you can set dedicated Markers to act as precise jump points for separate CUE triggers. These markers can be jumped to manually by an operator or targeted automatically via system commands.
Playout Overrides via Commands: Commands represent a deeper method of structuring your program flow. You can attach execution commands to individual clips or entire blocks at any position—including timestamps relative to the end of a clip. These commands can fully remote-control PLAYDECK, enabling your timeline to automatically trigger external events, change channel states, or jump directly to a targeted clip based on complex programming needs.
Integrating commercials or commercial breaks into an automated schedule is built directly into the program flow engine.
The Break Block Concept: If you want ads to seamlessly interrupt your active playout, you can format a block as a dedicated Break Block.
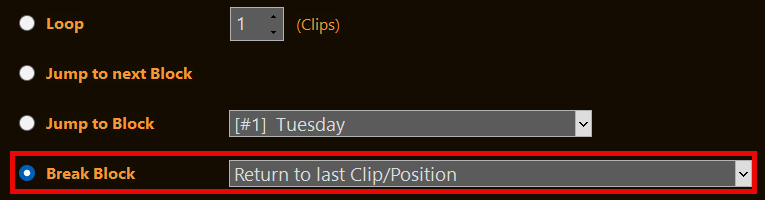
Automatic Resuming: Set the block end behavior to Break Block and configure it to Return to last Clip/Position. When the break ends, PLAYDECK cuts back to your main playlist, resuming the exact frame of the video clip that was playing before the interruption.
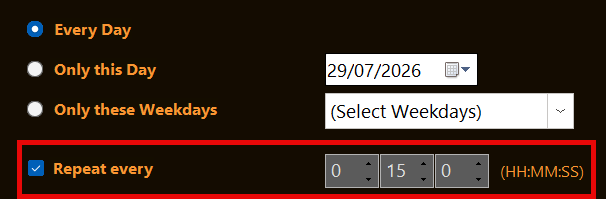
Interval Scheduling: These ad breaks can be tightly scheduled. You can time them to fire off at absolute real-world clock times or configure them to execute periodically on a fixed interval, such as every 15 minutes. For more information, check out the specialized Ad Breaks Documentation.
When managing complex broadcast schedules, keeping the user interface readable and providing reminders for operators is key to a flawless production.
Color Coding: You can visually group your program items by right-clicking any clip or group of clips and selecting Color. Use this to instantly separate commercials (e.g., Red) from your main content (e.g., Green), making long playlists highly scannable.
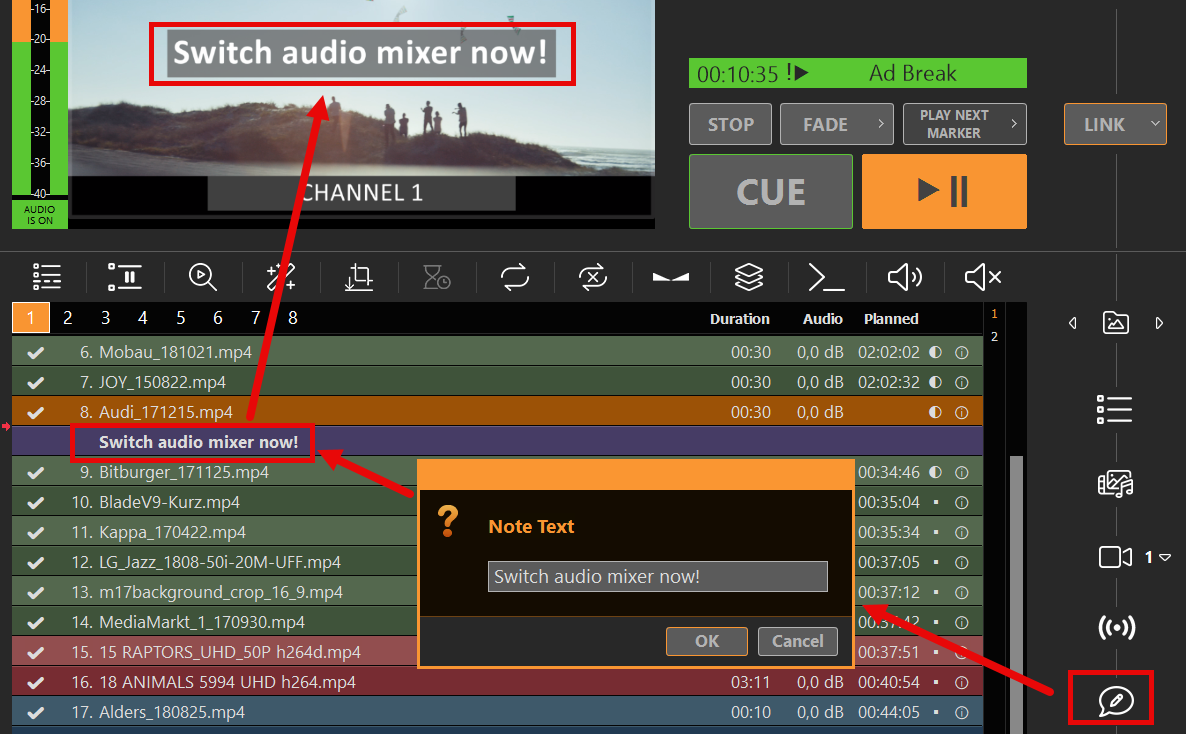
Text Notes for Segmenting: You can drag and drop text Notes directly into the playlist just like normal clips. These notes act as visual separators to segment your program within a block. They appear prominently as an INFO banner in the UI Preview window to remind an operator of crucial tasks (e.g., “Switch audio mixer now!” or “Prepare graphic overlay”), but they are completely invisible to your master output signal.
EPG Programme Descriptions: The same Notes can also supply the programme description (<desc>) when you export XMLTV. Place a Note inside the scheduled block (after the first clip, before the block end). If you use Notes as live operator prompts, keep those separate from EPG text — every Note in the block is concatenated into one description.
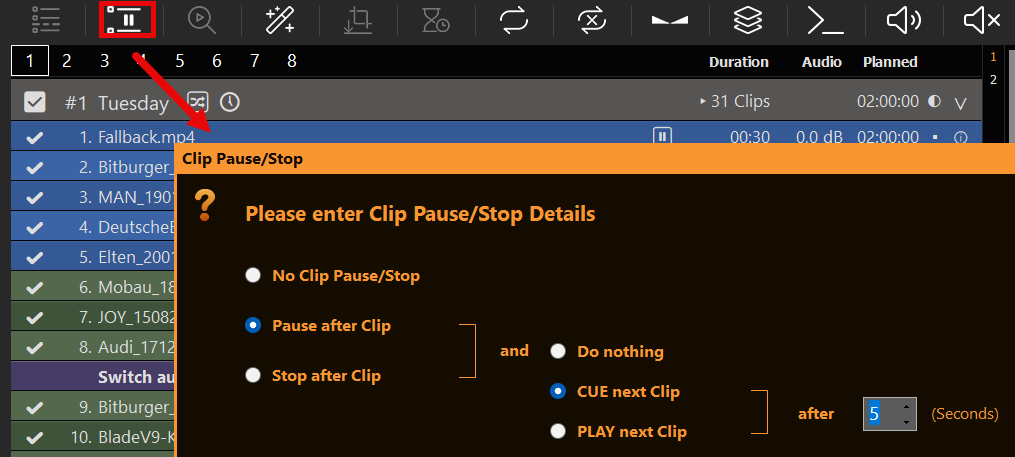
Clip Pauses (Semi-Automation): If you want a clip to stop after playing, you can apply a Clip Pause. The playlist will halt and wait for the operator to press play manually. Alternatively, you can configure a timed pause—PLAYDECK will wait for a pre-defined number of seconds before continuing automatically.
To hand over your automated schedule to management teams or external broadcasting networks, PLAYDECK offers industry-standard export tools located under the File menu.
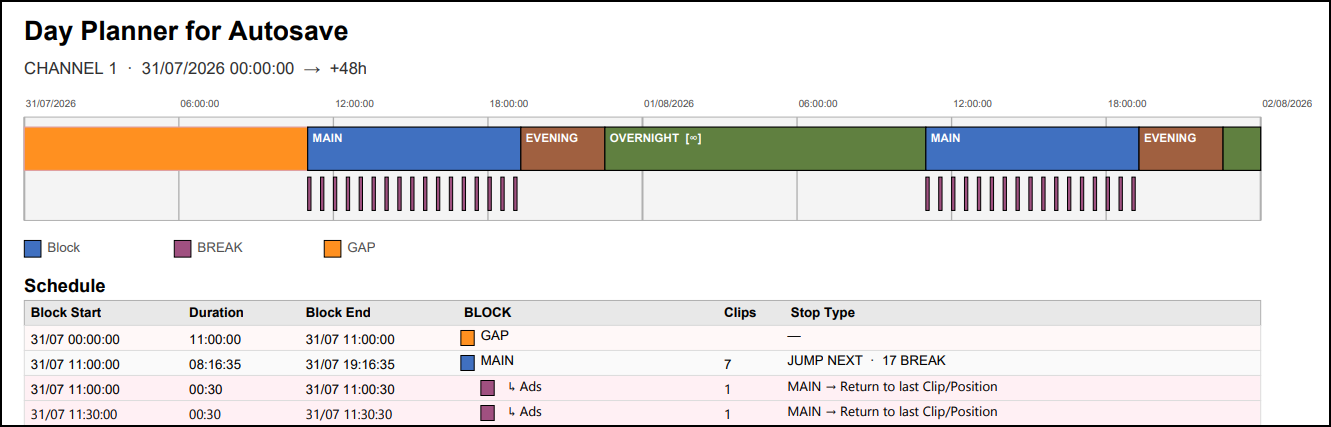
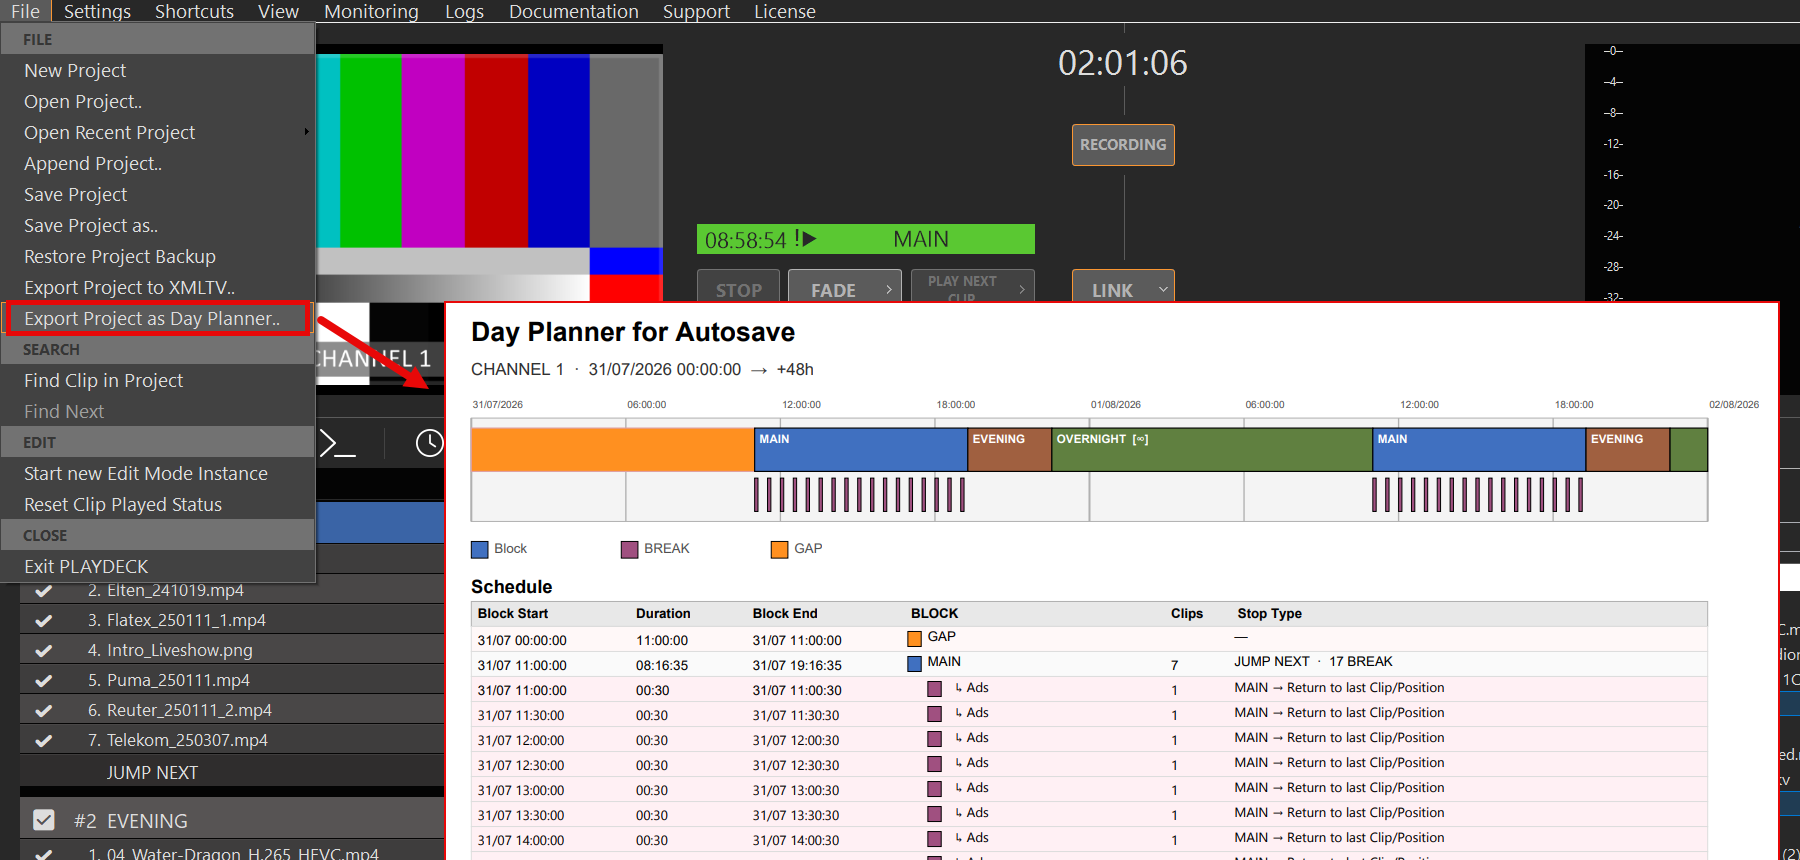
Export Project as Day Planner: This tool generates a clean, highly visual PDF overview of your schedule. It provides a macro-view of your program structure and clearly highlights scheduled Ad Breaks and playlist GAPs. Ideal for production managers who need to verify gapless program planning.
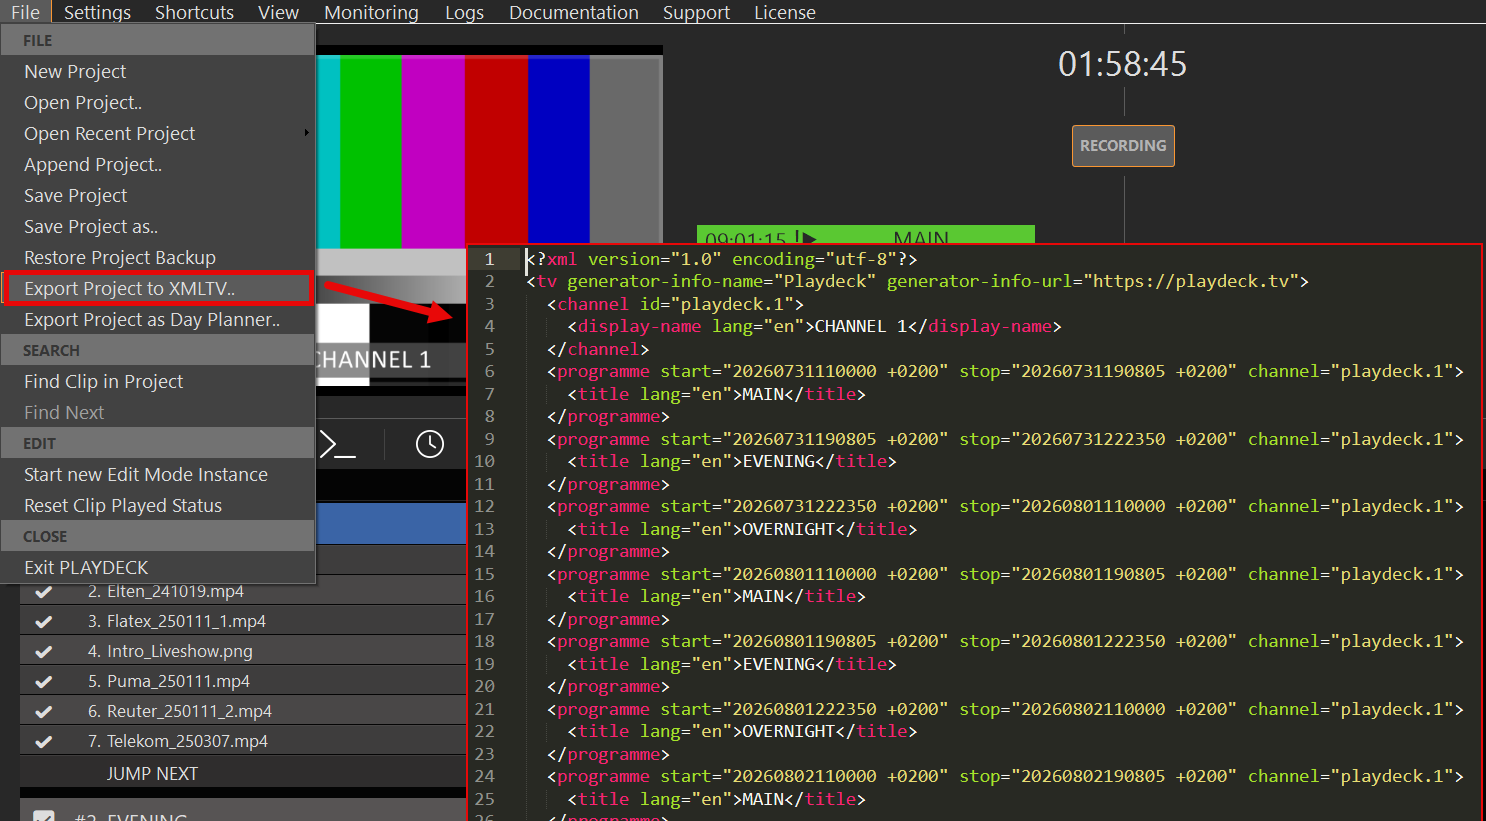
Export Project as XMLTV: Essential for formal broadcasting workflows. This exports an XML file with programme start/stop times from your scheduled playlist blocks. The format is widely used by IPTV servers, set-top boxes, and TV guide / EPG apps to show live programme information to viewers.
How to create a working EPG (step by step)
Schedule your programmes Only blocks with an active Schedule (time-of-day / weekday / date) become XMLTV programmes. The block name becomes the programme <title>. Unscheduled or inactive blocks are skipped. Break blocks are also skipped — they are interruptions, not stand-alone TV programmes.
Set channel names In Settings → Channel, set each channel’s Channel Name. These names appear as <display-name> in the XMLTV file. Channel IDs are always playdeck.1, playdeck.2, …
Add programme descriptions (optional) Insert a playlist Note inside the block with the viewer-facing synopsis. On export, that text becomes <desc>.
Put the Note inside the block (safest: after the first clip, before the block end).
Multiple Notes in the same block are merged into one description (separated by spaces).
Do not mix live operator reminders into the same Notes if you care about a clean EPG.
Export File → Export Project as XMLTV… PLAYDECK writes programmes for the near schedule window (about two weeks ahead). Channels must be licensed and started to appear in the export.
Publish & map in your IPTV / EPG system Host the .xml file on a URL your IPTV panel, middleware, or guide app can fetch (or copy it into the system). Then map each XMLTV channel id to your stream:
playdeck.1 → Channel 1 stream
playdeck.2 → Channel 2 stream Without this mapping, the guide often looks “empty” even though the file contains data.
Refresh when the schedule changes XMLTV is a snapshot. After playlist or schedule edits, export again and update the file on your server / panel.
Day Planner vs XMLTV — important differences
Day Planner (PDF)
XMLTV (EPG)
Purpose
Internal planning overview
Viewer-facing TV guide
Gaps / empty time
Shown as GAP rows
Not exported
Ad Breaks
Visible in the PDF
Not exported as programmes
Programme title
Block name
Block name → <title>
Programme description
—
Playlist Notes → <desc>
If the PDF looks “full” but the guide looks empty, check: correct calendar day, channel mapping (playdeck.N), and that you are looking at real programmes — not GAPs.
Minimal example
<programme start="20260810200000 +0000" stop="20260810210000 +0000" channel="playdeck.1">
<title lang="en">Evening News</title>
<desc lang="en">The latest national and international news stories of the day.</desc>
</programme>
(Category and icon are optional and currently not exported.)
Enterprise Automation: Custom Playout Logic via PLAYDECK API
If your broadcasting workflow requires deeply customized automation logic, proprietary scheduling databases, or integration with external master control switchers, you can bypass the standard user interface entirely.
Full Remote Architecture: PLAYDECK features a comprehensive, open programming interface.
Custom Playout Scripts: By using the PLAYDECK API, you can write your own custom scripts and external software logic to control, update, override, and drive your entire playout engine according to your custom rules.
Welcome to the Playdeck Cloud & Remote Productions guide. This central guide helps you transition from a local studio environment to a decentralized or cloud-hosted setup. Rather than detailing specific commercial cloud providers, this page gives you the exact blueprint to deploy Playdeck on any online server or headless machine, feed remote streams into your playlists, and configure network triggers for total remote automation.
Why Choose Remote Deployment? (Production Use Cases)
Installing Playdeck on an online remote server or data center computer instead of a local office machine provides critical architectural advantages. Below is why professional workflows utilize remote deployments:
The Problem with Local Office Setup: Running a live event playout from an office or venue laptop exposes you to local network drops, accidental Windows update reboots, or personnel accidentally messing with the local machine.
Why Remote PC Deployment: By moving Playdeck to a dedicated online server, you isolate the playout engine entirely. Even if your local office internet goes down completely, Playdeck continues to run safely in the data center. Its dedicated HDMI/SDI output automatically isolates the feed—guaranteeing that the operating system desktop, mouse cursors, or other running applications are never displayed on the program feed, maintaining a clean look even if a remote operator disconnects.
The Problem with Local Office Setup: Office computers are vulnerable to local power outages, hardware tampering, and standard consumer network interruptions, making them highly unreliable for around-the-clock broadcasting.
Why Remote PC Deployment: A remote data center computer offers enterprise-grade power redundancy (UPS) and climate control. You can manage a completely headless system from anywhere via RDP. Because you have full remote access, you can update, reorder, or completely replace the active playlist remotely via the web interface or API commands from any device worldwide, ensuring instant schedule adjustments on a headless system without interrupting the active stream.
Scenario C: Multi-Destination Cloud Distribution & Monitoring
The Problem with Local Office Setup: Standard office DSL or Wi-Fi connections simply lack the upload bandwidth required to output multiple high-quality video streams simultaneously, causing massive packet loss and stuttering.
Why Remote PC Deployment: Data center servers are hooked directly into massive internet backbones with symmetrical gigabit speeds. This allows you to output your main playout signal to a high-quality master SRT destination while simultaneously pushing multiple lower-bitrate RTMP feeds to social platforms—completely bypassing local office bandwidth bottlenecks. Furthermore, production assistants or clients can monitor the active playlist, clip countdowns, and system health status globally via the Web UI interface, ensuring zero performance impact on the primary hardware-accelerated video rendering engine.
System Requirements & Network Architecture
You can run Playdeck in the cloud or data centers on almost any modern virtualized or physical machine. This provides massive internet bandwidth for handling multiple parallel stream outputs and high-bitrate ingests compared to typical office DSL or Wi-Fi connections.
Operating System: Any standard Windows 11 (64-bit) environment.
Remote Management: The system can run completely “headless” (without a physical monitor attached). You can connect and manage the interface entirely via Remote Desktop Protocol (RDP).
Hardware & GPU: While standard hardware requirements apply, a dedicated GPU (e.g., NVIDIA) is highly recommended to handle hardware decoding for common codecs like H.264.
Base Specifications: For a detailed breakdown of recommended components, check out our Playdeck PC Build Guide.
Remote Inputs
Playdeck features an intelligent ingest engine that automatically detects your input source type. A major technical advantage: Playdeck does not constantly consume bandwidth for all streams. It initiates the stream network pull dynamically right before the clip is scheduled to air (one clip ahead in the playlist), allowing you to queue an infinite number of remote cameras or feeds without overloading your network.
Adding a Stream: Drag and drop the Stream Icon (located between the two playlists) directly into your playlist, then enter your ingest URL.
SRT & Live Feeds: Feed low-latency Secure Reliable Transport (SRT) or generic stream links directly into your timeline. For detailed stream configuration, see our Input Streams Guide.
YouTube Ingest: Paste any YouTube video or livestream URL. After Playdeck scans the link, right-click the item in your playlist and navigate to Video Tracks or Audio Tracks to manually select your preferred stream quality. Learn more in our YouTube Integration Guide.
Remote Outputs
Distribute your playout signal from your cloud server or studio to any remote destination with maximum efficiency:
Direct Cloud Streaming: Use the native streaming options to push your output directly to major cloud platforms (YouTube Live, Twitch, Facebook Live) or custom RTMP/SRT media servers.
Low-Latency Master Control: Deliver high-quality SRT output feeds to enterprise cloud switchers or decentralized broadcast facilities.
Virtual Monitoring: Map Playdeck’s output to virtual camera and audio drivers to route the live feed directly into video conferencing tools (Zoom, Microsoft Teams) for instant client approval or remote monitoring.
Remote Control & Automation
Playdeck offers a deep matrix of network commands, remote interfaces, and hardware trigger support divided cleanly within the settings menu.
Network > Remote Control
Web User Interface: Access a dedicated, mobile-friendly remote layout from any smartphone, tablet, or external browser. Simply scan the QR Code displayed in this menu section to launch it instantly without manual activation steps.
Bitfocus Companion: Control your playout from anywhere via a physical Stream Deck or virtual buttons. Review the integration steps in the Companion Documentation.
Playdeck API: Connect via WebSockets (REST API planned) to send commands or read live playlists, playout statuses, and events. This API forms the exact foundation of our own Web UI Remote Control. Read the technical syntax in the Playdeck API Reference.
Network > Incoming
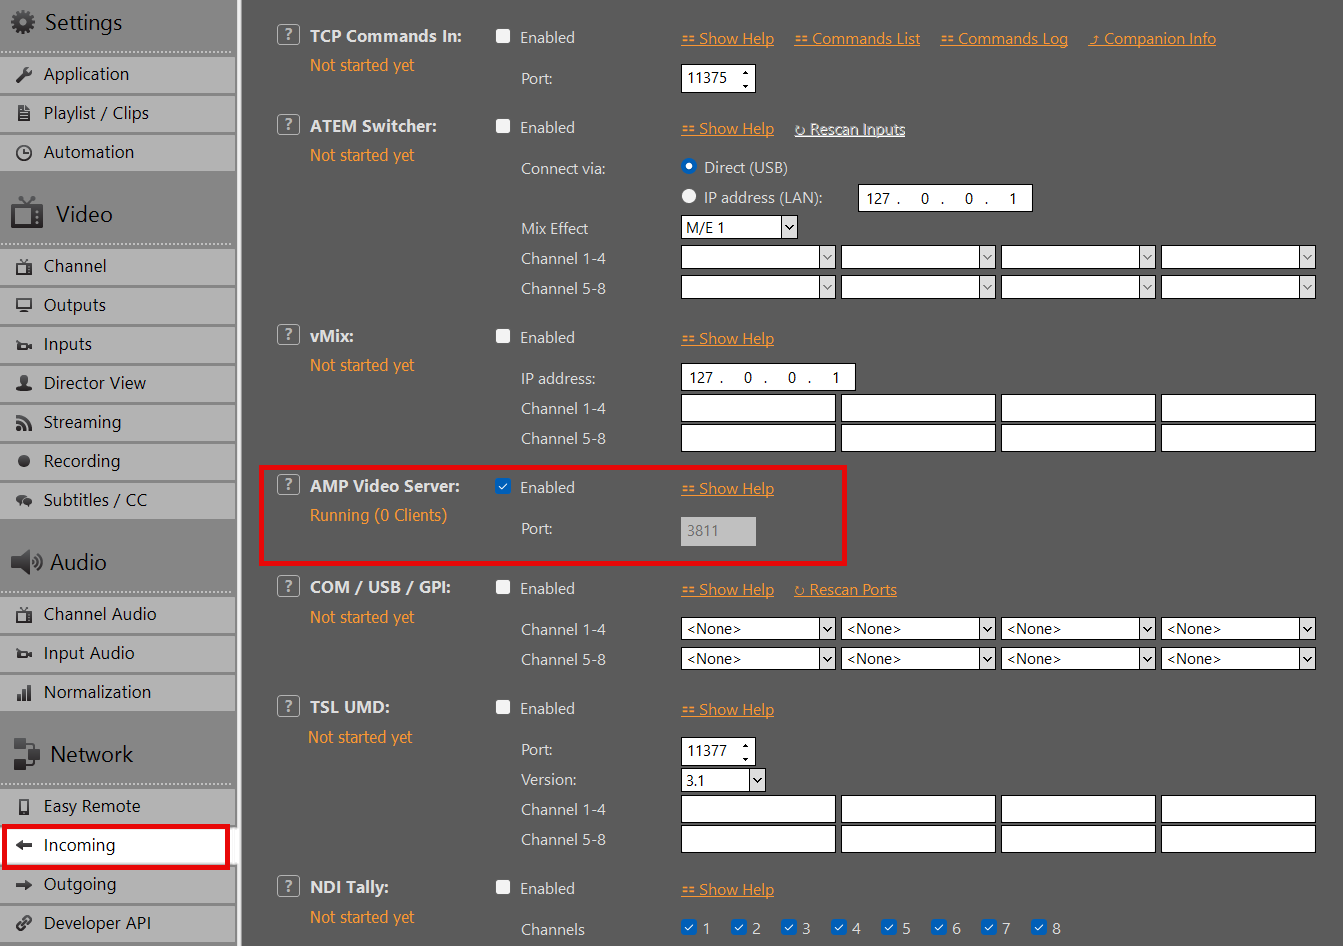
TCP Commands: An open, versatile interface used to fully remote-control Playdeck using third-party apps, including dynamically inserting new clips or initiating streams. See the complete command list in our TCP Commands Guide.
ATEM & vMix Integration: Map local or LAN-based ATEM Switchers (via USB/Network) and vMix instances to act as automatic CUE+PLAY triggers the exact moment a designated input goes live.
Hardware Triggers (COM/USB): Connect older or highly customized physical hardware devices utilizing a closed-circuit setup for instant CUE+PLAY actions.
Broadcast Standards (TSL UMD & NDI Tally): Drive automated playout via industry-standard TSL UMD (supported for versions 3.1 and 5.0, perfect for hardware mixers like ROSS) or trigger playout using NDI Tally when an assigned NDI input goes live.
Network > Outgoing
TCP Commands: Instruct Playdeck to automatically send custom, individual strings to external third-party hardware or software whenever specific events occur (e.g., Clip/Block Start, Action Buttons, or Overlay triggers).
TCP Events: Broadcast predefined, automated system status changes from Playdeck to keep external control systems perfectly in sync with your active playout timeline.
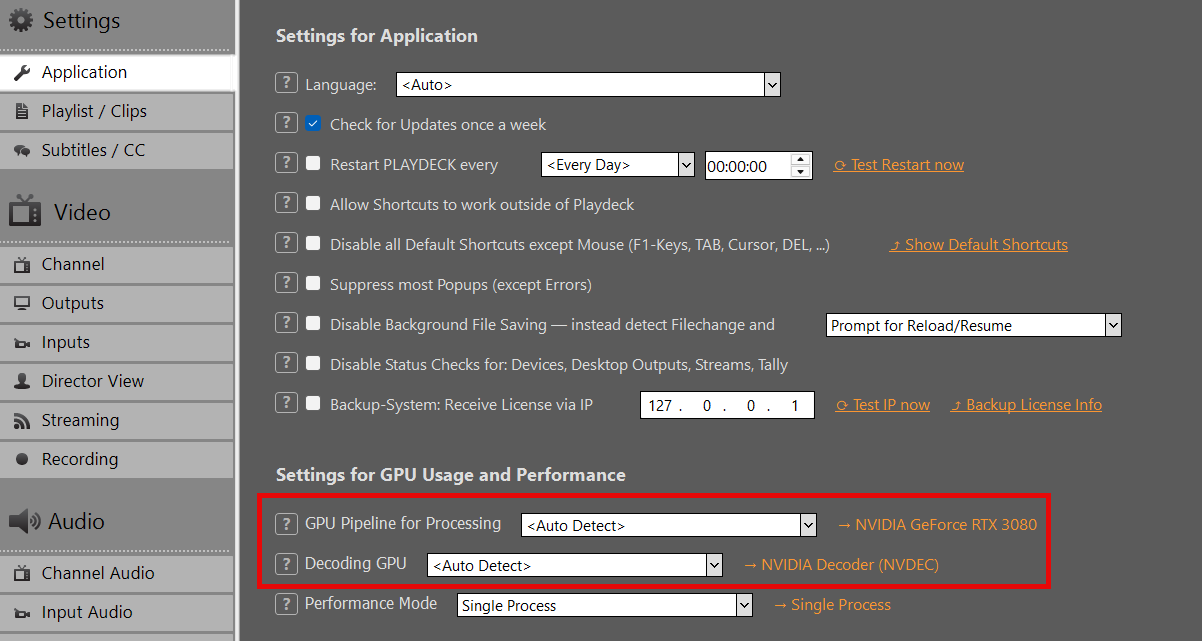
Graphics card NVIDIA GPU with at least Turing architecture (GTX 16xx / RTX 20xx or newer). Recommended: RTX 30xx / 40xx series (e.g. RTX 3080, 4070, 4080). → Required for 10-bit decoding/processing/encoding.
SDI output card Blackmagic Design DeckLink with 10-bit and HDR metadata support: – DeckLink 8K Pro – DeckLink 12G Extreme – DeckLink 6G / 12G models (Quad 2 / Duo 2 / Mini Recorder 4K etc.) → Older models (e.g. DeckLink 4K Extreme without 12G) may be limited to 4K 30p or no HDR metadata.
You can check your Graphics card in PLAYDECK:
Enabling HDR Mode
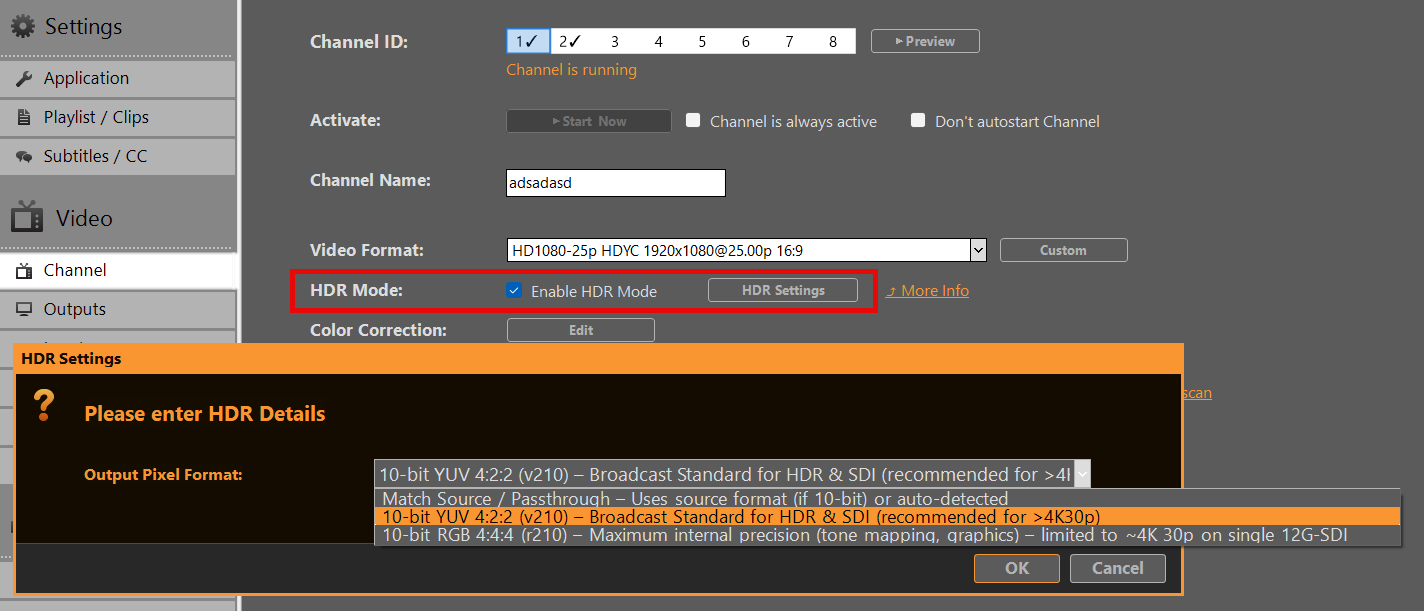
HDR Mode needs to be enabled in the Channel Settings. In HDR Settings, choose one of the following Output Pixel Format. Start with v210 unless you specifically need RGB processing.
Match Source / Passthrough Uses the source pixel format (if 10-bit) or auto-detected → May default to r210 on HLG/PQ content.
10-bit YUV 4:2:2 (v210) – Broadcast Standard for HDR & SDI (recommended) → Preferred choice for most SDI workflows. → Full compatibility up to 8K 60p on single-link 12G-SDI. → Recommended when frame rate > 4K 30p.
10-bit RGB 4:4:4 (r210) – Maximum internal precision → Best for tone mapping, keying or heavy internal processing. → Limitation: On many DeckLink cards limited to ~4K 30p (bandwidth constraint on single 12G-SDI link). → Use with caution at higher frame rates.
Setting up SDI Output
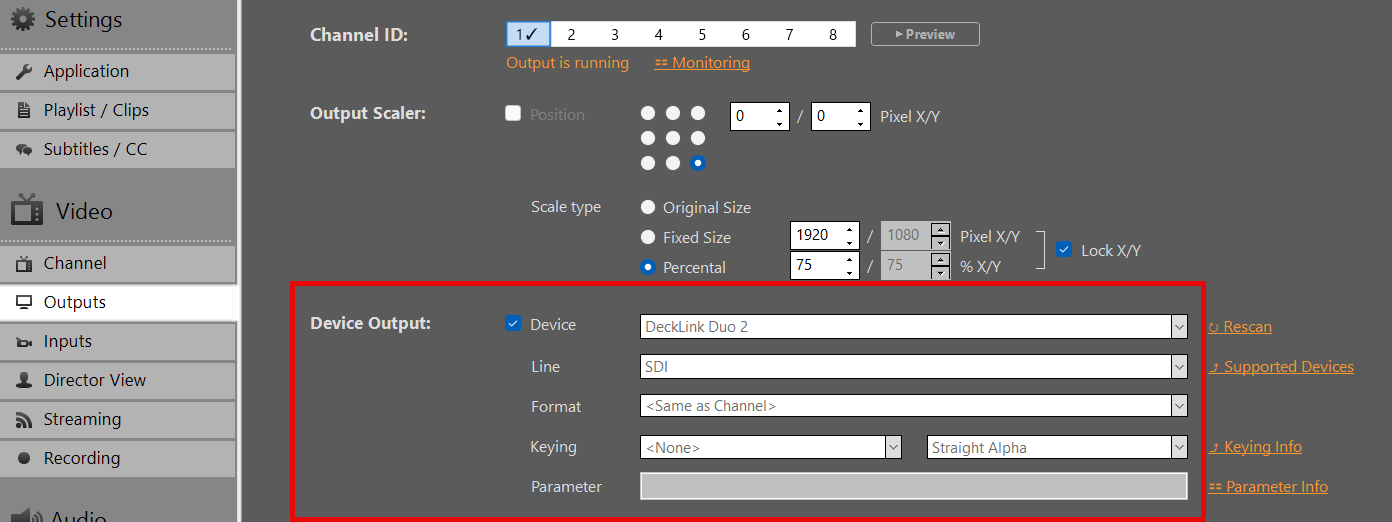
In Output Settings, select your DeckLink card as the output device. 10-bit Output will be activated automatically. If the Card doesn’t support it, it will fall back to SDR.
Important: HDR metadata (PQ/HLG) is carried in VANC (Vertical Ancillary Data) on SDI. Most modern DeckLink cards and downstream devices (monitors, switchers) detect this automatically when 10-bit signal is present. You need to re-enable your Device, if you changed Output Pixel Format in HDR Settings.
Setting up Recording
Select a Format/Container (recommended: MOV or MKV).
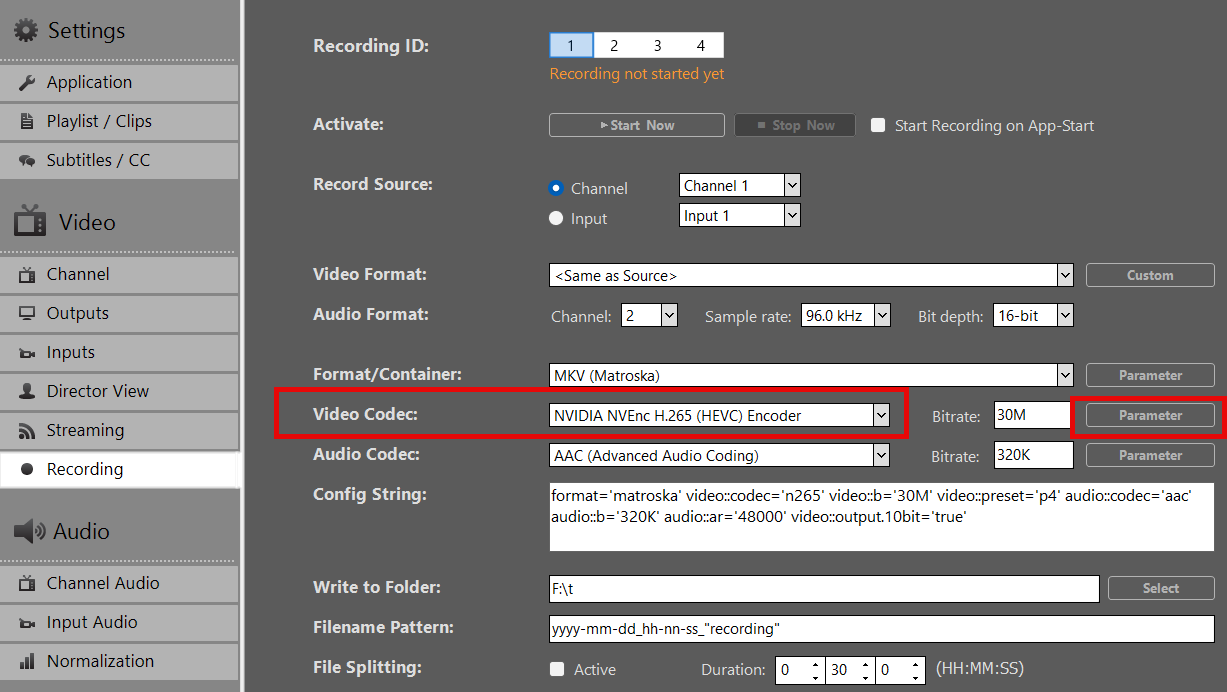
Pick NVIDIA H265 HEVC as Video Codec. Currently, no other Video Codecs are supported for HDR.
Apply your preferred bitrate (50–100 Mbps recommended for 4K HDR)
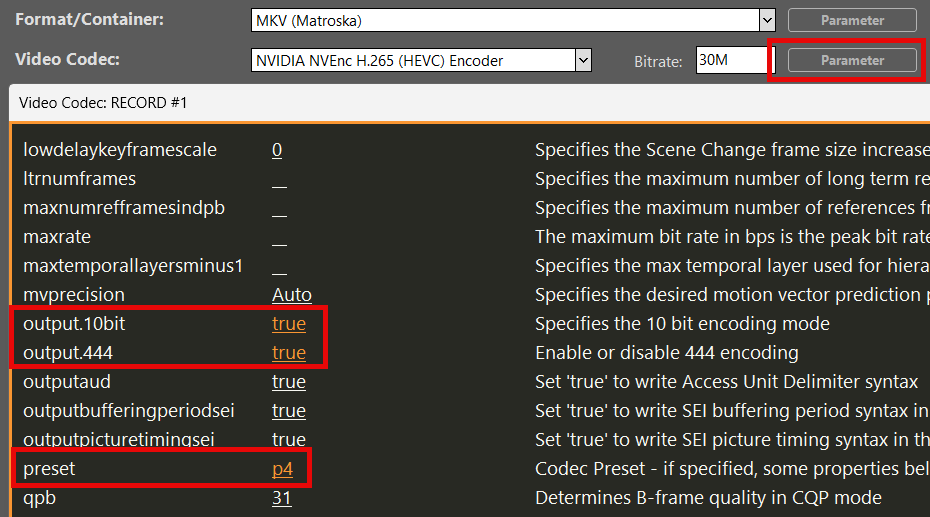
Click on Parameter behind Video Codec and set these options: – output.10bit = true – output.444 = true (! Only is “10-bit RGB 4:4:4 (r210)” selected in HDR Settings) – preset = p4
Result: Recorded file contains BT.2020 + HLG/PQ metadata when source was HDR.
Note:Preview on standard HDMI SDR monitors may appear washed-out or flat for HDR content — this is expected behavior.
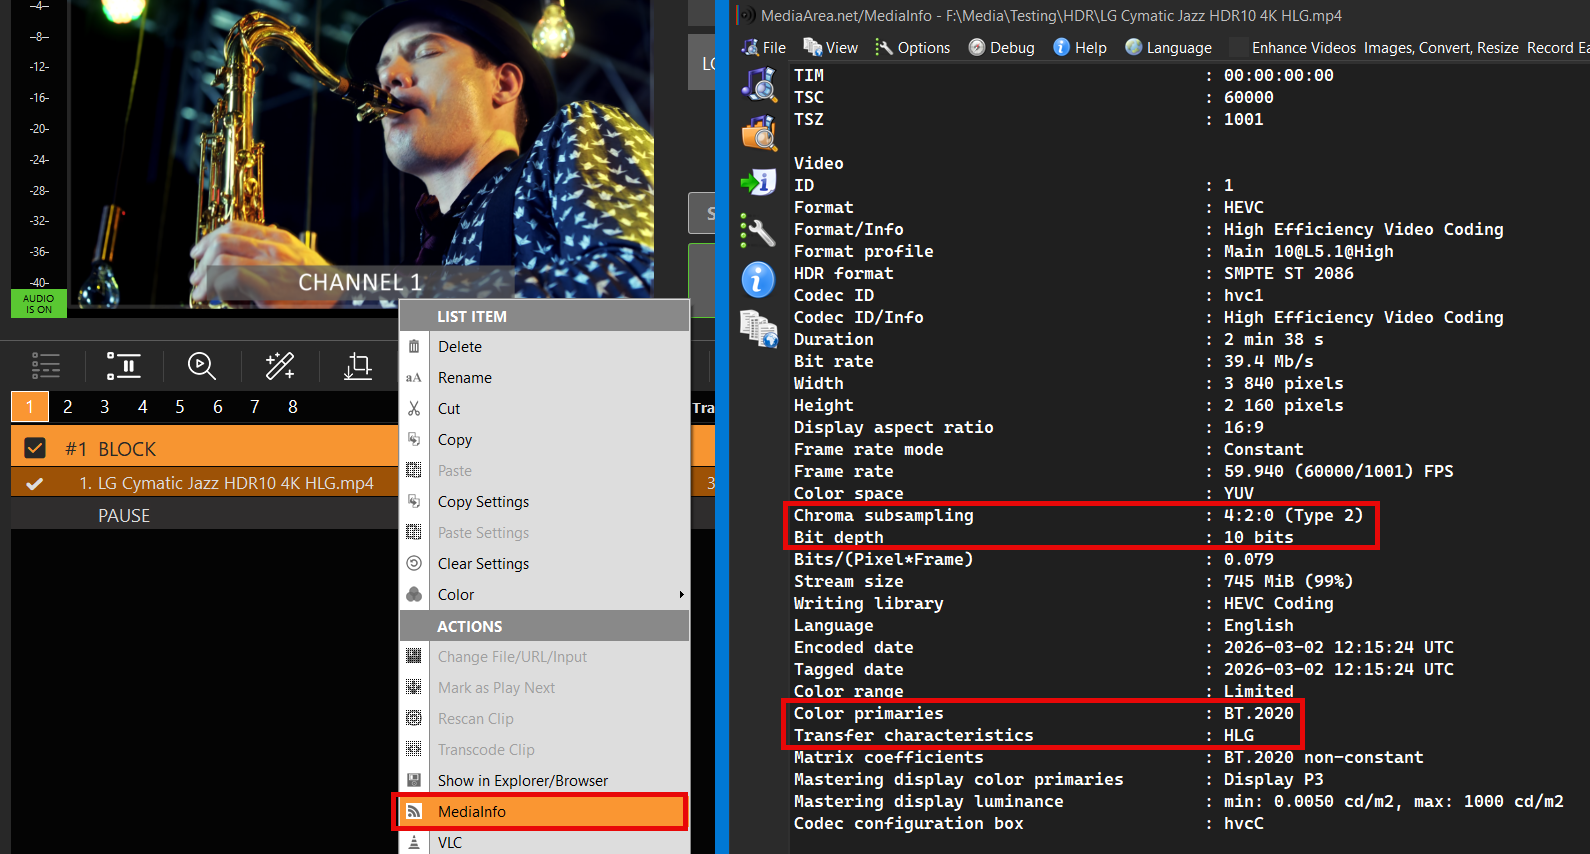
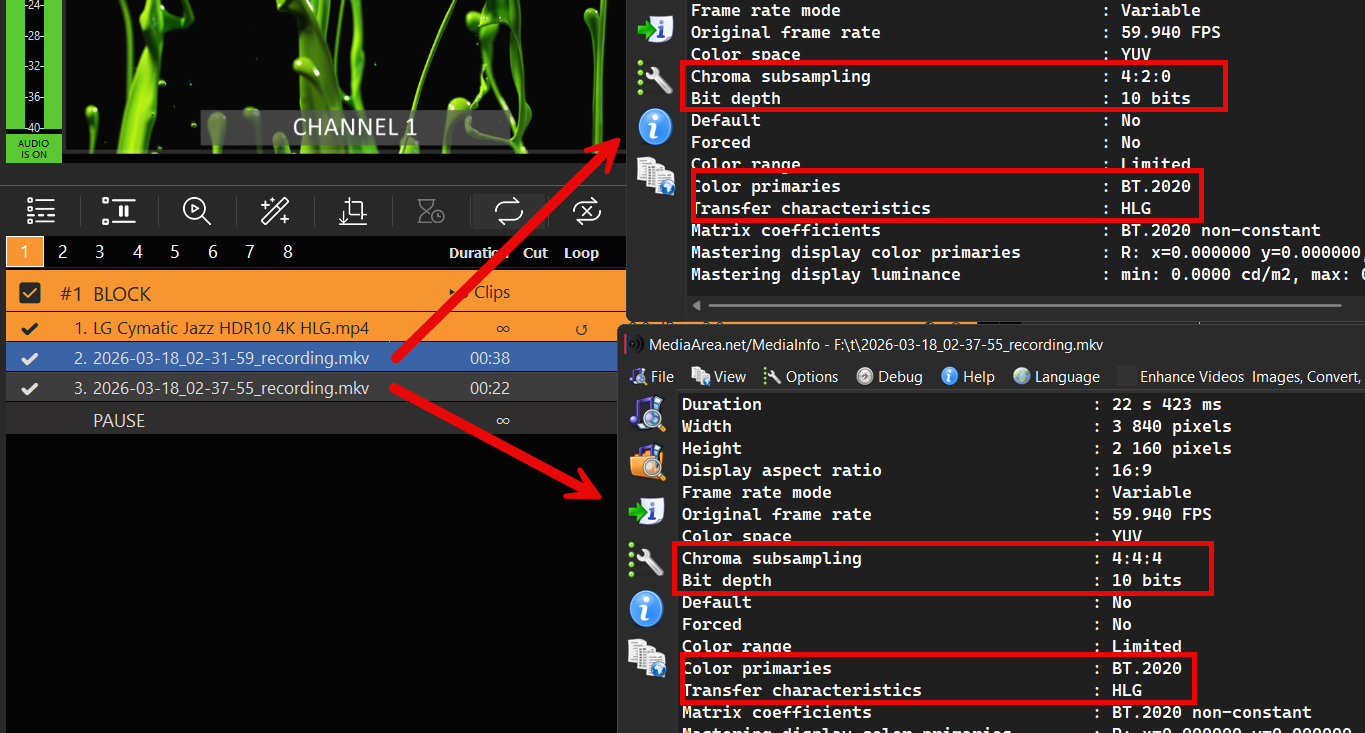
You can check on the Clip’s HDR properties by right-clicking the Clip and selecting MediaInfo:
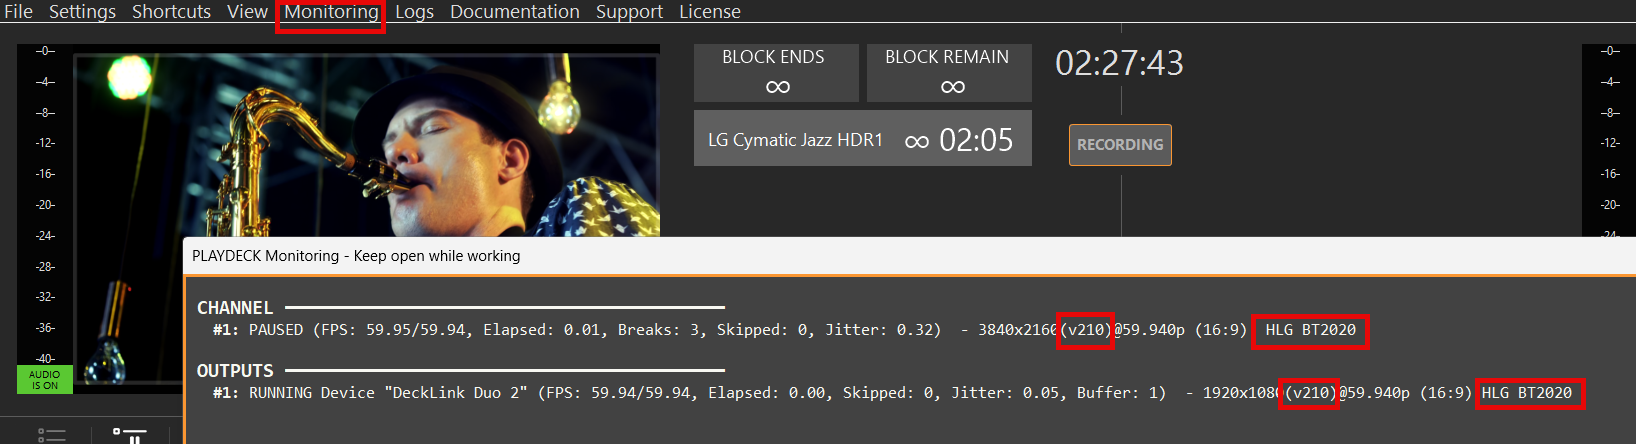
To verify, if PLAYDECK is correctly processing your HDR File, open Monitoring from the Main Menu and check these properties: – Pixel Format (v210 or r210) – Transfer characteristics (HLG or PQ) – Color primaries (BT2020)
This allows you to check, if your SDI Card is sending HDR without a SDI HDR Monitor.
To verify your Recording, open the Recording Folder and Drag Drop your new File into the Playlist.
It should show the same HDR Meta Data as your Original (or your HDR Settings):
Troubleshooting
Working with HDR requires sufficient system bandwidth to handle increased pixel data and frame sizes, which can be tested using Blackmagic’s SignalGenHDR.exe tool. Users can stress-test their setup by running4 simultaneous instances to output 4K signals and verify 12G-SDI throughput capacity.
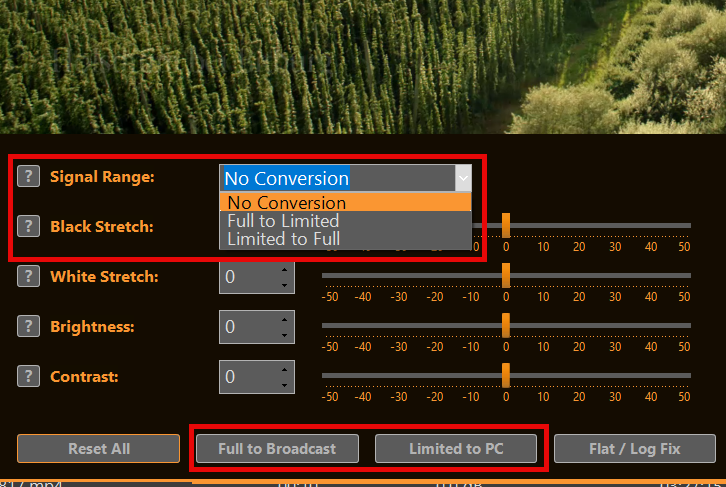
Video Range (Limited / Broadcast): Uses 16–235 (8-bit). Black = 16, white = 235. Standard for TV, broadcast, streaming — preserves headroom.
Full Range (PC / Data): Uses full 0–255. Black = 0, white = 255. Native for computer monitors, graphics, photos.
Color Range Expansion converts Video → Full Range (lifting blacks, expanding whites) to avoid washed-out appearance on PC displays. Mismatches cause crushed blacks, blown whites, or grayish/milky picture.
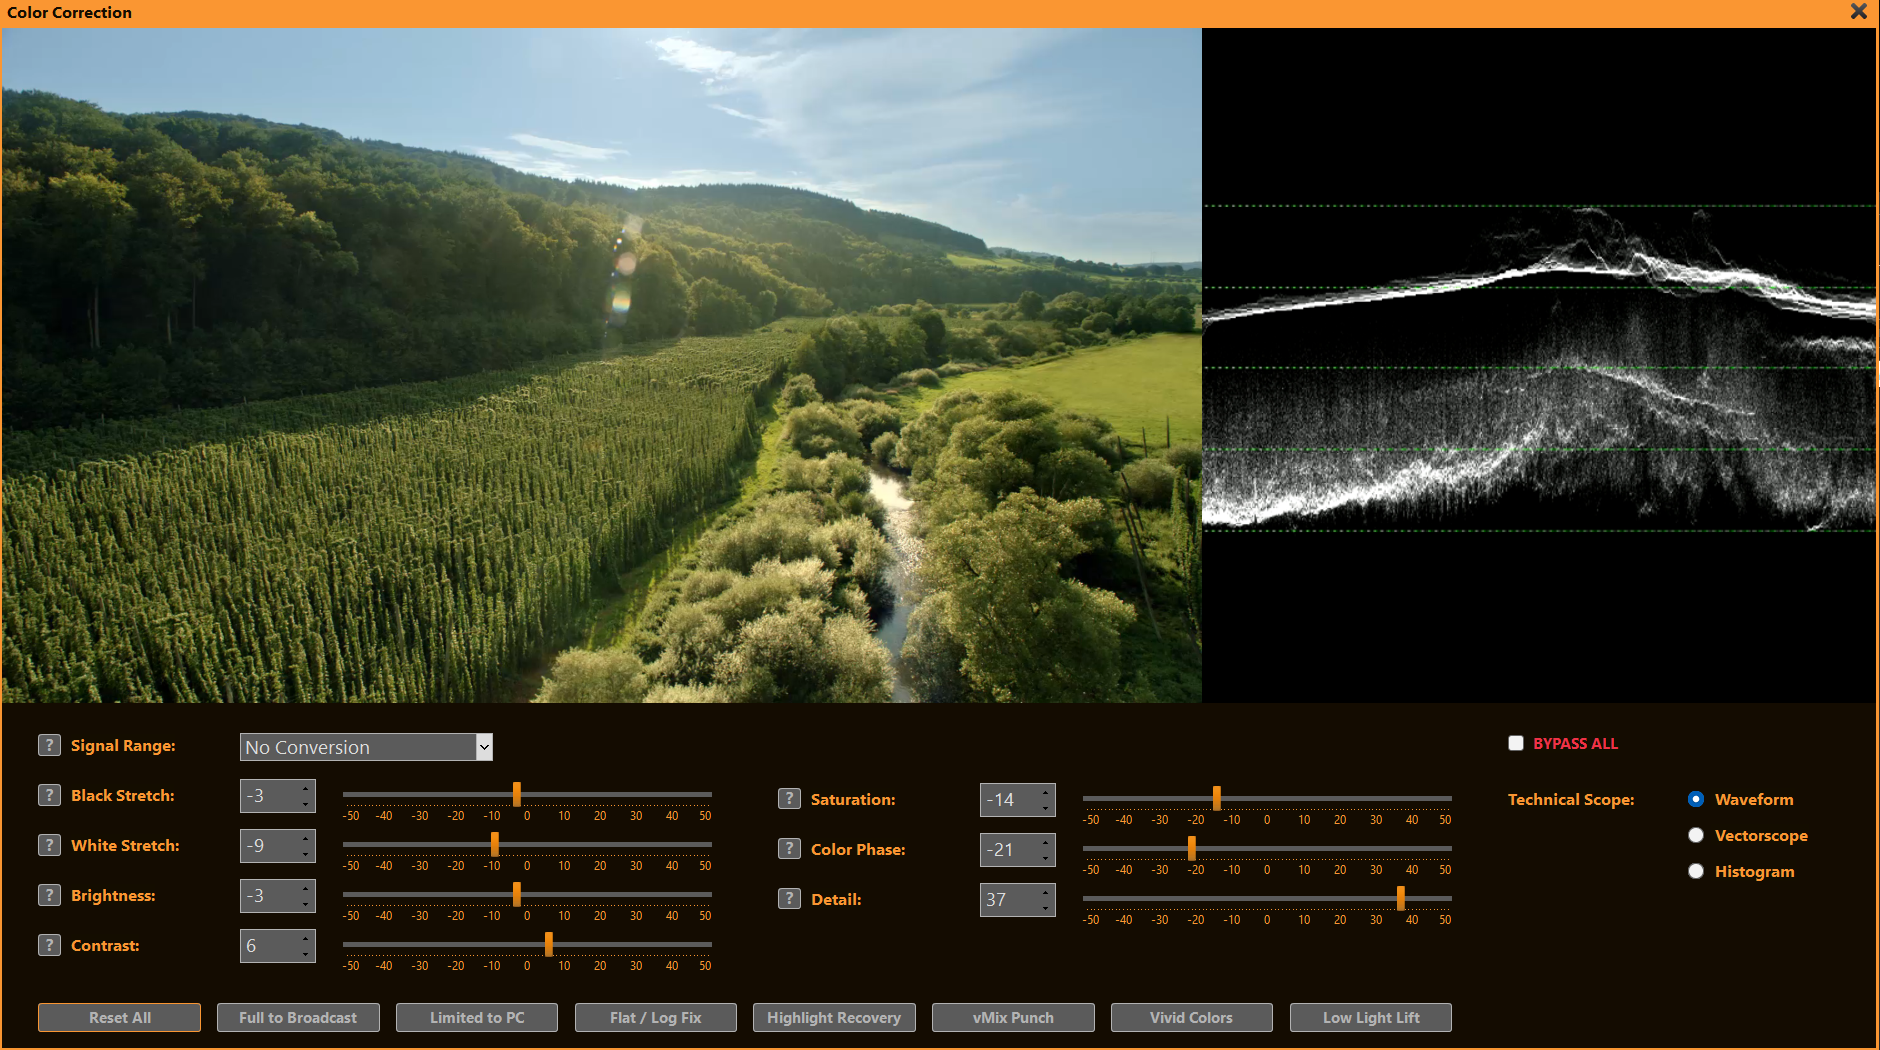
With PLAYDECK you can quickly convert between both modes by selecting the signal range or one of the preset buttons:
Color Adjustment Controls
PLAYDECK’s sliders help solve common broadcast and live-production challenges quickly:
Black Stretch Recover lost shadow detail in underexposed footage or create deeper, more cinematic blacks for dramatic looks.
White Stretch Bring back highlight detail in overexposed shots (e.g. skies, lights) or add punch to flat, washed-out highlights.
Brightness Correct overall too-dark or too-bright sources without changing contrast — ideal for matching multiple cameras.
Contrast Make flat, low-energy pictures pop for sports/news or reduce harsh contrast on harsh studio lighting.
Saturation Boost dull, desaturated camera feeds (e.g. ENG cameras) or tone down overly vivid graphics/logos for broadcast-safe output.
Color Phase Fix green/magenta casts from mismatched lighting, warm up cool skin tones, or match color temperature between sources.
Detail Sharpen soft, low-resolution streams or reduce noise in low-light footage without introducing artifacts.
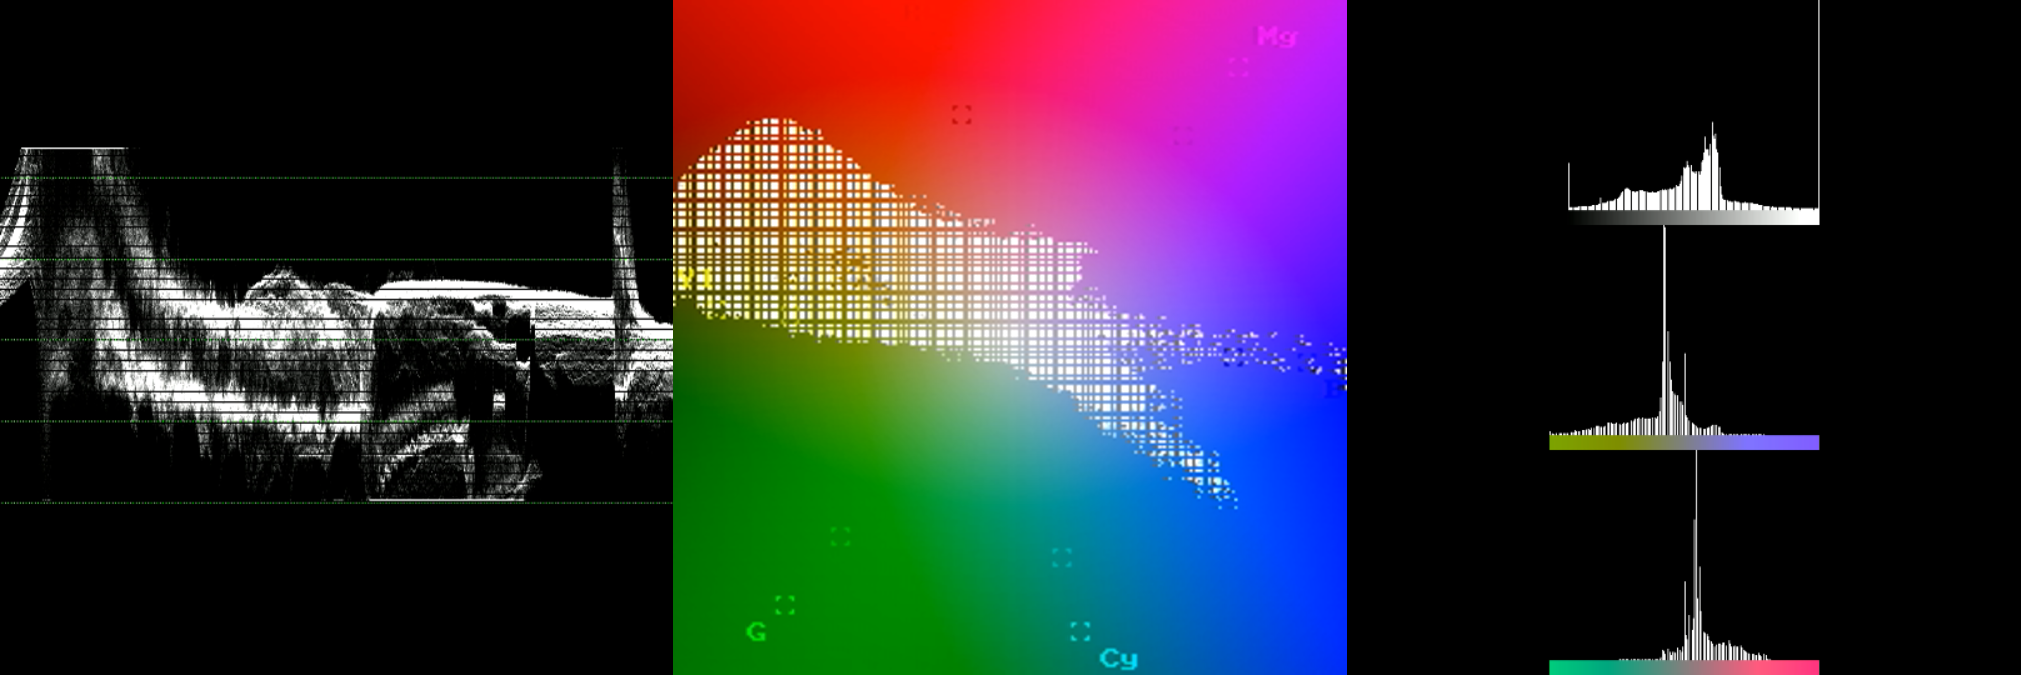
Tools: Waveform, Vectorscope & Histogram
hese professional monitoring tools appear in a dedicated panel next to the video preview — perfect for precise color and exposure control during live production or playback.
Waveform: Check overall exposure and luminance levels quickly. Spot clipped highlights (flat at 100 IRE), crushed blacks (piled at 0 IRE), or mismatched camera levels so you can adjust brightness/black/white stretch before broadcast.
Vectorscope: Verify and correct color balance and saturation. Ensure skin tones stay in the correct flesh-tone line, detect unwanted color casts (e.g. green from LED lights), and confirm broadcast-legal saturation without over-the-top vividness.
Histogram: Analyze tonal distribution across the image. Identify if shadows/midtones/highlights are evenly spread or if detail is lost in dark/bright areas — ideal for fine-tuning contrast and stretch sliders to achieve a balanced, professional picture.
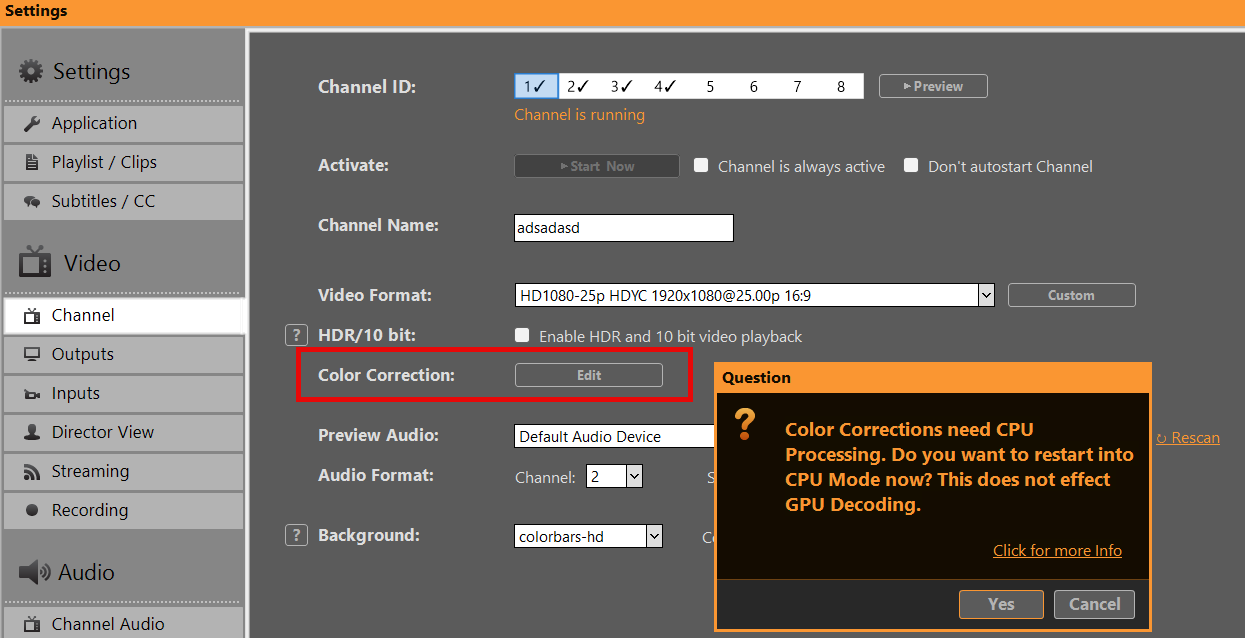
Why is CPU Processing required?
When using Color Correction (or certain other video filters) for the first time, PLAYDECK may prompt you to switch to CPU Processing:
Reason: Certain video filters (vfilters) on inputs and playlists rely on FFmpeg processing, which runs only on the CPU. The GPU pipeline does not support these standard filters, so CPU mode is required for them to work correctly — ensuring reliable playback and effects.
GPU Processing handles: Scaling, Mixing, Overlays, Format Conversion, and many Effects.
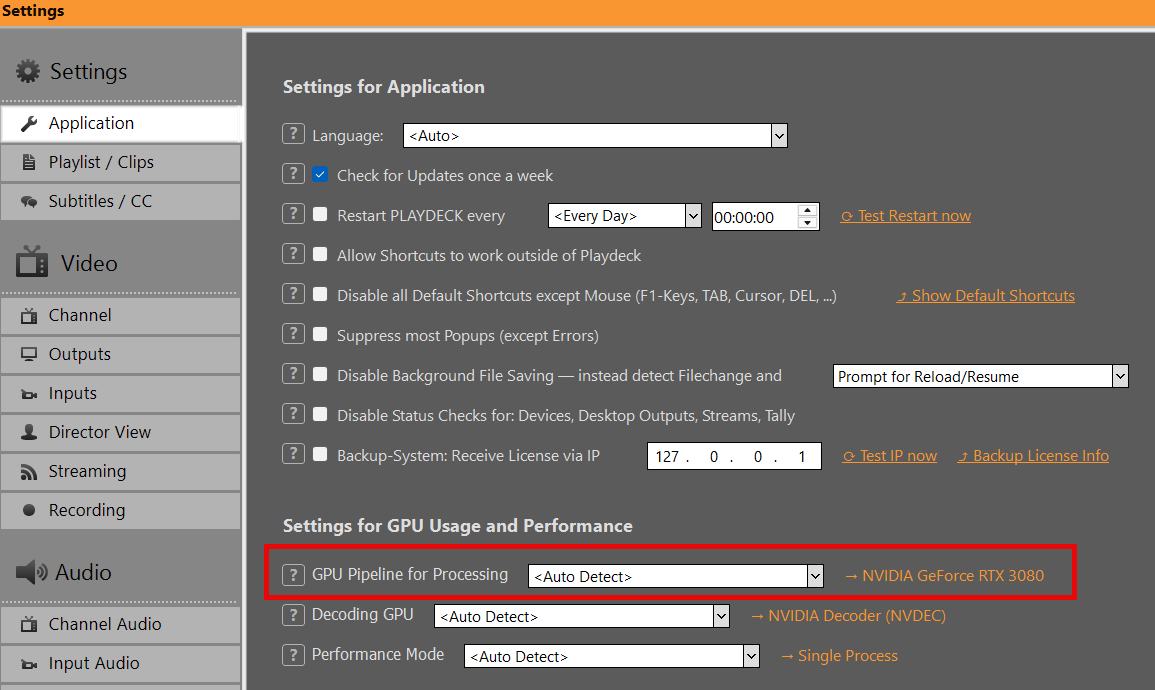
Switching to CPU mode keeps all features working normally — the only difference is higher CPU usage (and lower GPU load).
You can switch back to GPU Processing anytime in the application settings:
Simple, Flexible & Transparent: PLAYDECK is available in three editions and multiple license models to fit your production needs. All prices exclude VAT and can be processed in your preferred currency via our global shop. Choose the plan that matches your independent playout channels and workflow requirements.
We offer three editions tailored to your production scale, primarily differing in the number of independent main playout channels you can control simultaneously:
LITE: 1 independent playout channel – €190.80 per year (≈ €15.90/month, save €132 vs. monthly billing)
PLUS: 2 independent playout channels – €430.80 per year (≈ €35.90/month, save €288 vs. monthly billing)
STUDIO: 8 independent playout channels – €994.80 per year (≈ €82.90/month, save €684 vs. monthly billing)
All editions share the same powerful, rock-solid core: native support for virtually every codec and container format, low-latency GPU decoding, professional hardware I/O (SDI/HDMI via Blackmagic, AJA, Deltacast), IP streaming (NDI®, SRT, RTMP), graphics overlays, and automated failsafes.
For a full, detailed feature comparison chart (audio channel routing, recording channels, advanced scheduling, etc.), visit our official Plans & Pricing page: https://playdeck.tv/plans-pricing/
Choose Your License Model
PLAYDECK offers flexible licensing to match different workflows:
Online Shop License (most popular): Tied to your email in a personal License Pool. Requires internet for transfers/check-in/out. Easy portability.
USB Dongle License: Hardware-based (USB stick). No internet needed for daily use/activation. Portable by moving the dongle.
Offline License (special cases): Permanently bound to one specific PC (System ID). No internet ever required. Not portable without re-issuance.
Free Trial Edition (incl. Limitations)
Download and test PLAYDECK completely free—no time limit, no credit card required. Switch editions instantly inside the software via Menu → License → Change Trial Edition.
Limitations: — Watermark on all video outputs. — Occasional random short audio mutes (clearly signaled on screen).
All other production features are fully unlocked—ideal for comprehensive real-world testing of your local or cloud setup before purchase.
Quick Steps: — Shop / Online Pool: Open the License Manager inside PLAYDECK, log in with your purchase email, and instantly check out your seat from your personal pool. — Dongle: Simply plug the physical USB security key into the machine—the software auto-detects the license immediately. — Offline: Paste the machine-bound activation key provided by our support desk into the License Manager.
Support Options
[email protected] – available nearly 24/7, even for trial users or pre-purchase questions.
No forced onboarding. PLAYDECK is built to run easily out-of-the-box. If needed (rare), we can remote-connect via RustDesk to fix issues fast.
License Portability & Backup
PLAYDECK commercial licenses are highly flexible and designed to move seamlessly between production systems:
License Type
How to Transfer
Internet Required for Move?
Lost / Crash Handling
Shop License (Pool)
Check-in/out via internal License Manager (tied to email)
Yes
Free instant pool reset—simply email our desk.
Dongle License
Unplug and connect the physical USB stick to the new computer
No
Hardware replacement options available upon verification.
Offline License
Bound to one PC—email your new System ID for secure re-issuance
No
System ID re-issue possible for hardware upgrades.
Perfect for freelancers, technical rental fleets, and dynamic multi-PC staging environments.
NGO / Educational / Non-Profit: 25% discount on all licenses (any edition/duration). Email [email protected] with proof (e.g., official email/certificate) → we send discount code or invoice.
Multi-Year Pre-Pay: Up to 5 years with 25% discount on total. Contact support for quote.
No Lifetime License: We release regular updates for driver/OS/codec compatibility and third-party fees. Lifetime would mean missing critical improvements.
If you like to purchase a larger number of licenses, we can discuss special options – please contact us.
Upgrades, Downgrades & Cancellations
Upgrades & Downgrades: Possible at any time. We issue a pro-rata refund or store credit for your remaining license runtime, allowing you to seamlessly purchase your new tier. Due to automated shop infrastructure, direct mid-term upgrades cannot be processed automatically.
Cancellations: Cancel your subscription at any time via your user account at playdeck.tv or by emailing [email protected]. You will retain full commercial access until the exact end of your current paid billing period. No cancellation penalties apply.
Dongle Details
Dongle licenses share the exact same pricing structure as our annual online plans (minimum 1-year duration required). Extensions and renewals are processed remotely via network updates—no new hardware shipping is required for renewals.
One-Time Hardware Fee: €15 for the rugged USB security key (plus standard local shipping and handling costs).
Key Operational Advantages: — 100% Air-Gapped Security: Completely offline activation and continuous validation. No internet connection is ever required for daily deployment. — Instant Physical Portability: Move your license between production rigs instantly by simply plugging the USB key into the active machine.
Financial Example: A PLAYDECK Plus Dongle costs €430.80 per year plus a one-time €15 hardware fee.
Reseller Conditions
Interested in reselling PLAYDECK in your region or integrating it into your media staging catalog? We welcome international B2B partners and keep our referral process straightforward:
— Full authorization to market, promote, and sell PLAYDECK via your digital platforms. — 25% standard commission per referred sales transaction (processed via custom customer discount codes or direct payout architecture). — Fast commission claims backed by simple verification of prior customer interaction (e.g., email trail copy). — Access our unified digital asset deployment kit containing official logos, brand typography, and promotional banners: Download deployment kit.
Email [email protected] to launch your partnership—we keep our partner onboarding highly efficient.
This article will show how to create a Audio Playlist and combine this with a looping video, perfect for pre-show waiting Loops.
We start by creating a loop block and insert some mp3 audio file to the block:
Now we add a default image, which is shown, whenever audio-only clips are playing:
And voila, we have a pre-show waiting loop:
But that’s not all. We can also use a video loop instead of a still image. For this we add the video as overlay with a loop setting. The video will be shown in fullscreen, if it has the same size, otherwise we can scale it in the overlay settings:
We could also add an Countdown via overlays.uno. Quick and easy: