PLAYDECK can play almost any Codec out there. If the Codec is not supported by your GPU, it always falls back to CPU to make it work. There are very view exception: NotchLC for example cant be played with PLAYDECK.
We understand, that most of you have not much control over the Video Codec selection, as you receive your Video Files from Customer right before the show.
But if you have the Time to transcode the Video Files or even more are part of the production process, then you have more options than just H.264 MP4 Files.
We recommend going with AV1, if your NVIDIA supports it, except when you need Alpha-channel, than switch to HAP. In all other cases fall back to H.265/HEVC. ProRes has the best image quality, but is not really suited for real-time playback, as it is more of an editing and post-production codec.
There is also a feature in PLAYDECK to make clips playout-ready in one step (GPU codec, and optionally playlist size, FPS and rotation). Please see this article.
H.265/HEVC
General-purpose codec. Use, if your NVIDIA GPU does not support AV1 and if you dont need Alpha-channel.
GPU Decoding: Yes, but depends on NVIDIA GPU, see this List
Quality: Good quality at all bitrates
Alpha-channel: No
Features: HDR, 10-bit color, 8K
AV1
Most efficient Codec. Use, if you your GPU supports it and you don’t need Alpha-channel. Near-lossless quality and significantly smaller file sizes than ProRes.
Quality: Better quality than H.265/HEVC, but less than AV1
Alpha-channel: Yes (with HAP Alpha and HAP Q)
Features:
ProRes
Offers highest image quality with ProRes 4444. Preserves fine details and colors exceptionally well, at the cost of high CPU load. Use only, if you can afford the CPU load and need highest possible visual quality. This is an editing codec and no real-time codec.
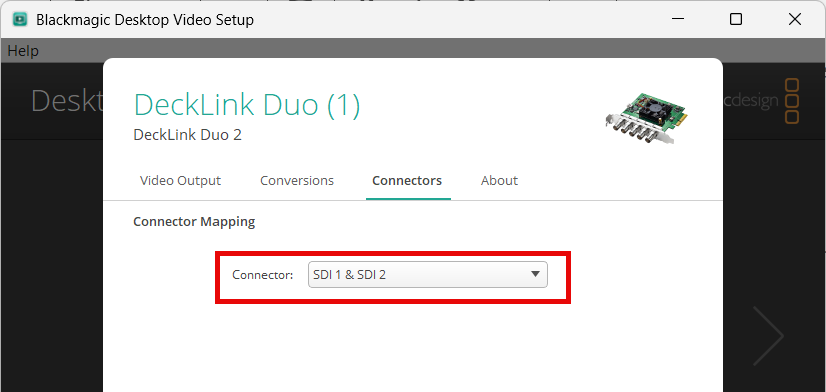
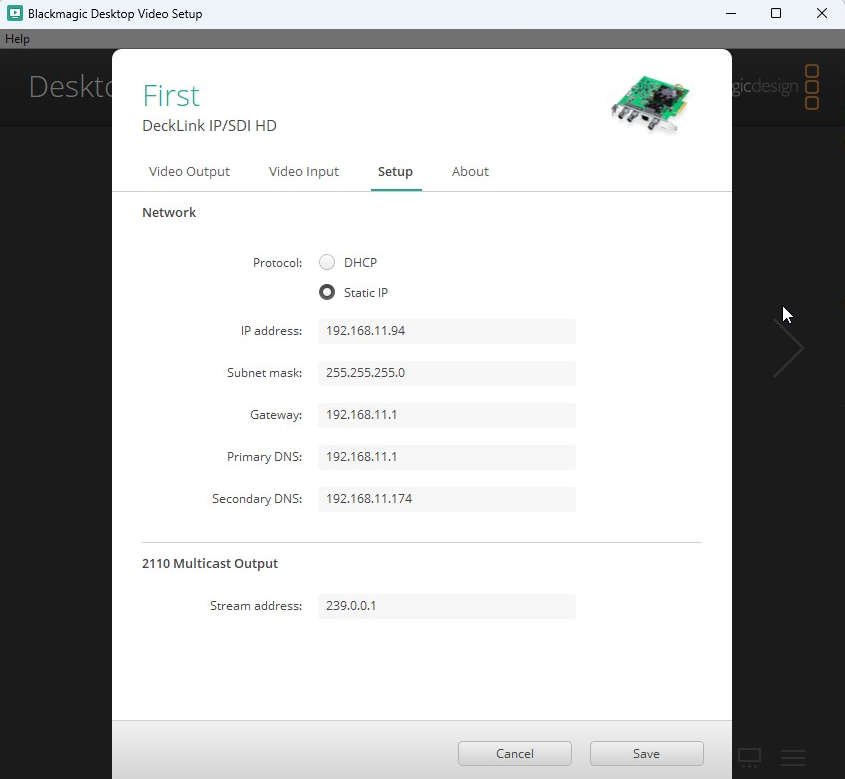
Use any Device that is capable of Internal Keying. In our example we use the Blackmagic DeckLink Duo2. Open the Desktop Video Setup and combine and first 2 SDI Outputs. Leave the other Outputs solo:
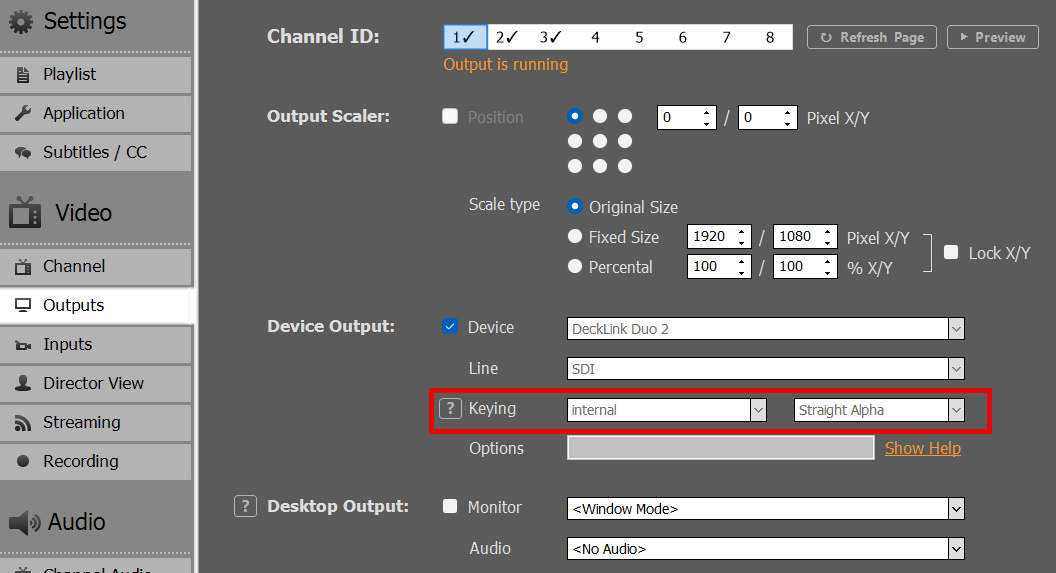
Next we enable Internal Keying in Channel 1 in PLAYDECK:
2. Setup of BG FEED
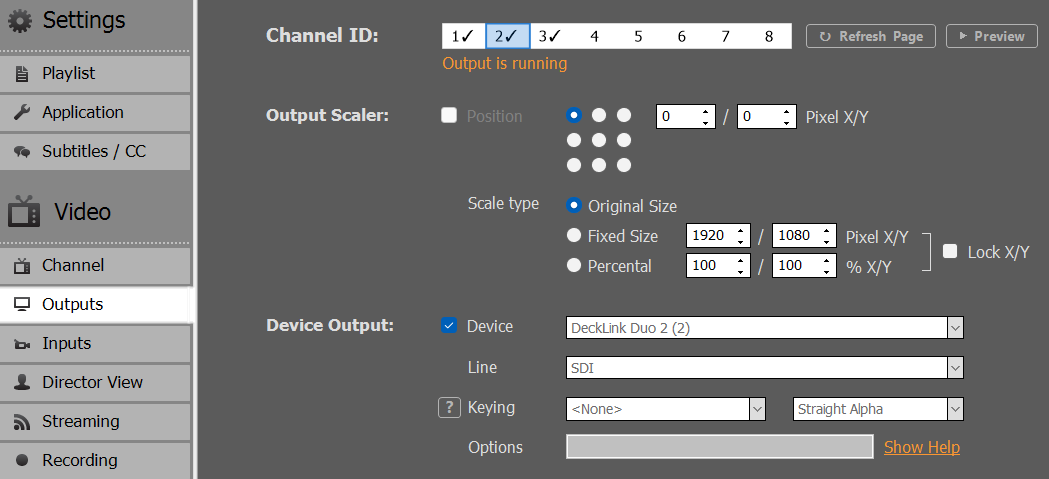
Now we need to send our BG FEED to SDI 1. For this we use Channel 2 and send it via SDI Loop from SDI 3 to SDI 1. Please note, that because we combined SDI 1+2, SDI 3 is now designated as “Decklink Duo 2 (2)”:
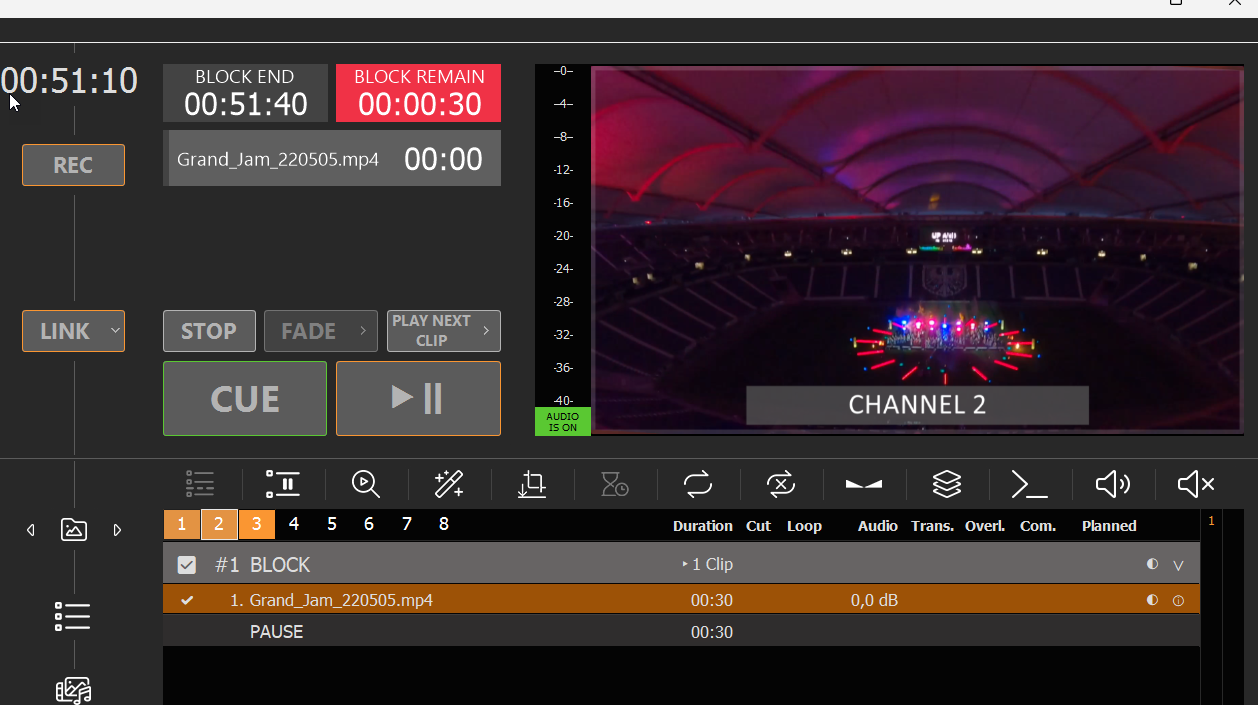
Then we start any video content on Channel 2:
If you have a SDI Monitor on SDI 2, you can already see the BG FEED playing there now.
We could now go ahead and play any Content with Alpha on Channel 1, which is keyed over the BG FEED, e.g. Alpha Videos (ProRes, HAP-A) or simple Overlays. But since we need our PIP FEEDBACK scaled and positioned, we need to set it up on another Channel.
3. Setup of PIP FEED
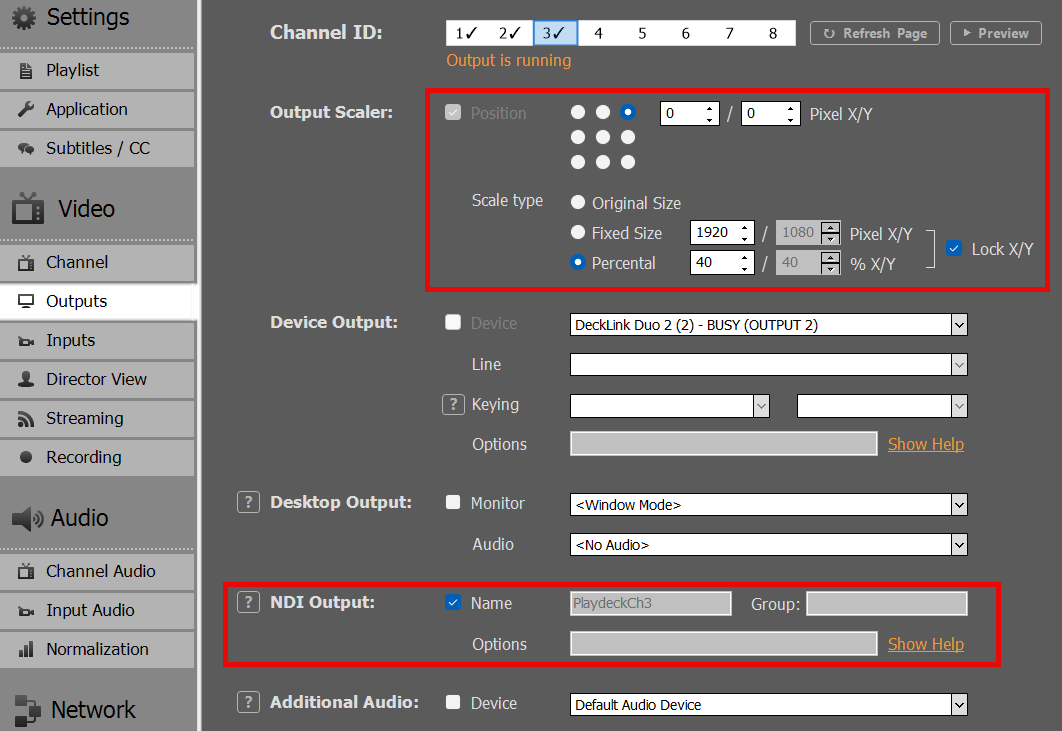
We use Channel 3 as PIP FEEDBACK, so we can play regular Video Content here. We want to send it via NDI from Channel 3 to Channel 1 and activate the Output Scaler, so that our PIP is in the UPPER RIGHT Corner:
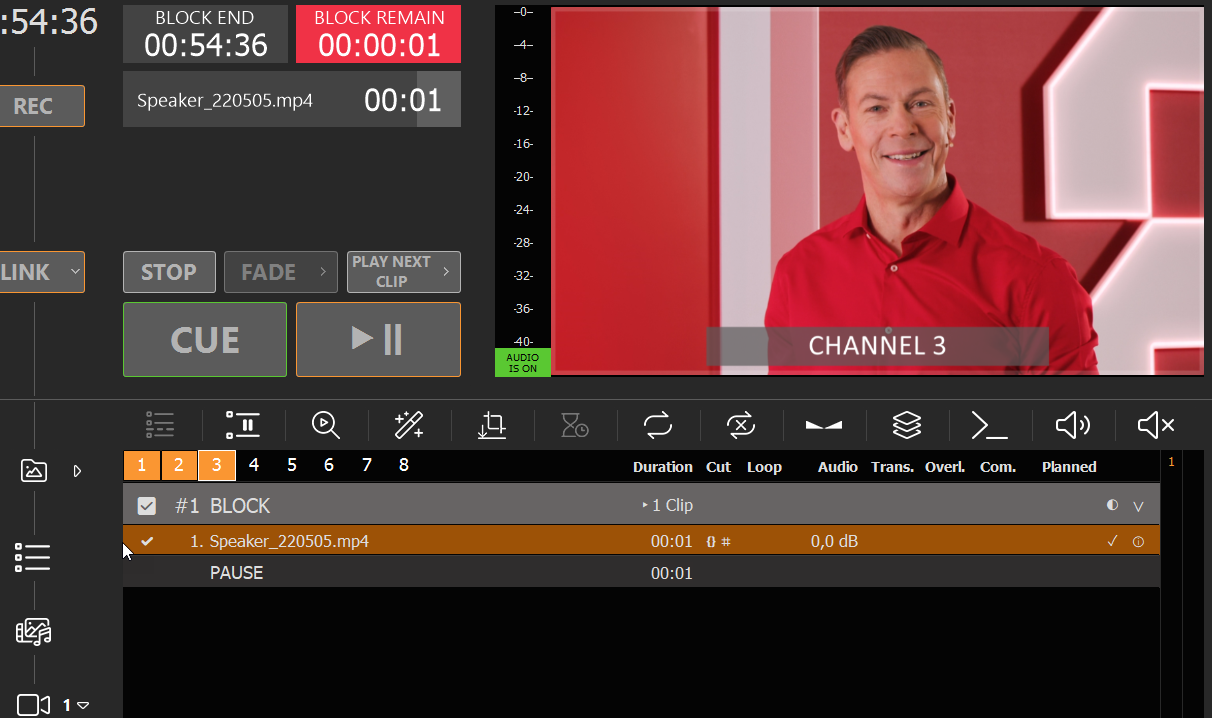
We now insert a Video Clip on Channel 3, but this could also be Live Video, Streams or anything else:
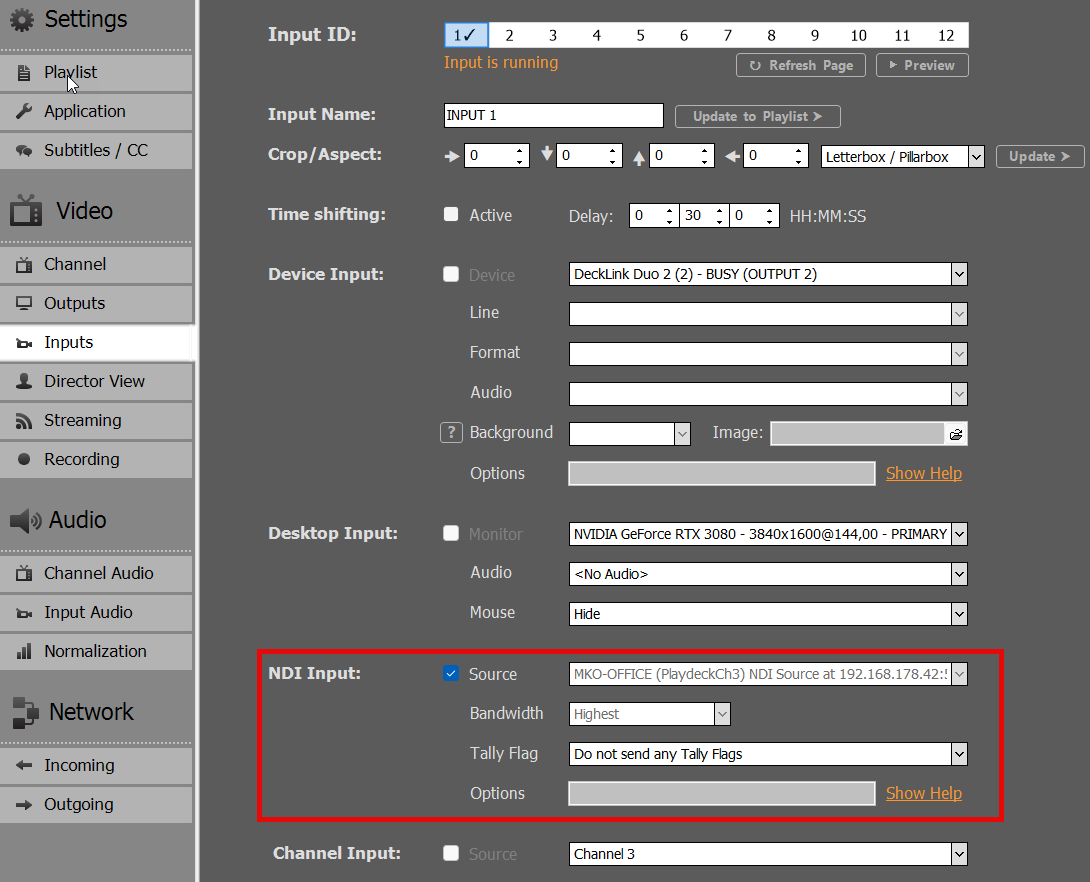
We loop this NDI Feedback to Input 1:
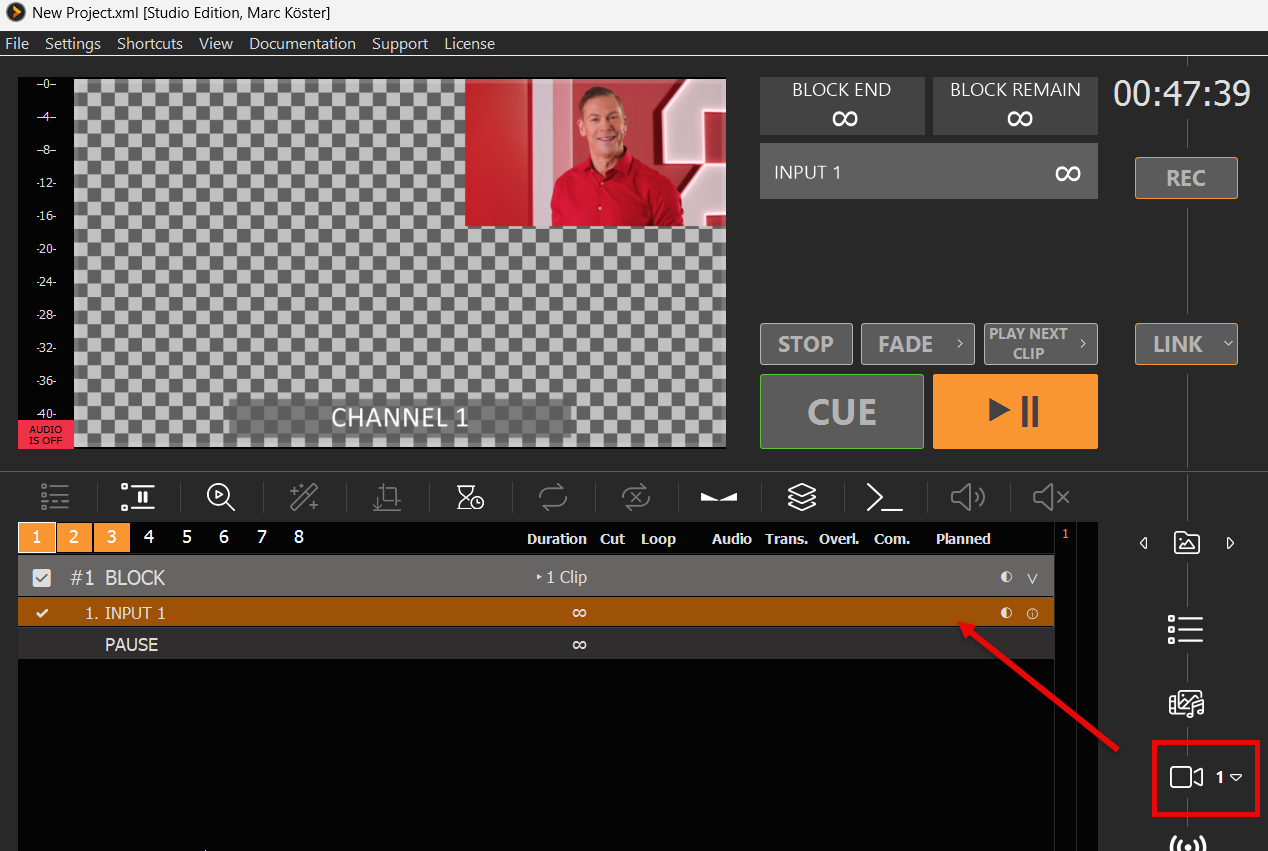
Then insert Input 1 into the Playlist of Channel 1:
We now downscaled the Channel 3 Playlist into Channel 1, which will be keyed over the BG FEED of Channel 2.
4. FINAL OUTPUT / MAIN FEED
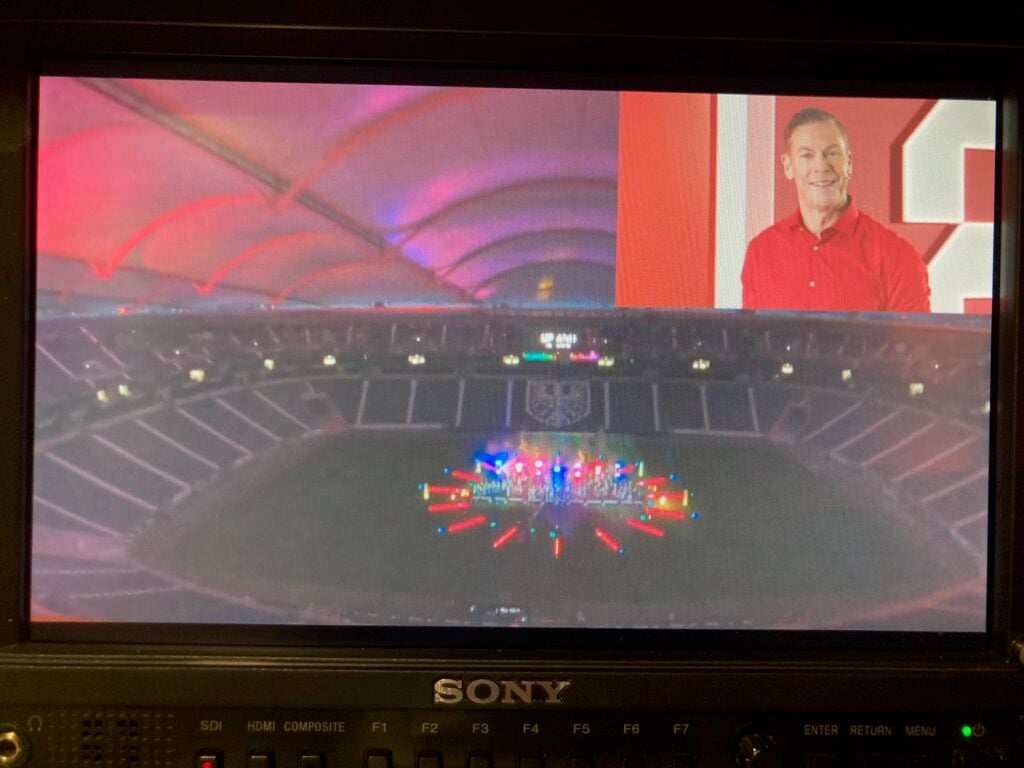
The MAIN FEED is send to SDI 2 and this is the result on the SDI Monitor of SDI 2 (photographed):
You have some spare Channel in PLAYDECK? Use them to prepare and test new Contents, then copy them to your Main Feed Channel. You can DRAG DROP Blocks from Channel to Channel, or copy them with pressing CTRL after starting DRAG DROP.
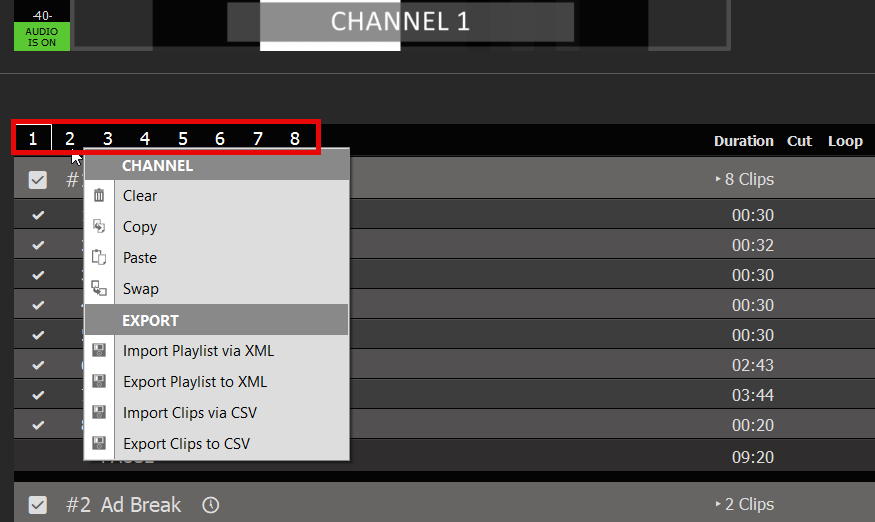
You can also copy, overwrite or append whole Playlists, by right-clicking the CHANNEL NUMBER:
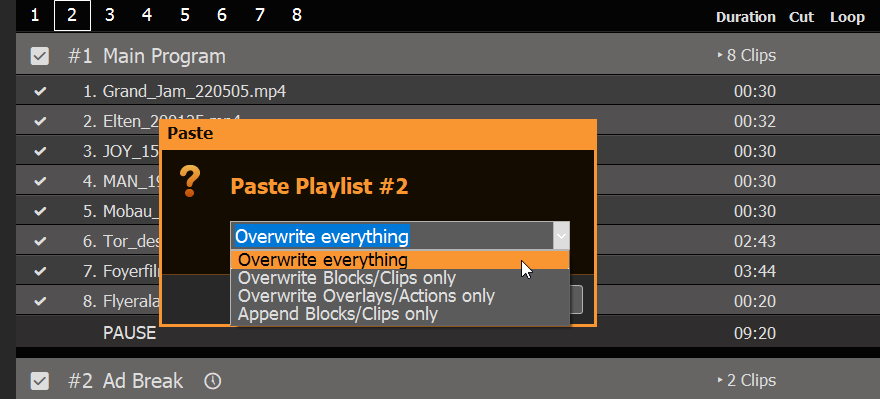
If you paste new Content on an existing Playlist (or Import XML), you get the option to overwrite or append:
Use Playlist Trial Edition
You can install PLAYDECK on any other machine and edit your Playlists there. Except the Watermark of the Trial Edition, there are no other restrictions, so you can prepare Playlists and send them to your Main System.
Append Playlist during Broadcast
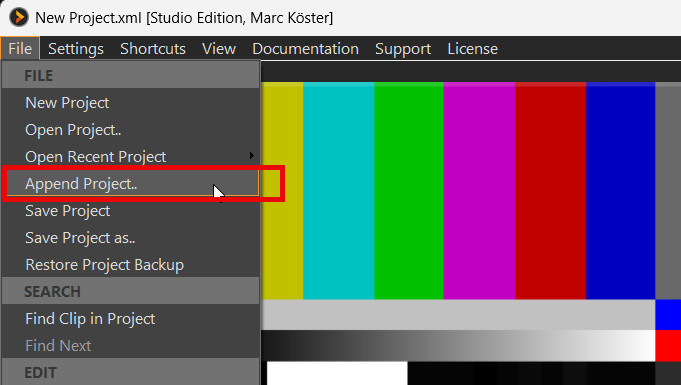
You want to import new Playlists and don’t want to interrupt your Broadcast? No problem: Use the APPEND PROJECT Option in the FILE MENU:
This will load any PLAYDECK Project, but instead of replacing the Playlists, all Playlists will be extended by the Clips found in the Project. You can then safely remove any old Content.
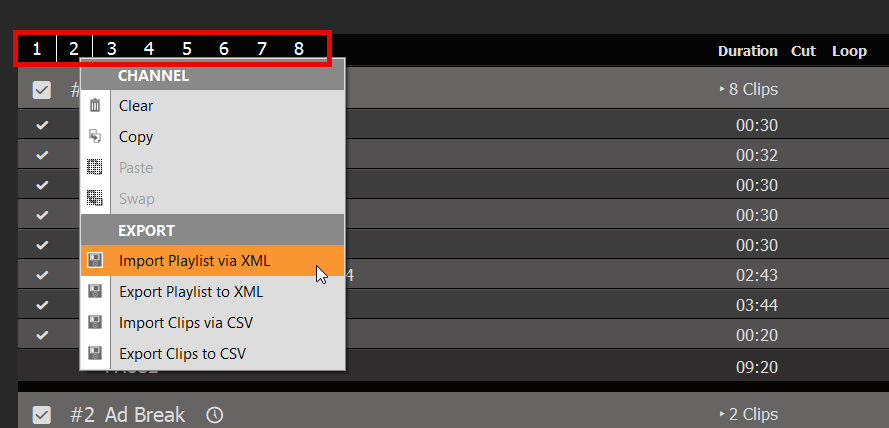
You can apply this procedure to individual Playlists by Exporting a Playlist to XML and Importing that XML on the other Machine. This is done by right-clicking the CHANNEL NUMBER:
This workflow is perfect for any day-to-day schedule, where you add new days and remove old ones.
Automatically Detect and Reload new Playlist
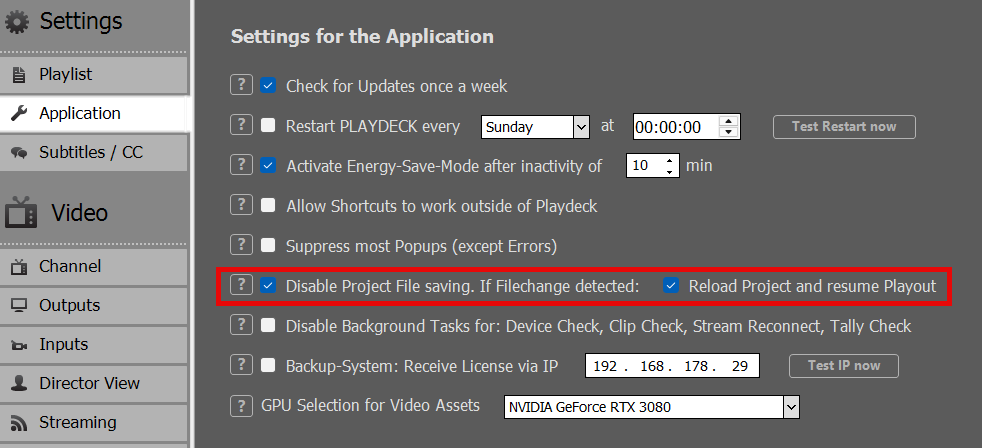
You can also OVERWRITE the current load Project File on your Main System and let PLAYDECK detect this and reload the Project, after which the Playout will resume. Enable this functionality in the Application Settings:
Note: RESUME PLAYOUT only works, if the current Playing Clip exists in the newly re-loaded Project, otherwise Playout stops for that Channel. The Clip is identified by a UNIQUE ID, so it could have moved to another Block in the re-loaded Project.
This workflow is best suited for any automated systems, where Project Files are generated automatically and uploaded to the Main System. Or when the Content Editor does not have access to the Main System and uploads the new Playlist to the NAS/Cloud Storage.
Interface with 3rd party Apps
We don’t support the Playlist Format of other 3rd party Apps, as there is just too much diversity on the market, and a lot Playlist Function (Mixing, Overlaps, Schedules) would not be compatible with PLAYDECK.
If you like to prepare your Playlist in a 3rd Party App, you need to export your Playlist to CSV, then Edit that CSV to work with PLAYDECK, then Import that CSV into PLAYDECK.
Why CSV? Because it is the most easy List Format, which support multiple values per Item. It can be edited with any Text or Table Editor, from Notepad to Excel.
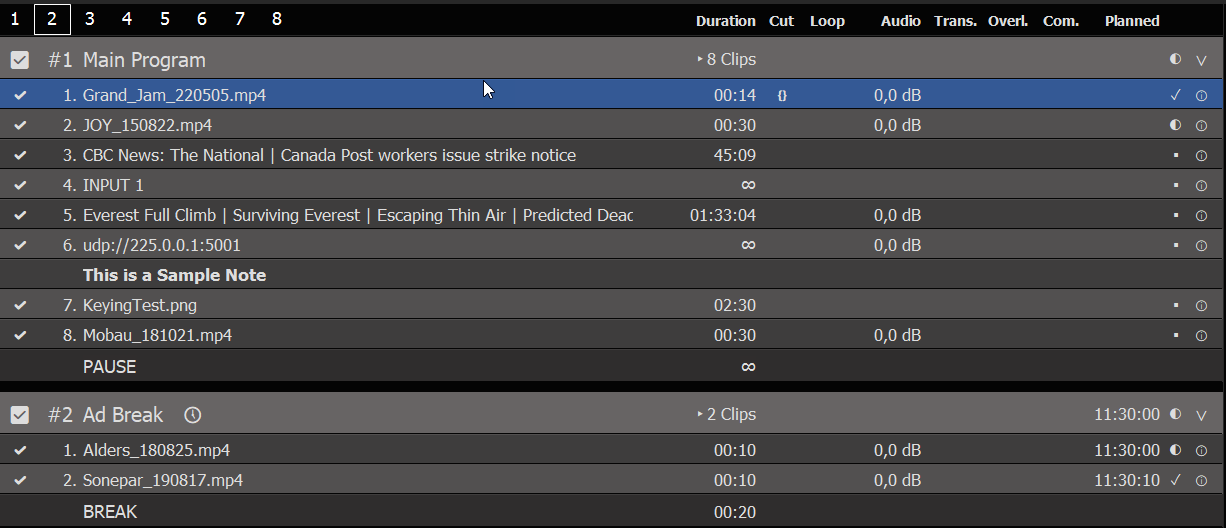
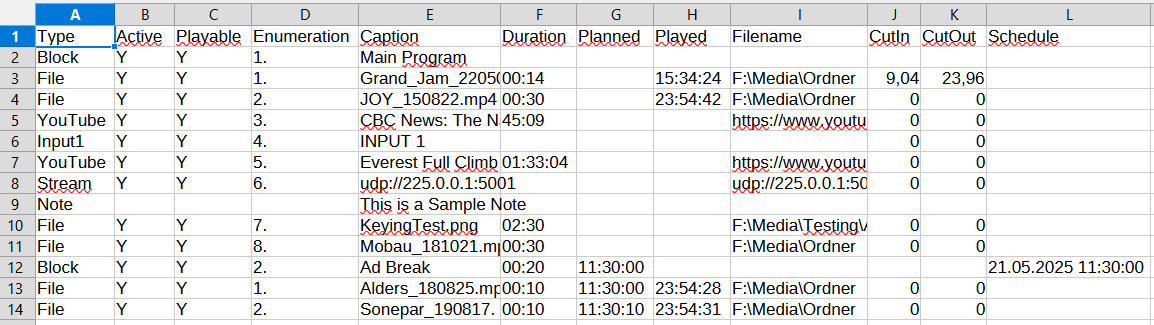
Let’s have a look at our CSV. For this we build ourself a Sample Playlists with 2 Blocks. We mixed in different Content Types: Video Clips with IN/OUT Points, Device Inputs, YouTube Videos, UDP Input Stream, GFX with Runtime, a Note. We also added a Schedule to the 2nd Block:
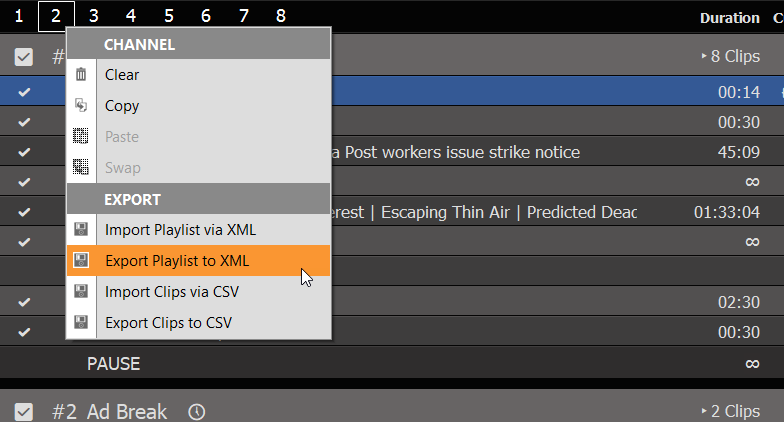
We now right-click the CHANNEL NUMBER 2 and select EXPORT TO CSV:
As you can see, its not “too” much Text Lines. Since the first Lines are just HEADER, it looks even more clear in a Table Editor:
And this is how you write/generate CSV Files: You export your Content in any 3rd party app, open any editor and bring it in PLAYDECK FORMAT. But WHAT IS PLAYDECK FORMAT.
These are the REQUIRED COLUMNS. They can be it ANY POSITION (any column #): Type = Block, File, Website (or YouTube), Input#, Stream, Note Caption = Any Text to display in PLAYDECK Filename = The Path/File or the URL (YouTube and Streams)
These are the OPTIONAL COLUMNS. They can be it ANY POSITION (any column #): Active = The Checkbox in the first Column in PLAYDECK Duration = Only used be File-Types that are Images. Leave empty or 0 for endless CutIn / CutOut = IN- and/or OUT-Point for Trimming Schedule = Only used by Block-Types
Note: More advanced Properties (e.g. Audio Gain) are not supported, as to keep our CSV Format clean and easy. To import/export ALL Properties, please use XML instead of CSV.
Note: PLAYDECK uses UTF-8 encoding for saving and loading CSV files.
PLAYDECK can play almost any clip in real time. That is convenient — and it can tax the system: CPU-only codecs (ProRes, DNxHD, HAP, MXF), a different resolution or frame rate than the playlist, iPhone rotation that lives only in metadata, squeezed pixels, or odd audio. If CPU hits the limit, you usually hear it first as audio stutter.
For a general overview of best possible Video Codecs for Playout, please see this article.
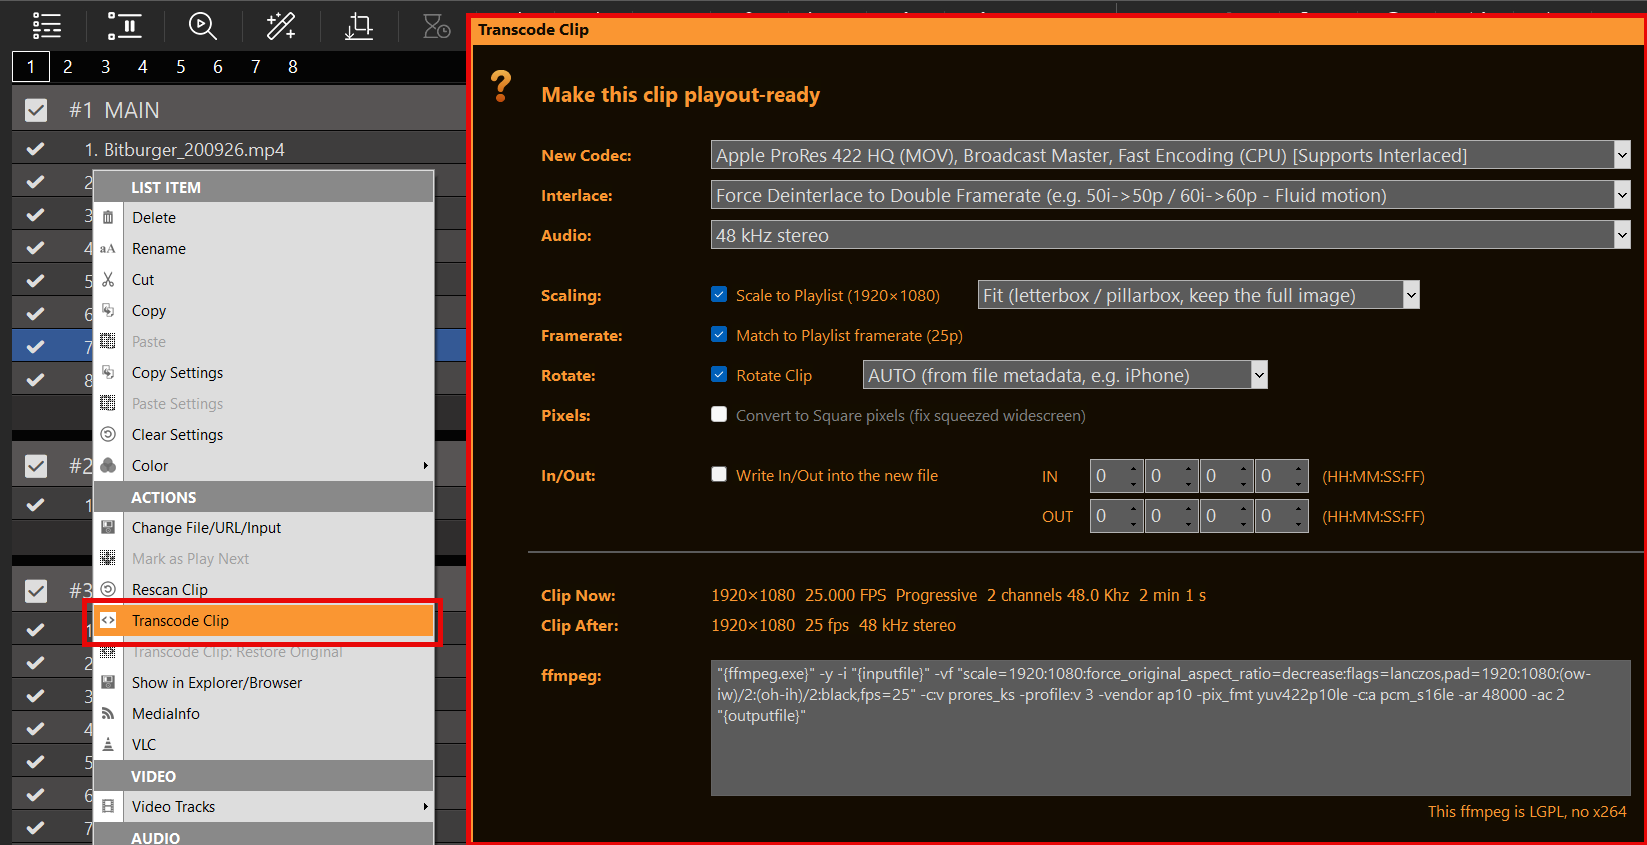
Transcode Clip writes a new file that is already in shape for your playlist (playout-ready). Right-click one or more clips → Transcode Clip.
Leave the top lists on AUTO if you are in a hurry. Tick the checkboxes below only if you need scale, FPS, rotation, square pixels or a baked-in cut — details in the next section.
The ffmpeg line at the bottom follows your options. You can edit it; a broken command is on the operator. PLAYDECK ships an LGPL ffmpeg (no x264). Hardware H.264 (NVENC/QSV) and software OpenH264 are fine. libx264 will fail.
Need the original file back? Right-click → Transcode Clip: Restore Original.
When you actually need it
Stutter / high CPU — ProRes, DNxHD, HAP, MXF: they decode on CPU in PLAYDECK. Transcode to a GPU codec (leave Codec on AUTO).
Yellow mismatch icons — clip size or FPS ≠ playlist. Tick Scale and/or Match framerate.
iPhone / sideways — tick Rotate, leave AUTO (or set 90° if AUTO does nothing).
Tiny web / YouTube files — Scale to playlist. YouTube clips can be transcoded in the same dialog (download + encode).
Show starts in 10 minutes — AUTO only, OK. No checkboxes required.
AUTO vs optional checkboxes
The dialog is split on purpose so you do not have to fear the wrong setting.
Top = AUTO. Codec, Interlace and Audio are always on. The first item in each list is AUTO. That is the safe default: PLAYDECK picks a GPU encoder if it can (NVENC, QSV, otherwise AV1), keeps progressive files progressive and handles interlaced sources, and for audio copies the original soundtrack when the new file format allows it (MP4: AAC/MP3, MOV: PCM/AAC, MKV: most codecs). If copy would break the file, it writes 48 kHz stereo instead (AAC, or PCM for ProRes/DNxHD).
You can still override: pick a specific codec, force deinterlace, force Copy original audio, or force 48 kHz stereo. You do not have to.
Bottom = optional. Scale, Framerate, Pixels, Rotate and In/Out are off until you tick them. Unticked means: leave the picture/time as it is, only the AUTO encode runs.
Scale to Playlist — enable the size change. Next to it: Fit (full image, black bars), Fill (crop to fill the frame), Stretch (distort to exact playlist size).
Match to Playlist framerate — write a constant playlist FPS. Use this for variable or “weird” rates (iPhone, web) so duration and audio stay in sync.
Convert to Square pixels — only active if the file is not 1:1. Old squeezed HD (e.g. 1440×1080 that should look 16:9). PLAYDECK and VLC can show that differently; the tick writes normal pixels.
Rotate Clip — tick to rotate. The dropdown is AUTO (from file metadata, typical iPhone) or 90° / 180°. Unticked = no rotation. PLAYDECK’s engine ignores rotation metadata; VLC often does not.
Write In/Out into the new file — tick to bake the cut into a shorter file. Unticked = in/out stay live in the playlist.
Leave every checkbox off if the only problem is CPU/GPU codec. Tick only the line that matches the clip you actually have.
After the run
The new file is saved next to the old one with _transcoded in the name, swapped into the playlist, and re-scanned. Multi-select: one pass, each clip keeps its own in/out if Bake is on.
If ffmpeg rejects the command (typo in the memo), PLAYDECK shows the error text. ESC cancels.
Playlist undo: Restore Project Backup if you need an older project state — that is separate from Restore Original on the clip.
What files are decoded on CPU
PLAYDECK can play these, but not via the GPU on Windows. That is when Transcode Clip (Codec AUTO) is worth it.
ProRes High-quality codec from Apple / Mac. Apple never released a GPU decoder for Windows, so PLAYDECK decodes ProRes on the CPU. If you need an alpha channel, HAP-A is the better Windows choice.
HAP and variants (HAP-A) Alpha channel, lower CPU load than ProRes — still CPU, not GPU.
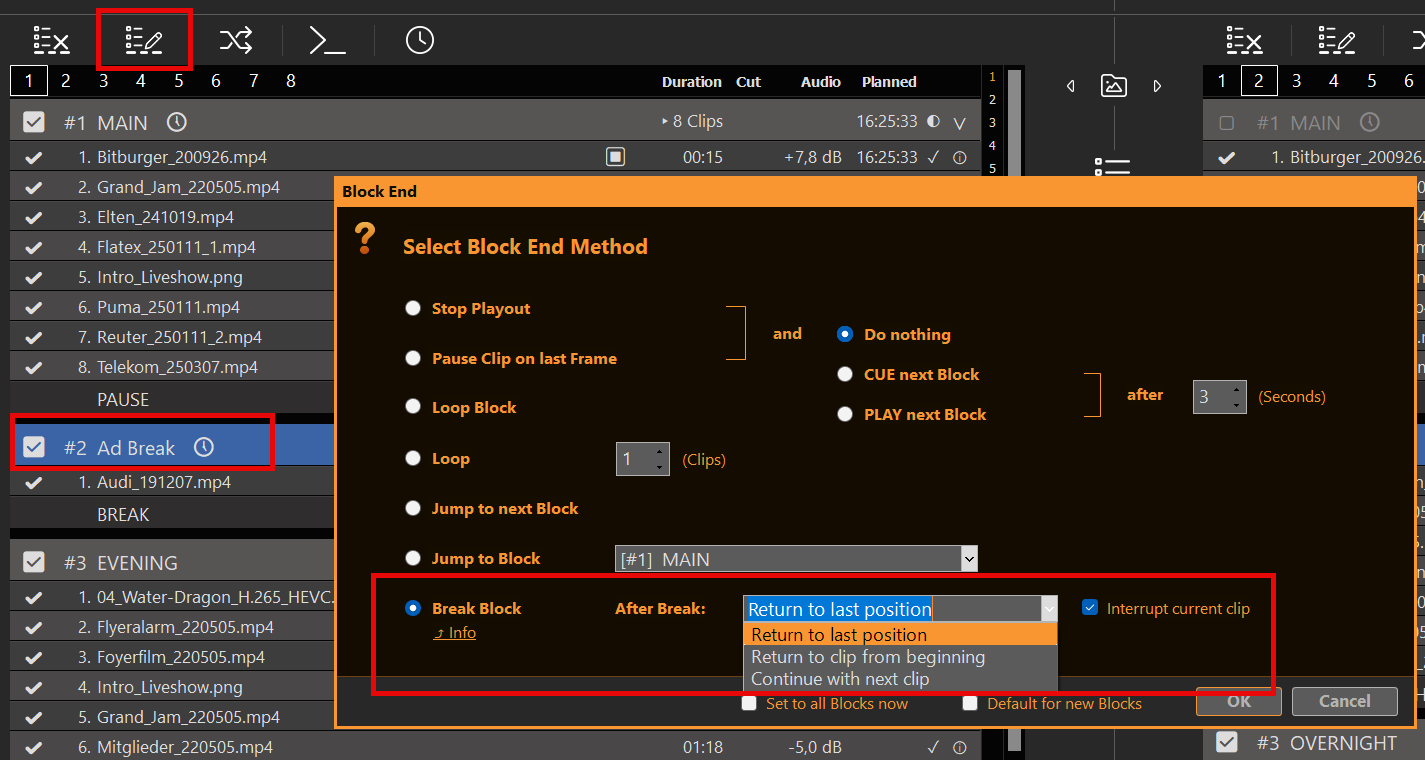
This is fairly simple: You create a new Content Block in your Playlist with one difference: The Block ends as BREAK BLOCK (instead of STOP or PAUSE). For this we select the Block and click on the BLOCK END Icon (or Double-Click the Block end). Then we select BREAK BLOCK.
After Break you choose where Playout continues when the ads are done:
Return to last position
Return to clip from beginning
Continue with next clip
Interrupt current clip is on by default. PLAYDECK then hard-cuts into the Break at the scheduled time. Uncheck it and the current clip is allowed to finish first — the Break plays as next, it does not cut.
This BREAK BLOCK behaves like this: Once it reaches its end, it will return to the clip and position (or other), which was playing BEFORE entering the BREAK BLOCK from OUTSIDE. Meaning: You can jump from anywhere to anywhere in the BREAK BLOCK, and it will remember where to return to.
Schedule Break Block
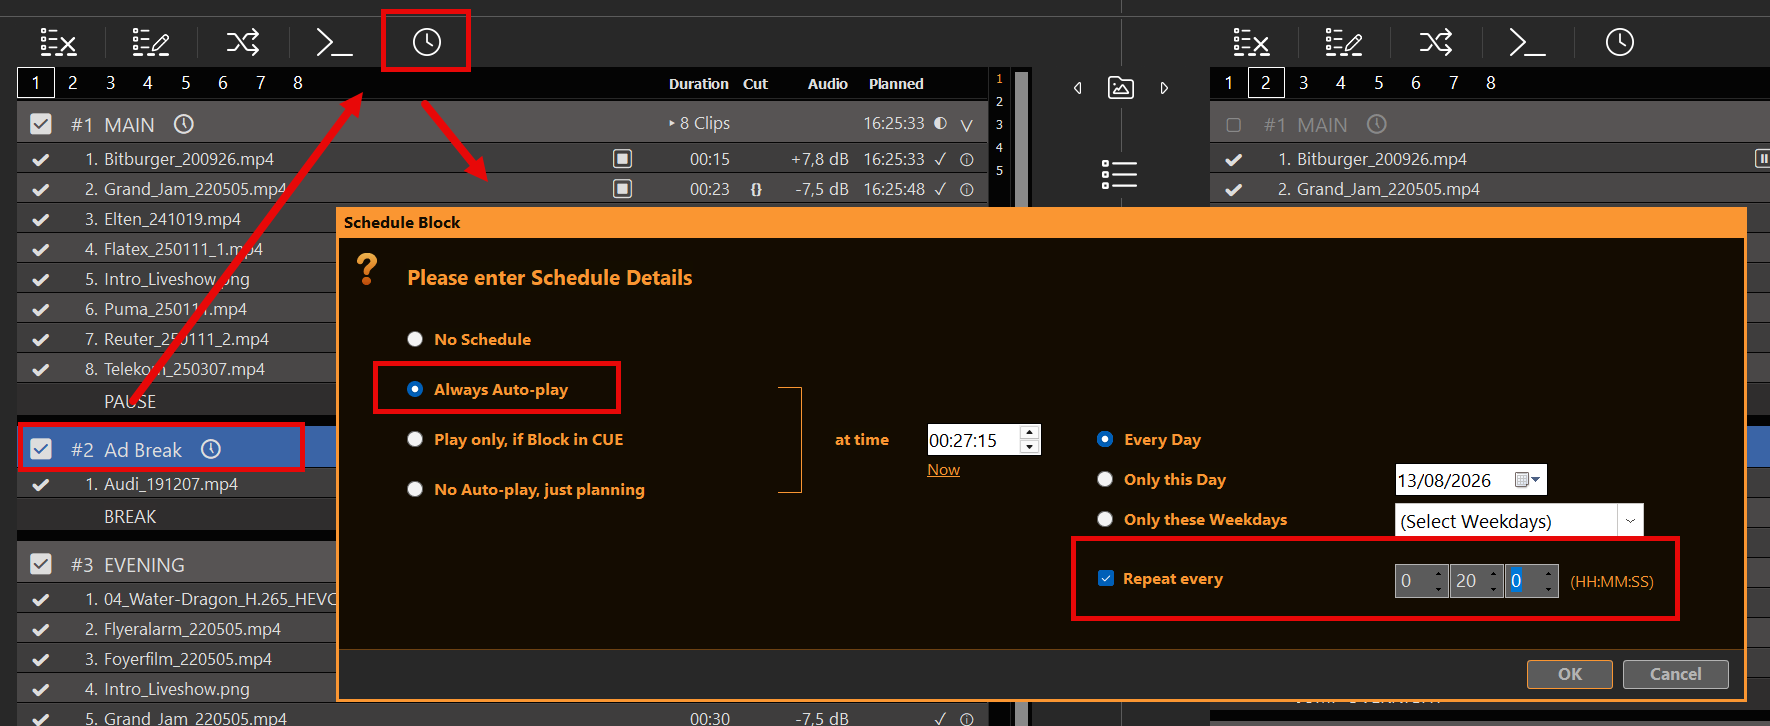
You can schedule the Break Block like any other Block Type by selecting the Block and clicking the SCHEDULE Icon:
In this example we start our Break Interruption every day at 11:00 o’clock and will repeat this every 2 and half hours for the remaining of the day. There will be no Ad Breaks between 0:00 and 11:30.
A scheduled Ad Break will NEVER fire on its own: If nothing is playing, there is nothing to interrupt and return back to. Consequentially a scheduled Ad Break will NEVER fire within another Ad Break. This also presents opportunity: You can program repeating Ad Breaks with collisions on purpose and have the first one get priority and ignore the other one.
With Interrupt current clip enabled, the Break starts at the scheduled time. With it disabled, PLAYDECK waits for the current clip to end. Live or endless clips never reach a clip end, so a Break with Interrupt off will not start while they are playing. Stop, CUE, or playing a different clip cancels a waiting Break. Pause keeps it.
Using Action Buttons for Ad Breaks
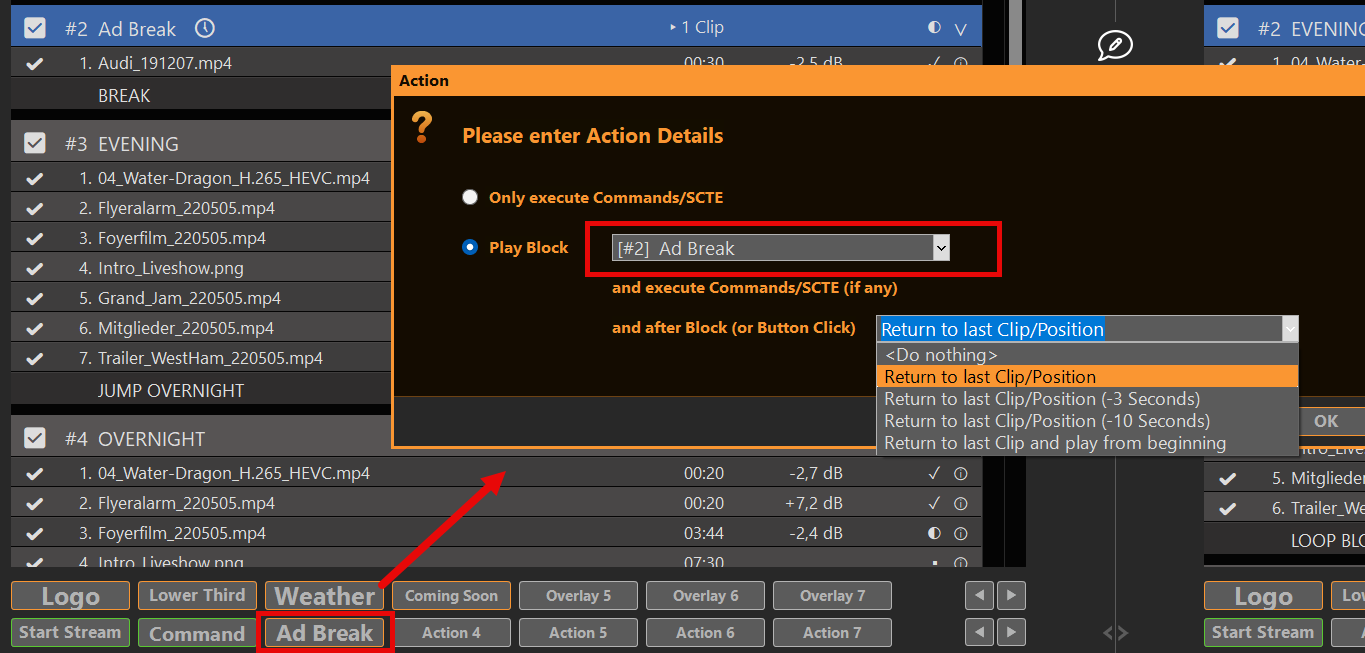
Instead of scheduled Break Blocks, you can also use Action Buttons. For this simply click an empty Action Button and select to play the related Ad Block:
After Block the Action can use its own return method:
Do nothing — uses the Break Block End (After Break)
Return to last Clip/Position
Return to last Clip/Position (−3 Seconds)
Return to last Clip/Position (−10 Seconds)
Return to last Clip and play from beginning
Continue with next clip exists only on the Block End, not on the Action. If you select Do nothing, the Block End will be used, like in our example above. If you select any other Option, the Return method of the Action will be used over the Block End method. This gives new options:
You could use both return methods, depending if the Break Block starts via scheduling or via Action Button
If started via Action Button, you can leave the Break Block EARLY and still return
The second option is perfect for looping Break Blocks, as you return to the previous playout if you click the Action Button a second time.
Attach Overlays to the Break Block
Oftentimes you want Overlays to start automatically together with your Break Block Content. We therefore recommend the following articles:
If you want to signal your Streaming Server or Broadcasting System to insert Ads for the duration of your Break Block, we recommend the following article:
This article will show how to use how to utilize the second Channel to create L-Band advertisements.
1. L-Band Specifications
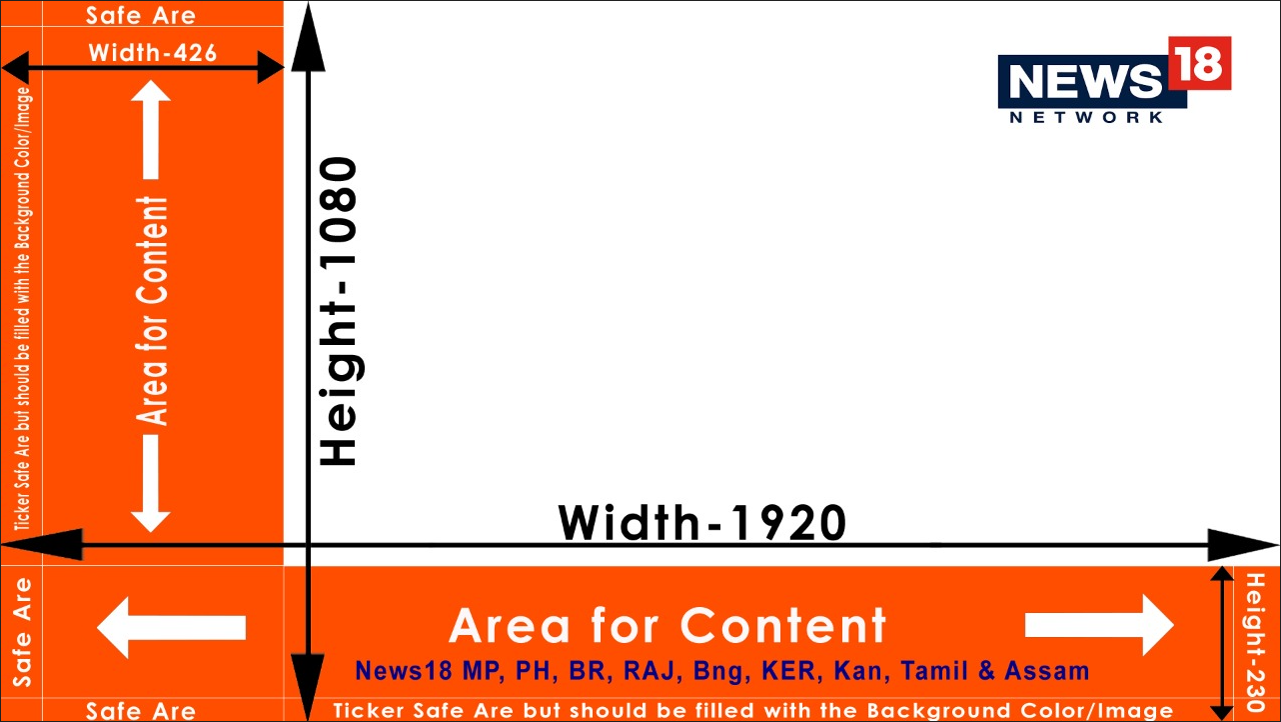
Every Station has their own specs on the size, so we just borrow this sample from News18:
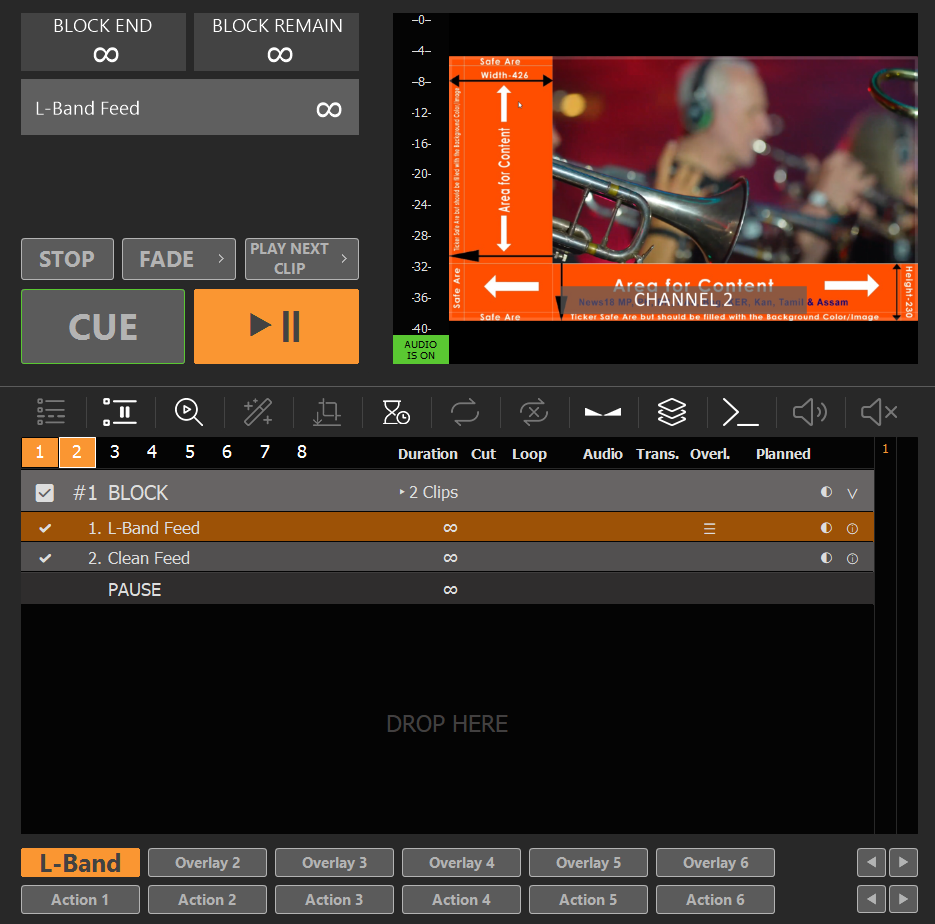
The principal is always the same: We “shrink” our main content proportionally to make room for Ads in the remaining area. After shrinking, we leave some overlap to not risk black background. Our final shrink-size is: 1520×855 Pixel.
2. Scale Channel 1 and send to Channel 2
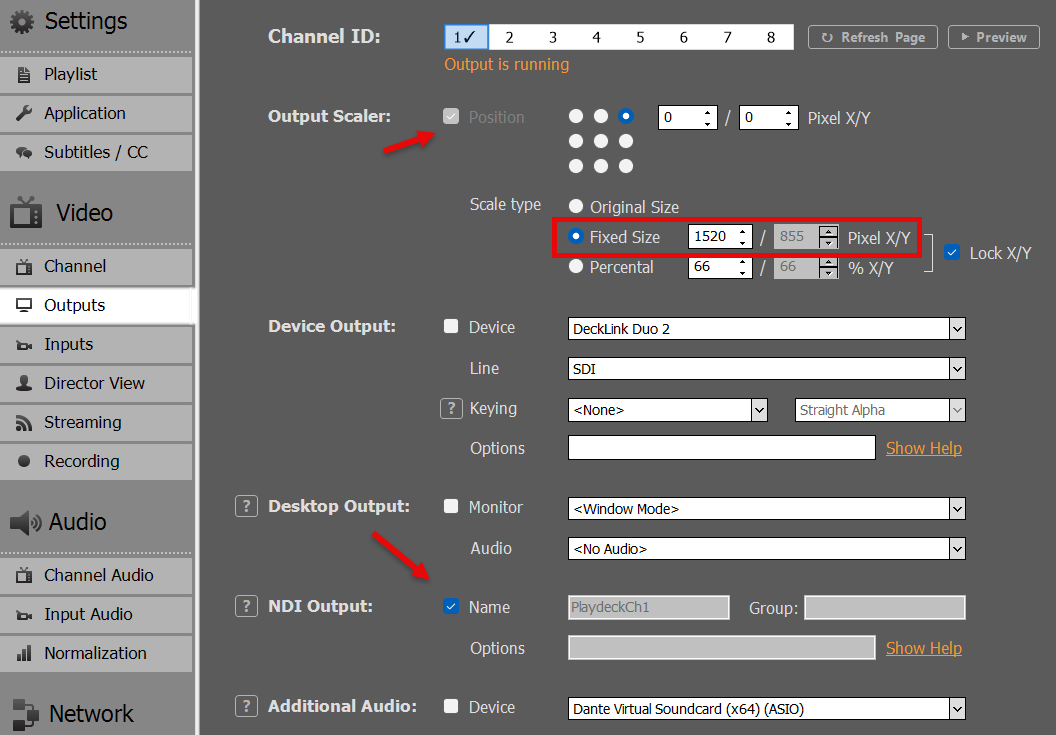
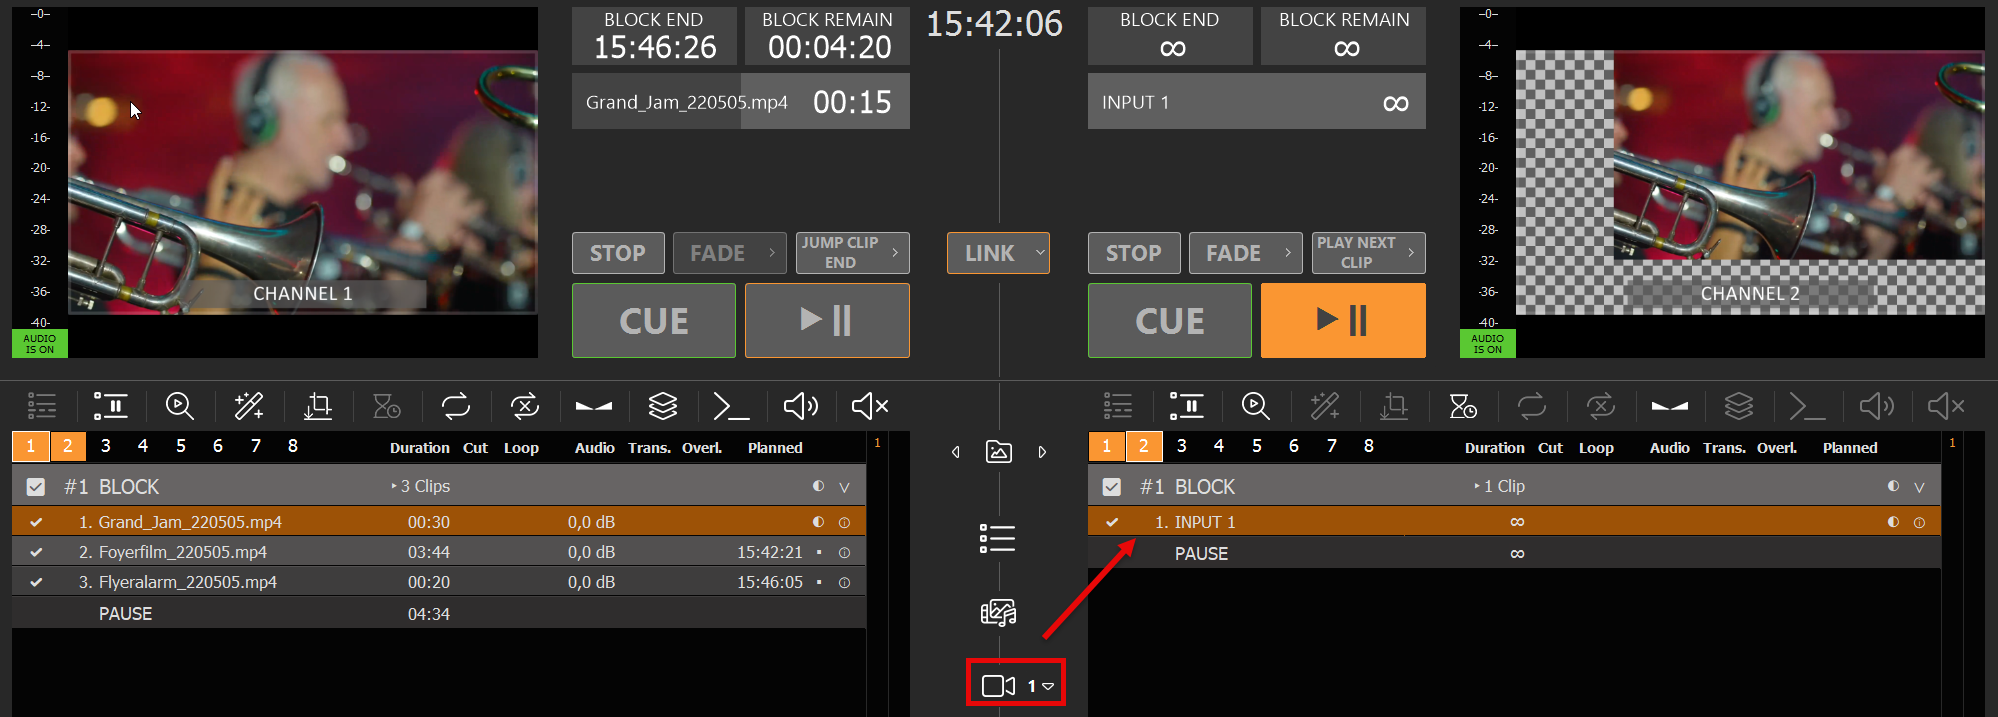
We assume with have our Main Video Content on Channel 1. So we enable the Output Scaler in the Settings to our shrunk size of 1520×855 Pixel. Then we send our scaled Content as NDI signal:
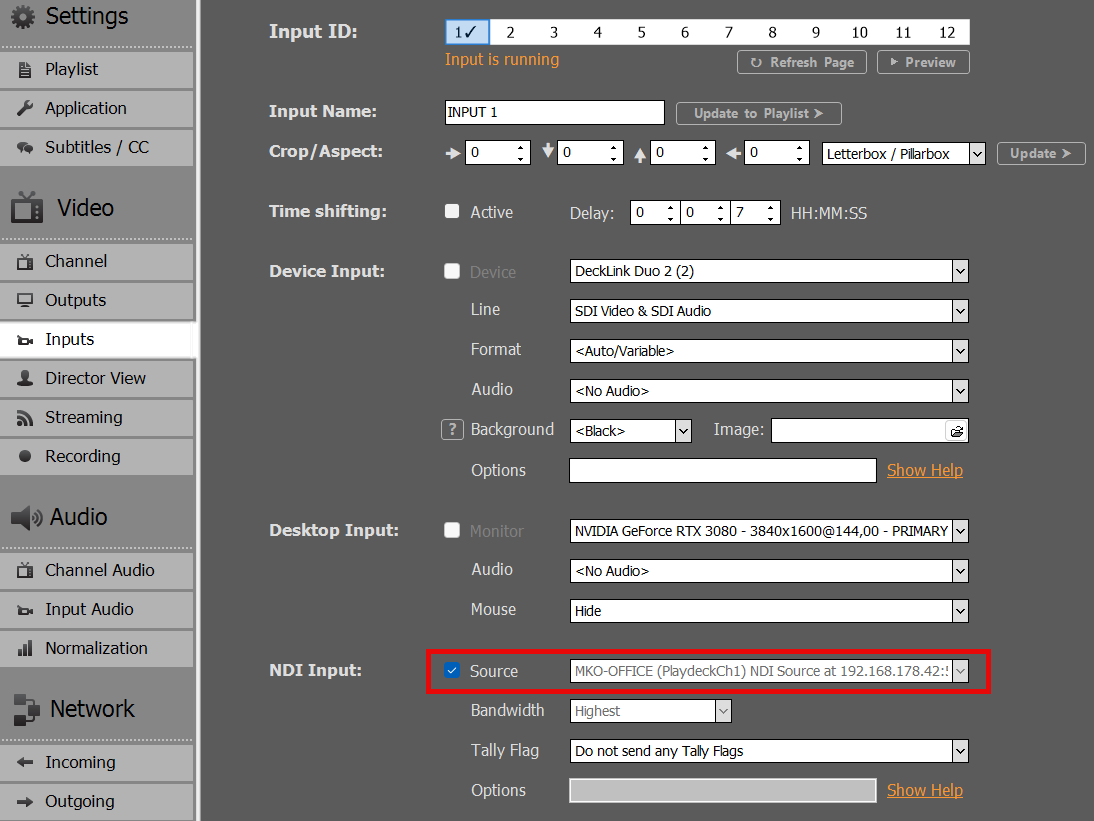
We now loop our NDI signal to Input 1:
We then add Input 1 to the Playlist of Channel 2, by Drag Drop of the Input Icon to the Playlist. We now have the Video Content in L-Band size:
3. Add the Clean Feed for Switching
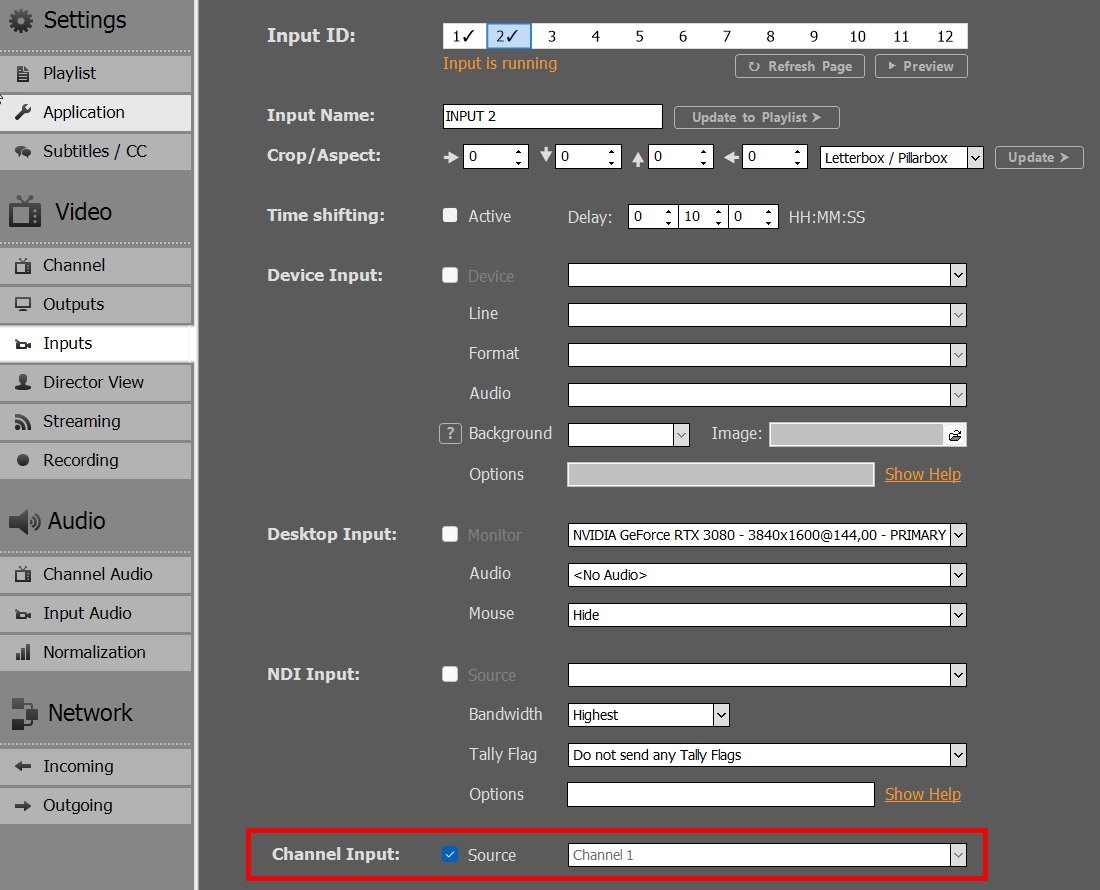
Since our Final Output will run over Channel 2, we also want our Clean Feed to be selectable in the Channel 2 Playlist. For this, we can simply copy the Channel without the Output Scaler. Use another Input and set Channel 1 as Source:
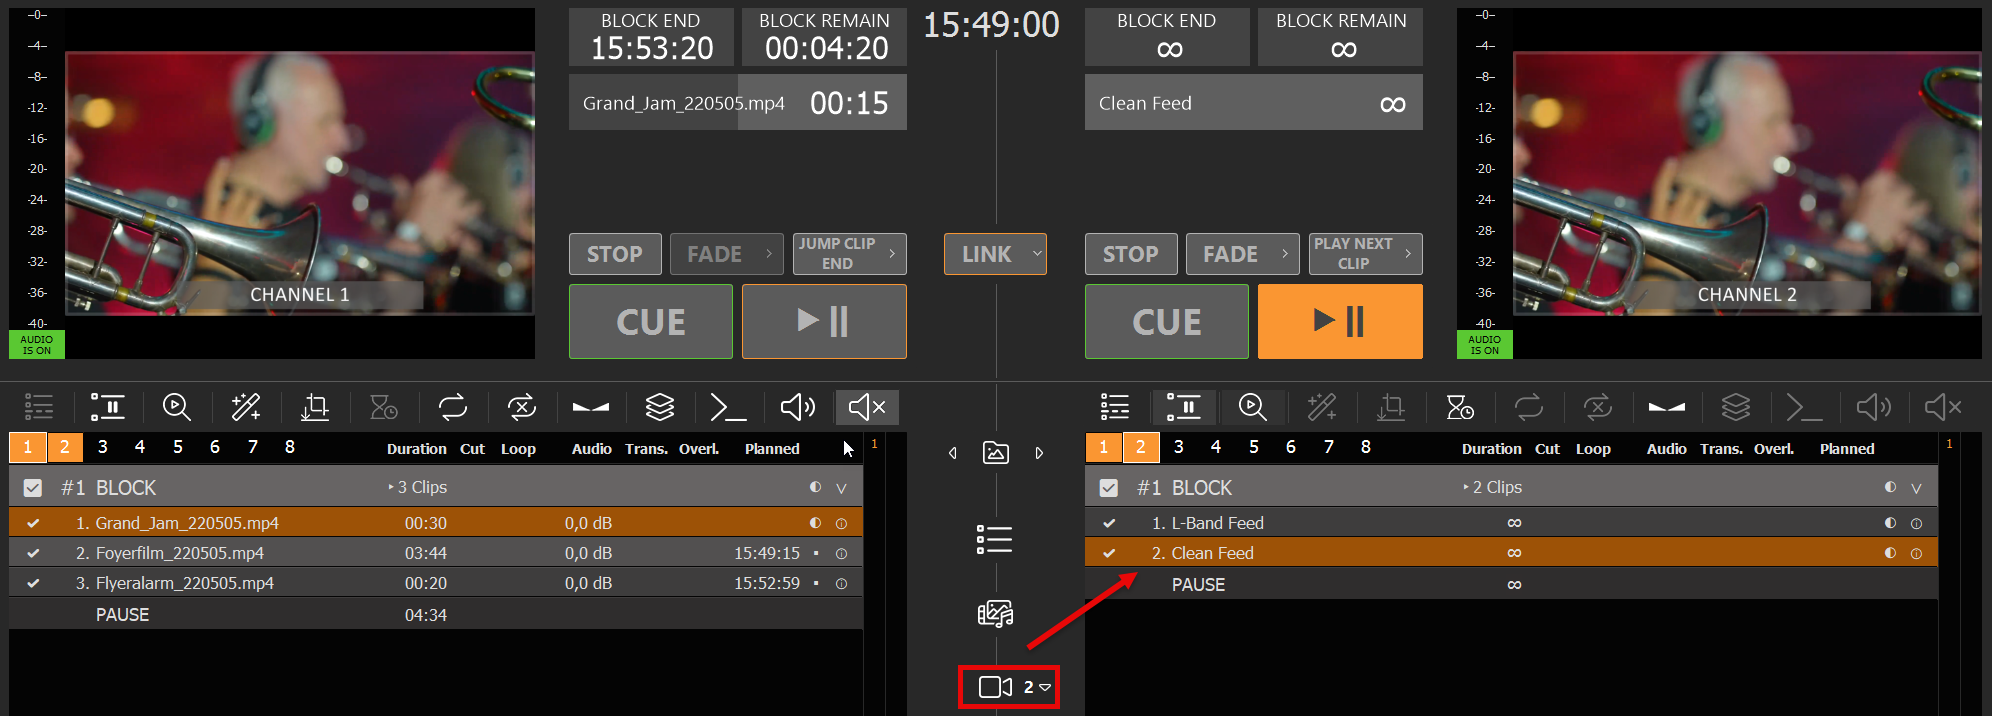
Then also add that Input to Channel 2. I already renamed both Inputs in the Playlist to be more distinguishable:
You can now quickly switch between L-Bands and Clean Feed.
Click on any empty Overlay Button, then add our Sample PNG:
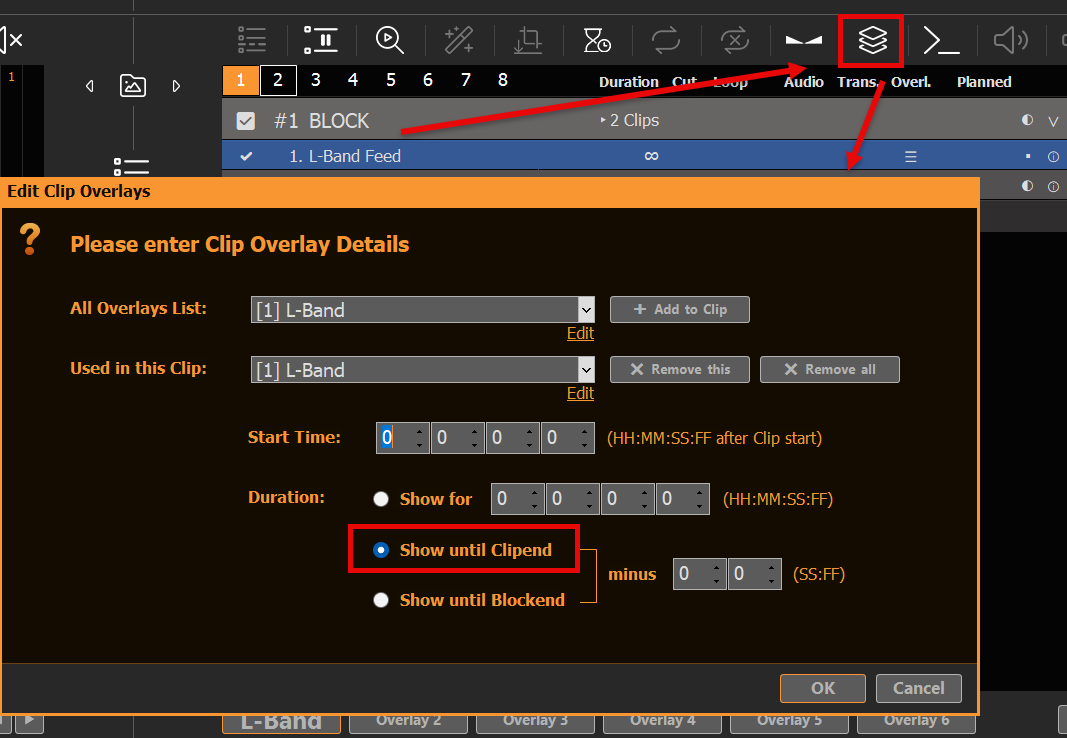
We now want our Overlay to ONLY play with the Playlist Clip for the “L-Band Feed” Input. For this we select the L-Band Clip and click the Overlay Icon, then add our new Overlay for the whole duration of the Clip:
Our L-Band Overlay will now automatically start together with the L-Band Feed:
Note: Overlays that are assigned to Clips always have a slight reaction delay. This can be overcome by finetuning Playlist and Overlay Fade Times. You could also split the L-Band Feed and Clean Feed to Channel 2 and 3 and use an external Mixer for Transitions.
Introducing a Reference Signal will force the Output Hardware to send Frames based on the Reference Clock.
1. Multichannel SYNC as a use case
If you plan to synchronize multiple channel, you should connect an external clock to your device, then CUE all Channel via LINK (or Commands) and UNPAUSE all Channel. This will start all Channel (almost) SYNC, while the Reference Clock will make sure, that all Channel STAY SYNC. This is only guaranteed for all Channel, that output over the same Device.
This article shows, how to use Action Buttons to start multiple Channel in SYNC.
2. Providing a Reference Signal (GenLock)
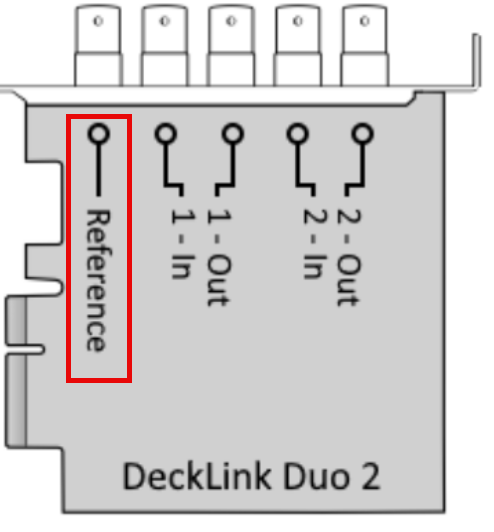
Please check with your manufacturer, if your Output Card supports a Reference Input. In this example we use “Blackmagic DeckLink Duo 2”:
If none of your other hardware generates a Clock Signal, you can use separate hardware to generate such a signal, like the Blackmagic Sync Generator.
3. Setting the Reference Input in PLAYDECK
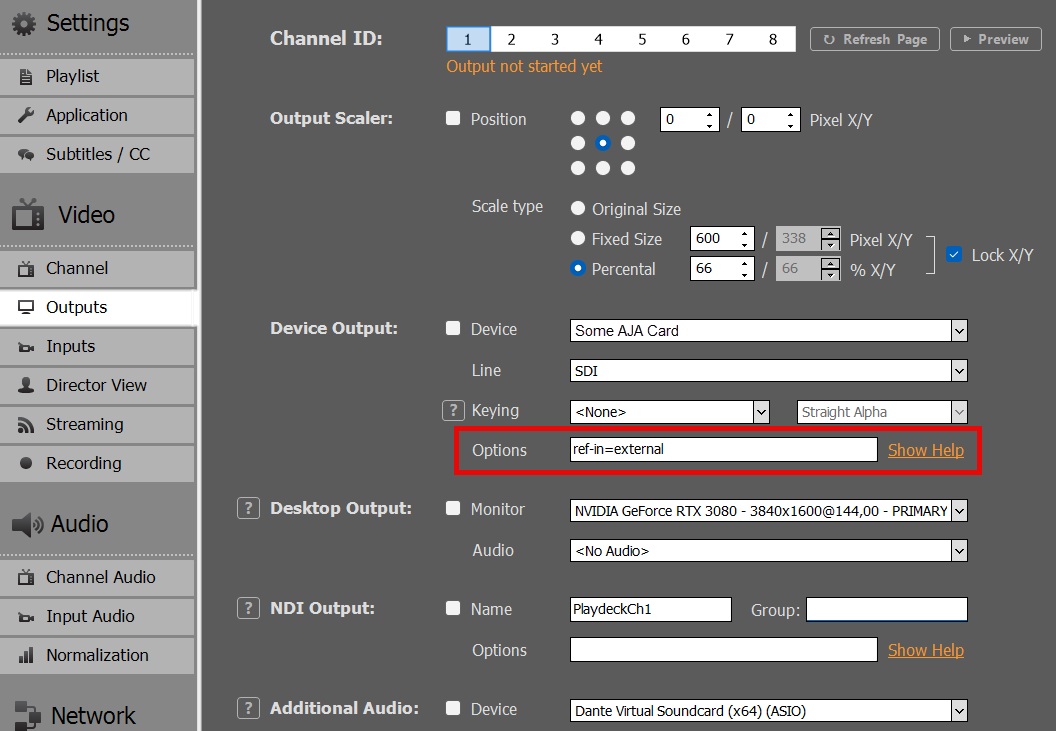
Some Devices need specific reference input settings, like AJA Devices. In this Example, we set the AJA Reference Input to “external” for the Device:
If you click on SHOW HELP, you will see all other Options, that can be set for each device manufacturer.
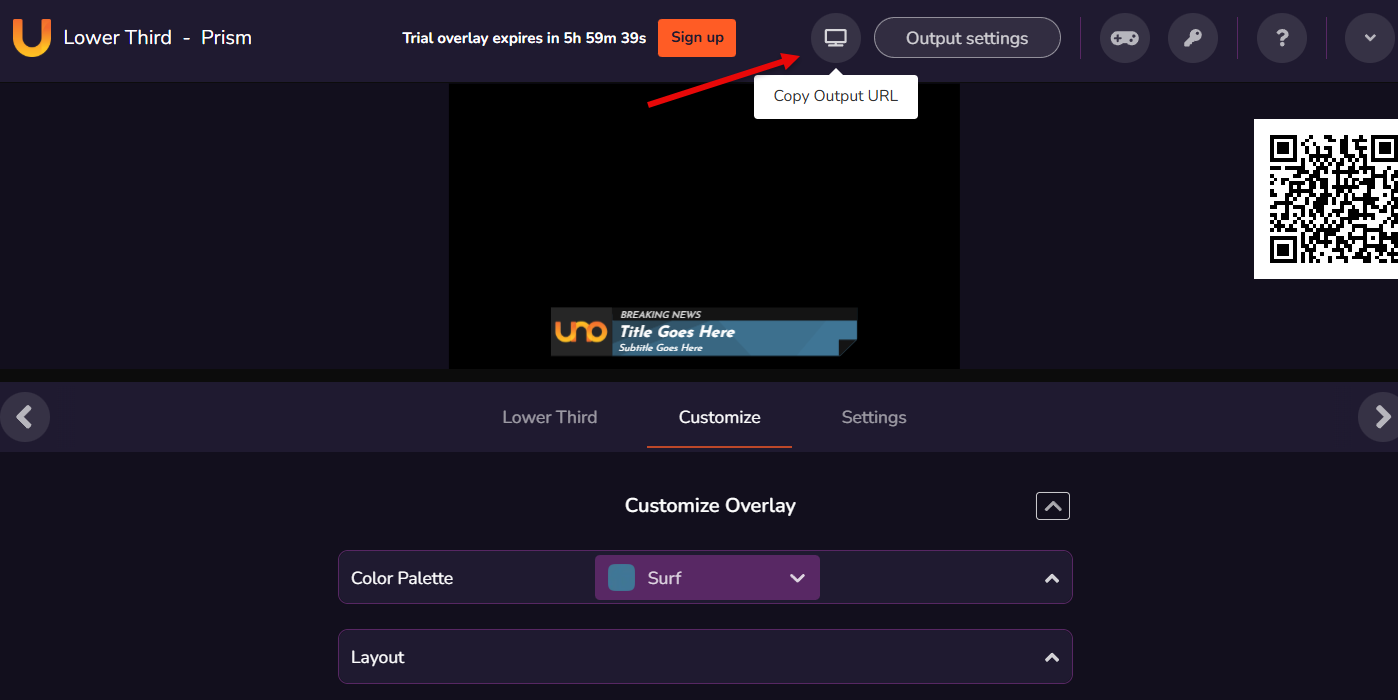
Then click on “Copy Output URL” to have the target URL in your Clipboard.
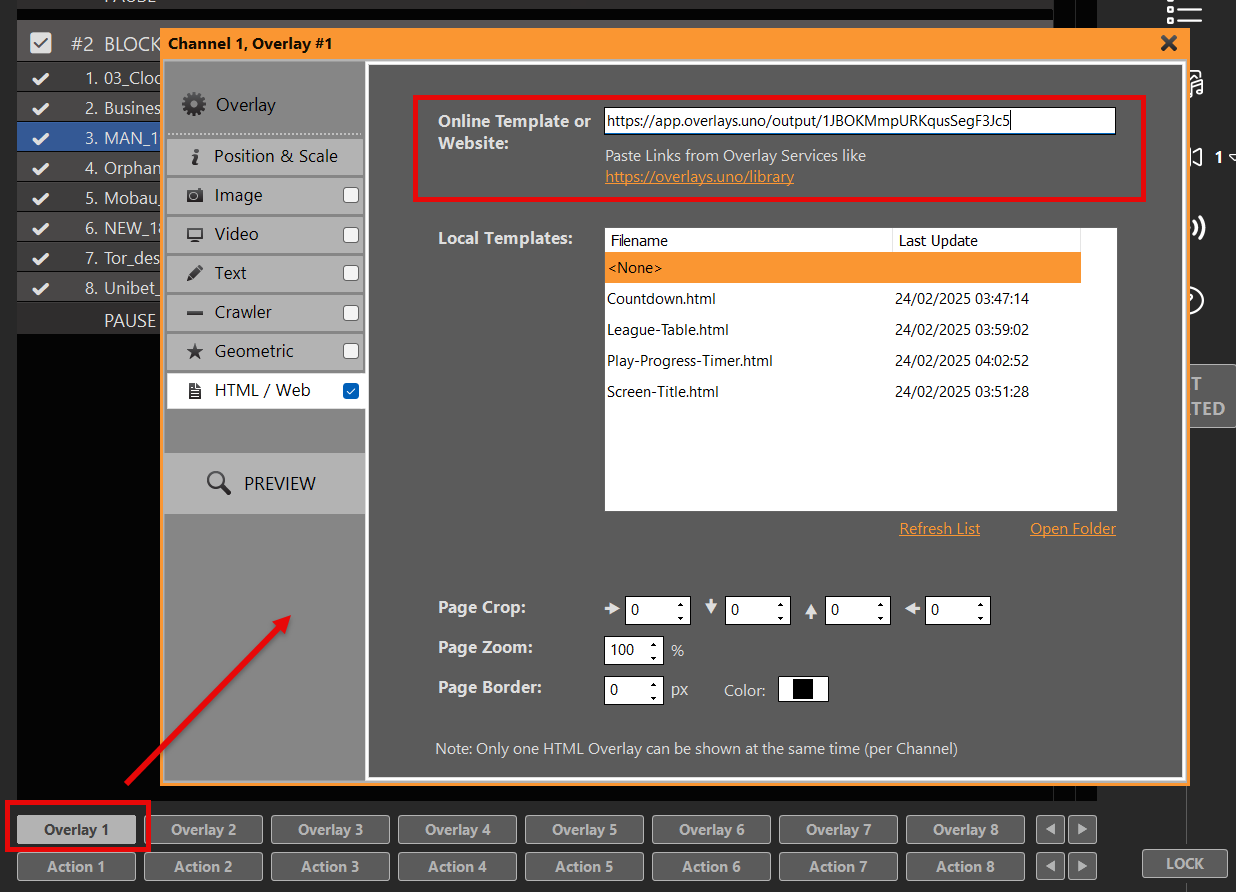
In PLAYDECK, click on any empty Overlay Button, select “HTML” and paste the URL into the upper Online Template Field:
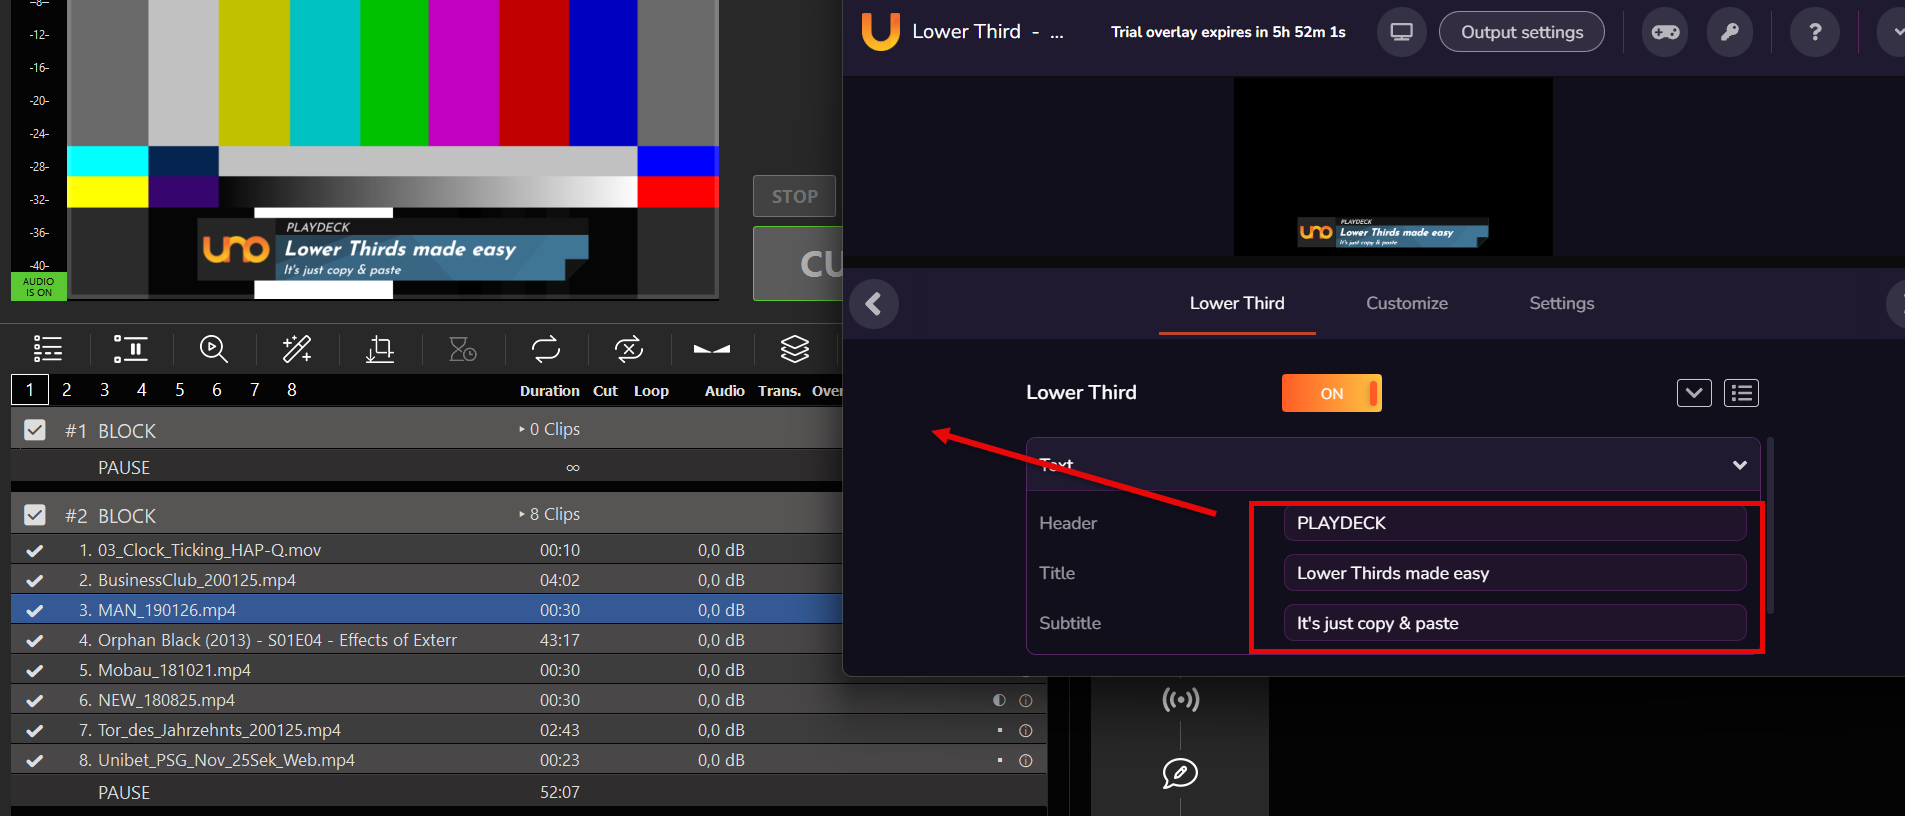
The Overlay is immediately ready for display. You can even live-update Logo and Text via the overlay.uno Overlay website:
2. Create Lower Third (with ClassX)
ClassX Liveboard is a professional CG Playout Solution for automating dynamic overlay contents. You can register for a Demo Version on their website.
After installation of LiveBoard, you can simply add Videos, GFX and other Contents via the user interface. There you also name the Contents with a unique identifier, e.g. “MyLowerThird” for later reference.
LiveBoard allows to connect via TCP and send Commands to show/hide certain Contents. A complete list of Commands is always found in their Window installation path: C:\Program Files\…\ClassX_Applications_v6\remotecontroltester\commands
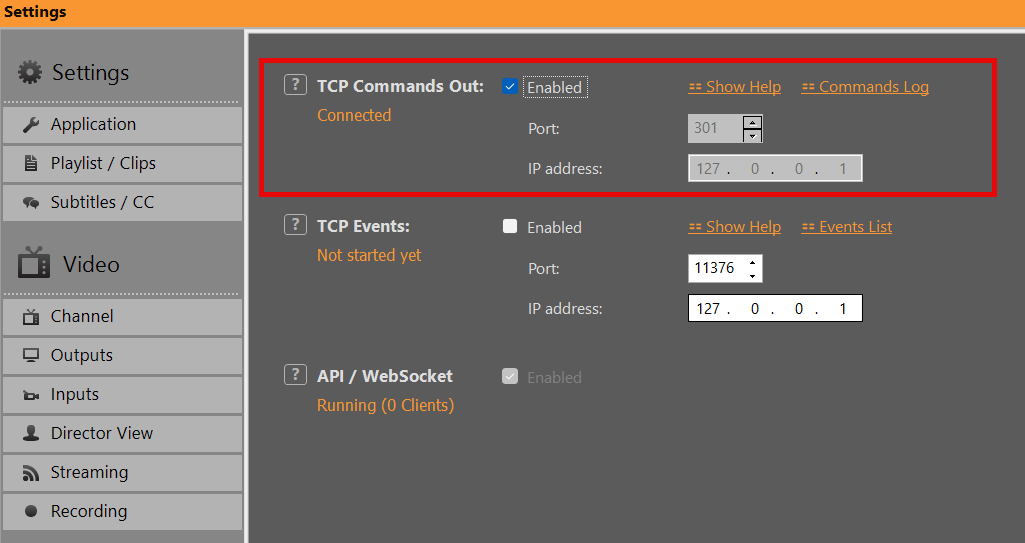
Lets enable our TCP in PLAYDECK to talk to LiveBoard. The default Port of LiveBoard is 301. Enabling this will show CONNECTED, if the LiveBoard Server is running. Otherwise PLAYDECK will try to connect every 5 seconds, so you can start LiveBoard before or after PLAYDECK:
Lets create our own custom “lower third” composed of a background GFX and Text and group them together.
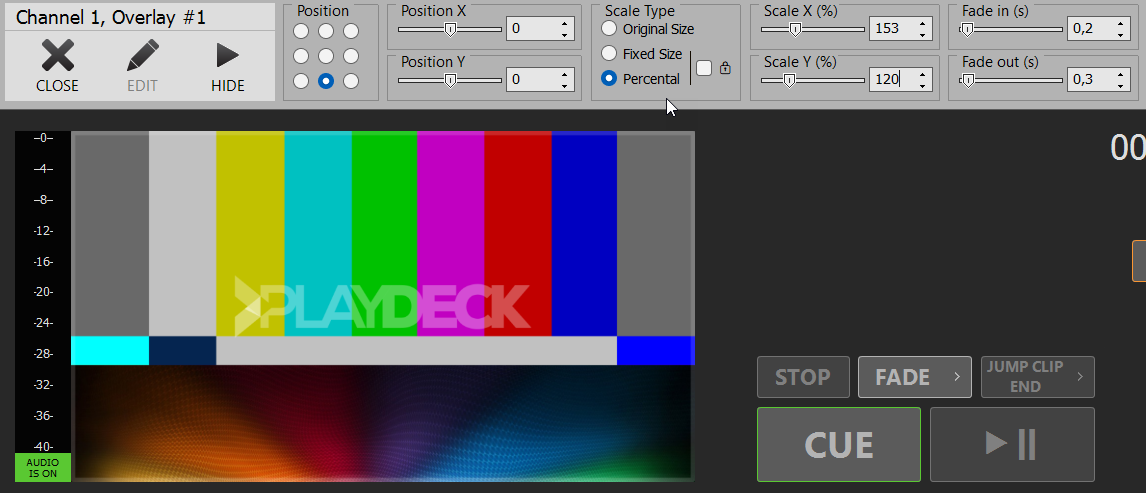
Click on an empty Overlay Button to open the Editor, then add some Background GFX. Close the Editor, right-click the Overlay Button and position your Background to the bottom area. We also right-click in the video preview and disable “Channel Name”:
We add another Text Overlay and use {blockname} as text placeholder for our title text. Then add another Text Overlay and use {clipname} as text placeholder. Then some positioning and it looks like this:
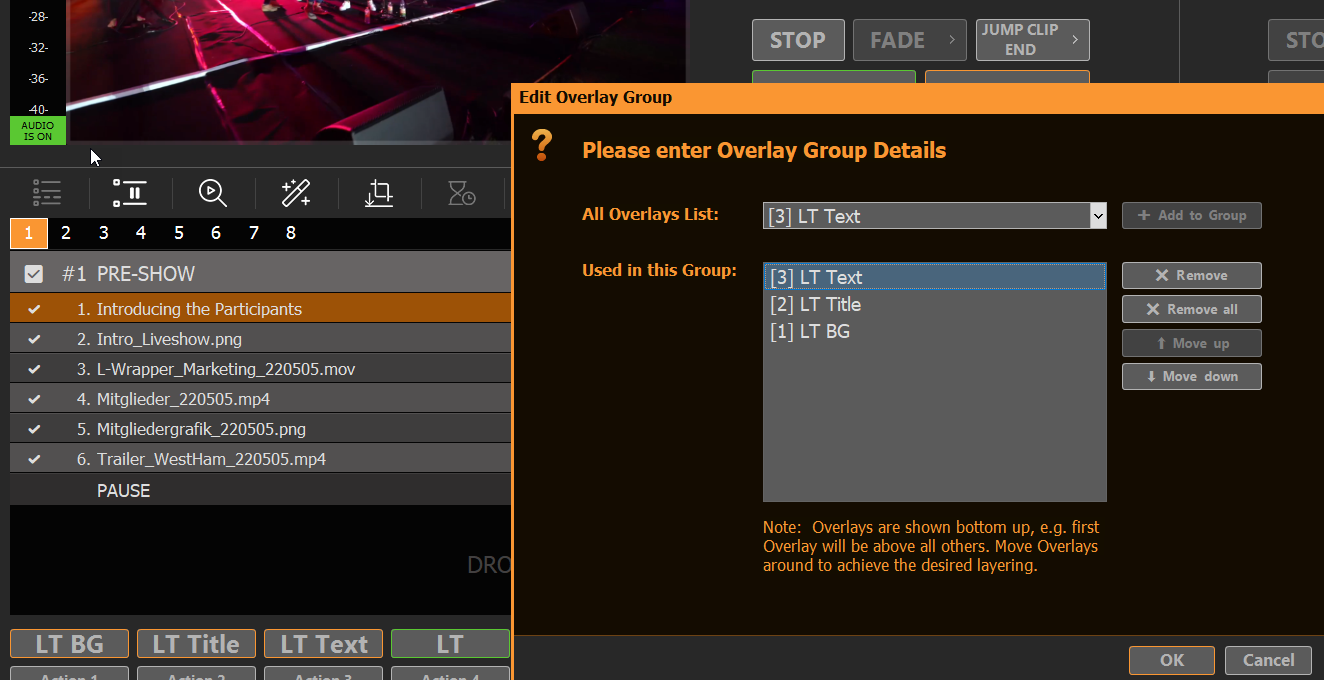
Now lets group then together: Right-click an empty Overlay Button and select “Create Overlay Group”. Then add our 3 previous Overlays and order them bottom-up:
4. Automate Overlay with Clips/Blocks
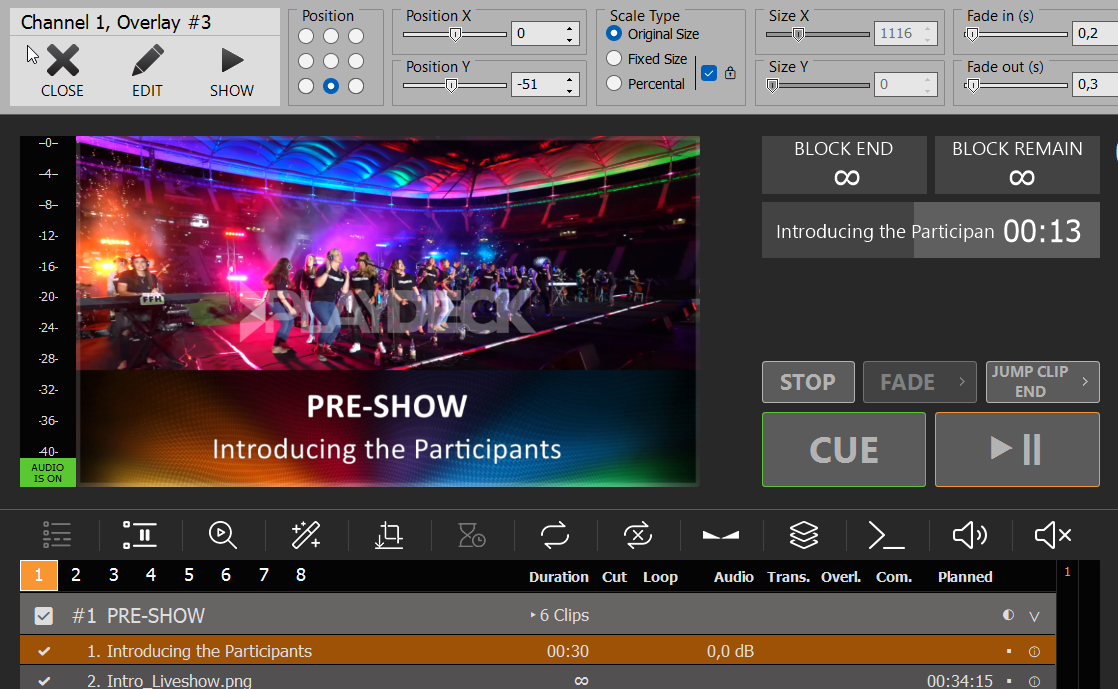
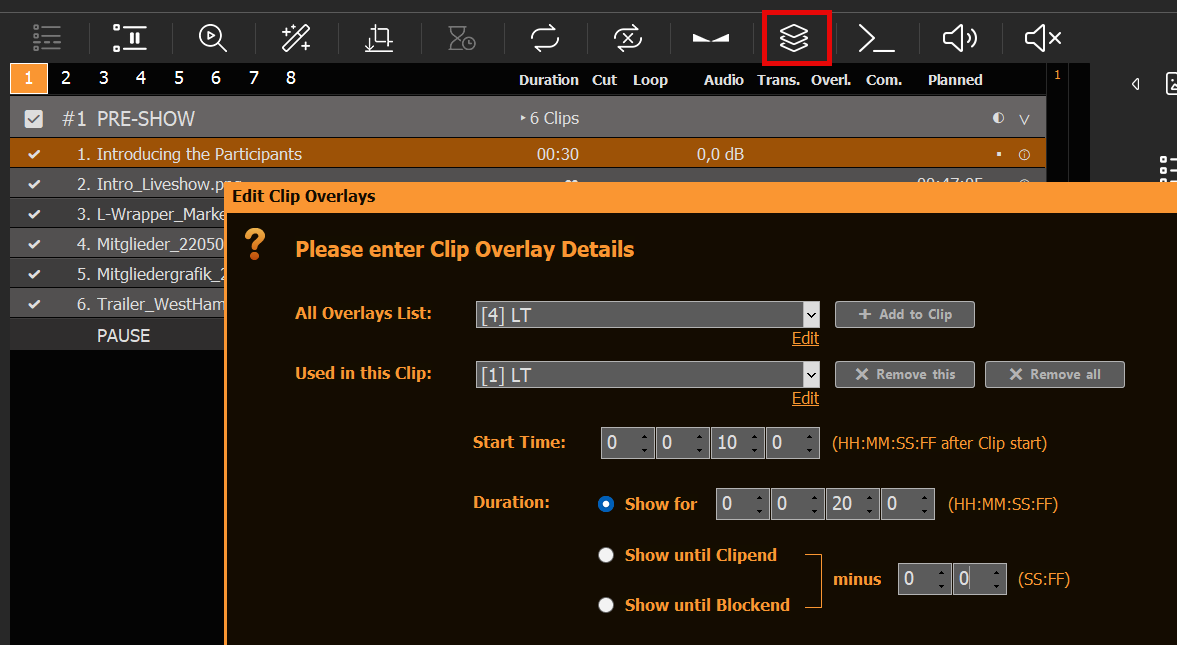
We now have a functioning Overlay Button for the Lower Third with dynamic Text Content. Now let’s attach this Overlay to a specific Clip. Select the related Clip and click on the Overlays Icon, then add our Overlay to that Clip, starting 5 Seconds into the Clip and showing for 10 Seconds:
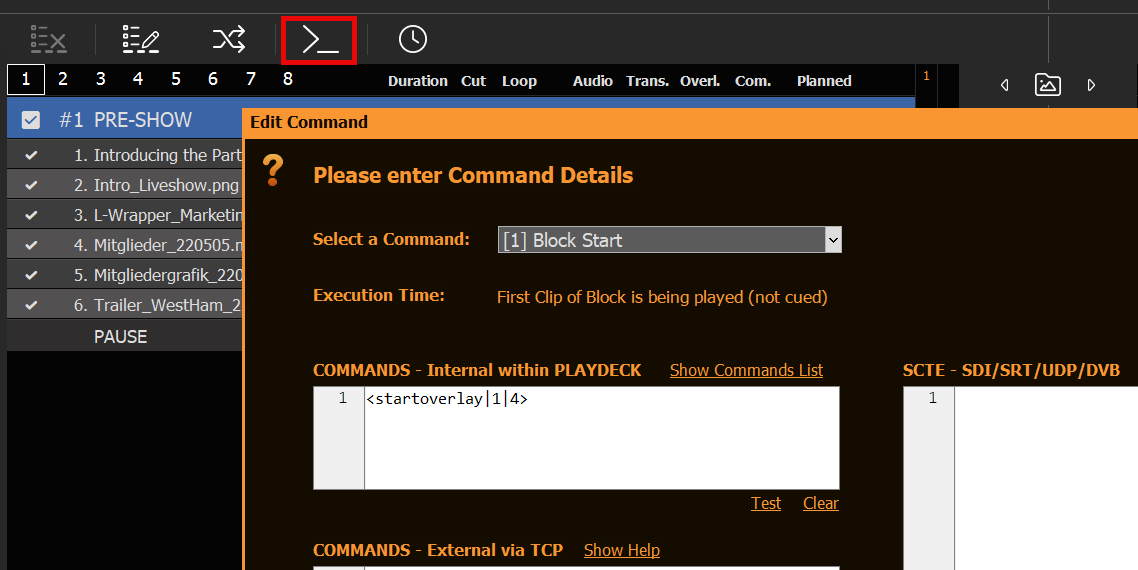
To attach an Overlay to a Block, you can use Commands:
You can copy the Overlay Attachments by right-clicking the Clip/Block and selecting “Copy/Paste Settings”. This will help immensely to duplicate attachments across the playlist.
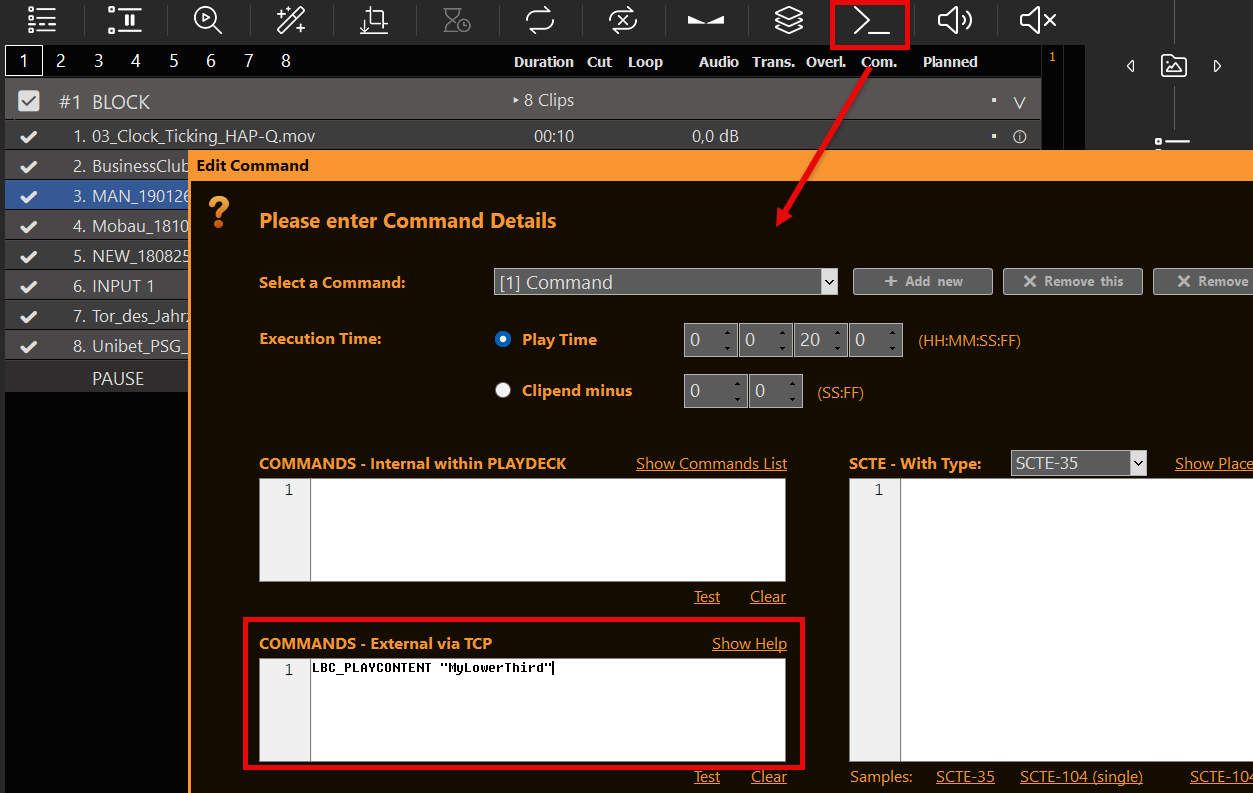
To automate external Overlays, e.g. ClassX, you would also use Commands on Clips or Blocks, but write your Commands in the “External via TCP” Section:
You can also show/hide Overlays via Actions Buttons via internal or external Commands.
5. Schedule Overlay
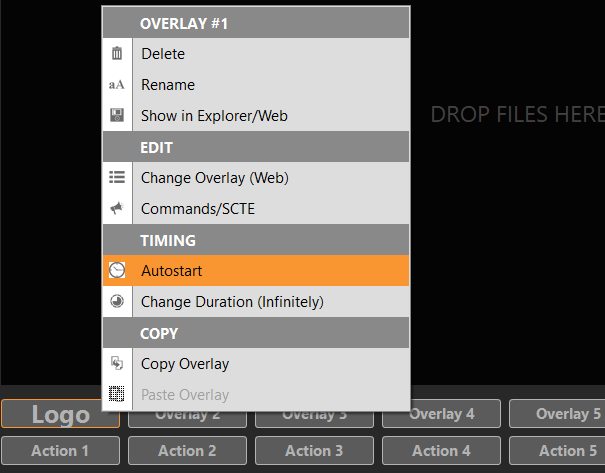
In addition to attaching overlays to playlist items, you can also schedule them to run at a specific time and for a specific duration, by right-clicking the overlay:
6. Remote Control
You already learned about Commands in 4. Automate Overlay with Clips/Blocks. You can call these commands from anywhere and start your overlays via your Stream Deck or any other Remote Control Software.
You can use one Channel of PLAYDECK just for the Overlays and send them to your Mixer via External Keying, which is supported for Device Output as well as NDI Output: https://playdeck.tv/howto/keying/
For High Quality and Lag-free network operation, we recommend using High-end network hardware (router, switch) as well as high speed ethernet cables (Cat6+).
PLAYDECK allows to assign a network configuration file, which will be loaded upon PLAYDECK start.
Structure of Configuration File (JSON)
{
    "protocol":"2110",
    "network2110":
    { // this part configures the parameters of the device itself, the connectors (SFP) with IP configurations
        "ptpPreferredGMID":"00-00-00-00-00-00-00-00",
        "ptpDomain":0,
        "setup4k":"false",
        "multiSDP":"false",
        "audioCombine":"false",
        "rxMatchOverride":0,
        "sfps":
        [   // the configuration itself for each of the connectors
            {
                "designator":"sfp1",
                "ipAddress":"192.16.45.8",
                "subnetMask":"255.255.0.0",
                "gateWay":"255.255.255.255",
                "enable":"true"
            },
            {
                "designator":"sfp2",
                "ipAddress":"192.16.45.9",
                "subnetMask":"255.255.0.0",
                "gateWay":"255.255.255.255",
                "enable":"true"
            }
        ]
    },
    "receiveVideo2110":
    [ // this part is to receive a video feed where you set the connector, the source address
      // and its port for both the connectors.
        {
            "stream":"video1",
            ...
        },
        {
            "stream":"video2",
            ...
        }
    ],
    "receiveAudio2110":
    [ // this part is to receive an audio feed where you set the connector, the source address
      // and its port for both the connectors.
        {
            "stream":"audio1",
            ...
        },
        {
            "stream":"audio2",
            ...
        }
    ],
    "receiveAnc2110":
    [  // this part is to receive the ancillary data where you set the connector, the source address
       // and its port for both the connectors.
        {
            "stream":"anc1",
            ...
        },
        {
            "stream":"anc2",
            ...
        }
    ],
    "transmitVideo2110":
    [  // this part is to send a video signal where you set the connector, the destination address
       // and its port for both the connectors.
        {
            "stream":"video3",
            ...
        },
        {
            "stream":"video4",
            ...
        }
    ],
    "transmitAudio2110":
    [  // this part is to send an audio signal where you set the connector, the destination address
       // and its port for both the connectors.
        {
            "stream":"audio3",
            ...
        },
        {
            "stream":"audio4",
            ....
        }
    ],
    "transmitAnc2110":
    [  // this part is to send ancilary data where you set the connector, the destination address
       // and its port for both the connectors.
        {
            "stream":"anc3",
            ...
        },
        {
            "stream":"anc4",
            ...
        }
    ]
}
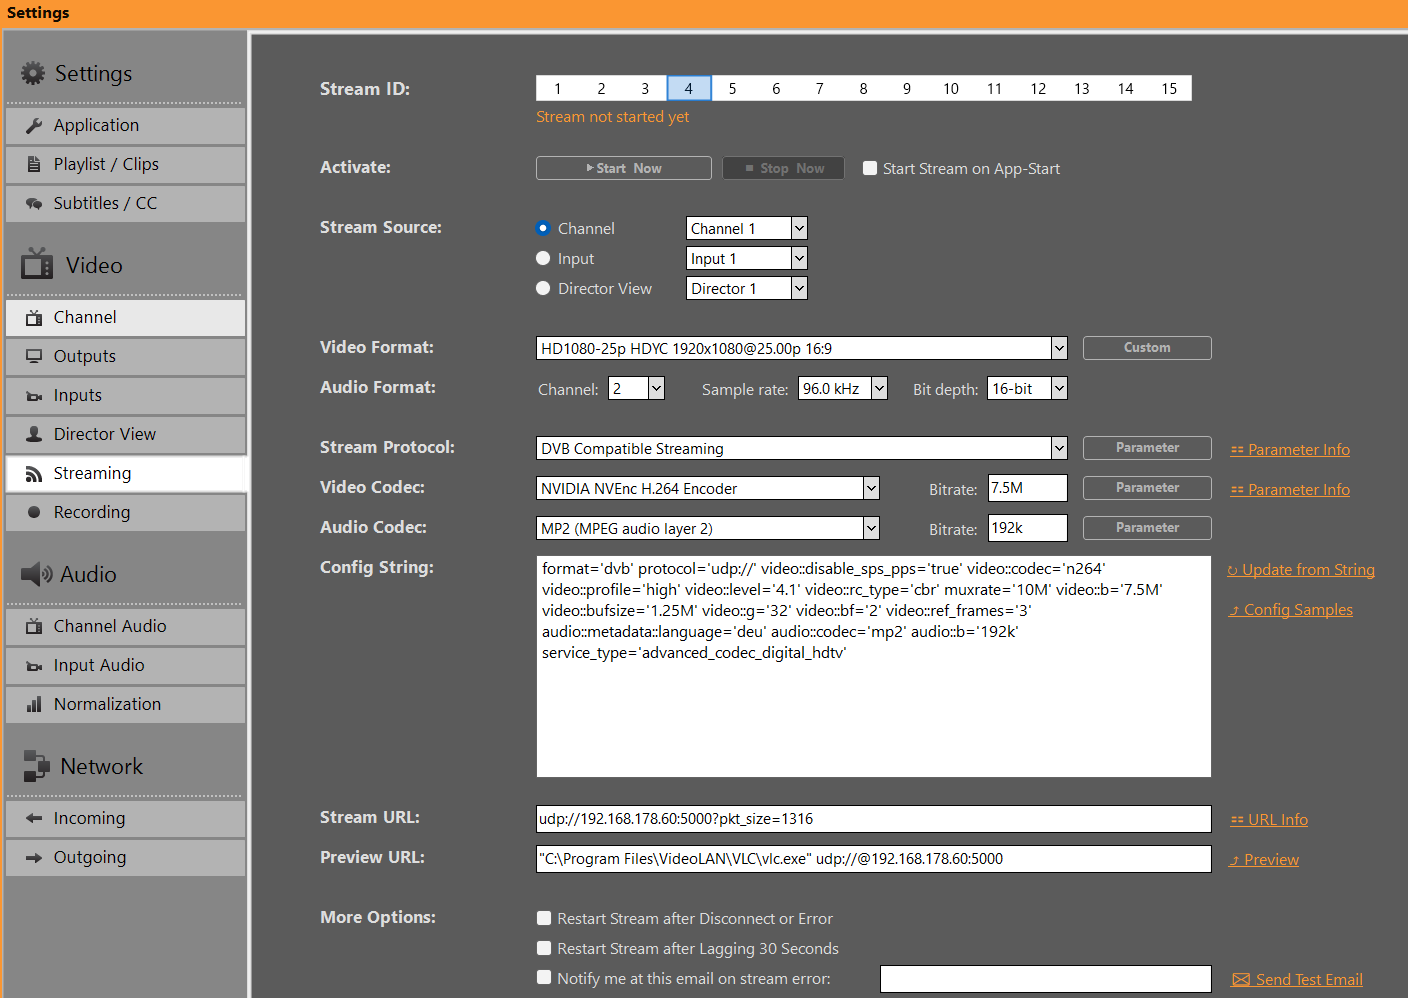
You are able to setup 15 different Stream Configurations for any Source, being Channel, Inputs and Director View. As a default, your Video Format is copied from the Source, once the Stream starts, but you can transcode into any Resolution.
Once you pick your Protocol, the other Fields for Video/Audio Codec and URL will change according to your selection, meaning: Not every Video/Audio Codec will be available for every Stream Protocol.
INFO: NVIDIA Encoder do NOT support Interlaced Formats anymore. Pick Intel QuickSync instead.
Your URL will show a suggestion of the required URL Format. Click on “URL Info” to show more examples, e.g. how to integrate Username/Password. The Preview URL will not be used by PLAYDECK, it’s just for your convenience to open the Internet Browser upon clicking “Preview”.
Using Parameter and Config
Further Parameter can be set to Protocol and Codecs, which are specific for your selection. These can be used to finetune your Settings, e.g. make your Stream CBR or add Metadata.
Clicking on “Parameter” will open a Editor, which will only show the possible Settings for your selection. It will highlight any Value that differs from the Default Value.
The “Config String” is a representation of all your Protocol/Codec selection as well as their respective Parameter. The Config String works both ways: You can also copy/paste a Config String into the Text Field, then click “Update from String” to apply the Values upwards. This allows you to simply copy Settings between Stream ID’s or share with other User.
Config Samples
Here is a quick selection of recommended Configurations for different purposes. Copy and Paste to PLAYDECK and click “Update from String”.
DVB Stream with CBR and GOP B-frames. No PCR or PTS-DTS or Buffer underrun Error
INFO: Every DVB Receiver is different und you might need different Parameters. Some Receiver will not allow ANY deviancy from official guidelines, and will show BLACK. The most reliable solution to encode DVB signals are Hardware Encoder, e.g. Haivision.
Best practice to test DVB Streams for PCR Error or other, is using one of these Tools: – DVBControl DVBAnalyzer (costs ~2000 EUR, but is most reliable and detects PTS-DTS Error) – StreamGURU (costs ~300 EUR, can detect any ETR Error and shows Bitrate Graphic) – TSAnalyzer (free, but can ingest Stream URL, needs TS File on HD) – Others worth mentioning: DVBInspector, Elecard Stream Analyzer, StreamXpert
————————————————————
SRT Stream in CBR for 25 FPS with High Quality Audio
The next Sample is being used by several Customer in a Multichannel Stream Setup to broadcast Music Video Content. This Config runs smooth for 4 parallel Output+Stream Channel – achieving optimal sound and picture quality with FHD ACC audio.
The next Sample is for Twitch. Use Twitch Inspector to check your Stream Stability and add “?bandwidthtest=true” to your Stream URL to prevent going Live.
video parameters—including 4:2:2 chroma subsampling, a specific GOP structure (M=3, N=15), and interlaced field processing—alongside professional-grade 24-bit PCM audio at a 48 kHz sample rate.
The default AAC streaming settings save CPU, but might sound flat on music channels. For pristine audio, choose one of the two profiles below based on your target audience and source material.
Quick Prep: – Source: Use 48 kHz clips (320kbps or lossless PCM). – Video: Lower video to 720p30 if bandwidth is low. Always use hardware encoding.
Option 1: Maximum Compatibility & Stability (Safe Variant)
Best for: Standard streaming, cable operators, and DVB-T multiplexers. This is the safest profile to prevent phase issues across various types of content.
audio::profile=’aac_low’: Sets AAC-LC for maximum quality and 100% hardware decoder compatibility. audio::aac_coder=’0′: Forces a high-quality two-loop encoding run for clear transients. (Change to 1 if you face CPU spikes). Dynamic Stereo: Leaves stereo management to the encoder, making it highly resilient against imperfect source material.
Best for: Dedicated music channels with pristine studio-grade source files. This profile utilizes a tight VBR envelope and forced Mid/Side stereo processing.
audio::stereo_mode=’ms_force’: Forces Mid/Side stereo processing, maximizing bandwidth efficiency for deep, wide stereo soundscapes. minrate=’200K’ / maxrate=’320K’ / bufsize=’640K’: A tight VBR envelope that prevents quality drops in quiet passages while leaving room for heavy musical peaks. Note: If your audio lacks “punch” or sounds hollow on certain clips, switch back to Option 1, as your source material might contain phase inconsistencies.
Color Space and Chroma subsampling and Interlace
The Support for certain Color Spaces, e.g. 4:2:2 for DVB, or Interlaced Encoding, depend very much on the Intel CPU or NVidia GPU you are using.
1. NVidia Support for Interlaced Encoding: – Pascal (GTX 10-Serie): Last architecture with interlace support – Turing / Ampere / Ada (RTX 20/30/40): Hardware support for interlaced encoding was removed – Blackwell (RTX 50-Serie): Interlaced encoding for H.264 (8-bit and 10-bit) has been re-introduced
2. NVidia Support for 4:2:2 Color Space: – Blackwell (RTX 50-Serie)
3. Intel Support for 4:2:2 Color Space – 10th Gen and newer processors offer support for Hardware Accelerated encoding and decoding of HEVC codec on 4:2:2 color sampling via Quick Sync. – Previous graphics controllers on 9th Generation Intel® Core™ Processors and older were limited to HEVC codec 4:2:0 color sampling for hardware accelerated encoding and decoding.
This is a quick config sample to encode 4:2:2 with Intel Quick Sync (10th Gen+)
Note: Features such as interlace and 4:2:2 color space are also available in x264 CPU encoders. Since we use an LGPL version of FFmpeg without GPL parts (e.g., libx264), these features are not enabled. It is possible to replace the FFmpeg libraries with your own versions.
Multiple Audio Tracks
If you need to send multiple Audio Tracks, e.g. for different Languages or for Director Audio, you can do so with all supported Protocols (DVB, RTMP, UDP and some more). You can also apply different Audio Codecs.
The way this works is, that you have ALL Audio Tracks already active in your Channel, then SPLIT the Audio Tracks for your Stream Output in e.g. Stereo Pairs.
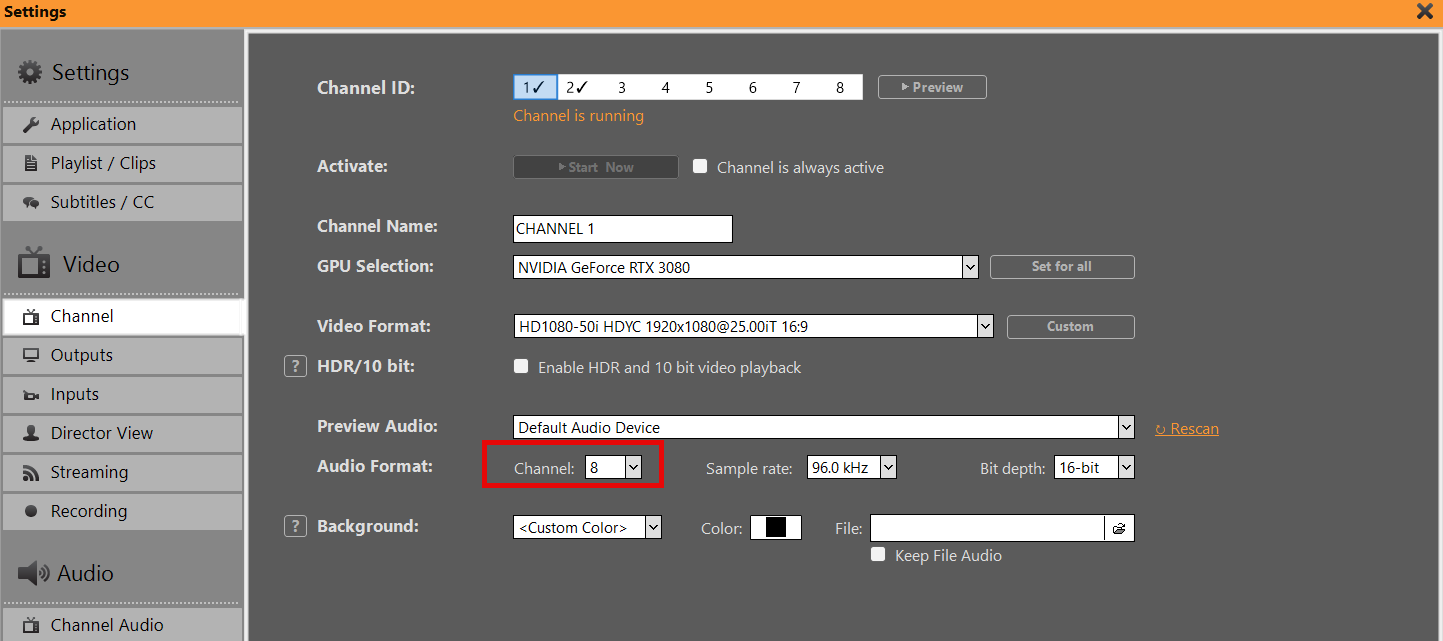
First, make sure your Channel is set to more then 2 Audio Channel:
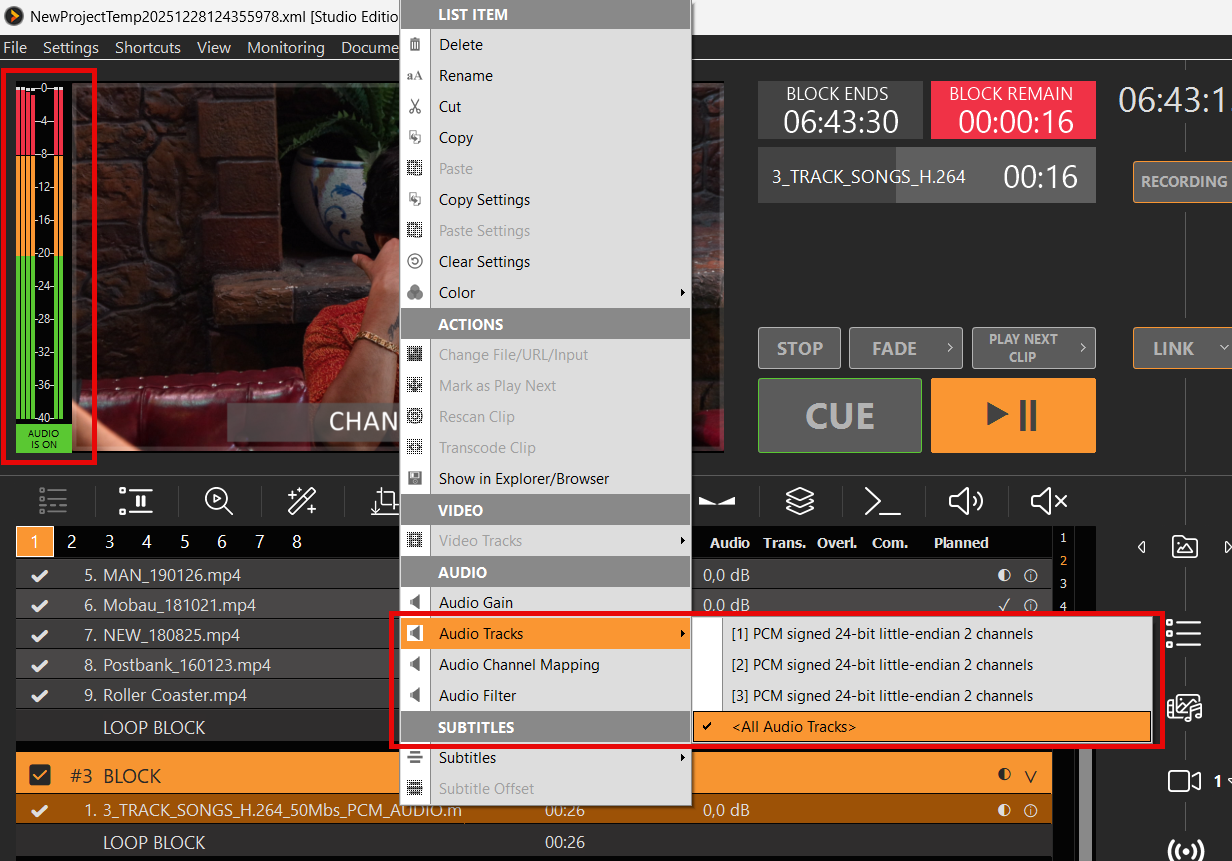
Then “fill” these Audio Channel with Audio Content, e.g. by enabling All Audio Tracks on a Clip or ingesting all Tracks via SDI (up to 16 Audio Tracks). You can also use Audio Mapping to mix up/down your Audio Tracks or use Audio Filter to copy and delay certain Audio Tracks.
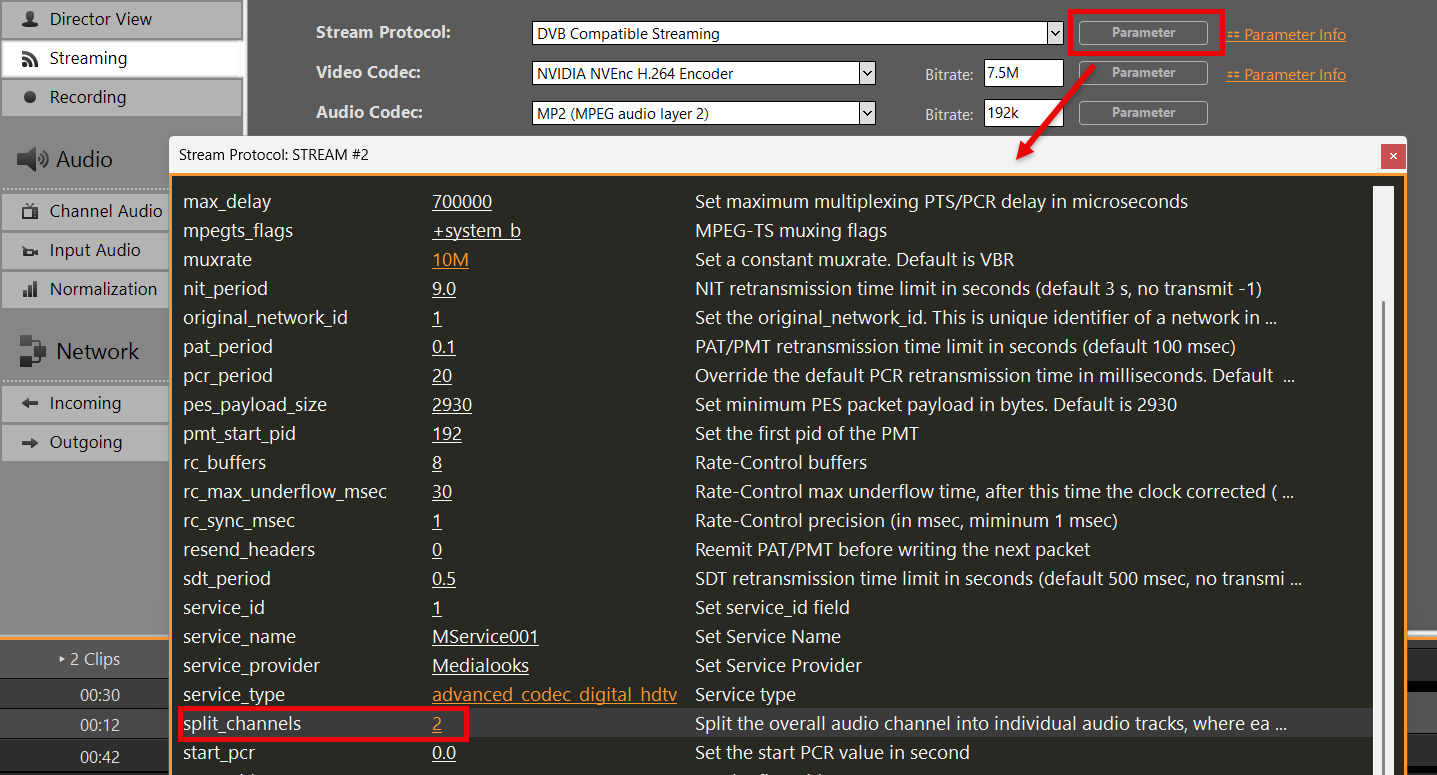
Then you open your Stream Settings, especially the Parameter of your Stream Protocol and enable Audio Track Splitting:
INFO: The Number of Audio Channel in your Stream Settings need to stay at 2.
If needed, you can apply different Audio Codecs for the addition Audio Tracks. Please note the added and increasing Numbers for every Audio Tracks after the first one:
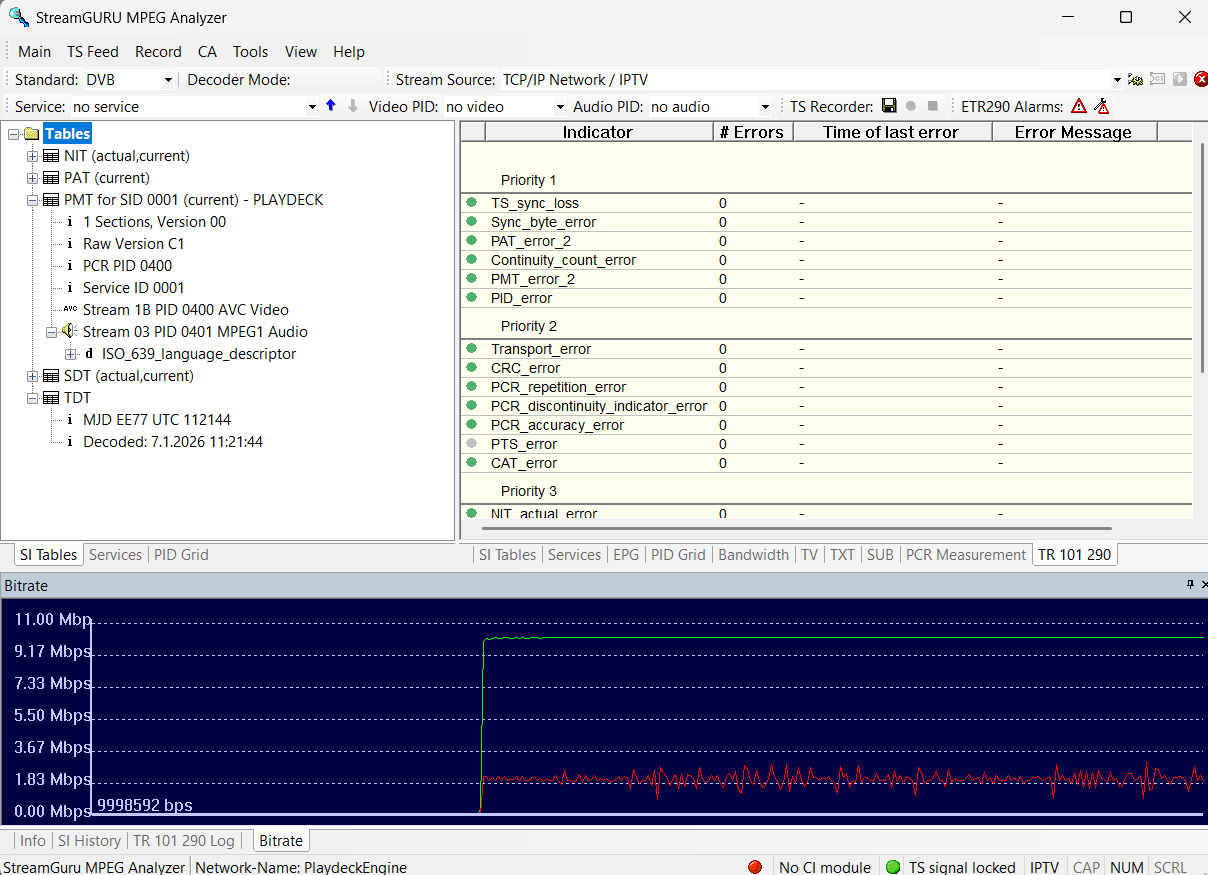
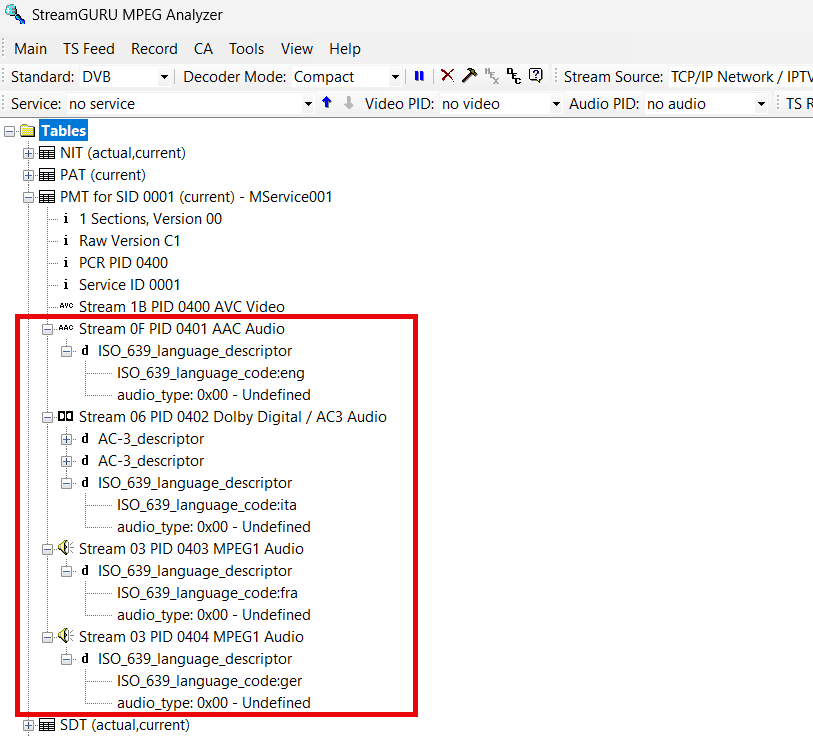
You can then test your resulting Audio Tracks in e.g. StreamGURU:
Routing Streams over specific IP
Your production requires you to send your streams via specific networks. This is mostly used to have a dedicated/reserved line for streaming, so it doesn’t interfere with regular network traffic.
If using UDP Streams you simple add this parameter directly to the URL: udp://ip:port?localaddr=172.20.10.2
If using SRT Streams you simple add this parameter directly to the URL. This only works in rendezvous mode: srt://ip:port?mode=rendezvous&localip=172.20.10.2
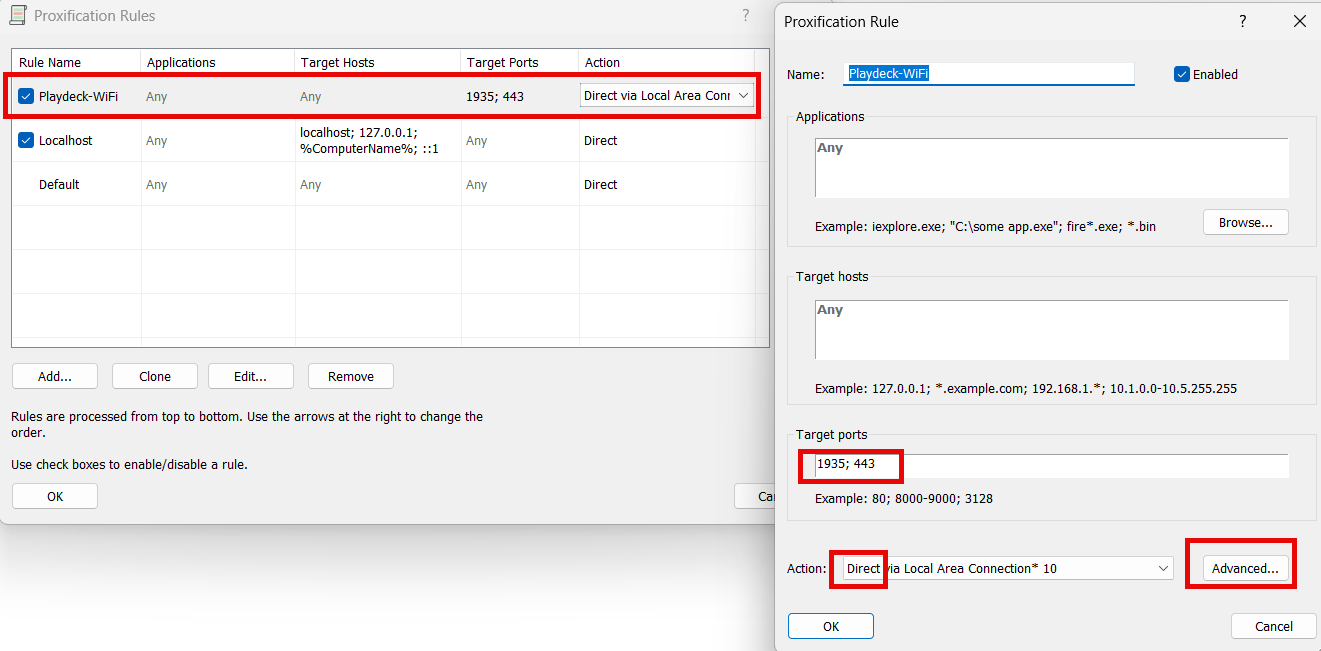
If using RTMP Streams, there sadly is no paramter. You need to route all RTMP outbound traffic manually. For this we use Proxifier. Goto Profile, Proxification Rules, Add new Rule and edit like this and move it to the top if the rules. Pick your desired adapter via “Advanced”.
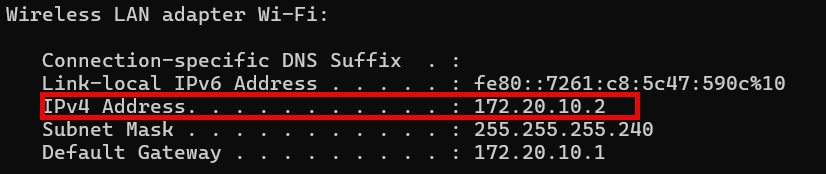
If you want to run a dry test locally without the 2nd line, enable both Ethernet Adapter and Wifi on your PC, then Start a new Hotspot on your Mobile Phone and connect PC Wifi to that Phone. Then open Console (“cmd”) and type “ipconfig”. The IP address you need is there:
If your Streams are lagging or even stopping completely, you are often in the dark what exactly happened. Here are some pointer to help you identify the problem.
1. Bitrate
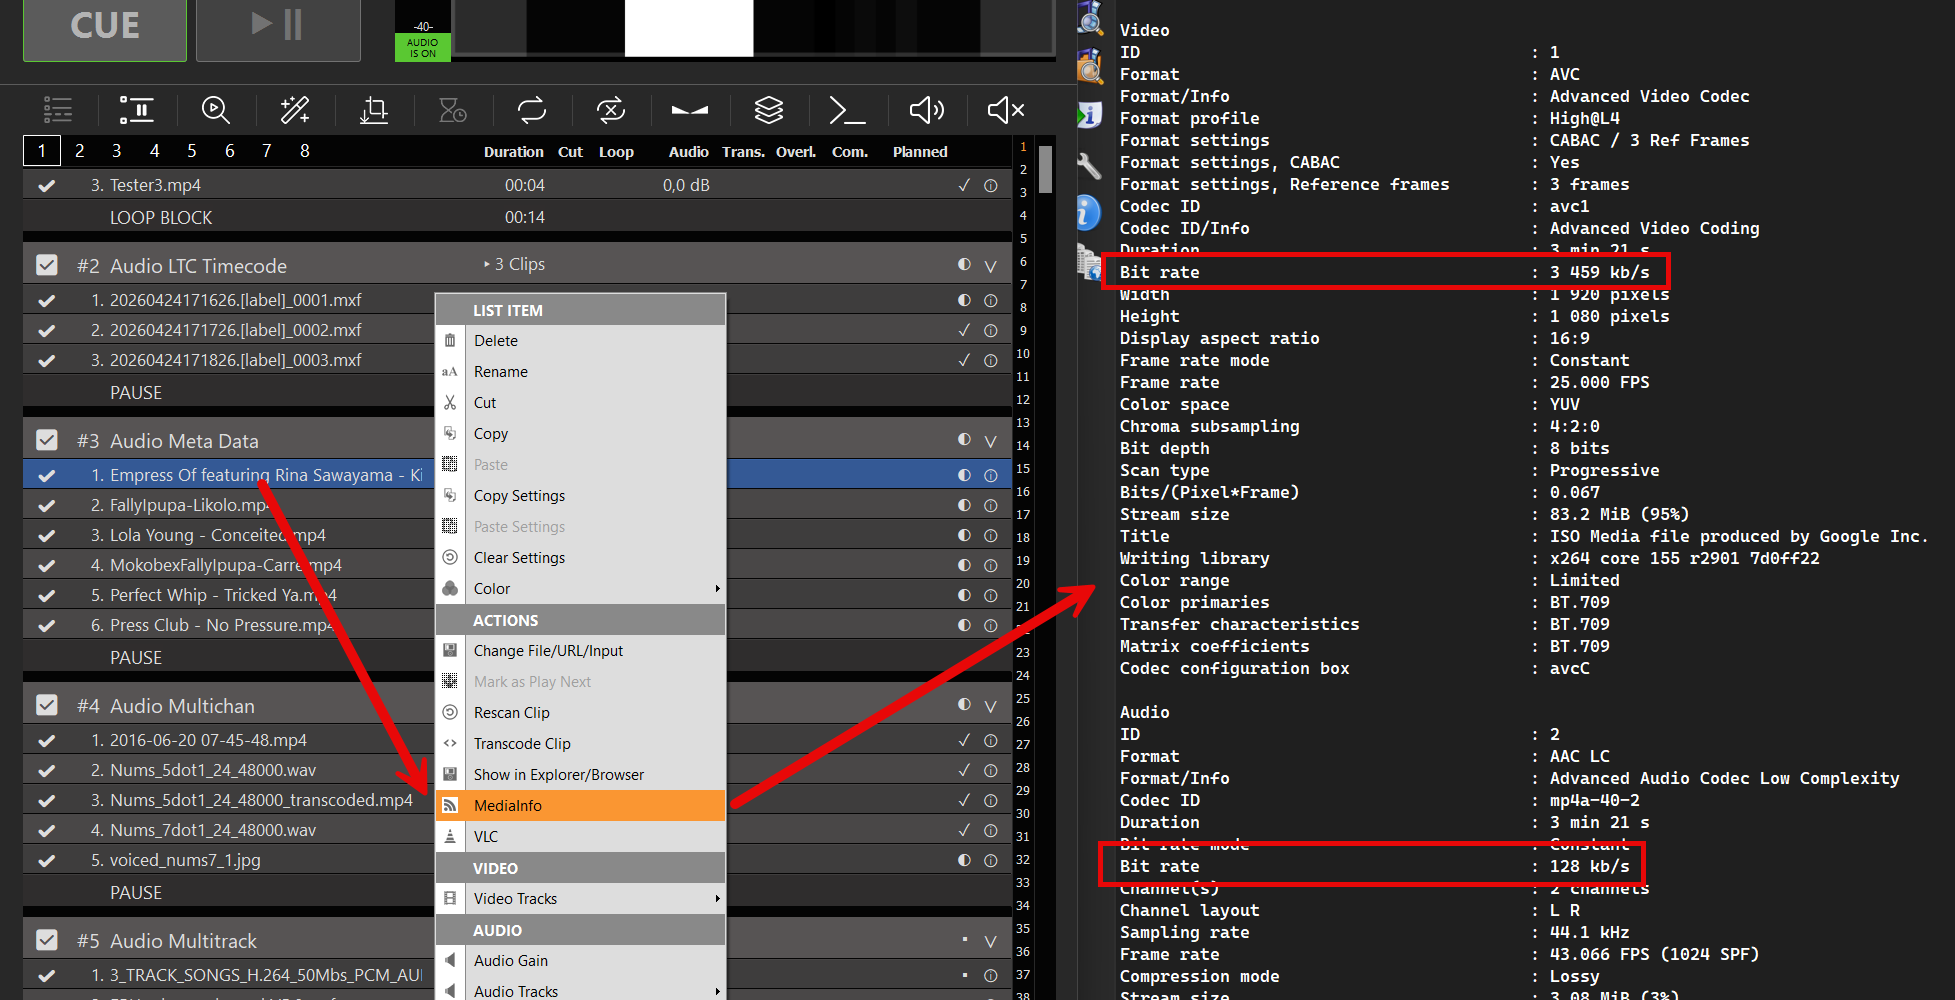
Follow this Rule: The Video and Audio Bitrate Setting (for your Stream) should never exceed the Clip Encoding Bitrate. Check by right-clicking your Clip in the Playlist and open MediaInfo. In this case, set your Video Bitrate to 3M and Audio Bitrate to 128K.
2. Monitoring
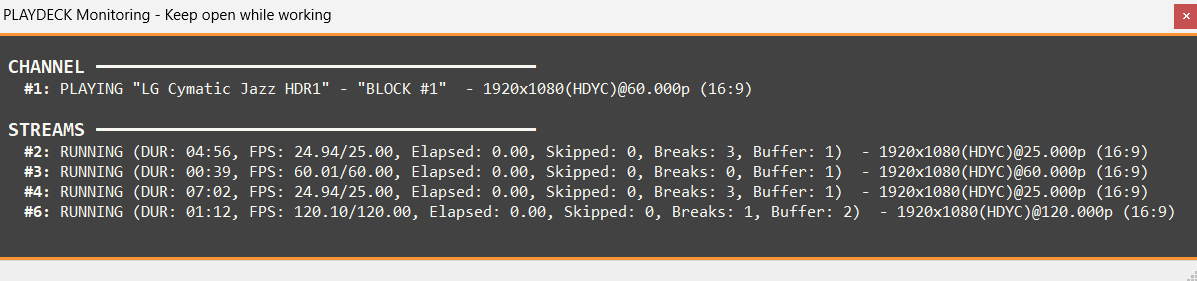
Open the Monitor Window in PLAYDECK or open the Stream Logs.
FPS 50/60 (FPS Average/Desired) Compares the current and average encoding frame rate against the desired level. A drop here indicates the system cannot keep up with real-time encoding.
Elapsed (Frame Waiting Time in Seconds) Shows Time elapsed after the last Frame has been processed. If this value increases, not frames can be processed due to missing Source, or false settings or no connection.
Skipped (Dropped Frames) The most critical indicator of performance bottlenecks. If this value increases, the encoder is intentionally dropping frames because it cannot process them fast enough.
Breaks (Frames lost) If the network is slow, you see Breaks because the Server wants a new frame but it cannot get there in time (for protocols that requires acknowledgement like RTMP or SRT). Breaks can also happen if the Source does not deliver a frame in time.
Buffer (Frames waiting) Monitors the number of frames waiting in the internal queue. A constantly growing buffer typically precedes skipped frames or Breaks. High Skipped, Low Breaks: This usually means your CPU/GPU encoder is too slow. High Breaks, Low/Zero Skipped: This usually means the network or source is the bottleneck. The writer is ready to encode but the frames aren’t arriving or being “pulled” at the correct time intervals due to the connection lag.
3. Network/Bandwidth Problems
Turn of all your Streams, open your Windows Console (“cmd” in Start Menu) and type
tracert <hostname_or_ip>
Use your Target URLs Hostname or IP Address. If you see any Values >100 ms, this will indicate a slow connection to your Stream Target.
Also keep in mind, that while today Download Speeds with Fibre, Cable or DSL or mostly high speed (>100 Mbps), the Upload Speed could be very much slower than that. Use a Tool like Speedtest to determine your actual Upload Speed.
Also use Bandwidth Profiler on the Stream Server to check, if your desired Bitrate is also received on the Server. Most Provider or Software will provide with Tools to measure the received Bitrate. Ideally it is shown as Graph, which can point out any Gaps during the Transmission. If you have no Tool at Hand, we recommend streaming to YouTube, as it has a build-in Stream Analyzer, which is very useful to diagnose any instable connections.
In addition, please check with your Provider or Service, if the provide any LOCAL Stream Ingest URL’s for your Region or Country. As an example, Twitch provides these Twitch Ingest Endpoints.