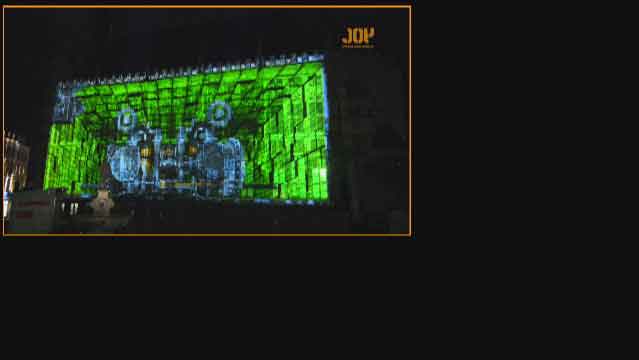
PLAYDECK can freely scale and position the content to be played back within the selected output resolution. This is especially useful if the playback is to be performed on a medium which has a different physical resolution and expects the signal to be pixel accurate, e.g. an LED wall. In many cases you can save yourself an expensive hardware scaler. This function is also called “Mapping”, “Pan & Scan” or “Region of Interest” by other manufacturers.
Example of scaled content within a Full-HD canvas using PLAYDECK’s Area of Interest Feature
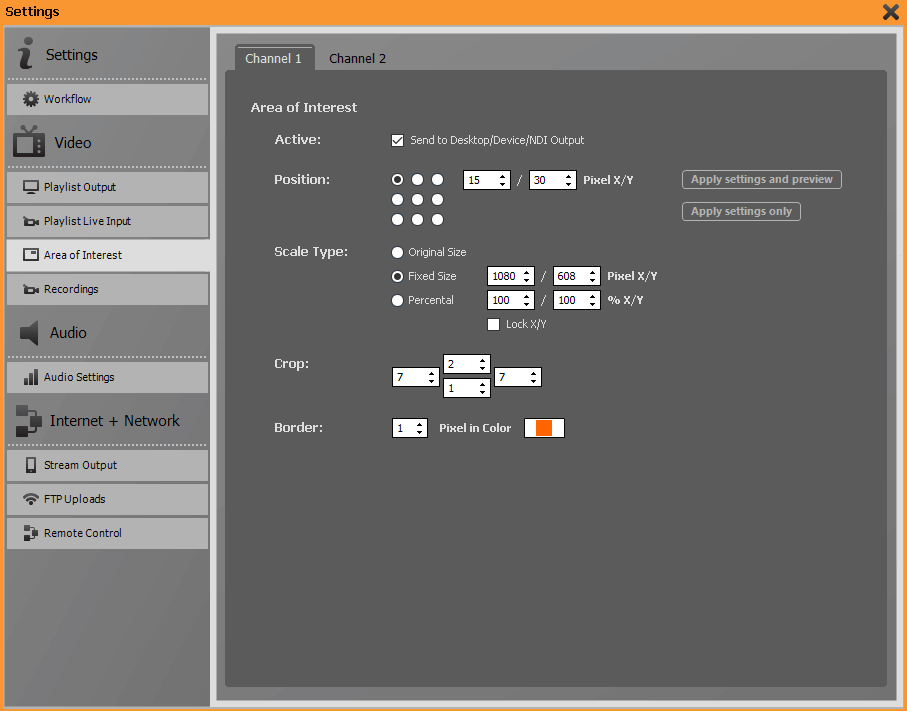
Using the Area of Interest menu, you can determine at which position (based on nine possible reference points, adjustable to pixel accuracy) and in which size (percentage or in pixels, with or without maintaining the aspect ratio) your content should be output. You can also crop the content from all four sides and add an inward pointing colored frame to better control the correct position on your LED wall. When you have entered the desired values, please press either Apply Settings & Preview (the values are transferred and you get a preview window for checking) or Apply Settings Only (the values are only transferred, no preview window is opened) and activate the checkbox Active.
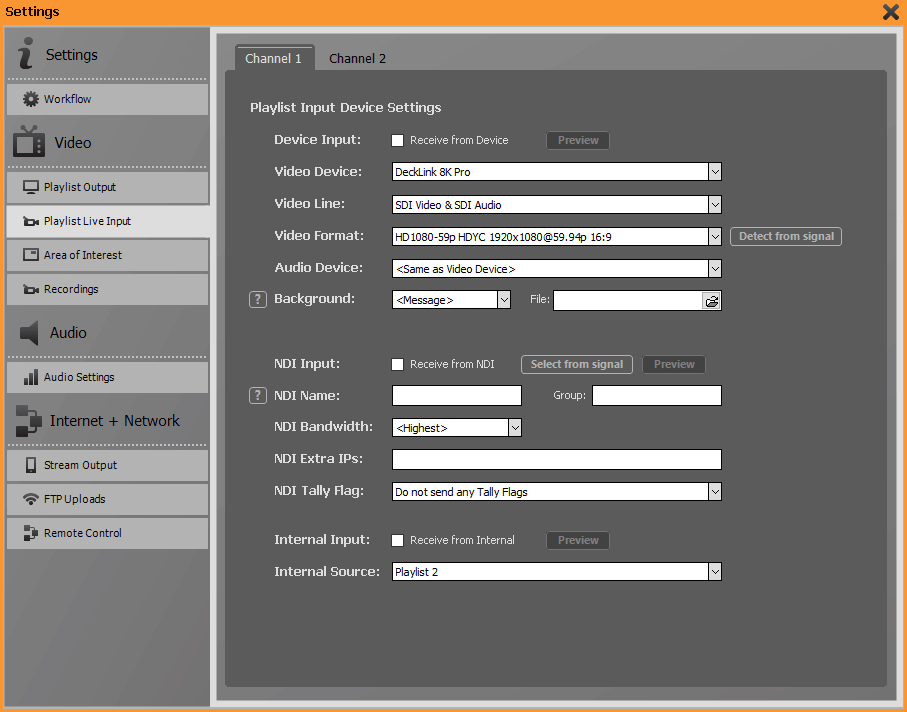
Within a playlist, you can not only use videos, graphics or audio tracks for playback, but you can also receive and output a live video signal. So you can automatically switch to another video source directly from the playlist without the need for an additional video mixer.
In the two upper drop-down boxes Video Device andVideo Line, please select the live input you want to display. In the Video Format field, please select which video format is available at the Live Input. Alternatively, you can also use the Detect from Signal button. If the information about the input resolution is transmitted from the card to the system, the correct value is automatically entered. With Audio Device you can specify a device for receiving the audio signal different from the video input card, if you want to. In the Background section you can set what PLAYDECK should show you if there is no correct video signal or the signal fails. You can choose between a text insertion (“No Video Signal”, <Message>), a file that you can assign using the file explorer on the right (<File>), or a still image of the last received video signal (<Last Frame>). After you have confirmed the Receive from Device checkbox, you can check the incoming live signal in a preview window using the Preview button. You can assign two different live signals for channel 1 and channel 2 or use the same connector for both playlists.
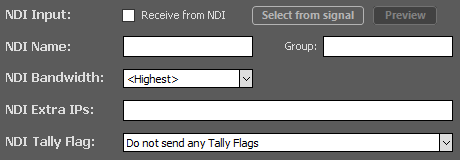
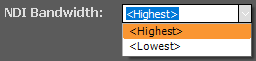
You can also use NDI streams in your playlist as a live input. By pressing Select from signal PLAYDECK will scan the connected network for NDI streams. All NDI streams found are displayed in a drop-down list from which the desired NDI stream can be selected. Activate NDI Input by checking the corresponding box and check the signal from the Preview window, if you like. You should only change the NDI Bandwidth to Lowest if you really want to get only a preview quality display. PLAYDECK does not currently support NDI|HX.
You should only change the NDI Bandwidth to Lowest if you really want to get only a preview quality display (reduced frame rate, reduced resolution). Lowest Bandwidth does not mean that an NDI|HX signal is output instead of the NDI signal. PLAYDECK does not currently support NDI|HX.
PLAYDECK can establish a return path for the transmission of tally flags via the incoming NDI signal. In the drop-down field, you can set the exact behaviour to perfectly align the forwarding of the tally signals to your needs.
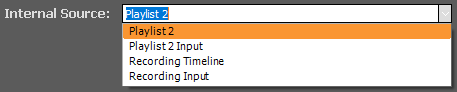
PLAYDECK also offers the option of making an output signal generated from PLAYDECK available internally as live input for the respective other playlist. Select the desired output from the drop-down list.
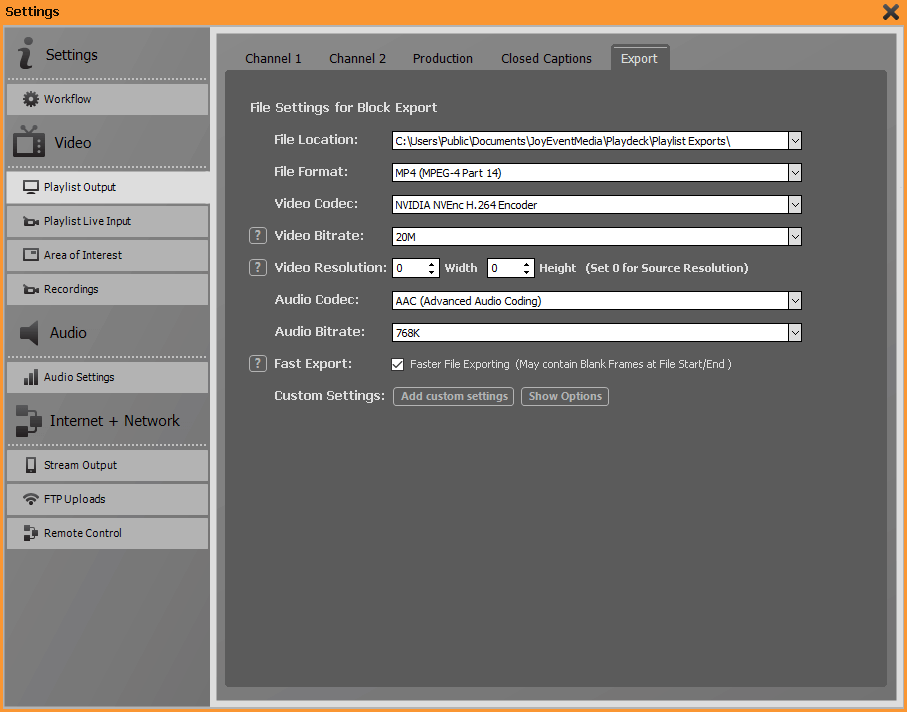
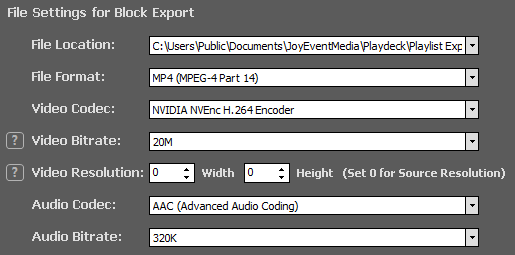
PLAYDECK can render all clips of a block including all used transition effects or overlays to a single file for you. Use the drop-down fields in the Export area to select the file path and codec, etc. where PLAYDECK should create the file. By default, the resolution of the exported file corresponds to the set output resolution of the playlist. If you want a different resolution, please set it in Video Resolution. Otherwise, please leave the values at zero.
The export of a block is usually executed at maximum speed. In individual cases, this can lead to some black frames appearing at the beginning or end of the exported file. If you want to exclude this, please deactivate the checkbox behind Fast Export.
You can customize the settings used to export the playlist (bitrate, keyframe interval, etc.) by entering them in the field that opens when you press the Custom Settings button. To get an overview of the available options, please open the help text under Show Options.
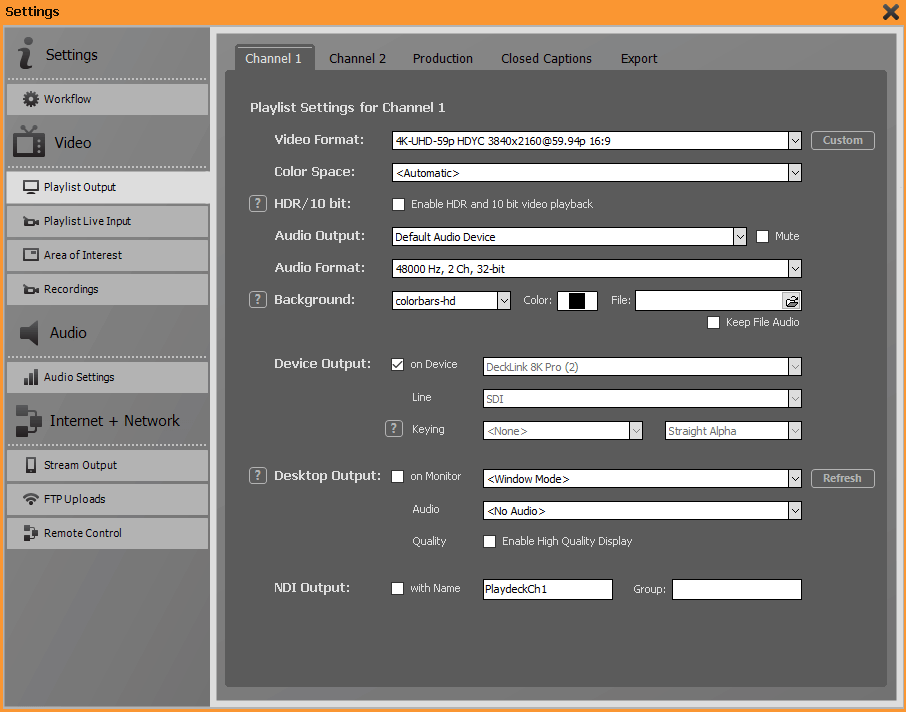
Use the drop-down boxes to set the desired values for output resolution, color space, additional audio output device and audio bitrate/channel number. Please note that the output card you are using may not necessarily be able to display all offered resolutions. If in doubt, please contact the manufacturer of your output card. The Automatic setting for the color space is recommended for most use cases. Only if you want an output with alpha channel for transparency information, please select the ARGB32 setting. By activating the checkbox next to HDR/10 Bit you start the HDR output of PLAYDECK. HDR is ONLY supported for devices, but not for desktop output. You also will not see HDR colors in your preview in PLAYDECK. Supported devices are Blackmagic (Input and Output) and Deltacast (Output only). You also need a NVidia GPU set as Decoder in PLAYDECK. You can play any HDR Clips (all codecs) and also select HDR Tracks in YouTube videos. HDR can also be combined with Alpha/Keying. When using the HDR output, please use videos whose frame rate and resolution match the output values, otherwise the system performance requirements will increase drastically. You can also create a custom output format. Please make sure that the output board you use can actually reproduce the values you set.
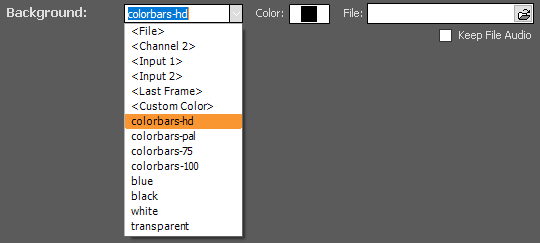
In this section you can set the content that PLAYDECK should display when the playlist is in STOP status. Select <File> to store an image or video file and assign it using the File Explorer on the right. Selected video files are played back in a loop. For an optimal playback, please make sure that the start and end frame match each other to ensure a clean loop. If you want the sound to be audible during playback of the desired video loop, please activate the Keep File Audio checkbox. Select <Channel 2> if you want to output the current playback from Channel 2 (and vice versa). Select <Input 1> or <Input 2> if you want to output the signal of a live input. Select <Last Frame> if you want PLAYDECK to hold the last frame displayed when you press STOP. With <Custom Color> you can display a freely selectable background colour. Alternatively, select one of the four available test patterns, or choose a blue, black or white background or transparent output.
In the Device Output section please select your desired output board. Some output cards provide different signals (e.g. SDI and alternatively HDMI). In the Line section you can activate the different jacks. Under Keying you can select whether the output signal should contain transparency information. The entries that you find in the drop-down field are provided by your output card. If in doubt, please ask the manufacturer of your output board which keying method you have to select for your desired purpose. See https://playdeck.tv/howto/internal-and-external-keying/ for more information about Keying, especially using Blackmagic Design output cards.
If you cannot use a dedicated playout card for video output, you can alternatively use a local output of your graphics card in the Desktop Output area. Before activating this feature, please make sure that you have selected “Extended Desktop” in the Windows settings for the screen display and that the settings of your graphics card for the extended desktop correspond to your desired playlist resolution and refresh rate. Please note that the quality of the color reproduction for the desktop output is determined by your graphics card and PLAYDECK has only little influence on it. Ticking the checkbox Enable High Quality Display often results in more precise colour reproduction.
Additionally, you have the possibility to provide the video signal via network as NDI stream (NDI is a trademark of NewTek). Give your playlist stream a different name (if desired) and assign an NDI group name if necessary. Check the box to start the NDI stream.
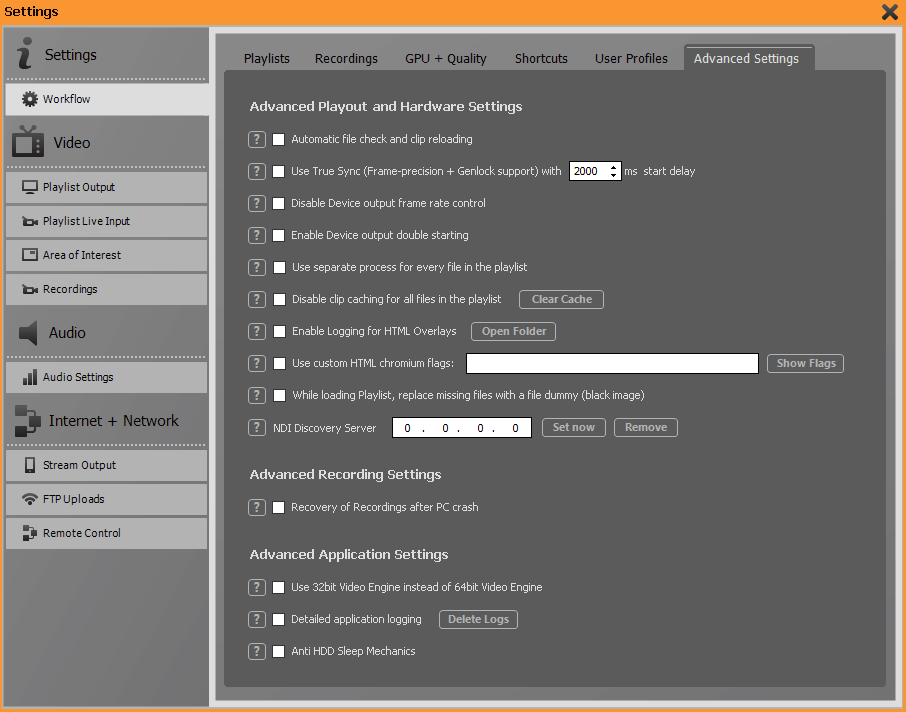
When this function is active, PLAYDECK checks all files in the playlist in the background for possible changes and reloads the corresponding clips. If a clip from the playlist cannot be found, it is marked in red. If this function is deactivated, you can manually reload the clip by right-clicking on it. Deactivating this function is useful if you mainly load clips via a network and want to avoid unnecessary loads on the network.
Activating this function enables frame-synchronous playback from both playlist channels. In order for playback to remain frame-synchronous, a valid sync signal (reference signal) must be present. Preparing both playout channels for synchronous start requires a start delay that you can set freely. If this time is too short, the synchronous start does not work reliably. In such a case, please set a longer time.
Normally, the frame rate control is taken over by the connected output device. If you observe lags, you can transfer frame rate control to PLAYDECK by activating this checkbox.
In individual cases, especially in the combination Blackmagic Design Decklink playout card togehter with keying, it may be necessary to reinitialise the playout card after starting PLAYDECK. To do this, please activate this function.
If you need special stability of the playout in demanding scenarios, you can start a separate render process for each clip in the playlist. This function is not recommended for longer playlists, as it requires more resources.
If you activate this check box, PLAYDECK does not use the saved and cached metadata of the clips from the playlist, but reloads the metadata from the header of the files every time the programme is started.
Activating this function causes the internally used Chromium Browser to write error logs.
You can use your own set of flags for the embedded Chromium browser. This may be necessary if security features restrict the scripts you use. Enabling this feature will turn off our default Chromium flags.
This function is particularly helpful if you want to open and check playlists from third parties and you do not have the corresponding files. In such a case, PLAYDECK replaces the missing files with a video or a still image with a black frame.
If you want to use an NDI Discovery Server, you must tell the system running PLAYDECK the IP address of the server. To do this, be sure to use the official NDI Access Manager. Only in cases where you do not have this software, you can enter the IP address of the NDI Discovery Server directly here in PLAYDECK.
Advanced Recording Settings
If enabled PLAYDECK will try to recover any crashed recording for playback. This can lead to increased resource requirements of active recordings.
Advanced Apllication Settings
Normally, you should not notice any difference between the 32-bit and the 64-bit video engine. Should you notice difficulties with the 64-bit engine in rare individual cases, you can switch to the 32-bit version here.
Only use this function if our support asks you to do so. A large amount of data will be written and your production could be slowed down.
Some hard disks go into an energy-saving mode after a certain period of time without read/write access, which in some cases cannot be influenced by the Windows system settings. In such cases, a clip that has been in CUE state for a longer time may start up after startup and then stall briefly until the hard disk has reached its nominal speed again. To avoid this phenomenon, PLAYDECK writes small files to the hard disk at regular short intervals and then deletes them again. Uncheck the checkbox if you want to disable this function.
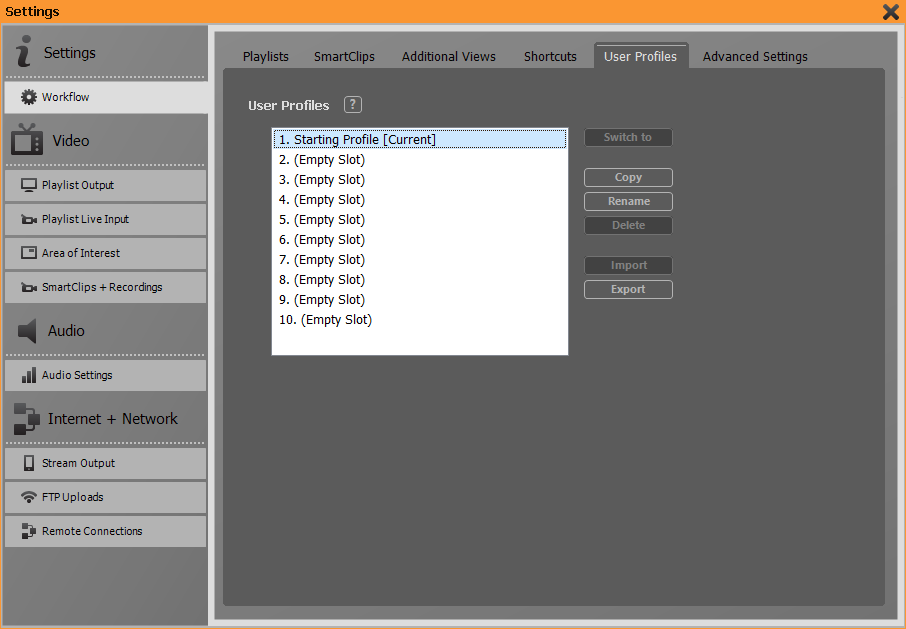
Under this menu item you can save your personal PLAYDECK settings under one of the ten available user profiles. All settings you have made under the menu item Settings are saved and are available after selecting a profile. If you want to transfer a user profile to another PC, you can export it from one PLAYDECK system and import it on another PLAYDECK system. In this case, system-specific settings (all settings with hardware reference) will not be transferred in order to avoid possible subsequent errors due to different hardware configurations.
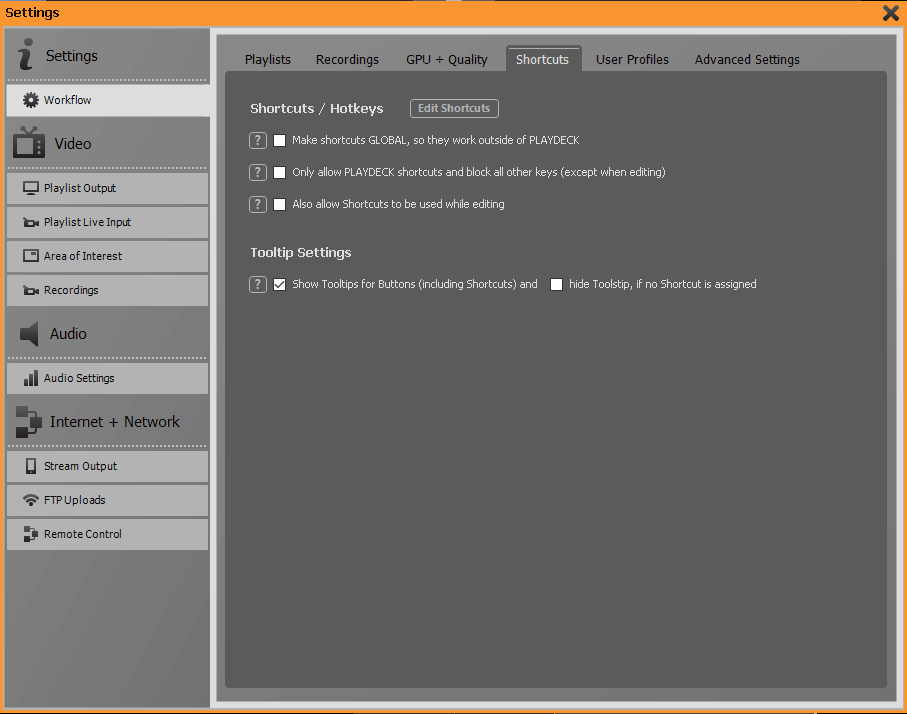
If this check box is activated, PLAYDECK can be controlled via the defined shortcuts even if another application is currently active in the foreground.
Activating this feature prevents all keystrokes except for the stored shortcuts. This is especially important if you want to use shortcuts that interact with Windows functions, e.g. cursor keys.
Normally, shortcuts are deactivated when you edit an item (e.g. when you rename an entry in the playlist) to prevent accidental execution of a shortcut. Checking this box will execute shortcuts even if you are in an edit mode.
Activating this check box enables the display of tooltips on the buttons of the user interface or hides them if no shortcut is assigned.
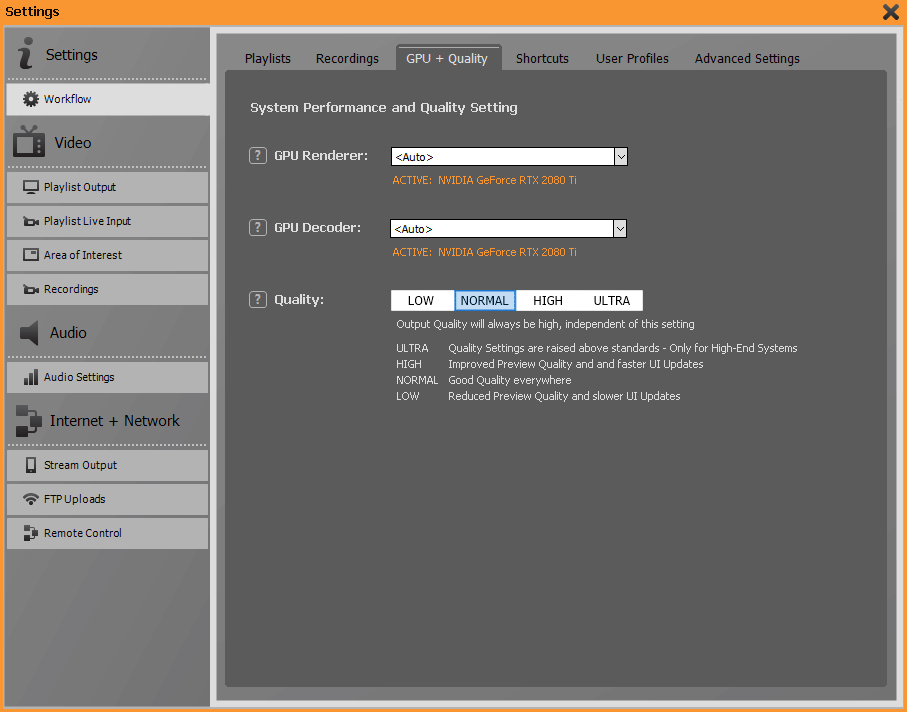
PLAYDECK performs a variety of scaling and rendering processes during playback. These processes place an unnecessary load on the system CPU and are therefore preferably executed on the GPU. PLAYDECK is highly optimised for use in combination with an Nvidia graphics card. Select the GPU to be used for the rendering processes in the drop-down field. The default setting <Auto> should be fine for most applications.
PLAYDECK uses the built-in Nvidia or Intel graphics card for decoding videos whenever possible. Please note that not all codecs can be decoded on the GPU. ProRes codecs in particular cannot be decoded on the GPU on Windows PCs, but only on the CPU.
In order to be able to use as many resources as possible for the output quality on less performant systems, you can set the quality settings for the previews in this area. In most cases, the settings Normal or High should work well.
In this menu item you can set all parameters for your optimal work with PLAYDECK:
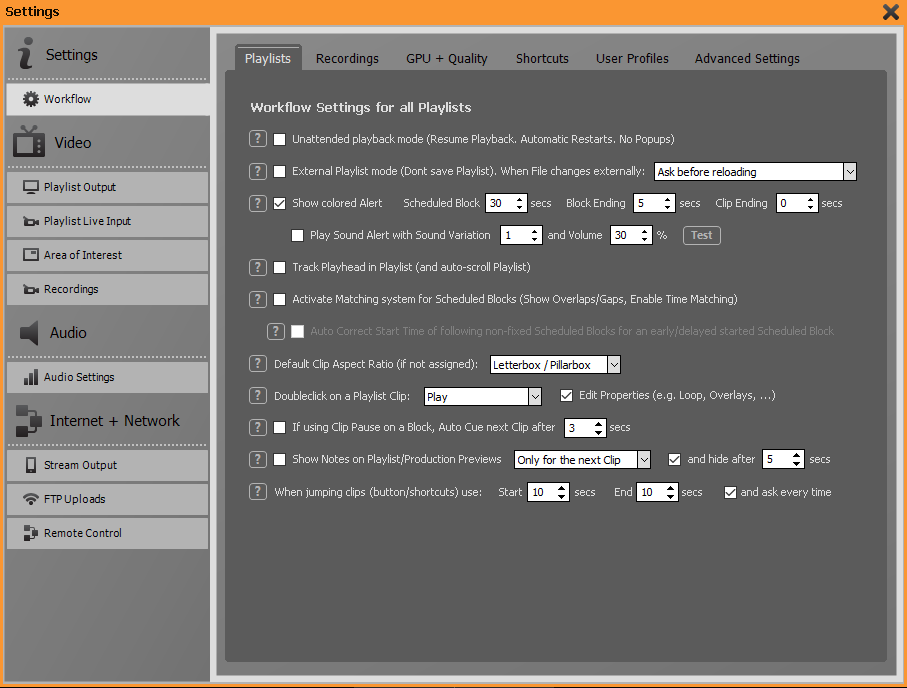
If you activate the first checkbox, you put PLAYDECK into Unattended Playback mode. In this mode, PLAYDECK is automatically restarted in the event of a possible malfunction and playback is resumed at the interrupted point. This mode is particularly suitable for 24/7 operation or for remote access scenarios where access to PLAYDECK should never be interrupted.
Activate this checkbox if the playlist is to be modified by a 3rd party tool. You can set the behaviour of PLAYDECK when the playlist file is changed in the drop-down field: Ask before reloading, Reload Playlist and Resume Playout, Reload Playlist and Restart at Clip 1, or Only Reload Playlist. If this function is activated, PLAYDECK no longer saves the playlist itself to avoid write conflicts.
Under this menu item you can set whether the progress bars in the navigator for the block timer, the clip timer and the schedule block timer should take on a signal color shortly before the time expires to draw your attention to the approaching end. You can also set the output of a signal tone. This will be output from the standard Windows audio device. You can choose from various signal tones and adjust the volume. With the help of the test button you can check your settings immediately.
If you activate the “Track Playhead in Playlist” function, then PLAYDECK will always align long playlists so that the currently playing clip is centered. This facilitates the overview when working with long playlists. Please keep in mind that this feature may be confusing if you often work on other parts of the playlist while playing a playlist: Each time a new clip is started, the playlist is recentered by PLAYDECK.
This checkbox should be activated if all scheduled blocks of the playlist are to be played immediately one after the other. PLAYDECK now shows gaps or overlaps between the blocks.
By clicking this check box, you activate automatic time correction for the schedule block function: If you start a block to which a scheduled start time has been assigned earlier or later than scheduled, the scheduled start times for all subsequent blocks are automatically corrected by the deviation that has occurred. For more information on the schedule block function, refer to chapter 3.1.
Here you can set the default behavior of PLAYDECK for scaling a video if it has an aspect ratio different from the set video output format: Letterbox / Pillarbox PLAYDECK scales the video while maintaining the aspect ratio until the video image just reaches the horizontal or vertical border. Correspondingly, vertical or horizontal black areas are created. Pan and Scan (Crop) PLAYDECK scales the video while maintaining the aspect ratio until the entire output image is completely filled with image content. Image contents outside the image are cropped. Fullscreen with no AR PLAYDECK scales the video without keeping the aspect ratio so that the whole screen is filled.
The scaling behaviour can be changed individually for each clip and for each action button by right-clicking with the mouse and selecting Aspect/Cut/Crop.
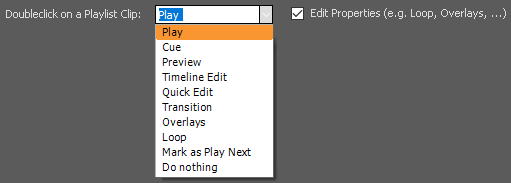
In this section you can set how PLAYDECK should behave when you double-click on an entry in the playlist. By default, a double click starts the playback of the clip. If the checkbox for Edit Properties is activated, a double-click in the corresponding column leads to the corresponding settings.
By default, PLAYDECK plays all media within a block immediately one after the other. With the Pause after each Clip function, which you can access by right-clicking on the block header, playback stops at the end of each individual clip. By activating the check box, PLAYDECK holds for the time set here on the last frame of the clip, then jumps to the first frame of the following clip and waits there for the next start command.
To optimally support the operator in the often stressful live operation, PLAYDECK offers the function to fade in notes and reminders on the previews while the playback of the clips from the playlist continues unchanged. In this section, you can set whether the notes should be displayed only during the following clip, until the end of the current block or only for a certain duration.
PLAYDECK offers a JUMP/NEXT button in the Control Section. The Jump function jumps either X seconds before the end of the clip (very useful for a rehearsal when the entire clip is not to be viewed) or X seconds after the beginning of a clip (useful for skipping intros). In this section, you set the desired times and can also activate that the times are queried each time you press JUMP.