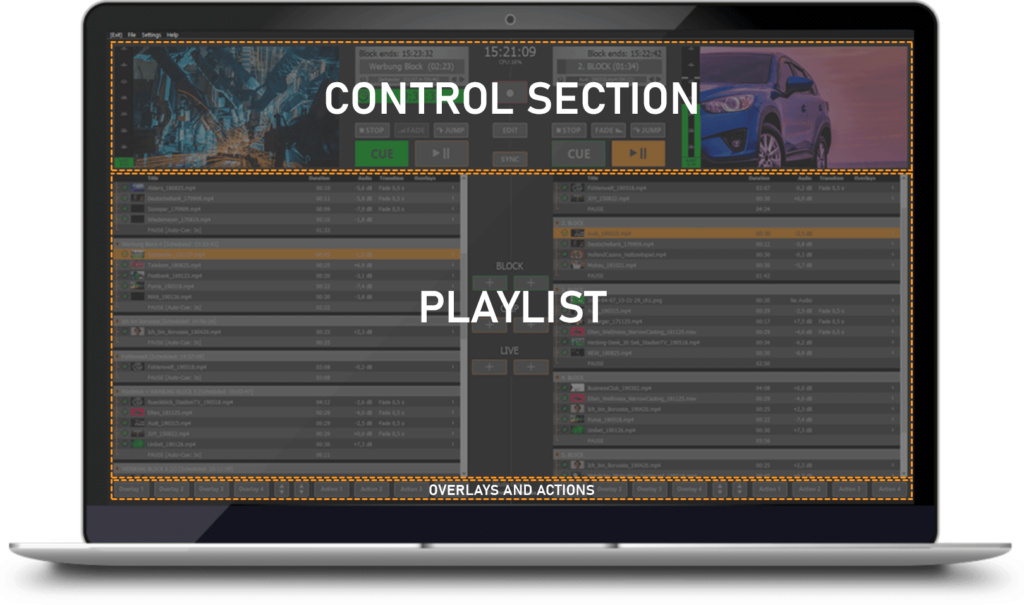
Control Section

PLAYDECK Professional Video Playback Playout Software for Windows * Playlist Control
The control section of PLAYDECK contains previews, control buttons and timers

In the control section there is a preview window for each of the two playlist channels with adjacent buttons for operating playback.
Above these buttons you will find several timers that help you to keep track of the timing of your show.
In the middle are the buttons for recording start and stop, for opening the SmartClips window and for SYNC operation of both playlist channels.

Channel Previews

PLAYDECK Professional Video Playback Playout Software for Windows * Playlist Preview Channel Name

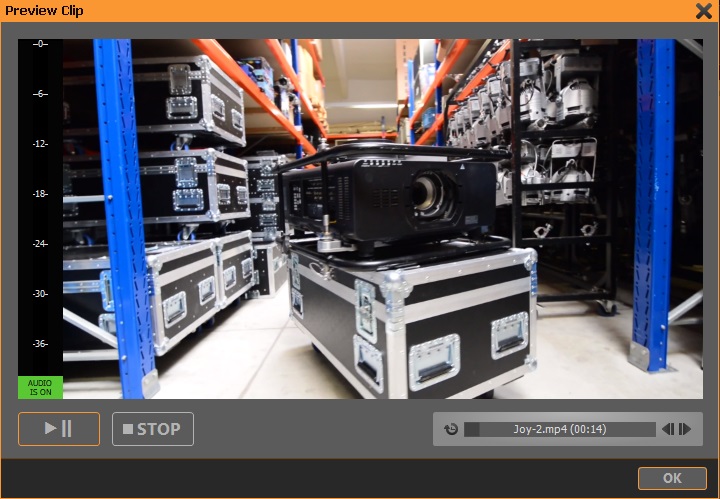
The Channel Previews always show the currently playing video signal. Next to it there is a VU meter with a clear indication whether the audio output is muted or not.

Left mouse click on the green field Audio is ON will mute the audio output and the display changes to a red field Audio is OFF.

Right-clicking on this field leads you to the audio settings in a very easy way:

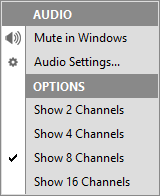
Mute in Windows disables sound output via the default audio device defined in Windows. If playback is done via a dedicated playout card, e.g. from Blackmagicdesign, then this sound output is not affected by this setting.

Audio Settings directly takes you to the corresponding menu (see chapter 2.1.6).

In the lower section Options you can select which number of channels the VU meter should display. Important: You can only display more than two channels if you have selected an audio format with more than two audio channels for the corresponding output channel in the Settings under Playlist Output (see chapter 2.1.2.1).

If you right-click on the preview window, the following context menu opens:

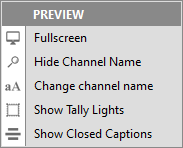
If you would like to view the contents of the preview window in full screen, please select Fullscreen. You can leave the fullscreen mode again by performing a single mouse click.

If you would like to display a channel name in the preview window (just like Giant Screen in the example above), please select Show Channel Name. To hide it, select Hide Channel Name. You can edit the channel name by selecting Change Channel Name.
The channel name is also displayed in the Director View. Of course it is not visible in the actual video output.

If you have connected PLAYDECK to a compatible device (e.g. Blackmagic ATEM series switcher, NDI receiver, vMix or TSL-enabled switcher), you can display a green (preview) or orange-red (program) tally frame around the preview window. To do this, select the menu item Show Tally Lights.

To display closed caption texts in the preview window, please activate the function Show Closed Captions.

Control buttons

PLAYDECK Professional Video Playback Playout Software for Windows * Playlist Control
PLAYDECKs playback control buttons

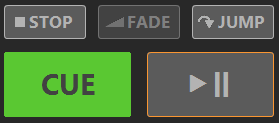
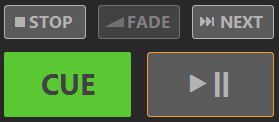
STOP stops the current playback and displays the content you selected in the menu item Background under Settings – All Settings – Playlist Output – Channel 1/2.

FADE fades a clip in or out of the background. The clip to be faded in must be selected in the playlist, but must not yet be in the CUE.

CROSS FADE, on the other hand, fades the currently running clip into the next clip.

Right-clicking the FADE button opens a menu where you can set the effect duration for fade-in and fade-out for both channels or change the fade mode to Cross-fade:

The JUMP function is particularly useful during rehearsals. With the help of JUMP you can easily skip the first X seconds of a clip or show only the last X seconds of a clip. You can set how many seconds are skipped at the beginning or displayed at the end of the clip under All Settings – Workflow – Playlists (see chapter 2.1.1.1).

Alternatively, the button can be assigned with the NEXT function. This way, you can put the next clip in the CUE, start it immediately or start the next block at the touch of a button.

You can set the function of the button via the context menu, which can be accessed by right-clicking on the button.

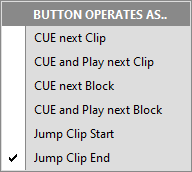
The control looks as follows when NEXT is activated:

PLAYDECK Professional Video Playback Playout Software for Windows * Playlist Control

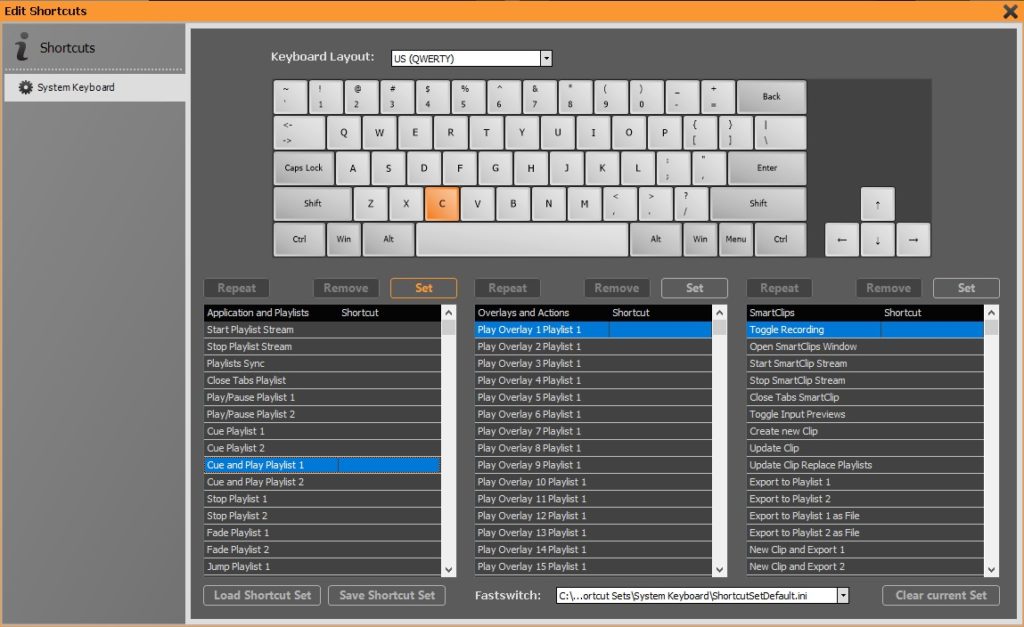
Note: If you want to use both the JUMP and NEXT keys in parallel, please use keyboard shortcuts or remote control.

The CUE button prepares a selected clip for playback and waits for the PLAY command on the first frame of the clip. If there is a clip in the CUE, this button is filled in green.
However, CUE does more than that:

  1. If you put the first clip of a block into CUE and this block has been assigned a scheduled start time (see 3.1 Block Header Functions), the countdown timer is automatically displayed.
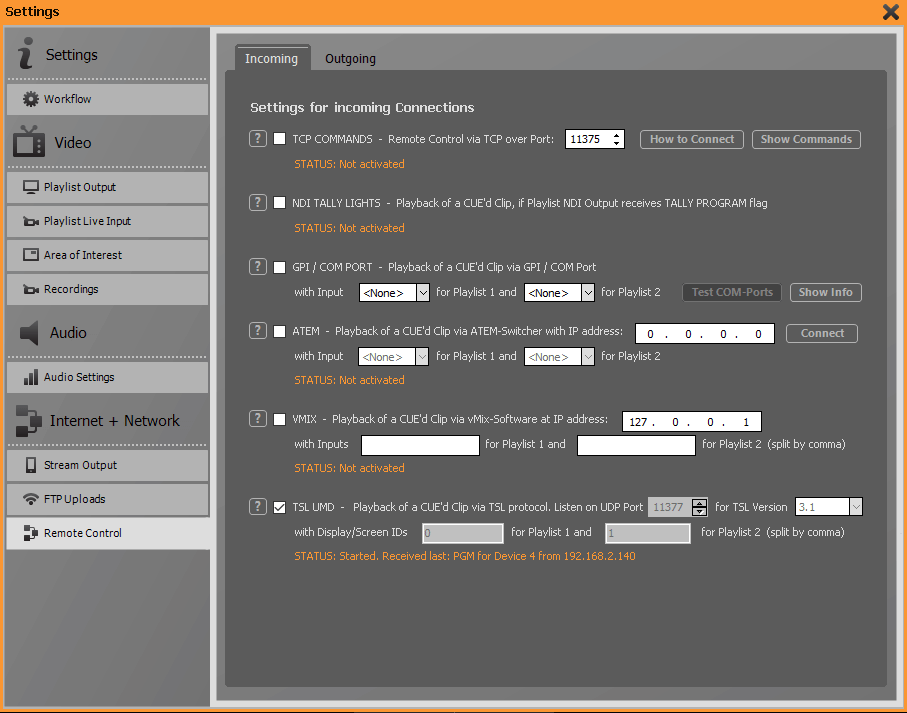
  2. When you put any clip into CUE, PLAYDECK waits for remote start commands to arrive, either from connected tally interfaces or directly from connected Blackmagic ATEM switchers, vMix Software, NDI receivers or TSL-enabled switchers (see 2.1.9.1 Incoming Remote Connections).

The PLAY/PAUSE button toggles between playback start and stop. During playback, the button turns orange.
If you want to start a clip from the playlist without putting it into the CUE first, you can simply double-click on this clip if you have set this function (see 2.1.1.1 Settings – All Settings – Workflow – Playlists: Double-click on playlist clip).

Block Timers and Countdown Timers

Block Timers

In the area above the control buttons you will find the Block and Countdown Timers.
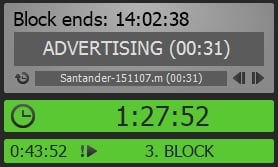
The grey coloured Block Timer shows you from top to bottom

  1. the time at which the block will end (as long as a clip is in the CUE, this end time is continuously updated)
  2. the remaining duration of the currently played block, and
  3. the remaining duration of the clip currently playing with a separate Clip Timer. Within the Clip Timer, you can jump to different positions within the clip with a single mouse click.

The block and clip timers can take on a signal color and can also play a warning sound when a preset remaining time is reached (see 2.1.1.1 Settings – All Settings – Workflow – Playlists: Show Colored Alert).

Use the small clock icon in the lower left corner to toggle between the remaining and the elapsed clip runtime.

The left and right arrows move the playhead one frame back and forward.

Countdown Timers

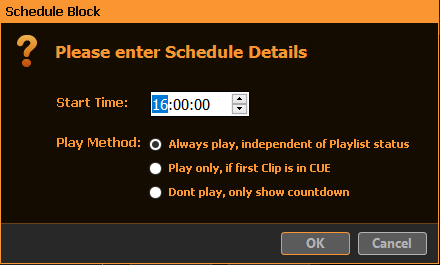
If you use the Schedule Block function (see 3.1 Block Header Functions), additional Countdown Timers are displayed:

When you put the first clip of a block to which you have assigned a scheduled start time into the CUE, the upper larger countdown timer will appear. This counts down to zero and then automatically starts playback (shown by a triangle next to the clock icon), or it just counts down to zero and then up again without starting the clip (depending on the setting made in 3.1).

The countdown timer may change to a signal color if a certain time is reached before the scheduled start time (see 2.1.1.1 Settings – All Settings – Workflow – Playlists: Show Colored Alert). It will always turn red as it counts up.

If you have provided a block with an autostart command that should be executed in any case (regardless of the current playback status of the playlist), you will receive an additional, smaller countdown timer as a warning.

SYNC Button

If you activate the SYNC button (it turns orange), you control both playlist channels together.
To prevent unwanted synchronous operation, an orange border is displayed around all control elements when the SYNC function is activated:

PLAYDECK Professional Video Playback Playout Software for Windows * Playlist Control Sync

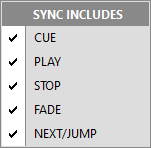
A right click on the SYNC button opens a selection menu with which you can determine which functions are to be sent to both playlist channels in SYNC mode:

If you do not see the SYNC button, you have either not activated the second playlist channel or you have deactivated the display of the button under menu item View – Show Sync Button.

REC Button

In the Studio version of PLAYDECK, the Edit-while-Ingest function is available. By pressing the REC button you start recording an incoming video signal (the button turns red). Pressing the REC button again stops the recording.

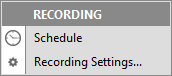
If you right click on the REC button, a menu opens where you can program the automatic recording start and open the recording settings:

EDIT Button

Pressing the EDIT button opens the Editing Workspace with the Edit-while-Ingest function.
For more information on the Editing functions, see chapter 6 The Editing Workspace.

Overview

PLAYDECK Professional Video Playback Playout Software for Windows * User Interface with two Playlists, Control Section and Overlay and Action Buttons
The user interface of PLAYDECK is divided into three main areas: Control Section, Playlist Area and Overlay/Action Buttons

Menu Bar

The menu bar takes you to the basic settings of PLAYDECK.

Under the menu item File you will find the commands for creating, opening or saving a playlist, the functions for importing and exporting a playlist as well as for generating a clip run log file.

The menu item Settings takes you to the sub-menu All Settings, where you can make the most important settings. You will find more detailed information in chapter 2.1. Furthermore, you will find the menu item Scripting, where you can extend and individualise the functionality of PLAYDECK with the help of various Java Script files. In addition, you can define keyboard shortcuts for almost every command via the sub-item Keyboard Shortcuts to adapt PLAYDECK perfectly to your usual workflow (see chapter 2.2).

Under the menu item View, you can adjust the visual appearance of the user interface to your personal preferences. For example, you can adjust the line height of the playlist, show thumbnails of all playlist clips or hide the overlay and action buttons.

The menu item Streams lets you start and stop the streaming playback for the two playlist channels and the Production Window and displays the stream status.

Under the menu item Help you can check for available updates, get access to the license manager and get in contact with our support team.

Control Section

In the upper area of the user interface you will find a preview window of the currently output video signal including audio level for each channel, the buttons for controlling the playout, and a number of time specifications for the playlist (end of playback of the current block, remaining time of the current block and the current clip, countdown to blocks for which the Schedule Block function has been set). Furthermore, between the two playlists you will find the button to start recording and open the edit window, as well as the button to activate the synchronous operation of both playlist channels.

Playlist Area

The largest area of the user interface is available below the control section for the playlist and its configuration. Here, you will find all entries that you have prepared for playback with PLAYDECK, clearly arranged in the respective playback blocks. A playback block consists of the block header with block name and information about scheduled start times, one or more lines of media (videos, still images, audio tracks, Youtube clips) or live inputs with the associated information, and a block end that defines the behavior of PLAYDECK when reaching the end of a block. To keep track of longer blocks, the view of the playlist can be customized in many ways. For more information about working with playlists, please refer to chapter 3.

Overlay and Action Buttons

Below the playlist you will find the buttons for controlling the overlays and the actions. Overlays can consist of videos or graphics (with or without transparency), text, scrolling text, web pages or HTML code, which you can show manually or automatically over the output video signal during playback from the playlist. Actions are individual media files in direct access. Pressing an action button interrupts the current playback and starts the stored media file. You can define how PLAYDECK should behave after the action file has finished playing. Please refer to chapter 4.2 Working with Actions for more details.

Keyboard Shortcuts

Most of the control commands for the operation of the two playlists, the overlay and action buttons as well as the editing window can be easily and flexibly assigned with keyboard shortcuts:

Menu for assigning keyboard commands to a variety of control functions

First, define your keyboard layout. Then select the control command you want to assign a shortcut to from the three categories and then press the corresponding key combination on your keyboard.
If you want to use keyboard commands that interact with Windows shortcuts, please activate the function Disable Keyboard Input to Main and SmartClips Window under Settings – All Settings – Workflow – Shortcuts.

For some functions it is helpful to be able to execute the command repeatedly while holding down the key. For example, you could assign the Next Frame command to a shortcut in the SmartClips window. If you press the corresponding key once briefly, the playhead jumps to the next frame. You might want the playhead to continuously jump to the next frame after a certain delay while you hold down the key until you release it.
You can set this up by selecting the corresponding function and then pressing the “Repeat” button:

When you have set up all your desired shortcuts, it is useful to save your shortcut set.
PLAYDECK allows you to save and load any number of different shortcut sets.
The Fastswitch dropdown field allows you to switch between the last used sets at lightning speed.

Incoming

PLAYDECK can be controlled remotely via a number of different methods, but can also send out control commands itself.
To control PLAYDECK from outside, the following methods are available:

  • TCP Commands
  • Auto-play via NDI Tally Light
  • Auto-play via GPI / COM-Port
  • Auto-play via Blackmagic Design ATEM Series Live Production Switcher
  • Auto-play via vMix Live Video Streaming Software
  • Auto-play via TSL UMD Protocol (v. 3.1 or 5.0)

You can remote control both playlists from PLAYDECK via TCP/IP commands from a remote control computer. You can use any tool you like for this, as no special format is required (no special encoding, no line ending command necessary). You can send several commands simultaneously.

Bitfocus Companion and Universe Show Control have already integrated extensive libraries for controlling PLAYDECK, which makes control particularly convenient.

The following control commands are available:

<cue|PLAYLIST|BLOCK|CLIP>
<cueandplay|PLAYLIST|BLOCK|CLIP>
<cuenext|PLAYLIST>
<cueandplaynext|PLAYLIST>
<cuenextblock|PLAYLIST>
<cueandplaynextblock|PLAYLIST>
<cueflex|PLAYLIST|PATTERN>
<cueandplayflex|PLAYLIST|PATTERN>
<cueandplaysync|PL1 BLOCK|PL2 BLOCK>
<cueandplaysyncflex|PL1 PATTERN|PL2 PATTERN>
<play|PLAYLIST>
<stop|PLAYLIST>
<pause|PLAYLIST>
<jumpstart|PLAYLIST>
<jumpend|PLAYLIST>
<previousclip|PLAYLIST>
<fadein|PLAYLIST>
<fadeout|PLAYLIST>
<restartclip|PLAYLIST>
<playoverlay|PLAYLIST|OVERLAY>
<stopoverlay|PLAYLIST|OVERLAY>
<toggleoverlay|PLAYLIST|OVERLAY>
<stopalloverlays|PLAYLIST>
<playaction|PLAYLIST|ACTION>
<playactionsync|PL1 ACTION|PL2 ACTION>
<loadplaylist|AUTOPLAY|FILENAME>
<selectclip|PLAYLIST|BLOCK|CLIP>
<insertclip|PLAYLIST|FILENAME>
<changeclip|PLAYLIST|FILENAME>
<appendclip|PLAYLIST|FILENAME>
<activate|PLAYLIST|BLOCK|CLIP>
<deactivate|PLAYLIST|BLOCK|CLIP>
<muteaudio|PLAYLIST>
<unmuteaudio|PLAYLIST>
<toggleaudio|PLAYLIST>
<hidenotes>
<restartscripts>
<startstream|TARGET>
<stopstream|TARGET>
<startrec>
<stoprec>

A detailed explanation of the individual commands, together with examples, can be obtained by clicking on the button Show Commands.

When PLAYDECK’s NDI output is activated, PLAYDECK receives tally signals from the connected NDI receiver via a return channel. As soon as PLAYDECK is switched live on air there, PLAYDECK starts playing the clip that is currently in the CUE state.

You can connect both playlists to almost any video mixer and have playback start automatically as soon as the corresponding channel of the mixer goes on air. For this purpose, the tally signal of the mixer is registered at the chosen COM port. As soon as a clip is in CUE state, PLAYDECK performs a simple loopback test on the corresponding COM port: If a galvanic connection between pin 3 (Transmit Data) and pin 2 (Receive Data) is registered for at least 50 ms, playback starts immediately.
If you need a corresponding tally-to-USB interface, please contact our support team.

Playback can be automated particularly conveniently if you have connected PLAYDECK to a Blackmagic ATEM Series live production switcher. As soon as a clip is in CUE state, PLAYDECK listens to the connected ATEM mixer. If the corresponding channel is switched live, playback starts immediately.
In order for PLAYDECK to communicate with your Blackmagic ATEM device, you need to install the ATEM Control software on your PLAYDECK computer. It is NOT necessary to start the software. PLAYDECK only requires access to the appropriate drivers and libraries.
Enter the IP address of the mixer (it must be in the same address space as your PLAYDECK system) and click Connect. Then you can select from the two drop-down fields which input channel of your ATEM device PLAYDECK should listen to.
Finally, please activate the checkbox on the left.

PLAYDECK can also be remotely controlled very conveniently when you connect it to vMix. The operating philosophy of vMix is that you can assign a source to several inputs. Enter the IP address of the vMix PC and fill in all vMix inputs for the two playlists to which PLAYDECK is to react with an auto start (separated by comma).

Finally, remote start via TSL UDP Tally protocol is available. PLAYDECK supports versions 3.1 and 5.0.
You can freely select the number of the port to be used for communication.
Enter the TSL ID to which Playlists 1 and 2 are to respond in the corresponding fields (some manufacturers call this ID “Screen ID”, “Channel ID” or “Device ID”). If PLAYDECK is to respond to more than one TSL ID, please separate the IDs with commas.

PLAYDECK expects the signal for Preview on Tally 1 and the signal for Program on Tally 2.

Actions

An action is a media file (video, audio or full-screen graphics) in direct access. As soon as the corresponding button is pressed, PLAYDECK starts playing the stored file.
Up to 30 such action files can be stored per playlist channel and controlled via mouse clicks or particularly conveniently via keyboard shortcuts or LAN commands.

PLAYDECK Professional Video Playback Playout Software for Windows * Overlay and Action Buttons
30 overlay and action buttons are available separately for each channel.

Files can be dragged and dropped directly from Windows Explorer or the Add-Clip window onto the desired button. Action buttons that have not yet been assigned a file have a gray outline, otherwise the outline is orange.
Actions that are currently played back have an orange button. They can be cancelled by clicking the mouse again.
Left mouse click on the arrow up-down button switches to the next actions, a right click returns to the previous bank.

Right clicking on an empty action opens a menu in which you can assign a media file or change the button name.
If the action is assigned, a right click leads to the following extended menu:

PLAYDECK Professional Video Playback Playout Software for Windows * Action Button Options Rightclick

Change File opens the File Explorer and allows you to exchange the saved media file.

Change Name opens a window in which you can give the button for the action a descriptive name.

Change After Action:
Here you can set how PLAYDECK should behave when a played back action clip is over. You can choose from the following options:
Default:
Uses the setting you have selected under Settings – All Settings – Workflow – Playlists in the “Default Behaviour after playing an action” section.
Pause on last Frame of Action:
PLAYDECK stops on the last frame of the action clip and waits for further commands.
Stop Playback and show Background
PLAYDECK stops playback and displays the default background. For details on setting the default background of a playlist, see X.Y
Return to Playlist Clip on Last Position
At the end of the action clip, PLAYDECK jumps back to the position in the playlist where the action clip was started. The state of the playlist when the action button is pressed is taken into account: If PLAYDECK was in a running playback, the playback will continue. If PLAYDECK was in a pause or cue state, this state will be restored.
Replay last played Playlist Clip
If the action button was pressed during an ongoing playback, the interrupted clip is played back from the beginning after the action clip has ended.
Play next Clip in Playlist
If the action button was pressed during an ongoing playback, the interrupted clip is skipped after the action clip is finished and the following clip is started.
Play selected Clip in Playlist
While the action clip is playing, the operator can decide where to resume playback after the action clip is finished by selecting a clip from the playlist.

Cut/Crop opens a window in which you can assign IN/OUT points to the action file and crop it in size. For more information, refer to the Playlist Functions – Clip Related Functions section.

If you activate Loop Action, the action is played back in an endless loop.

Change Custom Gain allows you to adjust the volume of the action file.

Copy Action opens a window in which you can easily copy buttons including all settings.

Clear Action deletes the corresponding action file from the button.

Overlays

An overlay is an image, a text, a ticker, an HTML file or even a website that can be superimposed on the output video signal. The image may or may not be full-screen and may or may not contain transparency information (alpha channel). Thus overlays are just as suitable for permanent station logos as for short lower thirds. Multiple overlays can be active simultaneously, with the exception of HTML overlays. PLAYDECK gives you access to up to 30 overlays per playlist channel. The overlays can be faded in and out with repeated left clicks or particularly conveniently via keyboard shortcuts or LAN commands.

PLAYDECK Professional Video Playback Playout Software for Windows * Overlay and Action Buttons
30 overlay and action buttons are available separately for each channel.

Files can be dragged and dropped directly from Windows Explorer or the Add-Clip window onto the desired button. Overlay buttons that have not yet been assigned a file have a gray outline, otherwise the outline is orange.
Overlays that are currently displayed have an orange button.
Left mouse click on the arrow up-down button switches to the next overlays, a right click returns to the previous bank.

Right clicking on an empty overlay opens a menu in which you can assign an image file or change the button name.
If the overlay is assigned, a right click leads to the following extended menu:

PLAYDECK Professional Video Playback Playout Software for Windows * Overlay Options Right Click

Edit Overlay opens a menu bar at the top of the interface where you can make all settings:

PLAYDECK Professional Video Playback Playout Software for Windows * Edit Overlay Settings Alpha Transparency Fade In Fade Out Position Scale Scaling

Select the file, rename the button or display the overlay. In addition, you can freely position and scale each image and add a fade-in and fade-out duration. Additionally you can assign a transparency (alpha channel) to the overlay.

Change Content lets you conveniently assign another media file to the corresponding overlay button.

Change Name opens a window in which you can give the button for the overlay a descriptive name.

Set Duration opens a window in which you can define whether the overlay is automatically hidden and after which time. This is perfect for displaying lower thirds which should automatically disappear after the same display duration.

Copy Overlay opens a window in which you can easily copy buttons including all settings.

Clear Overlay deletes the corresponding overlay from the button.

Block End Functions

Each playback block in PLAYDECK ends with an end of block command.
Right clicking on the block end opens the Block End Functions:

PLAYDECK Professional Video Playback Playout Software for Windows * Playlist Block End Functions Options

Insert Clip inserts a playlist entry just before the end of the block.

Delete (Merge Blocks) deletes the end of block command and merges the current and the following playback block into one.

Change to … opens a submenu with which you can change the block end command. The displayed command depends on the current end-of-block command.

Change to … (Default) replaces the current end of block command with the default one stored in Settings – All Settings – Workflow – Playlists

Clip Related Functions

Each playback block consists of one or more clips. A clip can be a video, an audio track, a graphic, or a live input:

Typical example of a clip entry in the PLAYDECK playlist with all its information

Meaning of the symbols and information from left to right:

  1. The green checkmark indicates that PLAYDECK has found the corresponding clip on the system and that it is suitable for playback. If a clip is missing or not suitable for playback, PLAYDECK displays a red cross here.
    If you want to skip a clip during playback without deleting it completely from the playlist, click on the green checkmark. This disappears and at the same time the entire line is grayed out. Clicking it again will add the clip back.
  2. Next to it, the file name of the clip or, if you have used the Rename Clip function, the clip name you have assigned is displayed.
  3. The next column contains the duration of the clip. If you have marked the clip with IN and/or OUT points, the actual display duration is indicated here.
  4. If you have trimmed the clip by setting IN or OUT points, green braces will appear. If you have cropped the clip, this is indicated by four small green angles. Move the mouse over the symbols to see the corresponding values.
  5. If you have looped a clip, a round arrow is displayed here. Move the mouse over the icon to see details.
  6. A value in dB indicates the level by which the playback volume of a clip is increased or decreased. The value may have been determined automatically or entered manually. Move the mouse over the value to get more information about sampling rate etc.
  7. If a clip has been provided with a transition effect to the following clip, you will find the transition type and effect duration next to it.
  8. If you want the display of overlays to start at the same time as the playback of the clip, you will find the corresponding information here.
  9. If desired, PLAYDECK will automatically check whether the resolution and frame rate of a clip match the set output resolution. A white i indicates a match, an i in an orange box indicates differences.
    Move the mouse over the i to get more information.

Clips can be moved my clicking and moving the Clip. If you press CTRL after starting dragging, the Clip will be copied instead of moved.

Right clicking a clip in the playlist opens the corresponding Clip Functions menu. This menu shows partly different entries depending on the type of clip:

PLAYDECK Professional Video Playback Playout Software for Windows * Playlist Item Option Settings Several Right Click

Insert Clip, Insert Live Input or Insert Note inserts a corresponding item BEFORE the selected clip.

Rename allows you to give the clip an alternative name without renaming the original file.

Delete deletes the corresponding clip from the playback block.

Cut/Crop opens another submenu where you can add IN/OUT points to the clip and also crop it in size:

PLAYDECK Professional Video Playback Playout Software for Windows * Cut Crop Clip

You set IN and OUT points with the help of the braces. In the Crop area you specify in pixels which area is to be cropped away from the four sides.
On the far left, you specify the scaling that PLAYDECK should apply when you use the Crop function. None of these operations will affect the original media file. The original file always remains unchanged.

Click on Show Crop View inserts markers on the preview window. You can grab and move them at a total of eight reference points. If you hold down the Ctrl key while moving a corner point, the current aspect ratio is maintained. Use the button in the middle to move the selected image section:

PLAYDECK Professional Video Playback Playout Software for Windows * Cut Crop Clip

Change Duration (only active when right-clicking on an image file) opens a submenu with several options for the display duration of the image:

Please select here whether the image should be played back infinitely, for a certain duration or until a certain time is reached.

Change File opens the file explorer so that you can exchange the file for another one.

Overlays opens a submenu where you can set which of the prepared overlays should be automatically launched when the clip is played:

Mute mutes the audio track of the clip during playback.

With Set Custom Gain you can freely assign a volume to the clip.

Add Loop opens a submenu that offers you various options for loop playback of a clip:

PLAYDECK Professional Video Playback Playout Software for Windows * Playlist Item Clip Loop Several Options

Please select whether the clip should be looped infinitely, whether the loop should be executed x times, whether the clip should be looped for a certain duration, or until a certain time is reached.

The Loop Clip to Block End function sets a repeat loop from the selected clip to the last clip of the playback block.

Preview opens a preview window of the corresponding clip. You can preview a clip while another clip from the playlist is playing. You can start and stop the preview playback and also jump through the clip in the Clip Progress Bar. The audio is played back during preview via the Windows default audio device. If you want to temporarily mute the audio playback, please left-click on the green “Audio is ON” icon below the VU meter. The field will then show “Audio is OFF” in red. Clicking it again reactivates the audio playback.

Properties opens a window with the file properties.

If you overwrite a file on your hard drive with a file of the same name, click Reload Clip to have PLAYDECK add the new file to the playlist.

Upload uploads the selected clip to the server defined in Settings – All Settings – FTP Uploads – Playlists.

Add Transition inserts a transition effect from the selected clip to the following clip. You can select the effect type and duration, set these values as default or use the previously saved default transition.

If you want to apply the same transition effect to several clips, you can select them together by holding down the Shift key.

If you want the loudness of all clips to be re-analyzed and re-adjusted, please select Redo EBU R128 Calculation.
Attention! All clips in the playlist will be re-analyzed, which takes some time depending on the length of the playlist.

The Use Reduced Block View function hides the block headers and the block end commands, allowing the operator to see a larger part of the playlist.
A stop command at the end of a block is represented by a solid red line, a pause command by a solid orange line, a pause & auto-cue command by a dashed orange line and a loop command by a solid green line.

Clear Playlist deletes all contents of the corresponding playback channel.

Show Clip in File Explorer displays the file folder where the corresponding clip is located and highlights the clip.

Block Header Functions

A playback block always starts with the block header, which contains the name of the block as well as information on scheduled start times, if applicable.

Blocks can be moved my clicking and moving the Block Header. If you press CTRL after starting dragging, the Block will be copied instead of moved.

Right clicking on the block header opens the block header functions.

With Rename you can change the name of the block.

Delete deletes the entire block from the playlist including the clips it contains.

Schedule opens a submenu for scheduling the block playback:

Please enter the planned start time for the respective block and choose between the three available options:
Should playback start no matter what status PLAYDECK is in at this start time? If so, any action will be aborted at that moment and playback of the block will begin.
Alternatively, AutoPlay can only start if the first clip of the block is in the CUE.
As a third option, PLAYDECK only displays a countdown on the user interface, but no autostart is performed.

Loop whole Block activates the endless playback of all clips in the playback block.

Export renders all clips including all transitions and overlays to a video. The settings for this are selected in the Settings – All Settings – Playlist Output – Export section.

Upload uploads all clips including all transitions and overlays to an upload server. The settings for this are selected in the section Settings – All Settings – FTP Upload