Control Section

In the control section there is a preview window for each of the two playlist channels with adjacent buttons for operating playback.
Above these buttons you will find several timers that help you to keep track of the timing of your show.
In the middle are the buttons for recording start and stop, for opening the SmartClips window and for SYNC operation of both playlist channels.
Channel Previews

The Channel Previews always show the currently playing video signal. Next to it there is a VU meter with a clear indication whether the audio output is muted or not.
Left mouse click on the green field Audio is ON will mute the audio output and the display changes to a red field Audio is OFF.
Right-clicking on this field leads you to the audio settings in a very easy way:
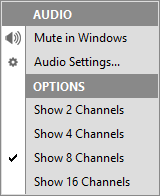
Mute in Windows disables sound output via the default audio device defined in Windows. If playback is done via a dedicated playout card, e.g. from Blackmagicdesign, then this sound output is not affected by this setting.
Audio Settings directly takes you to the corresponding menu (see chapter 2.1.6).
In the lower section Options you can select which number of channels the VU meter should display. Important: You can only display more than two channels if you have selected an audio format with more than two audio channels for the corresponding output channel in the Settings under Playlist Output (see chapter 2.1.2.1).
If you right-click on the preview window, the following context menu opens:
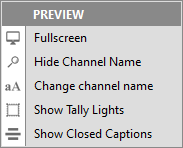
If you would like to view the contents of the preview window in full screen, please select Fullscreen. You can leave the fullscreen mode again by performing a single mouse click.
If you would like to display a channel name in the preview window (just like Giant Screen in the example above), please select Show Channel Name. To hide it, select Hide Channel Name. You can edit the channel name by selecting Change Channel Name.
The channel name is also displayed in the Director View. Of course it is not visible in the actual video output.
If you have connected PLAYDECK to a compatible device (e.g. Blackmagic ATEM series switcher, NDI receiver, vMix or TSL-enabled switcher), you can display a green (preview) or orange-red (program) tally frame around the preview window. To do this, select the menu item Show Tally Lights.
To display closed caption texts in the preview window, please activate the function Show Closed Captions.
Control buttons
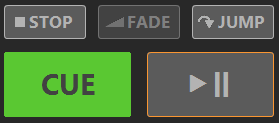
STOP stops the current playback and displays the content you selected in the menu item Background under Settings – All Settings – Playlist Output – Channel 1/2.
FADE fades a clip in or out of the background. The clip to be faded in must be selected in the playlist, but must not yet be in the CUE.
CROSS FADE, on the other hand, fades the currently running clip into the next clip.
Right-clicking the FADE button opens a menu where you can set the effect duration for fade-in and fade-out for both channels or change the fade mode to Cross-fade:

The JUMP function is particularly useful during rehearsals. With the help of JUMP you can easily skip the first X seconds of a clip or show only the last X seconds of a clip. You can set how many seconds are skipped at the beginning or displayed at the end of the clip under All Settings – Workflow – Playlists (see chapter 2.1.1.1).
Alternatively, the button can be assigned with the NEXT function. This way, you can put the next clip in the CUE, start it immediately or start the next block at the touch of a button.
You can set the function of the button via the context menu, which can be accessed by right-clicking on the button.
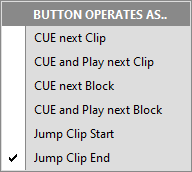
The control looks as follows when NEXT is activated:
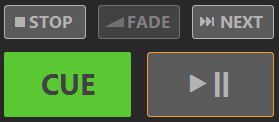
Note: If you want to use both the JUMP and NEXT keys in parallel, please use keyboard shortcuts or remote control.
The CUE button prepares a selected clip for playback and waits for the PLAY command on the first frame of the clip. If there is a clip in the CUE, this button is filled in green.
However, CUE does more than that:
- If you put the first clip of a block into CUE and this block has been assigned a scheduled start time (see 3.1 Block Header Functions), the countdown timer is automatically displayed.
- When you put any clip into CUE, PLAYDECK waits for remote start commands to arrive, either from connected tally interfaces or directly from connected Blackmagic ATEM switchers, vMix Software, NDI receivers or TSL-enabled switchers (see 2.1.9.1 Incoming Remote Connections).
The PLAY/PAUSE button toggles between playback start and stop. During playback, the button turns orange.
If you want to start a clip from the playlist without putting it into the CUE first, you can simply double-click on this clip if you have set this function (see 2.1.1.1 Settings – All Settings – Workflow – Playlists: Double-click on playlist clip).
Block Timers and Countdown Timers
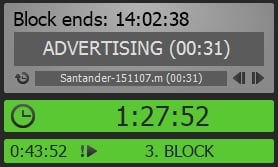
Block Timers
In the area above the control buttons you will find the Block and Countdown Timers.
The grey coloured Block Timer shows you from top to bottom
- the time at which the block will end (as long as a clip is in the CUE, this end time is continuously updated)
- the remaining duration of the currently played block, and
- the remaining duration of the clip currently playing with a separate Clip Timer. Within the Clip Timer, you can jump to different positions within the clip with a single mouse click.
The block and clip timers can take on a signal color and can also play a warning sound when a preset remaining time is reached (see 2.1.1.1 Settings – All Settings – Workflow – Playlists: Show Colored Alert).
Use the small clock icon in the lower left corner to toggle between the remaining and the elapsed clip runtime.
The left and right arrows move the playhead one frame back and forward.
Countdown Timers
If you use the Schedule Block function (see 3.1 Block Header Functions), additional Countdown Timers are displayed:
When you put the first clip of a block to which you have assigned a scheduled start time into the CUE, the upper larger countdown timer will appear. This counts down to zero and then automatically starts playback (shown by a triangle next to the clock icon), or it just counts down to zero and then up again without starting the clip (depending on the setting made in 3.1).
The countdown timer may change to a signal color if a certain time is reached before the scheduled start time (see 2.1.1.1 Settings – All Settings – Workflow – Playlists: Show Colored Alert). It will always turn red as it counts up.
If you have provided a block with an autostart command that should be executed in any case (regardless of the current playback status of the playlist), you will receive an additional, smaller countdown timer as a warning.
SYNC Button
If you activate the SYNC button (it turns orange), you control both playlist channels together.
To prevent unwanted synchronous operation, an orange border is displayed around all control elements when the SYNC function is activated:

A right click on the SYNC button opens a selection menu with which you can determine which functions are to be sent to both playlist channels in SYNC mode:
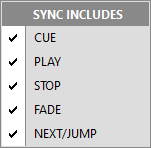
If you do not see the SYNC button, you have either not activated the second playlist channel or you have deactivated the display of the button under menu item View – Show Sync Button.
REC Button
In the Studio version of PLAYDECK, the Edit-while-Ingest function is available. By pressing the REC button you start recording an incoming video signal (the button turns red). Pressing the REC button again stops the recording.
If you right click on the REC button, a menu opens where you can program the automatic recording start and open the recording settings:

EDIT Button
Pressing the EDIT button opens the Editing Workspace with the Edit-while-Ingest function.
For more information on the Editing functions, see chapter 6 The Editing Workspace.