Sometimes, in Live Productions, you have to send the Audio delayed compared to the Video, to compensate for the processing Lag of huge LCD Screens (Lipsync). Or add a Limiter/Gate to the Microphone Input Audio.
This is actually pretty fast to implement in PLAYDECK. You add the ADELAY Audio Filter to the Channel like this. In this example we set 600ms Delay for Audio Channel 1 and 2:
This can also be set to INPUTS to compensate for any incoming Lipsync Issue.
Copy Audio and Delay
You can also COPY the Audio Channel 1 and 2 to Audio Channel 3 and 4 and delay those. The use case here is, that the Audio Mixer Person has Live Preview Audio.
This needs to be done on the Playlist Level, so clear any Audio Filter in the Settings.
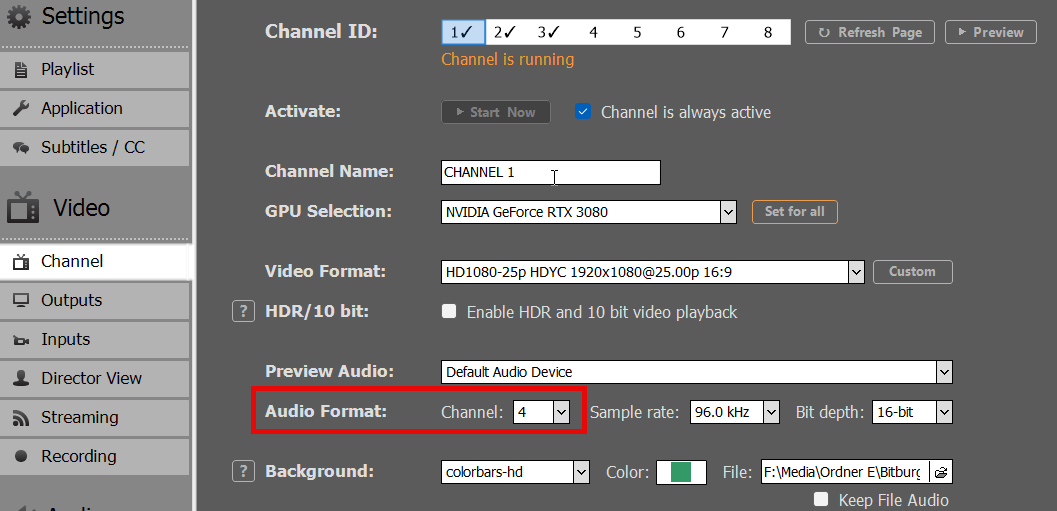
First, make sure to increase the Audio Channel for your Output Channel, otherwise all Audio Channel above 2 will not be processed:
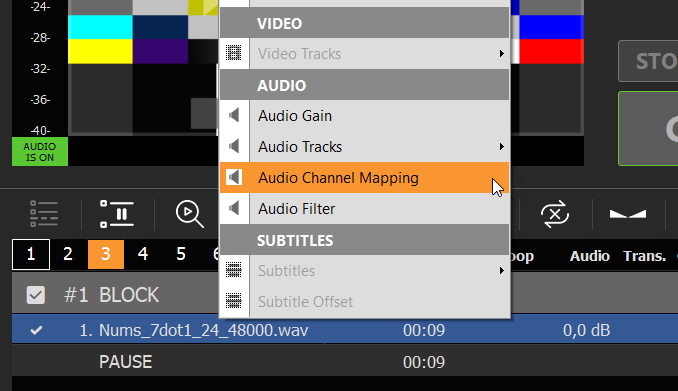
The Right-Click any Playlist Item and select AUDIO CHANNEL MAPPING:
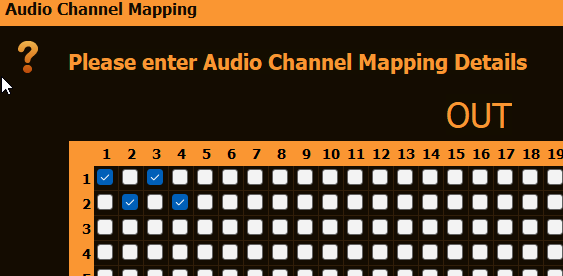
This will copy Audio Channel 1 and 2 to Audio Channel 3 and 4:
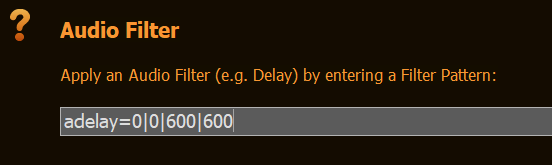
Now right-click the Playlist Item again, select AUDIO FILTER and add the ADELAY Filter, but only for Audio Channel 3 and 4:
More Audio Filter
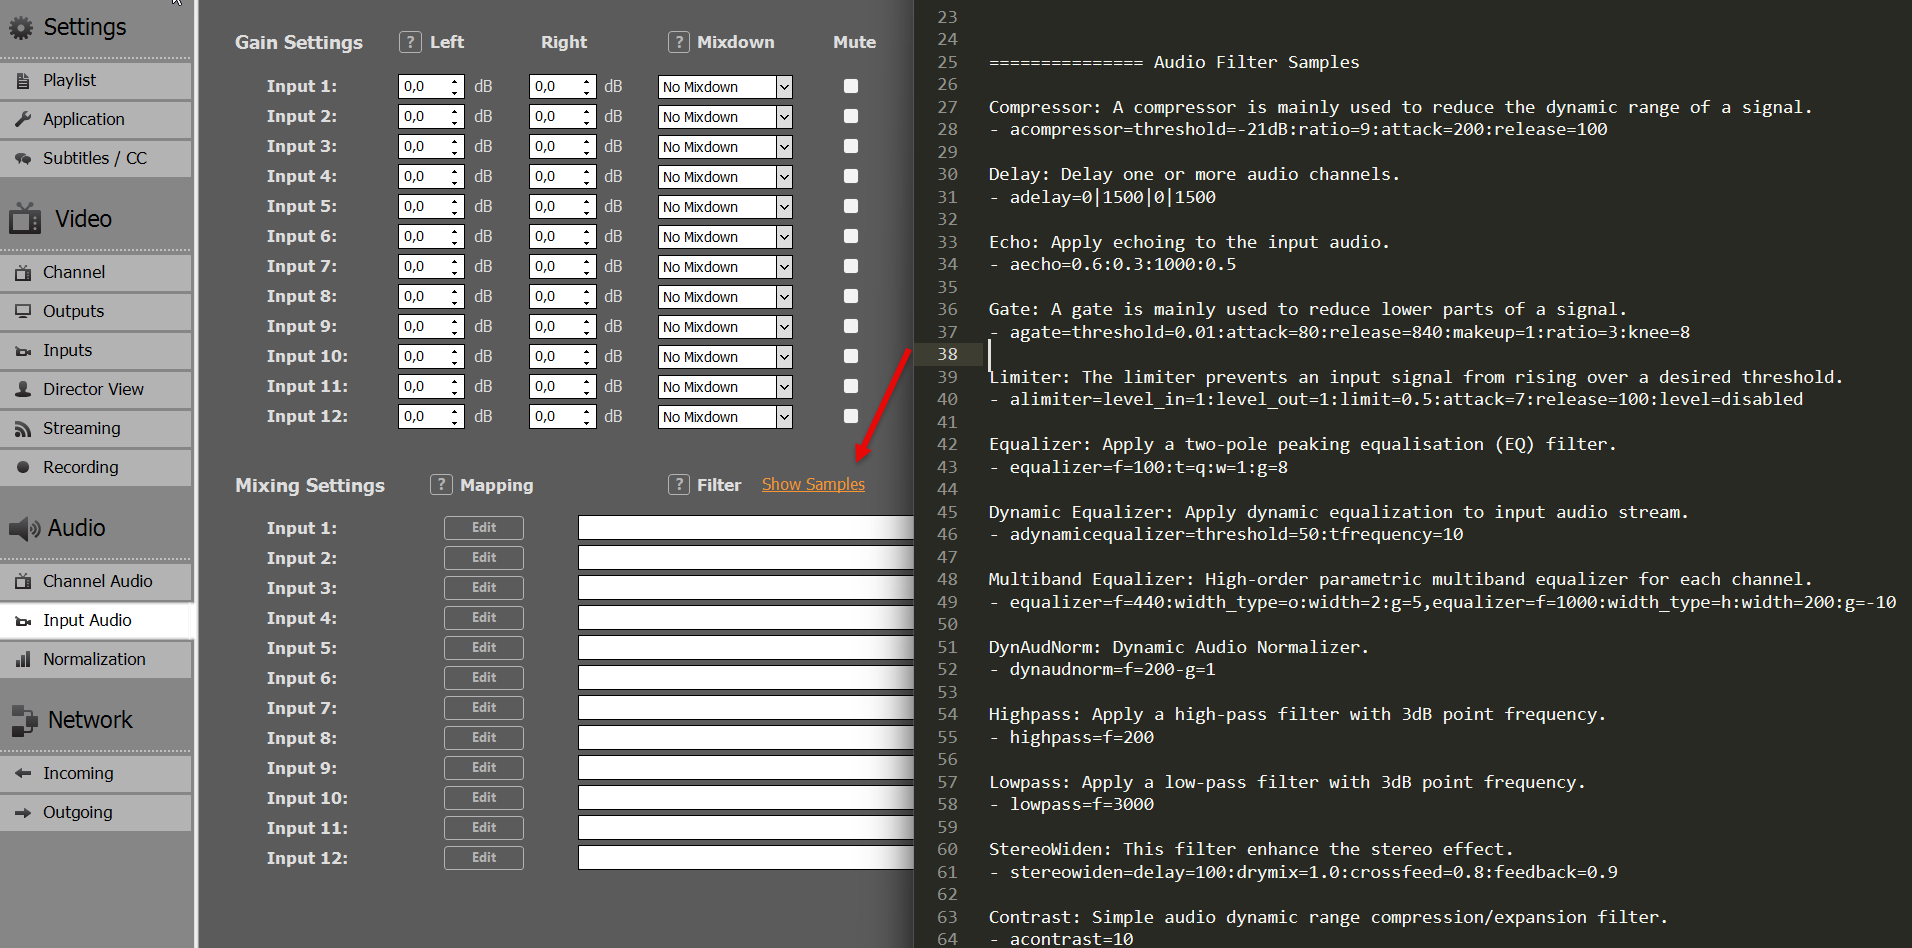
For a complete List of all Audio Filter, click SHOW SAMPLES. This will open a TEXT FILE with Examples.
Not please start PLAYDECK and reproduce the issue. DO NOT CLOSE PLAYDECK.
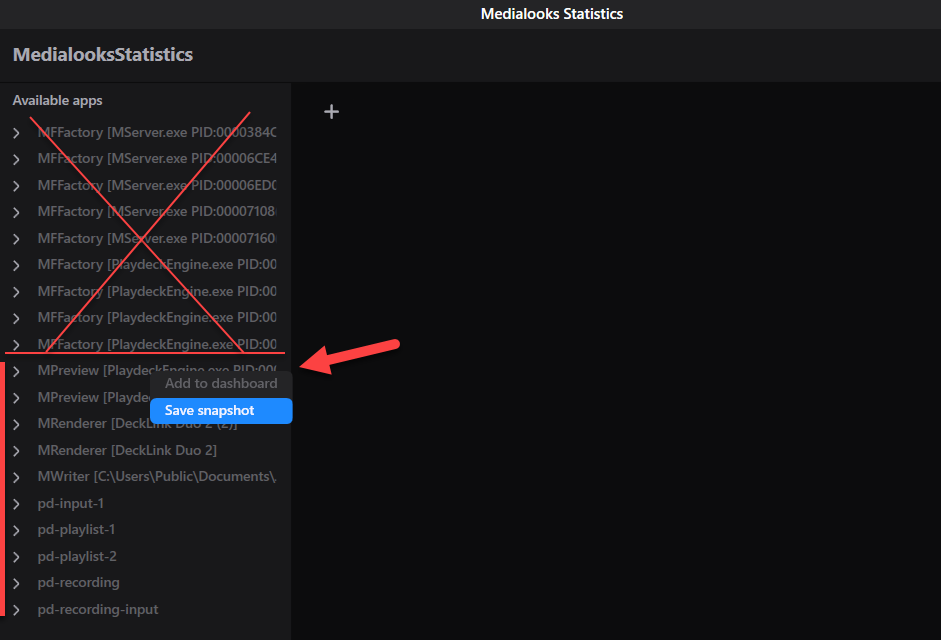
Now start the Tool “Snapshot.exe”. On the left side, right-click the first item you see, which IS NOT “MFFactory” and select “Save Snaphot”. As file format please use the pre-selected JSON format.
Now repeat this for every Item that is following. You will now have created a Snapshot of every Item, that is not MFFactory. So in the above Sample, we have 10 files in total.
3. ZIP’ing and Sending the Snapshots
Create a new ZIP File and add all Snapshots (*.json).
This article will show how to setup Video Engine Logging.
1. Setup Logging
We want to catch the Bug on the fly, meaning we start logging, reproduce the bug, then transport the log files to the video engine devs to fix that Bug.
Start PLAYDECK, open Settings and click the APPLICATION Tab and on the bottom you have this line:
The first thing to setup is your Output Folder for the Log Files. This can be a shared Folder on your Network. Logs can easily consume up to 1 GB per Minute (on Verbosity 0 and all Modules). Plan enough free disc space, depending on the estimated time until Bug occurrence.
The next setup is Verbosity: Please always start Logging with 0 – Tracing, so the Video Engine Devs have ALL information. Only use any other Verbosity to check for yourself.
With the Modules setting we pick what modules to log. Here are your options. You can combine them with comma. Only use all, if you don’t know what kind of Bug you are dealing with.
Once you check “Enable Video Engine Logging”, PLAYDECK will restart. It will create a new Subfolder (e.g. “2026-02-25_16-39-52”) with your designated Logging Path. This is to identify your current session.
Now wait until the bug happens. Then close PLAYDECK. This is important to finish writing all Log Files. If PLAYDECK hangs/freeze, kill it with the task manager.
Now we need to ZIP the contents of the session folder. Identify your session folder by the time you started PLAYDECK. Then right-click your session folder, select Compress to and pick 7z File (if available) or ZIP File. If PLAYDECK would still be open, this would result in an Error (Files still being written). Now lean back, compression could take some time.
Important: Don’t forget to create the Download Link and send us the Link to [email protected].
3. Cleanup
Be sure to delete the Log Files after ZIPPING to free disc space. PLAYDECK will not clean up the logfiles automatically.
Also make sure to deactivate the Setting “Enable Video Engine Logging” in PLAYDECK, as it will slow down your PLAYDECK performance. This setting is not meant to be enabled all the time.
SCTE Marker are mainly used to insert Ads into the Video Output by signaling the Receiver (e.g. Streaming Server) at what time to insert Ads and with what Duration. This allows 3rd Party Systems to dynamically pick Ads from a Database. You can read more about SCTE-35 in general on this website.
You can attach SCTE Marker to 4 different Objects in PLAYDECK: – Clips (any Position) – Blocks (Start and End) – Overlays (Show and Hide) – Actions Buttons
Instead of providing your with predefined SCTE Marker, we picked a different approach: You have to write your own SCTE Marker. This could mean a bit of a learning curve, but in the end, it is much more flexible. The advantage is, that you will always be compatible to all receiver. For gathering Clip duration and other “variables” we provide certain “placeholder”.
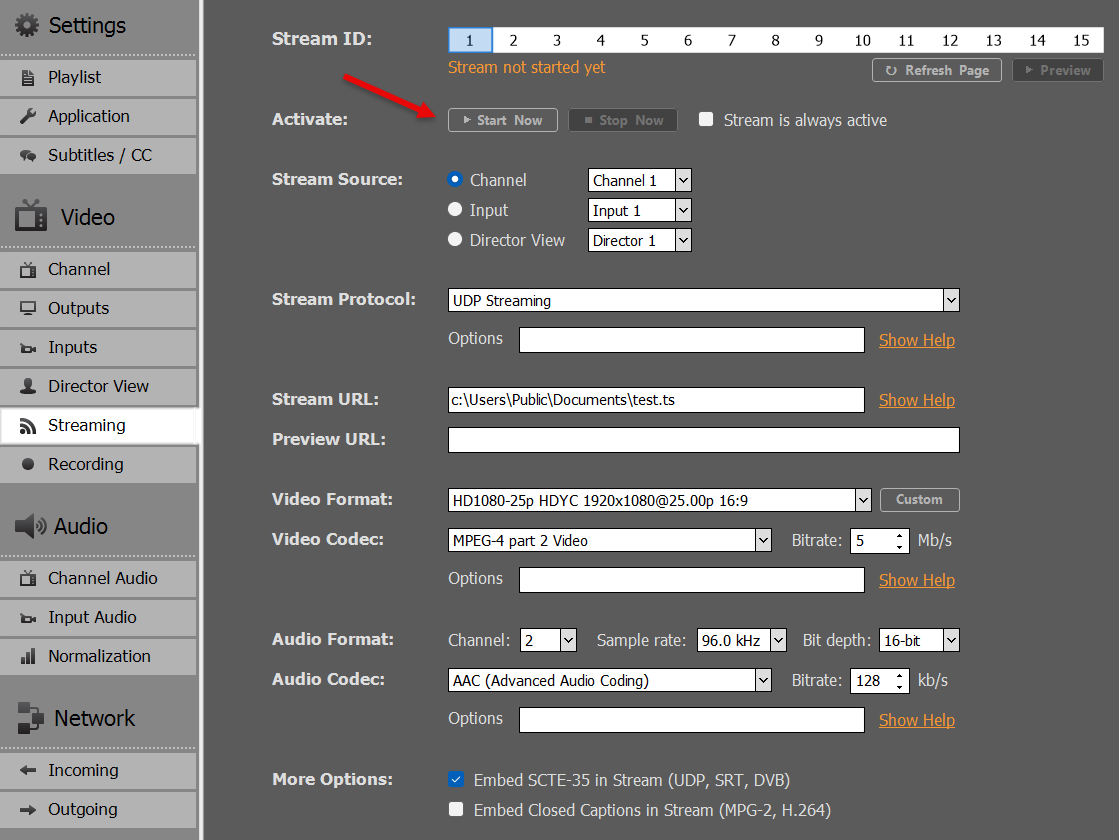
Please note, that SCTE has to be enabled in your Stream options:
SCTE-35 Marker Examples
Let’s look at some SCTE-35 Sample. It represents the most used form of SCTE-35 called “Splicing”.
Note: The SCTE-35 Format presented here works best with Nimble Streamer (see below). Depending on your Stream Server, the Format might be different. Ask your Provider.
This will insert an Ad and return to your Program automatically after the given duration. The duration will be set automatically by PLAYDECK for your current running Clip. This can be exchanged with {blockduration} or a manual value. If you pick a manual value for duration, the formula is: CLIP DURATION multiplied by 90000 and rounded. The reason behind this is, that 90000 is default Timescale most SCTE Systems use. Example: The Clip is 12.4 seconds, so the SCTE duration would be 1116000.
Instead of sending a duration, you could also send 2 separate SCTE Marker to Start/End the Ad. Those are called CUE-OUT (leaving your Program for Ad) and CUE-IN (return to your Program).
As you most likely have observed already, the only difference is “outOfNetworkIndicator” being 1 (CUE-OUT) and 0 (CUE-IN). The SCTE System itself will pair both Marker based on the “spliceEventId”.
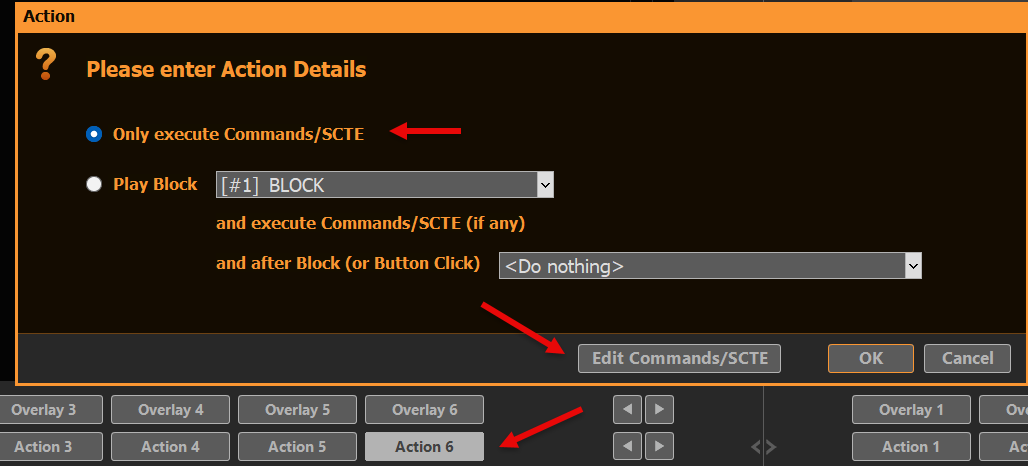
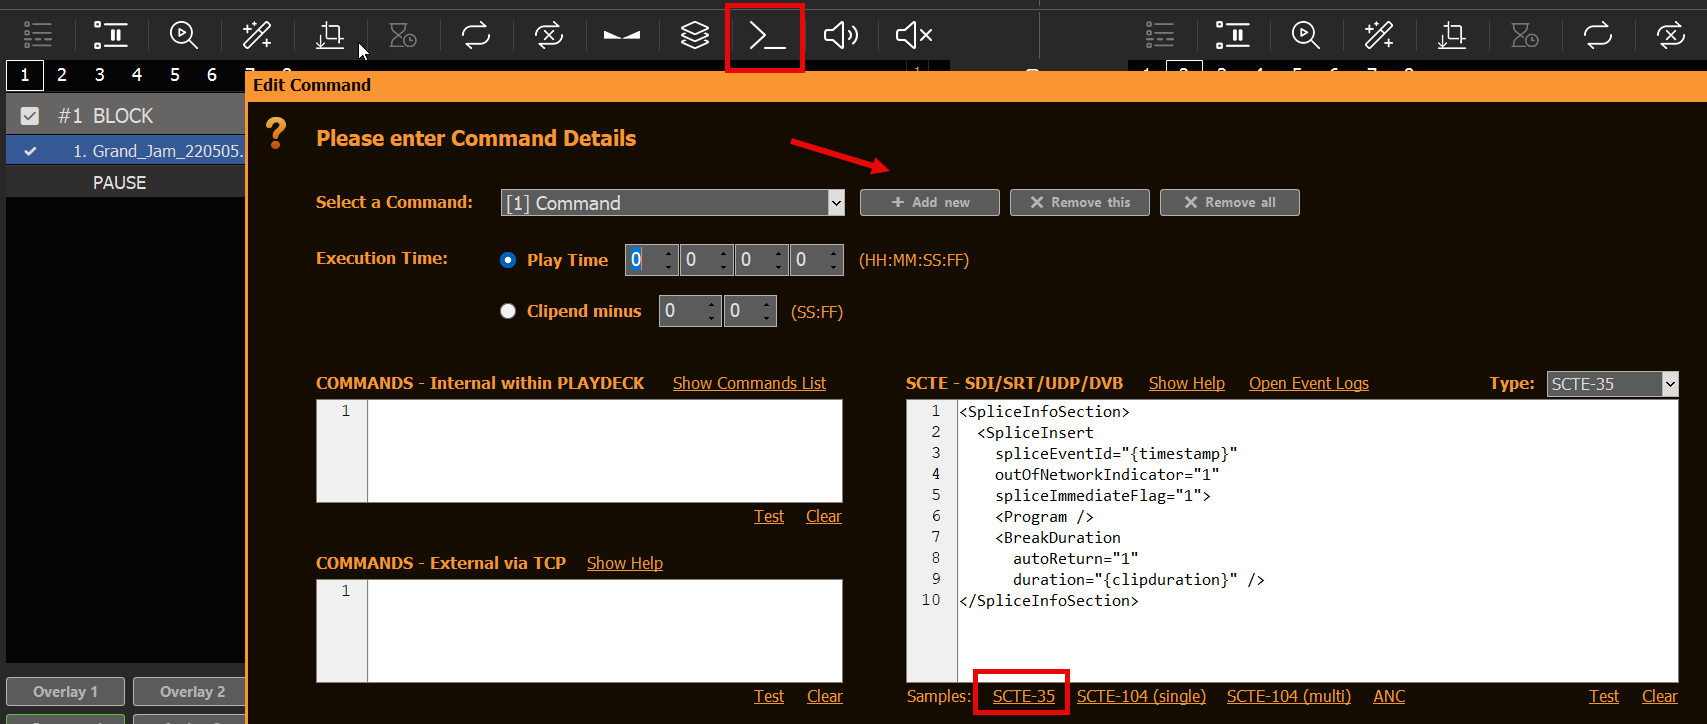
Open PLAYDECK. You don’t need to load any Clips yet. Right-Click on any ACTION Button, create a new Action and select COMMANDS/SCTE:
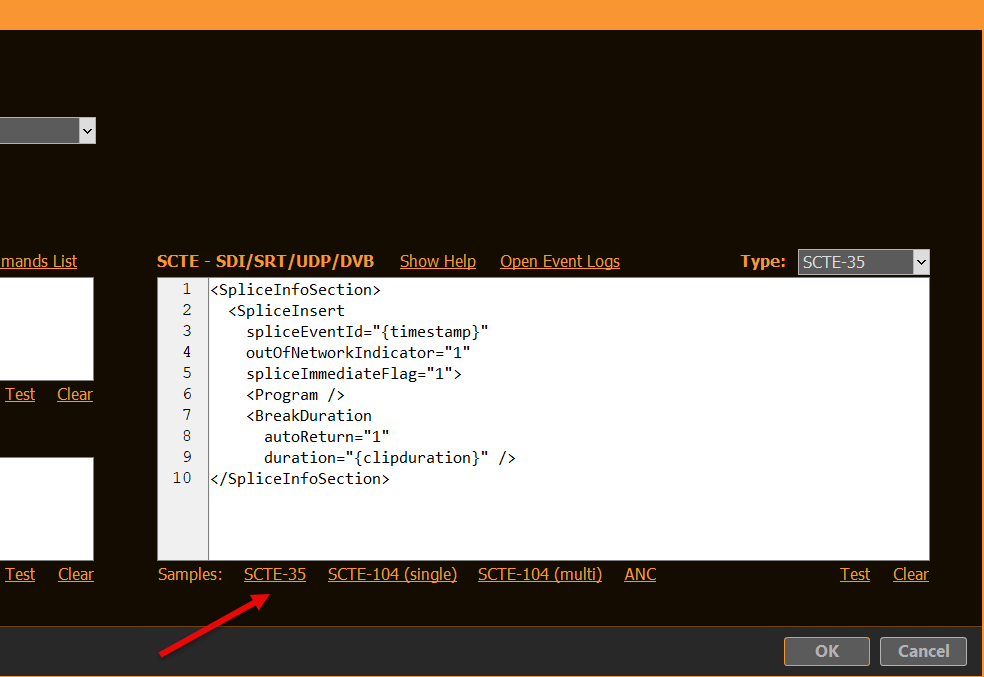
Insert the SCTE-35 Sample Tag by clicking SCTE-35. Close the Popups with OK (twice):
We are now able to send a SCTE-35 Tag to any compatible Stream (UDP, DVB, SRT). If you click the Action now, nothing will happen, as we don’t have a Stream yet.
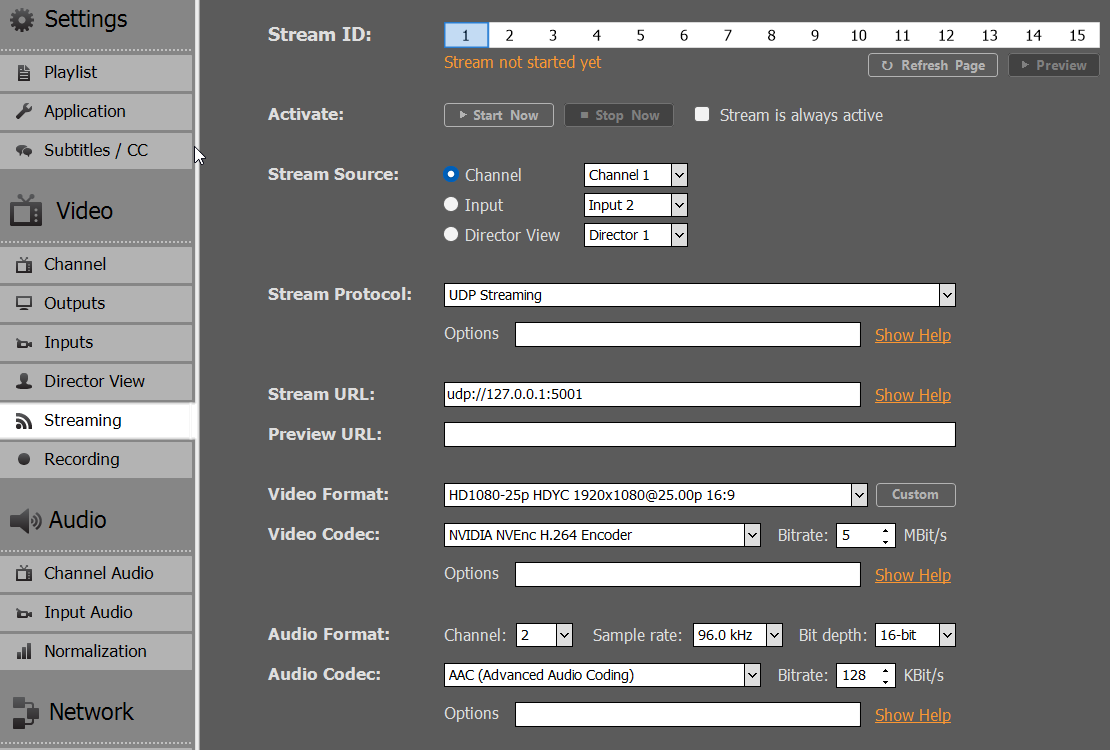
Let’s create a Test UDP Stream, where we simply send the Output to a File, so we don’t have to hassle with Server Stuff (yet). Copy the Settings as follows and start the Stream with START NOW.
We want to send our Sample SCTE-35 Tag to the Stream now. So close Settings and click your Action Button several Times, then go back to Settings and stop your Stream with STOP NOW.
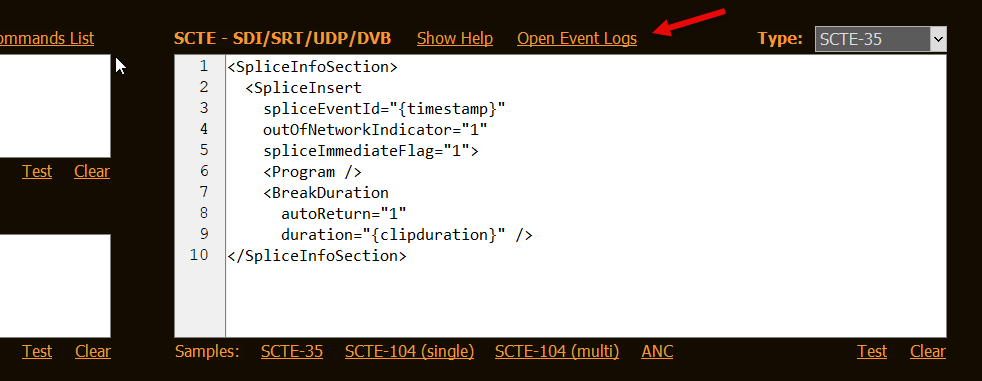
Your SCTE-35 Tags have been logged by PLAYDECK. You can check the Logs, if you go back to your SCTE-35 Code on the Action Button and click OPEN EVENT LOGS:
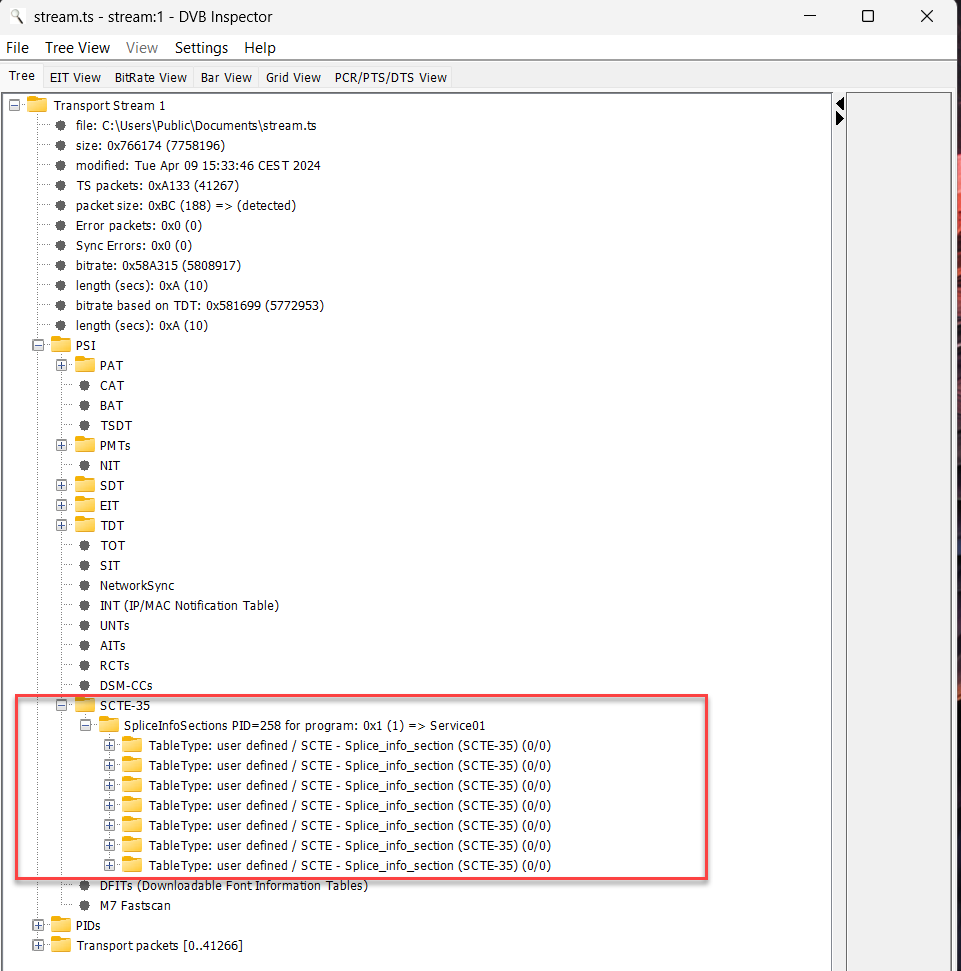
You can also make the SCTE-35 Tags visible, which are in your recorded Stream. For this, we need a separate Tool called “DVBInspector”. This Tool also needs JAVA Runtime, so download both:
Now unzip your “DVBinspector-1.18.0-dist.zip” (or similar) and start “DVBinspector-1.18.0.jar”. Then Drag+Drop your TS File onto the Application. Open the Tree as follows to view your SCTE Marker.
Test SCTE-35 Marker in Nimble Streamer
Nimble Streamer is our Streaming Service of choice. It is cost-efficient, easy to setup and maintain, but still has the depth of complexity for advanced use cases:
Install the 14-day Trial Version of Nimble to the same machine that PLAYDECK is running. This is not a necessity, but makes things simpler, as you don’t have to put up with a network setup. You will also be asked by Nimble to create an account with WMSPanel, which is a web based setup tool for Nimble, as the Nimble Streamer itself installs without User Interface.
INFO: For this SCTE-35 Sample to work, you DONT need to have “Nimble Live Transcoder” or “Nimble Advertizer” PlugIns, if you test this on a Live Installation. They are disabled in the Trial Installation by Default.
Once you got Nimble running, there is one more configuration you need to do manually. Open the Nimble Server Configuration file here: c:\Program Files\Nimble Streamer\conf\nimble.conf
At the bottom of this file, add the following Lines and save the file.
Important: You need to restart Nimble now by either restarting your PC or restarting the Windows Service “Nimble Streamer” manually.
Here are the lines again, but with comments for you (dont use these):
scte35_processing_enabled = true  // Enabled the SCTE module in general. Needed for all other Options
scte35_forwarding_enabled = true  // Allows passing through the SCTE-35 markers via Live Transcoder
hls_ad_scte35_forwarding_enabled = true  // Enables forwarding of SCTE-35 markers into HLS streams
hls_ad_marker_format = cue  // Sets Nimble to use CUE-OUT and CUE-IN markers
hls_ad_splice_out_cont_marker_enabled = true  // Enables automatic insertion of EXT-X-CUE-OUT-CONT
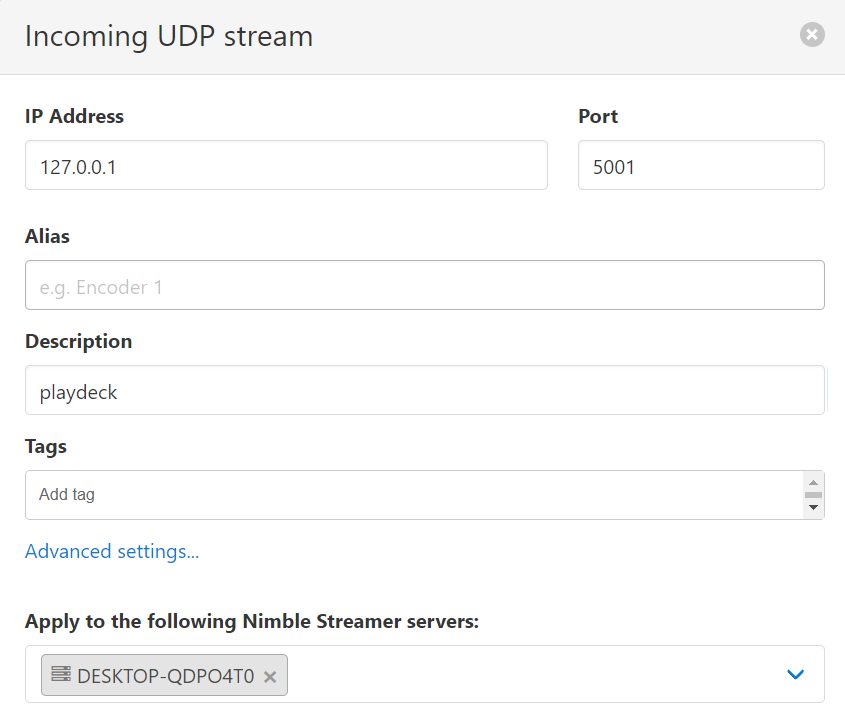
Now let’s set up your Streams in WMSPanel: First we are going to define our incoming Stream. Go to “Nimble Streamer” in the Menu and select “MPEGTS In” and click the “Add UDP stream” Button, then add the incoming stream like this. You can use any other Port, should 5001 be in use already.
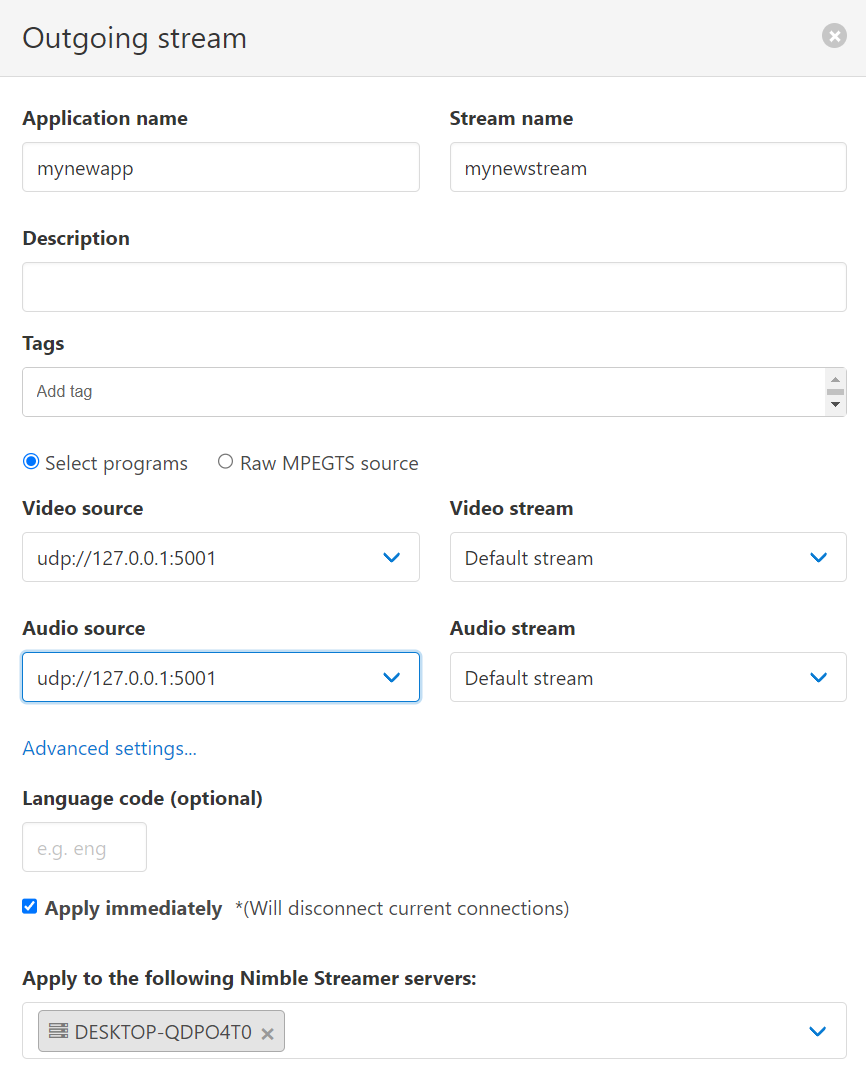
Next we are going to setup the outgoing stream format. We want to use HLS here to demonstrate the conversion of SCTE Marker from UDP to HLS. On the same page, go to “MPEGTS Out” and click the “Add outgoing stream” Button, then add like this. Make sure you select you input stream as video and audio source.
Next we continue our setup in PLAYDECK. Got to the Stream Output Settings and change the Stream URL to “udp://127.0.0.1:5001”.
INFO: You can pick any preferred Video Codec. SCTE-35 will always be send. In this case I picked H.264 to let my NVIDIA GPU do the encoding, which will lower my CPU usage.
INFO: Please note, that PLAYDECK is not capable to directly stream HLS. If you select “Apple HTTP Live Streaming” as Streaming Format, the output will be written to a file. You therefore need to specify a file target as “Stream URL” e.g. “c:\Users\Public\Documents\stream.m3u8”. Then use that File to stream using any Streaming Server. PLAYDECK is not able to write HLS SCTE Tags into the HLS Manifest file (the *.3u8 file).
Next we want PLAYDECK to automatically send SCTE, not just via a Button, but Clip related. So we insert any Clip and click the COMMANDS Icon in the Toolbar, then add a new Command, select PLAY TIME 0, then insert the SCTE-35 Sample:
INFO: You can also add SCTE Marker to Blocks, Overlays and Action Buttons.
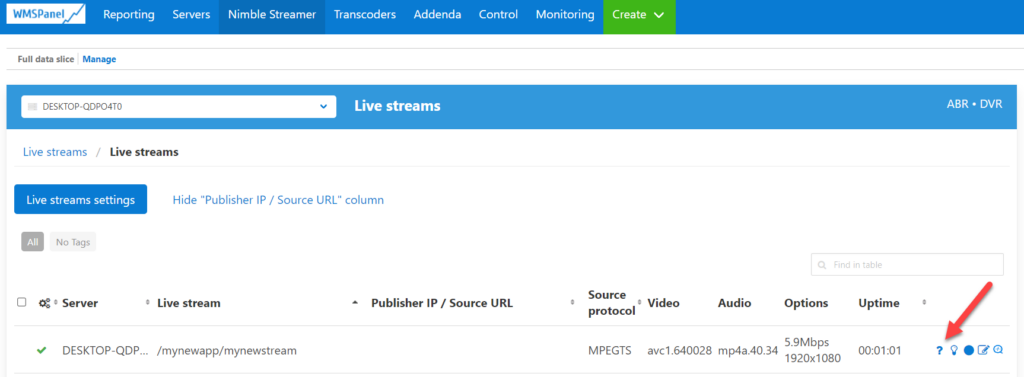
Now let’s get things rolling: CUE and PLAY the Clip and start the Stream in the PLAYDECK Settings. Hop over to the WMSPanel and open from the Menu “Nimble Streamer” the option “Live Streams”. You will now see 1 running Live stream. Click on it and pick the question mark on the far right like this.
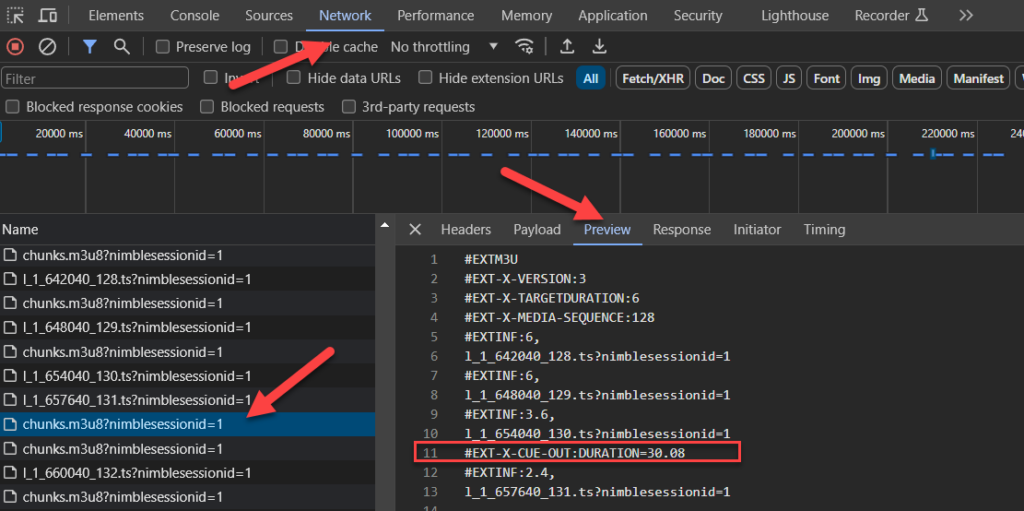
Once you posted that URL into CHROME, you will see your PLAYDECK stream playing immediately. Now let me show you how to monitor your SCTE Marker. In Chrome press F12 to open the Developer Tools. On top click the “Network” Tab. You will now see several “chunks.m3u8”, which are part of you stream. Click on one of the Chunk files (also called HLS Manifest) and select “Preview” next to it. You will now see the HLS SCTE Tag. If it isn’t there, click on another chunk, as we send the SCTE only on Clip Start.
That’s it! We reached our Test Goals. Upcoming are more information which might be relevant to dig into.
Additional Information
Logging in PLAYDECK
We log Incoming and Outgoing SCTE Tags separately. This gives you also the opportunity to test your outgoing SCTE by simply Looping your Output to an Input (SDI as well as Streams), and let PLAYDECK detect your SCTE. You can open the Log Files via the Main Menu:
Logging in Nimble Streamer
If anything goes wrong or doesn’t happen as expected, a good start is to review the Nimble Log Files. The Log can be found here on Windows: c:\Program Files\Nimble Streamer\log
Logging is enabled by default in the Nimble Trial addition, but in case you need to activate it, here are the flags for the “nimble.conf”.
log_access = file
logging = debug
Now open the log file and scan for “SCTE”. You might see something like this, which indicates you have a typo in your SCTE Marker in PLAYDECK:
[SCTE35] unsupported splice command type=6 for [mynewapp/mynewstream]
If your SCTE Marker parsed successful in Nimble, it will look like this:
This is a collection of tools and plugins with a large library to manipulate MPEG transport streams. With this you would be able to insert SCTE Marker outside of PLAYDECK based on an algorithm or other complex logic.
This tool can also convert SCTE-35 Marker in UDP Streams or MPEG-TS Files into HLS SCTE Tags. This allows you to install a streaming server, which does not have automatic SCTE-35 to HLS conversion.