This article will show options to prepare your Playlists on another System or import Playlist from other Apps.
In this article:
→ Use Free Channel
→ Use Playlist Trial Edition
→ Append Playlist during Broadcast
→ Automatically Detect and Reload new Playlist
→ Interface with 3rd party Apps
Use Free Channel
You have some spare Channel in PLAYDECK? Use them to prepare and test new Contents, then copy them to your Main Feed Channel. You can DRAG DROP Blocks from Channel to Channel, or copy them with pressing CTRL after starting DRAG DROP.
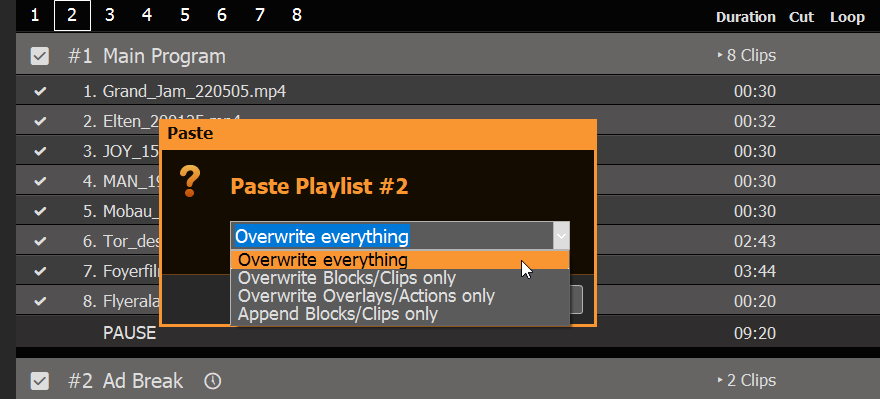
You can also copy, overwrite or append whole Playlists, by right-clicking the CHANNEL NUMBER:

If you paste new Content on an existing Playlist (or Import XML), you get the option to overwrite or append:
Use Playlist Trial Edition
You can install PLAYDECK on any other machine and edit your Playlists there. Except the Watermark of the Trial Edition, there are no other restrictions, so you can prepare Playlists and send them to your Main System.
Append Playlist during Broadcast
You want to import new Playlists and don’t want to interrupt your Broadcast? No problem: Use the APPEND PROJECT Option in the FILE MENU:
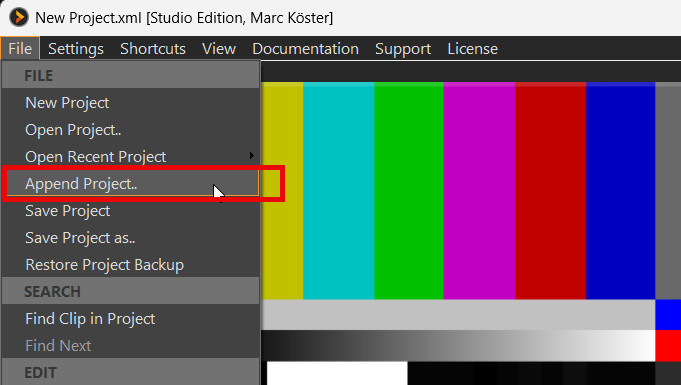
This will load any PLAYDECK Project, but instead of replacing the Playlists, all Playlists will be extended by the Clips found in the Project. You can then safely remove any old Content.
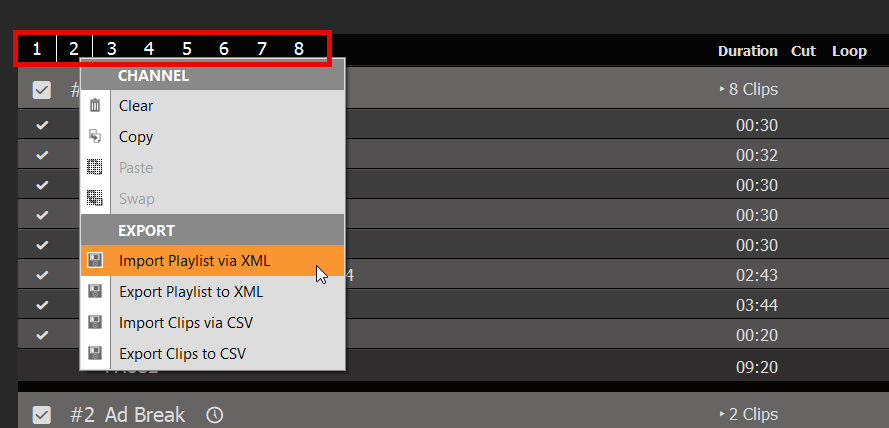
You can apply this procedure to individual Playlists by Exporting a Playlist to XML and Importing that XML on the other Machine. This is done by right-clicking the CHANNEL NUMBER:
This workflow is perfect for any day-to-day schedule, where you add new days and remove old ones.
Automatically Detect and Reload new Playlist
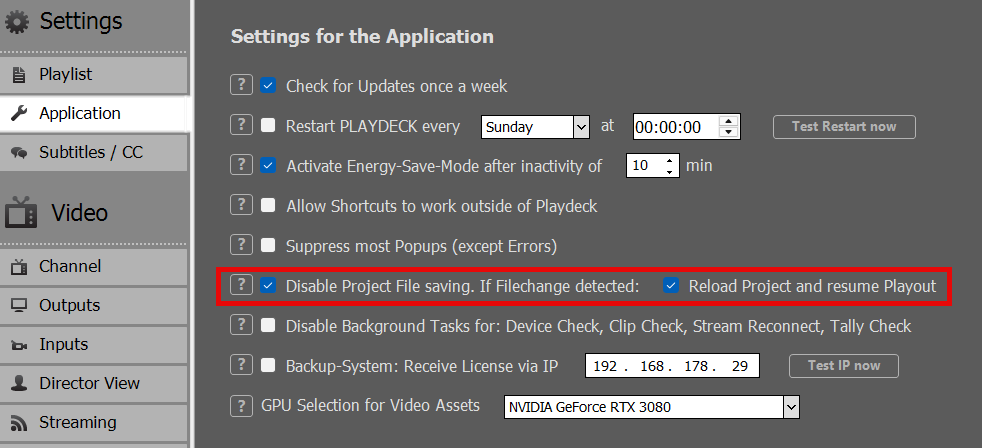
You can also OVERWRITE the current load Project File on your Main System and let PLAYDECK detect this and reload the Project, after which the Playout will resume. Enable this functionality in the Application Settings:
Note: RESUME PLAYOUT only works, if the current Playing Clip exists in the newly re-loaded Project, otherwise Playout stops for that Channel. The Clip is identified by a UNIQUE ID, so it could have moved to another Block in the re-loaded Project.
This workflow is best suited for any automated systems, where Project Files are generated automatically and uploaded to the Main System. Or when the Content Editor does not have access to the Main System and uploads the new Playlist to the NAS/Cloud Storage.
Interface with 3rd party Apps
We don’t support the Playlist Format of other 3rd party Apps, as there is just too much diversity on the market, and a lot Playlist Function (Mixing, Overlaps, Schedules) would not be compatible with PLAYDECK.
If you like to prepare your Playlist in a 3rd Party App, you need to export your Playlist to CSV, then Edit that CSV to work with PLAYDECK, then Import that CSV into PLAYDECK.
Why CSV? Because it is the most easy List Format, which support multiple values per Item. It can be edited with any Text or Table Editor, from Notepad to Excel.
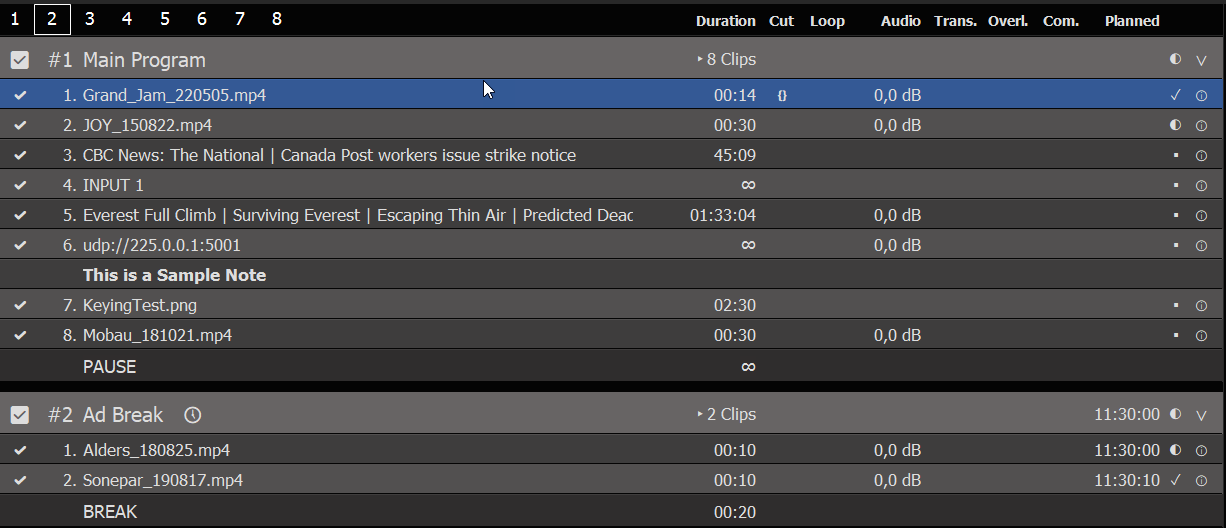
Let’s have a look at our CSV. For this we build ourself a Sample Playlists with 2 Blocks. We mixed in different Content Types: Video Clips with IN/OUT Points, Device Inputs, YouTube Videos, UDP Input Stream, GFX with Runtime, a Note. We also added a Schedule to the 2nd Block:
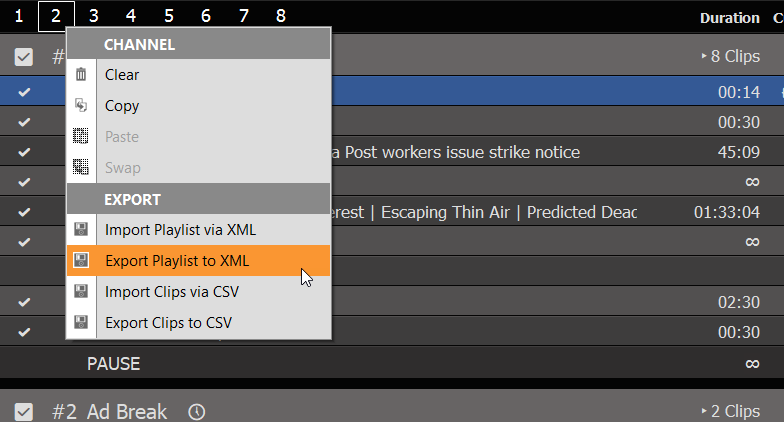
We now right-click the CHANNEL NUMBER 2 and select EXPORT TO CSV:
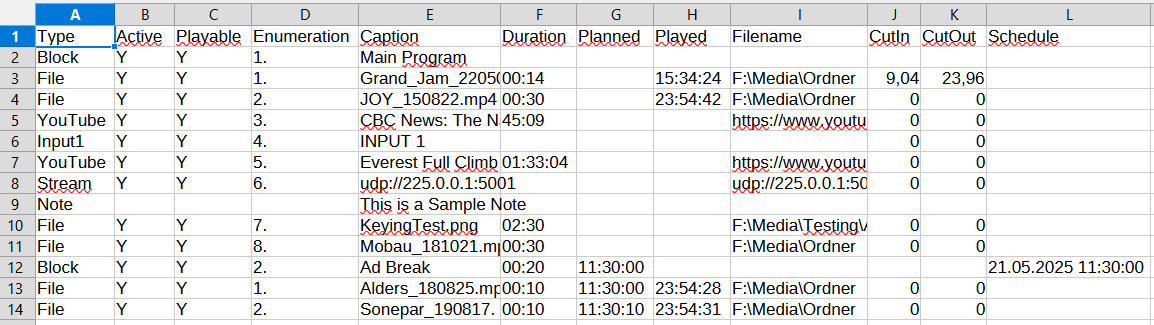
We then open the saved CSV File in Notepad (click here to download/open in new Tab):

As you can see, its not “too” much Text Lines. Since the first Lines are just HEADER, it looks even more clear in a Table Editor:
And this is how you write/generate CSV Files: You export your Content in any 3rd party app, open any editor and bring it in PLAYDECK FORMAT. But WHAT IS PLAYDECK FORMAT.
These are the REQUIRED COLUMNS. They can be it ANY POSITION (any column #):
Type = Block, File, Website (or YouTube), Input#, Stream, Note
Caption = Any Text to display in PLAYDECK
Filename = The Path/File or the URL (YouTube and Streams)
These are the OPTIONAL COLUMNS. They can be it ANY POSITION (any column #):
Active = The Checkbox in the first Column in PLAYDECK
Duration = Only used be File-Types that are Images. Leave empty or 0 for endless
CutIn / CutOut = IN- and/or OUT-Point for Trimming
Schedule = Only used by Block-Types
Note: More advanced Properties (e.g. Audio Gain) are not supported, as to keep our CSV Format clean and easy. To import/export ALL Properties, please use XML instead of CSV.
Note: PLAYDECK uses UTF-8 encoding for saving and loading CSV files.
