Troubleshooting Guide
We are sorry to hear that you have problems with PLAYDECK. Let us try our best to help you out with that. Pick an area, where you have problems.
Unable to start PLAYDECK
Example:
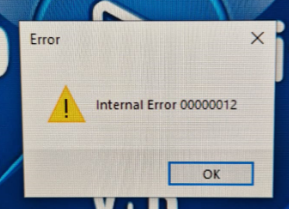
Cause:
Some 3rd party application is preventing PLAYDECK to start. PLAYDECK uses an advanced protection system for it’s licenses, which “may” be detected by Anti-Malware or Anit-Virus applications. This is of course a “false positive” and we assure you that PLAYDECK does not contain any unwanted access to your system.
Solution 1 (Anti-Malware):
Disable your Anti-Malware/Virus applications, including Windows Defender/Firewall and test PLAYDECK. Once you found the responsible application, you need to whitelist PLAYDECK and it’s video engine:
c:\Program Files (x86)\JoyEventMedia\Playdeck\Playdeck.exe
c:\Program Files (x86)\JoyEventMedia\Playdeck\engine\PlaydeckEngine.exe
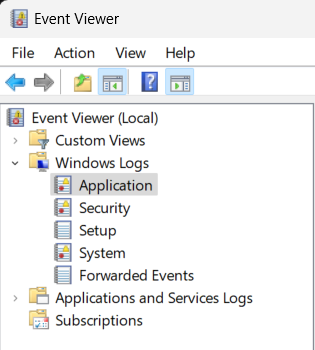
Solution 2 (Windows Error Event Log):
Check, if you Windows logged any application error while starting PLAYDECK and forward the message to [email protected] :
Also please check, if PLAYDECK itself write a Crash Dump and upload the file to us. Check in this location:
c:\ProgramData\JoyEventMedia\Playdeck\crashs\dumps
For uploading you can use our Download Portal. Just make sure to send the Download Link to us after uploading (COPY Button):
https://download.joy-event-media.de/
Solution 3 (Admin):
While PLAYDECK is fully capable to run with user priviliges, your System Configuration might require PLAYDECK to run under administrator priviliges. The cause for this can be 3rd party Security Software whitelisting all Apps, that run as administrator.
Right-Click PLAYDECK (eg. Desktop Icon), select Properties, then switch to the “Compability” Tab and activate “Run this program as an administrator”. If you start PLAYDECK from the Startmenu, right-click and select “Run as administrator”.
Example:
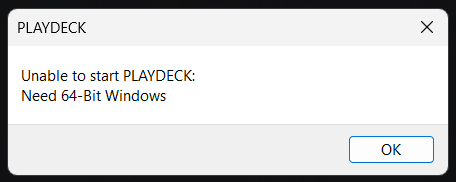
Cause:
PLADECK itself stopped during startup with the given Message. In the example PLAYDECK needs Windows in a 64-bit version.
Solution:
Please send us a screenshot of the error message to [email protected], so we can assist you further.
Example:
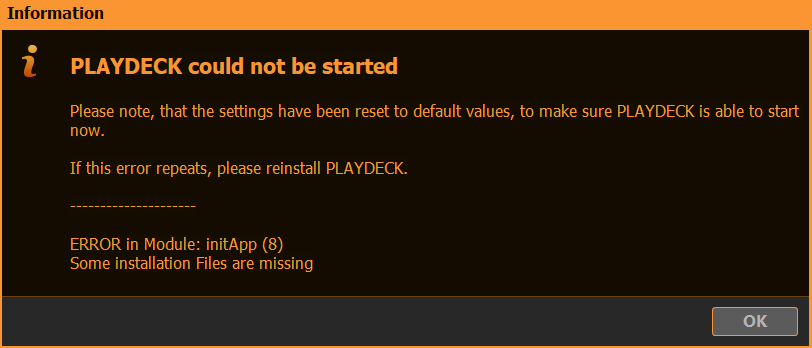
Cause:
PLAYDECK found a problem while starting up. In the example some files from the installation were missing.
Solution:
Install PLAYDECK again (no need to deinstall the current version) and during installation activate “Reset all Settings”:
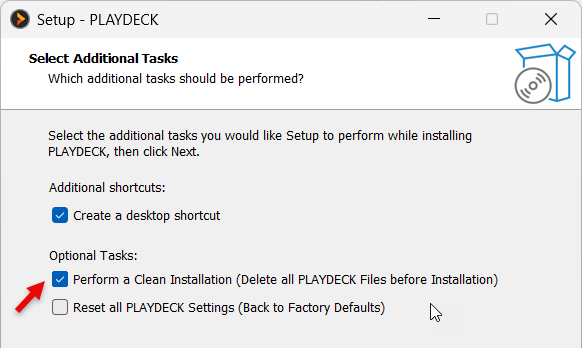
This will delete all cache files or conflicting settings. If this does not lead to success, please create the ZIP file from this folder and forward it to us at [email protected] :
c:\ProgramData\JoyEventMedia\Playdeck\logs\
Example:
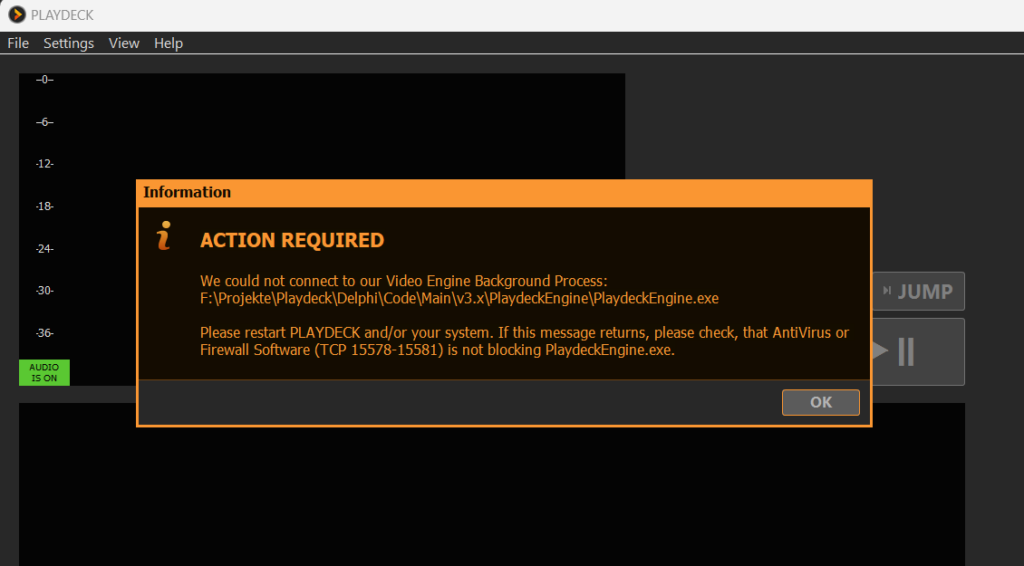
Cause:
PLAYDECK has no priviliges to communicate with it’s video engine application. This is mostly the result of a Firewall blocking the access.
Solution:
Go into your Windows Settings, to Network, then to Advanced Network Settings, then to Windows Firewall and click on “Allow an app through firewall”.
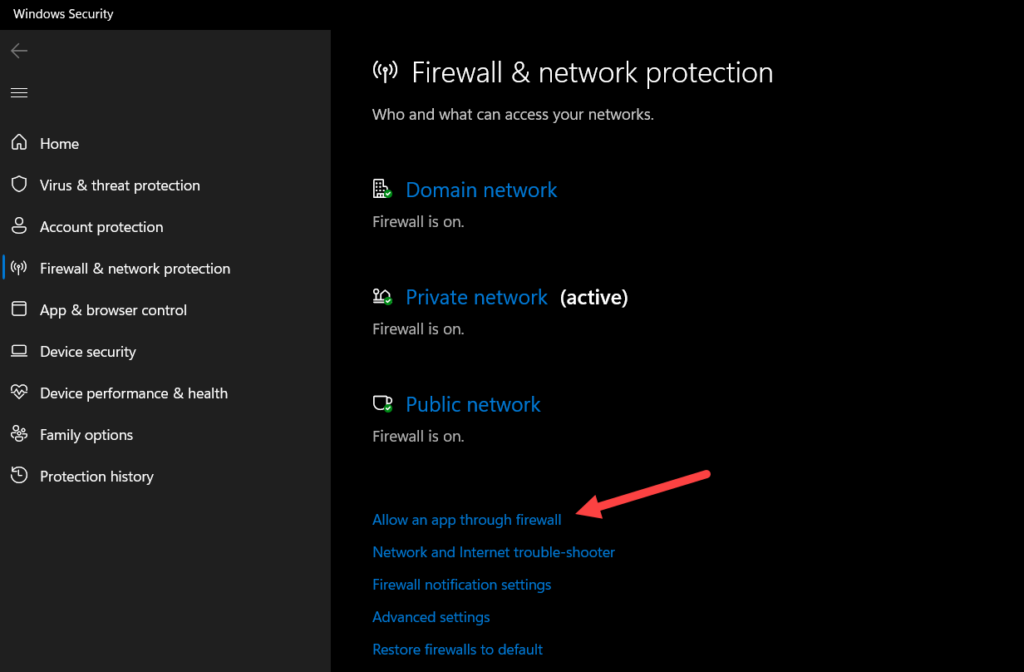
Make sure that “Playdeck” as well as “PlaydeckEngine” is listed and has a checkbox under “Private”. If either one Application is not listed click on “Allow another app” and add both Apps with these paths:
c:\Program Files (x86)\JoyEventMedia\Playdeck\Playdeck.exe
c:\Program Files (x86)\JoyEventMedia\Playdeck\engine\PlaydeckEngine.exe
Clip Playout Problems
Cause:
Most likely PLAYDECK is not able to communicate with your GPU Driver.
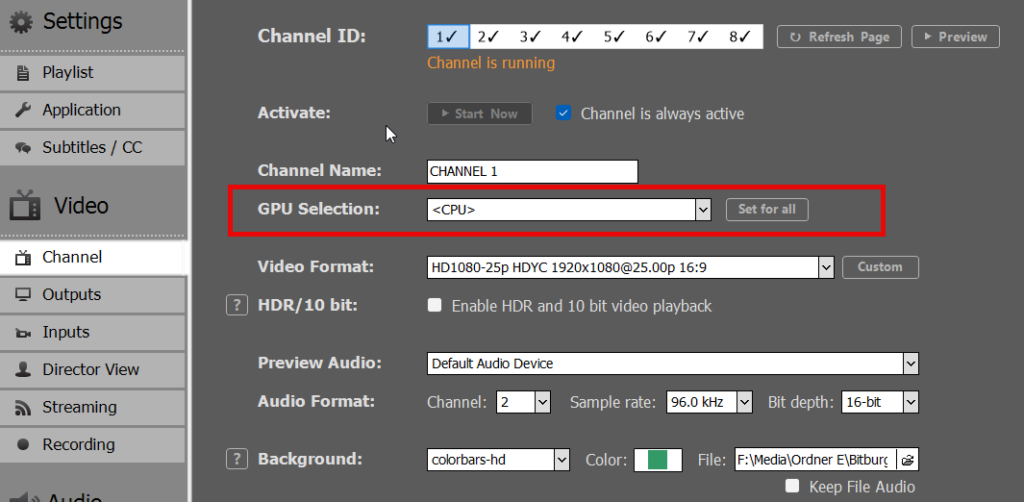
Solution 1 (Use CPU):
First, please test without any GPU involved to check if this is the cause of the problem. Set the CPU of the Channel to CPU in PLAYDECK.
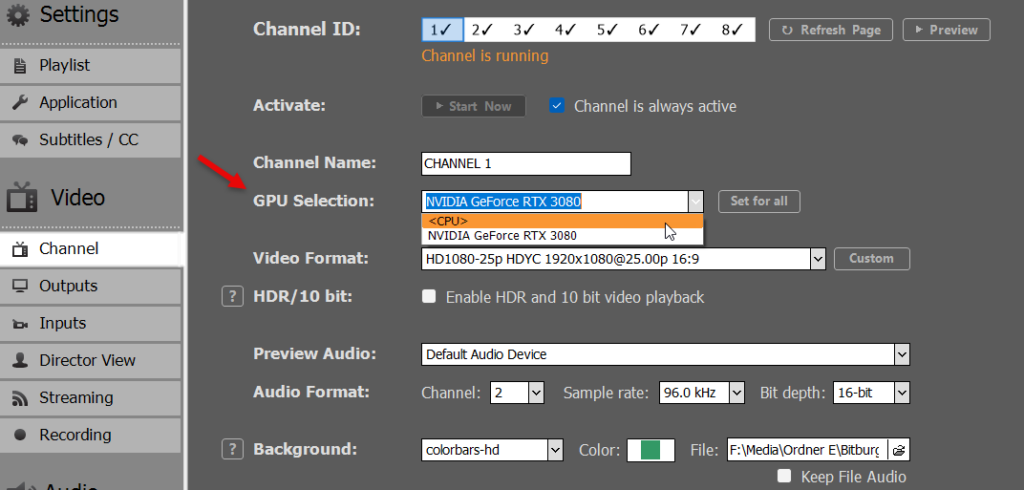
If it now turns out, the playout runs fine in CPU mode, you need to further check, what causes the GPU to fail. A driver update may be needed.
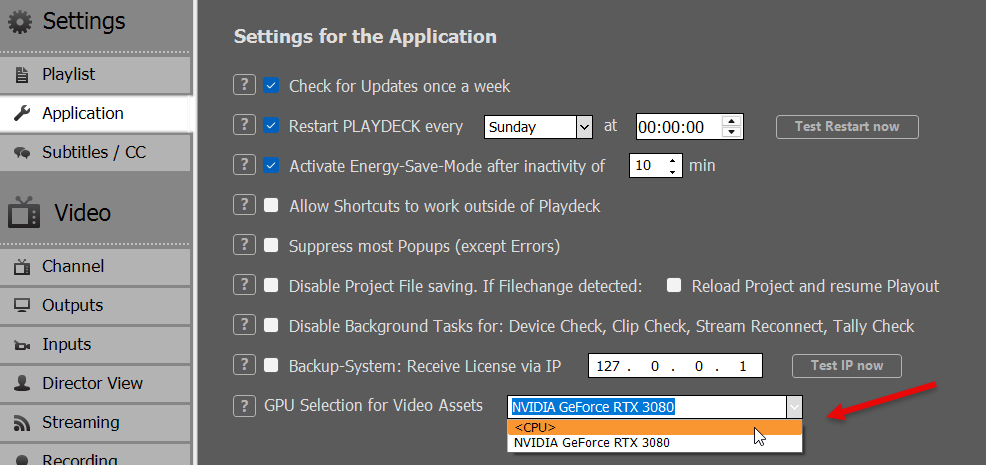
Solution 2 (Check other GPUs):
Play around with the above GPU Settings. Maybe PLAYDECK did not pre-select the correct GPU. Maybe you NEED to select your INTEL Onboard Card (Notebooks).
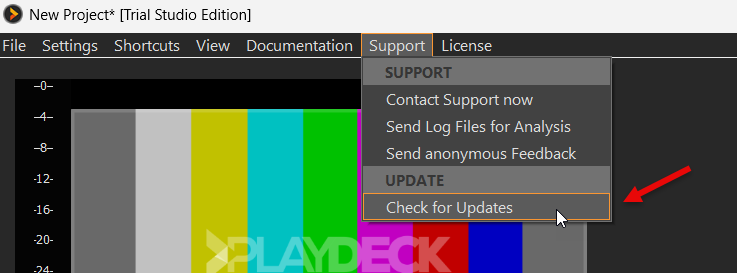
Solution 3 (Install GPU Drivers):
Make sure you installed the latest driver updates for GPU. If you use a NVIDIA, you can let PLAYDECK search for a newer Driver automatically.
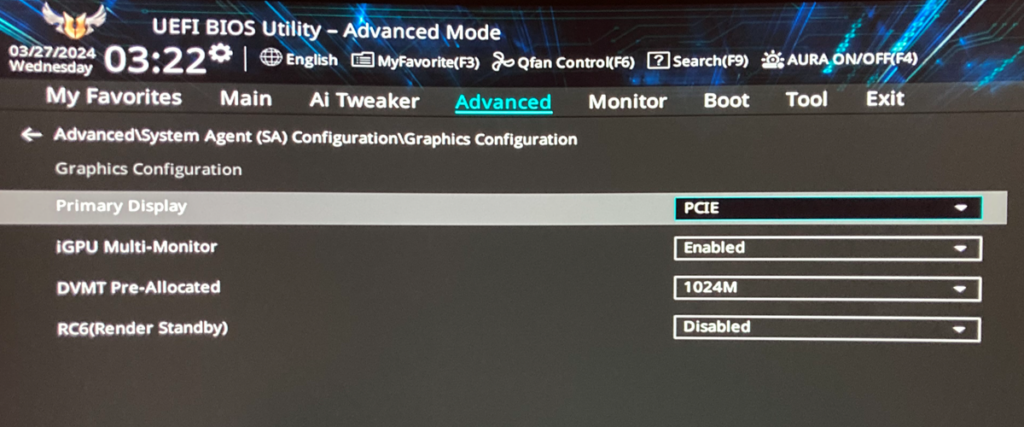
Solution 4 (Bios):
If you have two GPUs installed, one internal and one dedicated, it might be nessecary to DISABLE your internal GPU or set your dedicated GPU as PRIMARY. This can be done in the BIOS. Restart your PC and hit DEL Key several times to open your BIOS.
Solution 5 (Notebooks):
Notebooks are a bit special in regards to GPUs. Alot of Notebooks feature 2 GPUs, one Intel and one NVIDIA, but they don’t function as 2 different GPUs. The NVIDIA cant be used as exclusive GPU and is only used by the Notebook to OFFLOAD decoding jobs. If you would now pick the NVIDIA as GPU in PLAYDECK, it would not work. In this case, you need to select the PRIMARY GPU (the one, which is listed first), which will most likely be the INTEL.
Example:

Cause:
Your GPU is not detected by PLAYDECK and therefore not shown in PLAYDECK. This is mostly likely because PLAYDECK has no access to your GPU Device List. PLAYDECK uses OLE to access the WMI cimv2 namespace to read the current GPU List of the System.
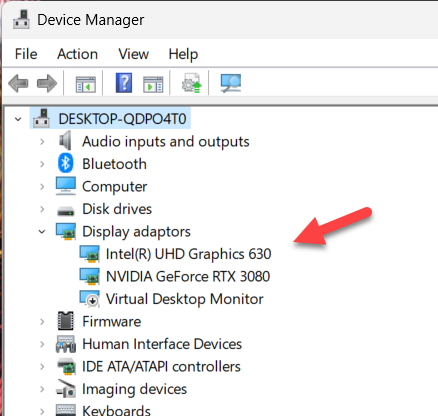
Solution 1 (Device Manager):
Check that your current User has Access to the Device List by opening the Device Manager. Right-Click on the Windows START Button and select “Device Manager”. Then try to unfold the “Display adaptors” topic. Check that your GPU is listed there correctly. If not, you need to install a valid driver and make sure, that your GPU is listed here, otherwise PLAYDECK can’t find it. Also, you will reveal any security layer, that might still be in effect.
Solution 2 (Admin):
While PLAYDECK is fully capable to run with user priviliges, your System Configuration might require PLAYDECK to run under administrator priviliges. The cause for this can be 3rd party Security Software whitelisting all Apps, that run as administrator.
Right-Click PLAYDECK (eg. Desktop Icon), select Properties, then switch to the “Compability” Tab and activate “Run this program as an administrator”. If you start PLAYDECK from the Startmenu, right-click and select “Run as administrator”.
Solution 3 (Security Layer):
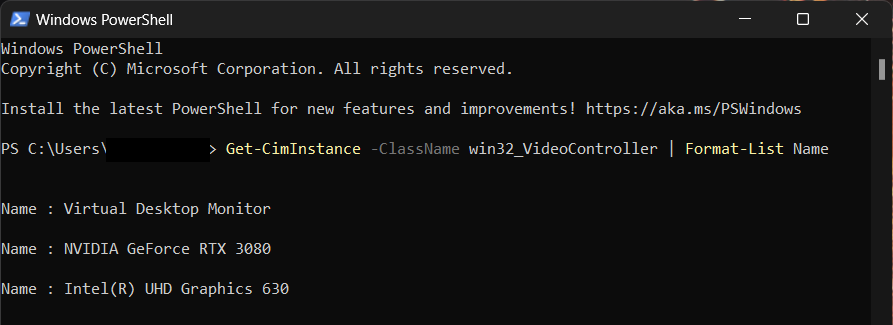
At this point it might be necessary to contact your IT Admin person and figure out, why you cant access the GPU Device List. To check, if your current Windows User supports listing the GPU Devices, open the Windows Powershell by right-clicking the Windows START Button and selecting “Windows PowerShell”. Copy, paste and execute the following Code Snippet:
Get-CimInstance -ClassName win32_VideoController | Format-List Name
If successful, it will list all installed virtual and physical GPUs. Example:
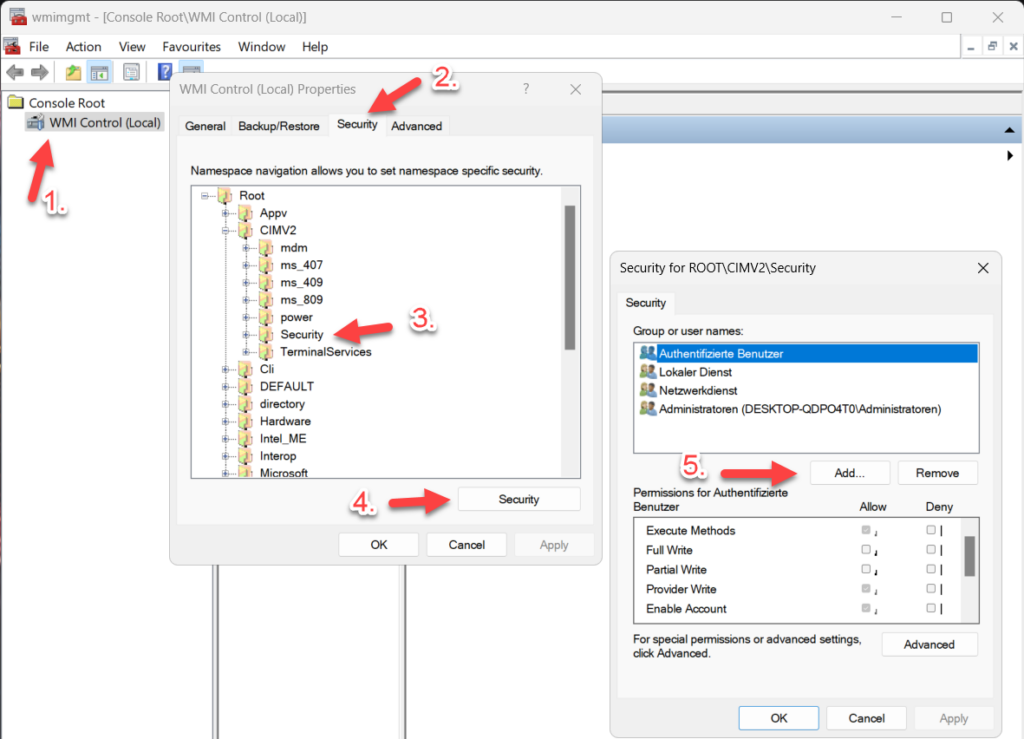
If you cant list the GPU Devices with this command, you might need to add extra security permissions. To directly edit the permisssion, run “wmimgmt.msc” by Right-Clicking the Windows START Button and selecting “Run”. Now Right-Click “WMI Control” and click “Properties”, select the “Security Tab”. In the Tree, select “Root > CIMV2 > Security” and click the “Security” Button. From there you either edit existing rights or add a new user/group:
Cause:
Audio stuttering (in Preview) is the first sign of System overload. Even if the Hardware is ok, it might not be utilized to the max.
Solution 1 (GPU):
Make sure you installed the latest driver updates for GPU. If you use a NVIDIA, you can let PLAYDECK search for a newer Driver automatically.

Altho you can run PLAYDECK without dedicated GPU (eg Onboard Intel HD 630), it is strongly recommended to install a NVIDIA GPU with a Score of minimum 8000 (as orientation), e.g. RTX 3080: https://www.videocardbenchmark.net/directCompute.html
Solution 2 (CPU):
The CPU is not taxed alot by PLAYDECK, if a dedicated GPU is used. There are some exceptions tho. Some Clip Codecs can’t be decoded via the GPU on Windows Systems: ProRes, DNxHD, HAP, MXF. In this case, you need to invest in a stronger CPU to get the same results.
Watch your CPU cores carefully in the task manager, while playing the stuttering clip. Maybe one CPU core is clipped at 100%, while other cores are barely being used. This phenomenon is called “CPU parking”. Check, if the CPU usage goes UP, if you DONT play any clips. This indicates, that the CPU cores are been parked, because there is less activity. Here is some information on how to proceed:
https://superuser.com/questions/1879051/how-to-disable-cpu-parking-in-windows-11
Watch out for specific processes in the task manager, which have sudden CPU spikes and disable those processes. One known process is “Antimalware Service Executable”, which is the Windows Defender:
https://blog.emsisoft.com/en/28620/antimalware-service-executable/
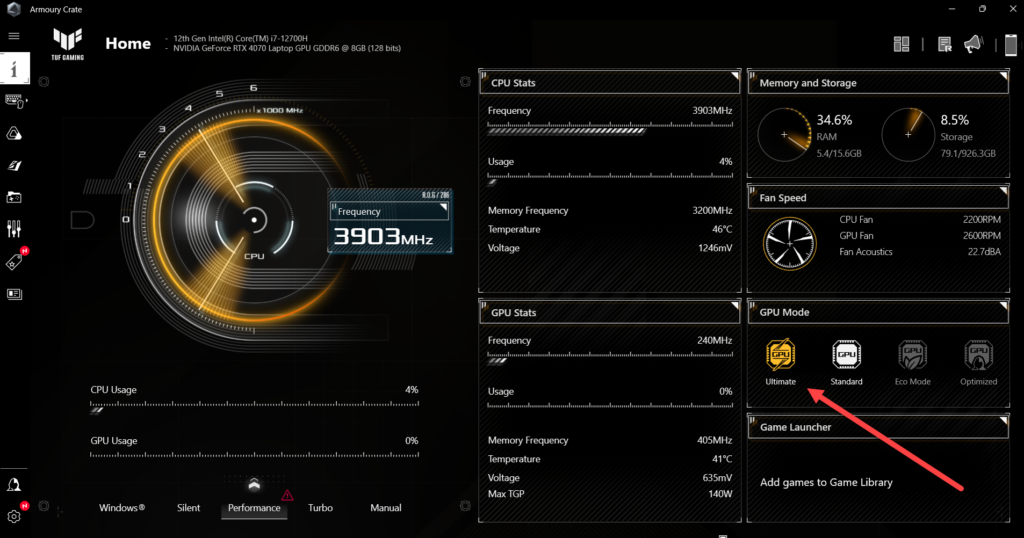
Solution 3 (Notebook or HP Office PCs):
In case you a running a Notebook (or HP Office PCs) you have to consider that they are pre-designed for power saving. Look for any and all options to maximize performance. Some Notebooks provide their own software to adjust performance settings. Here is an example of ASUS Notebook and their software “Armoury Crate”, where you need to set the GPU to “Ultimate” for it to work 100%:
Should you not have decided on a Notebook yet, we recommend grabbing a Gamer Notebook with NVIDIA Card and extend with Blackmagic Ultra Studio card via the thunderbolt interface. These Notebooks are pre-designed for maximum performance. Avoid buying Office-type Notebooks like Dell or HP, which are pre-designed for power saving and can seriously limit your playout performance.
Solution 4 (Output Card):
Altho you might use Desktop Output for HDMI Output, there is also the Option to invest into a dedicated Output Card, which outputs to HDMI or SDI (with SDI-to-HDMI Converter). This will offload alot CPU/GPU ressources to that Card and results in better output quality, stable frame rate, lower CPU/GPU usage, better video/audio SYNC, more “true” colors and less overall delay. This might be the tipping point, if you go from HD to 4K productions or from single channel playout to multi channel playout. It also allows you to keep otherwise outdated hardware in terms of CPU/GPU.
There also have been reports, where moving the Output Card to another PCIe Slot helped.
Solution 5 (Monitor):
Connect your Monitor to the same GPU that is set as GPU in PLAYDECK. Because if you connect your Monitor to a different GPU, an additional framerate conversion is introduced (for the channel preview), which can lead to stuttering.
Solution 6 (Harddisk / Network):
Please make sure, that the data rate of your clips can be transferred flawlessly through your system. If your clips run over the network, test them on your local harddisk. Edit your Windows Power Options and disable any HDD sleep mechanics. Place all used media on the same storage source, ideally a local SSD.
Solution 7 (PSU Power Unit / Other):
Sometimes you might not even realize, that even the power unit of a system can bottleneck the playout. This is especially true, if you use a powerfull graphics card and another playout card (e.g. Decklink), but only provide, lets say 600W power, which most certainly isnt enough and would cause the graphics card to cause stuttering (especially on the start of the clip, when power is drawn).
If using several video cards, a good airflow is also very important to prevent overheating of components, which most likely result in stuttering later on.
Cause:
If you have a Output Card activated as Output Device in PLAYDECK, chances are, that the Card itself causes the lag. These lags may appear instantly or after some time.
Solution 1 (Test without Device Output):
Test without activated Device Output to check, if the above Cause is the case.
Solution 2 (Update Card Drivers):
Make sure you installed the latest driver and firmware for that card. Here is an example for Blackmagic Decklink:
https://www.blackmagicdesign.com/support/family/capture-and-playback
Solution 3 (Disable Power Management):
If the audio stutter happens only after some hours of continuous device output, it might be Windows putting your Device in a Power Safe State. Disable Power Management for your Device:
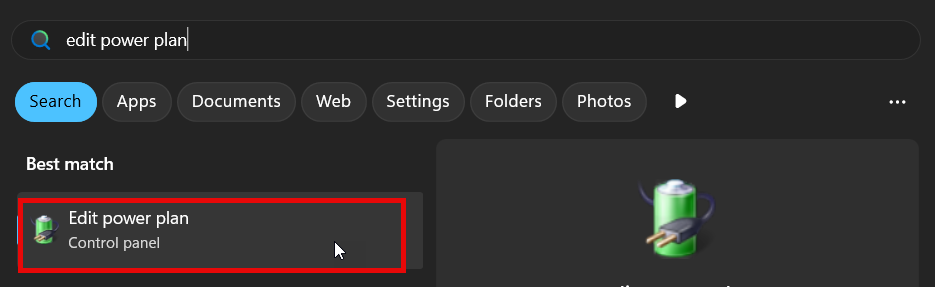
Open Windows Start Menu and search for “edit power plan” and open it:
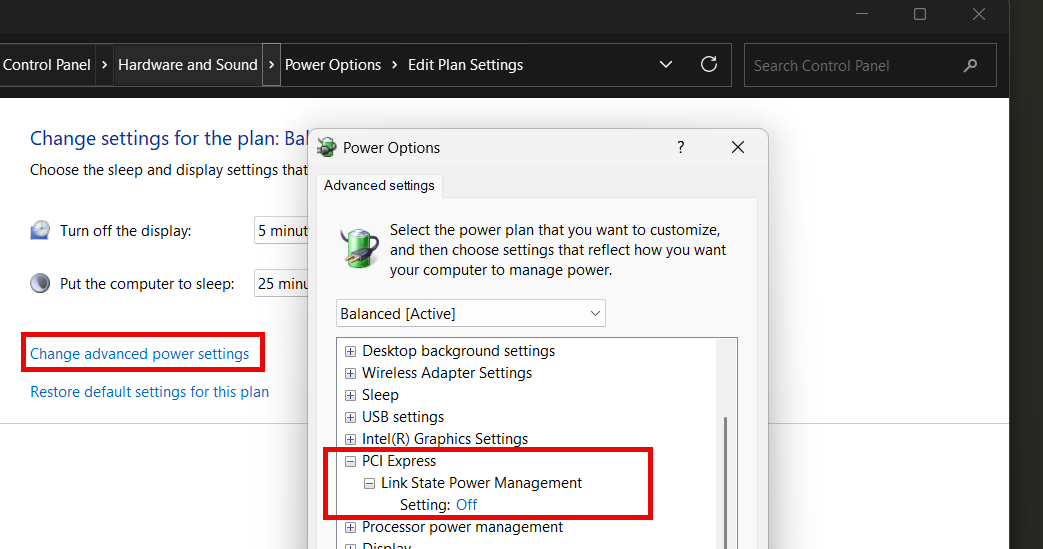
Then select “Change advanced power settings” and set “Link State Power Management” to OFF in “PCI Express”:
Solution 4 (Check PCIe Slot Bandwidth):
A more rare but possible scenario is using a PCIe Slot, which has been set to SHARED in the Bios. This will lead to a reduced maxium Bandwidth.
Solution 5 (Vendor Recommendations):
Here are 2 recommendations from Blackmagic (Vendor of the Decklink Cards):
1. Swap the Card to another PCIe slot
2. In BIOS, for that PCIe Slot, select “Gen.2” as PCIe mode (It normally defaults to either AUTO or Gen.3/4)
Cause:
Some Clips, especially their Codec, can take a huge toll on your System. Altho PLAYDECK is known for being able to play any Clip format and codec, it may be nessecary or advisable to transcode Clips. It is important to know, that not all Codecs can be decoded via the GPU on Windows Systems: ProRes, DNxHD, HAP, MXF need to be decoded via the CPU. Also you might not have a NVIDIA Card installed to decode certain Codecs (NVENC).
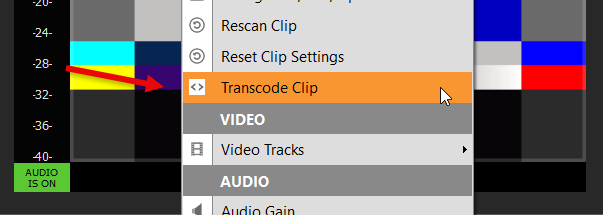
Solution 1 (Use PLAYDECK Transcoder):
PLAYDECK has a build-in transcoder, which will transcode one or more Clips into a MPEG-4 or AV1 Video Codec, which can be decoded via the GPU. Right-click the Clip(s) and select “Transcode Clip”. The Clip will be automatically swapped in the Playlist.
Solution 2 (Alpha Channel Clips):
You might be tempted to use Apple ProRes for Alpha Channel Support. But please keep in mind, that the ProRes Codec is not fully supported on Windows Systems by Apple, thus being decoded via CPU, and can easily lead to stuttering, especially in the HQ variant.
A good Windows alternative for Alpha Channel Support is the HAP Codec. This still needs to be decoded on the CPU, but performs alot better than ProRes.
Solution 3 (Apple Quicktime / Final Cut Pro):
Avoid Clips, that have been encoding with “Apple Quicktime” or “Final Cut Pro” (MAC). Those tend to cause problems in PLAYDECK.
Solution 4 (Same Resolution / FPS):
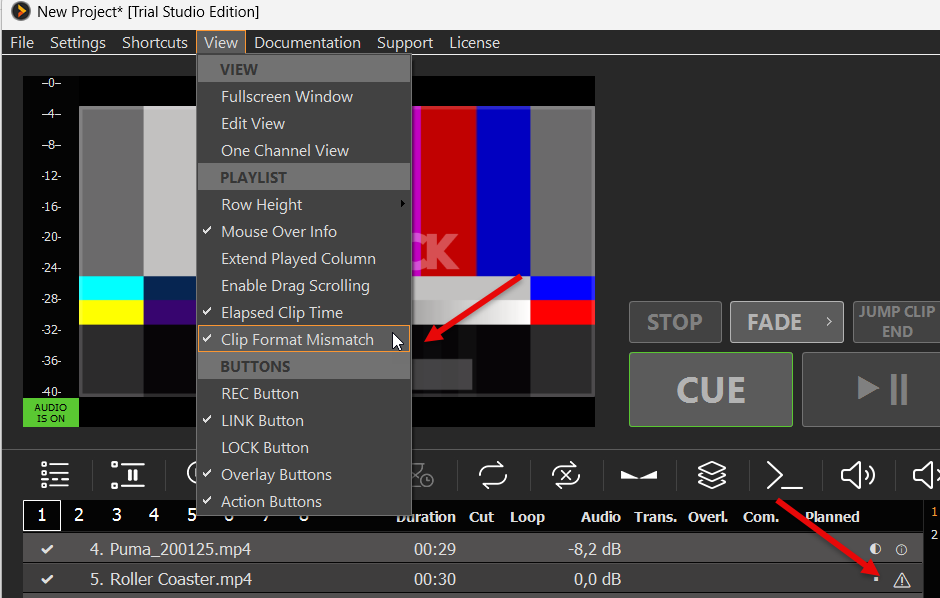
If you are on a very tight leash in regards to your performance, because your system is older or you running Multi Channel 4K HDR plus Streams plus Recording, there is one more thing you can do to reduce overall system load: You pre-render (or transcode) all your Clips to the same Resolution and FPS as you set your PLAYDECK Playlist (and Device Output) to. This will avoid another transcoding process on the GPU and will be a noticable improvement. You can enable “Clip Format Mismatch” in PLAYDECK, which will mark all Clips with a Warning Symbol that indicates, that either Frame Rate or Resolution does not match the Channel Settings.
Cause:
Windows Setting can be responsible for alot of problems. This is especially true for “Office PCs or Notebooks” from DELL, HP and Lenovo, as they are pre-configured for maximum power saving instead of maximum performance.
Solution 1 (PLAYDECK):
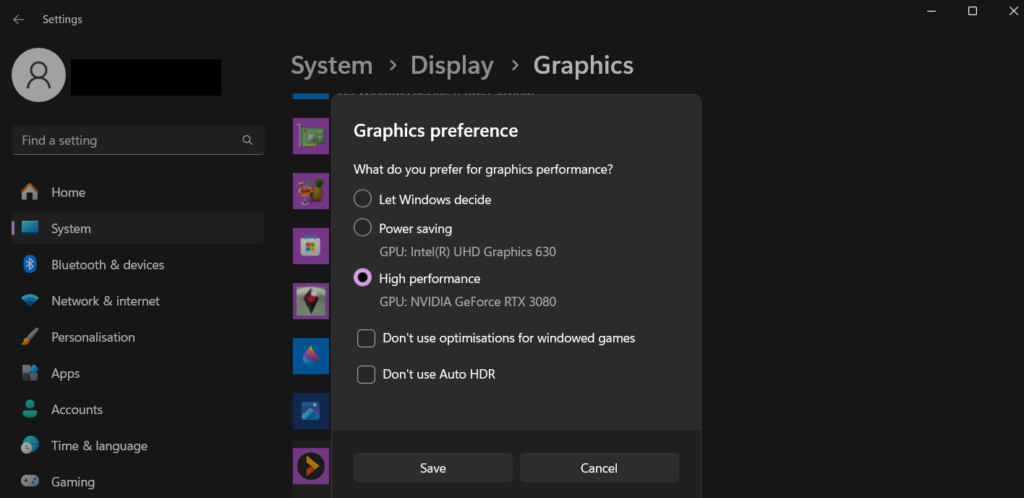
Chances are, you might not have heard of it, but there is a Window Setting to grant any App high priority performance over other Apps. Open Windows Settings, goto System, then Display. Scroll down and click on “Display”. Search for PLAYDECK. If it is not there, add it via “Add an app” ontop. Then click on “Playdeck”, then Options and select “High performance”. Do the same for “PlaydeckEngine”. Both locations are:
c:\Program Files (x86)\JoyEventMedia\Playdeck\Playdeck.exe
c:\Program Files (x86)\JoyEventMedia\Playdeck\engine\PlaydeckEngine.exe
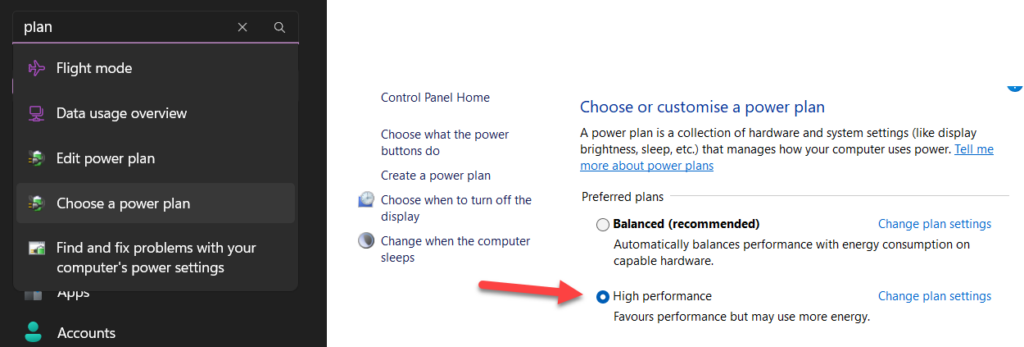
Solution 2 (Power Plan):
Change your Power Plan in Windows to “High performance”. Go to Windows Settings, and type in “plan” in the Search Box, click “Chose a power plan”, then click “High performance”.
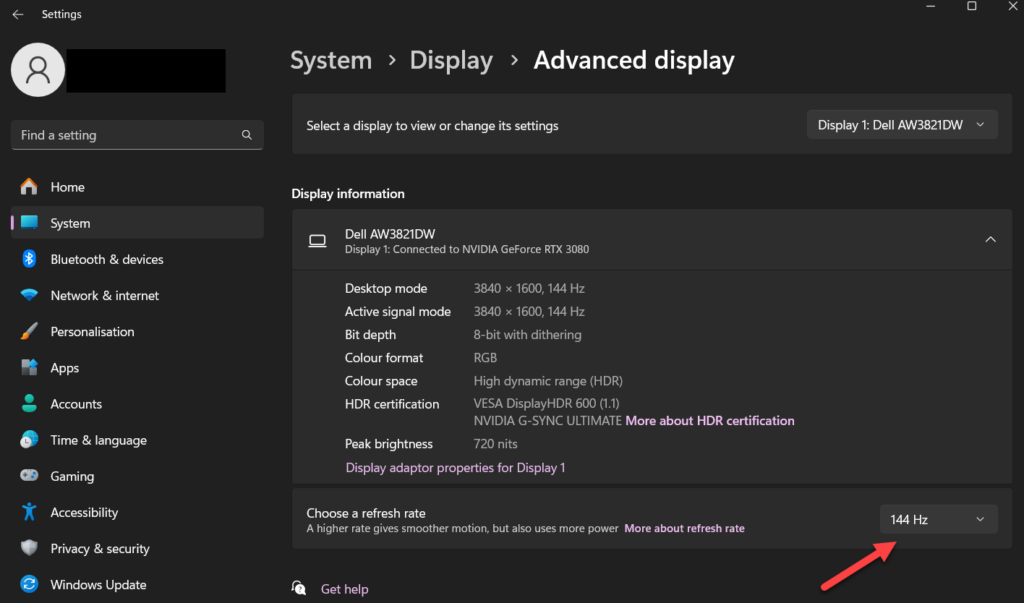
Solution 3 (Monitor Refresh Rate):
If you use HDMI Output via the Extended Desktop, please set the Refresh Rate of that Monitor to 59,99 Hz, or any other lower value close to your Playlist Video Format Refresh Rate. If your Monitor is running at 144 Hz, a transcoding process will try to reach the 144 FPS, which can lead to stuttering. Go to Windows Settings, then System, then Display, pick the Display in question, then select “Advanced display”.
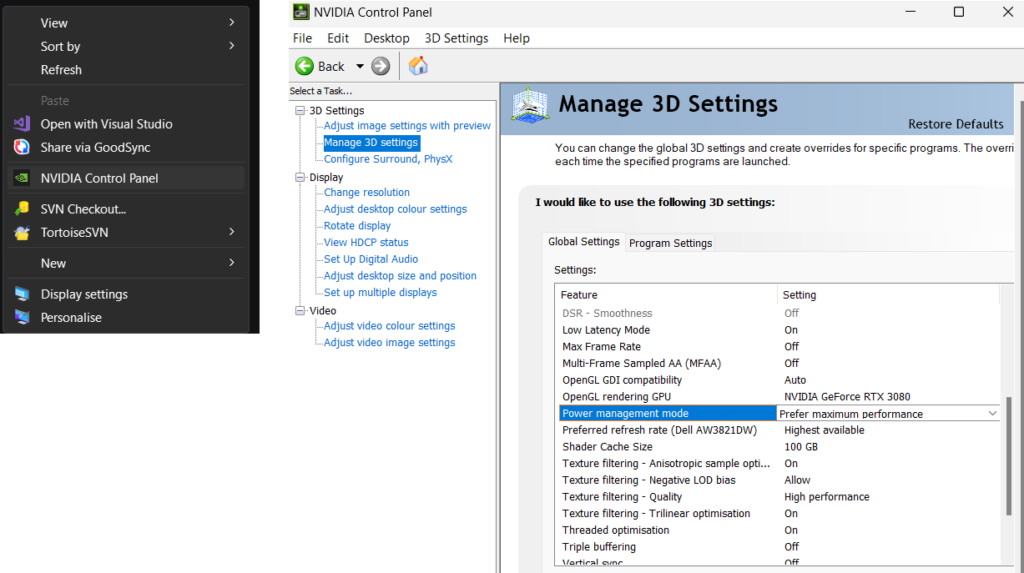
Solution 4 (NVIDIA Performance):
If you run a NVIDIA GPU, open the NVidia Settings by right-clicking on the Desktop and selecting “NVIDIA Control Panel”. In the “Manage 3D settings” under the “Global Settings” Tab, scroll down to “Power management mode” and set it to “Prefer maximum performance”.
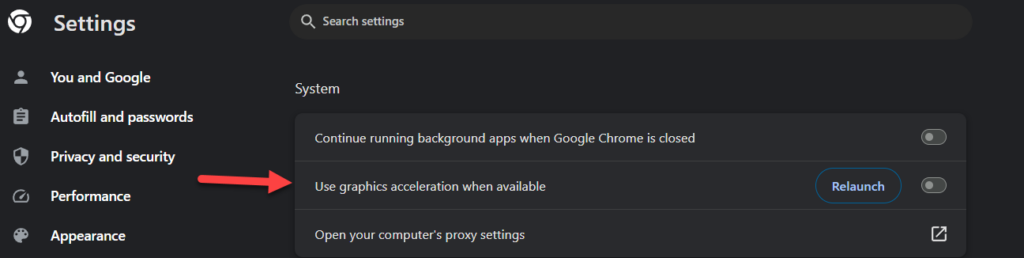
Solution 5 (Chrome and other Apps):
Some Apps have the “Power” to soak up so much ressources, that even PLAYDECK starts to stutter or produces audio hicks. One of those Apps is Chrome Browser, especially if you have video running in the browser. It’s best to keep other Apps closed while using PLAYDECK. If you urgently need the Browser to check your Streams, please deactivate GPU support in the Browser on your PLAYDECK System. Here is an example for Chrome: Go to Menu, click “Settings” and select “System”. There you can disable “Use graphics acceleration when available”.
Other known Apps to cause PLAYDECK problems (while open) are: Any Video Software, Discord, NDI Access Manager, Blackmagic Desktop Video, ATEM Control Software.
Solution 6 (Windows Services):
Apps, that can interfere with PLAYECK, can also run in the Background as Services. Open your Task Manager, go to the Processes Tab, and check for any Background Processes with noticable CPU usage. Switch to the Services Tab and find the Service responsible and deactivate it. For this click on “Open Service” in the upper right corner, double-click the service in question and select “disabled” as startup type. Once you are done, restart your PC.
Solution 7 (Windows Startup):
Similar to Services, there are Apps started in the Background during Windows Startup. You can find those in your Task Manager under the Tab “Startup apps”. To deactivate a startup app, right-click it and select “Disable”. Once you are done, restart your PC.
Known Startup Apps, that cause Problems with PLAYDECK: NVIDIA FrameView SDK
Example:
Cause:
The GPU, that you have selected as Decoder GPU in PLAYDECK, has problems decoding the current Clip Codec. This is mostly true for Intel GPUs.
Solution:
Set the GPU to CPU. This will shift some GPU usage to the CPU, but should work nontheless and circumvent the problem. We recommend installing a dedicated NVIDIA GPU.
Example:

Cause:
The Project has been loaded in OFFLINE Mode. Therefore Clip Scanning has been disabled. Clip Scanning is enabled by Default.
Solution:
Reload the Project and do NOT select OFFLINE, but just click OK.

Cause:
Some older SD Clips are decoded wrong on modern GPUs, resulting in a wrong aspect ratio.
Solution:
Switch your GPU to CPU to force decoding via CPU, which will result in correct display of older SD Clips. Since those Clips most likely wouldn’t benefit from GPU Decoding anyway, this will not result in bad performance.

Cause:
The official YouTube platform made changes to its system, which reflect on PLAYDECK being unable to correctly access the YouTube videos.
Solution:
Update the integrated YouTube Driver in PLAYDECK.

Overlay or Playlist Problems
Solution:
Please see this article on how to use Subtitles and Closed Captions with PLAYDECK:
https://playdeck.tv/manual/menu-settings/settings-all-settings/playlist-output/closed-captions/closed-captions/
Example:
Cause:
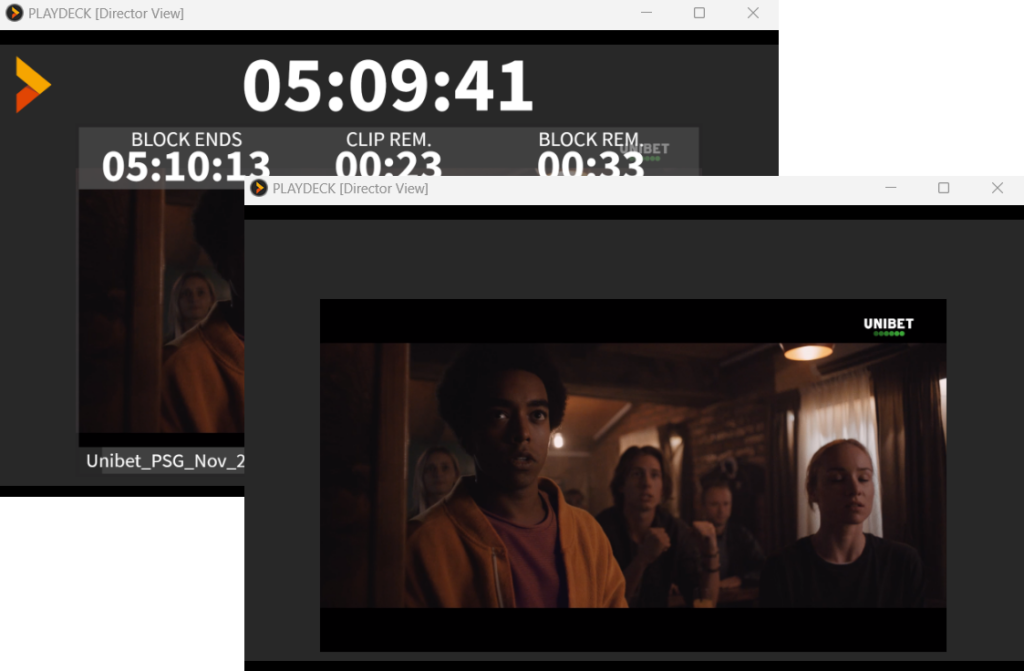
Some GPU, eg older Intel Onboard GPU, are unable to render HTML Overlays. In this case, please switch to CPU for either Director View or your Channel (for HTML Overlays).
Solution:
Set the GPU to CPU. This will shift some GPU usage to the CPU, but should work nontheless and circumvent the problem. Director View is using the GPU for Video Assets.
Solution:
Please see this article on how to use SCTE Marker with PLAYDECK:
https://playdeck.tv/howto/inserting-scte-35-marker/
Connected Hardware and 3rd Party Apps
Cause:
If your device is not listed within PLAYDECK as Input or Output hardware, it either misses the driver installation or is not supported by PLAYDECK.
Solution:
Please review the list of supported hardware:
https://playdeck.tv/howto/supported-input-output-cards/
If your card is listed, please make sure you installed the latest driver and firmware for that card. Here is an example for Blackmagic Decklink:
https://www.blackmagicdesign.com/support/family/capture-and-playback
If your card is not listed and you are looking to purchase a new card for PLAYDECK, we recommend going with Blackmagic Decklink Products. The most used Cards are “Decklink Duo 2” and alternatively the “Decklink 8K Pro”, which is a bit more future-proof.
Cause:
Most likely cause is network routing. The NDI protocol will connect per default to the target machine name and the NDI name. Once activated, NDI will continue to search for a signal and will also (re-)connect at a later time. Certain router configurations and/or port forwarding rules can mess with the native functionality of the NDI protocol.
Solution:
We recommend installing the NDI access manager on the PLAYDECK machine. This also allows you to define a discovery server on another IP address in the network.
https://ndi.video/tools/access-manager/
For monitoring NDI signals we recomment the NDI Studio Monitor:
https://ndi.video/tools/studio-monitor/
Cause:
If your monitor is not listed within PLAYDECK as Desktop Output, it is not setup as Extended Desktop and has not connected an active monitor.
Solution:
Connect a monitor via HDMI to the port of the GPU. PLAYDECK needs this monitor to be active, otherwise it will cancel the Desktop Output. In your Windows Display Settings, setup the secondary monitor as “Extended Desktop”.
Example:
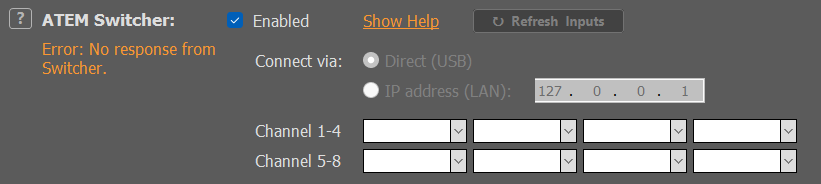
Solution 1 (Software):
Install or update the latest ATEM Control Software from the vendor website. It is called “ATEM Switchers 9.x Update”. You need at least version 9.x. It only has to be installed – you don’t need to start it every time you use PLAYDECK. You also don’t need to update the ATEM switcher firmware.
https://www.blackmagicdesign.com/support/family/atem-live-production-switchers
Solution 2 (Network):
Make sure PLAYDECK and the ATEM are in the same subnet network, meaning they share the same 3 parts of the IP adress like this: 192.168.1.X. Try to ping your ATEM via the Console with “ping ipadress”. Disable any Firewalls, that might prevent PLAYDECK to build a connection. It is advised to use a router in the network.
Solution 3 (Direct USB):
Connect your ATEM via USB to the PC that runs PLAYDECK. If the ATEM Control Software can find the ATEM Switcher, so can PLAYDECK.
Solution 4 (Companion):
You can install and use Bitfocus Companion. It has both ATEM and PLAYDECK PlugIns:
https://bitfocus.io/companion
Solution:
Please see this article on how to use COM/GPI with PLAYDECK:
https://playdeck.tv/howto/use-usb-gpi-interface-to-activate-playback/
Solution:
Please see this article on how to use DANTE with PLAYDECK:
https://playdeck.tv/howto/dante/
Example:
After disconnecting the Remote Connection to the PLAYDECK System, PLAYDECK stopps Playout, or NDI, or Streams. Upon Re-Connection, PLAYDECK seems to hang or doesnt respond.
Cause:
You are using a Remote Connection Tool, that installs its own virtual Display Driver. Such a Tool is “Windows Remote Desktop”, which installs the “Windows Remote Display Driver”. Upon disconnection, PLAYDECK crashes, because it doesnt know where to send its Preview Output to. Please also note, that Microsoft ended support for “Remote Desktop” in 5/2025.
Solution 1 (Better Remote Connection Tool):
We only use RustDesk to connect to our PLAYDECK Systems. It might not have the perfect image quality, but it has a much better response time (mouse/keyboard) and most important: It DOES NOT install any Virtual Display Driver, therefore not interrupting PLAYDECK upon disconnect.
Solution 2 (Install your own Virtual Display Driver):
If you install your own Virtual Display Driver, PLAYDECK has a Monitor to “fall back” to, once you disconnect your Remote Connection Tool. We tested this Virtual Display Driver with success. Install the Driver while connected with the same Remote Connection Tool and Windows Account, that you use for PLAYDECK.
Solution 3 (Connect Monitor):
If possible, you could also connect a physical Monitor to the PLAYDECK System, before connecting with your Remote Connection Tool. But this works less successful than Solution 2, because you would need to be logged into the PLAYDECK Windows Account and in some cases the Monitor needs to be active and/or mouse/keyboard needs to be connected. Solution 1 is therefore by far the safest way.
Cause:
Since MIRACAST is based solely on Wifi, it is very unreliably, as it will interrupt the connection, if the Wifi Signal is weak for just a moment. MIRACAST is unable to reconnect itself properly.
Solution 1 (Strong Wifi):
Please make sure that both your PC and your Receiver have a strong and steady Wifi Signal. Use your external Wifi Antenna. Many Motherboards will have an antenna in the package. Else use another USB Wifi product. If possible, upgrade your Wifi Standard to 6e or even 7.
Solution 2 (HDMI Transmission):
Please consider a HDMI Wireless Transmission System. It will use closed frequencies, thus making it much more reliable than open Wifi frequencies. Furthermore the quality will be much higher. It is also much easier to set up the Receiver as Extended Desktop Display in Windows.