PLAYDECK can be controlled remotely via a number of different methods, but can also send out control commands itself.
To control PLAYDECK from outside, the following methods are available:
- TCP Commands
- Auto-play via NDI Tally Light
- Auto-play via GPI / COM-Port
- Auto-play via Blackmagic Design ATEM Series Live Production Switcher
- Auto-play via vMix Live Video Streaming Software
- Auto-play via TSL UMD Protocol (v. 3.1 or 5.0)

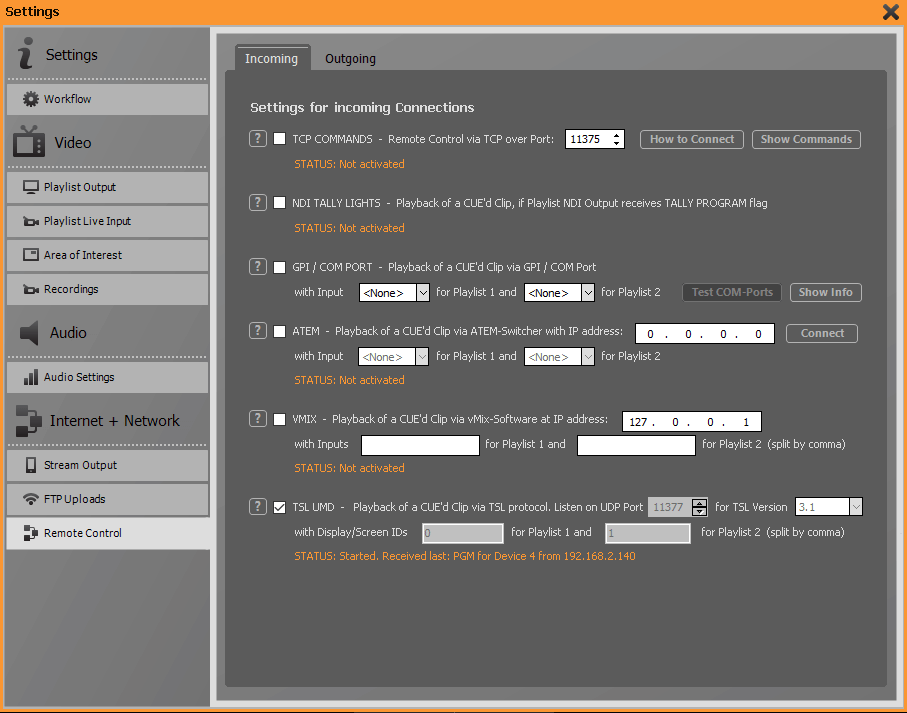
You can remote control both playlists from PLAYDECK via TCP/IP commands from a remote control computer. You can use any tool you like for this, as no special format is required (no special encoding, no line ending command necessary). You can send several commands simultaneously.
Bitfocus Companion and Universe Show Control have already integrated extensive libraries for controlling PLAYDECK, which makes control particularly convenient.
The following control commands are available:
<cue|PLAYLIST|BLOCK|CLIP>
<cueandplay|PLAYLIST|BLOCK|CLIP>
<cuenext|PLAYLIST>
<cueandplaynext|PLAYLIST>
<cuenextblock|PLAYLIST>
<cueandplaynextblock|PLAYLIST>
<cueflex|PLAYLIST|PATTERN>
<cueandplayflex|PLAYLIST|PATTERN>
<cueandplaysync|PL1 BLOCK|PL2 BLOCK>
<cueandplaysyncflex|PL1 PATTERN|PL2 PATTERN>
<play|PLAYLIST>
<stop|PLAYLIST>
<pause|PLAYLIST>
<jumpstart|PLAYLIST>
<jumpend|PLAYLIST>
<previousclip|PLAYLIST>
<fadein|PLAYLIST>
<fadeout|PLAYLIST>
<restartclip|PLAYLIST>
<playoverlay|PLAYLIST|OVERLAY>
<stopoverlay|PLAYLIST|OVERLAY>
<toggleoverlay|PLAYLIST|OVERLAY>
<stopalloverlays|PLAYLIST>
<playaction|PLAYLIST|ACTION>
<playactionsync|PL1 ACTION|PL2 ACTION>
<loadplaylist|AUTOPLAY|FILENAME>
<selectclip|PLAYLIST|BLOCK|CLIP>
<insertclip|PLAYLIST|FILENAME>
<changeclip|PLAYLIST|FILENAME>
<appendclip|PLAYLIST|FILENAME>
<activate|PLAYLIST|BLOCK|CLIP>
<deactivate|PLAYLIST|BLOCK|CLIP>
<muteaudio|PLAYLIST>
<unmuteaudio|PLAYLIST>
<toggleaudio|PLAYLIST>
<hidenotes>
<restartscripts>
<startstream|TARGET>
<stopstream|TARGET>
<startrec>
<stoprec>
A detailed explanation of the individual commands, together with examples, can be obtained by clicking on the button Show Commands.

When PLAYDECK’s NDI output is activated, PLAYDECK receives tally signals from the connected NDI receiver via a return channel. As soon as PLAYDECK is switched live on air there, PLAYDECK starts playing the clip that is currently in the CUE state.

You can connect both playlists to almost any video mixer and have playback start automatically as soon as the corresponding channel of the mixer goes on air. For this purpose, the tally signal of the mixer is registered at the chosen COM port. As soon as a clip is in CUE state, PLAYDECK performs a simple loopback test on the corresponding COM port: If a galvanic connection between pin 3 (Transmit Data) and pin 2 (Receive Data) is registered for at least 50 ms, playback starts immediately.
If you need a corresponding tally-to-USB interface, please contact our support team.

Playback can be automated particularly conveniently if you have connected PLAYDECK to a Blackmagic ATEM Series live production switcher. As soon as a clip is in CUE state, PLAYDECK listens to the connected ATEM mixer. If the corresponding channel is switched live, playback starts immediately.
In order for PLAYDECK to communicate with your Blackmagic ATEM device, you need to install the ATEM Control software on your PLAYDECK computer. It is NOT necessary to start the software. PLAYDECK only requires access to the appropriate drivers and libraries.
Enter the IP address of the mixer (it must be in the same address space as your PLAYDECK system) and click Connect. Then you can select from the two drop-down fields which input channel of your ATEM device PLAYDECK should listen to.
Finally, please activate the checkbox on the left.

PLAYDECK can also be remotely controlled very conveniently when you connect it to vMix. The operating philosophy of vMix is that you can assign a source to several inputs. Enter the IP address of the vMix PC and fill in all vMix inputs for the two playlists to which PLAYDECK is to react with an auto start (separated by comma).

Finally, remote start via TSL UDP Tally protocol is available. PLAYDECK supports versions 3.1 and 5.0.
You can freely select the number of the port to be used for communication.
Enter the TSL ID to which Playlists 1 and 2 are to respond in the corresponding fields (some manufacturers call this ID “Screen ID”, “Channel ID” or “Device ID”). If PLAYDECK is to respond to more than one TSL ID, please separate the IDs with commas.
PLAYDECK expects the signal for Preview on Tally 1 and the signal for Program on Tally 2.
