This article will show how to activate your License and remove the Watermark from the TRIAL Edition.
If you already have activated your License and want to know how to MOVE the License to another System, please see this article.
There is no separate “Full Version” Download, you simply transform your TRIAL Edition into a LITE, PLUS or STUDIO Edition. Always download and install the latest Version of PLAYDECK, since we publish regular updates: https://playdeck.tv/download/
All your Shop Licenses, that you purchased via playdeck.tv, will be stored in your personal Online License Pool. This helps you organize multiple Licenses.
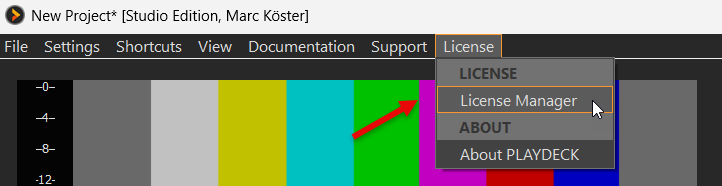
To transfer your license from the Online License Pool to your System, go into your License Manager:
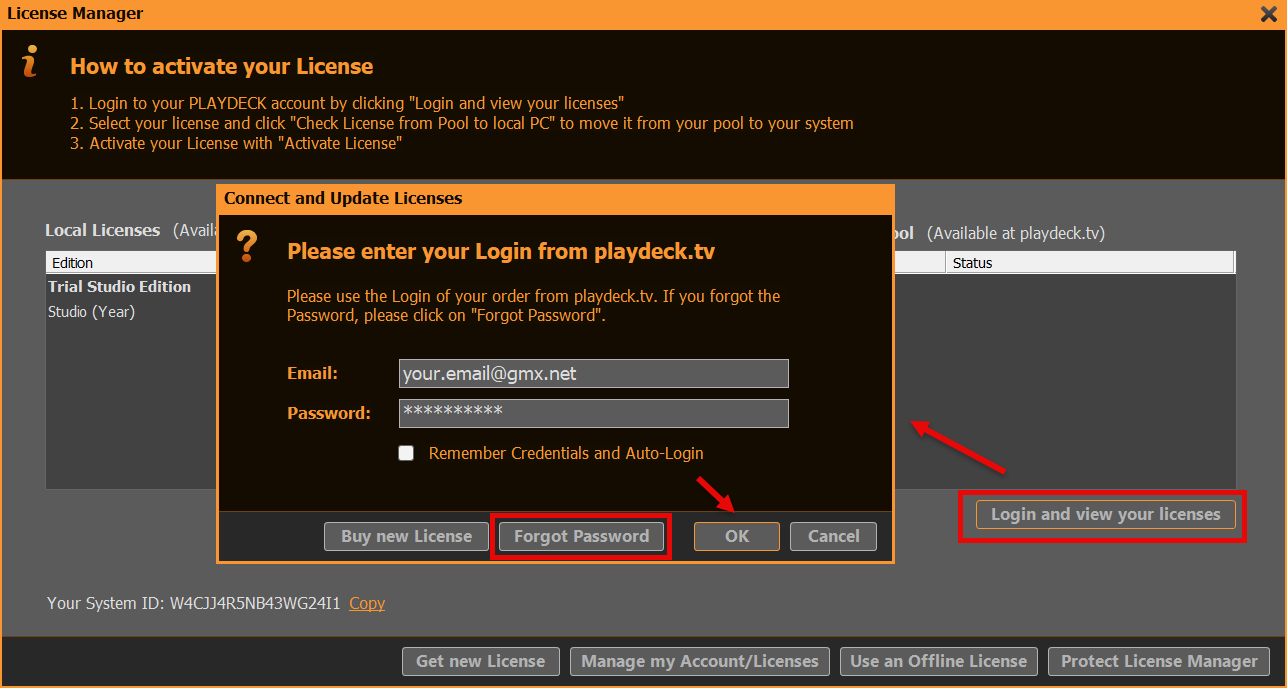
Now login to your PLAYDECK ACCOUNT. Use the email address and password, which you used during CHECKOUT in the SHOP. Use the FORGOT PASSWORD button, if you need to reset your password:
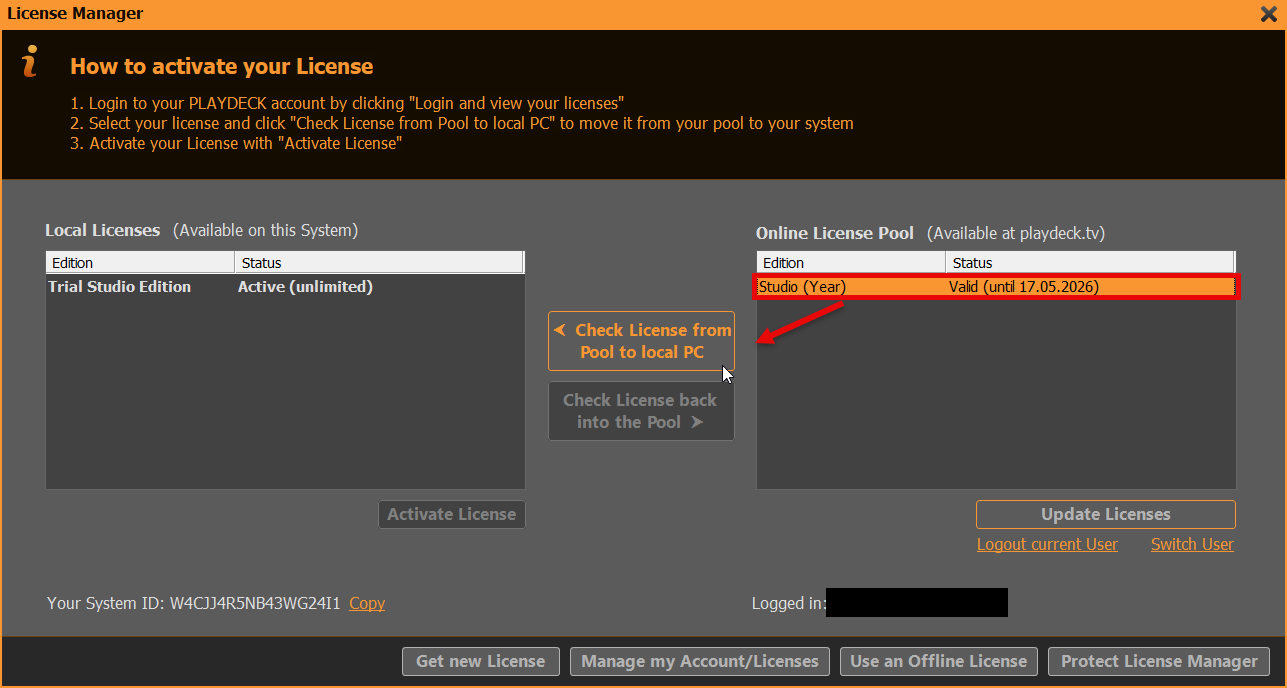
We can now move the License from you RIGHT Side to the LEFT Side with a Button Click (CHECK LICENSE FROM POOL TO LOCAL PC). This means, that the License becomes UNAVAILABLE to other Systems and becomes AVAILABLE on THIS System. PLAYDECK will now offer to activate the License and restart:
Dongle License
Simply attach the USB Dongle to the PC, then start PLAYDECK on that PC. Please note, that if you detach the Dongle while PLAYDECK is still running, PLAYDECK will close immediately and without prior notice. It is recommended to close PLAYDECK regularly to ensure, that all Data is saved properly.
Offline License
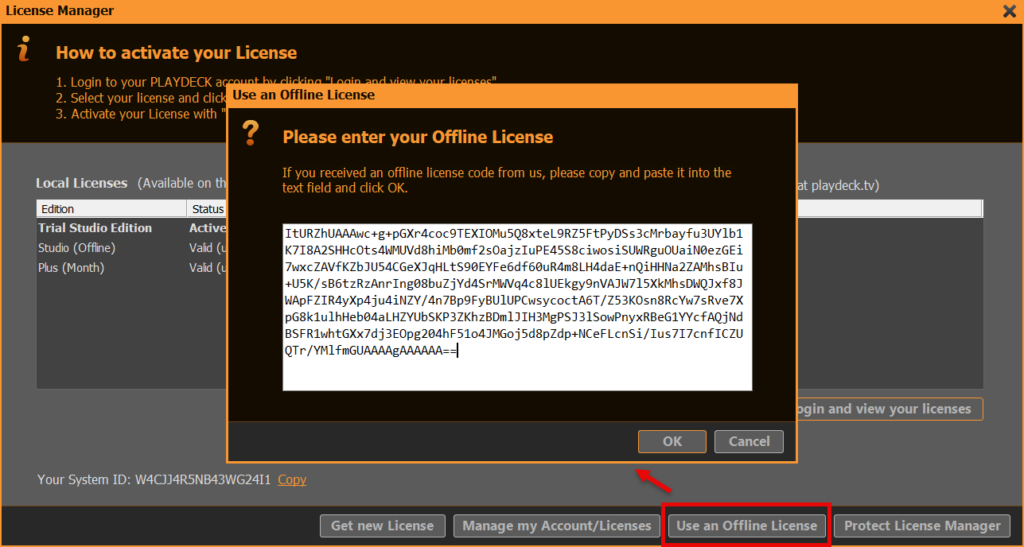
The Offline License is bound to the PLAYDECK System ID and can NOT be moved to another System by the Customer. To activate your Offline License, open the License Manager:
Then click on USE AN OFFLINE LICENSE and copy and paste the Offline License Code into the text field and click OK. PLAYDECK will now offer to activate the License and restart:
Backup License
We have a separate article on how to use the Backup License.
IMPORTANT: Please always send a message to [email protected], informing us about: – Log Files have been uploaded – Your PLAYDECK System ID – Date/Time of last occurrence of issue/problem
Thanks!
Send via Internet
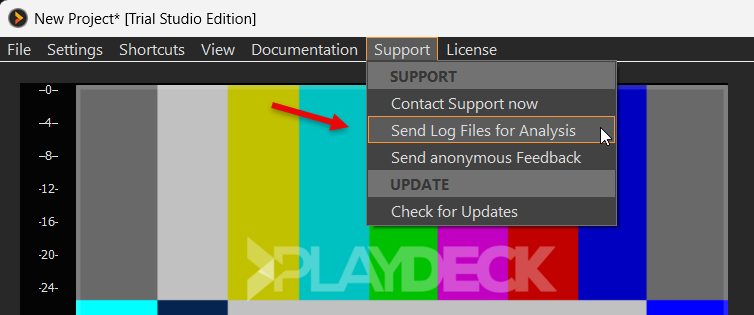
If you have an active Internet Connection on your PLAYDECK System, open the Main Menu and select SUPPORT and then SEND LOG FILES:
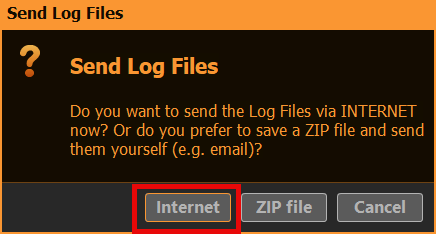
Then select the INTERNET Option:
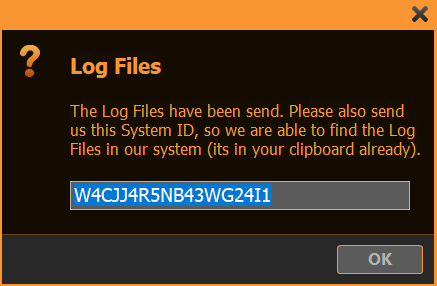
After the upload is complete, please send us a message to [email protected] along with your System ID. If you seen the following Popup, the System ID is in your Clipboard already and you can simply paste it with CTRL+V into your email message:
Send offline via ZIP File
If you DONT have an active Internet Connection on your PLAYDECK System, open the Main Menu and select SUPPORT and then SEND LOG FILES:
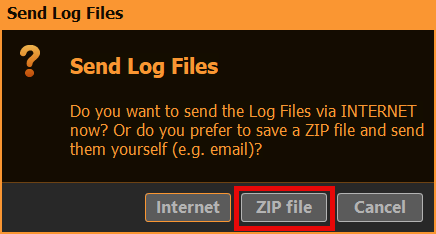
Then select the ZIP FILE Option:
After you pick a destination Folder on your System, a 7-ZIP-file will be written there:
Please send us a message to [email protected] along with your ZIP-file.
If your Email-system doesn’t allow sending Files or the ZIP-file itself is too large (> 5 MB), you can also use our download portal to upload the File.
Note: If you are unable to even start PLAYDECK, please ZIP this Folder manually: c:\ProgramData\JoyEventMedia\Playdeck\logs
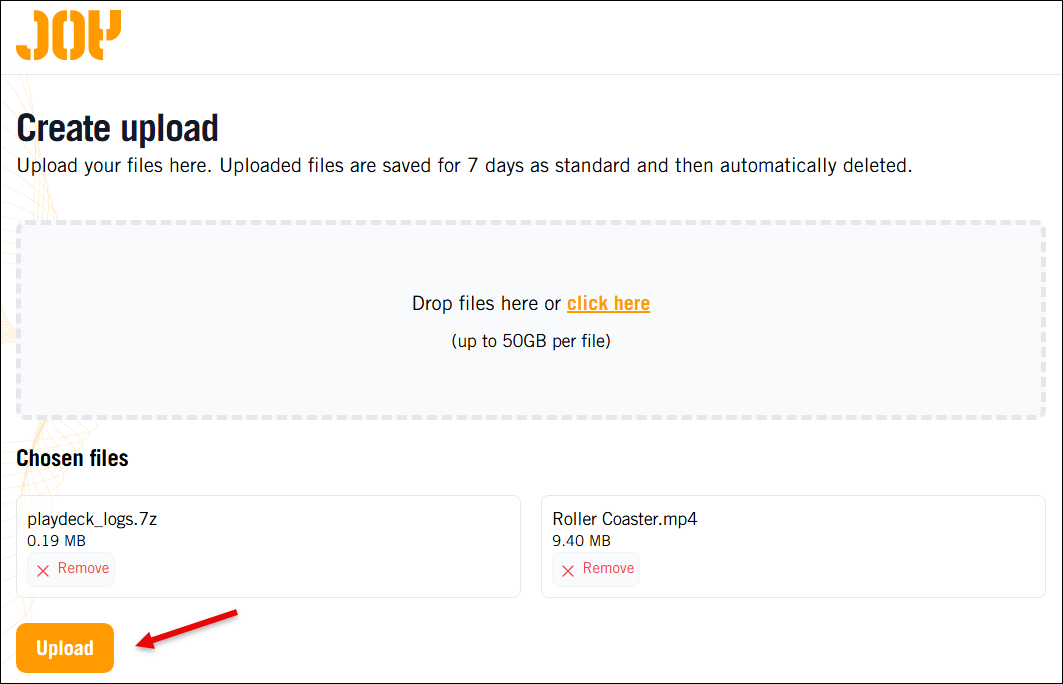
You can add your Files now via Drag-drop or file-browser. In our example we already added some PLAYDECK Log-files and a sample video. If you are done adding, please click UPLOAD.
Important: Without the Download-link we cant access your Files. This is to protect Customer data.
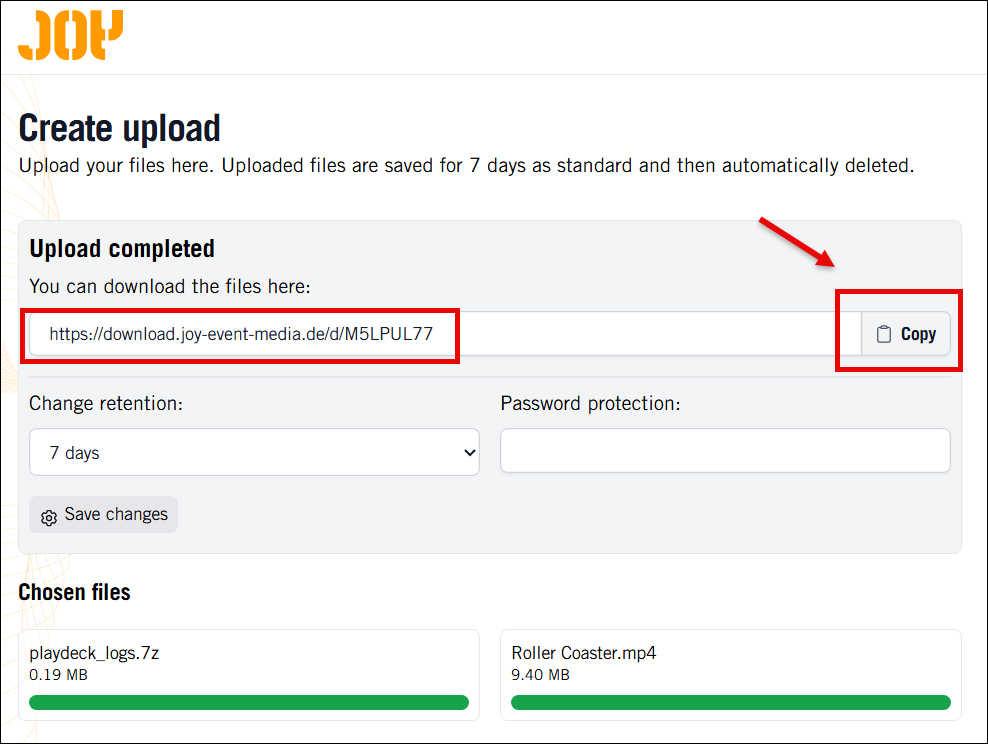
After the Upload is complete, please click COPY to put the Download-link into the Clipboard. Then write us a message to [email protected] along with that Download-link:
PLAYDECK can play almost any Codec out there. If the Codec is not supported by your GPU, it always falls back to CPU to make it work. There are very view exception: NotchLC for example cant be played with PLAYDECK.
We understand, that most of you have not much control over the Video Codec selection, as you receive your Video Files from Customer right before the show.
But if you have the Time to transcode the Video Files or even more are part of the production process, then you have more options than just H.264 MP4 Files.
We recommend going with AV1, if your NVIDIA supports it, except when you need Alpha-channel, than switch to HAP. In all other cases fall back to H.265/HEVC. ProRes has the best image quality, but is not really suited for real-time playback, as it is more of an editing and post-production codec.
There is also a Feature in PLAYDECK to quickly transcode your Video Files to a GPU-supported Codec. Please see this article.
H.265/HEVC
General-purpose codec. Use, if your NVIDIA GPU does not support AV1 and if you dont need Alpha-channel.
GPU Decoding: Yes, but depends on NVIDIA GPU, see this List
Quality: Good quality at all bitrates
Alpha-channel: No
Features: HDR, 10-bit color, 8K
AV1
Most efficient Codec. Use, if you your GPU supports it and you don’t need Alpha-channel. Near-lossless quality and significantly smaller file sizes than ProRes.
Quality: Better quality than H.265/HEVC, but less than AV1
Alpha-channel: Yes (with HAP Alpha and HAP Q)
Features:
ProRes
Offers highest image quality with ProRes 4444. Preserves fine details and colors exceptionally well, at the cost of high CPU load. Use only, if you can afford the CPU load and need highest possible visual quality. This is an editing codec and no real-time codec.
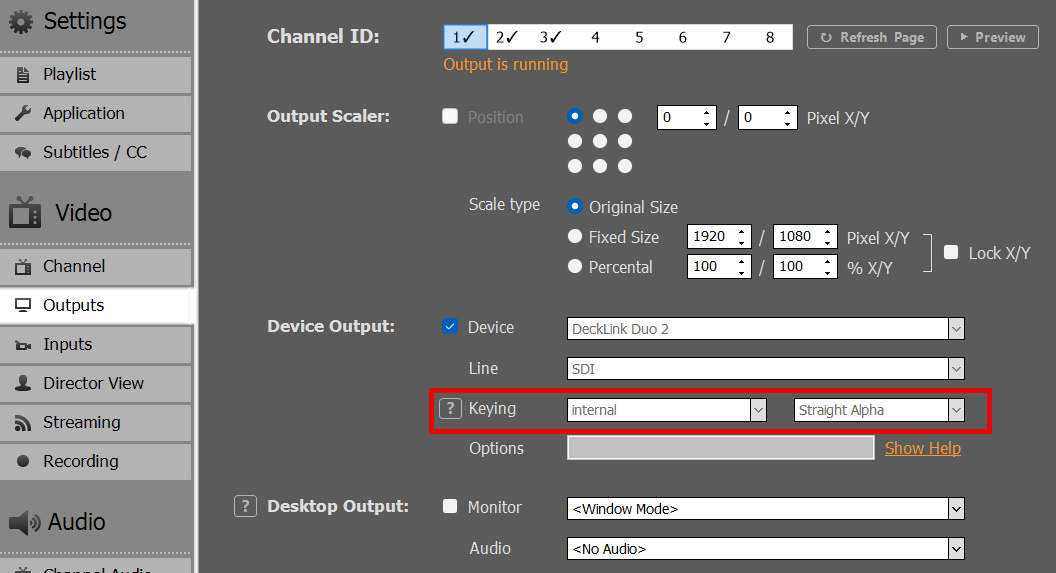
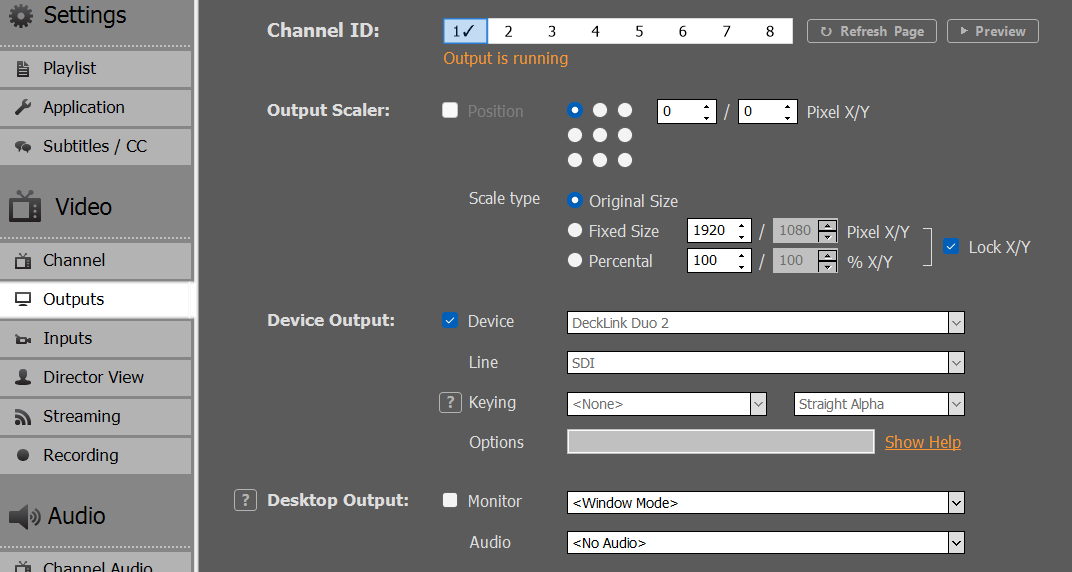
Use any Device that is capable of Internal Keying. In our example we use the Blackmagic DeckLink Duo2. Open the Desktop Video Setup and combine and first 2 SDI Outputs. Leave the other Outputs solo:
Next we enable Internal Keying in Channel 1 in PLAYDECK:
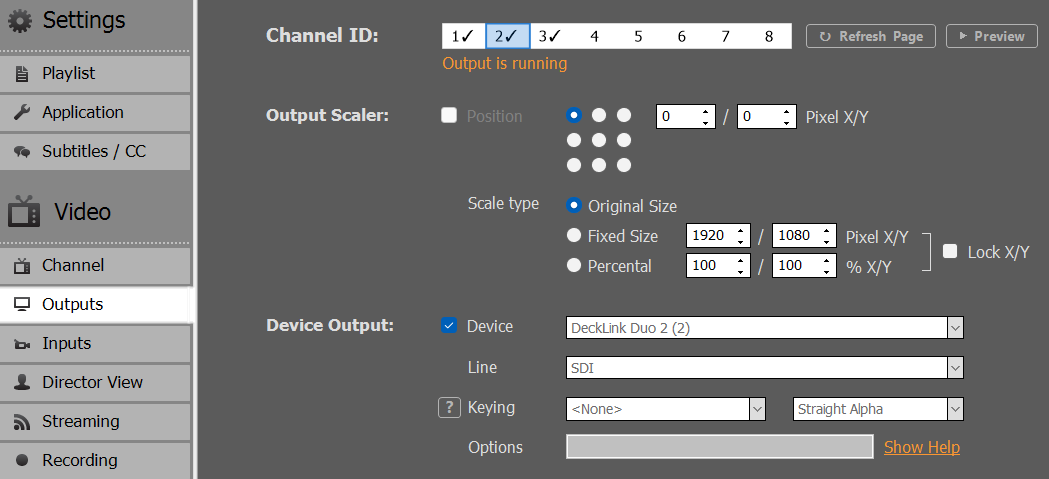
2. Setup of BG FEED
Now we need to send our BG FEED to SDI 1. For this we use Channel 2 and send it via SDI Loop from SDI 3 to SDI 1. Please note, that because we combined SDI 1+2, SDI 3 is now designated as “Decklink Duo 2 (2)”:
Then we start any video content on Channel 2:
If you have a SDI Monitor on SDI 2, you can already see the BG FEED playing there now.
We could now go ahead and play any Content with Alpha on Channel 1, which is keyed over the BG FEED, e.g. Alpha Videos (ProRes, HAP-A) or simple Overlays. But since we need our PIP FEEDBACK scaled and positioned, we need to set it up on another Channel.
3. Setup of PIP FEED
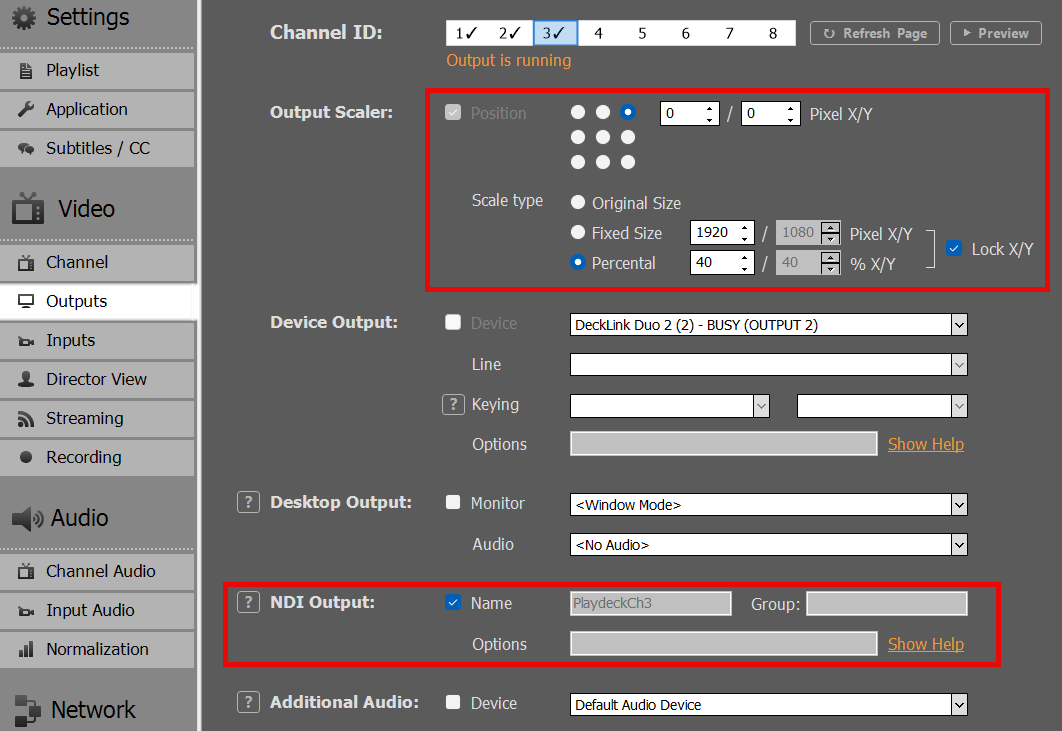
We use Channel 3 as PIP FEEDBACK, so we can play regular Video Content here. We want to send it via NDI from Channel 3 to Channel 1 and activate the Output Scaler, so that our PIP is in the UPPER RIGHT Corner:
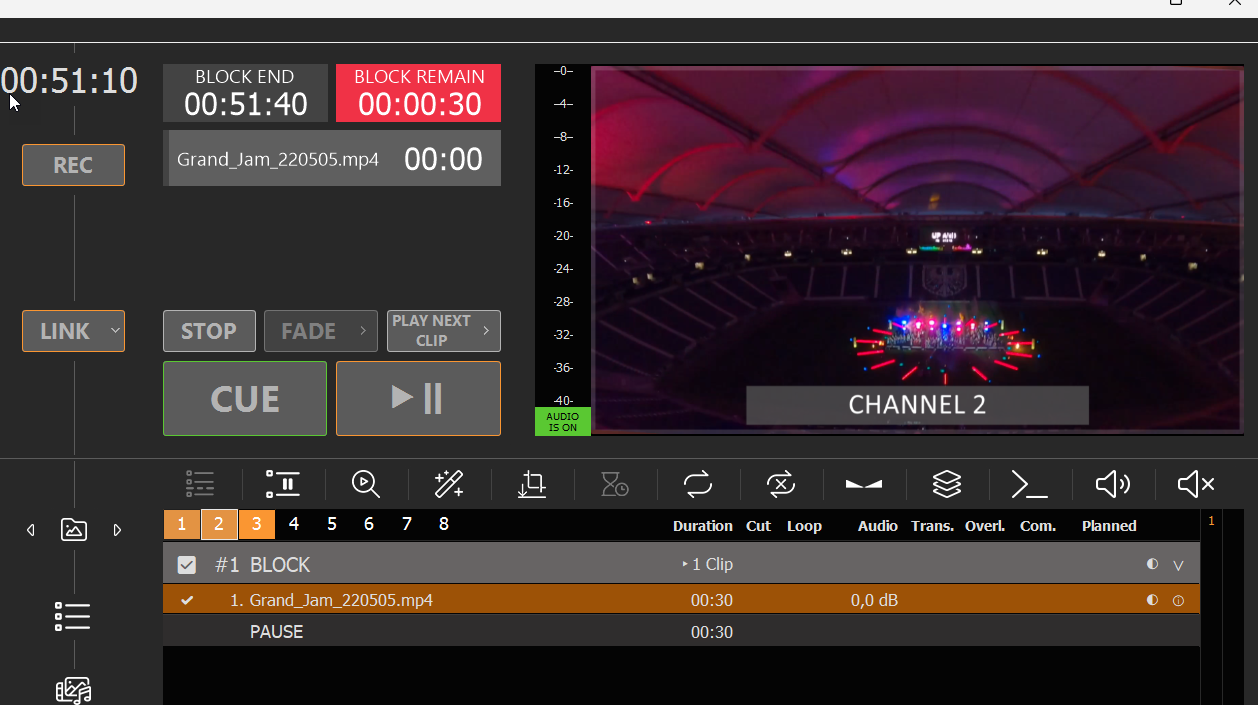
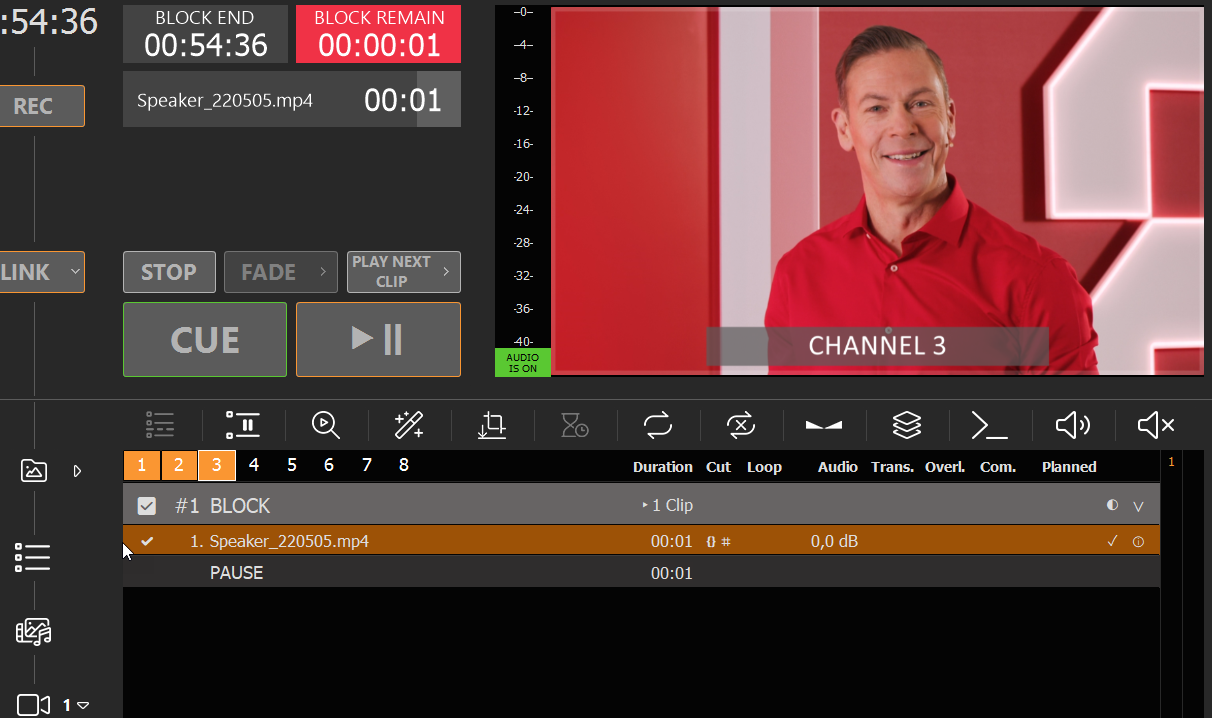
We now insert a Video Clip on Channel 3, but this could also be Live Video, Streams or anything else:
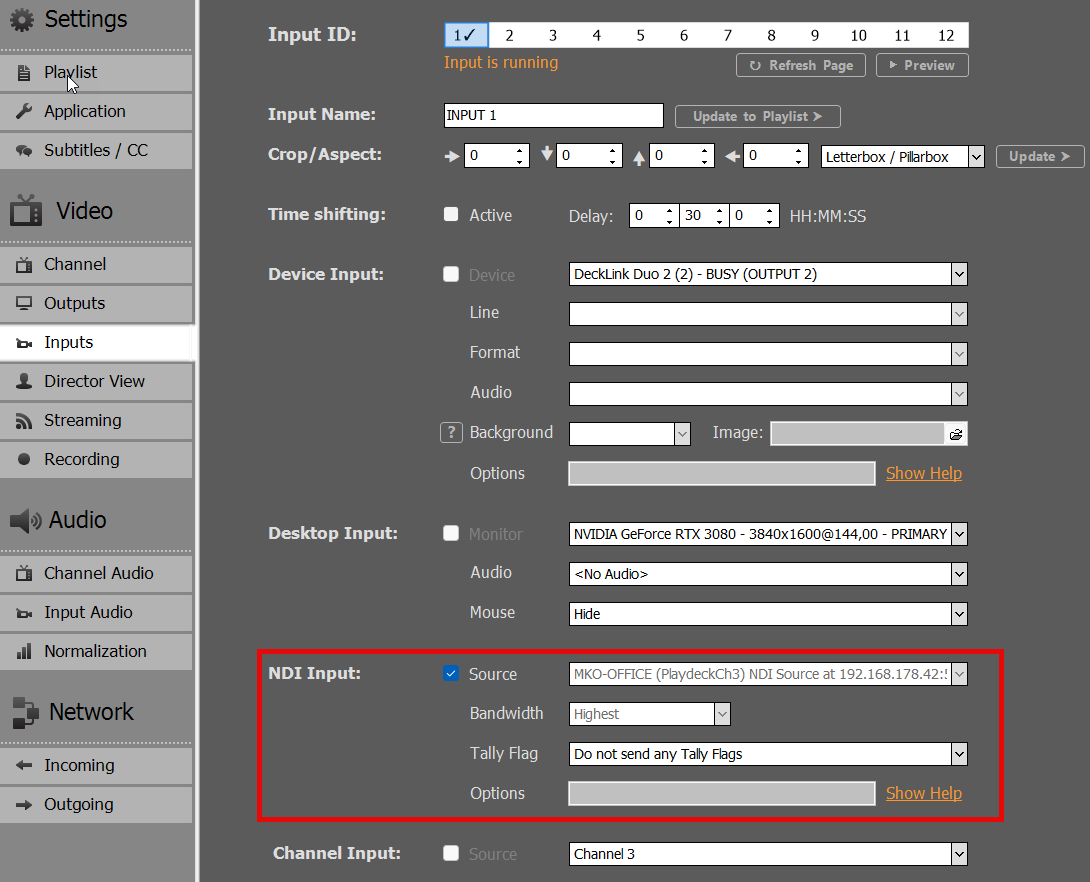
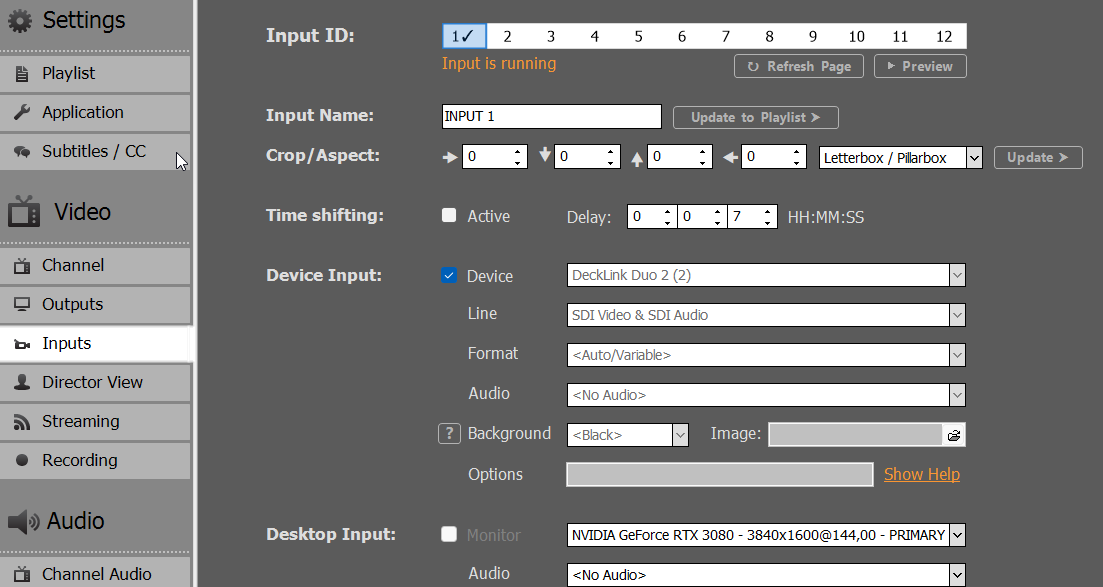
We loop this NDI Feedback to Input 1:
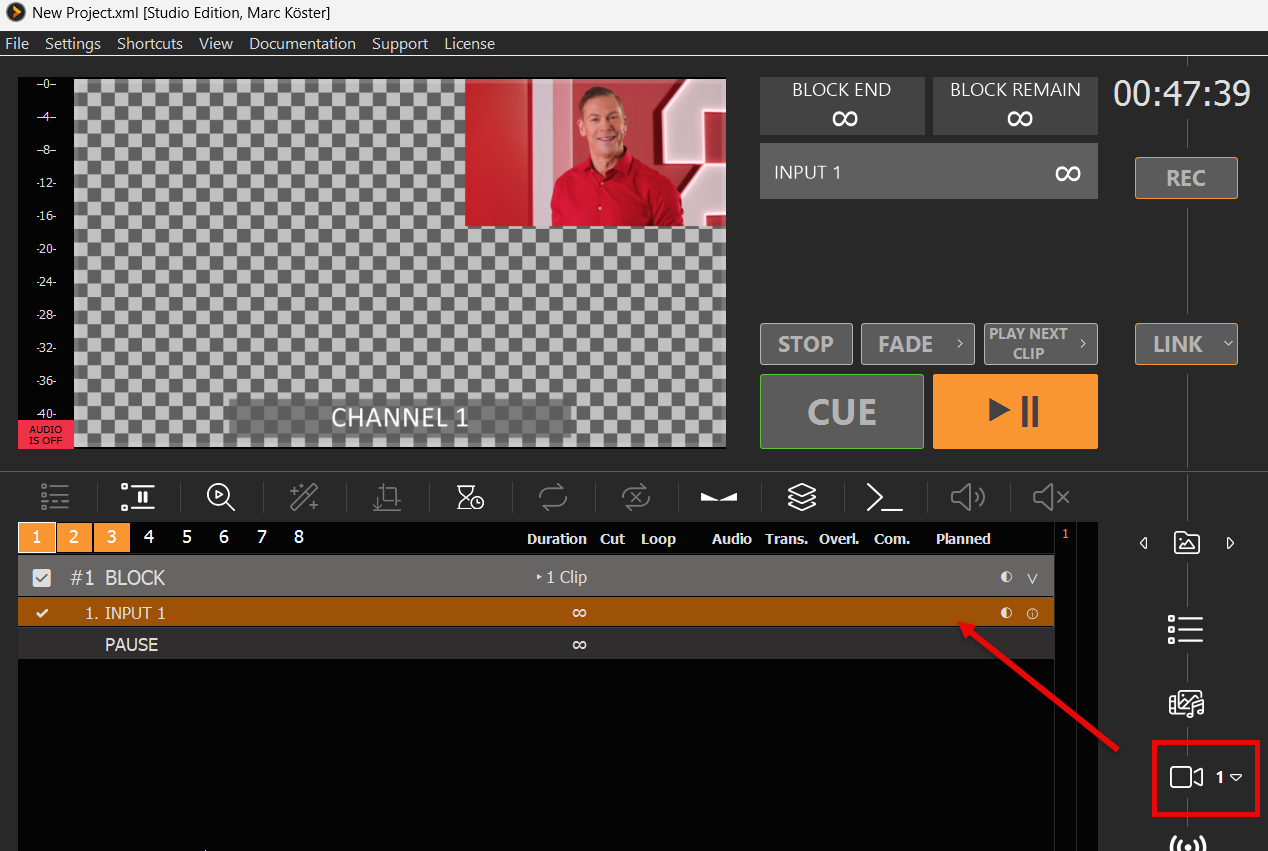
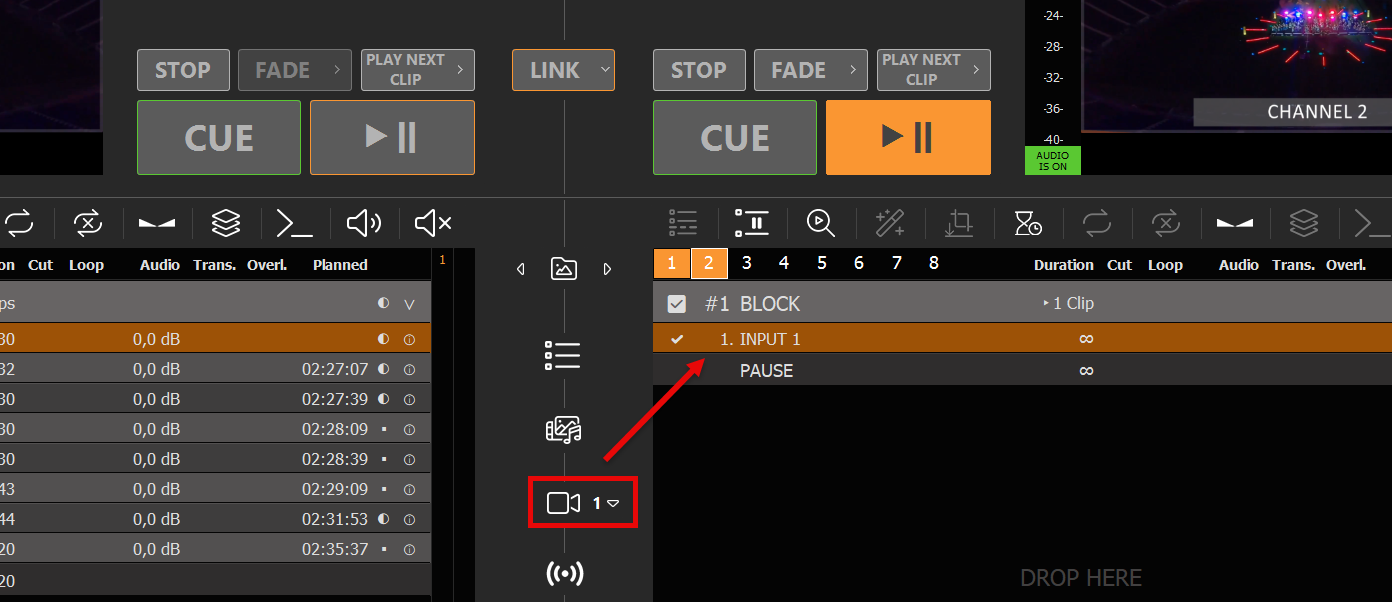
Then insert Input 1 into the Playlist of Channel 1:
We now downscaled the Channel 3 Playlist into Channel 1, which will be keyed over the BG FEED of Channel 2.
4. FINAL OUTPUT / MAIN FEED
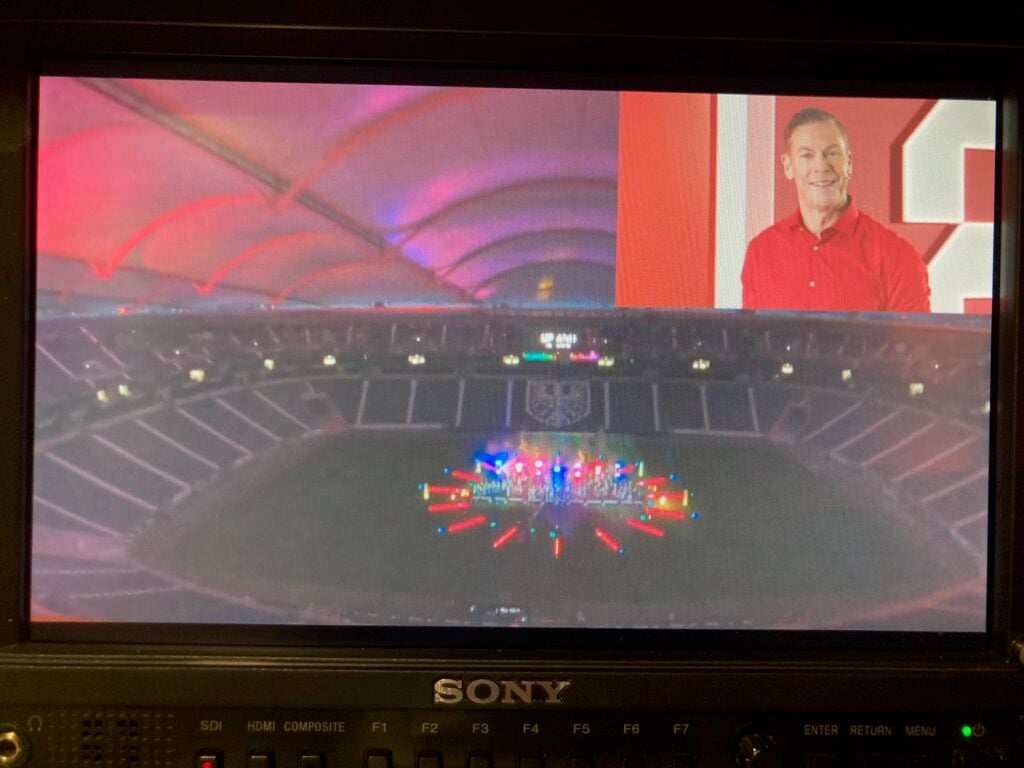
The MAIN FEED is send to SDI 2 and this is the result on the SDI Monitor of SDI 2 (photographed):
You have some spare Channel in PLAYDECK? Use them to prepare and test new Contents, then copy them to your Main Feed Channel. You can DRAG DROP Blocks from Channel to Channel, or copy them with pressing CTRL after starting DRAG DROP.
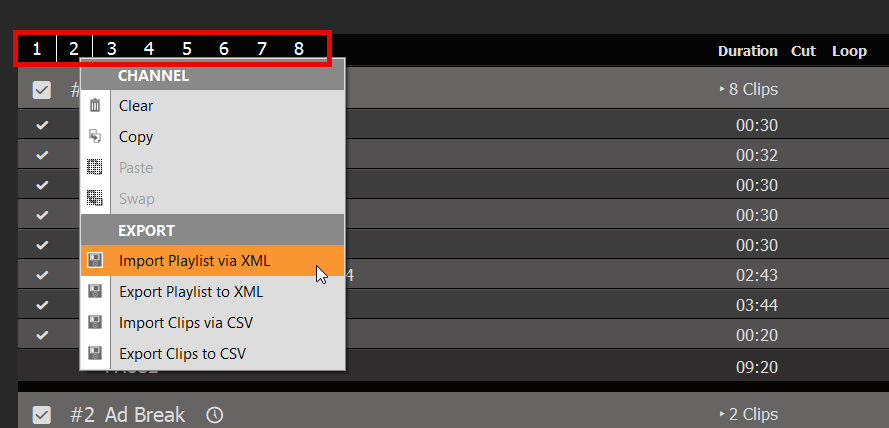
You can also copy, overwrite or append whole Playlists, by right-clicking the CHANNEL NUMBER:
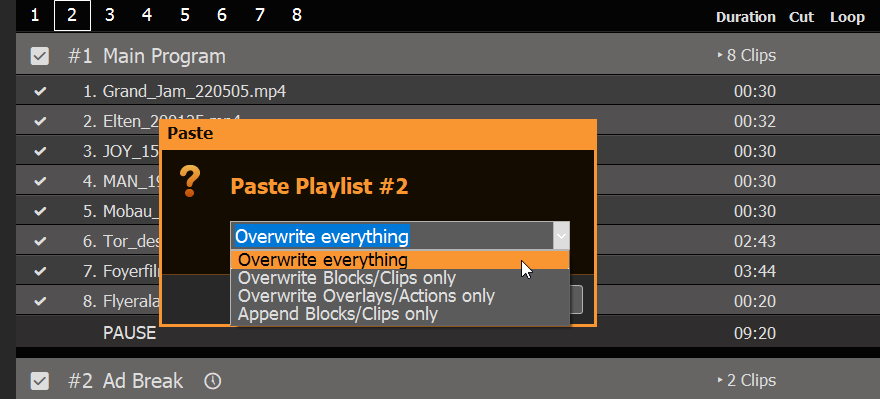
If you paste new Content on an existing Playlist (or Import XML), you get the option to overwrite or append:
Use Playlist Trial Edition
You can install PLAYDECK on any other machine and edit your Playlists there. Except the Watermark of the Trial Edition, there are no other restrictions, so you can prepare Playlists and send them to your Main System.
Append Playlist during Broadcast
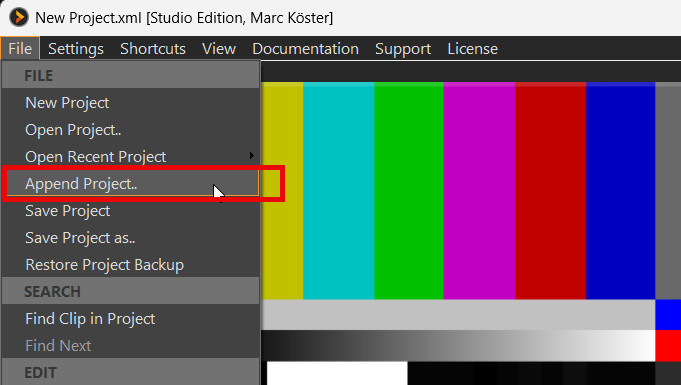
You want to import new Playlists and don’t want to interrupt your Broadcast? No problem: Use the APPEND PROJECT Option in the FILE MENU:
This will load any PLAYDECK Project, but instead of replacing the Playlists, all Playlists will be extended by the Clips found in the Project. You can then safely remove any old Content.
You can apply this procedure to individual Playlists by Exporting a Playlist to XML and Importing that XML on the other Machine. This is done by right-clicking the CHANNEL NUMBER:
This workflow is perfect for any day-to-day schedule, where you add new days and remove old ones.
Automatically Detect and Reload new Playlist
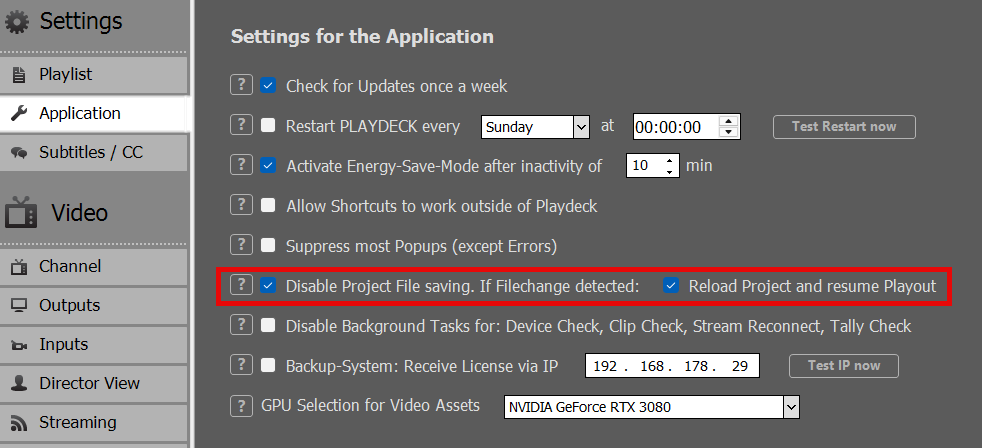
You can also OVERWRITE the current load Project File on your Main System and let PLAYDECK detect this and reload the Project, after which the Playout will resume. Enable this functionality in the Application Settings:
Note: RESUME PLAYOUT only works, if the current Playing Clip exists in the newly re-loaded Project, otherwise Playout stops for that Channel. The Clip is identified by a UNIQUE ID, so it could have moved to another Block in the re-loaded Project.
This workflow is best suited for any automated systems, where Project Files are generated automatically and uploaded to the Main System. Or when the Content Editor does not have access to the Main System and uploads the new Playlist to the NAS/Cloud Storage.
Interface with 3rd party Apps
We don’t support the Playlist Format of other 3rd party Apps, as there is just too much diversity on the market, and a lot Playlist Function (Mixing, Overlaps, Schedules) would not be compatible with PLAYDECK.
If you like to prepare your Playlist in a 3rd Party App, you need to export your Playlist to CSV, then Edit that CSV to work with PLAYDECK, then Import that CSV into PLAYDECK.
Why CSV? Because it is the most easy List Format, which support multiple values per Item. It can be edited with any Text or Table Editor, from Notepad to Excel.
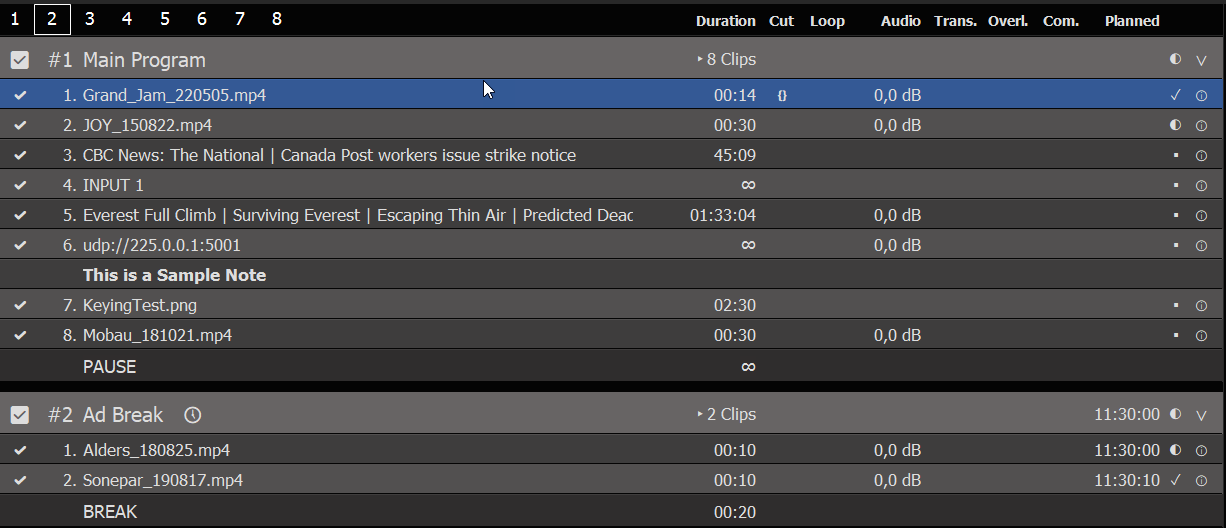
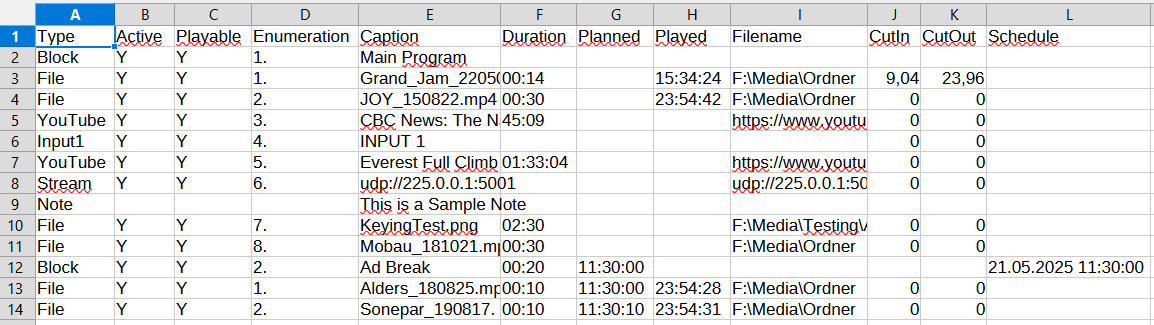
Let’s have a look at our CSV. For this we build ourself a Sample Playlists with 2 Blocks. We mixed in different Content Types: Video Clips with IN/OUT Points, Device Inputs, YouTube Videos, UDP Input Stream, GFX with Runtime, a Note. We also added a Schedule to the 2nd Block:
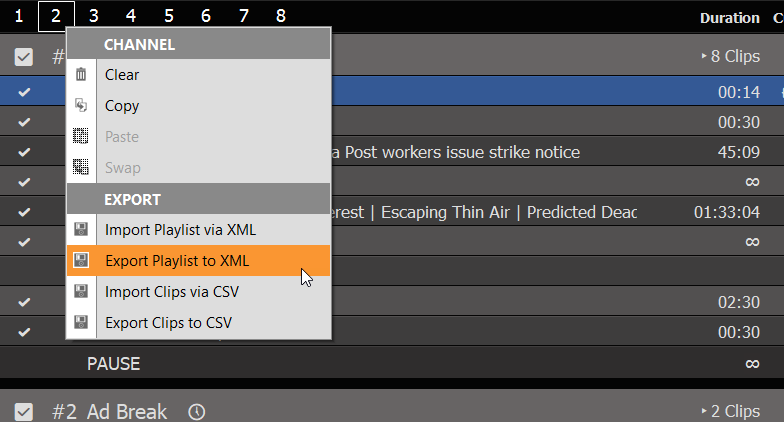
We now right-click the CHANNEL NUMBER 2 and select EXPORT TO CSV:
As you can see, its not “too” much Text Lines. Since the first Lines are just HEADER, it looks even more clear in a Table Editor:
And this is how you write/generate CSV Files: You export your Content in any 3rd party app, open any editor and bring it in PLAYDECK FORMAT. But WHAT IS PLAYDECK FORMAT.
These are the REQUIRED COLUMNS. They can be it ANY POSITION (any column #): Type = Block, File, Website (or YouTube), Input#, Stream, Note Caption = Any Text to display in PLAYDECK Filename = The Path/File or the URL (YouTube and Streams)
These are the OPTIONAL COLUMNS. They can be it ANY POSITION (any column #): Active = The Checkbox in the first Column in PLAYDECK Duration = Only used be File-Types that are Images. Leave empty or 0 for endless CutIn / CutOut = IN- and/or OUT-Point for Trimming Schedule = Only used by Block-Types
Note: More advanced Properties (e.g. Audio Gain) are not supported, as to keep our CSV Format clean and easy. To import/export ALL Properties, please use XML instead of CSV.
Note: PLAYDECK uses UTF-8 encoding for saving and loading CSV files.
For a general overview of best possible Video Codecs for Playout, please see this article.
While PLAYDECK is able to transcode all Clips in real time to your selected Output Format, this can put a heavy toll on your system during Playout, depending on your use case.
If your CPU usage reached critical level and you get playout lags (mostly perceived as audio stutter), you may want to make sure, that all Clips are decoded via the GPU, because most modern Graphic Cards can handle much more load than the CPU alone, thus making it possible to run multiple output channel with PLAYDECK.
PLAYDECK has an integrated transcoder for video/audio files. It will make it more easy for you to QUICKLY transcode multiple files at once, e.g. if your show starts soon and you just don’t have the time to transcode them via 3rd party tool like Adobe Media Encoder.
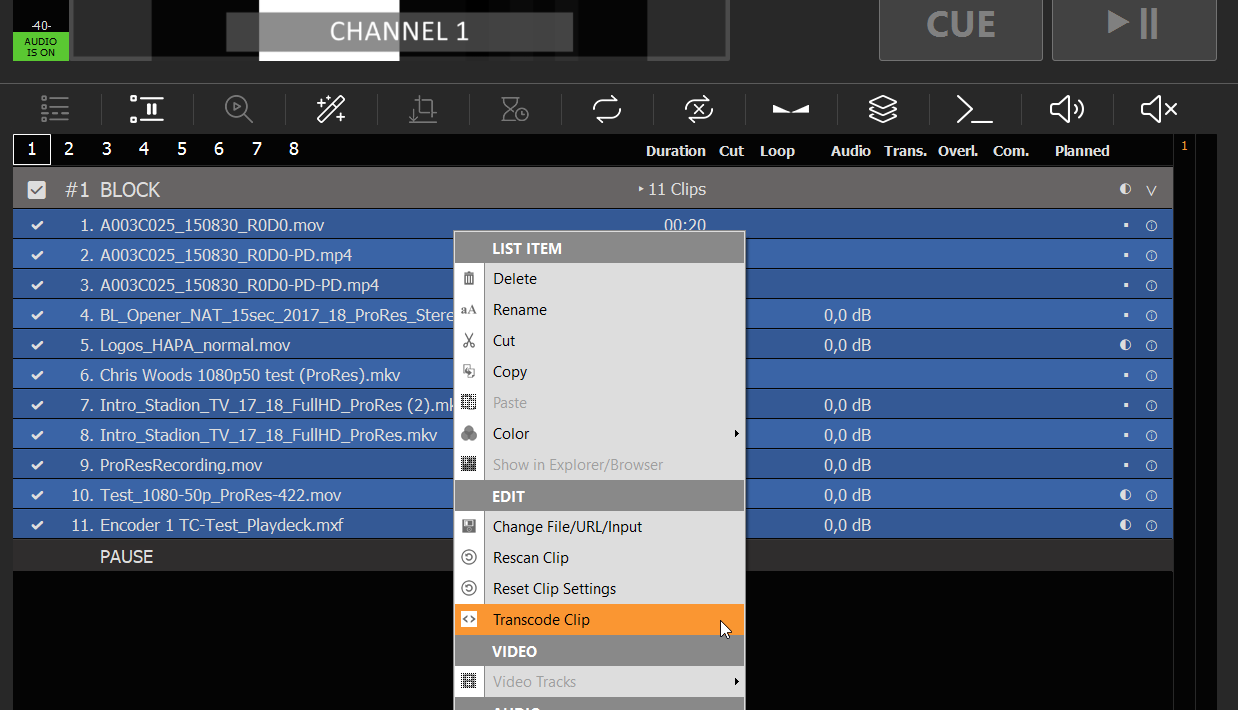
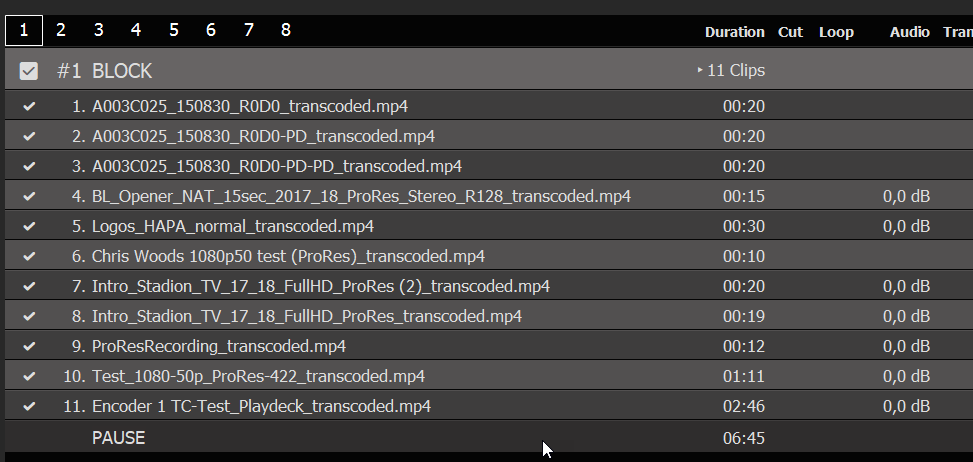
In your example we have a Block of Files, that only can be decoded via CPU, like ProRes, and HAP-A Video Codec. We now select any Clip, then press CTRL+A to select all Clips in the Block. You could also use SHIFT to select a Clip range or just CTRL to select individual Clips.
Now we right Clip one of the selected Clips and select “Transcode Clips”:
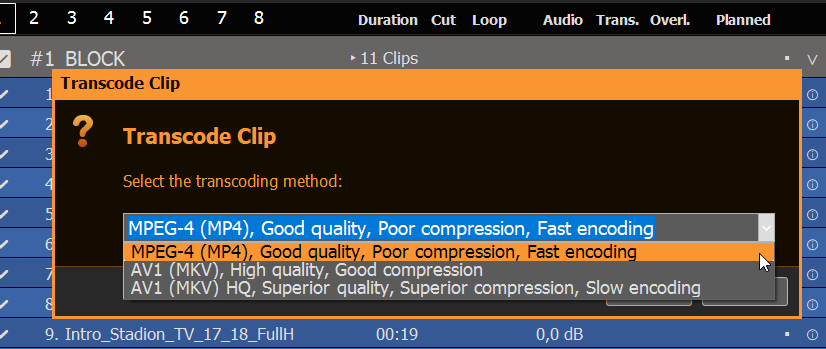
You will not get a list of pre-defined target video codecs, which all support GPU decoding:
If you are in a hurry or have a huge number of clips to transcode, pick the first option “MPEG-4”, as this options gives you incredibly fast results, while still maintaining a good quality. In all other cases go with the 2nd option “AV1”, as this produces fairly small files on SSD/HDD, while producing extreme high quality files, and also support HDR. The last option is unnervingly slow, but also takes quality and compression a tick higher, but the time/quality ratio is bad in this case. Use this for overnight-transcoding.
Note: Sadly, we can not offer transcoding in H.264 or H.265 because of license reasons.
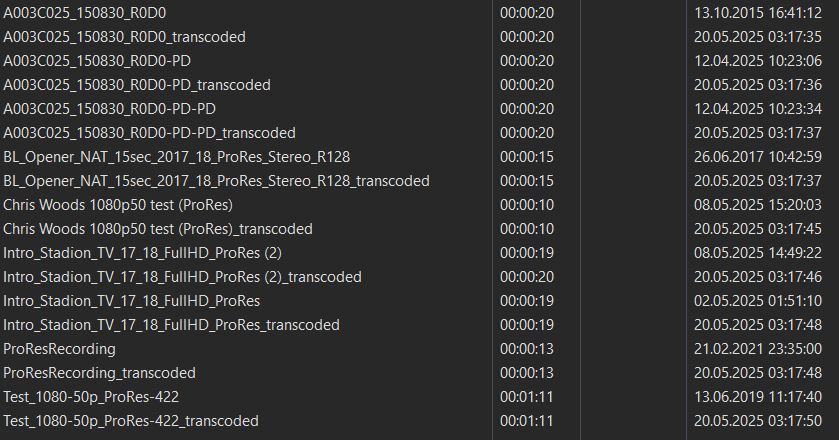
The transcoder will save the new file next to the old file and add “_transcoded” to the filename:
The new Files will be automatically replaced and re-scanned in your Playlist:
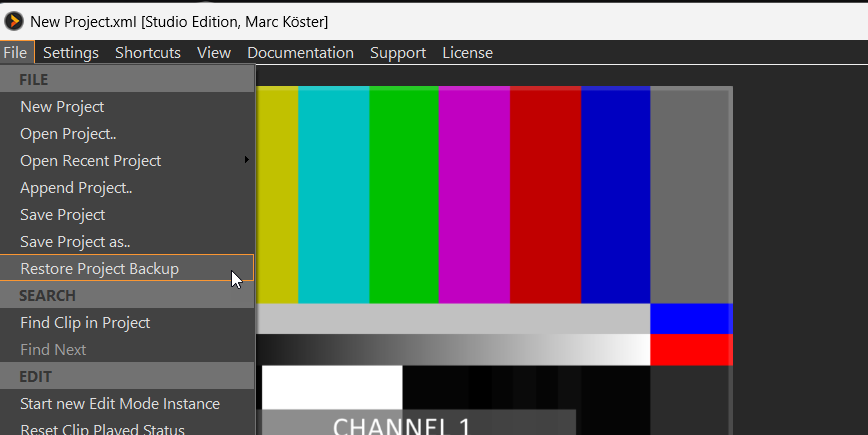
If you need to at any time return to an earlier version of your Playlist, you can use the “Restore Project Backup” function:
What Files are being decoded on CPU in PLAYDECK
ProRes This high quality video codec has it’s roots on MAC computers, as it also was developed by Apple. Sadly, Apple never released any codec information for Windows Systems, so it’s still fairly impossible to decode ProRes via the GPU. If you need the Alpha Channel, we recommend using HAP-A video codec.
HAP and variants like HAP-A These video codecs also support Alpha Channel and have very low CPU consumption.
DNxHD, MXF The codecs also cant be decoded via GPU in PLAYDECK.
This article will explain how you can use SCTE for your projects. PLAYDECK supports SCTE-35, which are exclusively used in Streams and SCTE-104, which are exclusively used in SDI Device signals.
Supported for Stream Inputs as well as Stream Outputs. Tested Stream Formats are UDP, DVB and SRT. The selection of the Video Codec does not influence SCTE transport. SCTE transport is always active and does not need to be enabled somewhere.
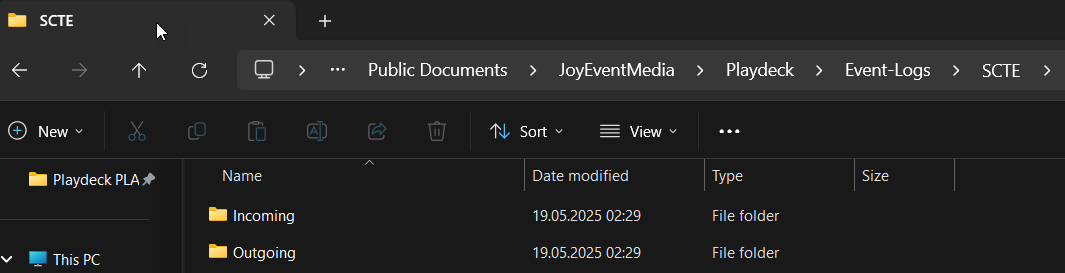
PLAYDECK can detect and display incoming SCTE-35 Marker. All incoming and outgoing Marker will be written to an Event Log.
PLAYDECK can forward incoming SCTE-35 Marker from Stream Input to Stream Output. Cross-Forwarding between UDP, DVB and SRT is supported, e.g. receiving SRT and forwarding to UDP.
SCTE-35 Testdrive
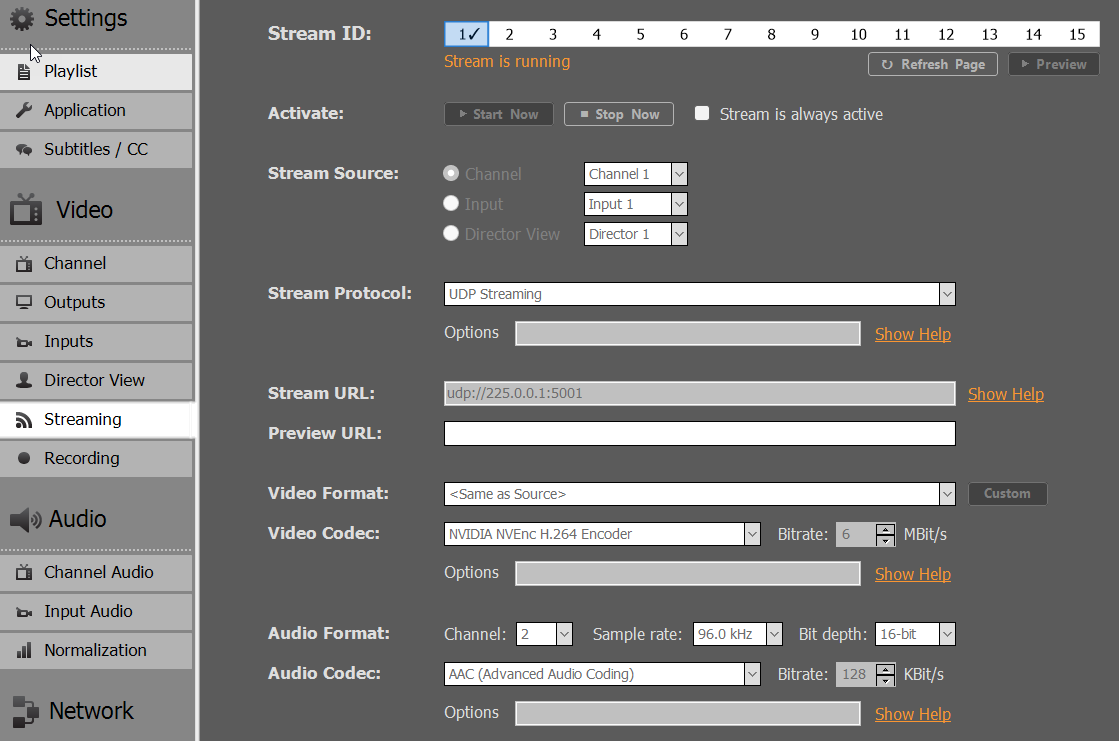
Let us dive into those topics a bit. As a test run we setup our own UDP signal loop. We stream Channel 1 to “udp://225.0.0.1:5001” via UDP:
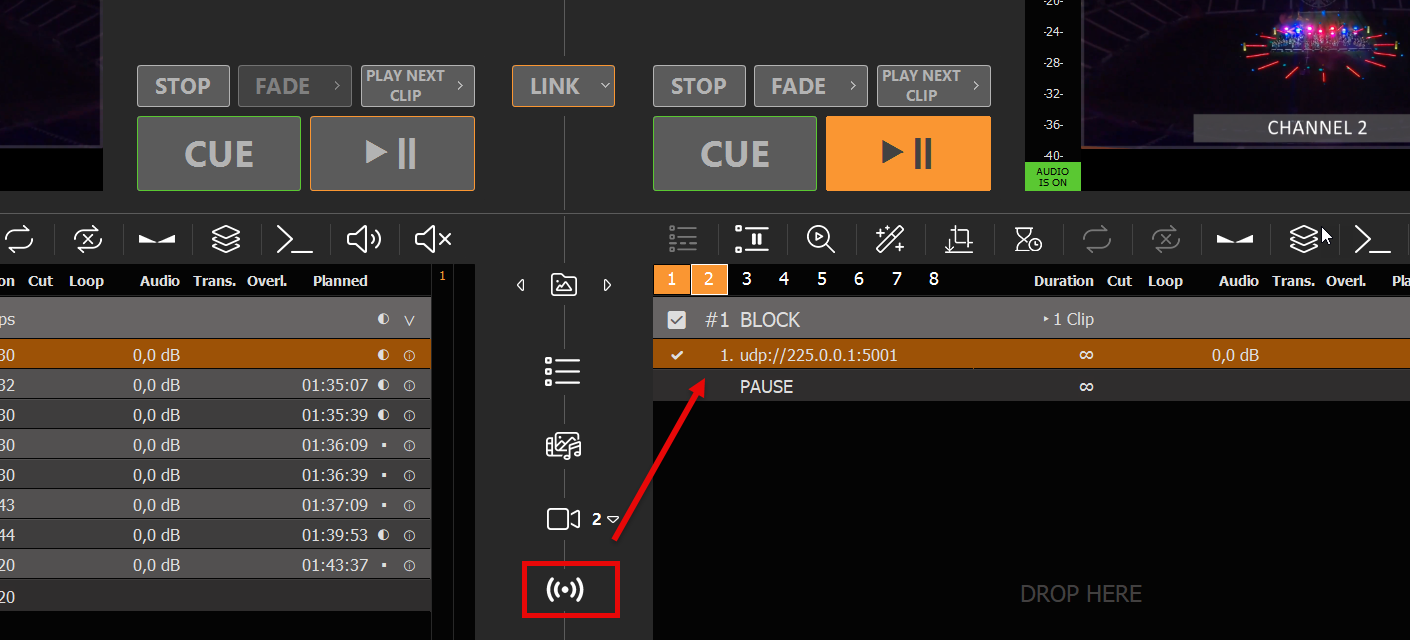
And play the Stream in Channel 2:
Now we only need a way to send a SCTE-35 marker in Channel 1. So we setup a new Command Action and use the smallest detectable SCTE-35 Marker (of course you can use any other): <SpliceInfoSection><SpliceInsert></SpliceInsert></SpliceInfoSection>
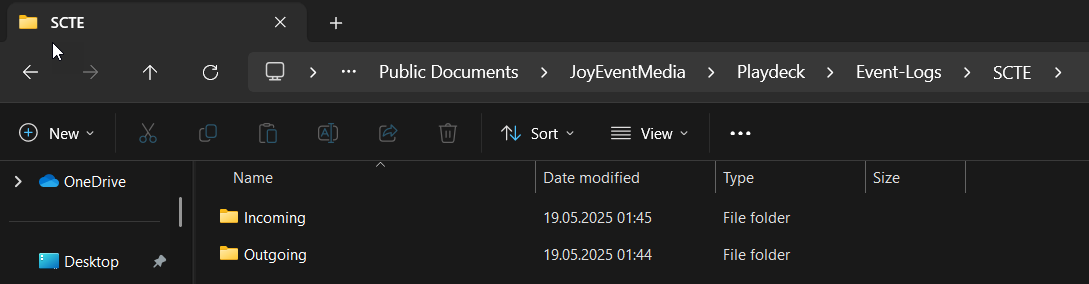
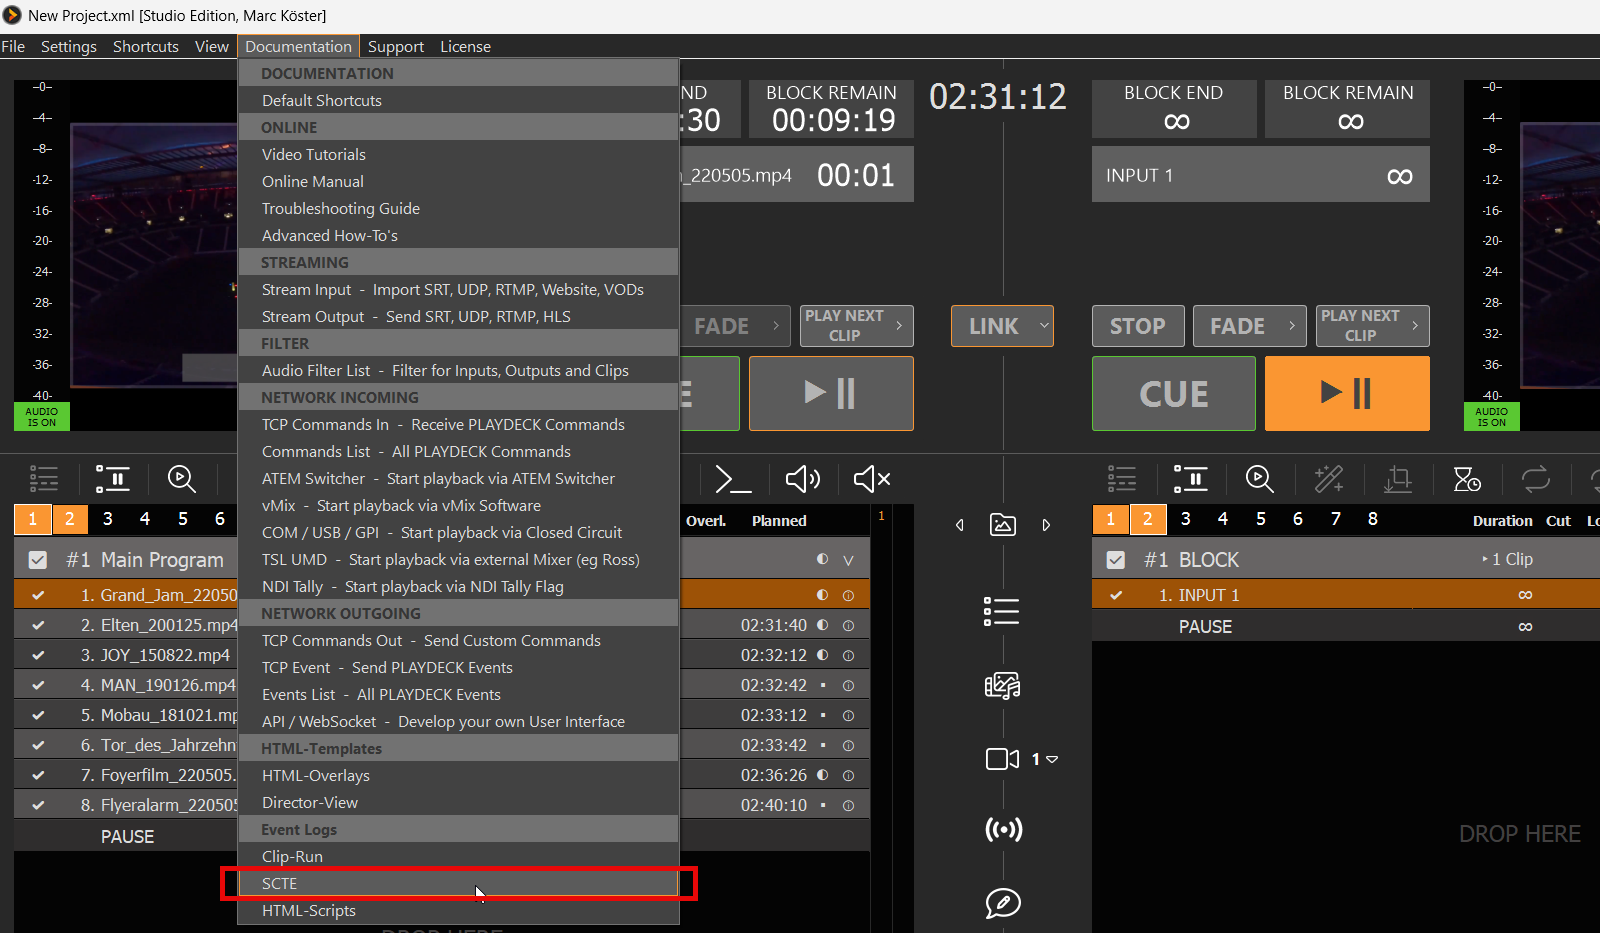
Make sure Channel 1 and Channel 2 are playing, then hit the Action Button. Then open the SCTE Event Log over the Main Menu > Documentation > SCTE:
You will see the outgoing Marker of your Action Button Click on Channel 1, and the detected incoming Marker on Channel 2:
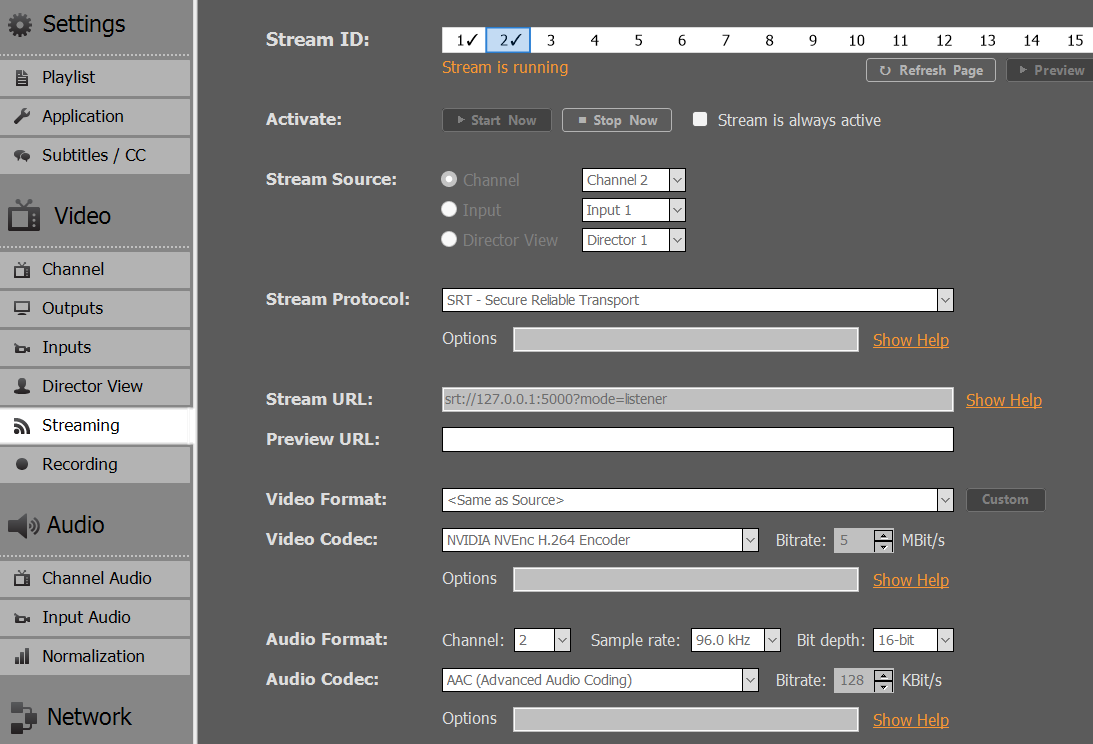
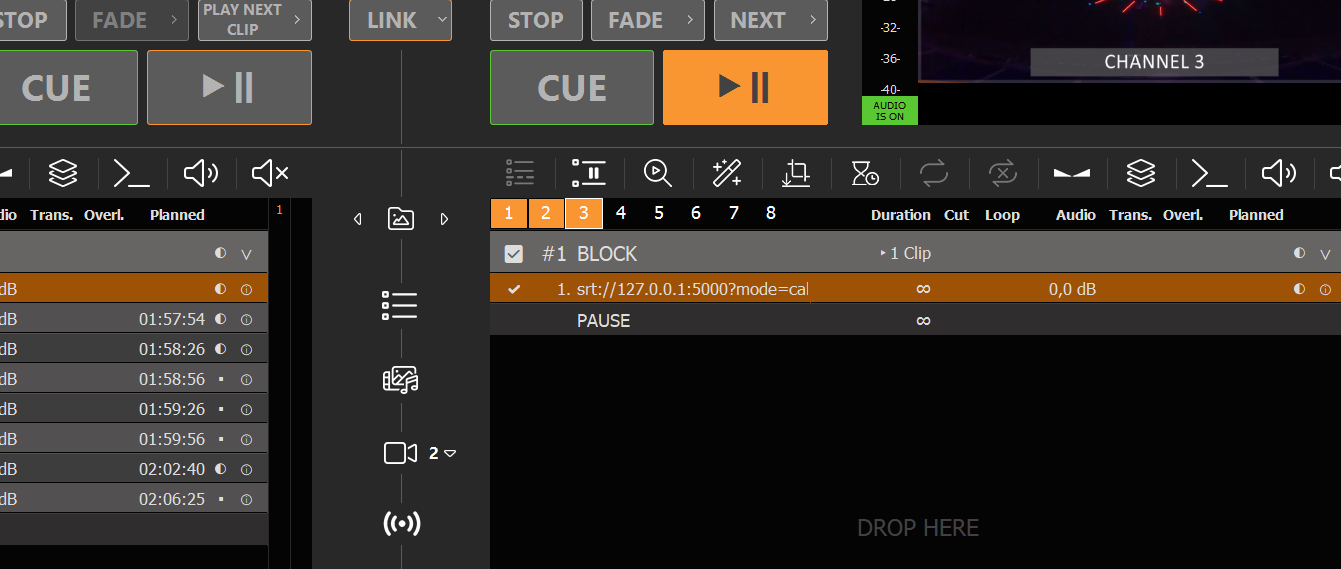
We even go one step further and setup ANOTHER Stream from Channel 2 to Channel 3 to test the SCTE Forwarding and Cross-over Detection (UDP to SRT). We send Channel 2 to “srt://127.0.0.1:5000?mode=listener” and receive in Channel 3 at “srt://127.0.0.1:5000?mode=caller”.
Note: If the IP 127.0.0.1 doesn’t work, please use your real local IP, e.g. 192.168.178.42. See Main Menu > License > About to check your Local IP adress.
If we now press our Action Button to send the SCTE-35 Marker, we detect it also in Channel 3:
Using SCTE-104 in SDI
SCTE-104 Facts
Supported for SDI Device Inputs as well as SDI Device Outputs, e.g. Blackmagic DeckLink. SCTE transport is always active and does not need to be enabled somewhere.
PLAYDECK can detect and display incoming SCTE-104 Marker. All incoming and outgoing Marker will be written to an Event Log.
PLAYDECK can forward incoming SCTE-104 Marker from SDI Input to SDI Output.
SCTE-104 Testdrive
Let us dive into those topics a bit. As a test run we setup our own SDI signal loop. We use our DeckLink Duo 2 and an SDI Loop Cable:
And play the SDI Input in Channel 2:
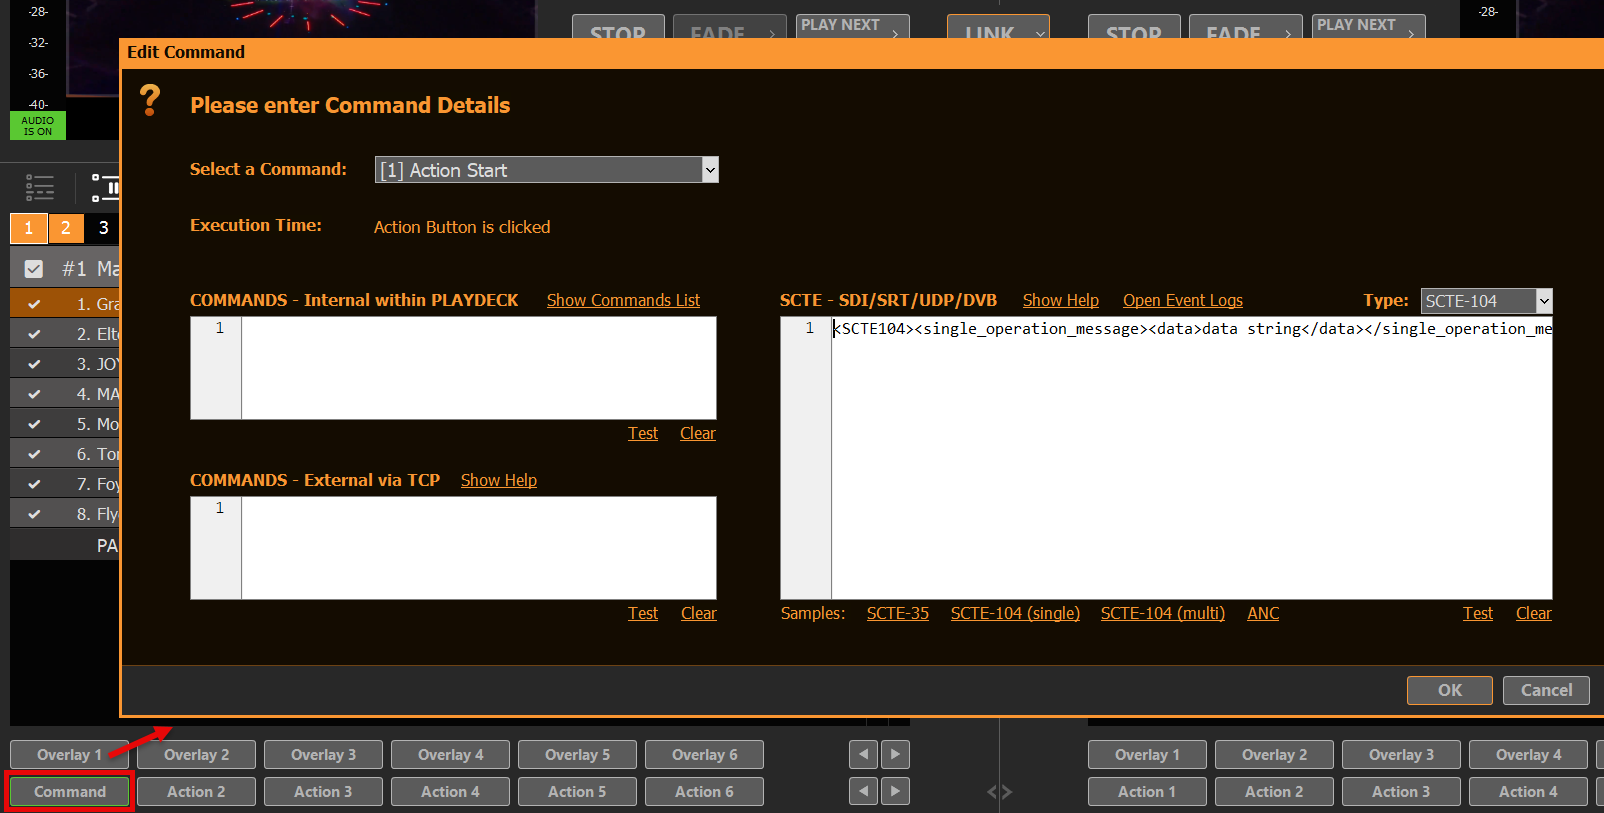
Now we only need a way to send a SCTE-104 marker in Channel 1. So we setup a new Command Action and use the smallest detectable SCTE-104 Marker (of course you can use any other): <SCTE104><single_operation_message><data>data string</data></single_operation_message></SCTE104>
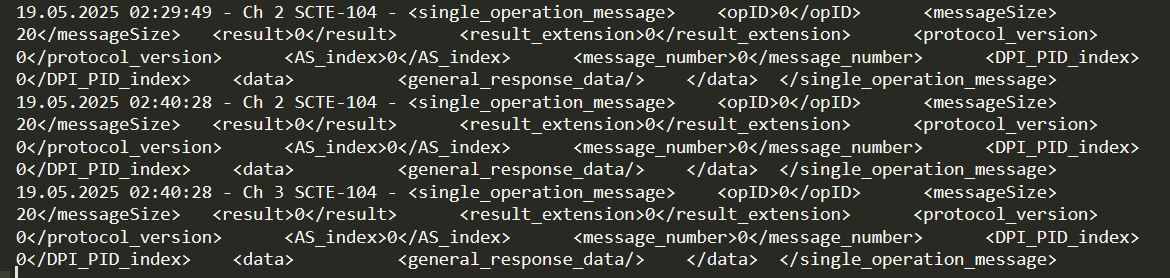
Make sure Channel 1 and Channel 2 are playing, then hit the Action Button. Then open the SCTE Event Log over the Main Menu > Documentation > SCTE:
You will see the outgoing Marker of your Action Button Click on Channel 1, and the detected incoming Marker on Channel 2:
We even go one step further and setup ANOTHER SDI Loop from Channel 2 to Channel 3 to test the SCTE Forwarding:
If we now press our Action Button to send the SCTE-104 Marker, we detect it also in Channel 3:
This is fairly simple: You create a new Content Block in your Playlist with one difference: The Block ends as BREAK BLOCK (instead of STOP or PAUSE). For this we select the Block and click on the BLOCK END Icon (or Double-Click the Block end). Then we select BREAK BLOCK and choose RETURN TO LAST POSITION (or any other):
This BREAK BLOCK behaves like this: Once it reaches its end, it will return to the clip and position (or other), which was playing BEFORE entering the BREAK BLOCK from OUTSIDE. Meaning: You can jump from anywhere to anywhere in the BREAK BLOCK, and it will remember where to return to.
Schedule Break Block
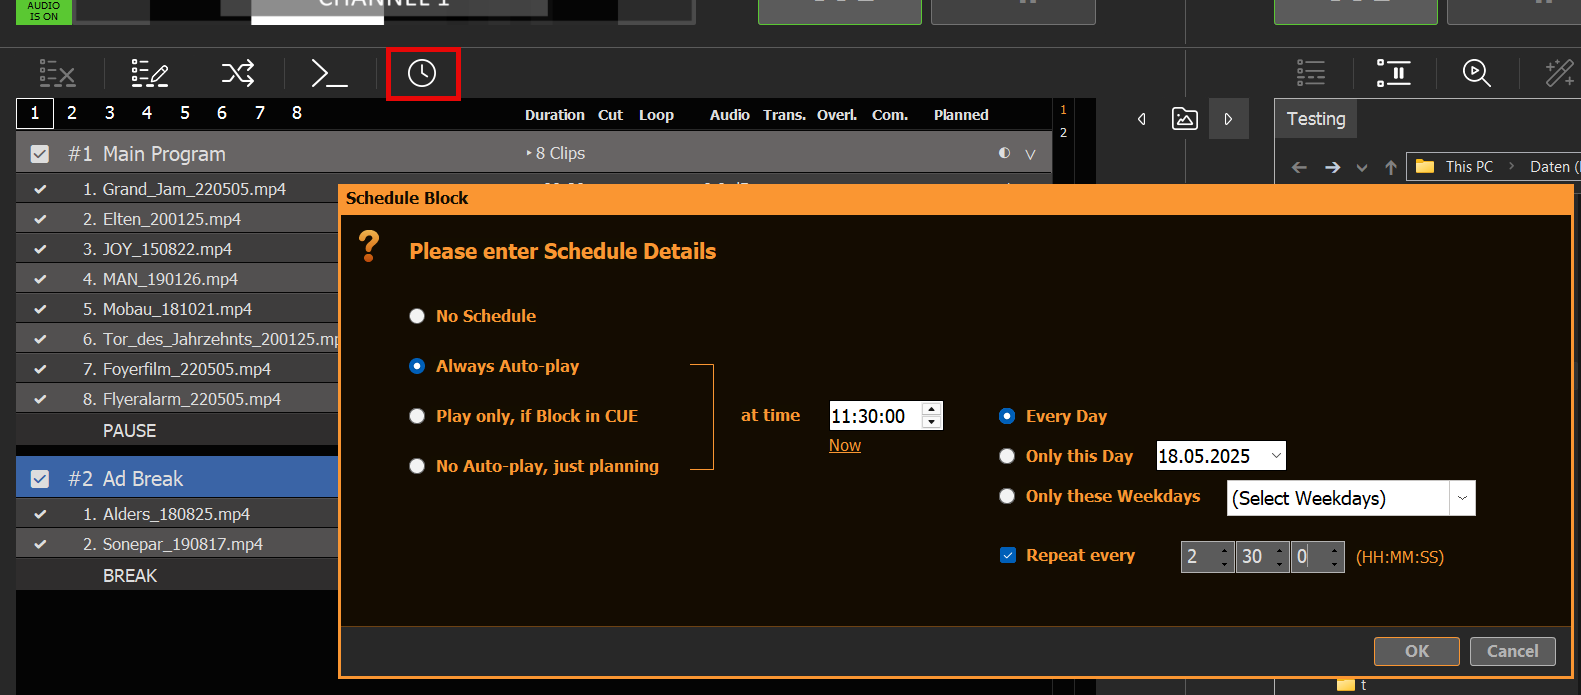
You can schedule the Break Block like an other Block Type by selecting the Block and clicking the SCHEDULE Icon:
In this example we start our Break Interruption every day at 11:00 o’clock and will repeat this every 2 and half hours for the remaining of the day. There will be no Ad Breaks between 0:00 and 11:30.
Using Action Buttons for Ad Breaks
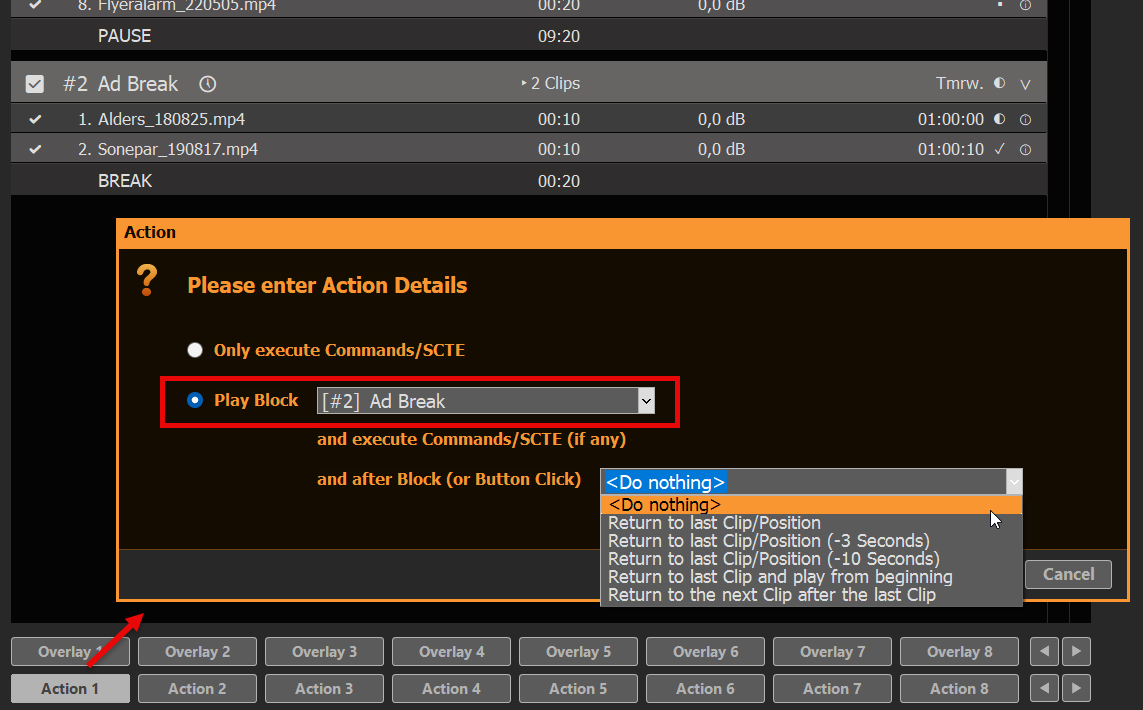
Instead of scheduled Break Blocks, you can also use Action Buttons. For this simply click and empty Action Button and select to play the related Ad Block:
You get the same selection for “returning” as for Block Ends. If you select “<Do nothing>”, the Block End will be used, like in our example above. If you select any other Option, the Return method of the Action will be used over the Block End method. This gives new options:
You could use both return methods, depending if the Break Block starts via scheduling or via Action Button
If started via Action Button, you can leave the Break Block EARLY and still return
The second option is perfect for looping Break Blocks, as your return to the previous playout, if you click the Action Button a second time.
Attach Overlays to the Break Block
Oftentimes you want Overlays to start automatically together with your Break Block Content. We therefore recommend the following articles:
If you want to signal your Streaming Server or Broadcasting System to insert Ads for the duration of your Break Block, we recommend to following articles:
This article will show how to use how to utilize the second Channel to create L-Band advertisements.
1. L-Band Specifications
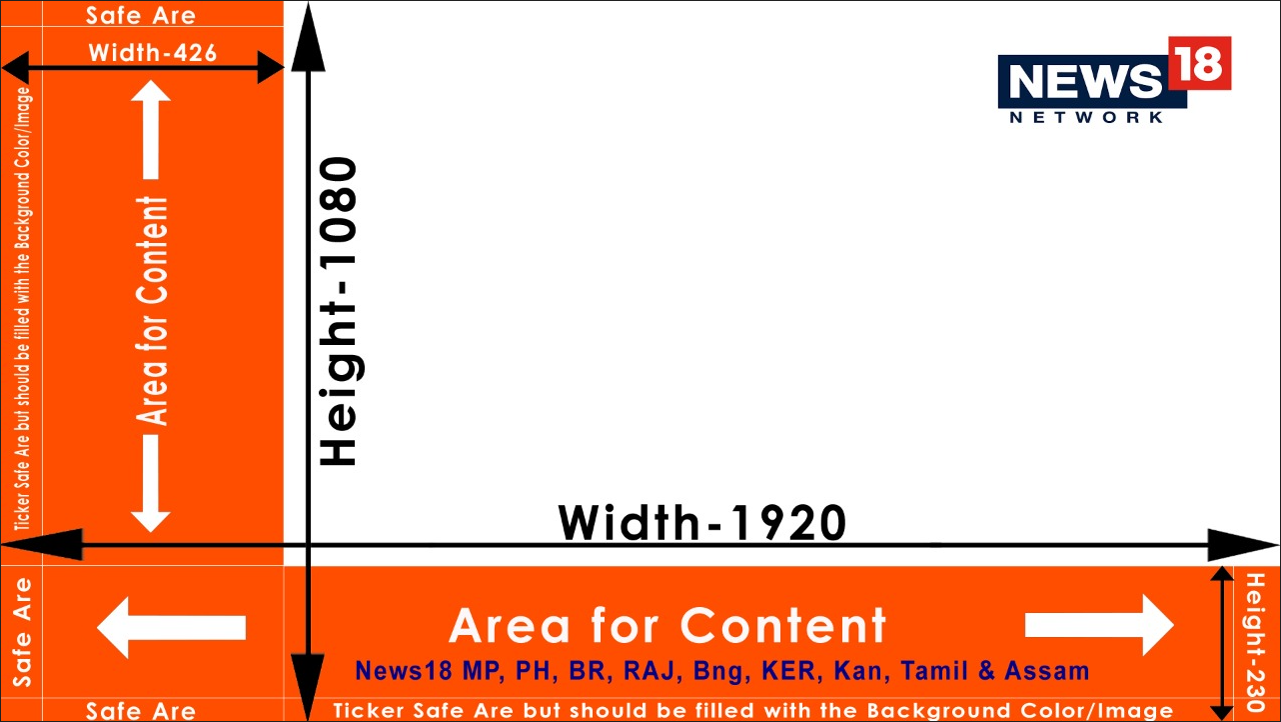
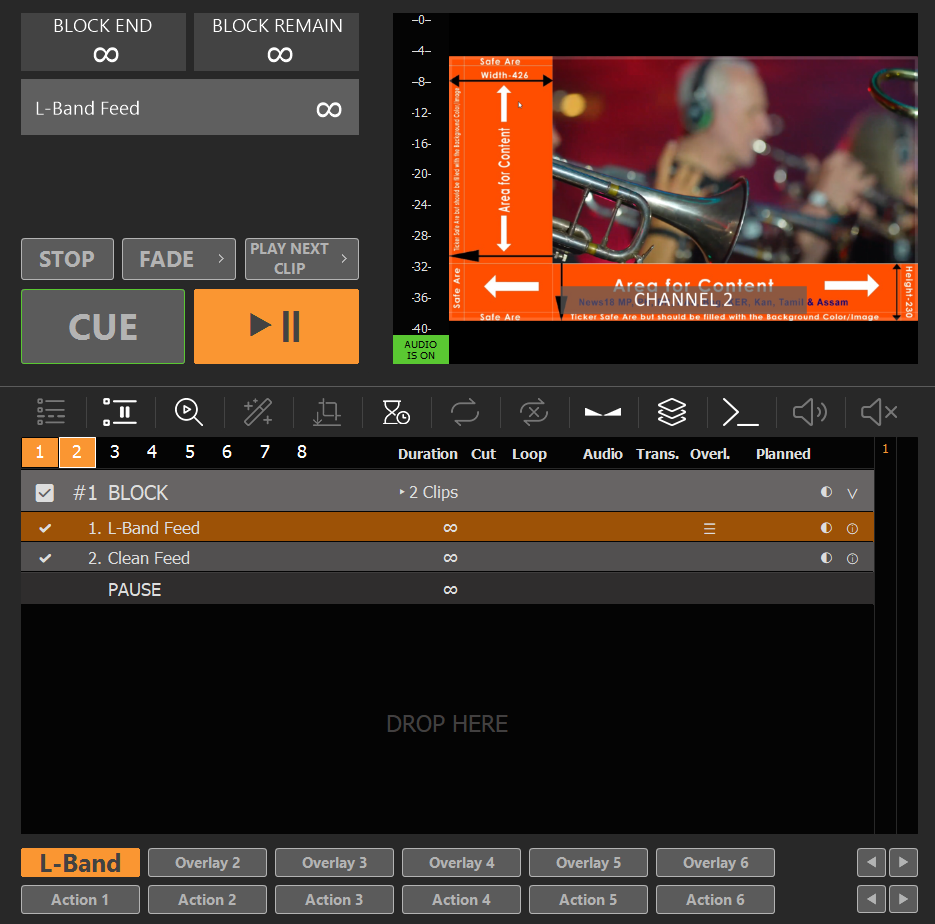
Every Station has their own specs on the size, so we just borrow this sample from News18:
The principal is always the same: We “shrink” our main content proportionally to make room for Ads in the remaining area. After shrinking, we leave some overlap to not risk black background. Our final shrink-size is: 1520×855 Pixel.
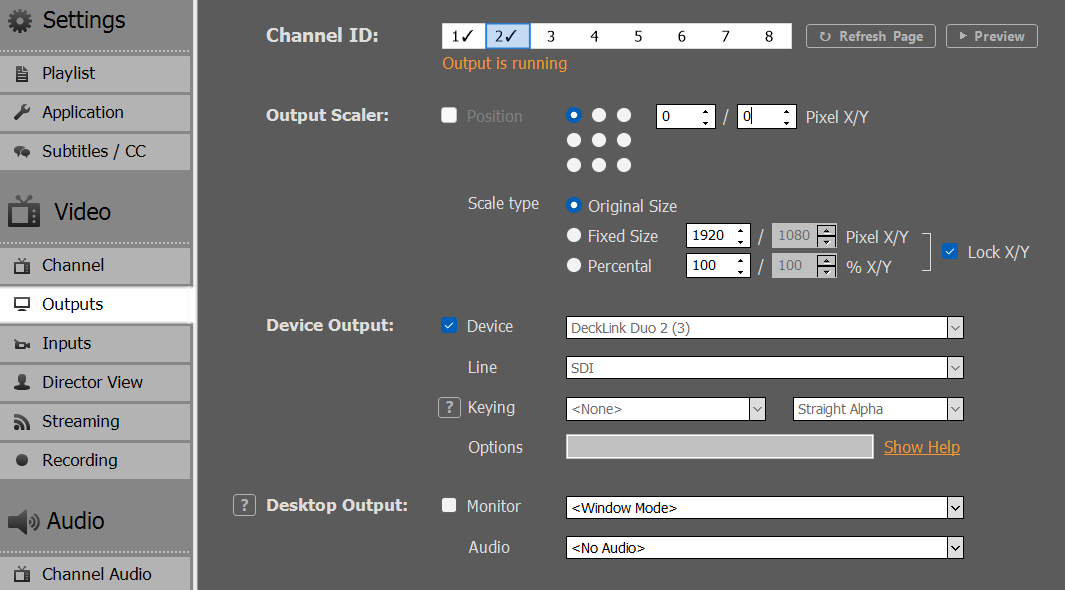
2. Scale Channel 1 and send to Channel 2
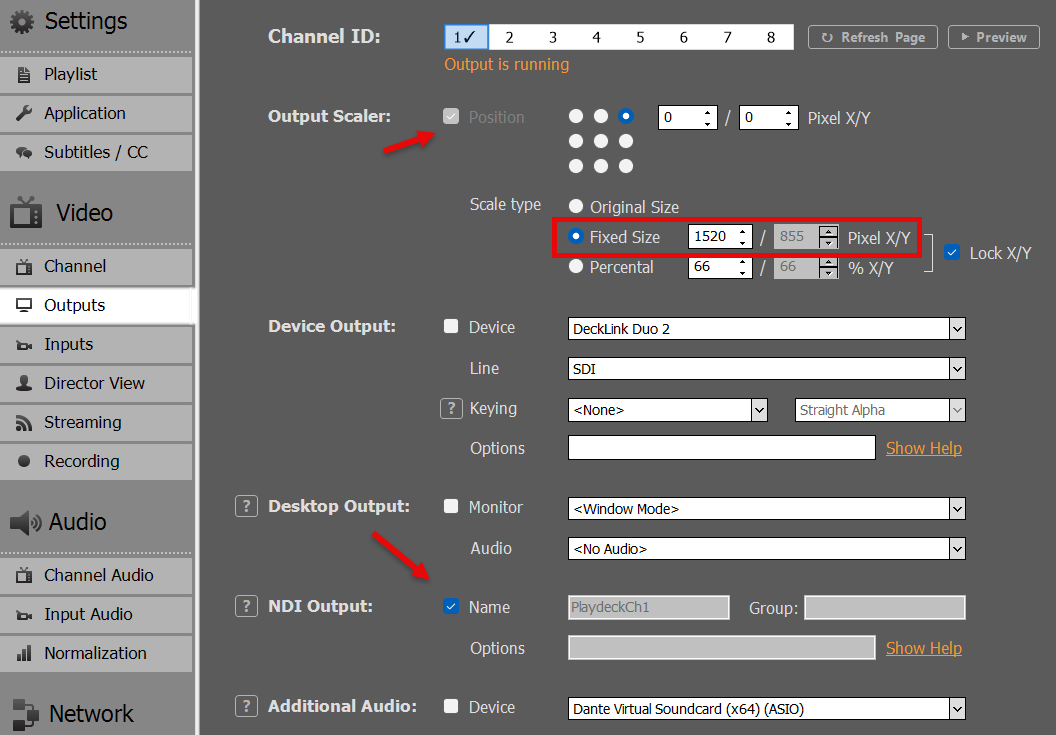
We assume with have our Main Video Content on Channel 1. So we enable the Output Scaler in the Settings to our shrunk size of 1520×855 Pixel. Then we send our scaled Content as NDI signal:
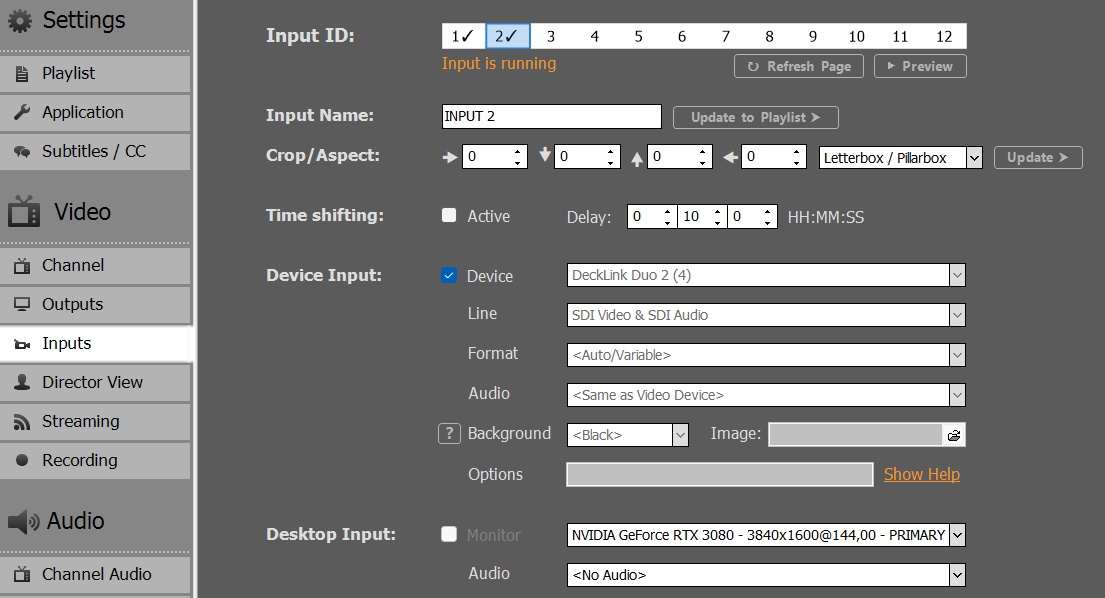
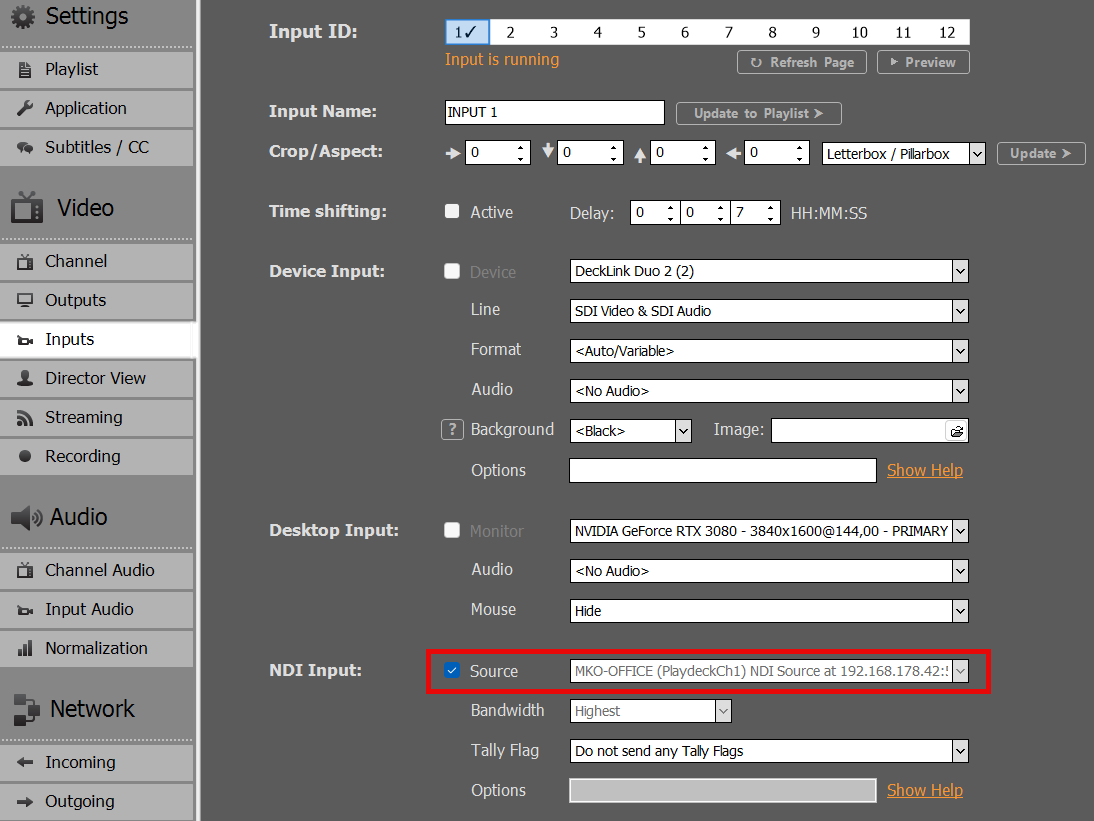
We now loop our NDI signal to Input 1:
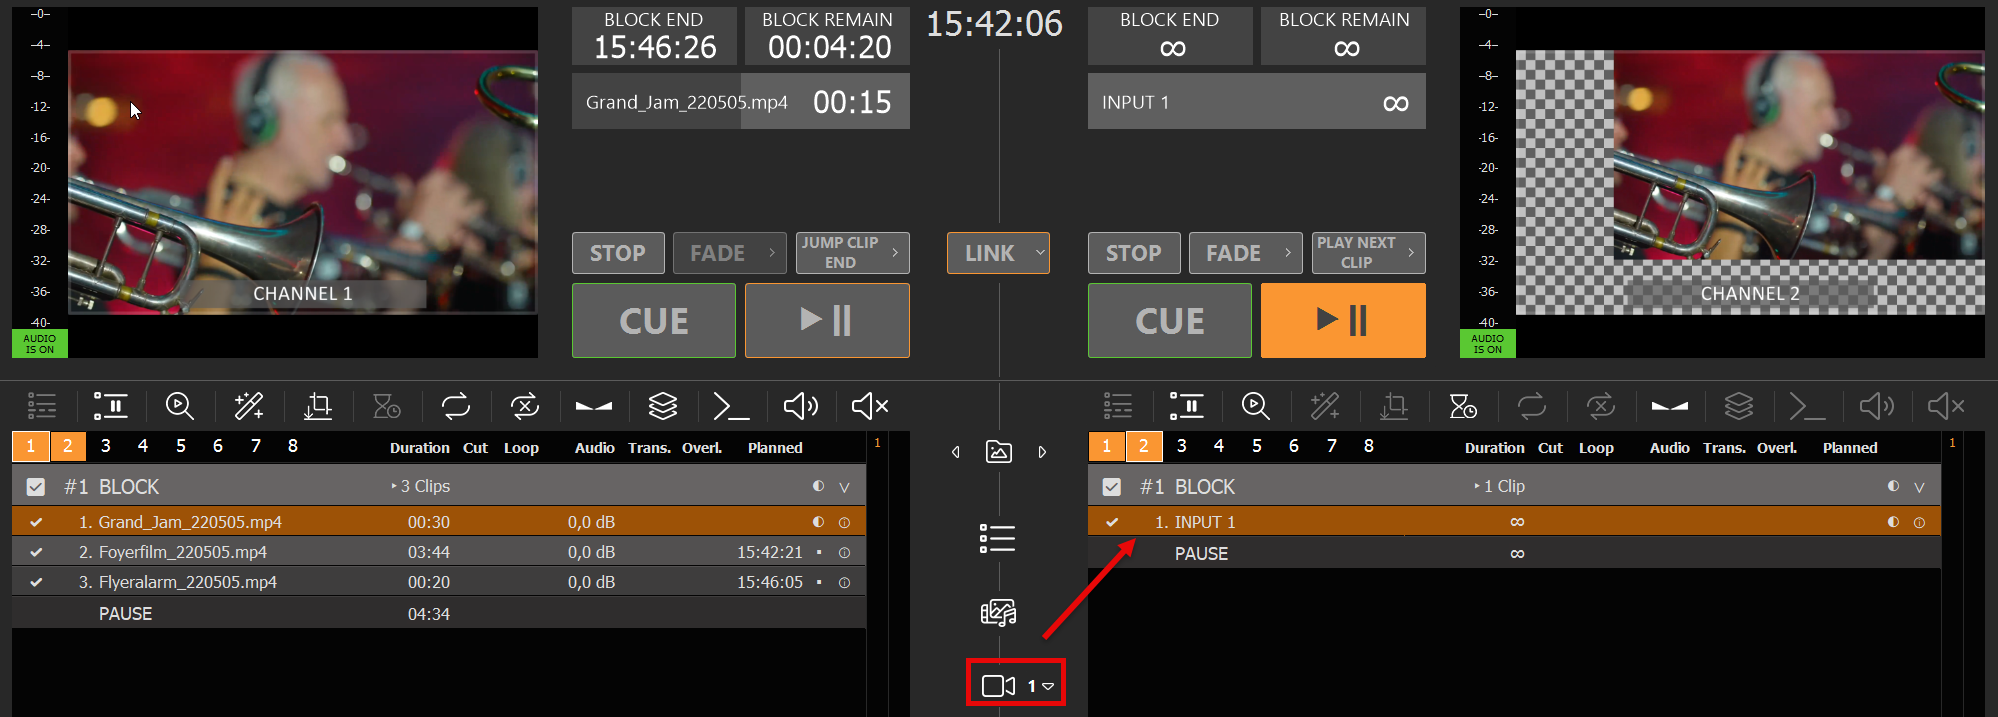
We then add Input 1 to the Playlist of Channel 2, by Drag Drop of the Input Icon to the Playlist. We now have the Video Content in L-Band size:
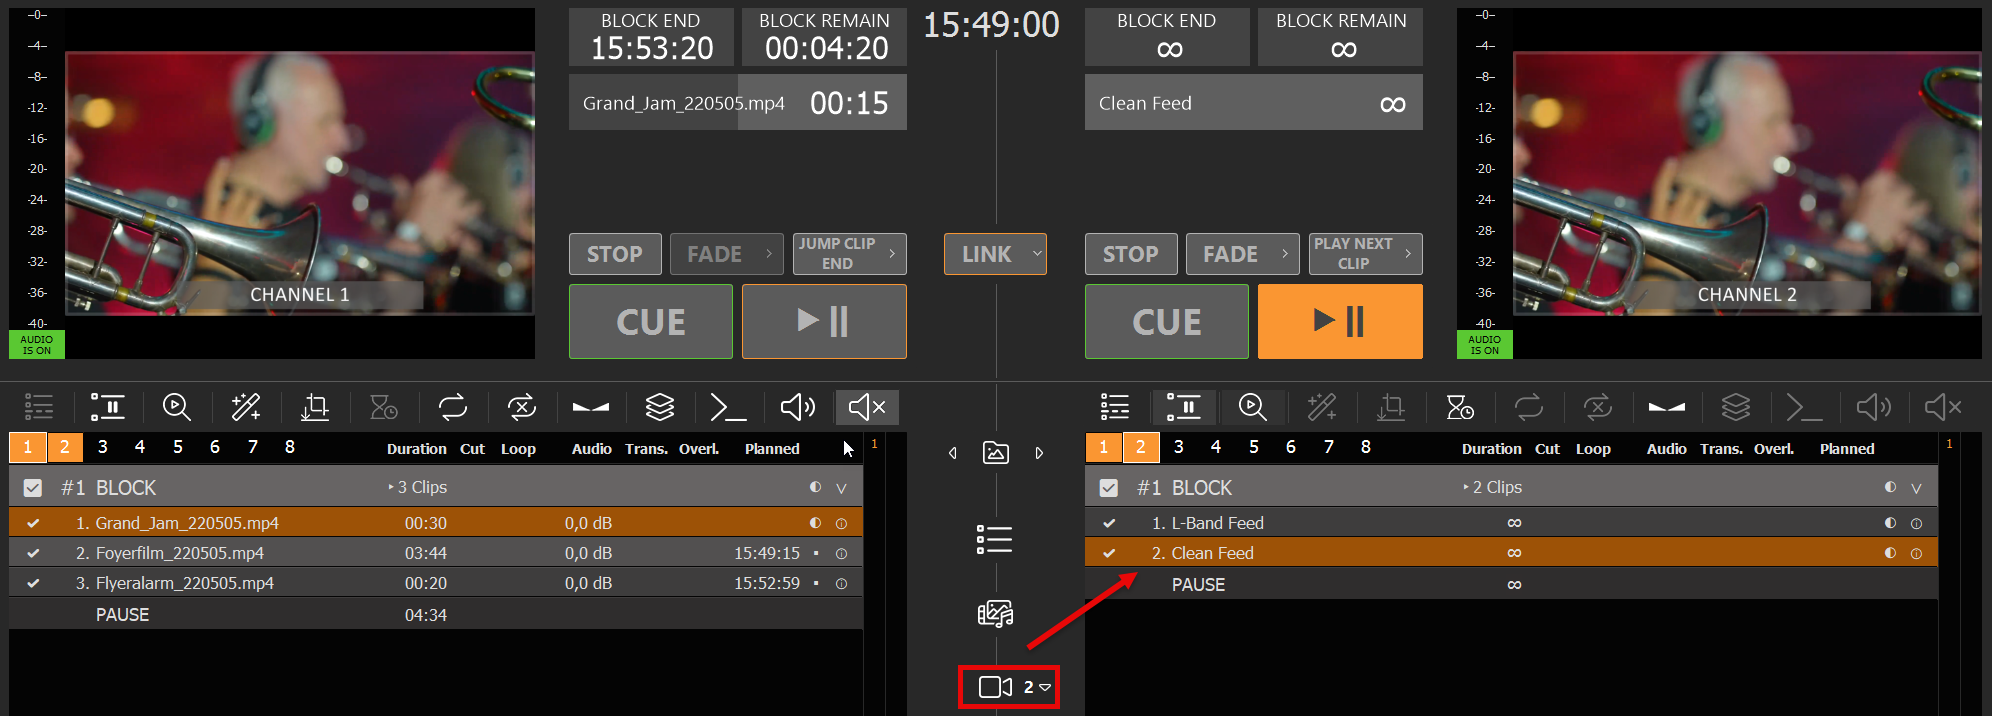
3. Add the Clean Feed for Switching
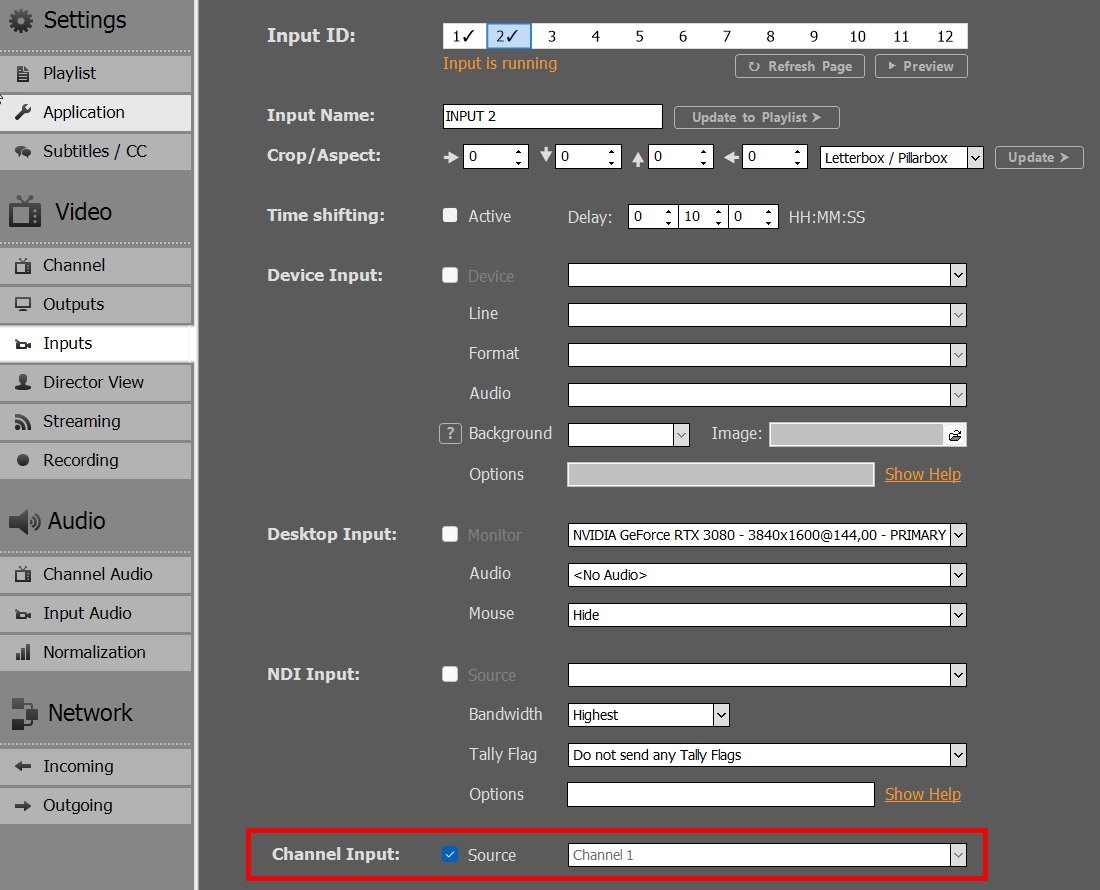
Since our Final Output will run over Channel 2, we also want our Clean Feed to be selectable in the Channel 2 Playlist. For this, we can simply copy the Channel without the Output Scaler. Use another Input and set Channel 1 as Source:
Then also add that Input to Channel 2. I already renamed both Inputs in the Playlist to be more distinguishable:
You can now quickly switch between L-Bands and Clean Feed.
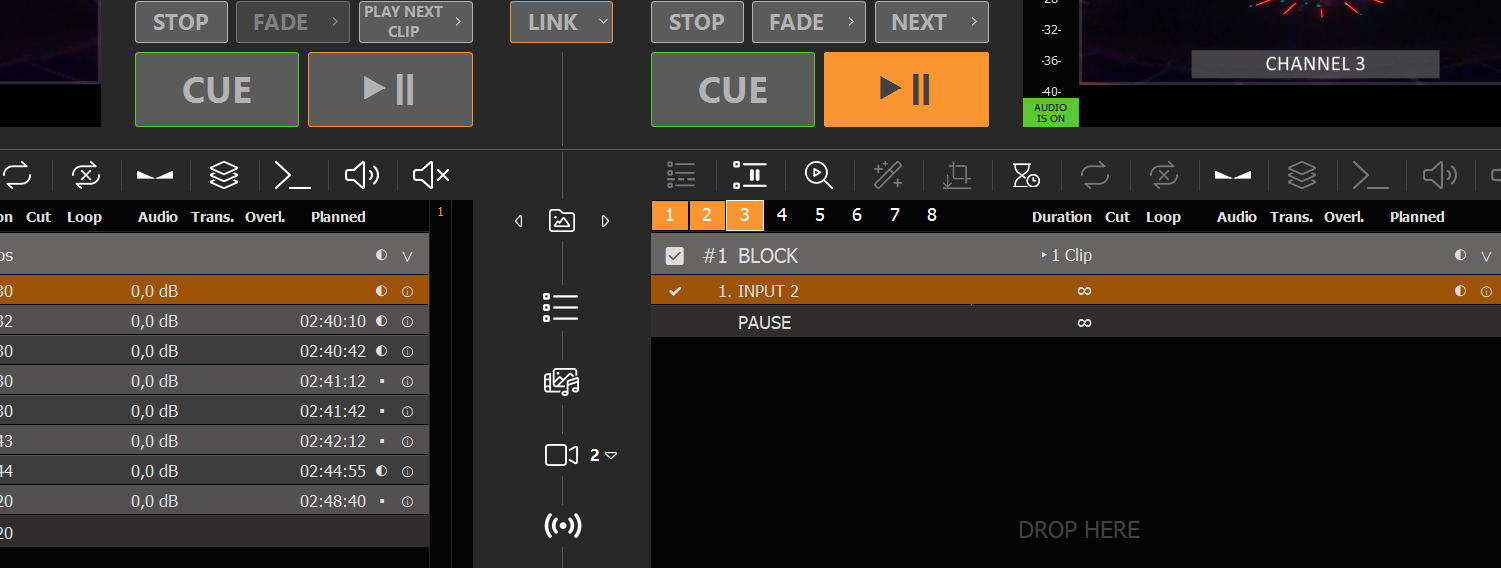
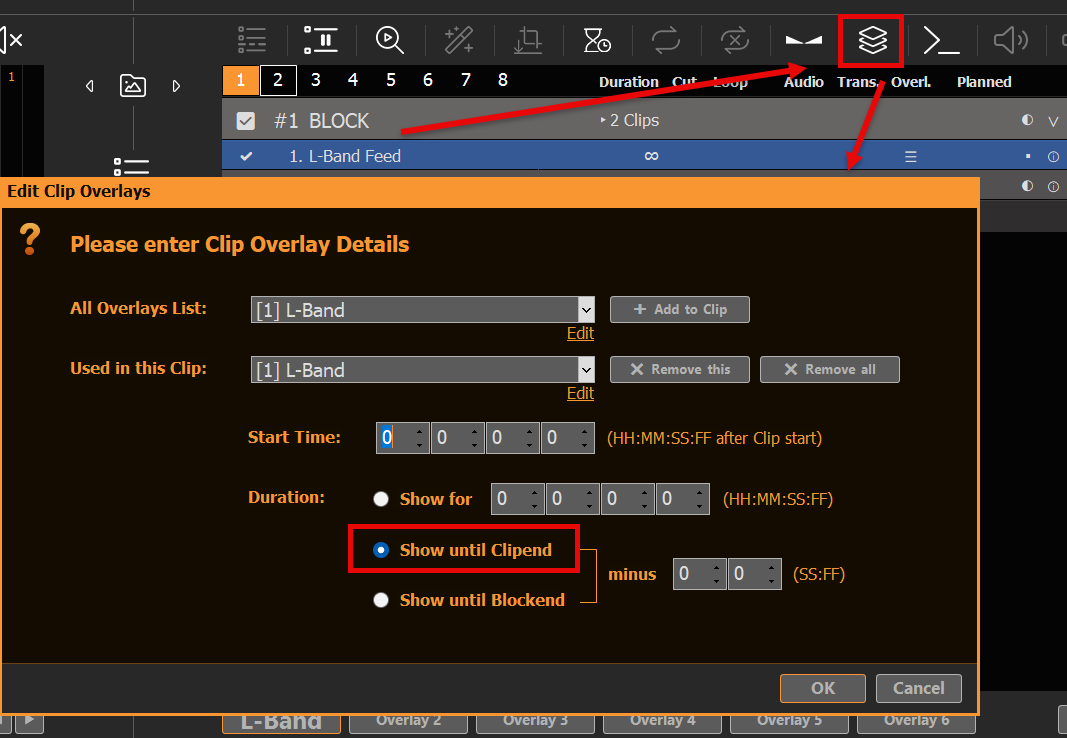
Click on any empty Overlay Button, then add our Sample PNG:
We now want our Overlay to ONLY play with the Playlist Clip for the “L-Band Feed” Input. For this we select the L-Band Clip and click the Overlay Icon, then add our new Overlay for the whole duration of the Clip:
Our L-Band Overlay will now automatically start together with the L-Band Feed:
Note: Overlays that are assigned to Clips always have a slight reaction delay. This can be overcome by finetuning Playlist and Overlay Fade Times. You could also split the L-Band Feed and Clean Feed to Channel 2 and 3 and use an external Mixer for Transitions.