User Manual & Guide
Official Multi-Channel Video Playout & Remote Production Documentation
Table of Contents
- User Manual & Guide
- Hardware
- Your PLAYDECK PC Build & Hardware Requirements
- Supported Input/Output Devices
- Internal and External Keying
- PiP (Picture-in-picture) with Internal Keying
- ST 2110 Device Setup
- Setup Device Reference Signal (GenLock)
- Playlist & Content
- Best Video Codecs for Playback
- Insert Input Streams into Playlist
- Insert YouTube Videos into Playlists
- Automate Overlay Lower Third with Clips
- Closed Captions / Subtitles
- Prepare/Import Playlists externally
- Create Pre-Show Waiting Loop
- Creating a Slideshow Single-Monitor
- Growing Files in Playlist
- Transcode Clips for GPU Decoding
- Video & Audio Output
- Broadcast your Video Feed
- Setup of your Output Streams
- ASIO / Dante Virtual Soundcard
- Multichannel Audio and Mixing
- Color Correction for Inputs and Channel
- HDR Output and Recording
- Audio Delay
- Advertisement & SCTE
- Ad Breaks to interrupt Playout
- Create L-Band Ads via second Channel
- Using SCTE for Inputs and Outputs
- Sending SCTE-35 to Stream Server
- Cloud & Remote Productions
- Setup Cloud & Remote Productions
- Using Companion for Playout Control
- Using Commands for Playout Control
- Video from/to OBS Studio
- Video from/to vMix
- Amazon EC2 Installation
- PLAYDECK API
- License & Support
- PLAYDECK License Options
- Activate your License
- Free Backup License
- Move License to another PC
- Recover lost license
- Send Log Files to Support Team
- Upload Files to Support Team
- Setup RustDesk unattended Access for Remote Support
- Video Engine Logging
User Manual & Guide
Welcome to the official PLAYDECK documentation. This comprehensive user guide is engineered to help you configure, automate, and operate your playout system flawlessly—whether you deploy on-site or in cloud-based remote production environments.
💡 Localized Production Workflows: To ensure flawless operation in high-pressure environments worldwide, the entire PLAYDECK software user interface natively supports 9 international languages.
Quick Start: System Architecture
PLAYDECK scales from simple single-channel setups to complex broadcast infrastructures. Before diving into the specific configuration chapters below, ensure you understand the core capabilities of your edition:
- Multi-Channel Playout: Manage and route up to 8 completely independent output channels simultaneously. Organize your videos, graphics, audio tracks, live inputs, or IP streams instantly via our high-speed drag-and-drop playlist interface.
- Real-Time Transcoding: Feed your playlist with almost any common video codec or container. The internal PLAYDECK engine automatically scales, converts, and transcodes all assets to match your global hardware output format in real time.
- Flexible Signal Routing: Output your pristine feeds via professional hardware I/O cards (Blackmagic Design, AJA, Deltacast, etc.), native low-latency NDI® streams, secure SRT feeds, or the Windows extended desktop.
- Advanced Control & Automation: Take absolute command of your production flow using rapid physical keyboard shortcuts, automated Tally interfaces, standardized network TCP/IP commands, or our native module built for Bitfocus Companion and Elgato Stream Deck systems.
Studio Edition: Real-Time Ingest & Audio Power
If you are operating the PLAYDECK Studio Edition, you have access to expanded broadcast-grade workflows:
- 4-Channel Recording & Focused Edit-While-Ingest: Capture up to 4 dedicated recording streams simultaneously. One designated master channel can be utilized for active Edit-While-Ingest clip generation, allowing you to use high-speed keyboard shortcuts to trim, cut, and push highlight clips to your playlist instantly while the background recording continues uninterrupted.
- Native ASIO & Dante Support: Route complex multichannel audio effortlessly with native, high-performance integration for ASIO devices and Dante Virtual Soundcard (DVS) managing up to 32 independent audio channels.
How to Navigate This Documentation
Please use the navigation menu in the left sidebar to access specific technical chapters. The menu automatically expands to guide you through our step-by-step guides on Hardware, Playlists, Routing, and Automation.
Hardware
Your PLAYDECK PC Build & Hardware Requirements
Please use these guidelines to choose or build the right hardware for your PLAYDECK system. While PLAYDECK can play virtually any codec on any Windows machine, professional video playout requires robust hardware to guarantee zero frame drops.
In this article:
→ System Configuration Archetypes
→ Legacy Systems & The CPU-Only Safety Net
→ Technical Performance Metrics (For Professionals)
→ Hardware Output Cards
→ Pre-Flight Troubleshooting Checklist
System Configuration Archetypes
Choose the production archetype below that aligns with your upcoming project requirements.
1. The “Set-and-Forget” Fixed Installation
Designed for: Stationary installations, corporate showrooms, medical facilities, schools, and digital signage.
If you need a compact, dedicated unit to seamlessly manage 1 or 2 channels of standard H.264 playback, look for small form-factor builds that do not compromise on hardware decoding.
- Our Recommendation: A performance-tier mini PC like the ASUS NUC 14 Performance or ASUS ROG NUC. Avoid the standard baseline office NUC models. Ensure your chosen mini PC configuration specifically includes a discrete NVIDIA RTX GPU (such as an RTX 4060 or 4070 laptop chip) to guarantee stutter-free H.264 timeline performance.
2. The Mobile Video Director
Designed for: Event tech providers, traveling AV crews, festivals, and remote live streaming.
If you deploy temporary live setups, push video to regional LED walls, or broadcast from mobile command stations, a thermal-efficient mobile rig is mandatory.
- Our Recommendation: High-performance, current-generation workstation or gaming laptops engineered for continuous maximum thermal load (such as the XMG ULTRA or Lenovo Legion Pro series). For broadcast environments, scale the laptop’s connectivity by pairing it with a Blackmagic UltraStudio capture and playback device via a high-bandwidth Thunderbolt interface.
3. The Broadcast & Studio Professional
Designed for: TV stations, multi-screen matrix setups, and 24/7 master control environments.
When your infrastructure handles simultaneous UHD/4K master outputs, heavily utilizes network protocols like NDI®, or handles deep layers of graphic lower-thirds, you require raw hardware overhead.
- Our Recommendation: A custom-built rackmount or tower workstation pairing a multi-core processor with a desktop NVIDIA RTX 4070 / 4080 GPU or higher, paired with hardware-locked internal SDI I/O cards (such as the Blackmagic DeckLink series).
Legacy Systems & The CPU-Only Safety Net
If your team is working with an existing office computer or an older laptop running basic integrated graphics (like Intel UHD Graphics), you do not necessarily have a hopeless case. PLAYDECK can adapt to older architectures if you configure the processing pipeline correctly.
If you encounter stuttering, timeline lag, or stability problems on older office hardware, apply this configuration fallback inside the application settings:
- Open your PLAYDECK settings.
- Locate the Application configuration settings.
- Switch the GPU Pipeline parameter to
<CPU only>. - Switch the Decoding GPU parameter to
<CPU only>.
Important Deployment Caveats for Legacy Hardware:
When fallback mode is active, your system CPU takes over the entire workload. To ensure successful execution without frame drops, you must limit your project scope: restrict your playout to a single channel, downscale your timeline target to standard 1080p Full HD, and ensure your playback clips match a highly optimized, lightweight playback format.
Technical Performance Metrics (For Professionals)
If your engineering department is evaluating existing inventory or sourcing custom parts, use these performance baselines.
1. The GPU Decoding Hierarchy
While alternative graphics options exist, they are not architecturally identical for live broadcast workloads:
NVIDIA RTX Architecture (Industry Standard): Highly recommended. NVIDIA’s dedicated NVDEC/NVENC blocks provide optimal hardware decoding throughput for standard broadcast clip formats, specifically H.264 and HEVC video streams.
Intel ARC Systems: Suitable for secondary deployments. They handle modern AV1 streams effectively and offer competent DVB 4:2:2 encoding, but do not match the overall parallel decoding capacity of an NVIDIA workstation chip under multi-channel production loads.
Intel UHD Onboard Graphics: Strictly intended for lightweight, single-channel legacy fallback usage using the CPU-only adjustments outlined above.
AMD Radeon Platforms: Hardware-accelerated video decoding via AMD is not officially supported inside PLAYDECK.
2. Target PassMark Benchmarks
If you are unsure of your current hardware performance levels, you can check your system components directly on the official PassMark Software Benchmark Database.
| Playout Scale | Target CPU PassMark Score | Target GPU PassMark Score |
|---|---|---|
| Single-Channel | 25,000+ | 9,000+ (e.g., Dedicated NVIDIA RTX) |
| Dual-Channel | 35,000+ | 12,000+ (e.g., Station-class Workstation) |
| 4 to 8 Channels | 50,000+ | 15,000+ (High-Tier Desktop RTX) |
3. When to Provision an Advanced CPU
Your system’s central processor handles severe system strain if your workflow requires any of the following processing types:
- High-bitrate master formats that bypass GPU decoding pipelines entirely (e.g., Apple ProRes, HAP, or Avid DNxHD).
- Multi-destination network routing using NDI® outputs, as these matrix encoders rely purely on your host processor.
- Intense deployment of live-rendered HTML graphics, data-driven lower-thirds, or real-time alpha-channel video overlays.
Hardware Output Cards
To bypass operating system desktop layer interference, maximize color accuracy, and maintain a strict hardware-locked framerate control signal, offload your primary feeds to a dedicated PCIe or Thunderbolt video interface.
PLAYDECK maintains native compatibility with major broadcast hardware lines, including:
- Blackmagic Design (DeckLink / UltraStudio)
- AJA Video Systems
- Deltacast & Bluefish444
- Magewell, Osprey, and Stream Labs
- ASIO & Dante Virtual Soundcard audio endpoints
Pre-Flight Troubleshooting Checklist
If you experience playback stutter, audio sync issues, or unexpected lag during configuration, run through this quick self-diagnostic checklist before contacting support.
- Check the
<CPU only>toggle: If running on an office laptop with integrated Intel graphics, ensure both GPU Pipeline and Decoding GPU are set to<CPU only>in the settings menu. - Verify Windows Power Plans: Laptops often throttle performance on battery. Connect your device to a power outlet and change your Windows power plan to High Performance or Best Performance.
- Monitor the Playback Clock: Look at the integrated performance monitor in PLAYDECK during playback. If the frame counter drops or turns red, your hardware is hitting a performance bottleneck.
- Match Output Refresh Rates: Ensure the refresh rate of your Windows display settings (e.g., 50Hz or 60Hz) exactly matches the output frame rate of your project settings in PLAYDECK.
- Inspect the Clip Codec: If a specific video causes issues, verify its properties. High-bitrate 4K files or uncompressed formats will overwhelm basic system processors. Use an H.264 MP4 file for the safest baseline test.
- Update the I/O Drivers: If using Blackmagic DeckLink or UltraStudio hardware, ensure you have the latest version of Desktop Video installed via the Blackmagic Design support page.
Supported Input/Output Devices
We basically support all cards of the following manufacturers, since we always include the latest drivers. But because of the vast amount of cards out there, we only tested the most common ones.
Blackmagic Design
Important: Needs Version 14.5+ of Blackmagic Desktop Video Setup.
- DeckLink 4K Extreme 12G
- DeckLink 8K Pro
- DeckLink Duo 2
- Intensity Pro 4K
- DeckLink Mini Monitor / Mini Recorder
- DeckLink Quad 1 / 2 / HDMI Recorder
- DeckLink SDI 4K
- DeckLink Studio 2 / 4K
- Ultra Studio HD Mini / 4K Mini / 4K Extreme 3 / Monitor 3G
- DeckLink IP/SDI HD
AJA
- Corvid 24 R1
- Corvid 44
- Corvid 88
- KONA LHi
- KONA IP
Deltacast
- DELTA-3G-e 22
- DELTA-3G-elp-d 8c
- DELTA-3G-elp-key 11
- DELTA-ip-ST2110
Bluefish444
- Epoch 4K Neutron
- Epoch 4K Supernova S+
- Epoch Neutron
- Epoch Supernova CG
- KRONOS K8
DekTec
- DTA-2144B
Magewell
- Pro Capture Quad HDMI
- Pro Capture Quad SDI
Osprey
- Osprey 915
- Osprey 925
- Osprey 927
- Osprey 935
- Osprey 945
- Osprey 914
- Osprey 924
- Osprey 944
- Osprey 1214
- Osprey 1215
- Osprey 1225
- Osprey 1227
- Osprey 1245
- Osprey 1285
- Osprey M15
- Osprey M14
- Osprey M24
- Osprey M25
Stream Labs
- Alpha HD
- MH4LM
- MS4
- MSP2
Yuan
- SC550N1
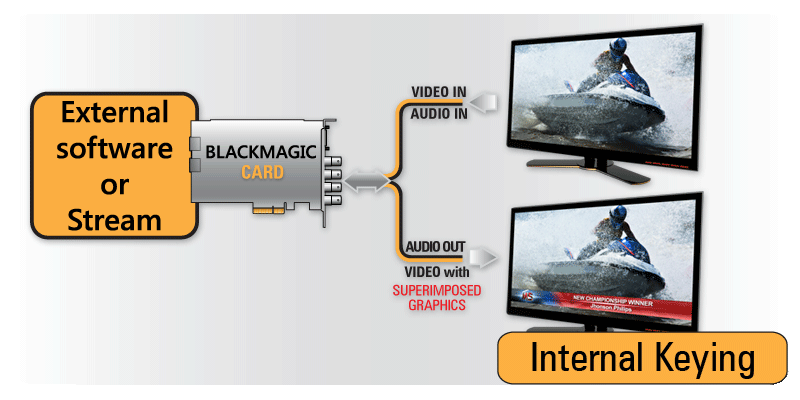
Internal and External Keying
PLAYDECK supports both Internal (Superimposed Graphics over Incoming Signal) and External (Generating Video Fill and Key Signal) Keying, given that the Output card supports it too. You can also output the key or fill signal separately.
You can also use NDI to send your Key or Fill Signal with Alpha Channel Support.
Internal Keying
In Internal Keying mode, PLAYDECK will superimpose the video over an incoming signal on the same card:
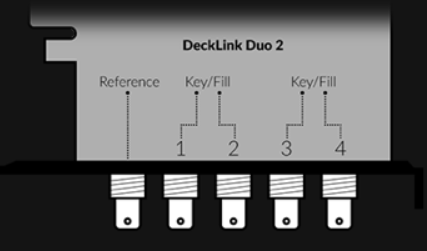
Lets take the Decklink Duo 2 for example: It has 4 SDI Ports. We need to tell the Card, which 2 Ports will be used for Internal Keying with the help of Desktop Video Setup (Blackmagic’s own Setup-App):


The Decklink will now operate like this:

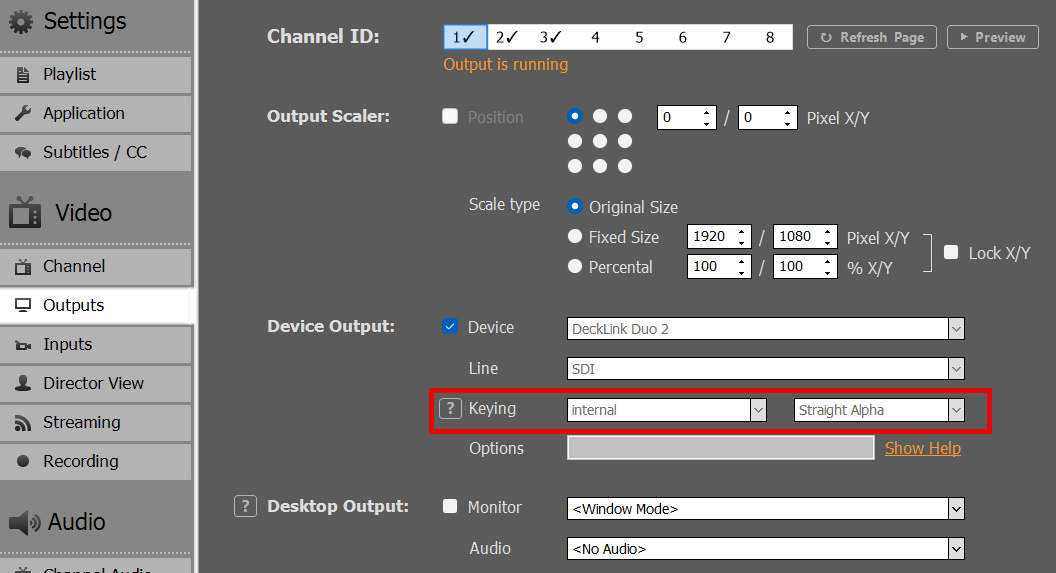
If we start PLAYDECK now, the INTERNAL Option becomes selectable as Device Output:

Once you activate the Device for Keying, PLAYDECK will automatically change your Background to TRANSPARENT and your Color Space to ARGB32 (to support Alpha Channel):

The Image shows PLAYDECK Overlays Sample: Create Overlay > HTML > Screen-Title.html.
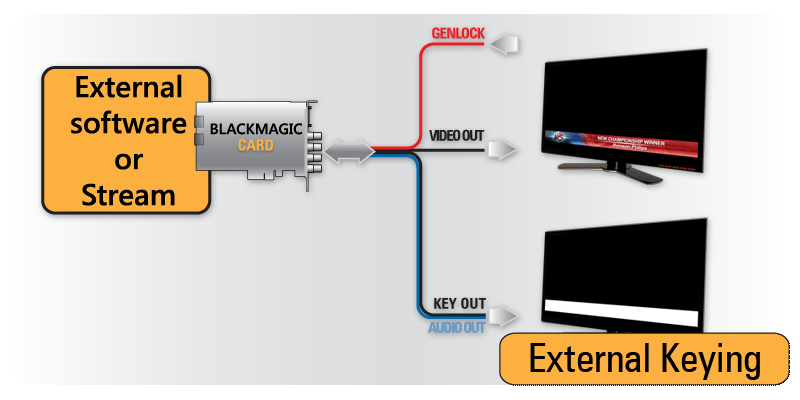
External Keying
In External Keying mode, PLAYDECK generates both Fill and Key signals and the keying is made by an external keyer:
Lets take the Decklink Duo 2 for example: It has 4 SDI Ports. We need to tell the Card, which 2 Ports will be used for External Keying with the help of Desktop Video Setup (Blackmagic’s own Setup-App):
The Decklink will now operate like this:
If we start PLAYDECK now, the EXTERNAL Option becomes selectable as Device Output:

Once you activate the Device for Keying, PLAYDECK will automatically change your Background to TRANSPARENT and your Color Space to ARGB32 (to support Alpha Channel):
The Image shows PLAYDECK Overlays Sample: Create Overlay > HTML > Screen-Title.html.
PiP (Picture-in-picture) with Internal Keying
This article will show how to utilize Internal Keying as means of overlaying Video over Video (Picture in Picture).
1. Setup of Internal Keying
We need to setup PLAYDECK to have a BG FEED and a PIP FEED and mix them into the MAIN FEED. For this we use Internal Keying. See this article for more info on Internal Keying.
Use any Device that is capable of Internal Keying. In our example we use the Blackmagic DeckLink Duo2. Open the Desktop Video Setup and combine and first 2 SDI Outputs. Leave the other Outputs solo:

Next we enable Internal Keying in Channel 1 in PLAYDECK:
2. Setup of BG FEED
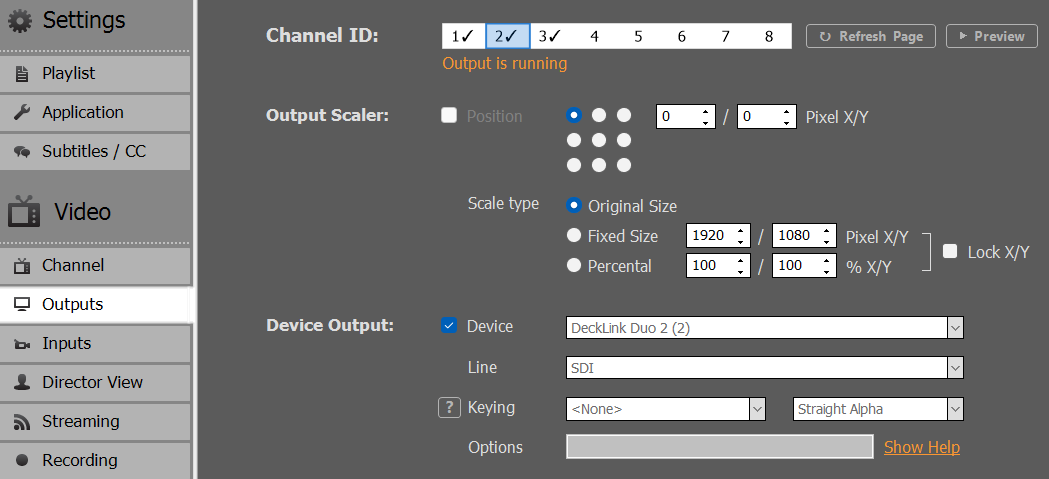
Now we need to send our BG FEED to SDI 1. For this we use Channel 2 and send it via SDI Loop from SDI 3 to SDI 1. Please note, that because we combined SDI 1+2, SDI 3 is now designated as “Decklink Duo 2 (2)”:
Then we start any video content on Channel 2:
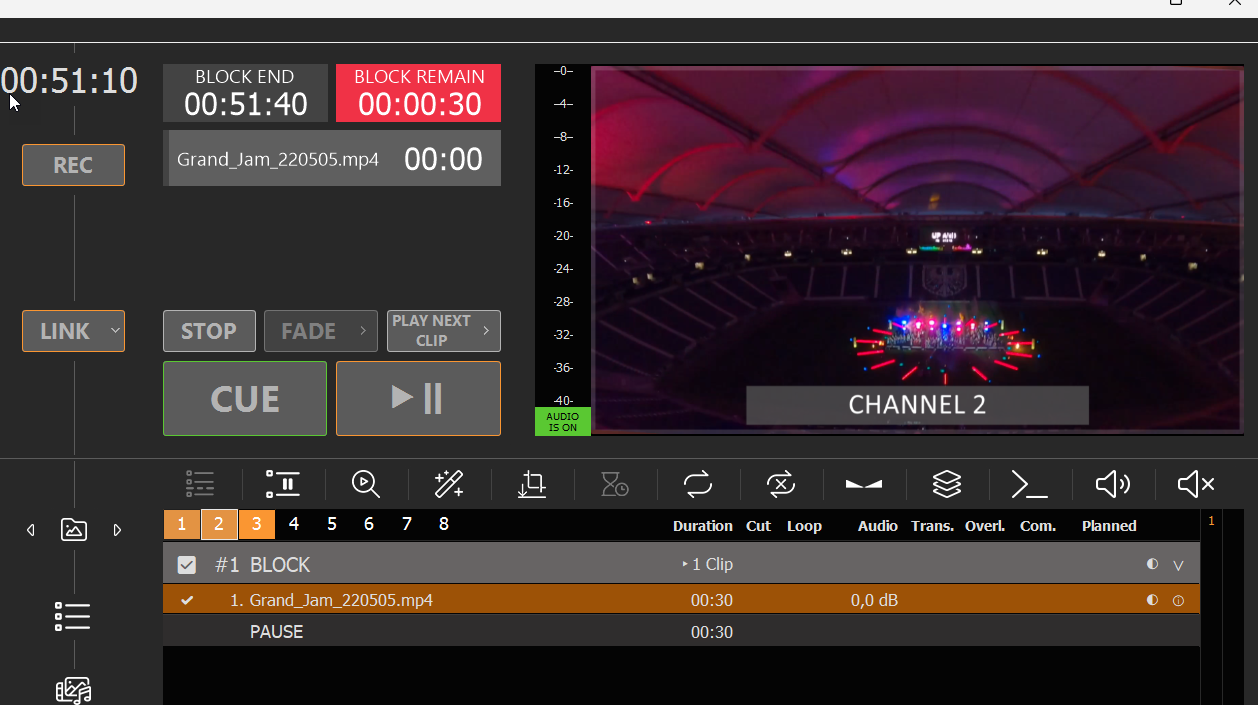
If you have a SDI Monitor on SDI 2, you can already see the BG FEED playing there now.
We could now go ahead and play any Content with Alpha on Channel 1, which is keyed over the BG FEED, e.g. Alpha Videos (ProRes, HAP-A) or simple Overlays. But since we need our PIP FEEDBACK scaled and positioned, we need to set it up on another Channel.
3. Setup of PIP FEED
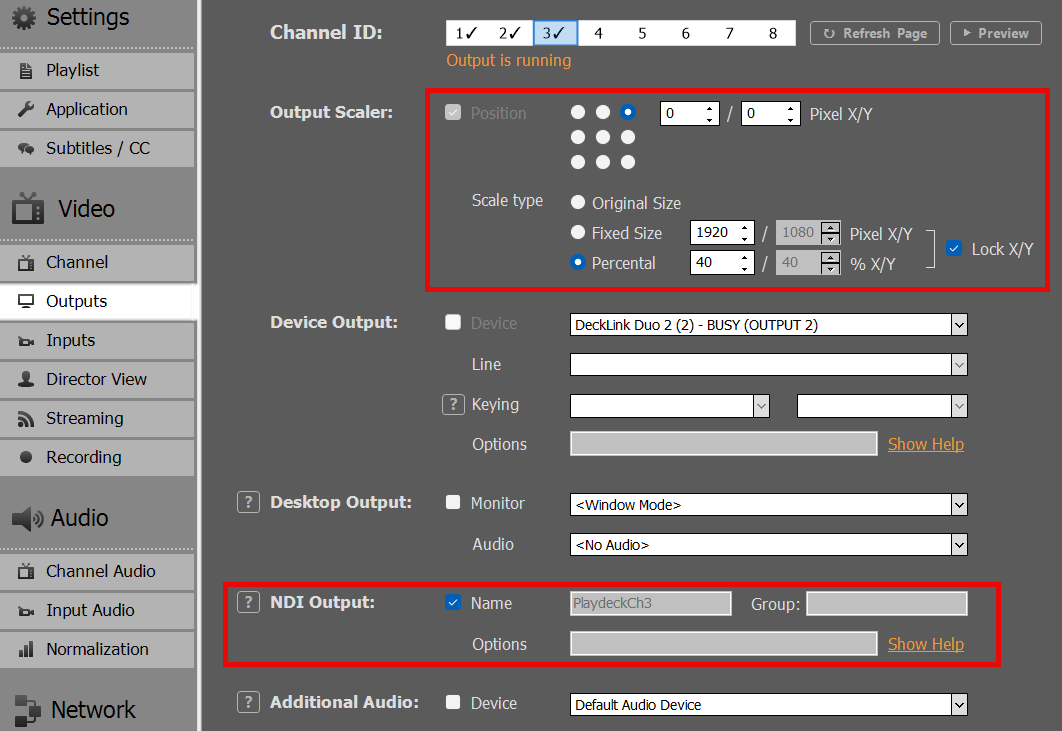
We use Channel 3 as PIP FEEDBACK, so we can play regular Video Content here. We want to send it via NDI from Channel 3 to Channel 1 and activate the Output Scaler, so that our PIP is in the UPPER RIGHT Corner:
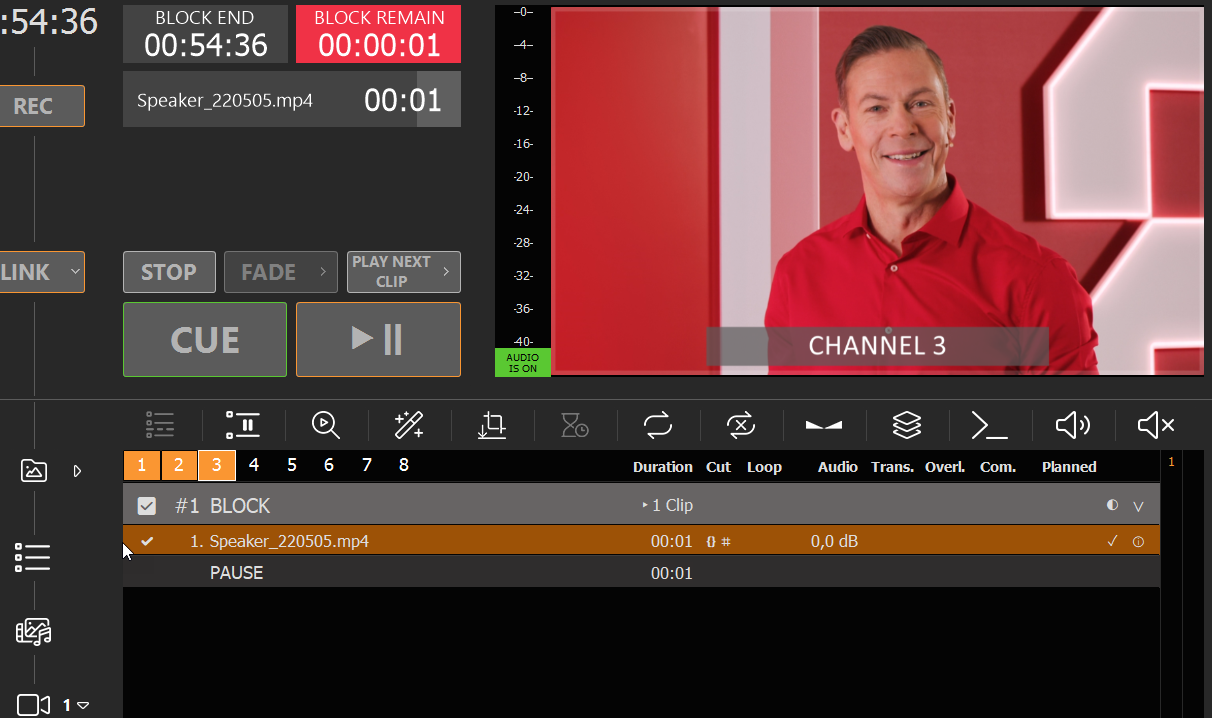
We now insert a Video Clip on Channel 3, but this could also be Live Video, Streams or anything else:
We loop this NDI Feedback to Input 1:
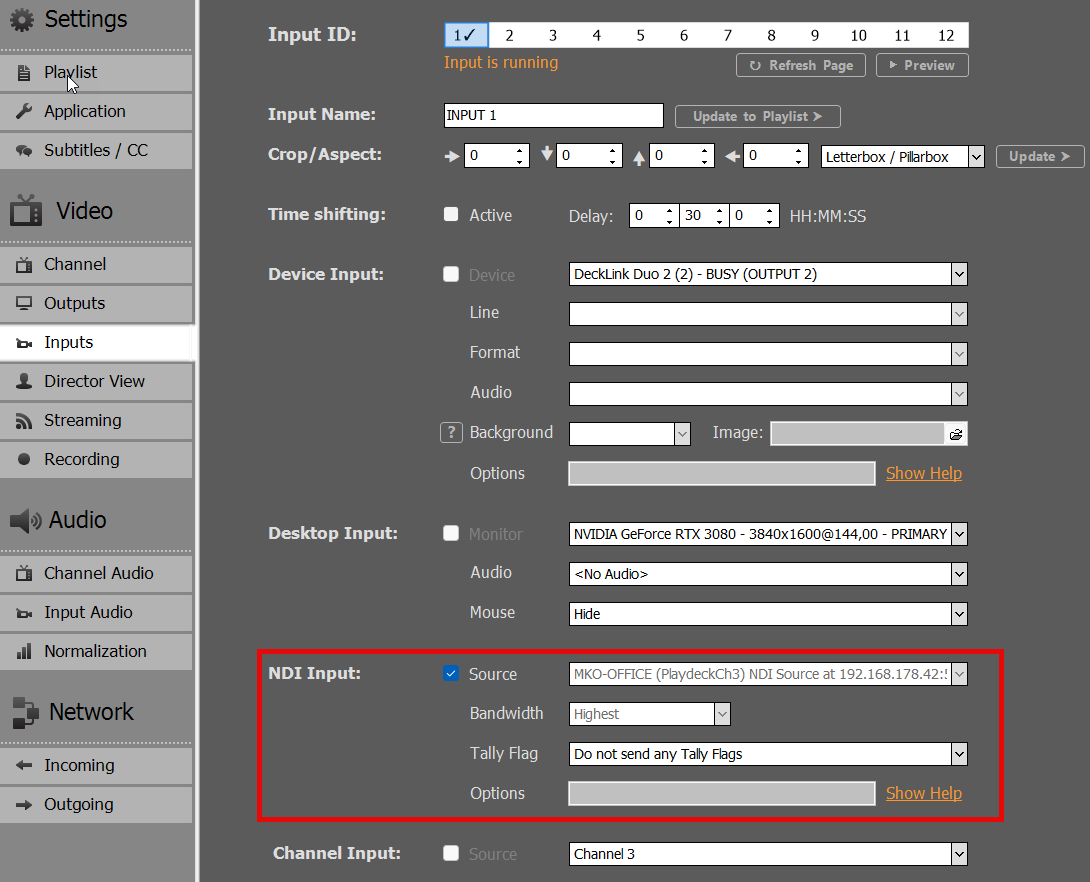
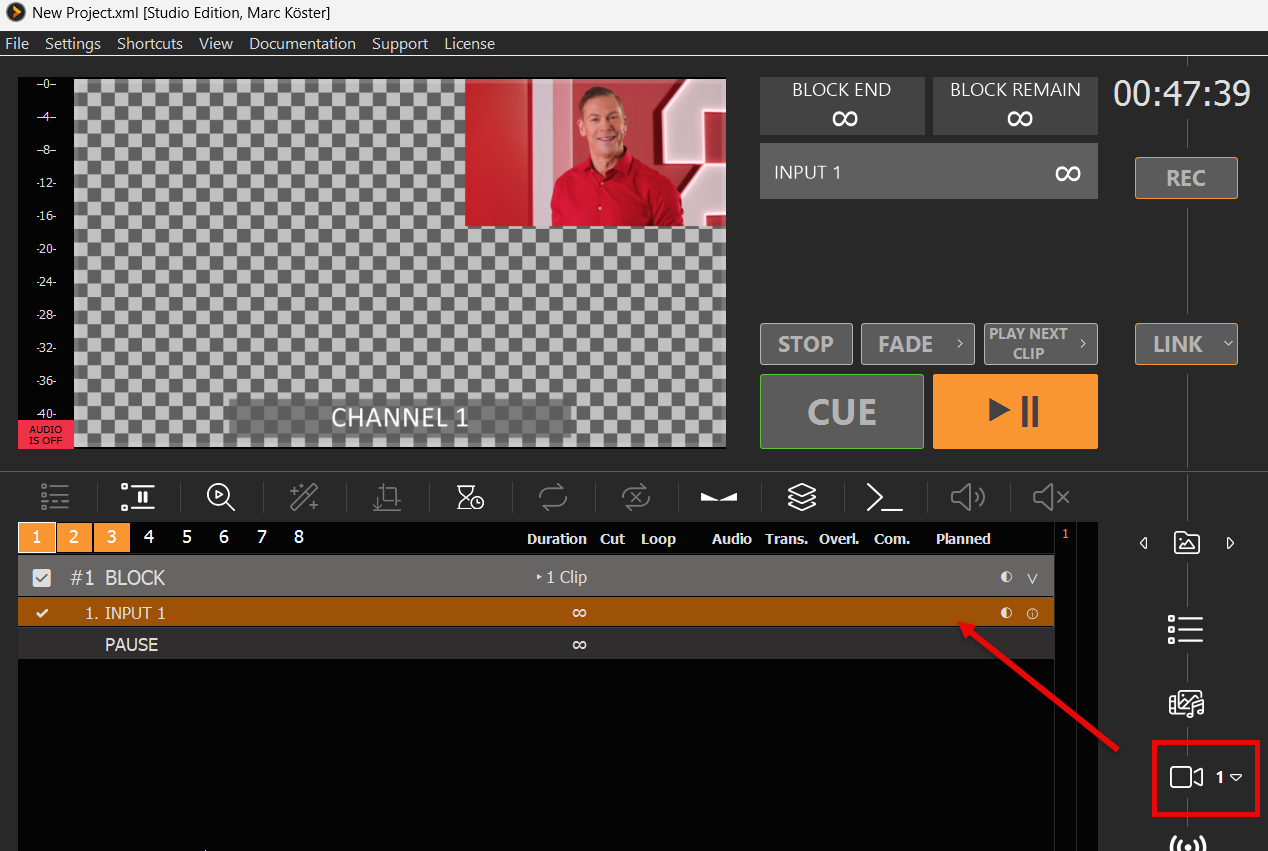
Then insert Input 1 into the Playlist of Channel 1:
We now downscaled the Channel 3 Playlist into Channel 1, which will be keyed over the BG FEED of Channel 2.
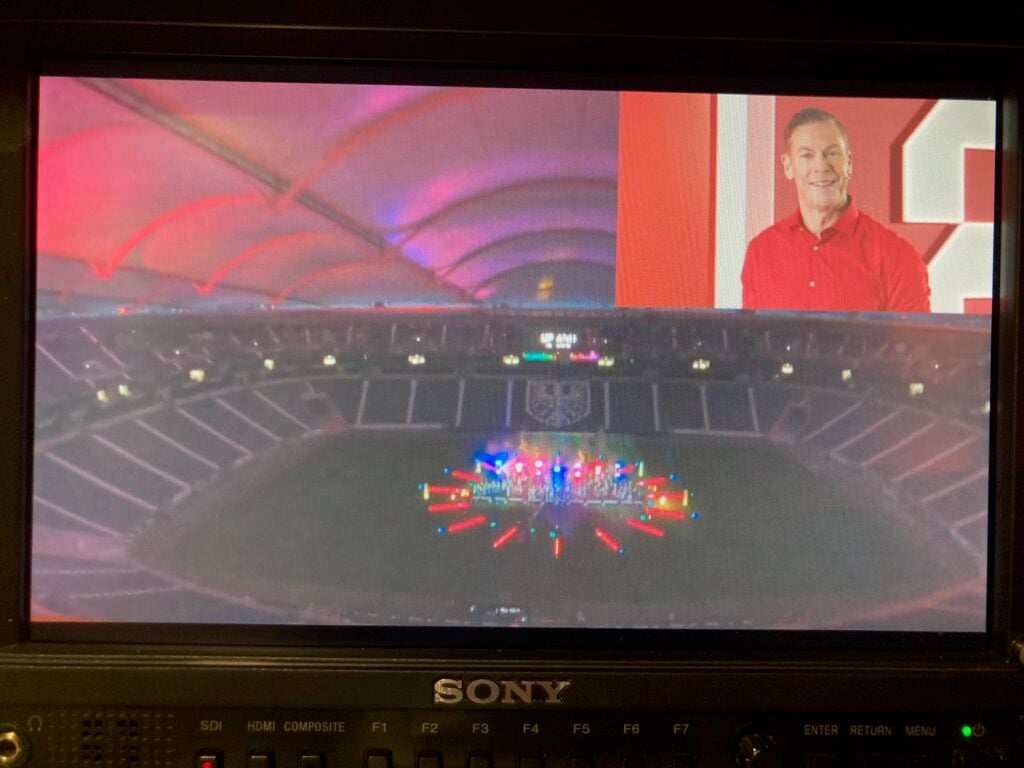
4. FINAL OUTPUT / MAIN FEED
The MAIN FEED is send to SDI 2 and this is the result on the SDI Monitor of SDI 2 (photographed):
ST 2110 Device Setup
For High Quality and Lag-free network operation, we recommend using High-end network hardware (router, switch) as well as high speed ethernet cables (Cat6+).
In this article:
→ BlackMagic 2110/IP Cards
→ AJA 2110/IP Cards
→ Deltacst 2110/IP Cards
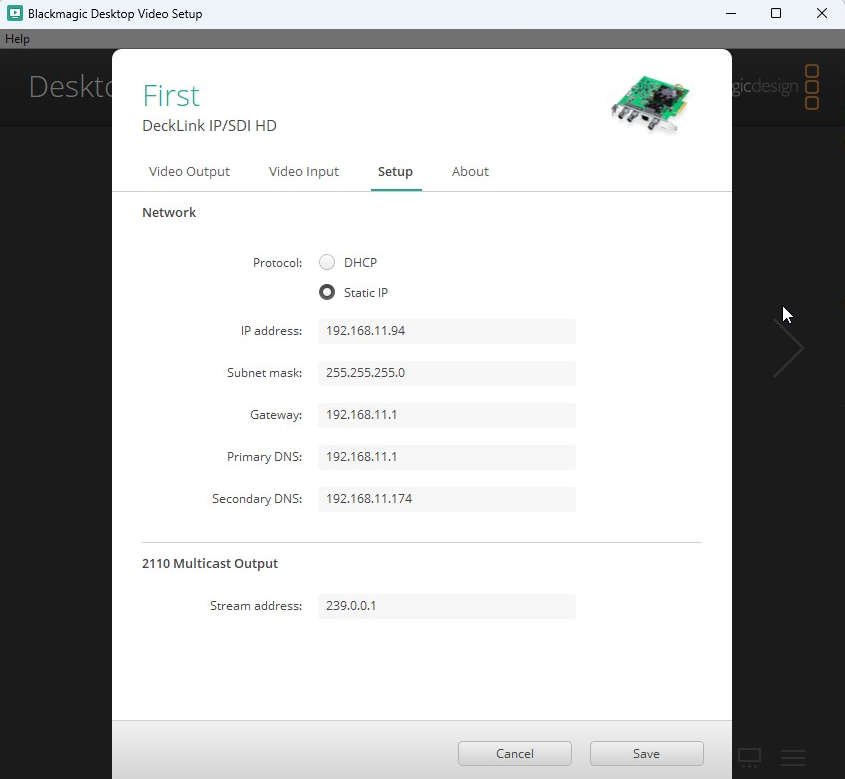
BlackMagic 2110/IP Cards
BlackMagic Devices can be configured with the Tools given by the manufacturer:
Blackmagic Desktop Video Setup:
AJA 2110/IP Cards
PLAYDECK allows to assign a network configuration file, which will be loaded upon PLAYDECK start.
Structure of Configuration File (JSON)
{
    "protocol":"2110",
    "network2110":
    { // this part configures the parameters of the device itself, the connectors (SFP) with IP configurations
        "ptpPreferredGMID":"00-00-00-00-00-00-00-00",
        "ptpDomain":0,
        "setup4k":"false",
        "multiSDP":"false",
        "audioCombine":"false",
        "rxMatchOverride":0,
        "sfps":
        [   // the configuration itself for each of the connectors
            {
                "designator":"sfp1",
                "ipAddress":"192.16.45.8",
                "subnetMask":"255.255.0.0",
                "gateWay":"255.255.255.255",
                "enable":"true"
            },
            {
                "designator":"sfp2",
                "ipAddress":"192.16.45.9",
                "subnetMask":"255.255.0.0",
                "gateWay":"255.255.255.255",
                "enable":"true"
            }
        ]
    },
    "receiveVideo2110":
    [ // this part is to receive a video feed where you set the connector, the source address
      // and its port for both the connectors.
        {
            "stream":"video1",
            ...
        },
        {
            "stream":"video2",
            ...
        }
    ],
    "receiveAudio2110":
    [ // this part is to receive an audio feed where you set the connector, the source address
      // and its port for both the connectors.
        {
            "stream":"audio1",
            ...
        },
        {
            "stream":"audio2",
            ...
        }
    ],
    "receiveAnc2110":
    [  // this part is to receive the ancillary data where you set the connector, the source address
       // and its port for both the connectors.
        {
            "stream":"anc1",
            ...
        },
        {
            "stream":"anc2",
            ...
        }
    ],
    "transmitVideo2110":
    [  // this part is to send a video signal where you set the connector, the destination address
       // and its port for both the connectors.
        {
            "stream":"video3",
            ...
        },
        {
            "stream":"video4",
            ...
        }
    ],
    "transmitAudio2110":
    [  // this part is to send an audio signal where you set the connector, the destination address
       // and its port for both the connectors.
        {
            "stream":"audio3",
            ...
        },
        {
            "stream":"audio4",
            ....
        }
    ],
    "transmitAnc2110":
    [  // this part is to send ancilary data where you set the connector, the destination address
       // and its port for both the connectors.
        {
            "stream":"anc3",
            ...
        },
        {
            "stream":"anc4",
            ...
        }
    ]
}
Sample Configuration File
You can download this sample JSON File.
Assign Configuration to PLAYDECK
The Configuration will be loaded while starting PLAYDECK and will be assigned to all Inputs and Outputs (if assigned).
For INPUTS, edit the full path to your JSON File in this Registry Key:
HKEY_CURRENT_USER\Software\Medialooks\MFormats\MFLive\AJA2\aja.ip_config
For OUTPUTS, edit the full path to your JSON File in this Registry Key:
HKEY_CURRENT_USER\Software\Medialooks\MFormats\MFRenderer\AJA2\aja.ip_config
Deltacast 2110/IP Cards
PLAYDECK allows to assign a network configuration file, which will be loaded upon PLAYDECK start.
Structure of Configuration File (JSON)
{
    "tx2110Setup":
    {
        "ethPort":0,
        "DHCP":"true",
        "ipAddress":"127.0.0.1",
        "subnetMask":"255.255.255.0",
        "gateWay":"127.0.0.1",
        "ipAddressMulticast":"239.1.32.32",
        "udpPort":16
    },

    "rx2110Setup":
    {
        "ethPort":0,
        "DHCP":"true",
        "ipAddress":"127.0.0.1",
        "subnetMask":"255.255.255.0",
        "gateWay":"127.0.0.1",
        "ipAddressMulticast":"239.1.32.32",
        "udpPort":16
    }
}
Sample Configuration File
You can download this sample JSON File.
Assign Configuration to PLAYDECK
The Configuration will be loaded while starting PLAYDECK and will be assigned to all Inputs and Outputs (if assigned).
For INPUTS, edit the full path to your JSON File in this Registry Key:
HKEY_CURRENT_USER\Software\Medialooks\MFormats\MFLive\MFDeviceDC\dc.ip_config
For OUTPUTS, edit the full path to your JSON File in this Registry Key:
HKEY_CURRENT_USER\Software\Medialooks\MFormats\MFRenderer\DC\dc.ip_config
Setup Device Reference Signal (GenLock)
Introducing a Reference Signal will force the Output Hardware to send Frames based on the Reference Clock.
1. Multichannel SYNC as a use case
If you plan to synchronize multiple channel, you should connect an external clock to your device, then CUE all Channel via LINK (or Commands) and UNPAUSE all Channel. This will start all Channel (almost) SYNC, while the Reference Clock will make sure, that all Channel STAY SYNC. This is only guaranteed for all Channel, that output over the same Device.
This article shows, how to use Action Buttons to start multiple Channel in SYNC.
2. Providing a Reference Signal (GenLock)
Please check with your manufacturer, if your Output Card supports a Reference Input. In this example we use “Blackmagic DeckLink Duo 2”:
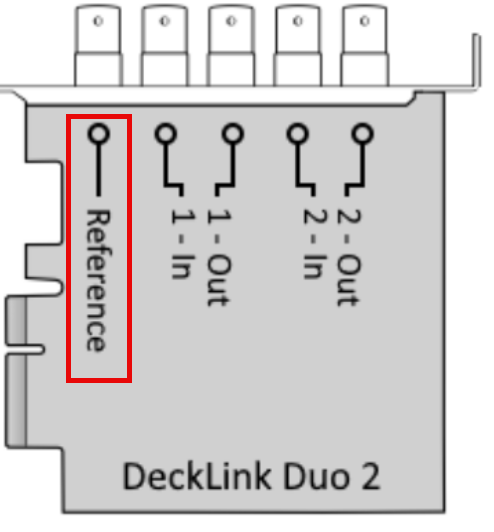
If none of your other hardware generates a Clock Signal, you can use separate hardware to generate such a signal, like the Blackmagic Sync Generator.
3. Setting the Reference Input in PLAYDECK
Some Devices need specific reference input settings, like AJA Devices. In this Example, we set the AJA Reference Input to “external” for the Device:
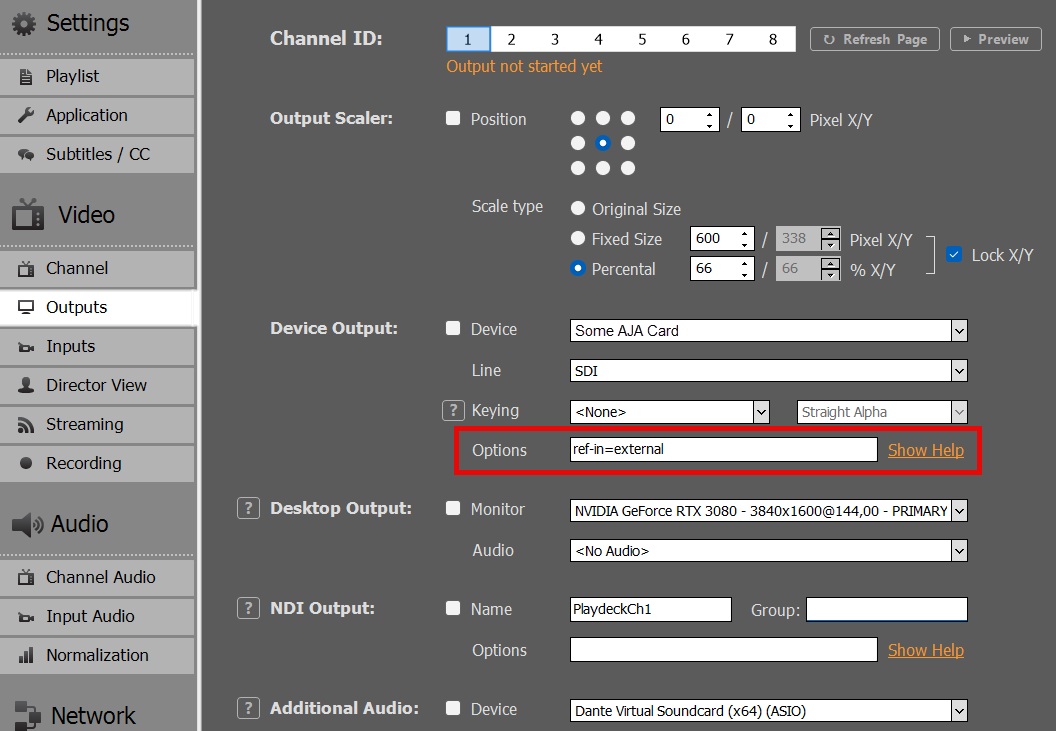
If you click on SHOW HELP, you will see all other Options, that can be set for each device manufacturer.
Playlist & Content
Best Video Codecs for Playback
PLAYDECK can play almost any Codec out there. If the Codec is not supported by your GPU, it always falls back to CPU to make it work. There are very view exception: NotchLC for example cant be played with PLAYDECK.
We understand, that most of you have not much control over the Video Codec selection, as you receive your Video Files from Customer right before the show.
But if you have the Time to transcode the Video Files or even more are part of the production process, then you have more options than just H.264 MP4 Files.
We recommend going with AV1, if your NVIDIA supports it, except when you need Alpha-channel, than switch to HAP. In all other cases fall back to H.265/HEVC. ProRes has the best image quality, but is not really suited for real-time playback, as it is more of an editing and post-production codec.
There is also a Feature in PLAYDECK to quickly transcode your Video Files to a GPU-supported Codec. Please see this article.
H.265/HEVC
General-purpose codec. Use, if your NVIDIA GPU does not support AV1 and if you dont need Alpha-channel.
- Developer: JCT-VC
- GPU Decoding: Yes, but depends on NVIDIA GPU, see this List
- Quality: Good quality at all bitrates
- Alpha-channel: No
- Features: HDR, 10-bit color, 8K
AV1
Most efficient Codec. Use, if you your GPU supports it and you don’t need Alpha-channel. Near-lossless quality and significantly smaller file sizes than ProRes.
- Developer: Alliance for Open Media (Open Source)
- GPU Decoding: Yes, but depends on NVIDIA GPU, see this List
- Quality: Better quality than H.265/HEVC, esp. at lower bitrates
- Alpha-channel: No
- Features: HDR, 10-bit color, 8K
HAP
Very universal Codec. Use, if you need Alpha-channel, and preferred over ProRes because of lower CPU load.
- Developer: Vidvox
- GPU Decoding: No, but lower CPU load than ProRes
- Quality: Better quality than H.265/HEVC, but less than AV1
- Alpha-channel: Yes (with HAP Alpha and HAP Q)
- Features:
ProRes
Offers highest image quality with ProRes 4444. Preserves fine details and colors exceptionally well, at the cost of high CPU load. Use only, if you can afford the CPU load and need highest possible visual quality. This is an editing codec and no real-time codec.
- Developer: Apple
- GPU Decoding: No. High CPU load
- Quality: Better quality than all other, esp. at higher bitrates
- Alpha-channel: Yes (with ProRes 4444)
- Features: HDR, 10/12-bit color, 8K
Insert Input Streams into Playlist
This article will show how to insert Streams into your Playlist.
In this article:
→ Insert Stream (SRT, RTMP, UDP, …)
→ Insert YouTube Video
→ Insert Website Video
Insert Stream (SRT, RTMP, UDP, …)
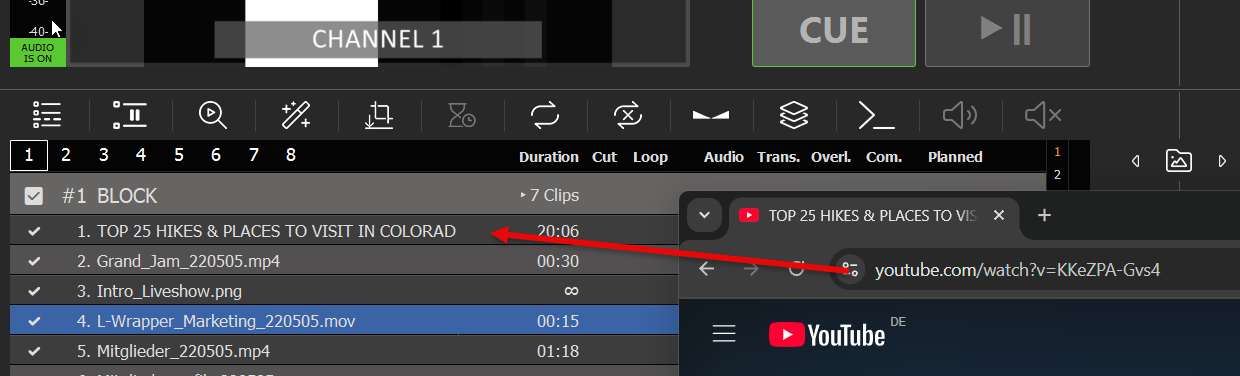
You can directly Drag Drop any YouTube URL from your Browser to PLAYDECK:
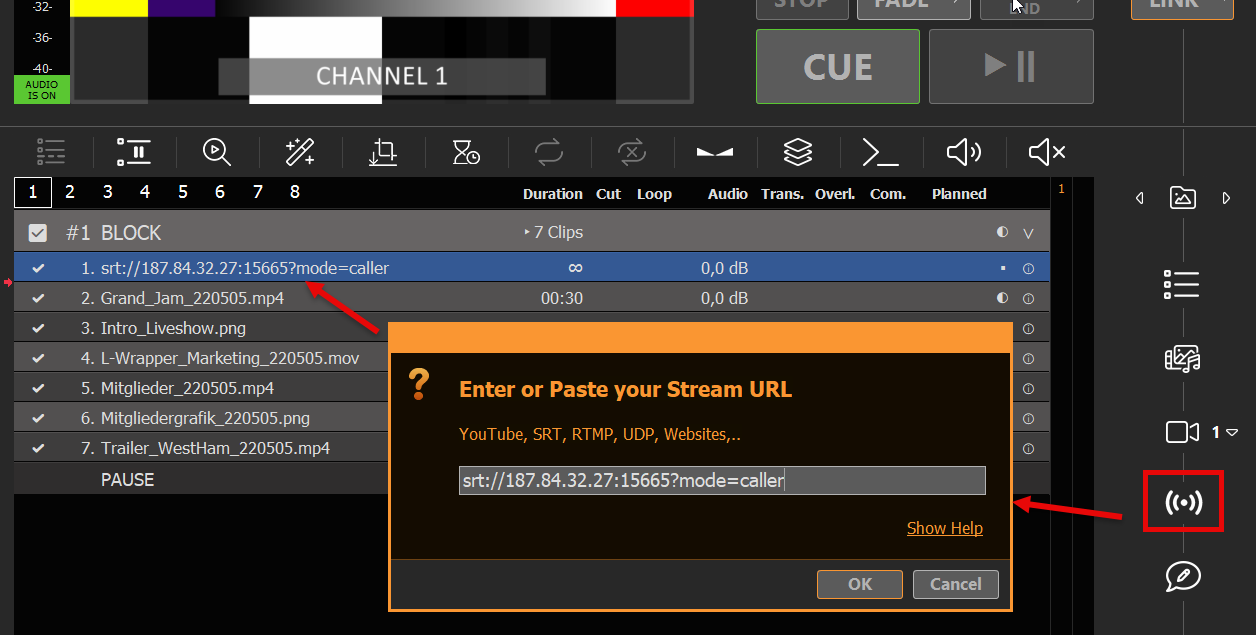
To insert a new Stream into your Playlist, simply Drag Drop the STREAM Icon onto the Playlist. A new Popup will appear, where you can enter the Stream URL:
Your Stream will be scanned by PLAYDECK now. If the PLAYDECK could connect to your Stream successfully, the Text will be shown in WHITE. You can now play the Stream and/or can double-click the INFO icon to view more information about the Stream, like Video format and codec:
If the Stream can NOT be connected, it will appear in RED:

If you made a typo, you can quickly re-edit the URL by right-clicking and selecting CHANGE URL:
Insert YouTube Video
You can insert YouTube Links via Drag Drop or in the same manner as insert as Input Stream. See this article on more information about YouTube.
Insert Website Video
You can insert some Websites per Drag Drop directly into the Playlist or via the STREAM Icon. We use TWITCH in this example. Click SHOW HELP to get more info about what Websites can be used:
Insert YouTube Videos into Playlists
This article will show how to load and edit YouTube Videos.
1. Load YouTube into PLAYDECK
You can directly Drag Drop any YouTube URL from your Browser to PLAYDECK:
Or you can use the Stream Drag Drop Icon to paste/edit the URL:
Your YouTube Videos is ready to play out-of-the-box. The quality will be pre-selected dependent on your Playlist Video Format and the Formats provided from YouTube.
Note: Avoid using long YouTube Links with Playlists like “…?v=0oIIRc0zc_U&list=RD0oIIRc0zc_U”, as they might not work or cause Lag/Stutter. We recommend using short links like “…?v=0oIIRc0zc_U”.
2. Update YouTube Driver
Should the added YouTube Clip be shown as UNPLAYABLE/RED in PLAYDECK, please update the integrated YouTube Driver. Chances are, YouTube made changes to its platform and you need a newer driver from us:

3. Change Quality, Video and Audio
YouTube Videos are always available in different qualities. You can switch Video Tracks by right-clicking the YouTube Video:
Note: YouTube provides combined Video+Audio Tracks, which are much faster. If you switch to non-combined Video Track, caching can take much longer and seeking can desync video/audio.
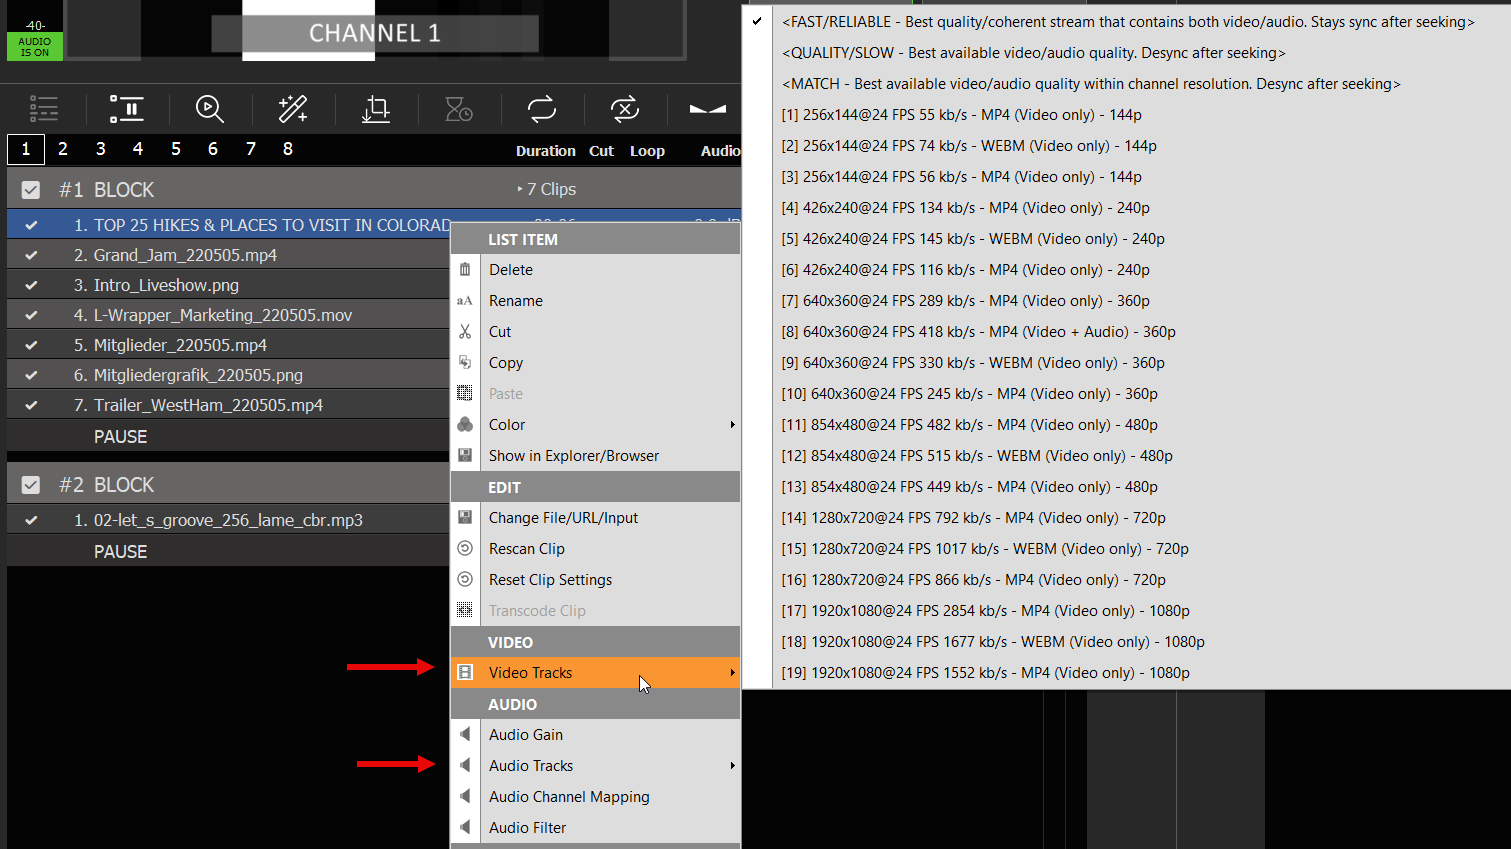
Automate Overlay Lower Third with Clips
This article will show how to use how to create Overlays Groups and bind them to Clips or schedule them.
In this article:
→ Create Lower Third (with overlays.uno)
→ Create Lower Third (with ClassX)
→ Create Lower Third (in PLAYDECK)
→ Automate Overlay with Clips/Blocks
→ Schedule Overlay
→ Remote Control
→ External Keying
1. Create Lower Third (with overlays.uno)
For this example we use a ready-to-go Lower Third Overlay from overlays.uno.
Open this Overlay Template and click on “Use for free”:
https://overlays.uno/library/199-Lower-Third—Prism
Then click on “Copy Output URL” to have the target URL in your Clipboard.
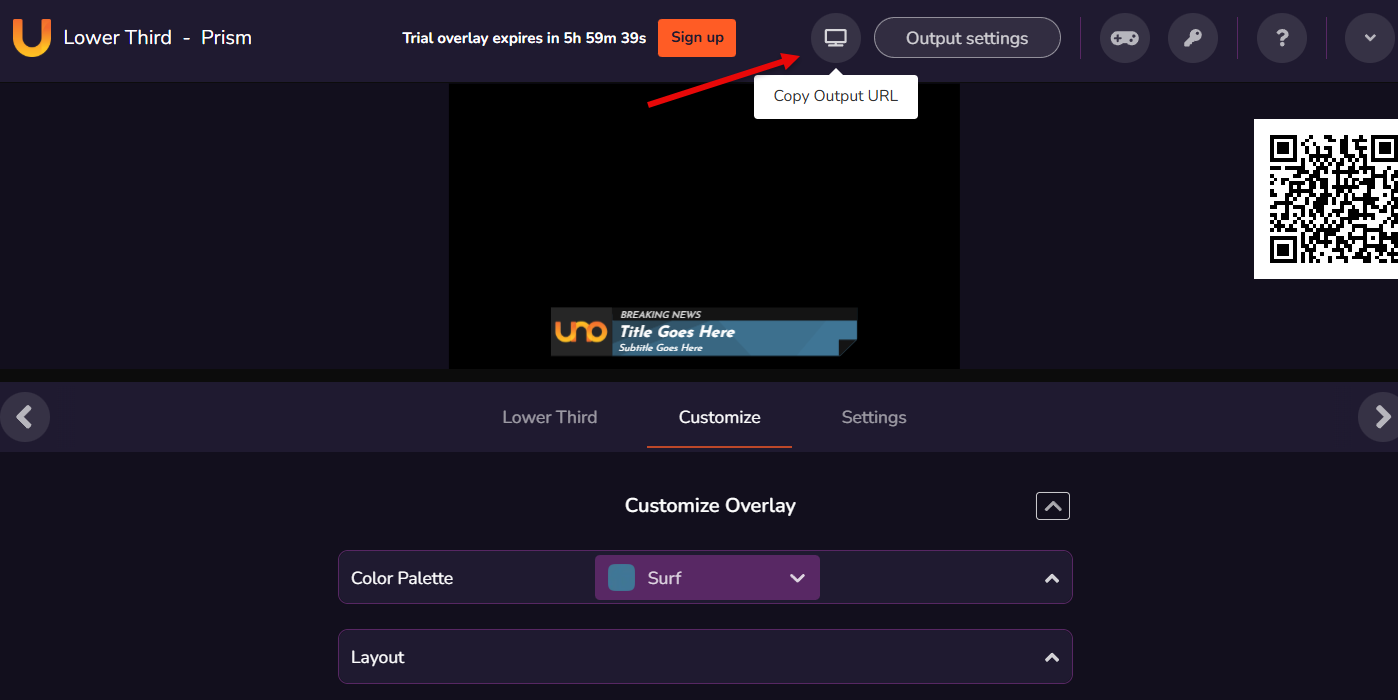
In PLAYDECK, click on any empty Overlay Button, select “HTML” and paste the URL into the upper Online Template Field:
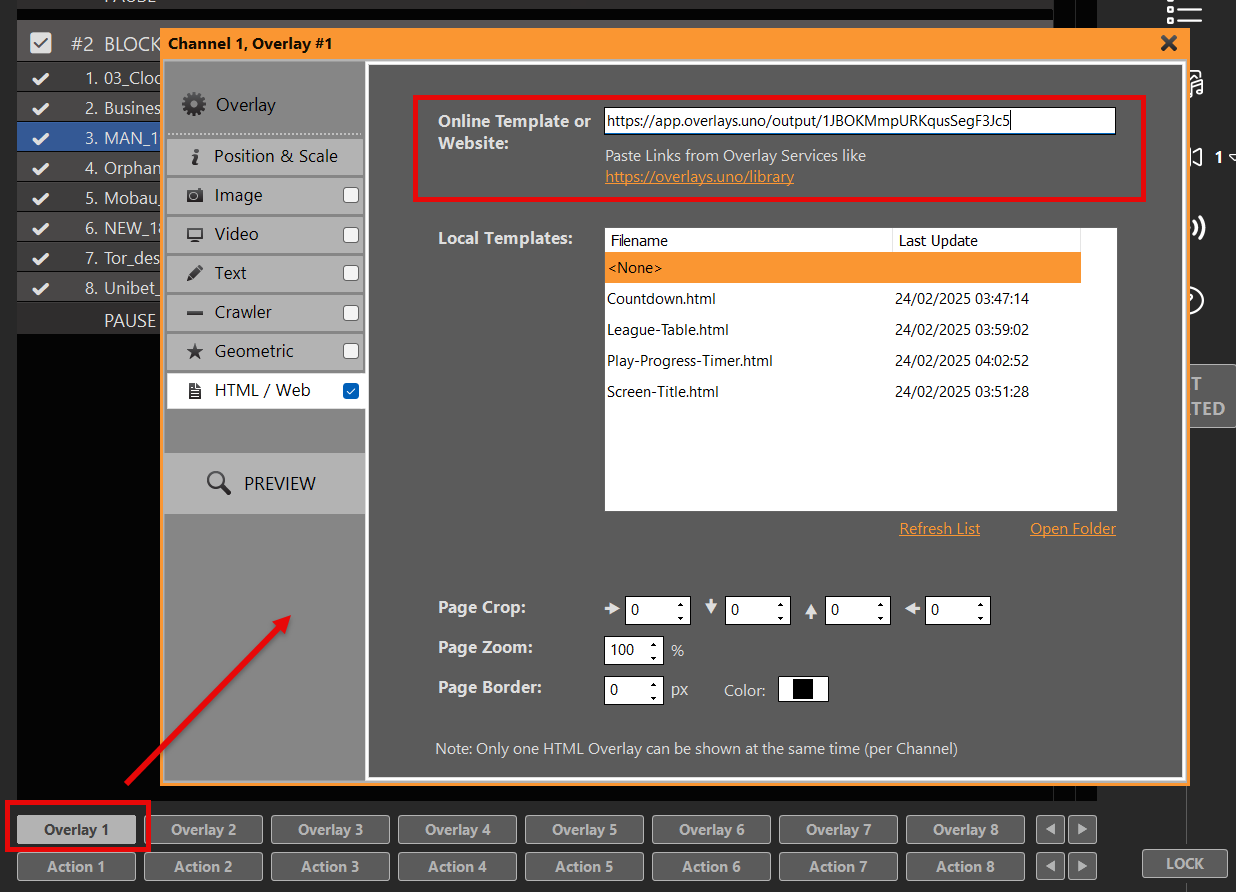
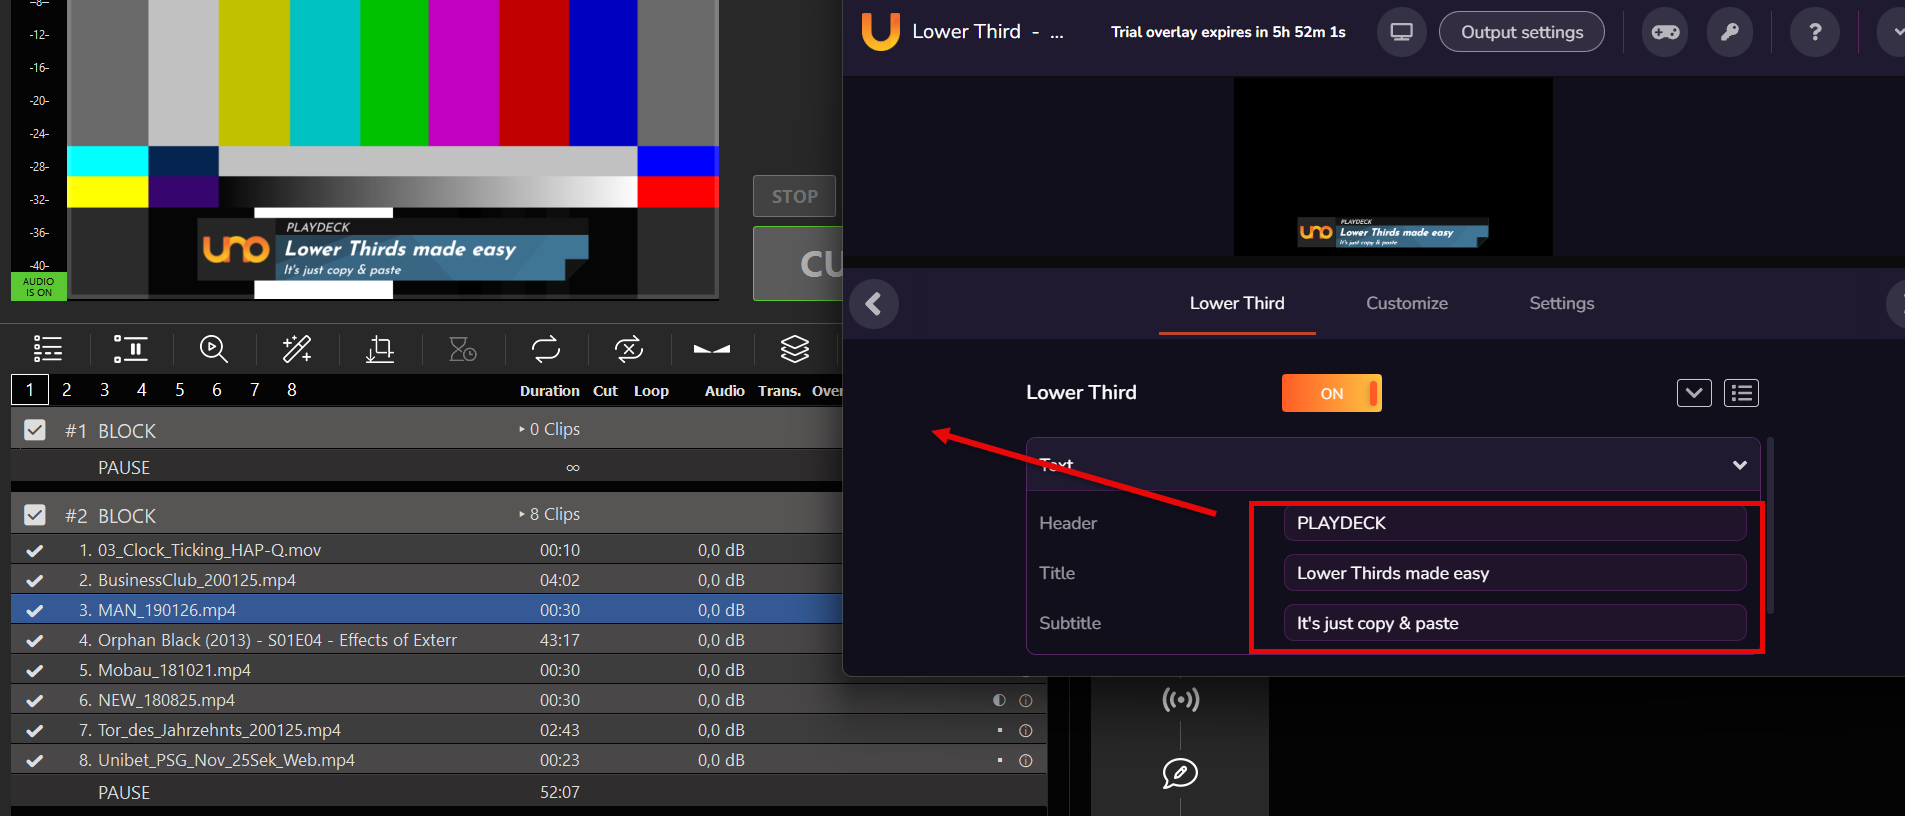
The Overlay is immediately ready for display. You can even live-update Logo and Text via the overlay.uno Overlay website:
2. Create Lower Third (with ClassX)
ClassX Liveboard is a professional CG Playout Solution for automating dynamic overlay contents. You can register for a Demo Version on their website.
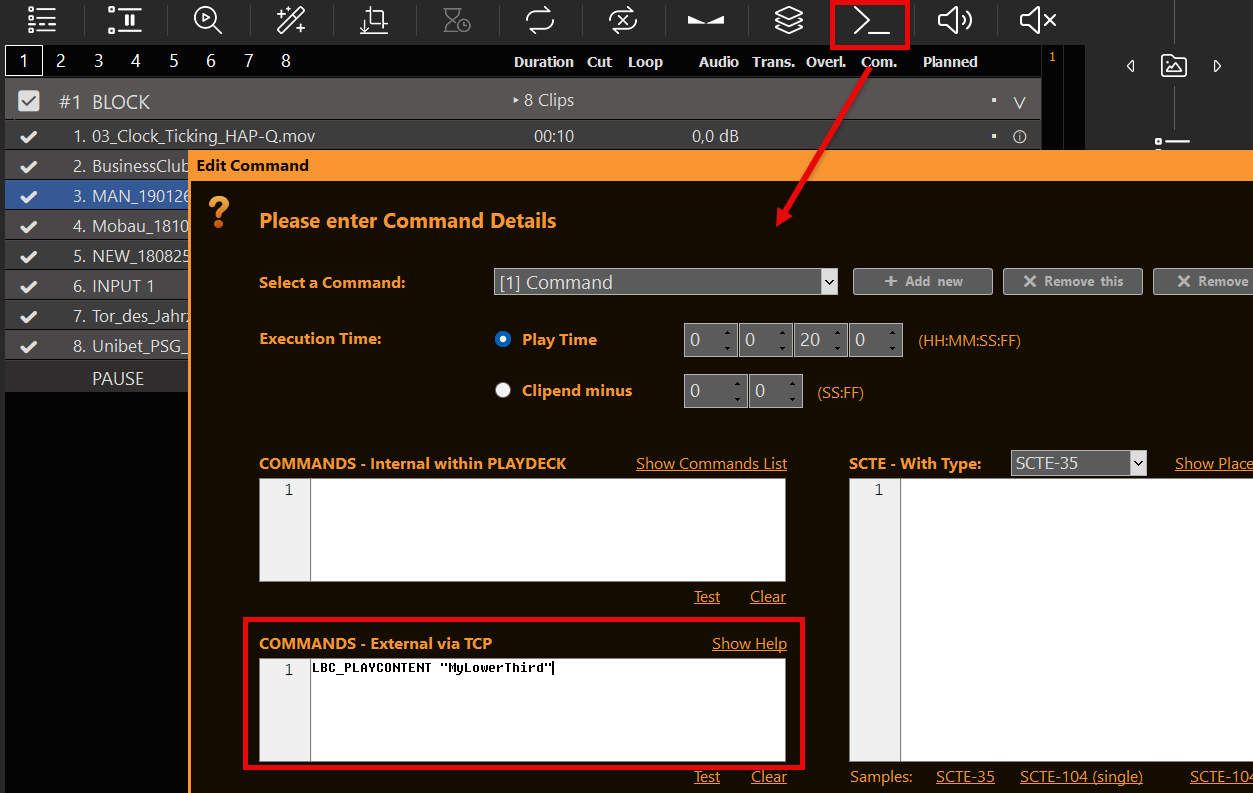
After installation of LiveBoard, you can simply add Videos, GFX and other Contents via the user interface. There you also name the Contents with a unique identifier, e.g. “MyLowerThird” for later reference.
LiveBoard allows to connect via TCP and send Commands to show/hide certain Contents. A complete list of Commands is always found in their Window installation path:
C:\Program Files\…\ClassX_Applications_v6\remotecontroltester\commands
For now, these 2 Commands are enough for us:
LBC_PLAYCONTENT "MyLowerThird"
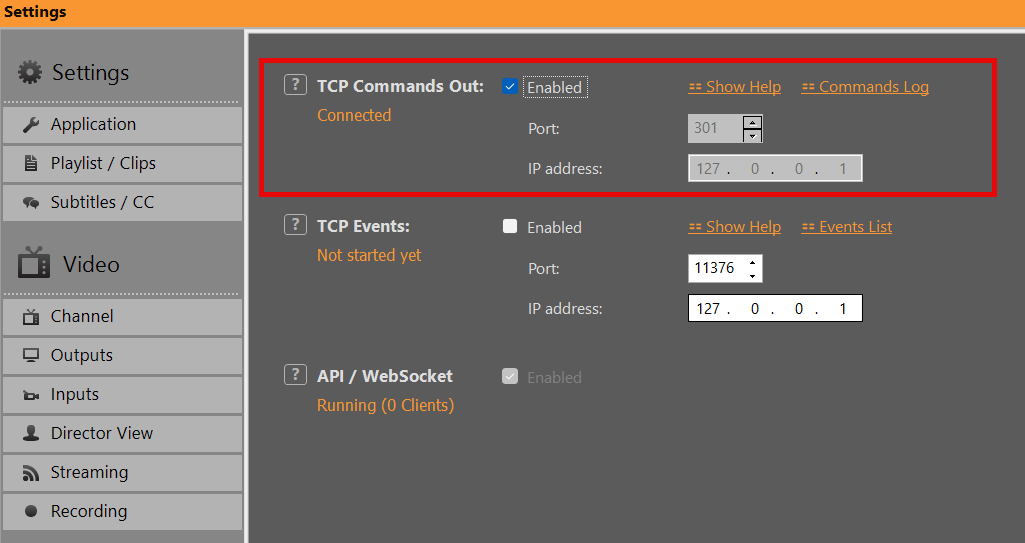
LBC_STOPCONTENT "MyLowerThird"Lets enable our TCP in PLAYDECK to talk to LiveBoard. The default Port of LiveBoard is 301. Enabling this will show CONNECTED, if the LiveBoard Server is running. Otherwise PLAYDECK will try to connect every 5 seconds, so you can start LiveBoard before or after PLAYDECK:
Please follow up with 4. Automate Overlay with Clips/Blocks
3. Create Lower Third (in PLAYDECK)
Lets create our own custom “lower third” composed of a background GFX and Text and group them together.
Click on an empty Overlay Button to open the Editor, then add some Background GFX. Close the Editor, right-click the Overlay Button and position your Background to the bottom area. We also right-click in the video preview and disable “Channel Name”:
We add another Text Overlay and use {blockname} as text placeholder for our title text. Then add another Text Overlay and use {clipname} as text placeholder. Then some positioning and it looks like this:
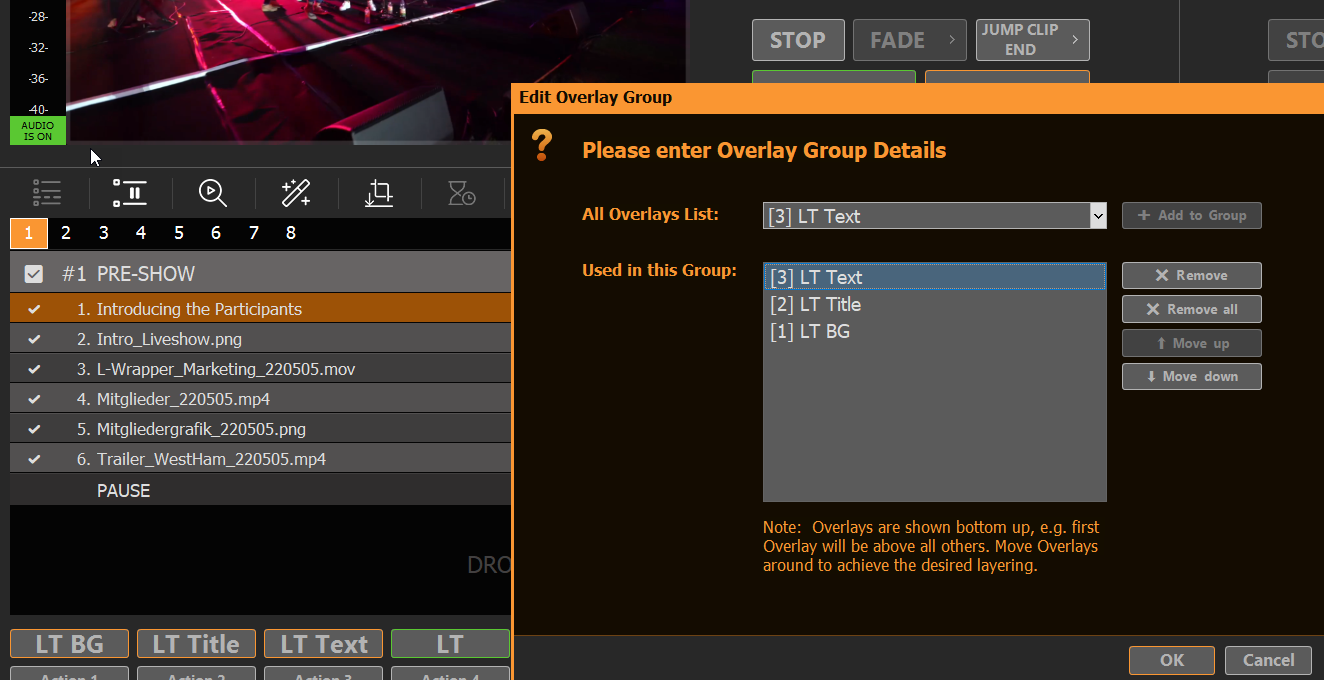
Now lets group then together: Right-click an empty Overlay Button and select “Create Overlay Group”. Then add our 3 previous Overlays and order them bottom-up:
4. Automate Overlay with Clips/Blocks
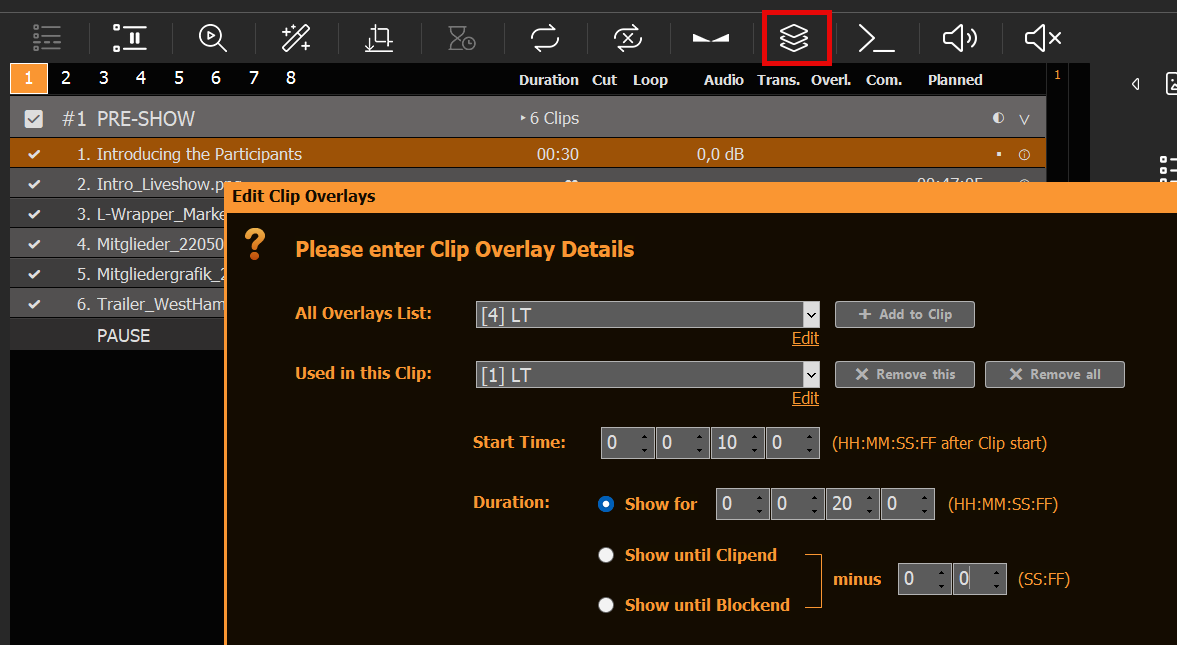
We now have a functioning Overlay Button for the Lower Third with dynamic Text Content. Now let’s attach this Overlay to a specific Clip. Select the related Clip and click on the Overlays Icon, then add our Overlay to that Clip, starting 5 Seconds into the Clip and showing for 10 Seconds:
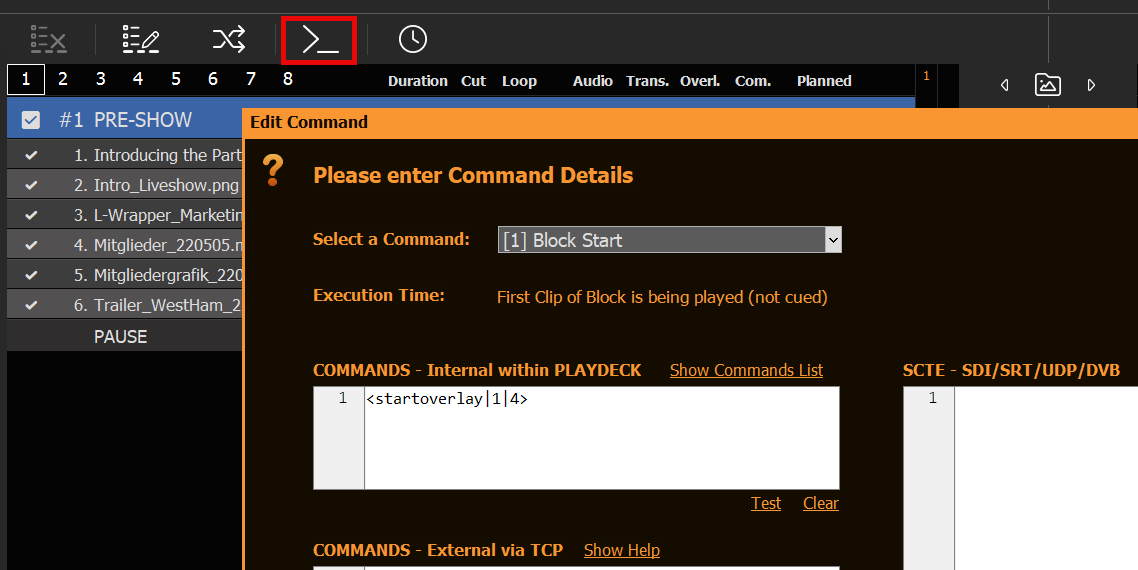
To attach an Overlay to a Block, you can use Commands:
You can copy the Overlay Attachments by right-clicking the Clip/Block and selecting “Copy/Paste Settings”. This will help immensely to duplicate attachments across the playlist.
To automate external Overlays, e.g. ClassX, you would also use Commands on Clips or Blocks, but write your Commands in the “External via TCP” Section:
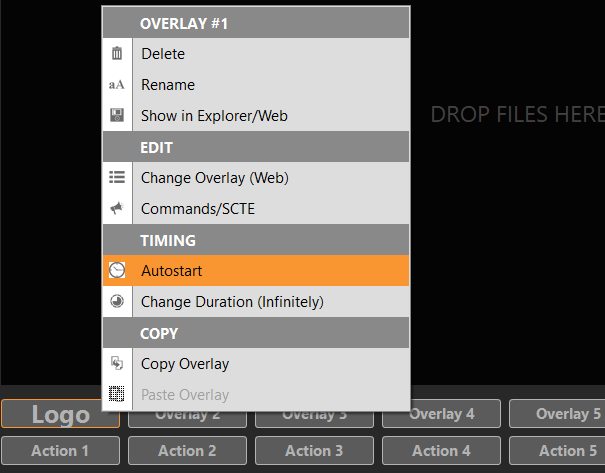
You can also show/hide Overlays via Actions Buttons via internal or external Commands.
5. Schedule Overlay
In addition to attaching overlays to playlist items, you can also schedule them to run at a specific time and for a specific duration, by right-clicking the overlay:
6. Remote Control
You already learned about Commands in 4. Automate Overlay with Clips/Blocks. You can call these commands from anywhere and start your overlays via your Stream Deck or any other Remote Control Software.
Here is an article on how to setup and use commands in general:
https://playdeck.tv/howto/commands/
And here you find more information on how to setup and use Stream Deck with Companion:
https://playdeck.tv/howto/companion/
7. External Keying
You can use one Channel of PLAYDECK just for the Overlays and send them to your Mixer via External Keying, which is supported for Device Output as well as NDI Output:
https://playdeck.tv/howto/keying/
Closed Captions / Subtitles
This article will show how to use Closed Captions and Subtitles.
In this article:
→ Introduction
→ Testing
→ Add new CC/Subtitles to Video
Introduction
PLAYDECK supports Closed Captions CEA-608 (NTSC) and CEA-708 (digital television) and Subtitles.
They work differently in PLAYDECK. Here is how:
1. Subtitles
They can only be sourced from Video files and are ALWAYS burned onto the picture. You can select them via right-click on the Clip. The Subtitle track is disabled by default:
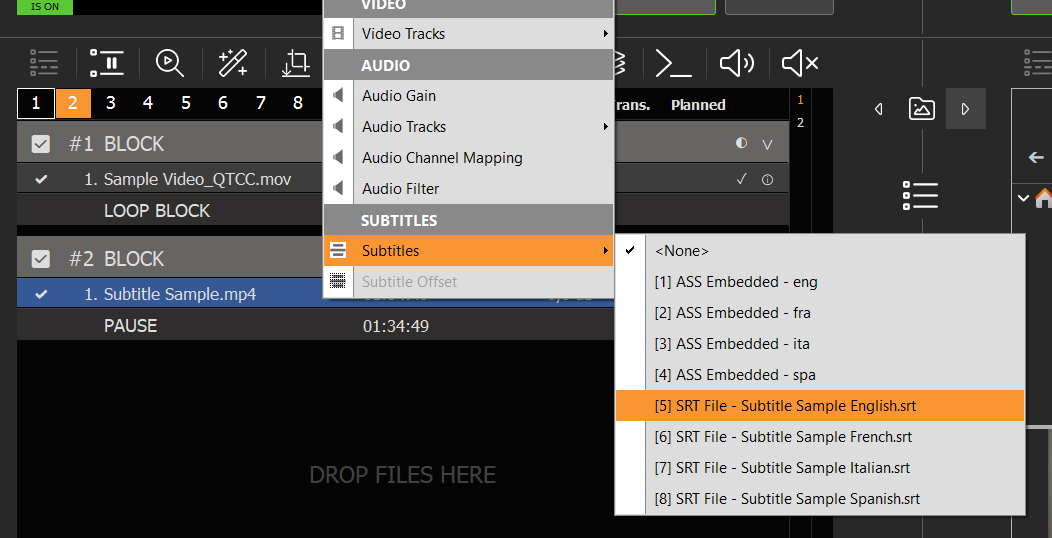
Subtitles can be embedded into the Clip, they are called “ASS Embedded”. They can also be an external SRT-file. This File must have the same Filename (except the extension .srt). The SRT-file can be in the same folder or in any of the sub-folders “Subs” or “Subtitles”.
If you send your video feed to anywhere (SDI, NDI, Stream), the Subtitles will be rendered in the picture frame. You can change the optics like font type etc. in the settings.
2. Closed Captions
CC can have many different sources and are either Burn-In or Pass-Through only.
In Video files the CC track can be embedded and is shown as “CC Embedded” when right-click the Clip:

The option to switch between Burn-In and Pass-Through can be found in the settings. Burn-In means, that the CC text will be rendered onto the picture frames, just like Subtitles. If in Pass-Through Mode, the CC Text will only be shown in the Preview, but not on any Output. The task of rendering the CC Text is therefore “passed on” to the next receiver, e.g. YouTube Live Stream.
Besides video files, CC is supported by the following input and output methods, meaning PLAYDECK can read, preview and send CC with:
– SDI Device (If Device supports it)
– Streams with MPG-2 or H.264 Video Codec (any protocol e.g. UDP, RTMP, SRT)
– NDI Device
Please note that NDI support for CC is not universal, therefore only PLAYDECK can send and receive CC via NDI (Loops).
Please also note, that CC contains information about text position and animation, which can’t be changed by PLAYDECK for previewing or burn-in. It is hard-coded into the CC Tracks. The animation names typically are “Roll-Up” or “Pop-On”. They may be changed after pass-through by another receiver.
Testing
We provide this Sample Clip for, so you can test Closed Captions in action:
https://downloads.playdeck.tv/assets/Sample Video_QTCC.mov
1. Add Clip and select CC Track
Add the Video Clip to Channel 1. Right-click the Clip and select the CC Track. Also set the Block to Loop. You should now be able to see the CC Text in the lower Preview. You can disable the “CHANNEL 1” Overlay by right-clicking the Preview.

2. Output the Stream via SDI and NDI
Activate any SDI Device and loop the Signal to another SDI Port for testing (if available). Also active NDI with default settings:
3. Output to UDP Stream
Setup a new local UDP Stream. Make sure the UDP protocol is selected and you use (any) H.264 Video Codec. The Target URL is your local IP adress: udp://192.168.178.42:5000?pkt_size=1316. Click on Parameter and activate the embed_cc flag.

4. Add SDI and NDI Inputs
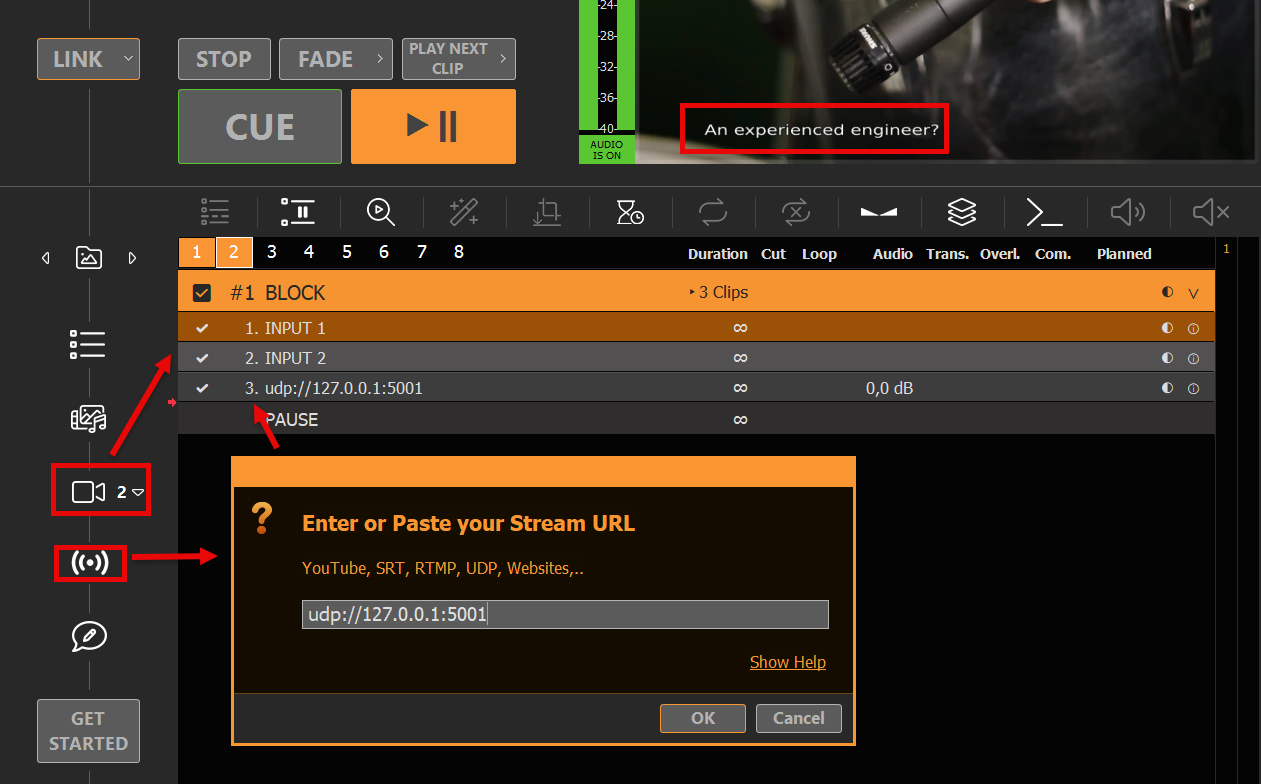
We now loop our outputs to new Inputs in PLAYDECK itself. We use INPUT 1 for SDI and INPUT 2 for NDI.

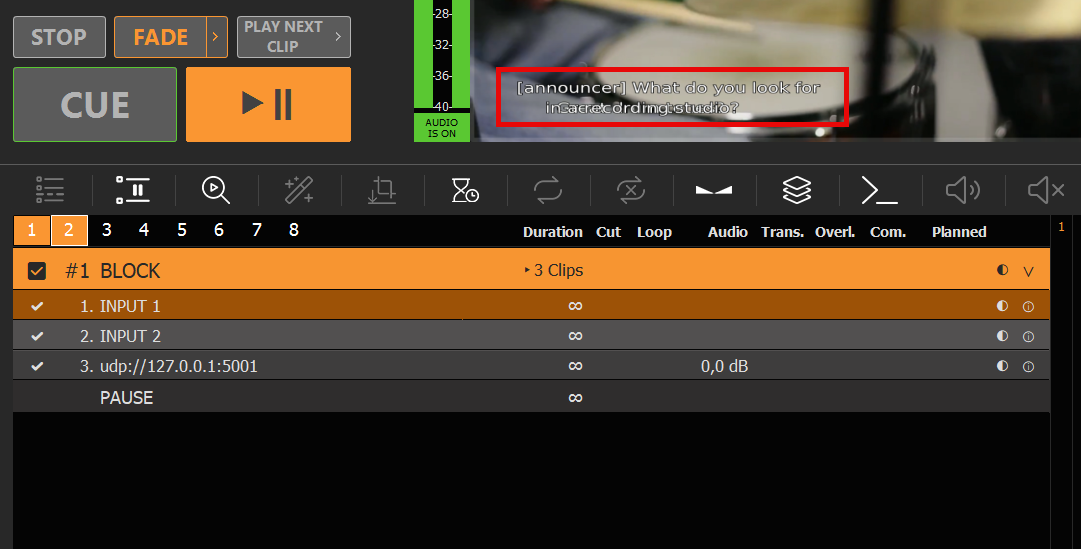
5. Insert Inputs and UDP Stream to Channel 2
We add Input 1 and 2 to the Channel 2 Playlist by Drag Drop of the Input Icon. We then add our UDP Stream by Drag Drop of the Stream Icon. The Stream URL is: udp://127.0.0.1:5001. You can now observe that all 3 new Clips will show their source CC in the Channel 2 Preview area. You have now successfully send and received CC Tracks via SDI, NDI and UDP.
6. Explaining Burn-in and Pass-Through
While playing any Clip on Channel 2, we observe double Text in the PLAYDECK Preview area of Channel 2. This is because Channel 1 is burning the CC onto the picture by default (rendering the Text on all Frames). In addition, Channel 2 detects a CC Track in the Input, that is being “passed through” from the Input. Channel 2 then shows the CC Tracks as Preview in the Channel 2 Preview area. We therefore have 2 CC Texts overlapping each other: One already in the input video feed and another from the CC Track that is passed-through:
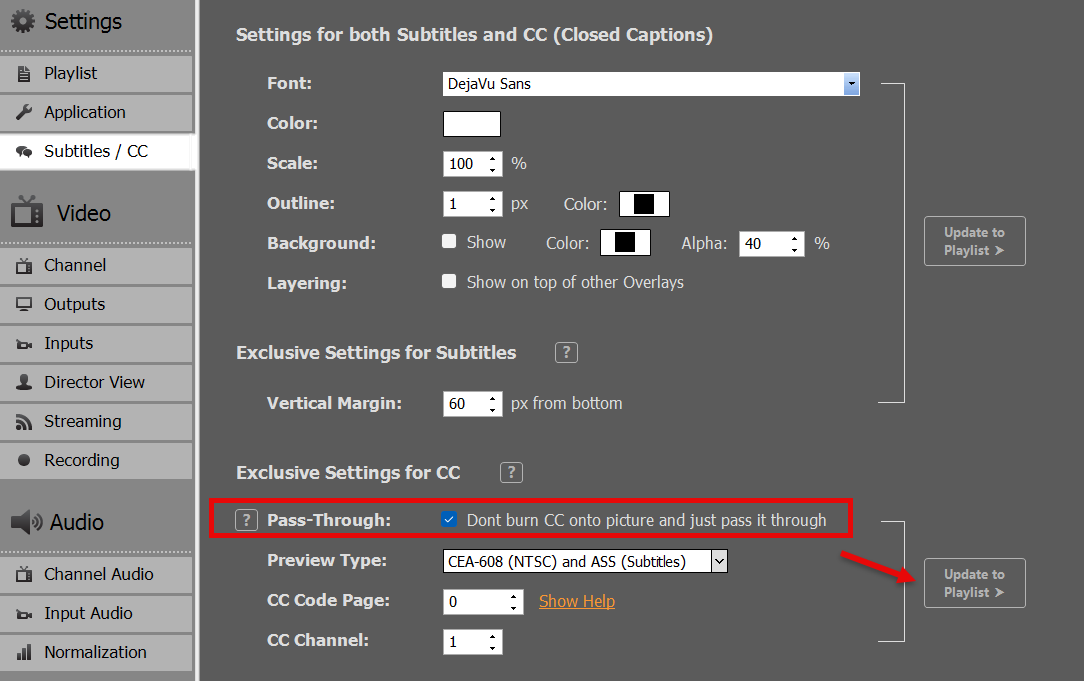
7. Switching off Burn-in
As observed in the last paragraph, Closed Caption are burned onto the Picture and then send to SDI, NDI and Streams. We want to change this behavior to just pass-through the CC and have PLAYDECK render the CC in the Preview Area. We therefore activate the checkbox “Pass-Through” in the CC settings. After clicking “Update to Playlist”, we don’t observe double texts anymore on the Channel 2 preview.
8. Controlling with Desktop Output
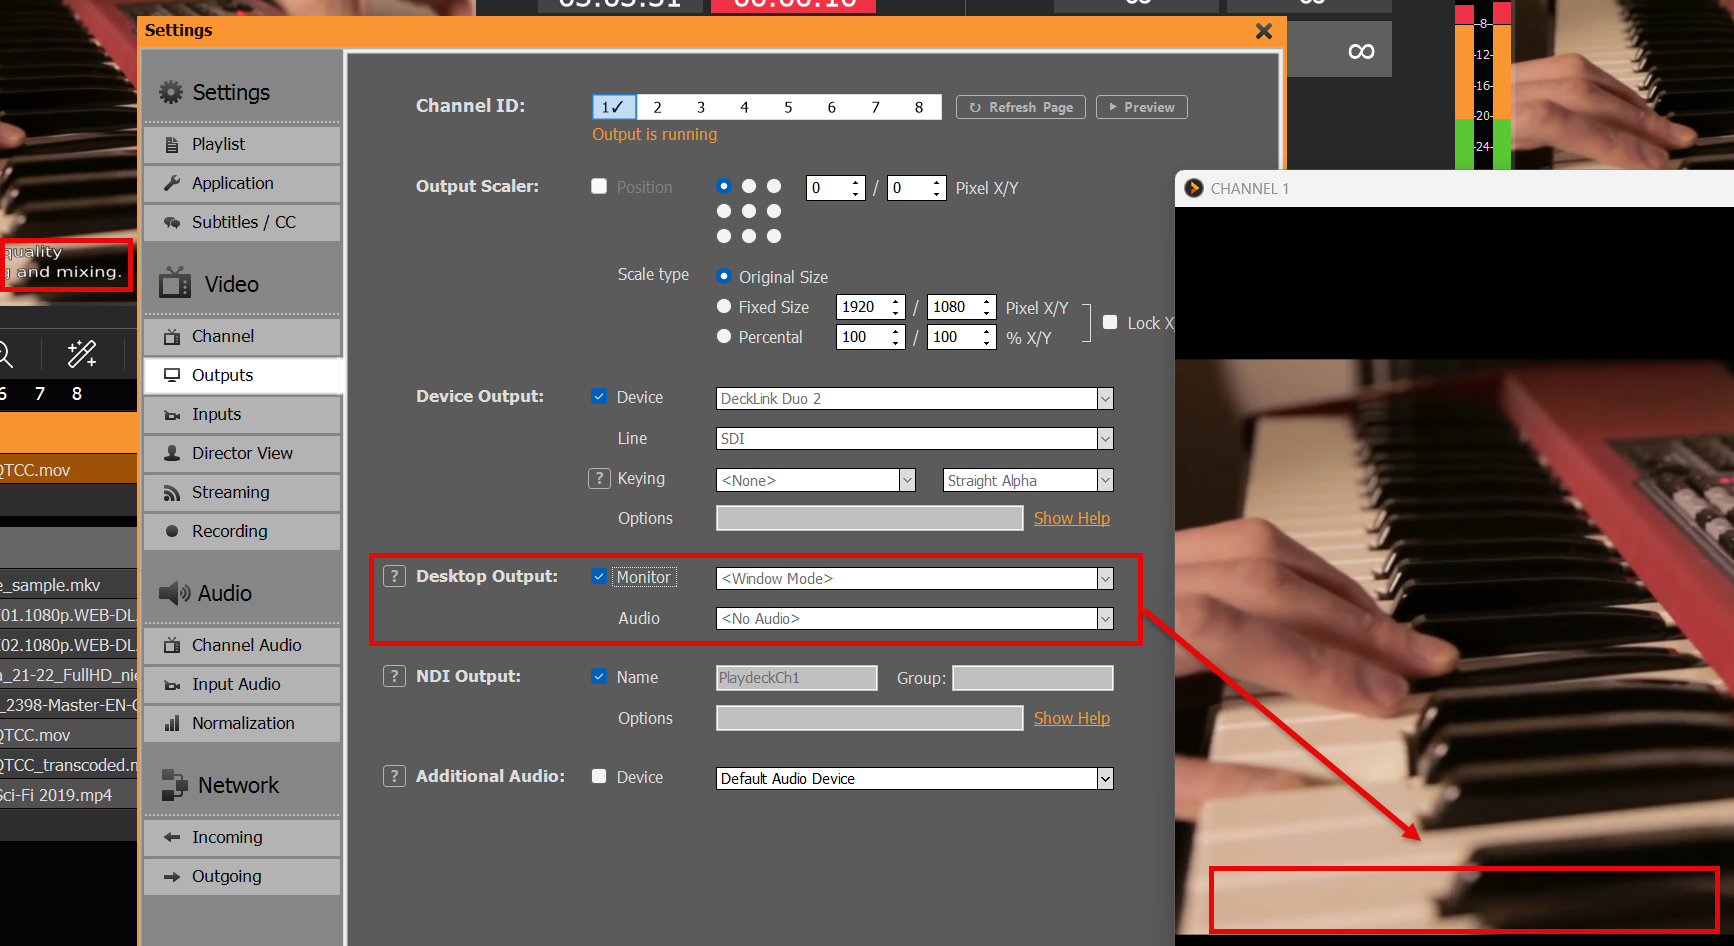
To check, if the CC is burned into the picture or not, we activate a Desktop Output in “Window Mode”. This always represents, how the video feed is send to devices and streams:
9. Monitoring
You can check the status of your input and output video feeds by enabling the MONITORING window:

Add new CC/Subtitles to Video
PLAYDECK has no tools to add CC/Subtitles manually (by entering text) into videos or video feeds. But there are many tools available in the internet to add CC/Subtitles, e.g.
https://www.veed.io/
https://studio.youtube.com/
Prepare/Import Playlists externally
This article will show options to prepare your Playlists on another System or import Playlist from other Apps.
In this article:
→ Use Free Channel
→ Use Playlist Trial Edition
→ Append Playlist during Broadcast
→ Automatically Detect and Reload new Playlist
→ Interface with 3rd party Apps
Use Free Channel
You have some spare Channel in PLAYDECK? Use them to prepare and test new Contents, then copy them to your Main Feed Channel. You can DRAG DROP Blocks from Channel to Channel, or copy them with pressing CTRL after starting DRAG DROP.
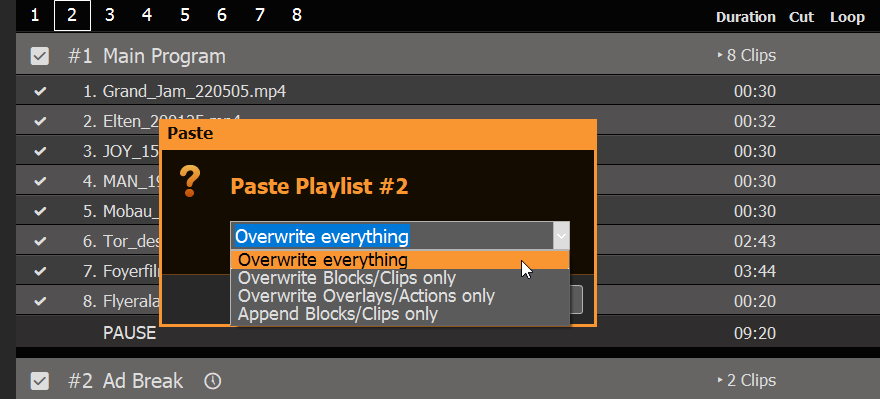
You can also copy, overwrite or append whole Playlists, by right-clicking the CHANNEL NUMBER:

If you paste new Content on an existing Playlist (or Import XML), you get the option to overwrite or append:
Use Playlist Trial Edition
You can install PLAYDECK on any other machine and edit your Playlists there. Except the Watermark of the Trial Edition, there are no other restrictions, so you can prepare Playlists and send them to your Main System.
Append Playlist during Broadcast
You want to import new Playlists and don’t want to interrupt your Broadcast? No problem: Use the APPEND PROJECT Option in the FILE MENU:
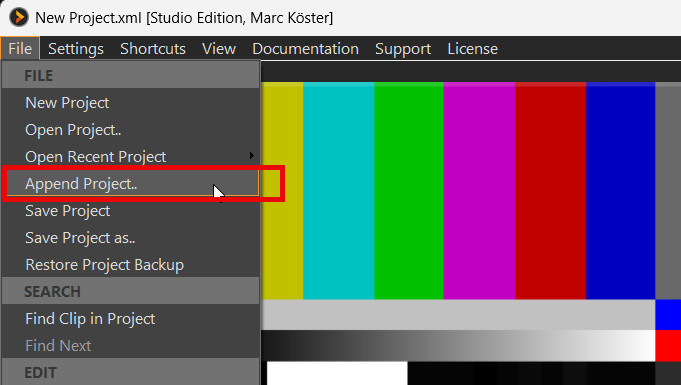
This will load any PLAYDECK Project, but instead of replacing the Playlists, all Playlists will be extended by the Clips found in the Project. You can then safely remove any old Content.
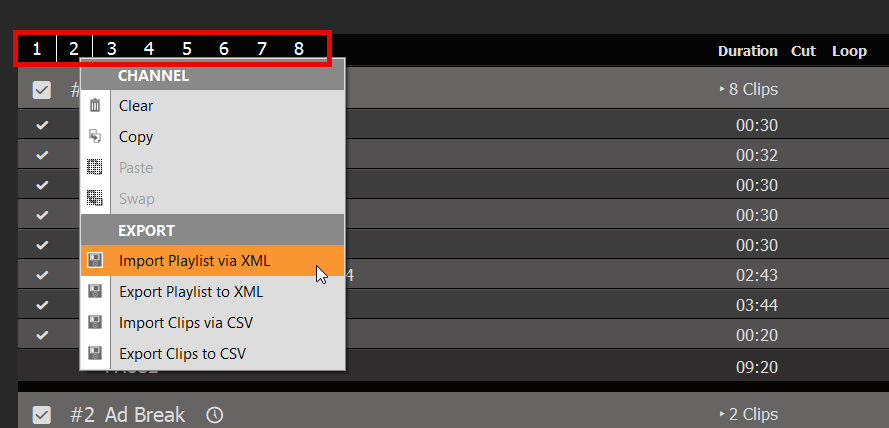
You can apply this procedure to individual Playlists by Exporting a Playlist to XML and Importing that XML on the other Machine. This is done by right-clicking the CHANNEL NUMBER:
This workflow is perfect for any day-to-day schedule, where you add new days and remove old ones.
Automatically Detect and Reload new Playlist
You can also OVERWRITE the current load Project File on your Main System and let PLAYDECK detect this and reload the Project, after which the Playout will resume. Enable this functionality in the Application Settings:
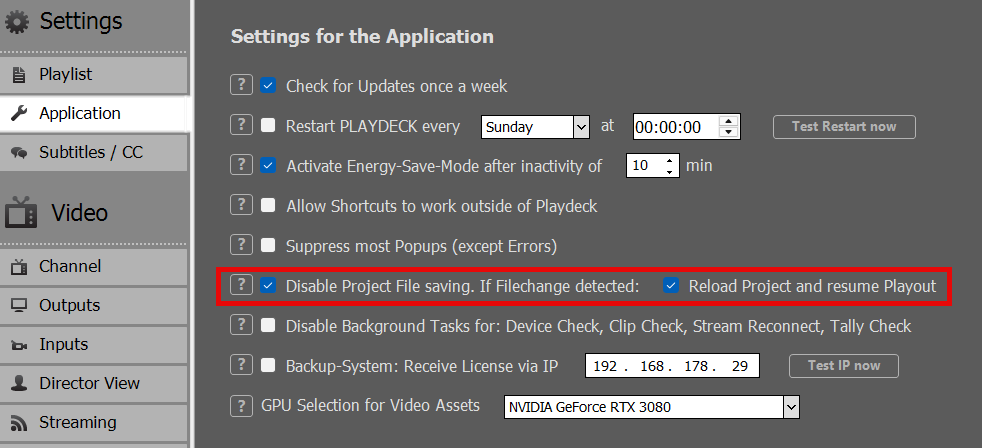
Note: RESUME PLAYOUT only works, if the current Playing Clip exists in the newly re-loaded Project, otherwise Playout stops for that Channel. The Clip is identified by a UNIQUE ID, so it could have moved to another Block in the re-loaded Project.
This workflow is best suited for any automated systems, where Project Files are generated automatically and uploaded to the Main System. Or when the Content Editor does not have access to the Main System and uploads the new Playlist to the NAS/Cloud Storage.
Interface with 3rd party Apps
We don’t support the Playlist Format of other 3rd party Apps, as there is just too much diversity on the market, and a lot Playlist Function (Mixing, Overlaps, Schedules) would not be compatible with PLAYDECK.
If you like to prepare your Playlist in a 3rd Party App, you need to export your Playlist to CSV, then Edit that CSV to work with PLAYDECK, then Import that CSV into PLAYDECK.
Why CSV? Because it is the most easy List Format, which support multiple values per Item. It can be edited with any Text or Table Editor, from Notepad to Excel.
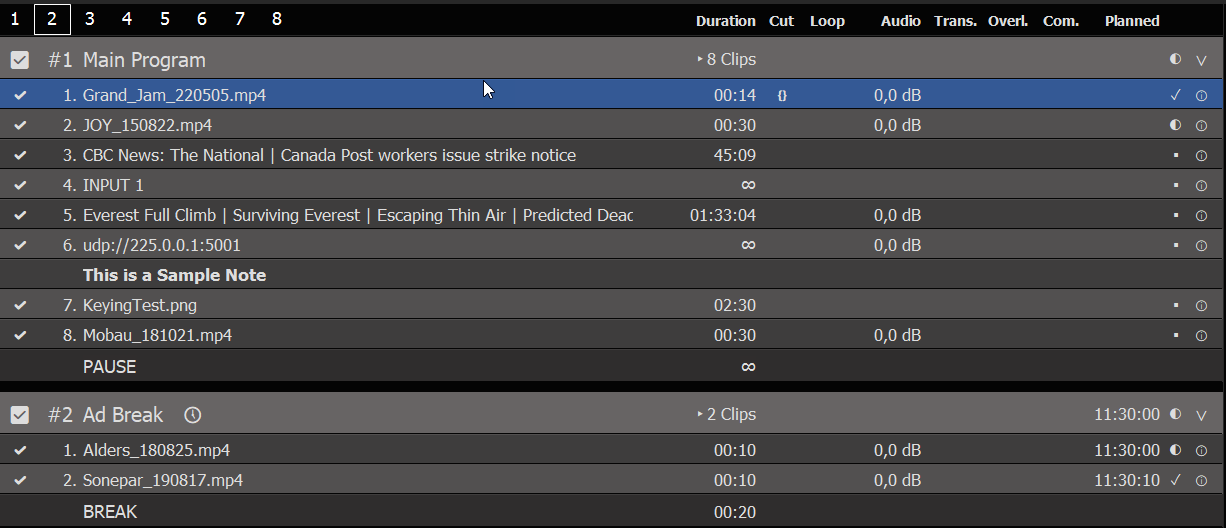
Let’s have a look at our CSV. For this we build ourself a Sample Playlists with 2 Blocks. We mixed in different Content Types: Video Clips with IN/OUT Points, Device Inputs, YouTube Videos, UDP Input Stream, GFX with Runtime, a Note. We also added a Schedule to the 2nd Block:
We now right-click the CHANNEL NUMBER 2 and select EXPORT TO CSV:
We then open the saved CSV File in Notepad (click here to download/open in new Tab):

As you can see, its not “too” much Text Lines. Since the first Lines are just HEADER, it looks even more clear in a Table Editor:
And this is how you write/generate CSV Files: You export your Content in any 3rd party app, open any editor and bring it in PLAYDECK FORMAT. But WHAT IS PLAYDECK FORMAT.
These are the REQUIRED COLUMNS. They can be it ANY POSITION (any column #):
Type = Block, File, Website (or YouTube), Input#, Stream, Note
Caption = Any Text to display in PLAYDECK
Filename = The Path/File or the URL (YouTube and Streams)
These are the OPTIONAL COLUMNS. They can be it ANY POSITION (any column #):
Active = The Checkbox in the first Column in PLAYDECK
Duration = Only used be File-Types that are Images. Leave empty or 0 for endless
CutIn / CutOut = IN- and/or OUT-Point for Trimming
Schedule = Only used by Block-Types
Note: More advanced Properties (e.g. Audio Gain) are not supported, as to keep our CSV Format clean and easy. To import/export ALL Properties, please use XML instead of CSV.
Note: PLAYDECK uses UTF-8 encoding for saving and loading CSV files.
Create Pre-Show Waiting Loop
This article will show how to create a Audio Playlist and combine this with a looping video, perfect for pre-show waiting Loops.
We start by creating a loop block and insert some mp3 audio file to the block:
Now we add a default image, which is shown, whenever audio-only clips are playing:
And voila, we have a pre-show waiting loop:
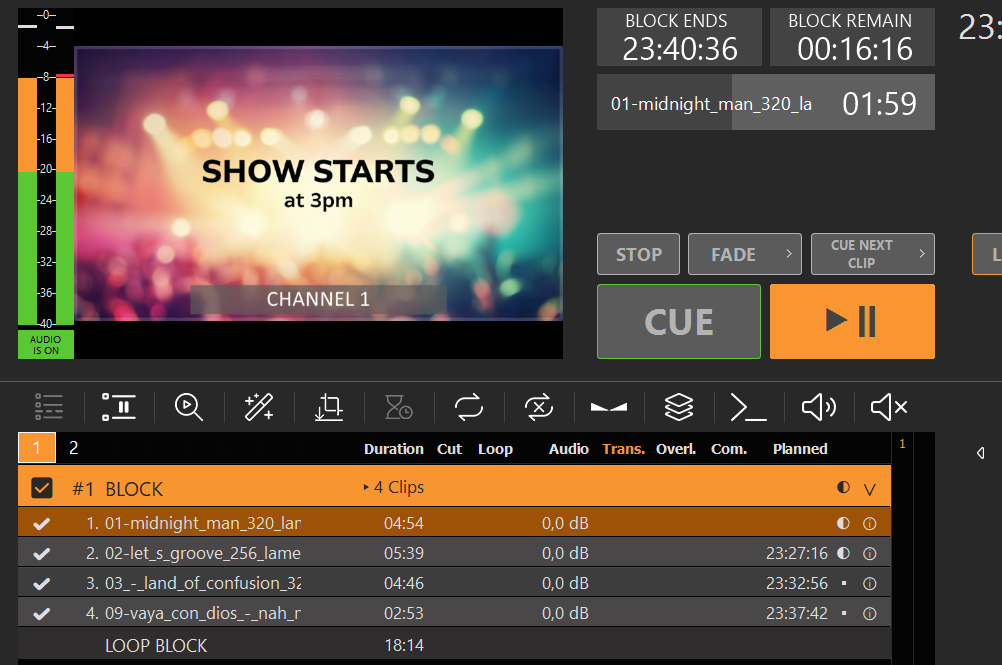
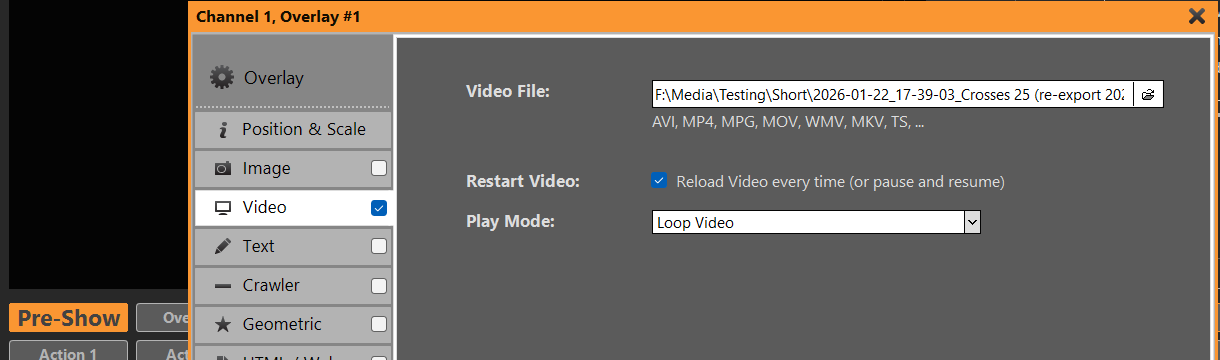
But that’s not all. We can also use a video loop instead of a still image. For this we add the video as overlay with a loop setting. The video will be shown in fullscreen, if it has the same size, otherwise we can scale it in the overlay settings:
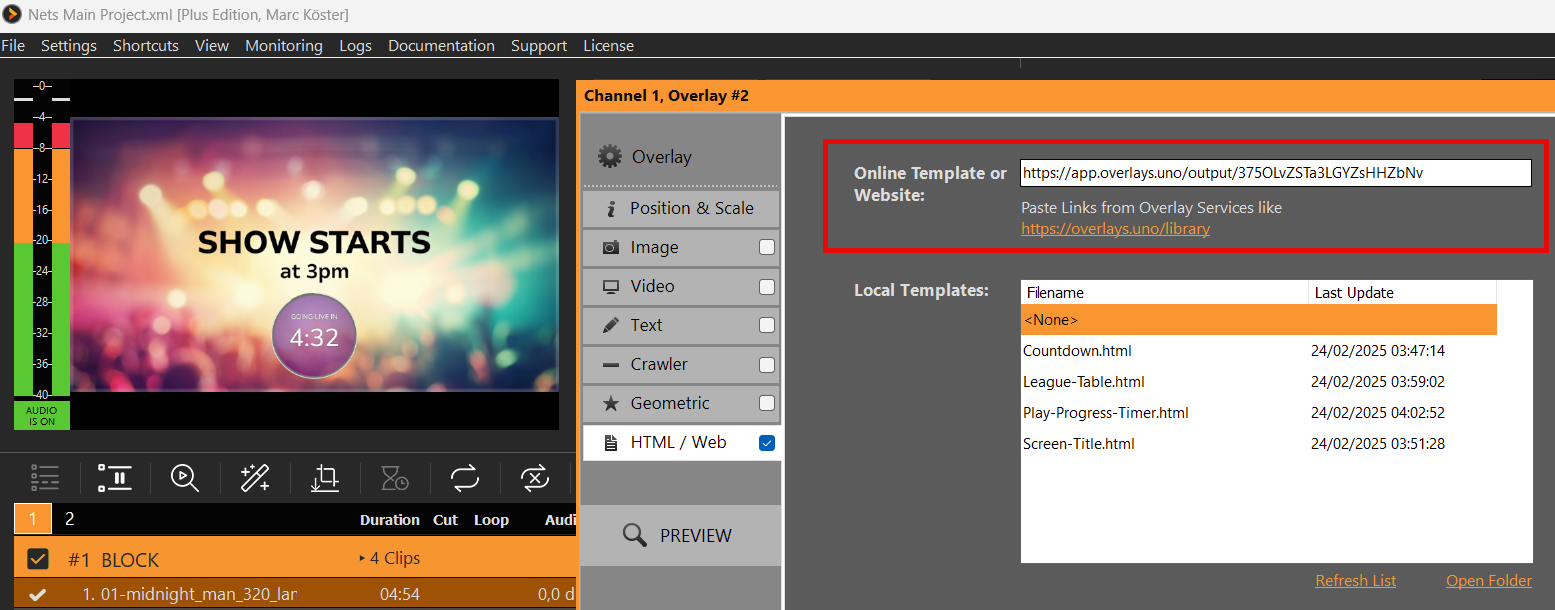
We could also add an Countdown via overlays.uno. Quick and easy:
Creating a Slideshow Single-Monitor
This article will show how to create a Slideshow with Transitions and output on the same Monitor.
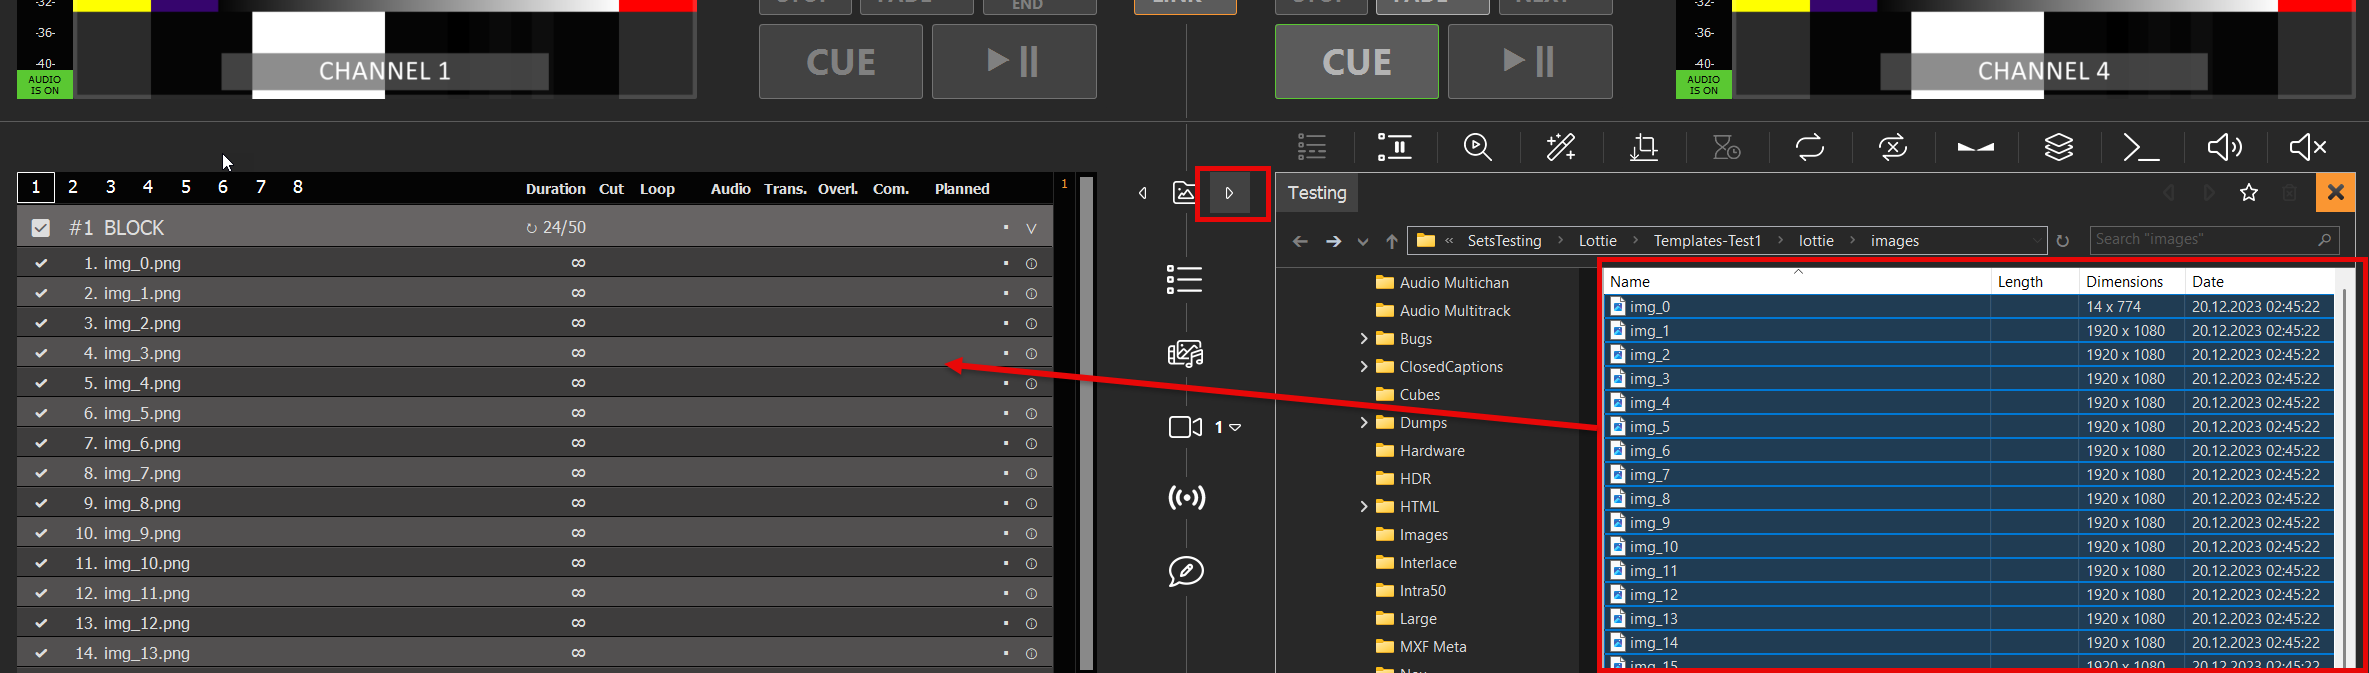
1. Creating the Show
Open the integrated File Explorer by clicking the right-arrow between the Playlists. The search for your images folder, select all images and add the to the Playlist by Drag Drop:
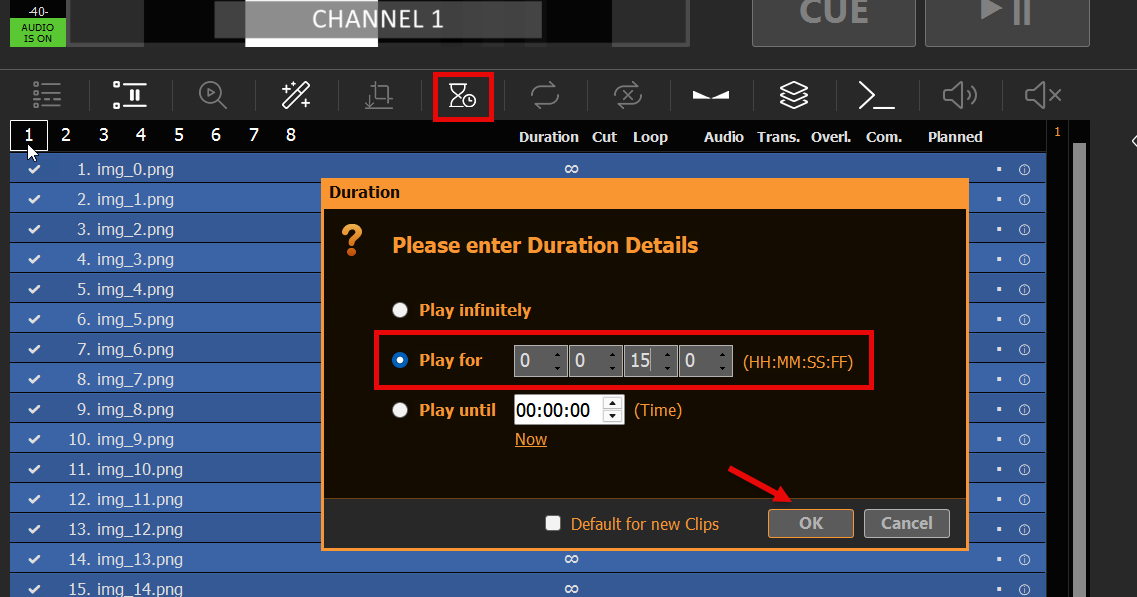
Select any Clip in the Playlist and press CTRL+A to select all Clips, then select the Icon for DURATION and enter a suitable duration for each image, e.g. 15 seconds:
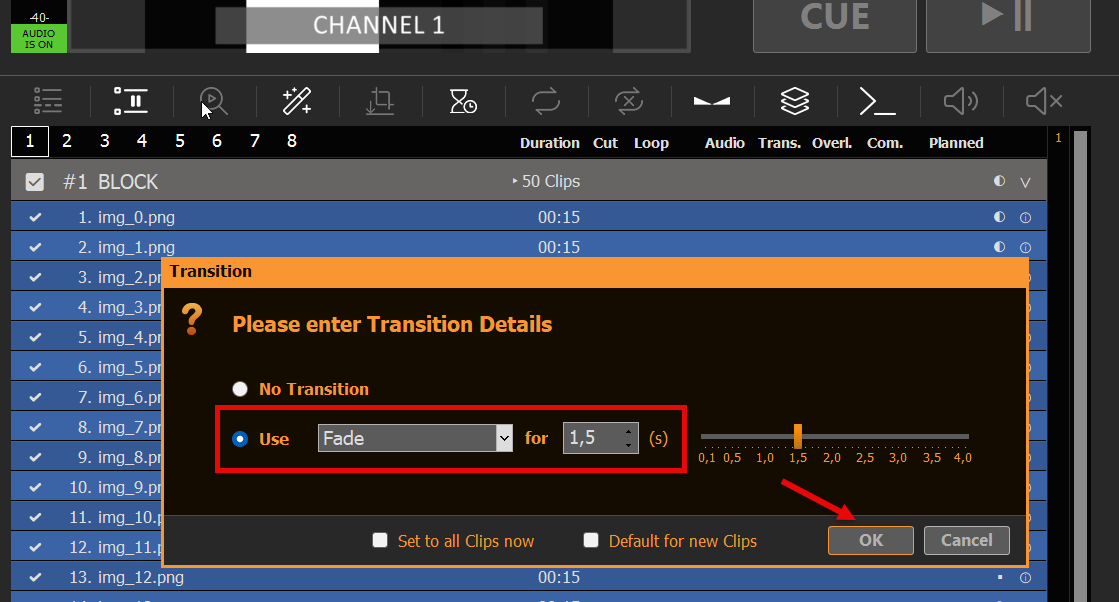
While al Clips are still selected, click the Icon TRANSITION next and add any transition. In this case we use a smooth long Fade Transition:
At the bottom of the Playlist you can see the total duration of your Slideshow:

2. Playing the Slideshow
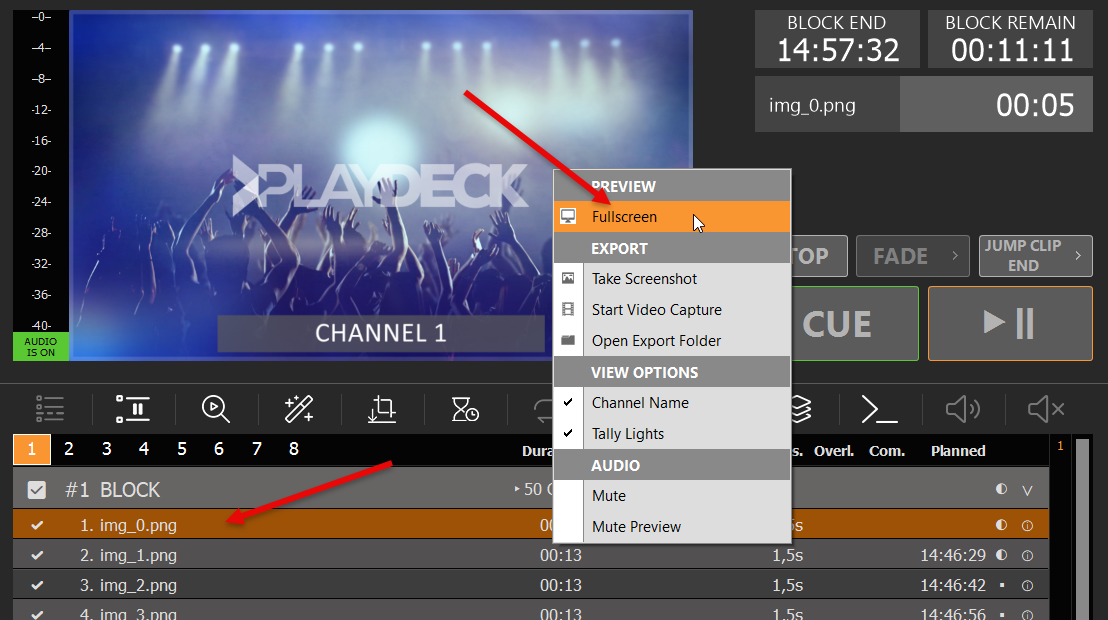
You simply double-click the first Clip (or use Buttons CUE+PLAY), then double-click the Preview Area (or right-click and select FULLSCREEN). Your Playout will now be maximized to your Monitor Size, at maximum Quality. And the Mouse Cursor will be hidden. Use ESC to exit Fullscreen.
Note: During Fullscreen, you can use the SPACE Key to pause/u-pause Playback.
You can also output the video signal on a second monitor, or send it to your TV. You could also send it via NDI to another PC and open the signal with PLAYDECK (use the free Backup License), or VCL Mediaplayer or any other 3rd party app:
Growing Files in Playlist
This article will show how to insert growing files into a playlist.
Definition
A growing file is a file that is still being recorded – it is therefore growing in size.
Recommended Setting
When working with growing Files, we recommend you enabling the Settings “Re-scan the runtime of growing files” to make sure the duration is updated every 5 seconds in your playlist view:
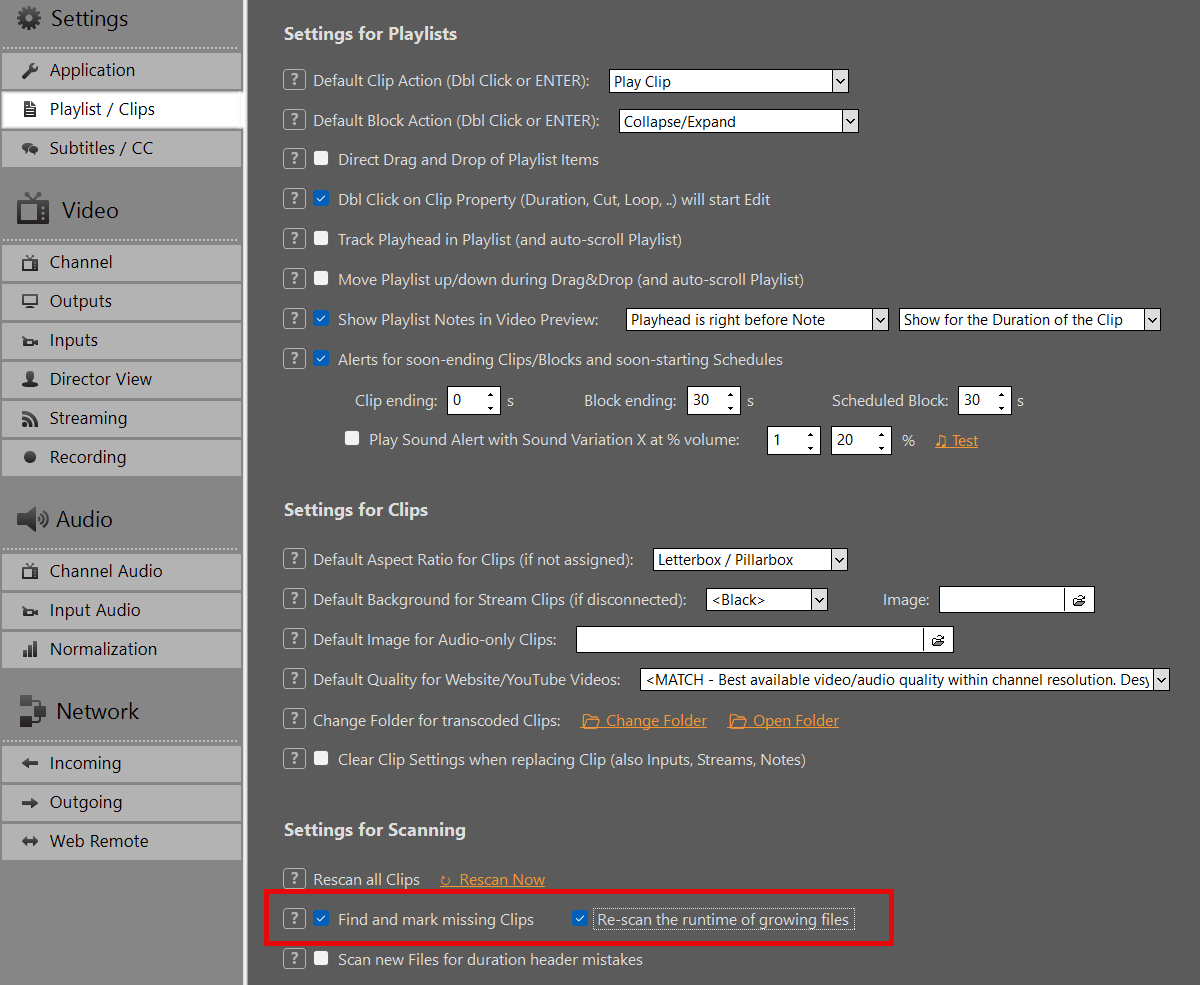
Insert to Playlist
Growing files can be inserted to the playlist like any other file: By Drag Drop from outside of PLAYDECK or using the integrated file explorer. They will be detected as “growing”, which can be verified in the info column. The clip duration will be updated every 5 seconds:
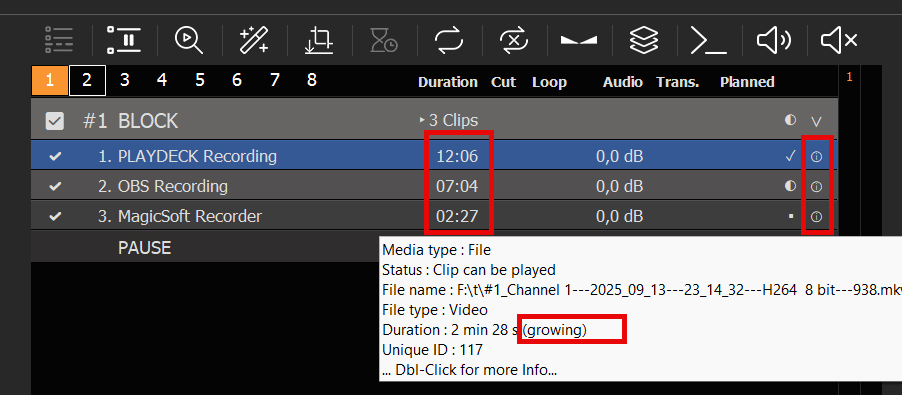
Possible Sources
The files can be recorded anywhere, they don’t need to be recorded in PLAYDECK. In the above screenshot we are using one PLAYDECK recording, another from OBS Studio and another from MagicSoft Recorder.
Possible Formats
Only the following file container formats are supported. But within that container you can use any video codec:
– MKV
– AVI
– MPEG
Cutting and Editing
You can cut and edit growing files the same way as regular files. For example: You can set an OUT point to the file and loop it, while it is still being recorded.
Transcode Clips for GPU Decoding
For a general overview of best possible Video Codecs for Playout, please see this article.
While PLAYDECK is able to transcode all Clips in real time to your selected Output Format, this can put a heavy toll on your system during Playout, depending on your use case.
If your CPU usage reached critical level and you get playout lags (mostly perceived as audio stutter), you may want to make sure, that all Clips are decoded via the GPU, because most modern Graphic Cards can handle much more load than the CPU alone, thus making it possible to run multiple output channel with PLAYDECK.
In this article:
→ Using the integrated transcoder
→ What Files are being decoded on CPU in PLAYDECK
→ What GPU’s are recommended?
Using the integrated transcoder
PLAYDECK has an integrated transcoder for video/audio files. It will make it more easy for you to QUICKLY transcode multiple files at once, e.g. if your show starts soon and you just don’t have the time to transcode them via 3rd party tool like Adobe Media Encoder.
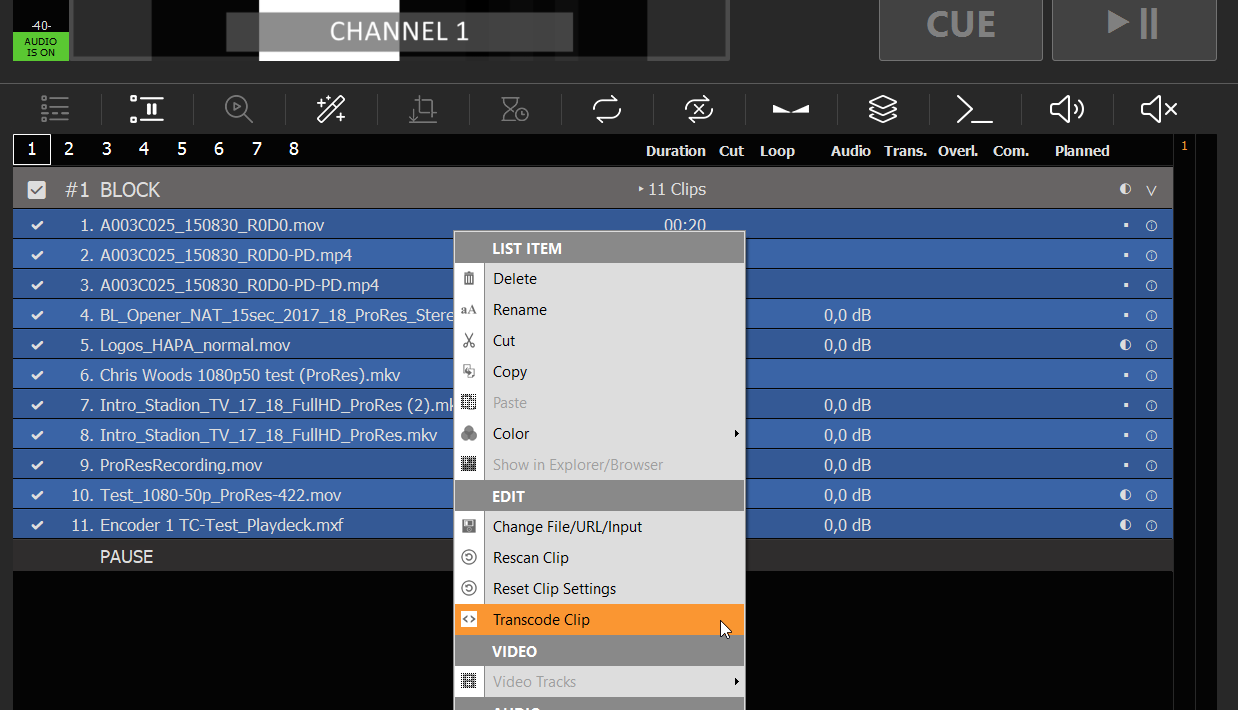
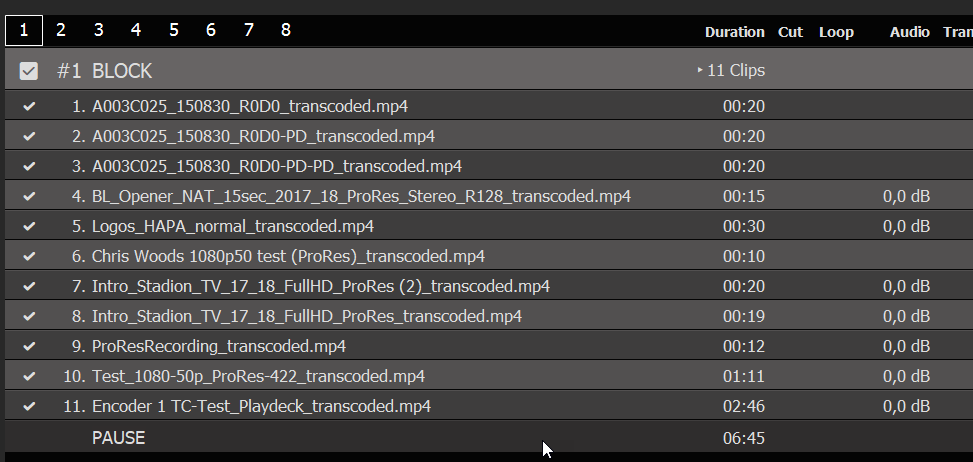
In your example we have a Block of Files, that only can be decoded via CPU, like ProRes, and HAP-A Video Codec. We now select any Clip, then press CTRL+A to select all Clips in the Block. You could also use SHIFT to select a Clip range or just CTRL to select individual Clips.
Now we right Clip one of the selected Clips and select “Transcode Clips”:
You will not get a list of pre-defined target video codecs, which all support GPU decoding:
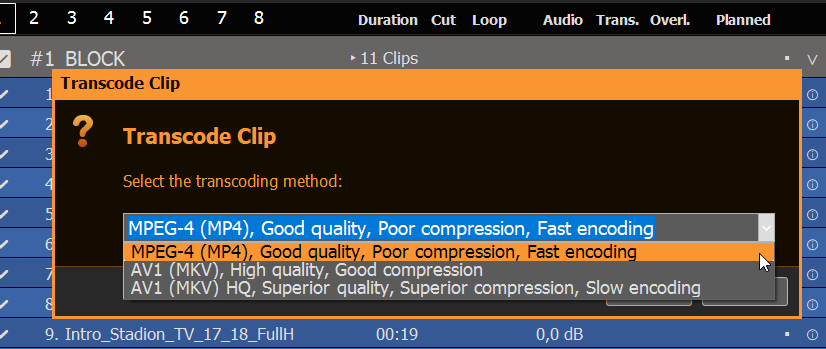
If you are in a hurry or have a huge number of clips to transcode, pick the first option “MPEG-4”, as this options gives you incredibly fast results, while still maintaining a good quality. In all other cases go with the 2nd option “AV1”, as this produces fairly small files on SSD/HDD, while producing extreme high quality files, and also support HDR. The last option is unnervingly slow, but also takes quality and compression a tick higher, but the time/quality ratio is bad in this case. Use this for overnight-transcoding.
Note: Sadly, we can not offer transcoding in H.264 or H.265 because of license reasons.
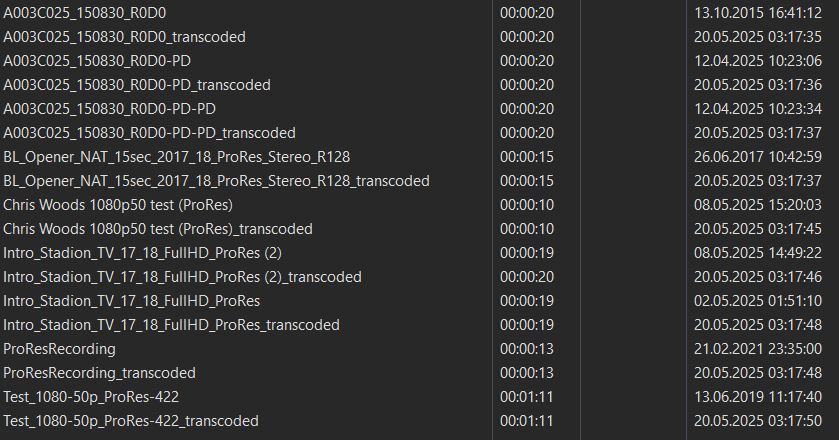
The transcoder will save the new file next to the old file and add “_transcoded” to the filename:
The new Files will be automatically replaced and re-scanned in your Playlist:
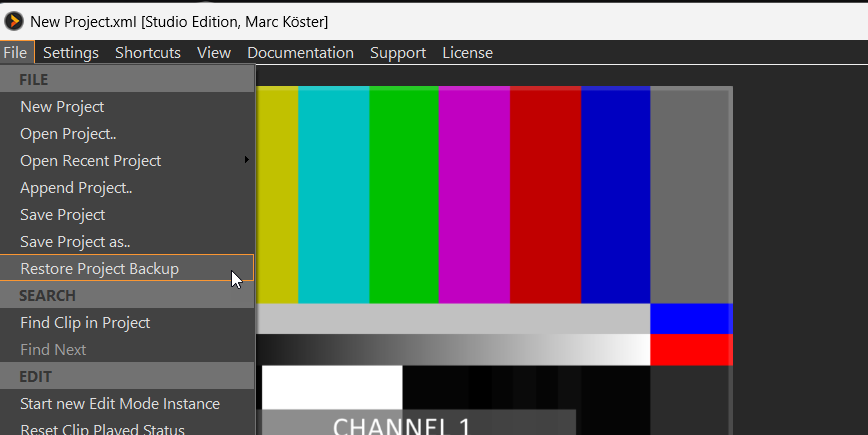
If you need to at any time return to an earlier version of your Playlist, you can use the “Restore Project Backup” function:
What Files are being decoded on CPU in PLAYDECK
ProRes
This high quality video codec has it’s roots on MAC computers, as it also was developed by Apple. Sadly, Apple never released any codec information for Windows Systems, so it’s still fairly impossible to decode ProRes via the GPU. If you need the Alpha Channel, we recommend using HAP-A video codec.
HAP and variants like HAP-A
These video codecs also support Alpha Channel and have very low CPU consumption.
DNxHD, MXF
The codecs also cant be decoded via GPU in PLAYDECK.
What GPU’s are recommended?
We refer to this article for PC Building for PLAYDECK.
Video & Audio Output
Broadcast your Video Feed
This article will show how to send your channel video feed to any desired target and audience.
In this article:
→ Single-Monitor Output
→ HDMI via Extended Desktop
→ SDI / HDMI Output Card
→ SMTP ST 2110 / IP Output Card
→ NDI (Network Device Interface)
→ Streaming (UDP, RTMP, SRT, DVB, …)
→ Dante Virtual Soundcard (DVS)
→ Director View
Single-Monitor Output
The most simple way to show your Video Feed, is to output your Channel in Fullscreen. Enable Fullscreen by Double-Clicking the Preview or Right-Click and select “Fullscreen”:

The Fullscreen Output will use a much higher quality and FPS as the regular Preview. You can exit the Fullscreen by pressing any Mouse Button or the ESC Key.
This Mode is best suited for quick private Slideshows. Here is an example on how to setup a Slideshow with PLAYDECK:
https://playdeck.tv/howto/slideshow/
HDMI via Extended Desktop
Another simple way to send your video feed is to use your HDMI outputs of your PC or your Graphics Card. To make the HDMI Output visible to PLAYDECK, you need to setup a new “Extended Desktop Output”, like you would do, if you added a secondary Monitor:
1. Connect in Windows
Connect your HDMI Device to your PC physically and turn the HDMI on, so Windows can find it. Connect it to your Graphics Card (preferred) or your Mainboard. Right-Click anywhere on your Desktop and select “Display settings”. You should see your new Monitor and it should say “Display is extended” (That’s why it’s called “Extended Desktop”). If you don’t have access to your HDMI Output Device yet (e.g. LED Screen), you can use any Dummy PC Monitor for Setup. PLAYDECK will later scale your (other) output automatically, if you use the same HDMI Port. Please also make sure, your Monitor uses 60 FPS and not 120 or 144, as this might lead to lag.
2. Assign in PLAYDECK
Start PLAYDECK and select your new Monitor as “Desktop Output” for your Channel. Once activated, PLAYDECK will “overlay” its output on the Monitor. It will be On-Top of all other Windows Apps and the Mouse Pointer will be disabled. Should you accidently activate this on your PRIMARY Display, press ALT+F4 to close it, as you cant access Windows or PLAYDECK otherwise.
PLAYDECK is able to re-connect to your Desktop Output, should it disconnect or on a power-loss or if the HDMI Device is receiving power after PLAYDECK has been started already.
This Mode is best suited for local transmission to a TV or LED Screen, e.g. during exhibitions or events.
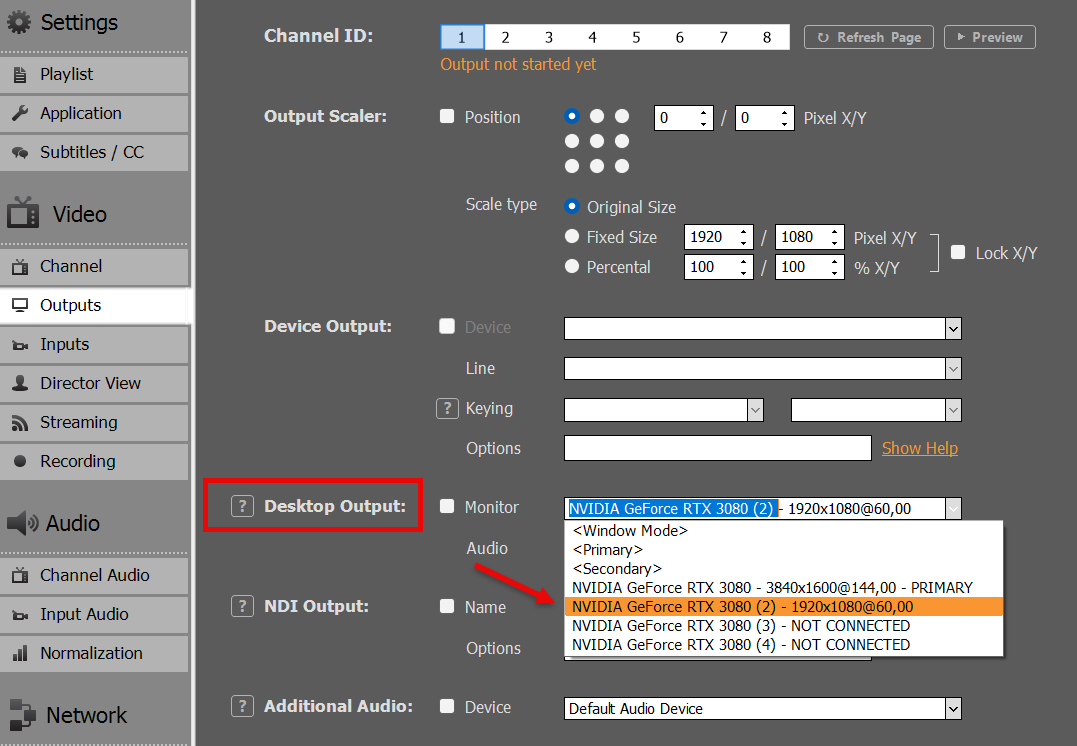
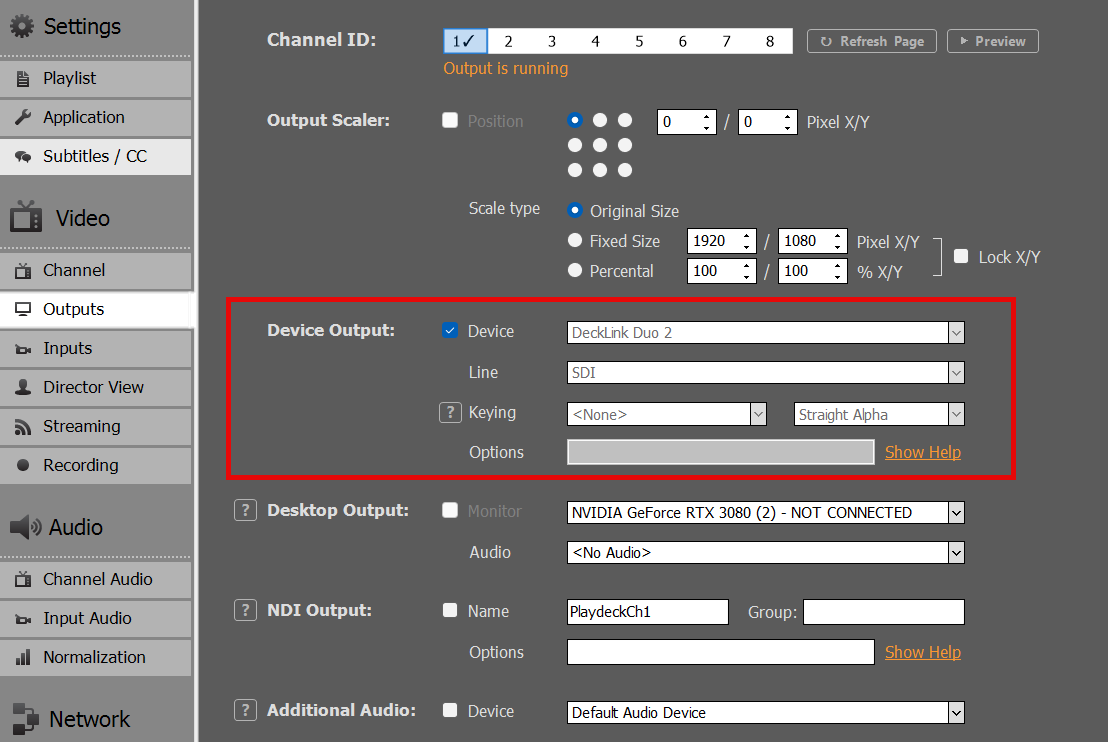
SDI / HDMI Output Card
Output Cards have a huge advantage over Desktop Output:
– Stronger Video Signal for longer cable transport
– Much less CPU/GPU Usage, as Card will offload resources
– No Frame Drops, as Cards have integrated Frame Rate Control and Conversion
– Much higher picture quality, especially Colors
Output Cards are almost always worth the costs and are highly recommended. They provide a much more stable video transport solution compared to Desktop Output and an overall better experience.
Find a list of all supported Output Cards:
https://playdeck.tv/howto/supporteddevices/
If you need a recommendation, we mostly use BlackMagic DeckLink Cards. They are available for SDI and HDMI:
https://www.blackmagicdesign.com/products/decklink
1. Install the Output Card into your PC
You would need a separate PCIe Slot on your Mainboard. Imagine this Card as “Secondary Graphics Card”. Please make sure, that the PCIe provides the necessary bandwidth needed by the Device. Some PCIe Slots are “shared” and only have half the bandwidth, leading to stuttering video output. This might be changed via BIOS. You can also “host” your Card in an external housing for mobile production, like the “Sonnet Echo Express” and connect it via Thunderbolt, but please be aware that bandwidth available via Thunderbolt is lower than the PCIe bandwidth required for some some Cards like the “DeckLink 8K Pro”.
2. Install Driver for Windows
Most Cards need a specific Driver installed for Windows to operate. Those Driver also deliver Tools to test the Card before using it in PLAYDECK.
Make sure, you always have the latest Version of the Driver installed in your System for maximum stability and quality. For BlackMagic Card, PLAYDECK needs at least “Desktop Video 14.5” as Driver, otherwise the Card will not work as intended:
https://www.blackmagicdesign.com/support/family/capture-and-playback
3. Activate in PLAYDECK
Select your Output Cards and Line in PLAYDECK and activate the Device Output. Unlike Desktop Outputs, these Output Cards don’t need a connected display via SDI or HDMI, they will activate right away:
SMTP ST 2110 / IP Output Card
These Cards are very similar to SDI/HDMI Cards described above. Please read there for Installation.
The difference between 2110 and SDI Cards is, that 2110 Cards send the signal via LAN (local area network). This is a modern and growing standard for Studios to transport video signals within the company. While it is theoretically possible to use existing LAN for ST 2110, it is recommended to use a separate LAN with specific PTP-aware switches (precision time protocol). Once setup, the main advantage is, the multiple receiver can easily access the video feed generated by PLAYDECK.
We provide a separate article for 2110 Devices and their Network setup options:
https://playdeck.tv/howto/2110-device-setup/
NDI (Network Device Interface)
NDI is another Network Transport Option for your video feeds. It can be used with the existing LAN (local area network) and doesn’t need specific network configuration. It provides its own “discovery system”, meaning: You send your NDI signal into the network and it will be automatically detected by any NDI receiver.
NDI is the preferred method to exchange video feeds with other Applications. Here are some examples:
https://playdeck.tv/howto/obs-studio/
https://playdeck.tv/howto/vmix/
NDI can also be used in a Cloud Setup, e.g. Amazon EC2 instances, to transport between server:
https://playdeck.tv/howto/amazon-ec2/
You can use NDI to “loop” the Signal within PLAYDECK for specific Tasks, like this Picture-In-Picture:
https://playdeck.tv/howto/pip/
There are many tools available to help you setup NDI in your environment:
https://ndi.video/tools/
If you need to setup a NDI Discovery Server, this will help you:
https://ndi.video/tools/access-manager/
https://docs.ndi.video/all/using-ndi/ndi-tools/ndi-tools-for-windows/access-manager
Note: There has been a problem with NDI causing stuttering after a window update. Here is the solution:
https://www.vmix.com/knowledgebase/article.aspx/376/windows-update-affecting-ndi-stability
Streaming (UDP, RTMP, SRT, DVB, …)
You can pick out of several Streaming Protocols, which all serve a different purpose.
– UDP/RTMP Streaming: Low-latency Live Streaming
– SRT: High-reliability Broadcasts
– DVB: Traditional Broadcasting
– And many more (RTP, RIST, Icecast, HLS
We provided a more in-depth article for streaming:
https://playdeck.tv/howto/output-streams/
Dante Virtual Soundcard (DVS)
This is strictly speaking not a video feed, as DVS is audio-only. This is yet another Network (LAN) Option. The use case for DVS is, if you need to send your audio feed SEPARATE or ADDITIONAL to your video feeds, or in audio-only productions. The most common use case is, that in live events, the audio mixer needs ALL audio feeds of ALL PLAYDECK channel, meaning: He wants to receive 8 audio channel in stereo pairs of your 4 video channel.
We are providing an article to setup and use Dante:
https://playdeck.tv/howto/dante/
Director View
This is a specific Output option PLAYDECK provides, to inform your crew of the state of affairs: This will mix several different video feeds into one video feed and overlay information about remaining time. This is meant to provide assistance in a multi-room or multi-person environment.
This video feed works like a separate channel: You can send it parallel to your other outputs. You can setup and send up to 4 different Director Views. You can pick how many and which channel should be included:
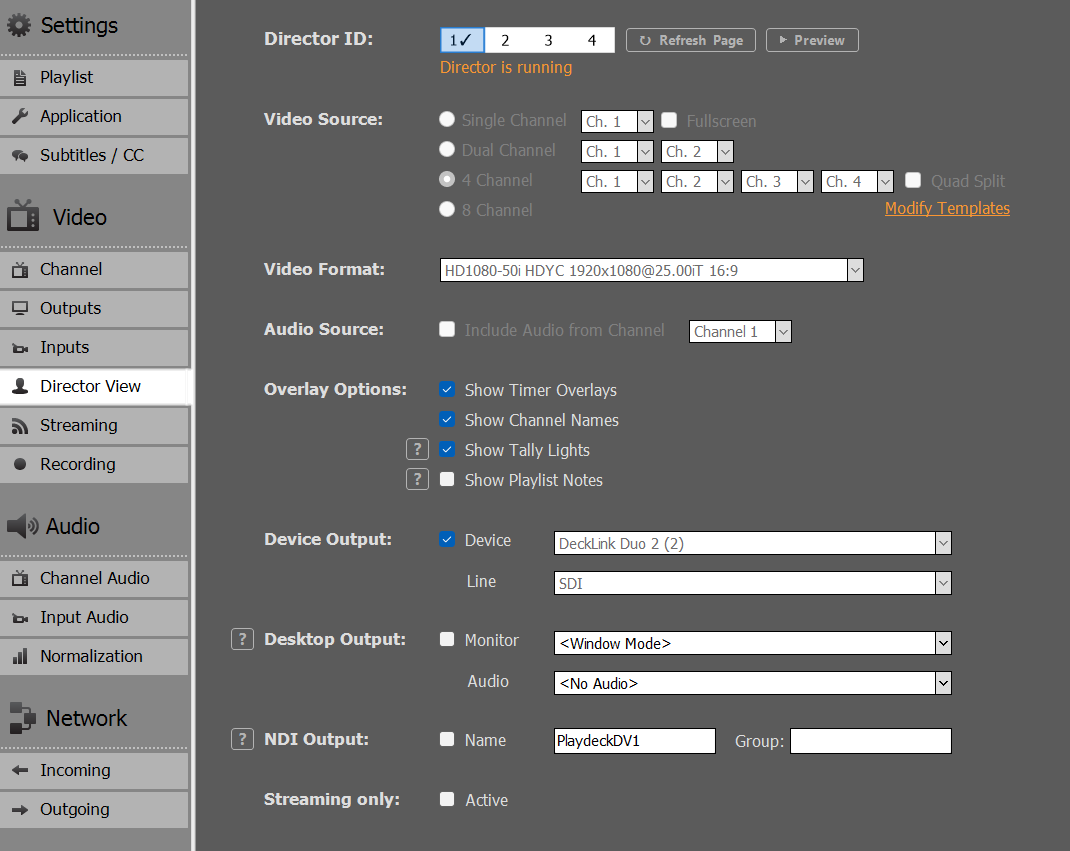
In addition, you can modify the overlay to fit your own company, e.g. integrate your own logo or change fonts.
Setup of your Output Streams
This article will show how to setup your Output Streams for different purposes.
In this article:
→ Introduction
→ Using Parameter and Config String
→ Config Samples
→ AAC High Quality Audio Streams
→ Color Space and Chroma subsampling and Interlace
→ Multiple Audio Tracks
→ Closed Captions and SCTE
→ Routing Streams over specific IP
→ Monitoring & Troubleshooting
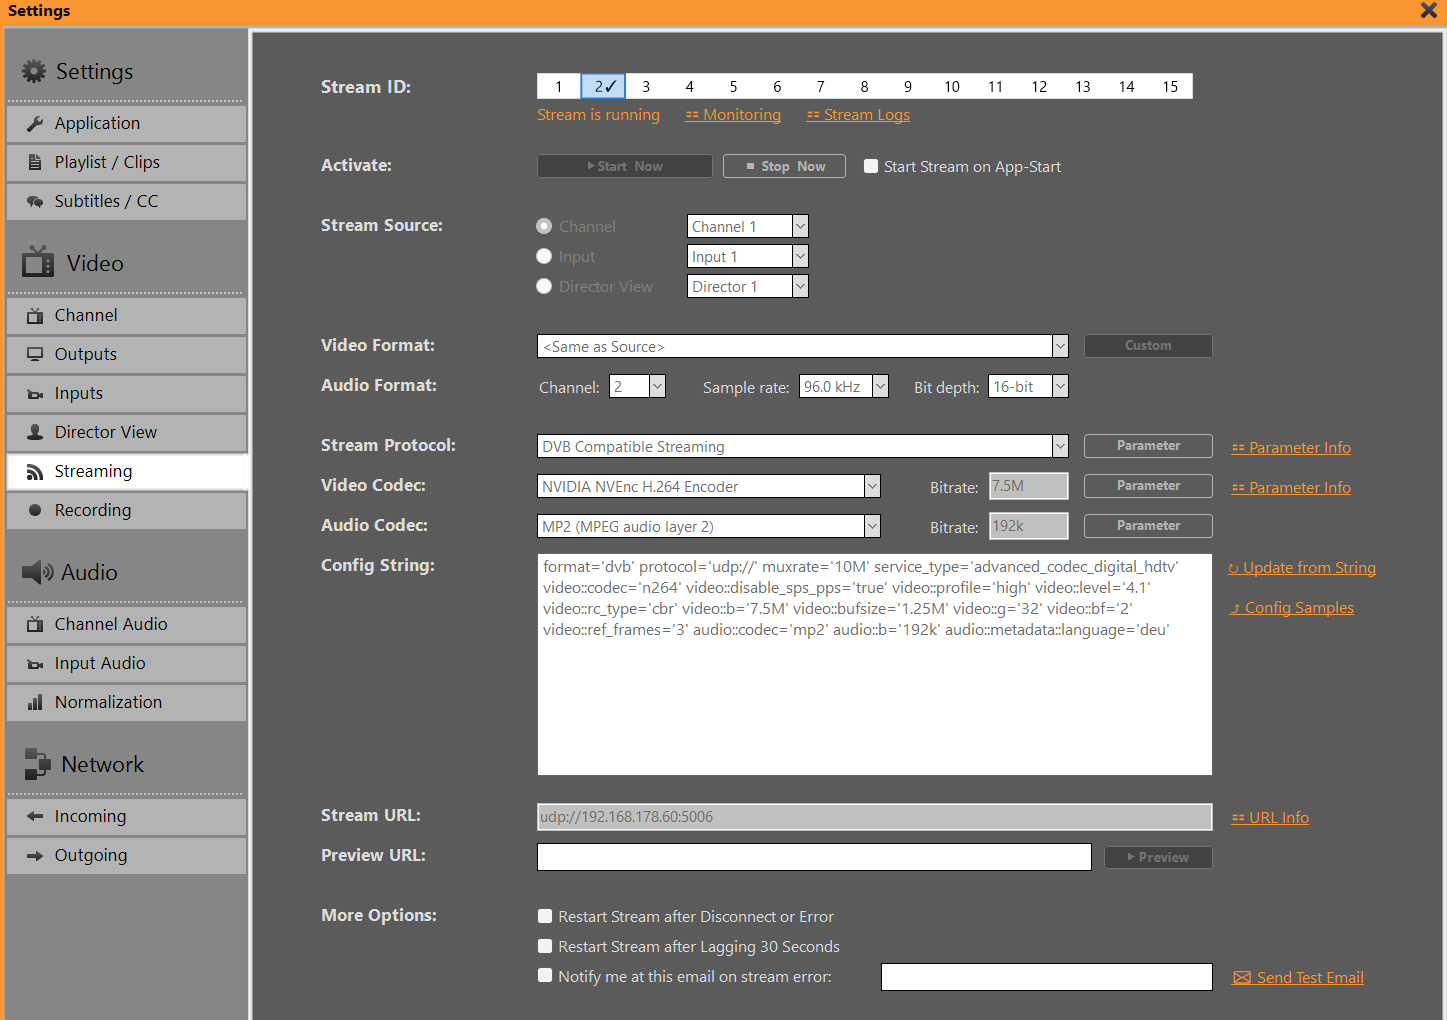
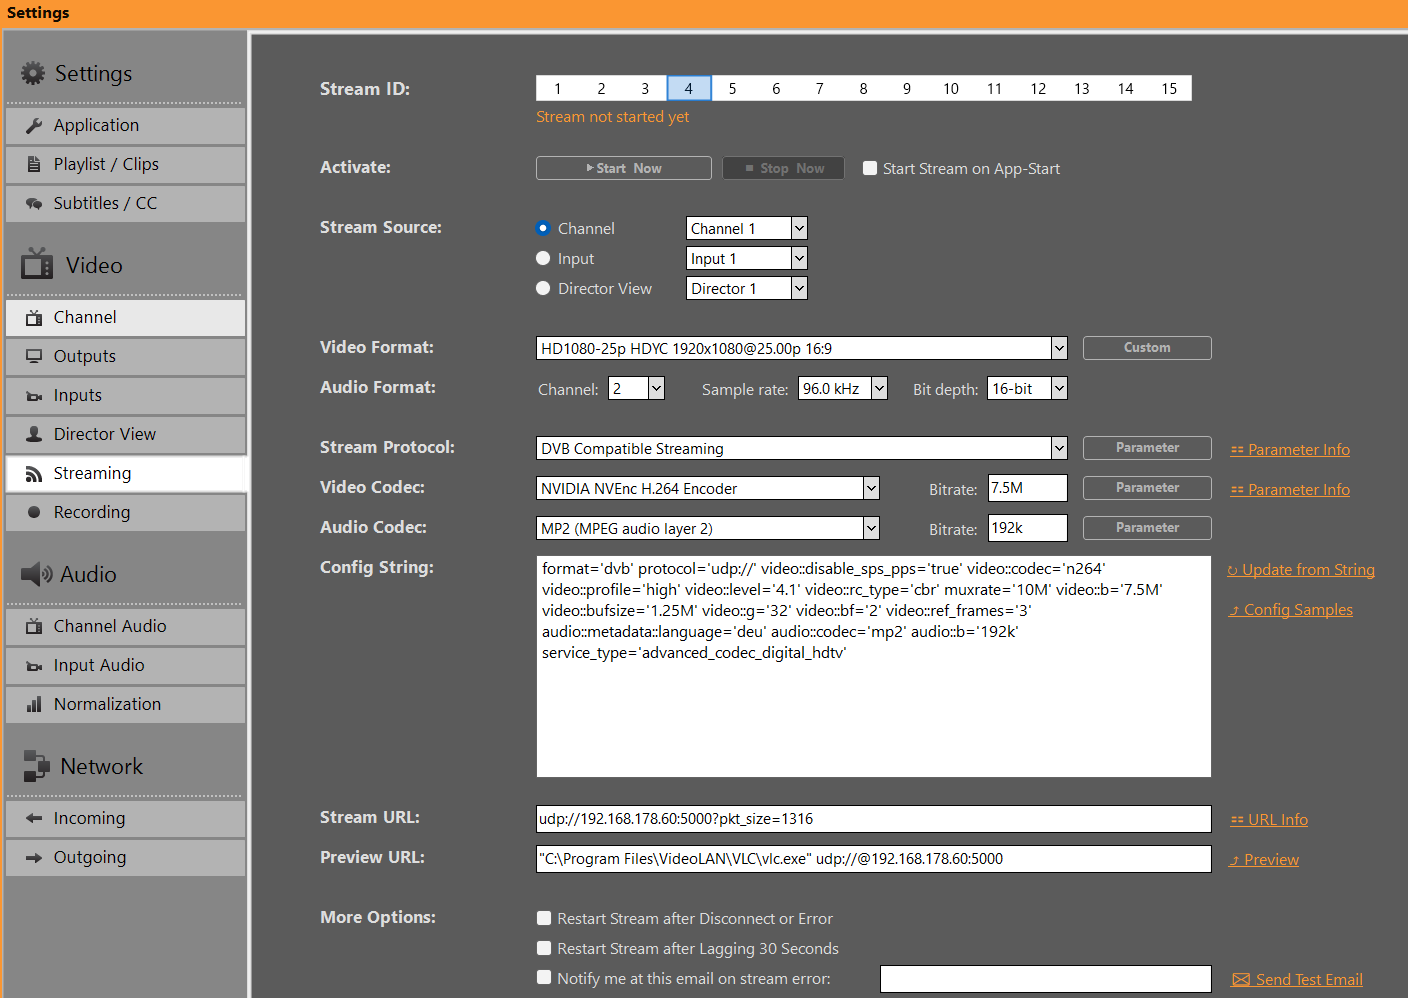
1. Introduction
You are able to setup 15 different Stream Configurations for any Source, being Channel, Inputs and Director View. As a default, your Video Format is copied from the Source, once the Stream starts, but you can transcode into any Resolution.
Once you pick your Protocol, the other Fields for Video/Audio Codec and URL will change according to your selection, meaning: Not every Video/Audio Codec will be available for every Stream Protocol.
INFO: NVIDIA Encoder do NOT support Interlaced Formats anymore. Pick Intel QuickSync instead.
Your URL will show a suggestion of the required URL Format. Click on “URL Info” to show more examples, e.g. how to integrate Username/Password. The Preview URL will not be used by PLAYDECK, it’s just for your convenience to open the Internet Browser upon clicking “Preview”.
2. Using Parameter and Config
Further Parameter can be set to Protocol and Codecs, which are specific for your selection. These can be used to finetune your Settings, e.g. make your Stream CBR or add Metadata.
Clicking on “Parameter” will open a Editor, which will only show the possible Settings for your selection. It will highlight any Value that differs from the Default Value.
The “Config String” is a representation of all your Protocol/Codec selection as well as their respective Parameter. The Config String works both ways: You can also copy/paste a Config String into the Text Field, then click “Update from String” to apply the Values upwards. This allows you to simply copy Settings between Stream ID’s or share with other User.
3. Config Samples
Here is a quick selection of recommended Configurations for different purposes. Copy and Paste to PLAYDECK and click “Update from String”.
DVB Stream with CBR and GOP B-frames. No PCR or PTS-DTS or Buffer underrun Error
format='dvb' protocol='udp://' mpegts_start_pid='60' video::streamid='80' video::disable_sps_pps='true' video::codec='n264' video::profile='high' video::level='4.1' video::rc_type='cbr' muxrate='10M' video::b='7.5M' video::bufsize='1.25M' video::g='32' video::bf='2' video::ref_frames='3' audio::streamid='81' audio::metadata::language='deu' audio::codec='mp2' audio::b='192k' pmt_start_pid='100' mpegts_flags='-system_b' rc_buffers='4' pcr_period='35' pat_period='0.1' sdt_period='0.5' tdt_period='10' start_pcr='0' service_name='TEST' service_provider='PD' service_id='1' original_network_id='1' transport_stream_id='201' service_type='advanced_codec_digital_hdtv'
Or in Short Form:
format='dvb' protocol='udp://' video::disable_sps_pps='true' video::codec='n264' video::profile='high' video::level='4.1' video::rc_type='cbr' muxrate='10M' video::b='7.5M' video::bufsize='1.25M' video::g='32' video::bf='2' video::ref_frames='3' audio::metadata::language='deu' audio::codec='mp2' audio::b='192k' service_type='advanced_codec_digital_hdtv'
INFO: Every DVB Receiver is different und you might need different Parameters. Some Receiver will not allow ANY deviancy from official guidelines, and will show BLACK. The most reliable solution to encode DVB signals are Hardware Encoder, e.g. Haivision.
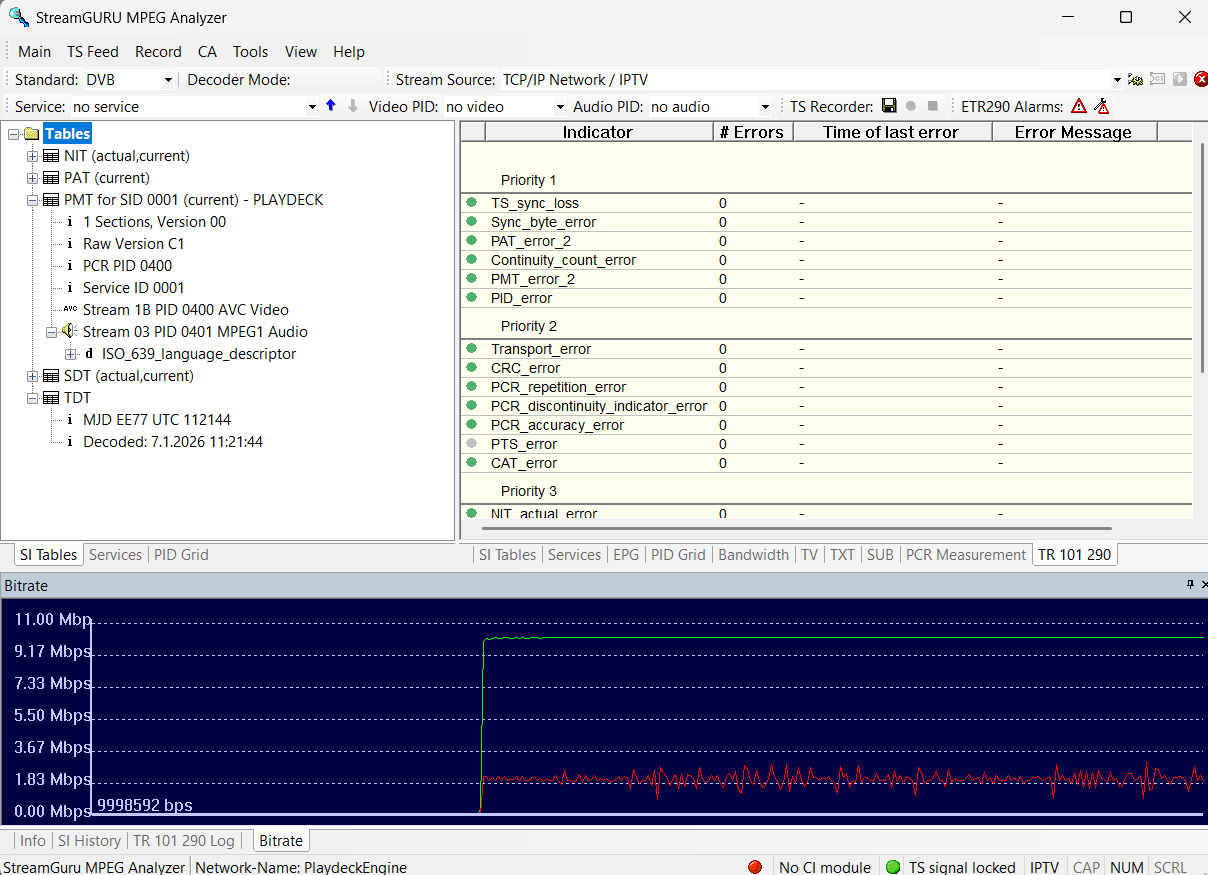
Best practice to test DVB Streams for PCR Error or other, is using one of these Tools:
– DVBControl DVBAnalyzer (costs ~2000 EUR, but is most reliable and detects PTS-DTS Error)
– StreamGURU (costs ~300 EUR, can detect any ETR Error and shows Bitrate Graphic)
– TSAnalyzer (free, but can ingest Stream URL, needs TS File on HD)
– Others worth mentioning: DVBInspector, Elecard Stream Analyzer, StreamXpert
————————————————————
SRT Stream in CBR for 25 FPS with High Quality Audio
The next Sample is being used by several Customer in a Multichannel Stream Setup to broadcast Music Video Content. This Config runs smooth for 4 parallel Output+Stream Channel – achieving optimal sound and picture quality with FHD ACC audio.
format='mpegts' protocol='srt://' video::codec='n264' video::b='4M' video::rc_type='cbr' video::preset='p4' audio::codec='aac' audio::b='128K' audio::profile='aac_low' audio::stereo_mode='ms_force' audio::minrate='128K' audio::maxrate='128K' audio::bufsize='128K' audio::aac_coder='0'————————————————————
RTMP Stream in CBR for 60 FPS with 2 second-keyframe
The next Sample is for YouTube. Use the YouTube Analytic and Stream Health Tools to test your Stream Satbility:
format='flv' protocol='rtmp://' video::codec='n264' video::b='9000k' video::maxrate='9000k' video::bufsize='9000k' video::g='120' video::preset='veryfast' audio::codec='aac' audio::b='128k' audio::ar='44100'
The next Sample is for Twitch. Use Twitch Inspector to check your Stream Stability and add “?bandwidthtest=true” to your Stream URL to prevent going Live.
format='flv' protocol='rtmp://' merge_tracks='true' video::codec='n264' video::b='5800k' video::maxrate='5800k' video::bufsize='5800k' video::g='120' video::preset='veryfast' audio::codec='aac' audio::b='128k' video::tune='zerolatency' audio::codec='aac' audio::ar='44100' audio::b='128k'
————————————————————
Sony XDCAM HD422 Standard
video parameters—including 4:2:2 chroma subsampling, a specific GOP structure (M=3, N=15), and interlaced field processing—alongside professional-grade 24-bit PCM audio at a 48 kHz sample rate.
format='mxf' video::codec='mpeg2video' video::b='50M' video::interlace='1' video::top='1' video::g='15' video::v422='true' video::bf='2' video::flags='+ildct+ilme' audio::codec='pcm_s24le' audio::ar='48000'4. AAC High Quality Audio Streams
The default AAC streaming settings save CPU, but might sound flat on music channels. For pristine audio, choose one of the two profiles below based on your target audience and source material.
Quick Prep:
– Source: Use 48 kHz clips (320kbps or lossless PCM).
– Video: Lower video to 720p30 if bandwidth is low. Always use hardware encoding.
Option 1: Maximum Compatibility & Stability (Safe Variant)
Best for: Standard streaming, cable operators, and DVB-T multiplexers. This is the safest profile to prevent phase issues across various types of content.
format='mpegts' protocol='udp://' video::codec='n264' video::b='4M' audio::codec='aac' audio::b='256K' audio::profile='aac_low' audio::aac_coder='0'
audio::profile=’aac_low’: Sets AAC-LC for maximum quality and 100% hardware decoder compatibility.
audio::aac_coder=’0′: Forces a high-quality two-loop encoding run for clear transients. (Change to 1 if you face CPU spikes).
Dynamic Stereo: Leaves stereo management to the encoder, making it highly resilient against imperfect source material.
Option 2: High-Fidelity Streaming (Optimized Stereo Variant)
Best for: Dedicated music channels with pristine studio-grade source files. This profile utilizes a tight VBR envelope and forced Mid/Side stereo processing.
format='mpegts' protocol='udp://' video::codec='n264' video::b='4M' audio::codec='aac' audio::b='256K' audio::profile='aac_low' audio::stereo_mode='ms_force' audio::minrate='200K' audio::maxrate='320K' audio::bufsize='640K' audio::aac_coder='0'
audio::stereo_mode=’ms_force’: Forces Mid/Side stereo processing, maximizing bandwidth efficiency for deep, wide stereo soundscapes.
minrate=’200K’ / maxrate=’320K’ / bufsize=’640K’: A tight VBR envelope that prevents quality drops in quiet passages while leaving room for heavy musical peaks.
Note: If your audio lacks “punch” or sounds hollow on certain clips, switch back to Option 1, as your source material might contain phase inconsistencies.
5. Color Space and Chroma subsampling and Interlace
The Support for certain Color Spaces, e.g. 4:2:2 for DVB, or Interlaced Encoding, depend very much on the Intel CPU or NVidia GPU you are using.
Here is a page for NVidia NVenc and 422 Support and here for Intel Quick Sync and 422 Support.
In basic terms:
1. NVidia Support for Interlaced Encoding:
– Pascal (GTX 10-Serie): Last architecture with interlace support
– Turing / Ampere / Ada (RTX 20/30/40): Hardware support for interlaced encoding was removed
– Blackwell (RTX 50-Serie): Interlaced encoding for H.264 (8-bit and 10-bit) has been re-introduced
2. NVidia Support for 4:2:2 Color Space:
– Blackwell (RTX 50-Serie)
3. Intel Support for 4:2:2 Color Space
– 10th Gen and newer processors offer support for Hardware Accelerated encoding and decoding of HEVC codec on 4:2:2 color sampling via Quick Sync.
– Previous graphics controllers on 9th Generation Intel® Core™ Processors and older were limited to HEVC codec 4:2:0 color sampling for hardware accelerated encoding and decoding.
This is a quick config sample to encode 4:2:2 with Intel Quick Sync (10th Gen+)
format='dvb' protocol='udp://' video::codec='hevc_qsv' video::b='5M' audio::codec='aac' audio::b='128K' video::pix_fmt='yuyv422'
Note: Features such as interlace and 4:2:2 color space are also available in x264 CPU encoders. Since we use an LGPL version of FFmpeg without GPL parts (e.g., libx264), these features are not enabled. It is possible to replace the FFmpeg libraries with your own versions.
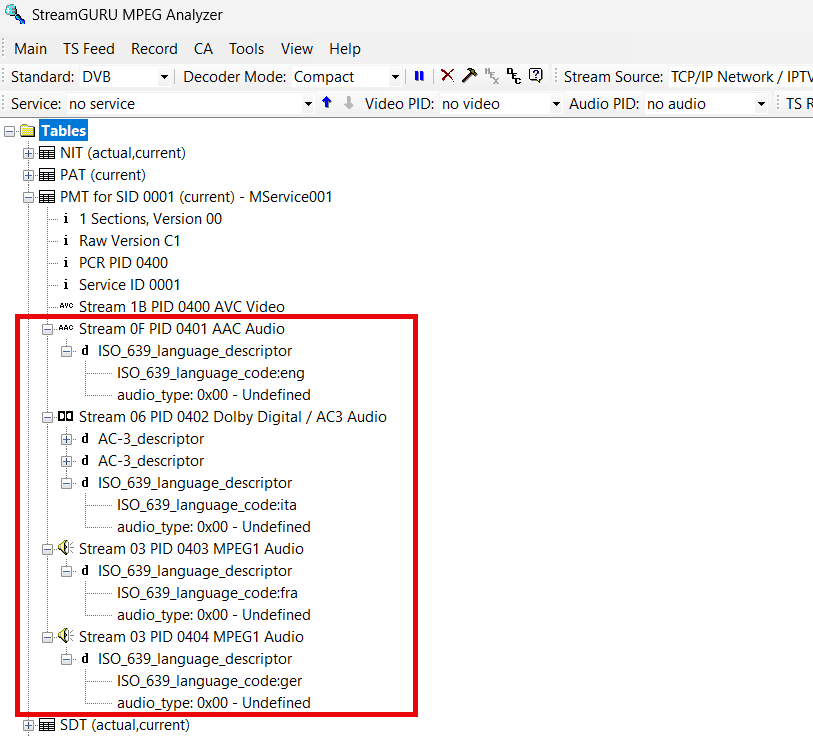
6. Multiple Audio Tracks
If you need to send multiple Audio Tracks, e.g. for different Languages or for Director Audio, you can do so with all supported Protocols (DVB, RTMP, UDP and some more). You can also apply different Audio Codecs.
The way this works is, that you have ALL Audio Tracks already active in your Channel, then SPLIT the Audio Tracks for your Stream Output in e.g. Stereo Pairs.
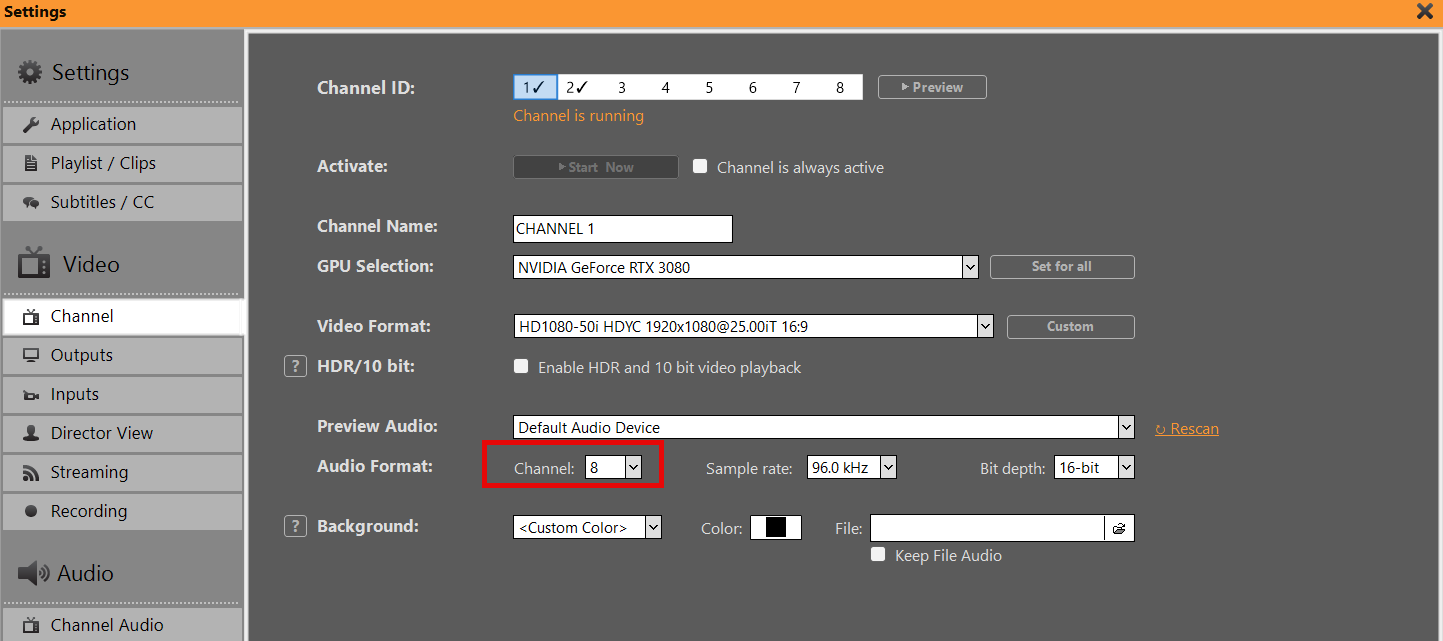
First, make sure your Channel is set to more then 2 Audio Channel:
Then “fill” these Audio Channel with Audio Content, e.g. by enabling All Audio Tracks on a Clip or ingesting all Tracks via SDI (up to 16 Audio Tracks). You can also use Audio Mapping to mix up/down your Audio Tracks or use Audio Filter to copy and delay certain Audio Tracks.
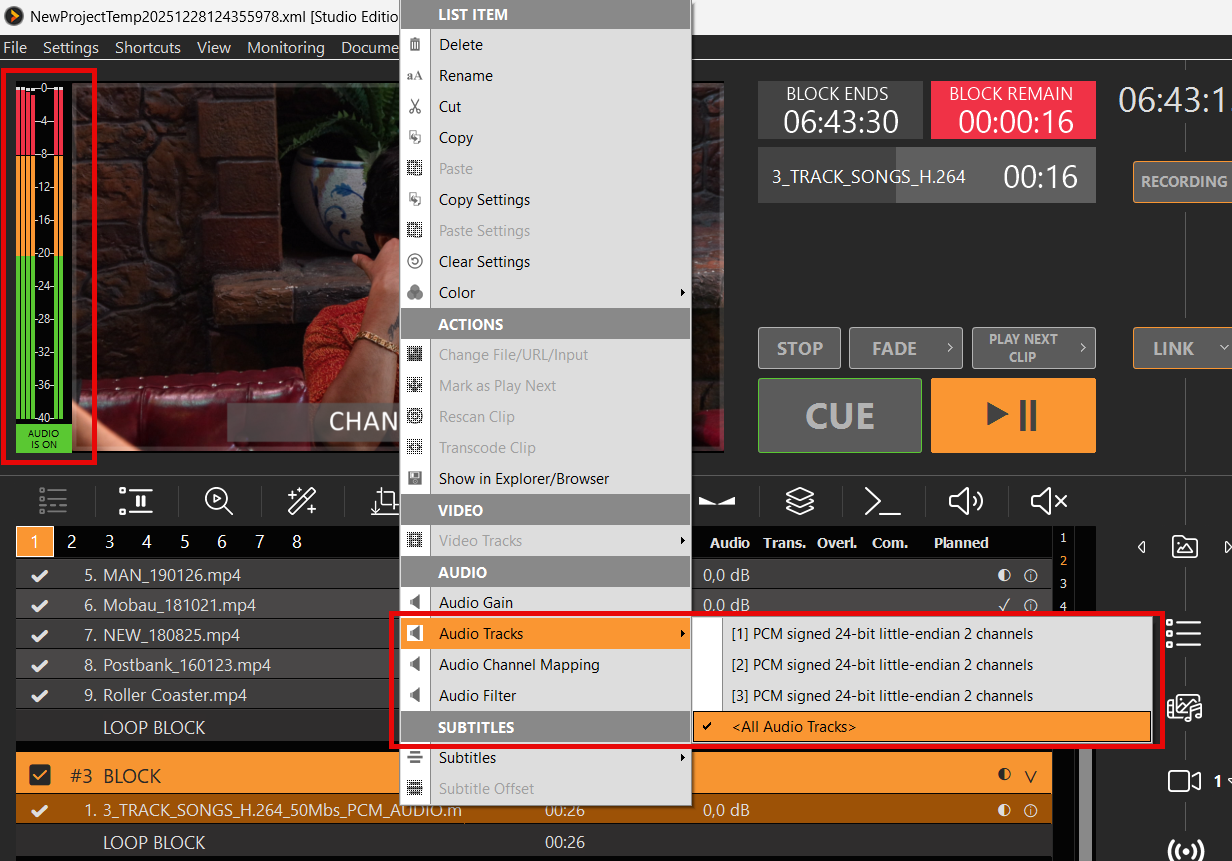
Then you open your Stream Settings, especially the Parameter of your Stream Protocol and enable Audio Track Splitting:

INFO: The Number of Audio Channel in your Stream Settings need to stay at 2.
If needed, you can apply different Audio Codecs for the addition Audio Tracks. Please note the added and increasing Numbers for every Audio Tracks after the first one:
audio::codec='aac' audio.1::codec='ac3' audio.2::codec='libmp3lame' audio.3::codec='mp2'
You can also apply a Language Descriptor for every Audio Track:
audio::metadata::language='eng' audio.1::metadata::language='ita' audio.2::metadata::language='fra' audio.3::metadata::language='ger'
INFO: Language Codes must comply to ISO 639-2
You can then test your resulting Audio Tracks in e.g. StreamGURU:
7. Closed Captions and SCTE
Both can be enabled in the Parameter Settings of your Protocol:

INFO: SCTE-35 is only available for Protocols: SRT, DVB, UDP (any Video Codec). Closed Caption will only work with Video Codecs: MPEG-2, H.264 (any Protocol)
This will require both to be enabled and available in your Channel already. Please refer to the following articles for more information on SCTE and/or Closed Captions:
→ Sending SCTE-35 to Stream Server
→ Closed Captions / Subtitles
8. Routing Streams over specific IP
Your production requires you to send your streams via specific networks. This is mostly used to have a dedicated/reserved line for streaming, so it doesn’t interfere with regular network traffic.
If using UDP Streams you simple add this parameter directly to the URL:
udp://ip:port?localaddr=172.20.10.2
If using SRT Streams you simple add this parameter directly to the URL. This only works in rendezvous mode:
srt://ip:port?mode=rendezvous&localip=172.20.10.2
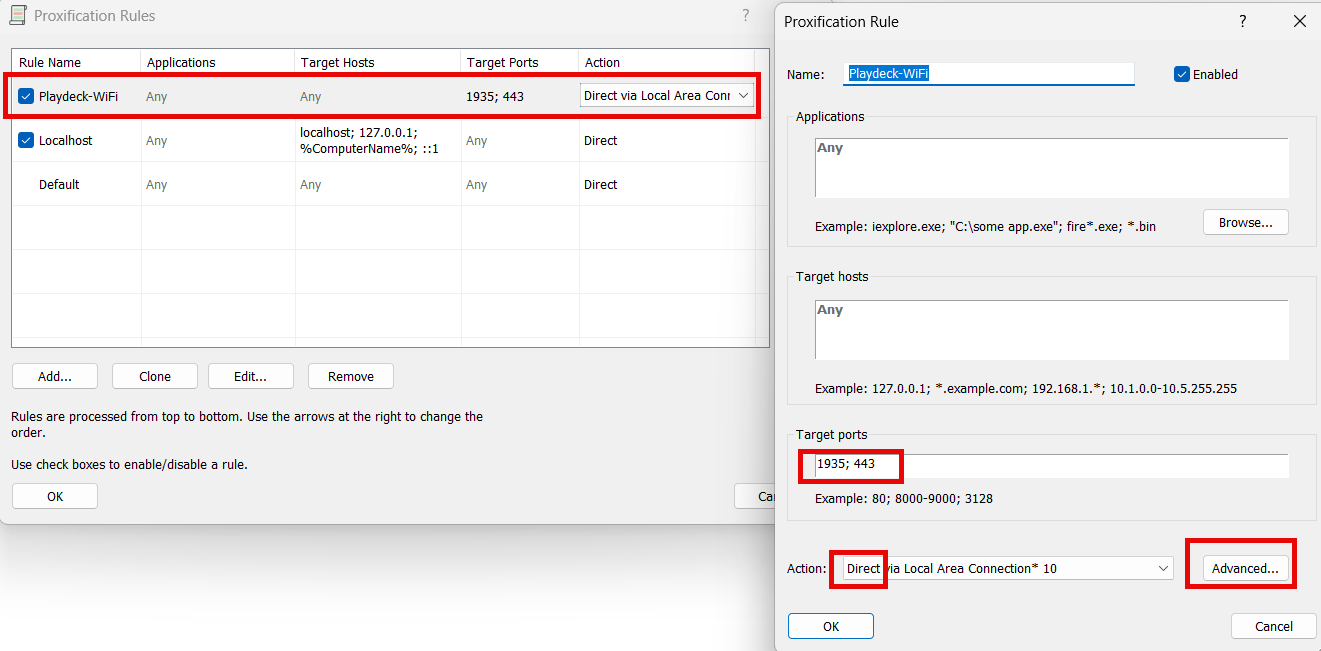
If using RTMP Streams, there sadly is no paramter. You need to route all RTMP outbound traffic manually. For this we use Proxifier. Goto Profile, Proxification Rules, Add new Rule and edit like this and move it to the top if the rules. Pick your desired adapter via “Advanced”.
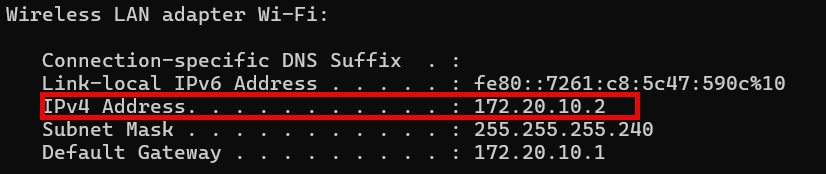
If you want to run a dry test locally without the 2nd line, enable both Ethernet Adapter and Wifi on your PC, then Start a new Hotspot on your Mobile Phone and connect PC Wifi to that Phone. Then open Console (“cmd”) and type “ipconfig”. The IP address you need is there:
You can test your network traffic with wireshark.
9. Monitoring & Troubleshooting
If your Streams are lagging or even stopping completely, you are often in the dark what exactly happened. Here are some pointer to help you identify the problem.
1. Bitrate
Follow this Rule: The Video and Audio Bitrate Setting (for your Stream) should never exceed the Clip Encoding Bitrate. Check by right-clicking your Clip in the Playlist and open MediaInfo. In this case, set your Video Bitrate to 3M and Audio Bitrate to 128K.
2. Monitoring
Open the Monitor Window in PLAYDECK or open the Stream Logs.
FPS 50/60 (FPS Average/Desired)
Compares the current and average encoding frame rate against the desired level. A drop here indicates the system cannot keep up with real-time encoding.
Elapsed (Frame Waiting Time in Seconds)
Shows Time elapsed after the last Frame has been processed. If this value increases, not frames can be processed due to missing Source, or false settings or no connection.
Skipped (Dropped Frames)
The most critical indicator of performance bottlenecks. If this value increases, the encoder is intentionally dropping frames because it cannot process them fast enough.
Breaks (Frames lost)
If the network is slow, you see Breaks because the Server wants a new frame but it cannot get there in time (for protocols that requires acknowledgement like RTMP or SRT). Breaks can also happen if the Source does not deliver a frame in time.
Buffer (Frames waiting)
Monitors the number of frames waiting in the internal queue. A constantly growing buffer typically precedes skipped frames or Breaks. High Skipped, Low Breaks: This usually means your CPU/GPU encoder is too slow. High Breaks, Low/Zero Skipped: This usually means the network or source is the bottleneck. The writer is ready to encode but the frames aren’t arriving or being “pulled” at the correct time intervals due to the connection lag.
3. Network/Bandwidth Problems
Turn of all your Streams, open your Windows Console (“cmd” in Start Menu) and type
tracert <hostname_or_ip>
Use your Target URLs Hostname or IP Address. If you see any Values >100 ms, this will indicate a slow connection to your Stream Target.
Also keep in mind, that while today Download Speeds with Fibre, Cable or DSL or mostly high speed (>100 Mbps), the Upload Speed could be very much slower than that. Use a Tool like Speedtest to determine your actual Upload Speed.
Also use Bandwidth Profiler on the Stream Server to check, if your desired Bitrate is also received on the Server. Most Provider or Software will provide with Tools to measure the received Bitrate. Ideally it is shown as Graph, which can point out any Gaps during the Transmission. If you have no Tool at Hand, we recommend streaming to YouTube, as it has a build-in Stream Analyzer, which is very useful to diagnose any instable connections.
In addition, please check with your Provider or Service, if the provide any LOCAL Stream Ingest URL’s for your Region or Country. As an example, Twitch provides these Twitch Ingest Endpoints.
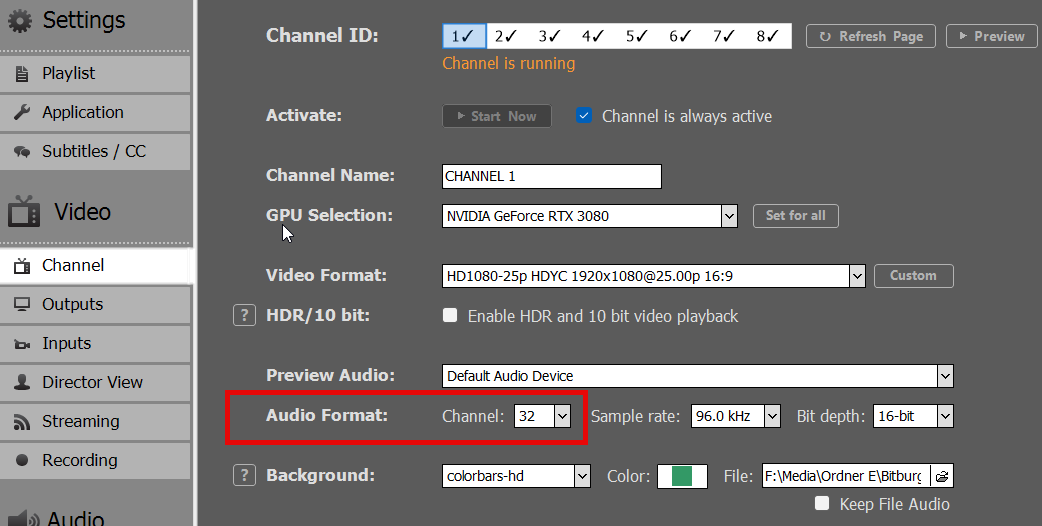
ASIO / Dante Virtual Soundcard
This article explains how to setup ASIO audio interface and devices with PLAYDECK.
In this article:
→ Setup ASIO
→ Dante Virtual Soundcard (DVS)
→ Troubleshooting
Setup ASIO
Enable the “Additional Audio Output” setting to output audio via ASIO.
Important: As a real-time playout solution, PLAYDECK requires a stable synchronization clock from the ASIO device. Without this clock signal, frames cannot be processed correctly, resulting in severe stuttering.
Dante Virtual Soundcard (DVS)
Dante Virtual Soundcard (DVS) is a software solution that turns your computer into a Dante-enabled workstation, allowing you to transmit and receive high-quality audio over a standard Ethernet (LAN) network.
https://www.getdante.com/products/software-essentials/dante-virtual-soundcard/
You can interface DVS with PLAYDECK using either ASIO or WDM mode:
- ASIO (Recommended): Transmit up to 64 audio channels across all PLAYDECK outputs. This provides the lowest latency and highest channel count for professional workflows.
- WDM: Limited to 16 audio channels, restricted to one stereo pair per PLAYDECK output channel.
Configuration Steps
1. Start the DVS Engine:
Open the Dante Virtual Soundcard control panel, set the interface to ASIO, and click Start.
2. Select the Device in PLAYDECK:
You can now select “Dante Virtual Soundcard” as your ASIO device within the PLAYDECK settings.
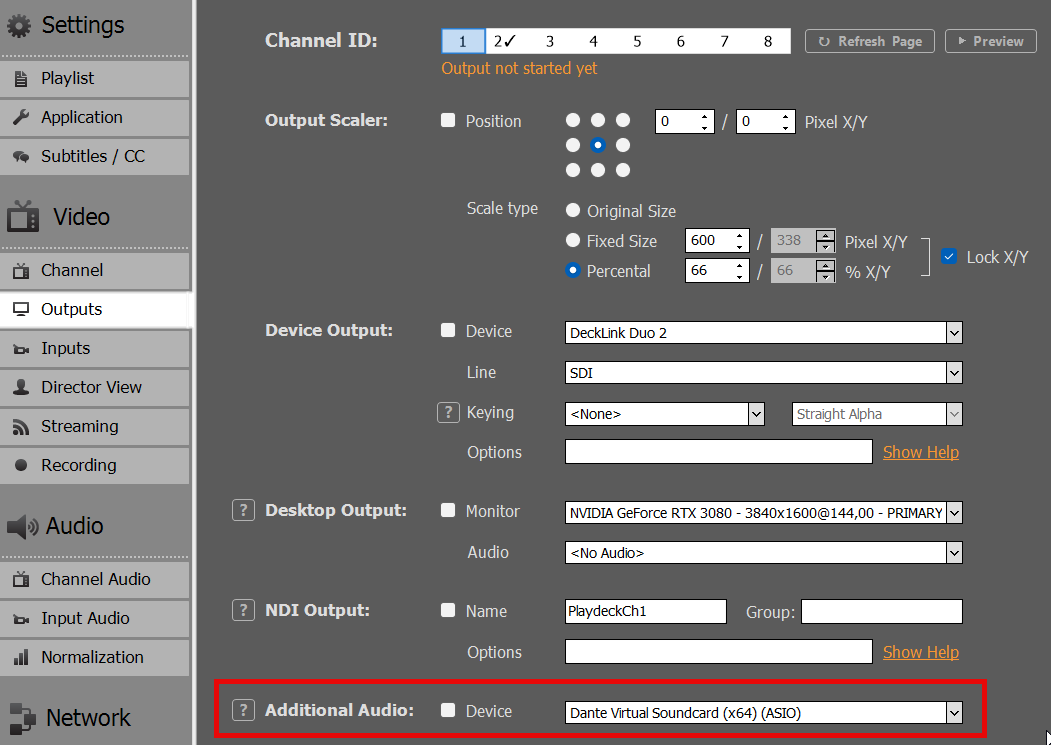
3. Channel Mapping:
PLAYDECK will automatically begin routing the audio channels assigned to that specific output. A single output can support up to 32 audio channels.
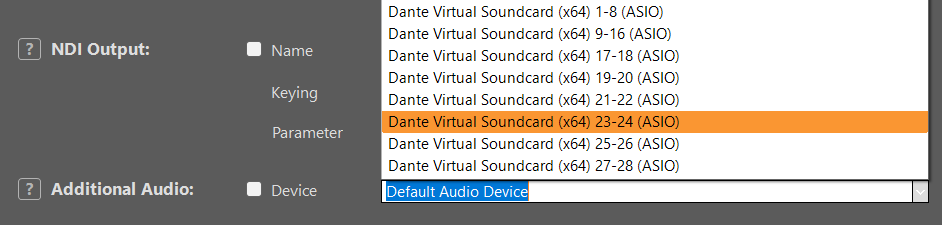
4. ASIO Device Splitting:
To use the ASIO driver across multiple PLAYDECK output channels simultaneously, enable ASIO Device Splitting.

5. Assigning Multiple Outputs:
Once splitting is active, DVS will appear as multiple sub-devices. This allows you to assign a dedicated ASIO device to each individual PLAYDECK output channel.
Note on Splitting Logic: The channel allocation is determined by the “Audio Channels” setting for each output. For example, if Output 1 and 2 are set to 8 channels each, and others are set to 2 channels, the ASIO driver will split the stream accordingly to accommodate those specific requirements.
Troubleshooting
Slow Playback (Frame by Frame)
This occurs if PLAYDECK cannot synchronize with the clock signal from the ASIO device. Because PLAYDECK is a real-time playout engine, it requires a stable clock to process frames.
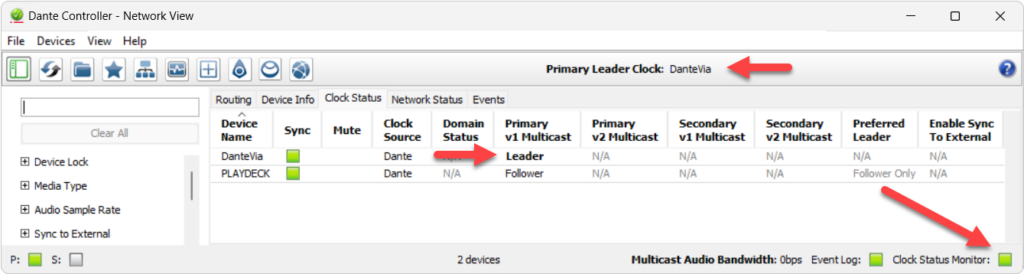
Solution: Ensure a Clock Leader (formerly Master Clock) is active on your network. This can be provided by hardware (e.g., a Dante-enabled mixer), a software driver, or a dedicated clock generator.
If you are using Dante, you may need additional tools to verify your workflow. Follow these steps to set up a local test environment:
- PC 1: Install PLAYDECK and Dante Virtual Soundcard (DVS). Start DVS in ASIO mode and select it within PLAYDECK.
- PC 2: Install Dante Via and Dante Controller.
- In both Dante Via and Controller, ensure the correct Ethernet Interface is selected.
- In Dante Via, enable at least one output device.
Once configured, open Dante Controller. You should see “Dante Via” acting as the Clock Leader with your PLAYDECK system successfully connected.
View this screen capture of the test setup:
https://downloads.playdeck.tv/assets/DanteClockTest.mkv
Note: In some cases, installing ASIO4ALL can help stabilize the “handshake” between PLAYDECK and specific audio interfaces. (https://asio4all.org/)
Poor Audio Quality
Distorted or “glitchy” audio is usually caused by a sample rate mismatch. Ensure the Sample Rate (e.g., 48 kHz) is identical across all of the following:
- Windows Sound Settings (Advanced properties)
- PLAYDECK settings
- ASIO Device / DVS control panel
Audio Channel Mixing and Routing
When working with multichannel audio, you may need to downmix your channels for specific outputs. Please refer to this article for detailed instructions on managing multichannel routing.
Multichannel Audio and Mixing
PLAYDECK support 32 Audio Channel per Output Channel. You can pass-thru Audio Channel (via SDI, NDI, Streams, ASIO), Mix-down to Stereo/Mono or Mix-up to Multichannel. Please note, that we have a sperate Post for Dante Virtual Soundcard.
Pass-thru
Enable Multichannel Audio by simply setting more than 2 Audio Channel in your Output Channel Settings. In this example we set 16 Audio Channel, as this is the native number of Audio Channel for SDI Output Cards:
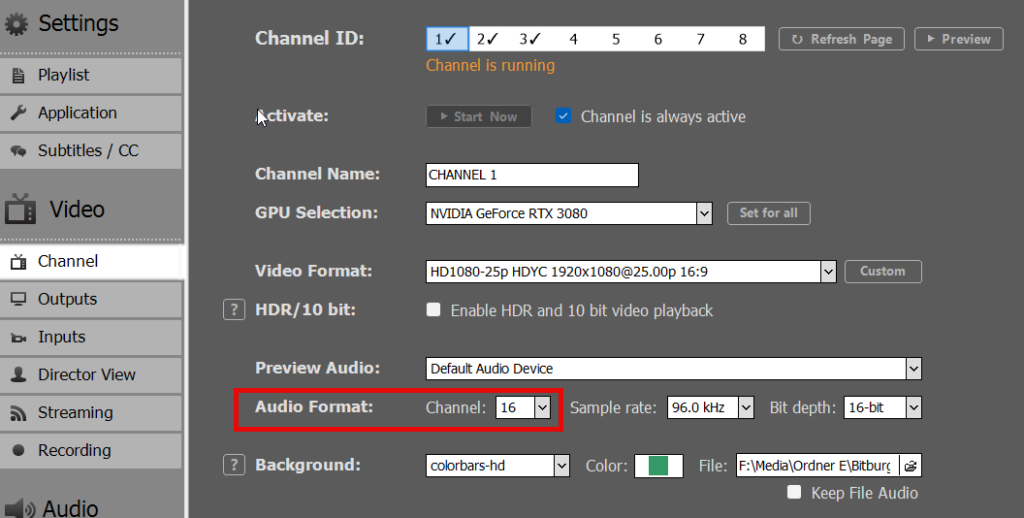
Now you are good to go already. Your VU Meter will switch automatically to 16 Audio Channel:
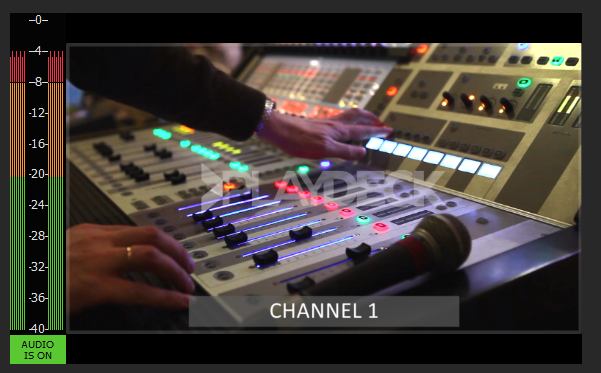
Multichannel Audio is not also active for all Inputs and Outputs: SDI, NDI, Streams. You can check, if you click PREVIEW after activating your Device. All Previews have VU Meter as Overlays:
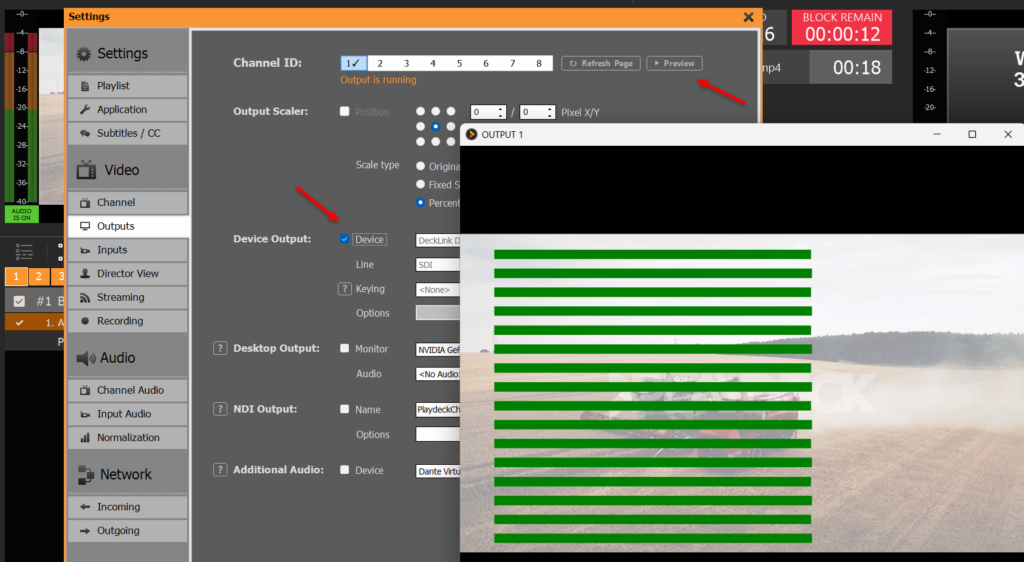
Here is another Example for Input Preview:
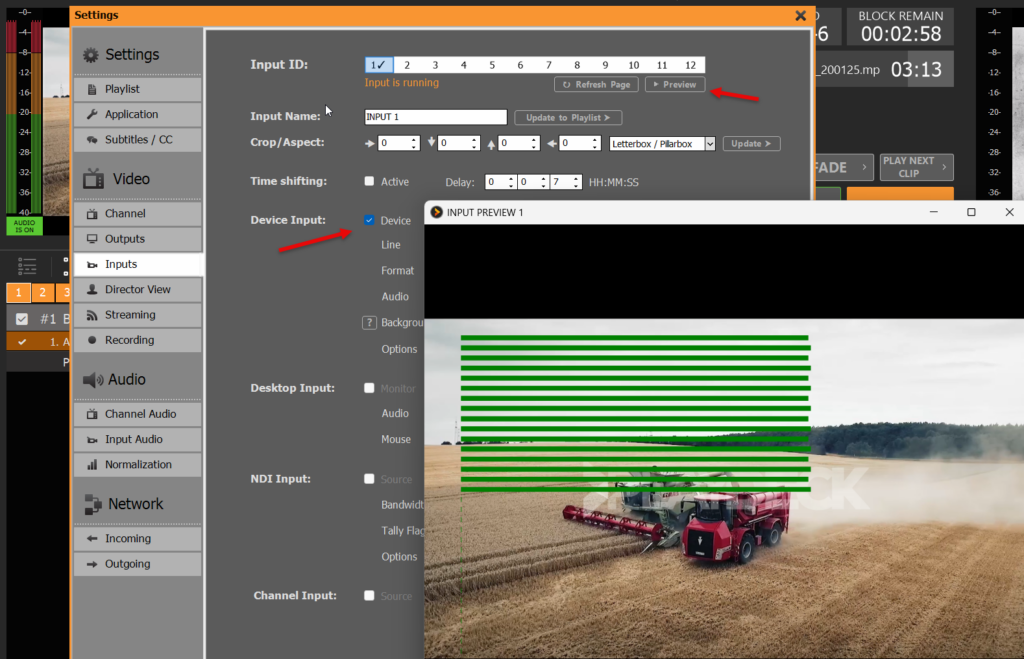
Mix-down
If you have Multichannel-Audio Content (or SDI Inputs) and want to Mix-down your Audio to MONO/STEREO, you would also need to increase the Audio Channel. In this case we use 16. This is important to tell PLAYDECK to process 16 Audio Channel (from Source eg SDI), otherwise all Audio Channel above 2 would be CUT/SILENT:
You can now select different ways to Mix-down your Audio. Please note, that there are seperate Settings for CHANNEL (Clips, Input Streams) and INPUTS (Device Input):
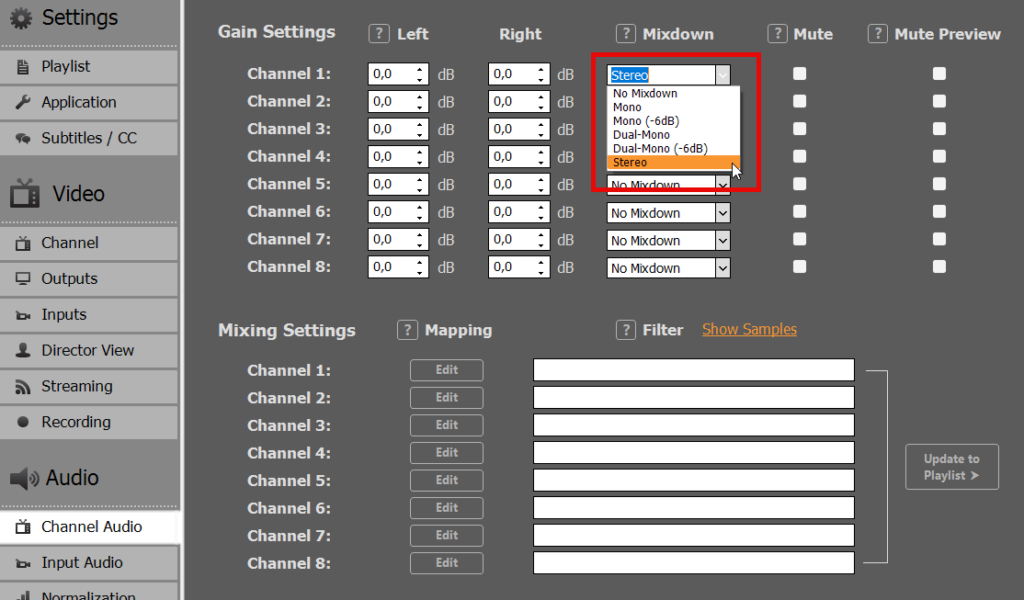
Multiple Audio Tracks
If your File has more than one Audio Tracks, you can switch the Audio Tracks by right-clicking the File and selecting AUDIO TRACKS:
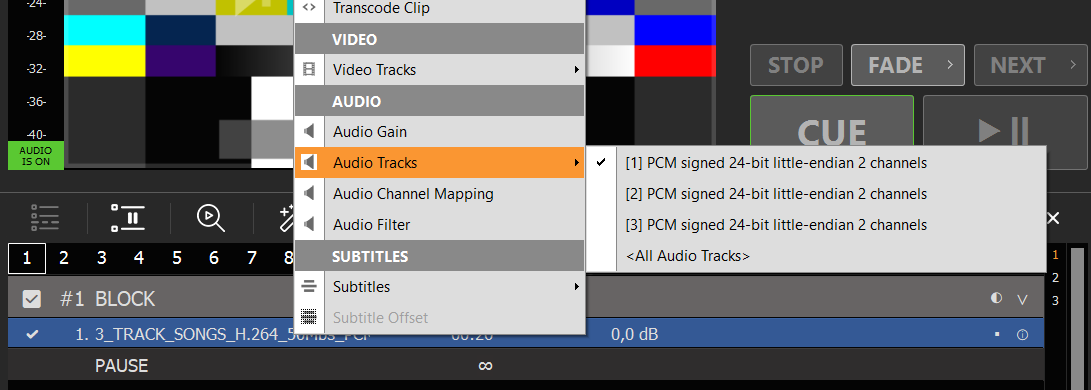
To play ALL Audio Tracks at once, select ALL AUDIO TRACKS. Alle Audio Channel will be concatenated. In our example this would result in 6 Audio Channel for Output. So make sure to set your Channel to 8 Audio Channels, otherwise everything above 2 Channel will not be processed:
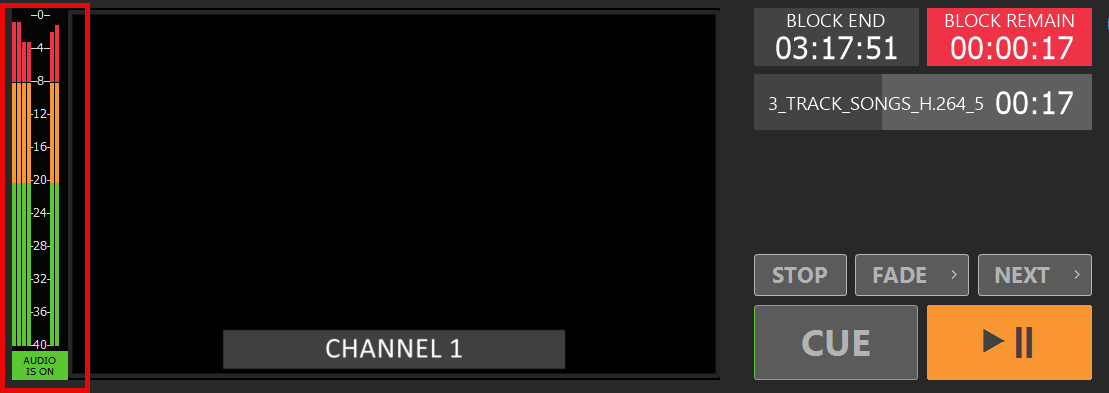
Note: Use any of the other Mixing Options to Mix-down to STEREO or similar.
Custom Mixing
For more advanced Mixing, you can click EDIT under MIXING SETTINGS. In this example we Mix-down 16 incoming Audio Channel to 4 outgoing Audio Channel. Please note, that there are seperate Settings for CHANNEL (Clips, Input Streams) and INPUTS (Device Input):
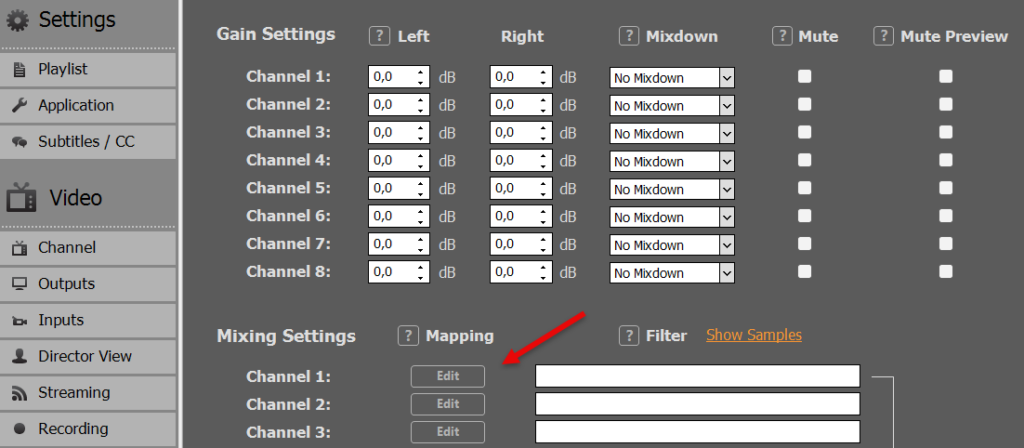
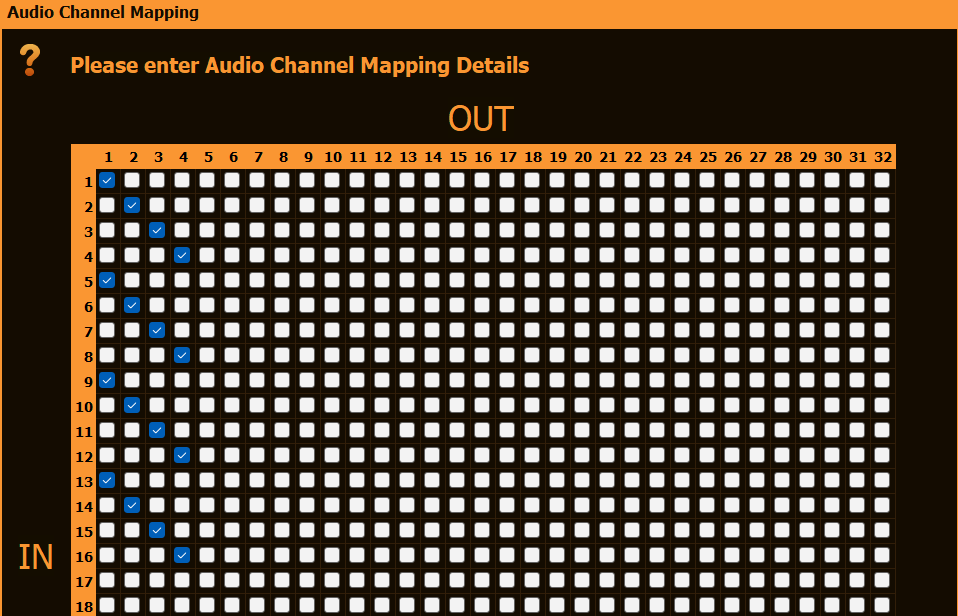
You can refine your Mixing even more by moving to the Content Level: Right-click any Playlist Item and select AUDIO CHANNEL MAPPING:
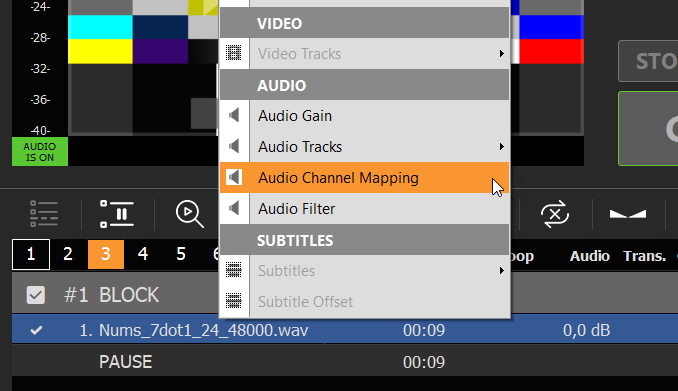
Color Correction for Inputs and Channel
This article will show how to use Color Correction Tools for your Broadcasts.
→ Video Range (16-235) vs. Full Range (0-255)
→ Color Adjustment Controls
→ Tools: Waveform, Vectorscope & Histogram
→ Why is CPU Processing required?
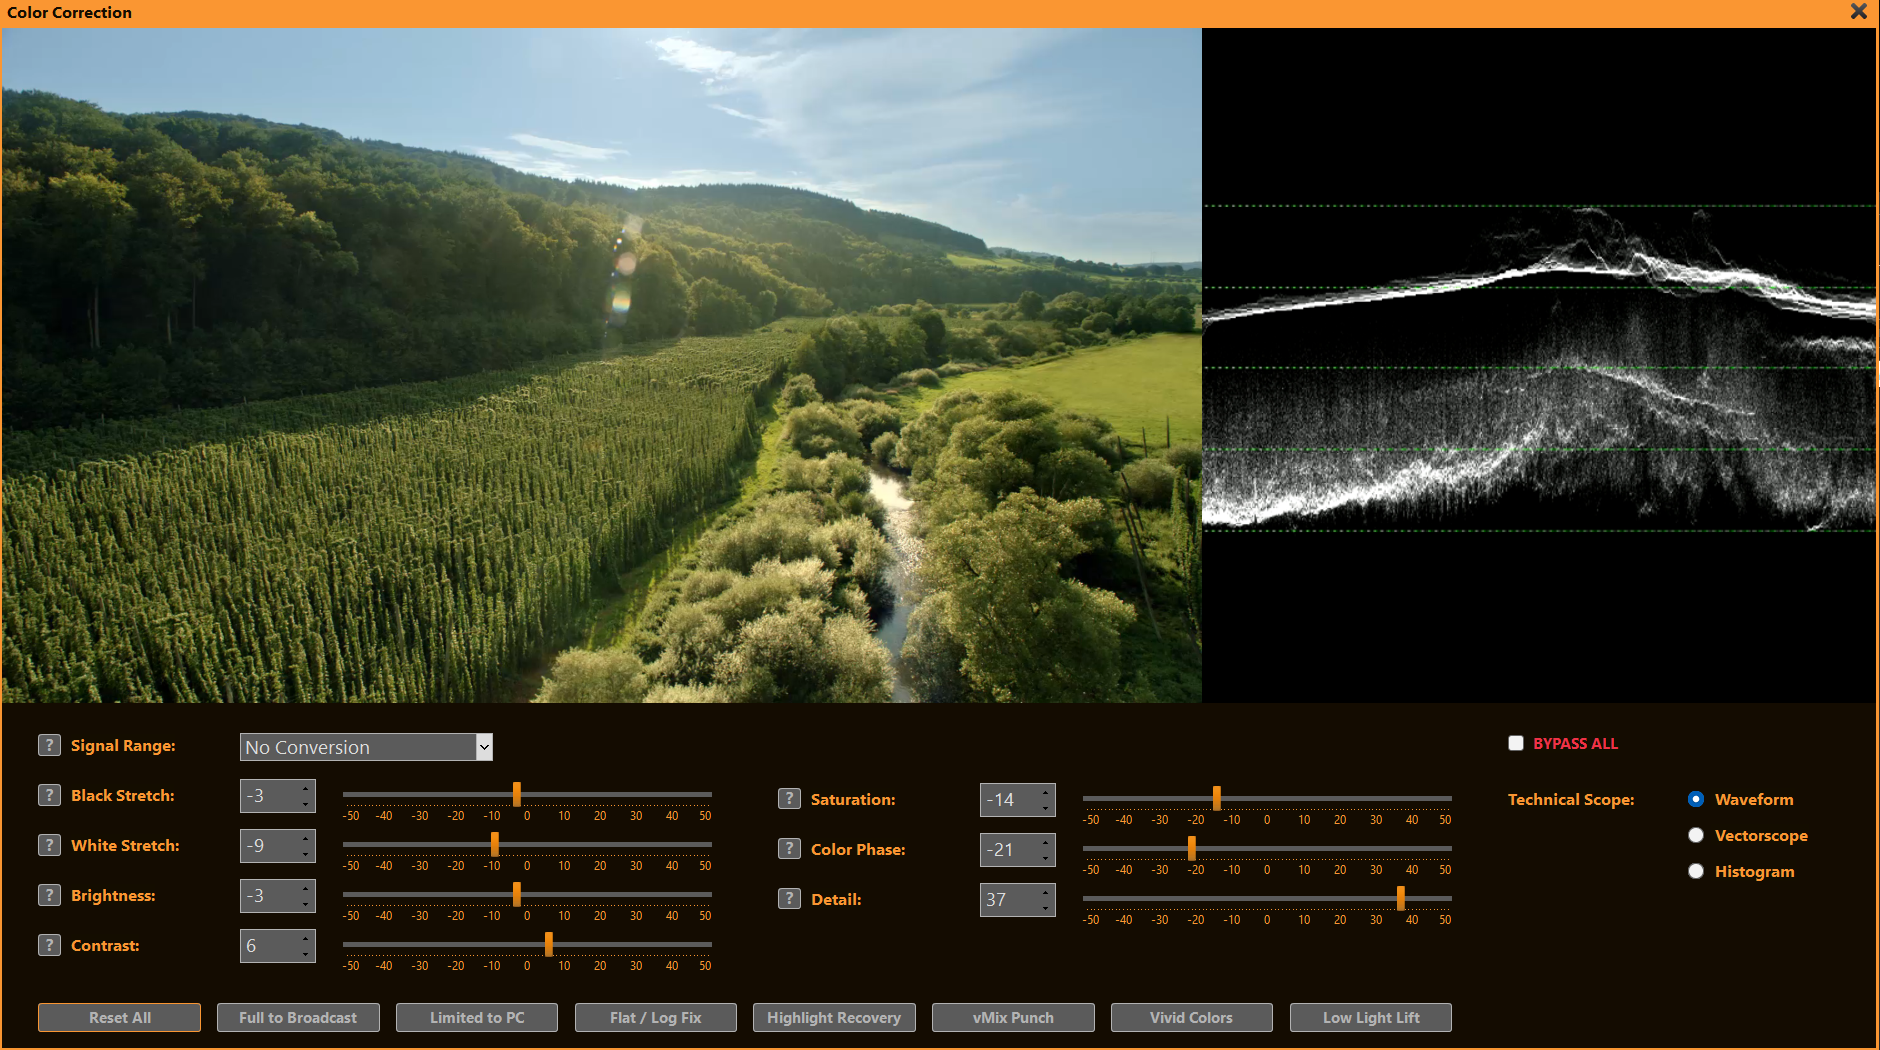
Video Range (16-235) vs. Full Range (0-255)
Video Range (Limited / Broadcast): Uses 16–235 (8-bit). Black = 16, white = 235. Standard for TV, broadcast, streaming — preserves headroom.
Full Range (PC / Data): Uses full 0–255. Black = 0, white = 255. Native for computer monitors, graphics, photos.
Color Range Expansion converts Video → Full Range (lifting blacks, expanding whites) to avoid washed-out appearance on PC displays. Mismatches cause crushed blacks, blown whites, or grayish/milky picture.
With PLAYDECK you can quickly convert between both modes by selecting the signal range or one of the preset buttons:
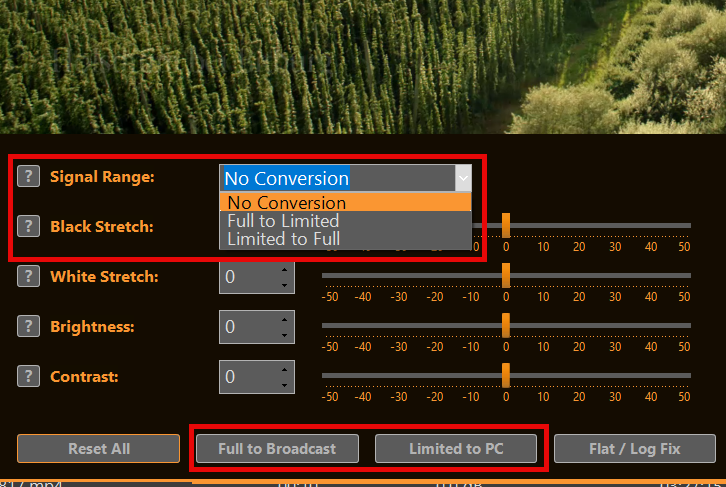
Color Adjustment Controls
PLAYDECK’s sliders help solve common broadcast and live-production challenges quickly:
- Black Stretch Recover lost shadow detail in underexposed footage or create deeper, more cinematic blacks for dramatic looks.
- White Stretch Bring back highlight detail in overexposed shots (e.g. skies, lights) or add punch to flat, washed-out highlights.
- Brightness Correct overall too-dark or too-bright sources without changing contrast — ideal for matching multiple cameras.
- Contrast Make flat, low-energy pictures pop for sports/news or reduce harsh contrast on harsh studio lighting.
- Saturation Boost dull, desaturated camera feeds (e.g. ENG cameras) or tone down overly vivid graphics/logos for broadcast-safe output.
- Color Phase Fix green/magenta casts from mismatched lighting, warm up cool skin tones, or match color temperature between sources.
- Detail Sharpen soft, low-resolution streams or reduce noise in low-light footage without introducing artifacts.

Tools: Waveform, Vectorscope & Histogram
hese professional monitoring tools appear in a dedicated panel next to the video preview — perfect for precise color and exposure control during live production or playback.
- Waveform: Check overall exposure and luminance levels quickly. Spot clipped highlights (flat at 100 IRE), crushed blacks (piled at 0 IRE), or mismatched camera levels so you can adjust brightness/black/white stretch before broadcast.
- Vectorscope: Verify and correct color balance and saturation. Ensure skin tones stay in the correct flesh-tone line, detect unwanted color casts (e.g. green from LED lights), and confirm broadcast-legal saturation without over-the-top vividness.
- Histogram: Analyze tonal distribution across the image. Identify if shadows/midtones/highlights are evenly spread or if detail is lost in dark/bright areas — ideal for fine-tuning contrast and stretch sliders to achieve a balanced, professional picture.
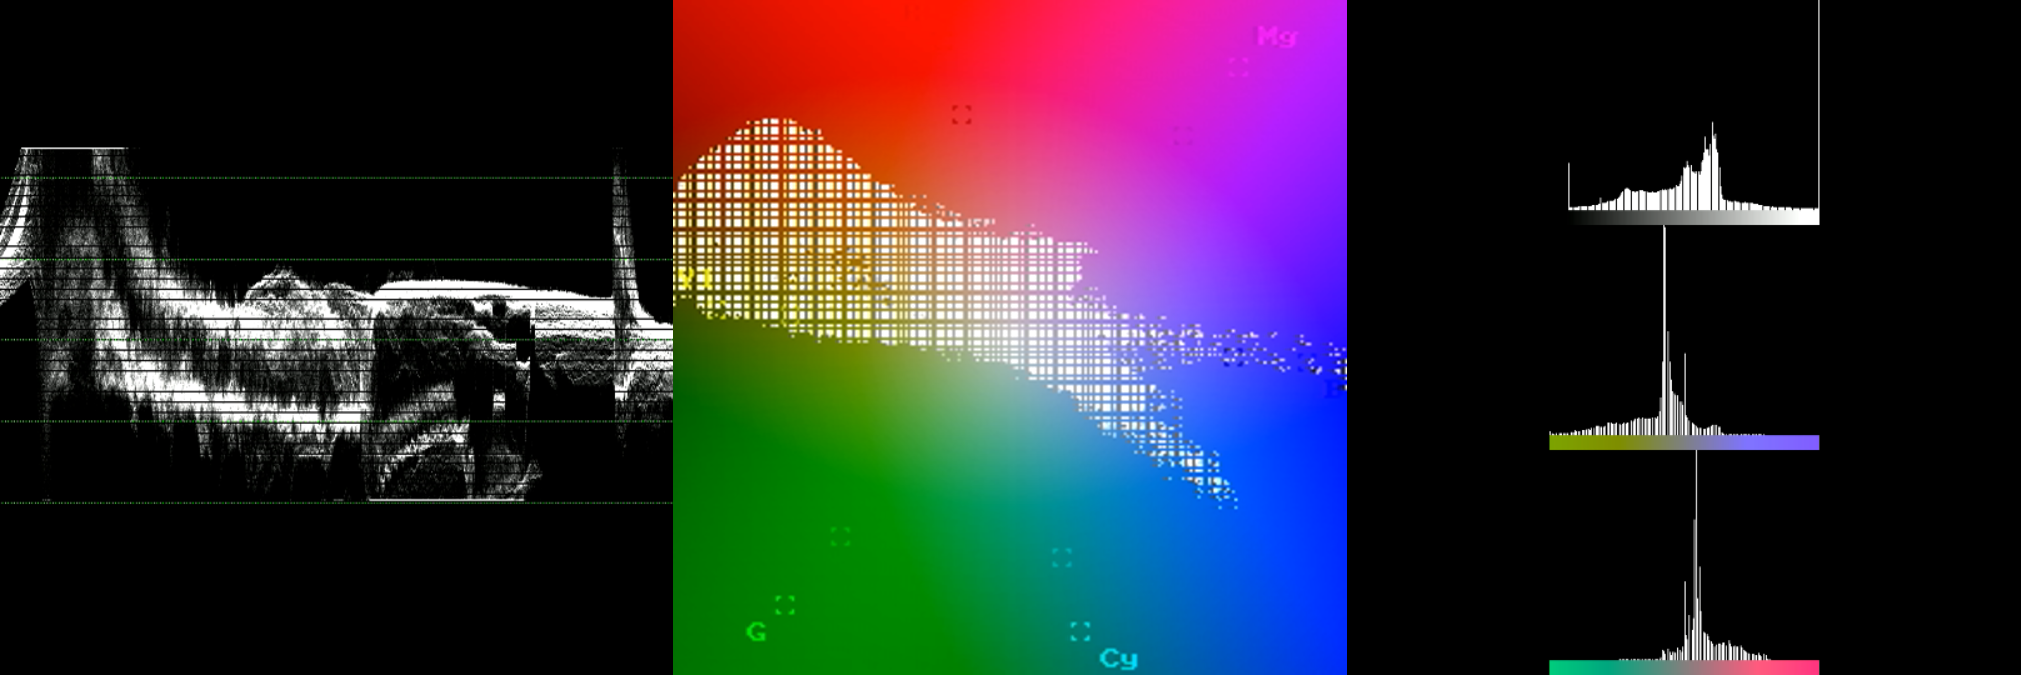
Why is CPU Processing required?
When using Color Correction (or certain other video filters) for the first time, PLAYDECK may prompt you to switch to CPU Processing:
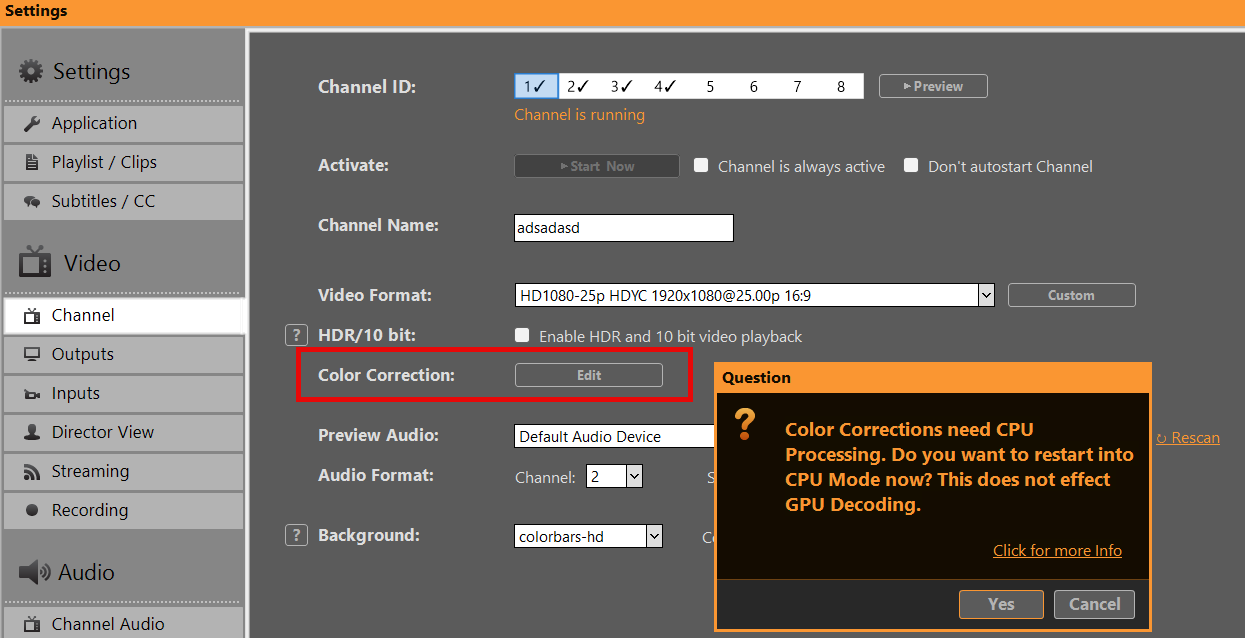
Reason: Certain video filters (vfilters) on inputs and playlists rely on FFmpeg processing, which runs only on the CPU. The GPU pipeline does not support these standard filters, so CPU mode is required for them to work correctly — ensuring reliable playback and effects.
GPU Processing handles: Scaling, Mixing, Overlays, Format Conversion, and many Effects.
Switching to CPU mode keeps all features working normally — the only difference is higher CPU usage (and lower GPU load).
You can switch back to GPU Processing anytime in the application settings:
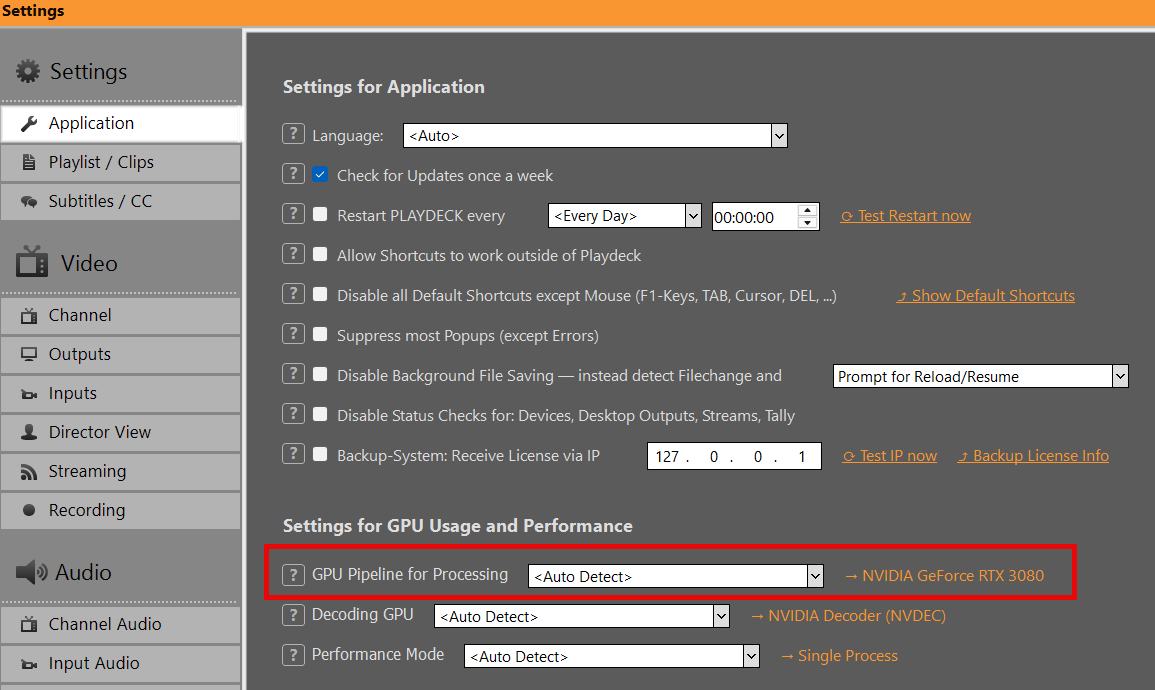
HDR Output and Recording
PLAYDECK supports HDR playback, SDI output (via Blackmagic DeckLink) and HDR recording.
→ Prerequisites in Hardware
→ Enabling HDR Mode
→ Setting up SDI Output
→ Setting up Recording
→ Monitoring & Controlling
→ Troubleshooting
Prerequisites in Hardware
Graphics card
NVIDIA GPU with at least Turing architecture (GTX 16xx / RTX 20xx or newer).
Recommended: RTX 30xx / 40xx series (e.g. RTX 3080, 4070, 4080).
→ Required for 10-bit decoding/processing/encoding.
SDI output card
Blackmagic Design DeckLink with 10-bit and HDR metadata support:
– DeckLink 8K Pro
– DeckLink 12G Extreme
– DeckLink 6G / 12G models (Quad 2 / Duo 2 / Mini Recorder 4K etc.)
→ Older models (e.g. DeckLink 4K Extreme without 12G) may be limited to 4K 30p or no HDR metadata.
You can check your Graphics card in PLAYDECK:
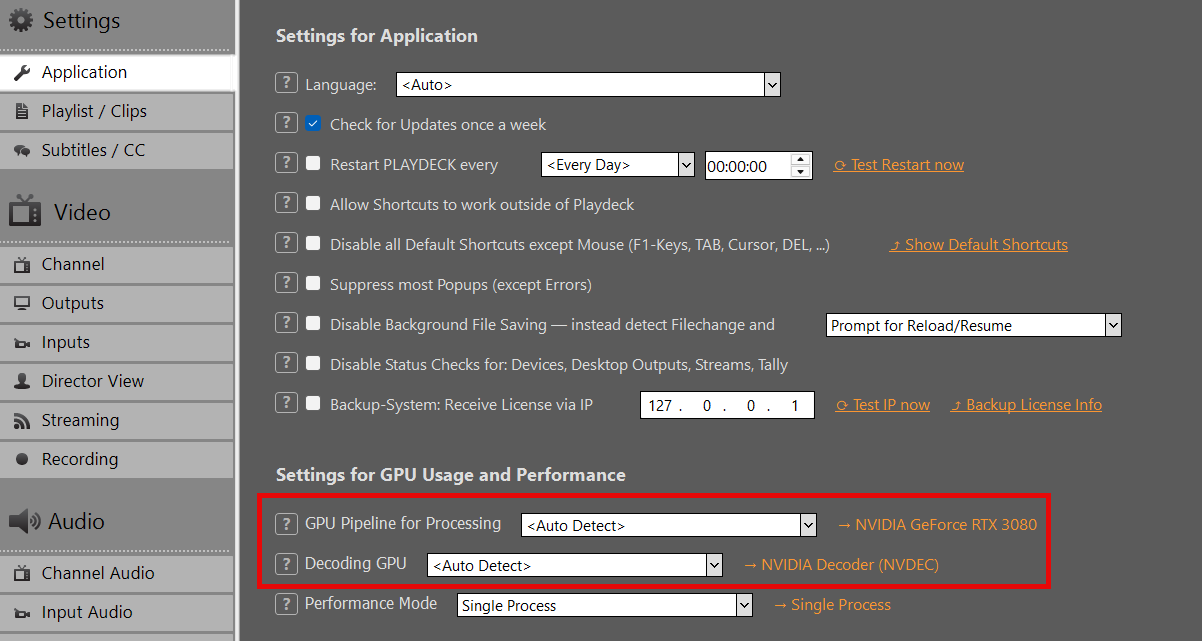
Enabling HDR Mode
HDR Mode needs to be enabled in the Channel Settings. In HDR Settings, choose one of the following Output Pixel Format. Start with v210 unless you specifically need RGB processing.
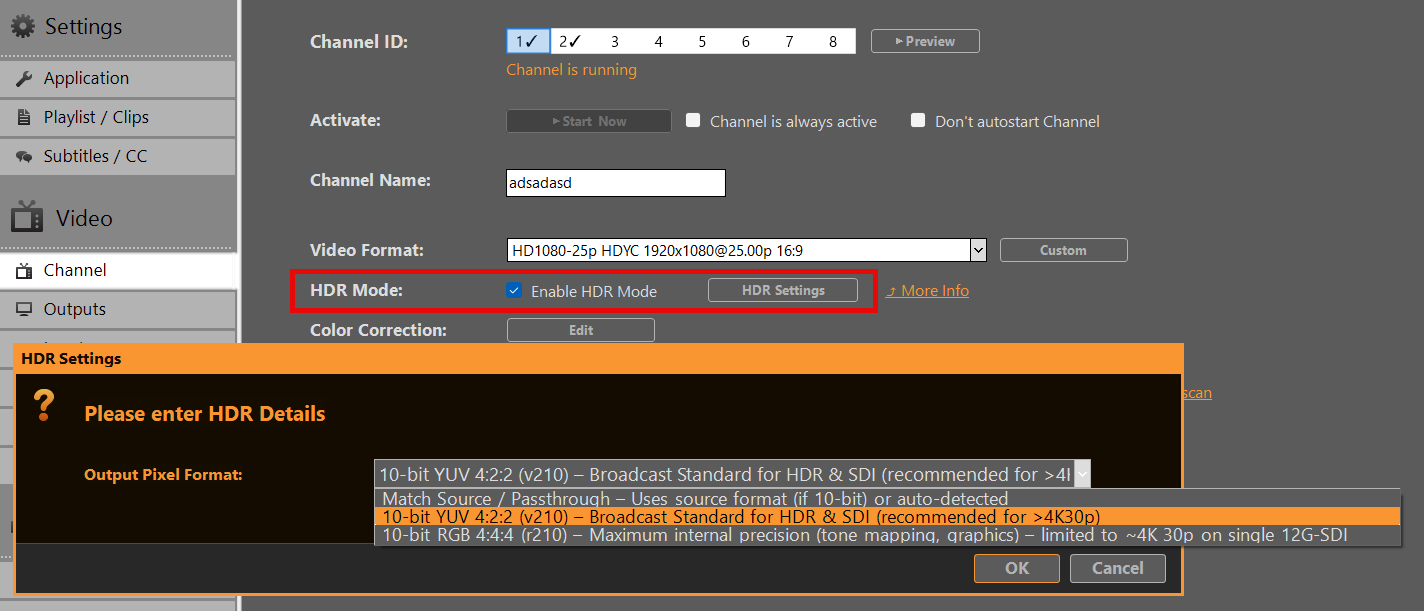
Match Source / Passthrough
Uses the source pixel format (if 10-bit) or auto-detected
→ May default to r210 on HLG/PQ content.
10-bit YUV 4:2:2 (v210) – Broadcast Standard for HDR & SDI (recommended)
→ Preferred choice for most SDI workflows.
→ Full compatibility up to 8K 60p on single-link 12G-SDI.
→ Recommended when frame rate > 4K 30p.
10-bit RGB 4:4:4 (r210) – Maximum internal precision
→ Best for tone mapping, keying or heavy internal processing.
→ Limitation: On many DeckLink cards limited to ~4K 30p (bandwidth constraint on single 12G-SDI link).
→ Use with caution at higher frame rates.
Setting up SDI Output
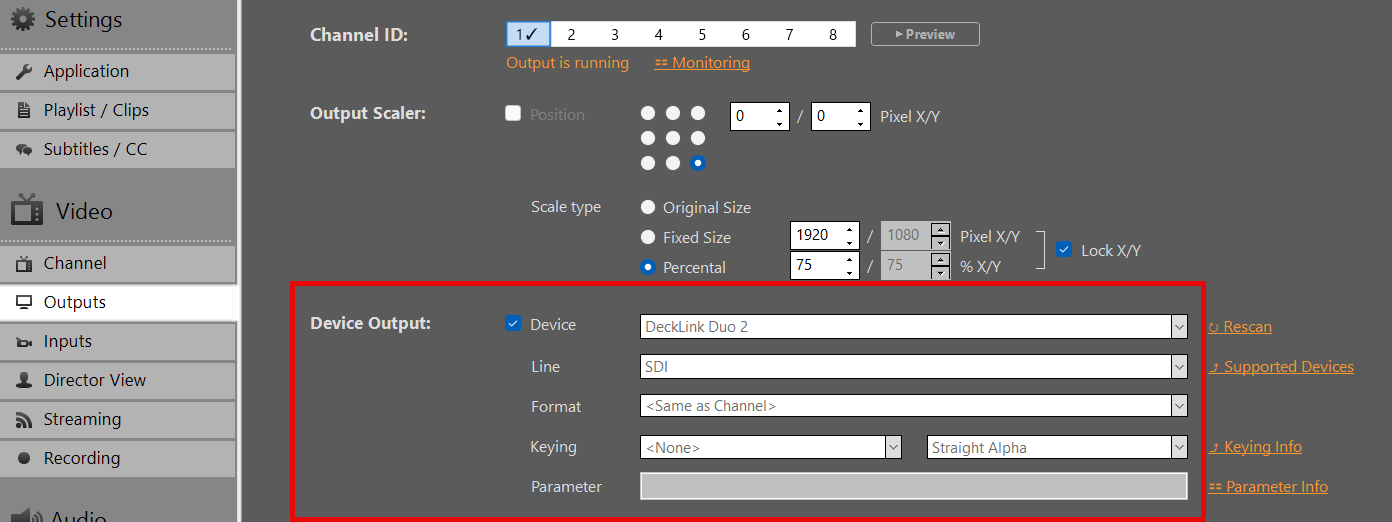
In Output Settings, select your DeckLink card as the output device. 10-bit Output will be activated automatically. If the Card doesn’t support it, it will fall back to SDR.
Important:
HDR metadata (PQ/HLG) is carried in VANC (Vertical Ancillary Data) on SDI.
Most modern DeckLink cards and downstream devices (monitors, switchers) detect this automatically when 10-bit signal is present.
You need to re-enable your Device, if you changed Output Pixel Format in HDR Settings.
Setting up Recording
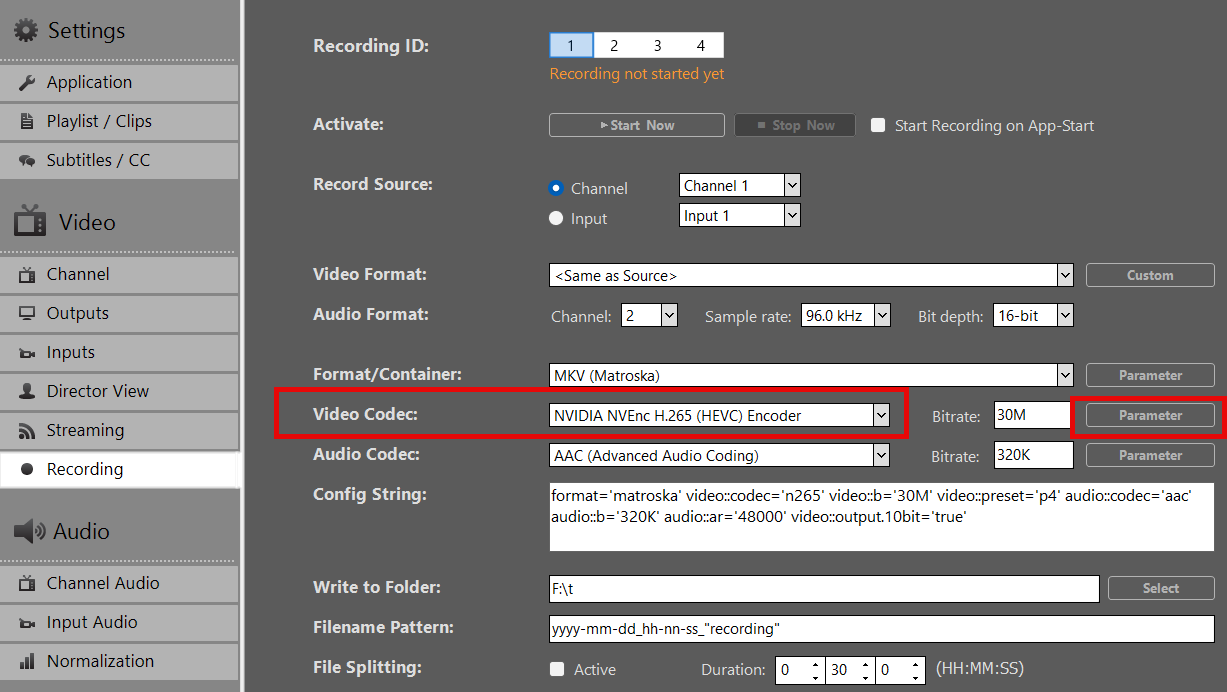
- Select a Format/Container (recommended: MOV or MKV).
- Pick NVIDIA H265 HEVC as Video Codec. Currently, no other Video Codecs are supported for HDR.
- Apply your preferred bitrate (50–100 Mbps recommended for 4K HDR)
- Click on Parameter behind Video Codec and set these options:
– output.10bit = true
– output.444 = true (! Only is “10-bit RGB 4:4:4 (r210)” selected in HDR Settings)
– preset = p4
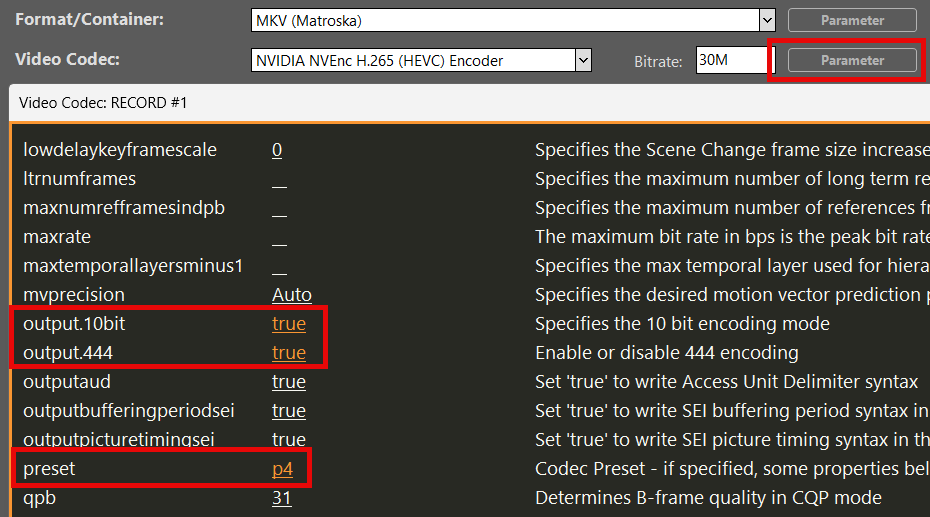
Result: Recorded file contains BT.2020 + HLG/PQ metadata when source was HDR.
Monitoring & Controlling
Play a HDR Clip in the Playlist. You can download this HDR HLG BT2020 Test Video.
Note: Preview on standard HDMI SDR monitors may appear washed-out or flat for HDR content — this is expected behavior.
You can check on the Clip’s HDR properties by right-clicking the Clip and selecting MediaInfo:
To verify, if PLAYDECK is correctly processing your HDR File, open Monitoring from the Main Menu and check these properties:
– Pixel Format (v210 or r210)
– Transfer characteristics (HLG or PQ)
– Color primaries (BT2020)
This allows you to check, if your SDI Card is sending HDR without a SDI HDR Monitor.
To verify your Recording, open the Recording Folder and Drag Drop your new File into the Playlist.

It should show the same HDR Meta Data as your Original (or your HDR Settings):
Troubleshooting
Working with HDR requires sufficient system bandwidth to handle increased pixel data and frame sizes, which can be tested using Blackmagic’s SignalGenHDR.exe tool. Users can stress-test their setup by running4 simultaneous instances to output 4K signals and verify 12G-SDI throughput capacity.
Download the Tool here:
https://downloads.playdeck.tv/assets/SignalGenHDR.zip
Audio Delay
Sometimes, in Live Productions, you have to send the Audio delayed compared to the Video, to compensate for the processing Lag of huge LCD Screens (Lipsync). Or add a Limiter/Gate to the Microphone Input Audio.
In this article:
→ Simple Audio Delay
→ Copy Audio and Delay
→ More Audio Filter
Simple Audio Delay
This is actually pretty fast to implement in PLAYDECK. You add the ADELAY Audio Filter to the Channel like this. In this example we set 600ms Delay for Audio Channel 1 and 2:

This can also be set to INPUTS to compensate for any incoming Lipsync Issue.
Copy Audio and Delay
You can also COPY the Audio Channel 1 and 2 to Audio Channel 3 and 4 and delay those. The use case here is, that the Audio Mixer Person has Live Preview Audio.
This needs to be done on the Playlist Level, so clear any Audio Filter in the Settings.
First, make sure to increase the Audio Channel for your Output Channel, otherwise all Audio Channel above 2 will not be processed:
The Right-Click any Playlist Item and select AUDIO CHANNEL MAPPING:
This will copy Audio Channel 1 and 2 to Audio Channel 3 and 4:
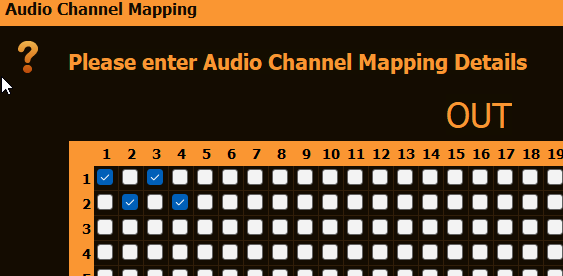
Now right-click the Playlist Item again, select AUDIO FILTER and add the ADELAY Filter, but only for Audio Channel 3 and 4:
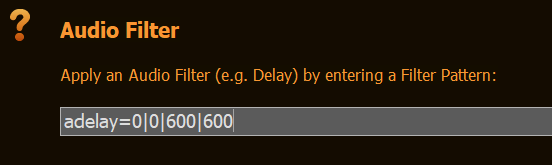
More Audio Filter
For a complete List of all Audio Filter, click SHOW SAMPLES. This will open a TEXT FILE with Examples.
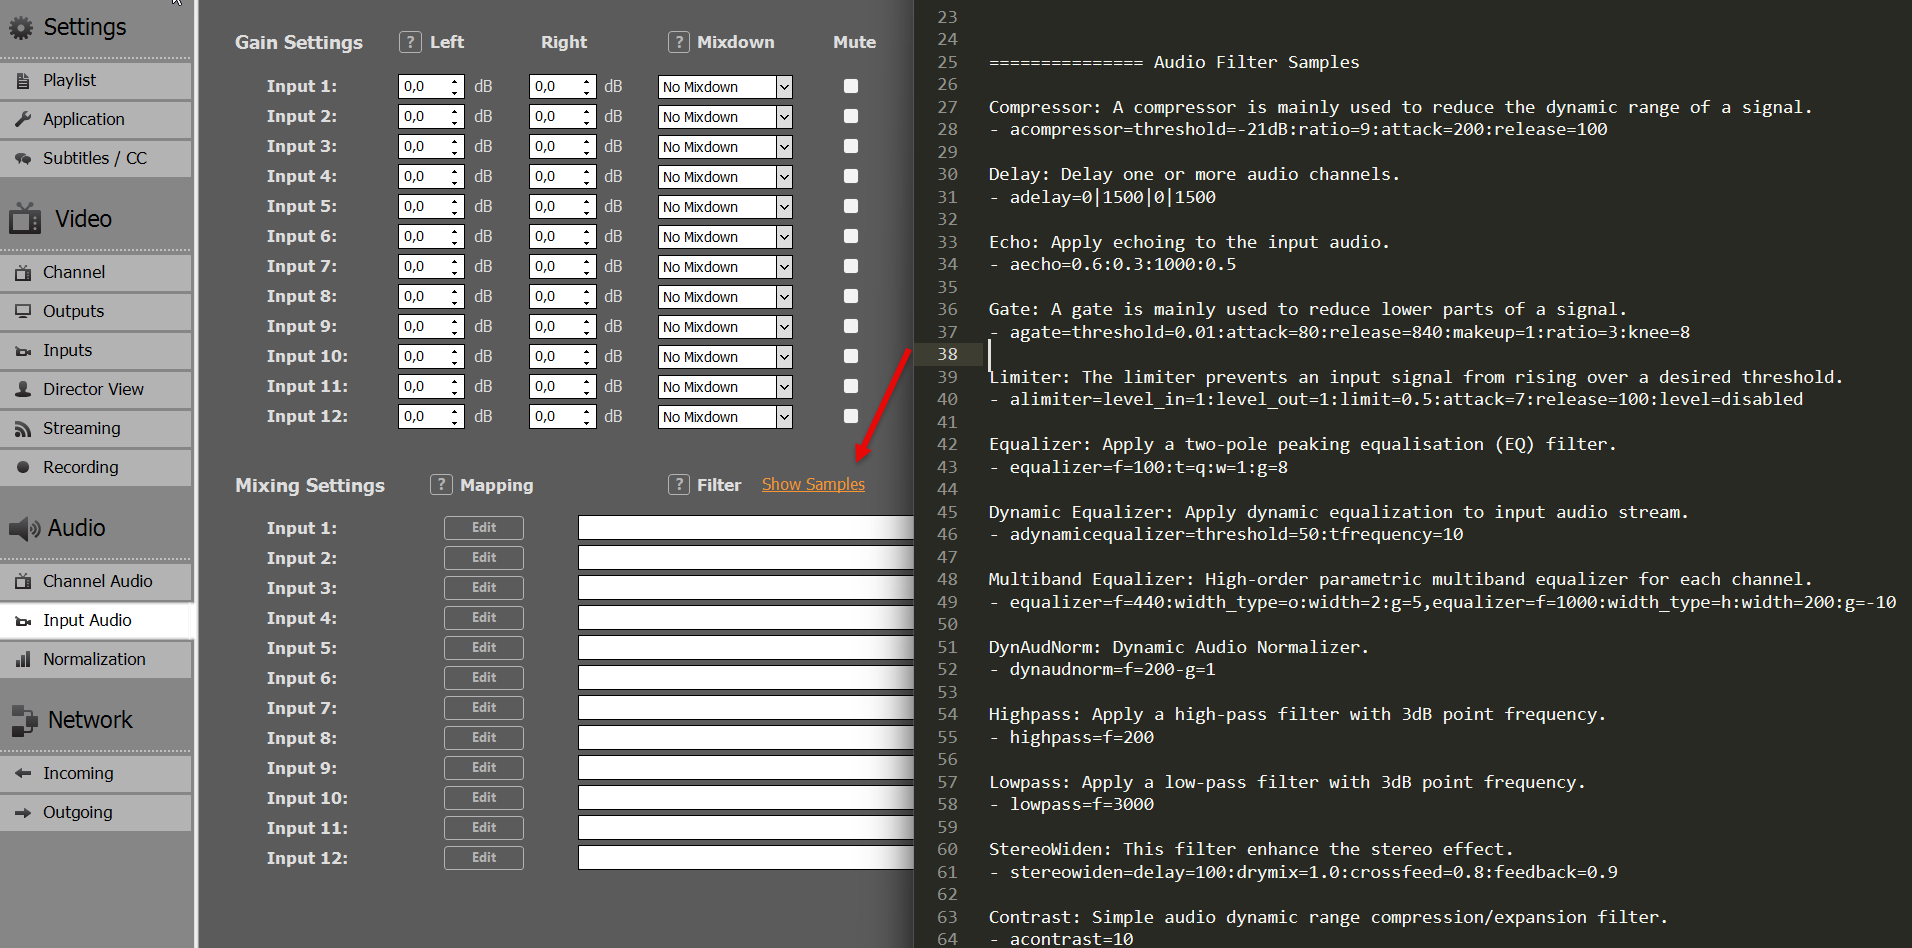
Advertisement & SCTE
Ad Breaks to interrupt Playout
This article will show how to use a BREAK BLOCK to create Ad Breaks, that interrupt your regular Playout, and will return after.
In this article:
→ Using Break Blocks as Ad Breaks
→ Schedule Break Block
→ Using Action Buttons for Ad Breaks
→ Attach Overlays to the Break Block
→ Attach SCTE Marker to the Break Block
Using Break Blocks as Ad Breaks
This is fairly simple: You create a new Content Block in your Playlist with one difference: The Block ends as BREAK BLOCK (instead of STOP or PAUSE). For this we select the Block and click on the BLOCK END Icon (or Double-Click the Block end). Then we select BREAK BLOCK and choose RETURN TO LAST POSITION (or any other):

This BREAK BLOCK behaves like this: Once it reaches its end, it will return to the clip and position (or other), which was playing BEFORE entering the BREAK BLOCK from OUTSIDE. Meaning: You can jump from anywhere to anywhere in the BREAK BLOCK, and it will remember where to return to.
Schedule Break Block
You can schedule the Break Block like an other Block Type by selecting the Block and clicking the SCHEDULE Icon:
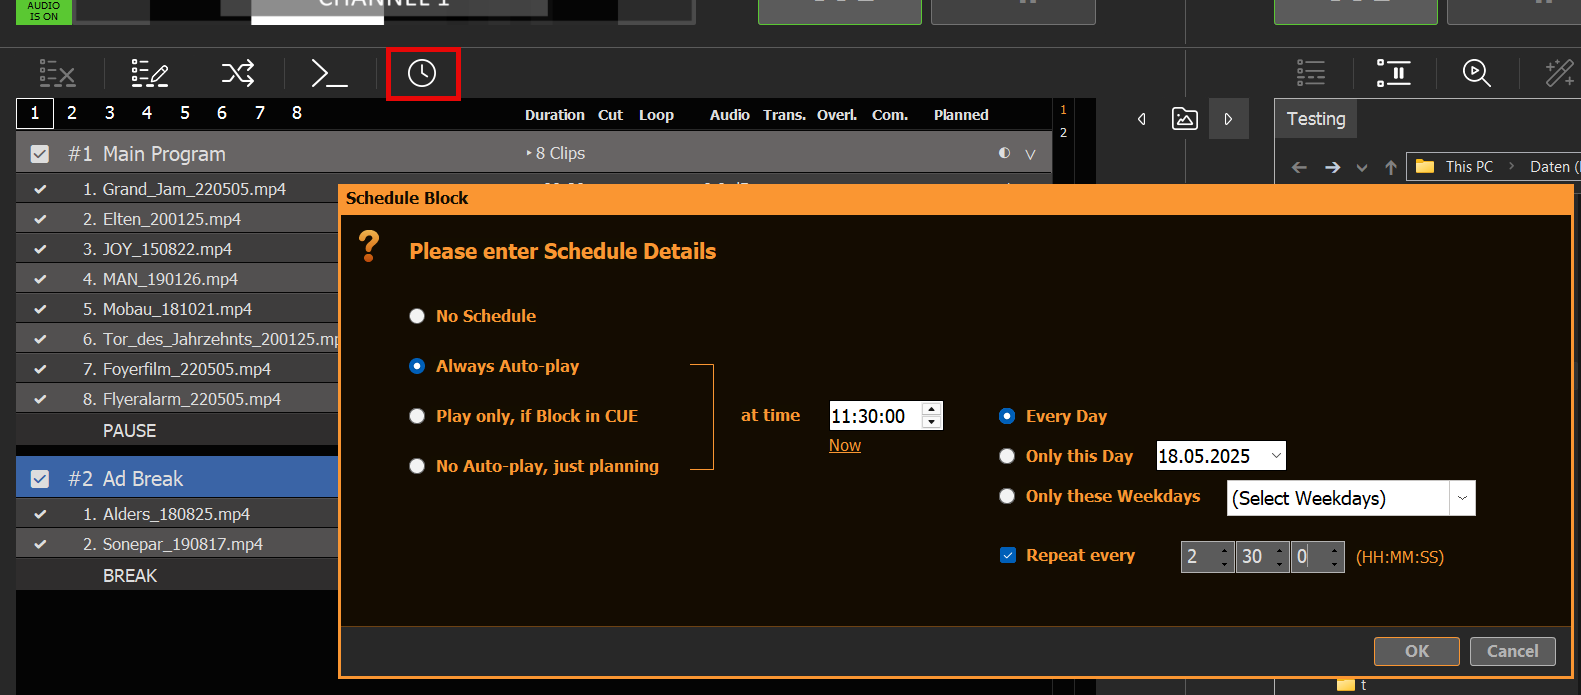
In this example we start our Break Interruption every day at 11:00 o’clock and will repeat this every 2 and half hours for the remaining of the day. There will be no Ad Breaks between 0:00 and 11:30.
Using Action Buttons for Ad Breaks
Instead of scheduled Break Blocks, you can also use Action Buttons. For this simply click and empty Action Button and select to play the related Ad Block:
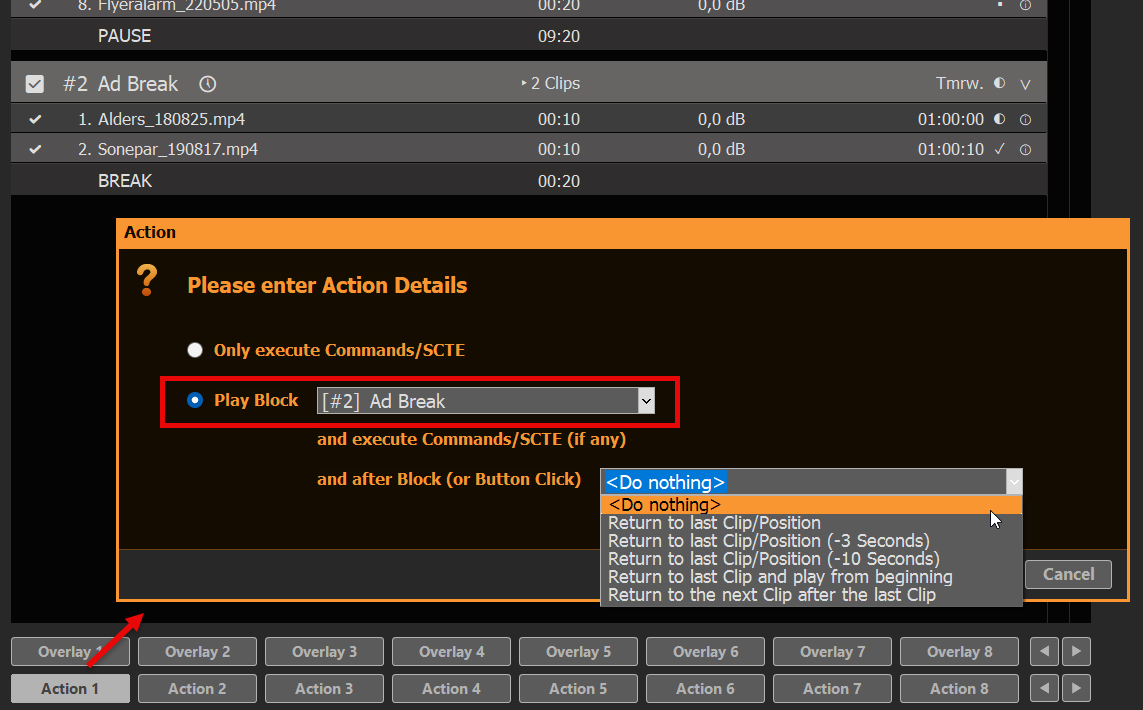
You get the same selection for “returning” as for Block Ends. If you select “<Do nothing>”, the Block End will be used, like in our example above. If you select any other Option, the Return method of the Action will be used over the Block End method. This gives new options:
- You could use both return methods, depending if the Break Block starts via scheduling or via Action Button
- If started via Action Button, you can leave the Break Block EARLY and still return
The second option is perfect for looping Break Blocks, as your return to the previous playout, if you click the Action Button a second time.
Attach Overlays to the Break Block
Oftentimes you want Overlays to start automatically together with your Break Block Content. We therefore recommend the following articles:
- Automate Overlay Lower Third with Clips
- Create L-Band Ads via second Channel
- External Overlays with ClassX (and other)
Attach SCTE Marker to the Break Block
If you want to signal your Streaming Server or Broadcasting System to insert Ads for the duration of your Break Block, we recommend to following articles:
Create L-Band Ads via second Channel
This article will show how to use how to utilize the second Channel to create L-Band advertisements.
1. L-Band Specifications
Every Station has their own specs on the size, so we just borrow this sample from News18:
The principal is always the same: We “shrink” our main content proportionally to make room for Ads in the remaining area. After shrinking, we leave some overlap to not risk black background. Our final shrink-size is: 1520×855 Pixel.
2. Scale Channel 1 and send to Channel 2
We assume with have our Main Video Content on Channel 1. So we enable the Output Scaler in the Settings to our shrunk size of 1520×855 Pixel. Then we send our scaled Content as NDI signal:
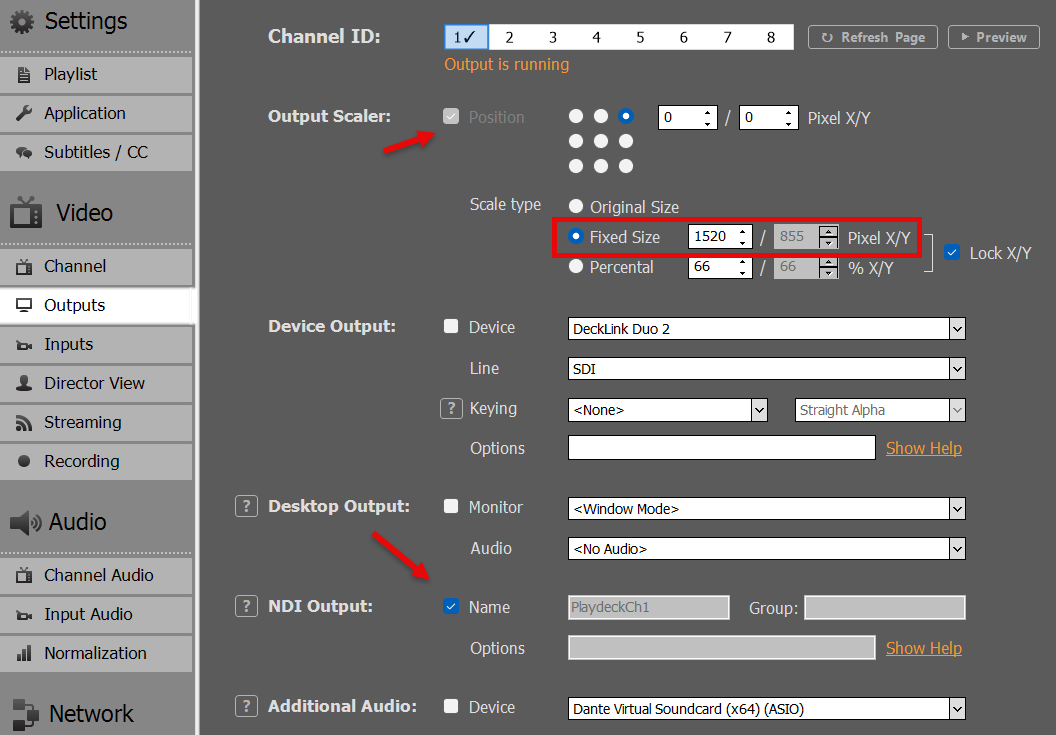
We now loop our NDI signal to Input 1:
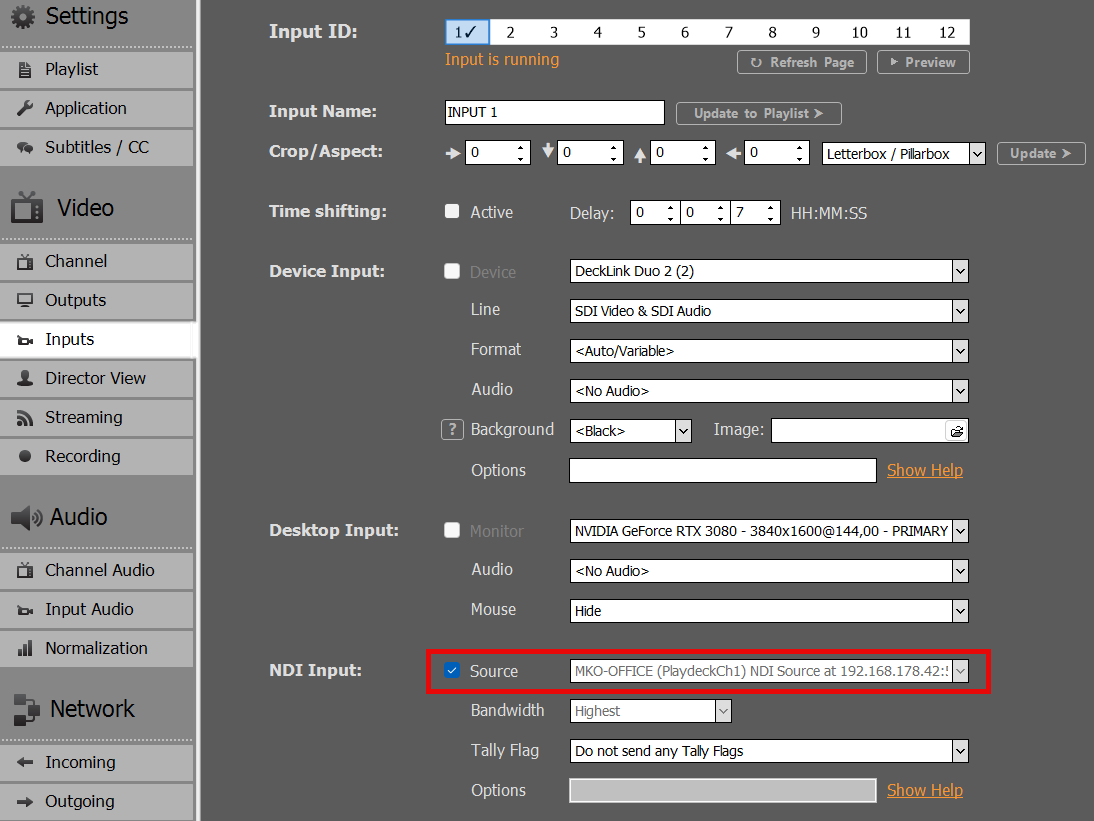
We then add Input 1 to the Playlist of Channel 2, by Drag Drop of the Input Icon to the Playlist. We now have the Video Content in L-Band size:
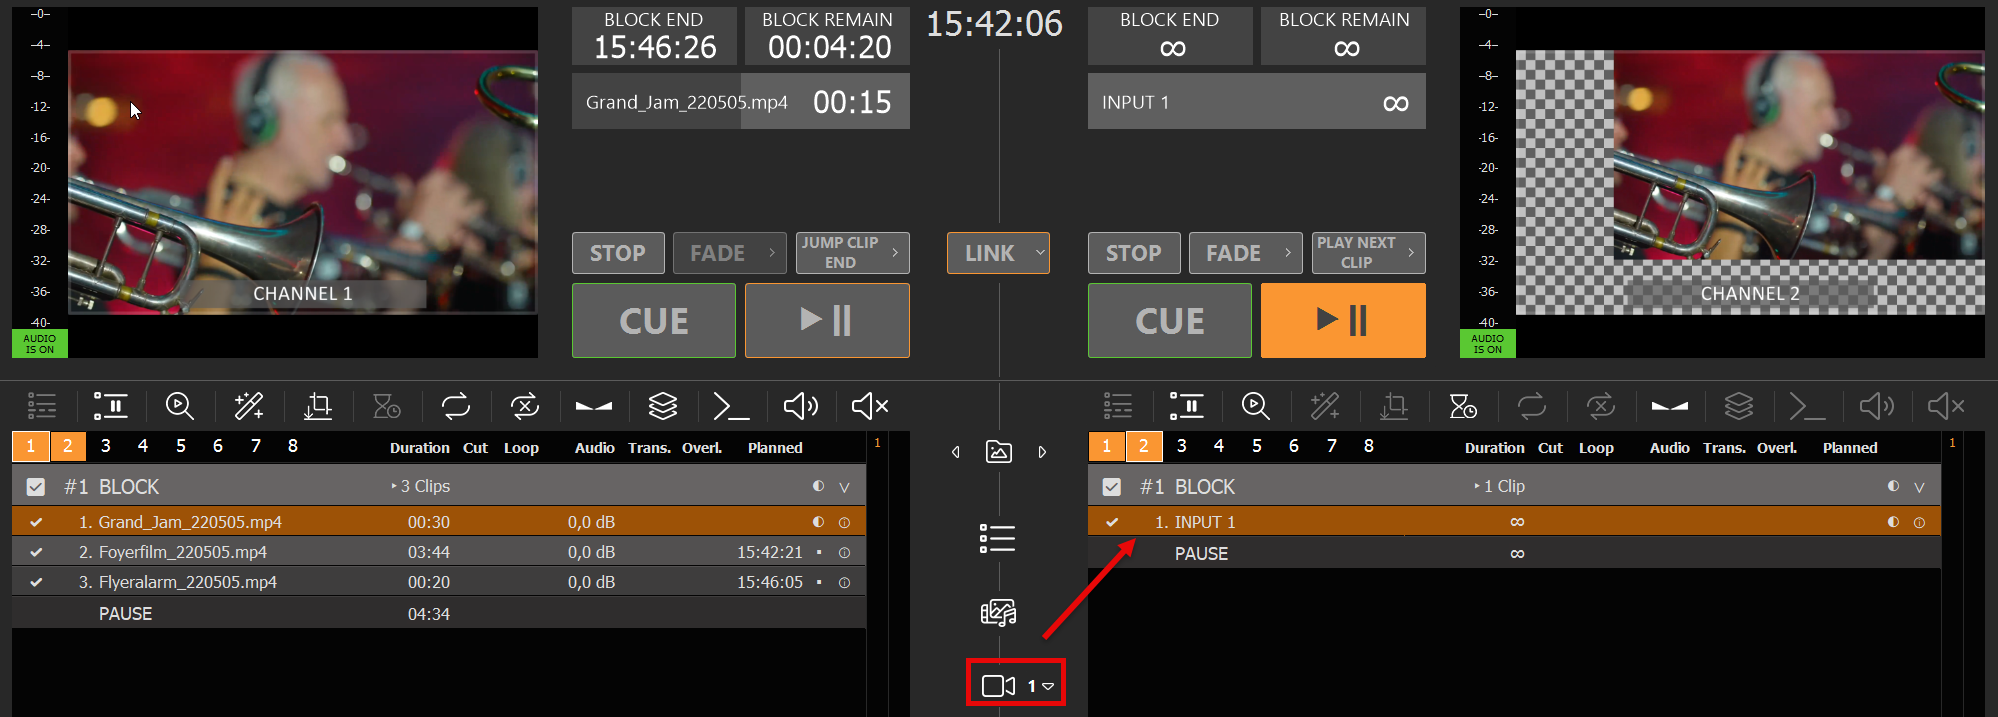
3. Add the Clean Feed for Switching
Since our Final Output will run over Channel 2, we also want our Clean Feed to be selectable in the Channel 2 Playlist. For this, we can simply copy the Channel without the Output Scaler. Use another Input and set Channel 1 as Source:
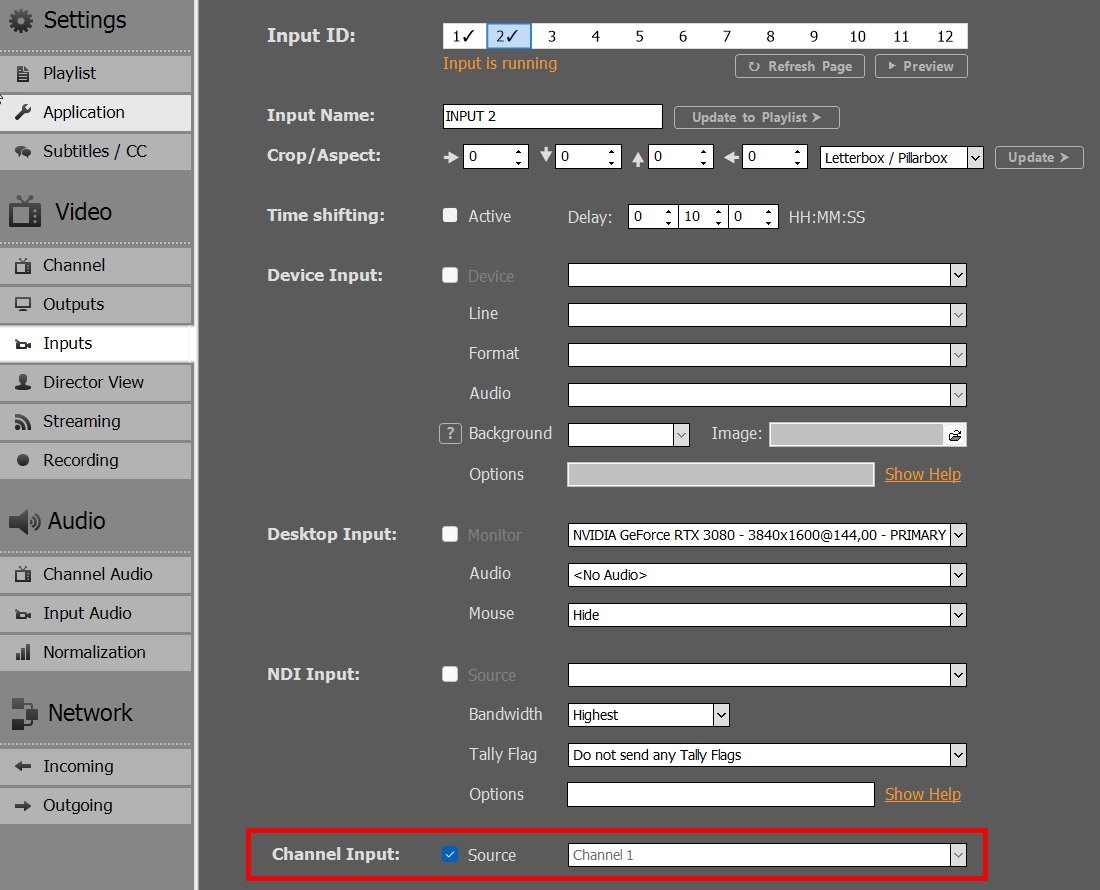
Then also add that Input to Channel 2. I already renamed both Inputs in the Playlist to be more distinguishable:
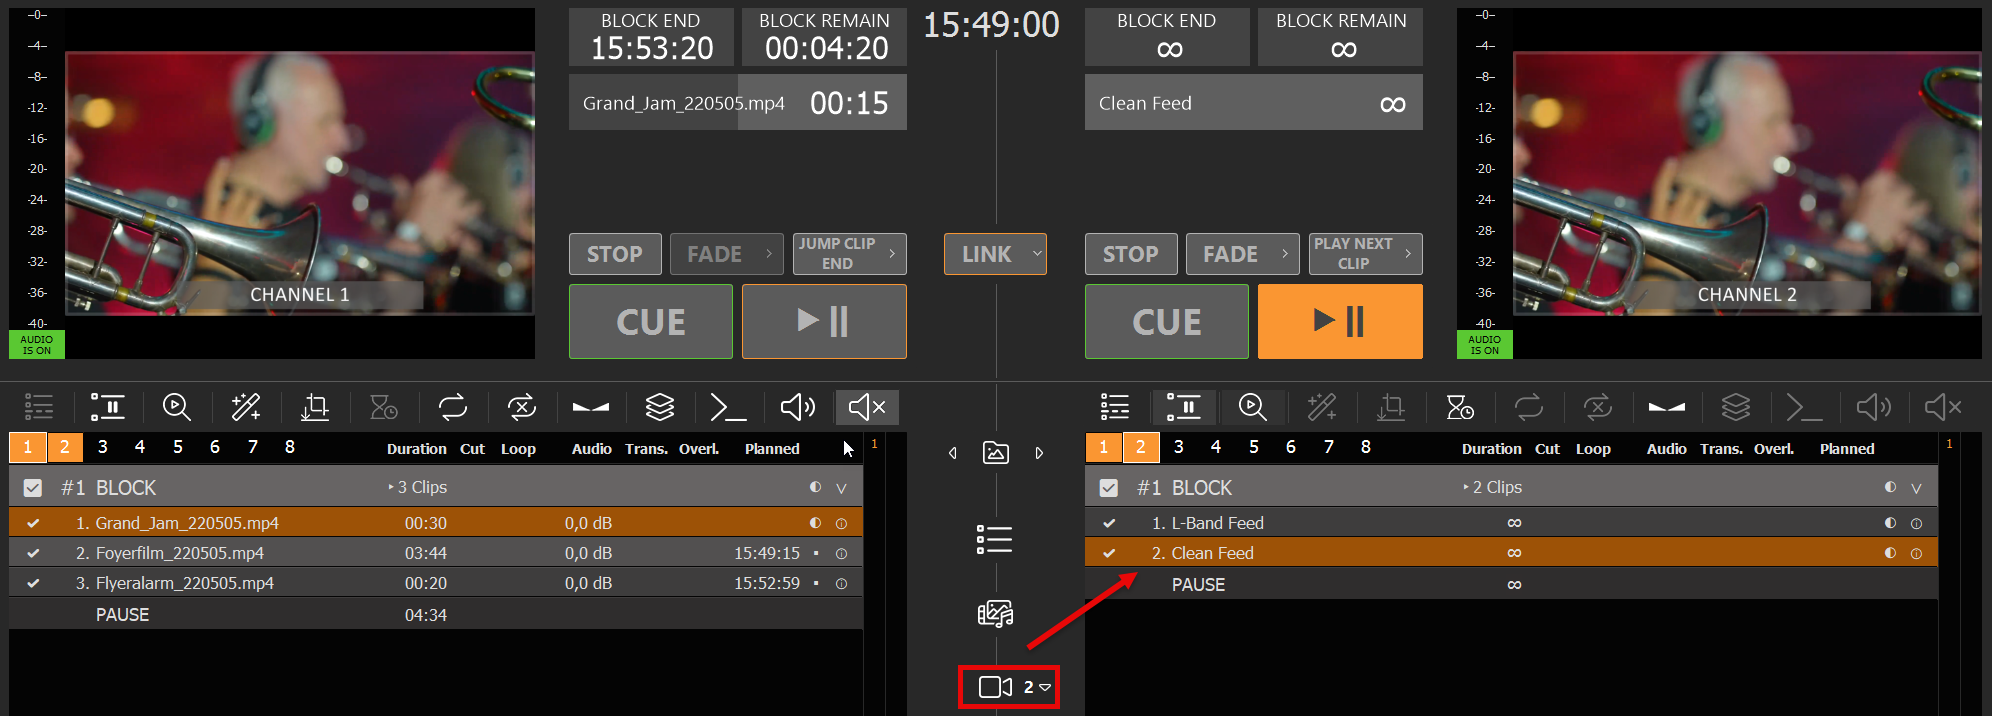
You can now quickly switch between L-Bands and Clean Feed.
4. Use Overlays for L-Bands
You can use PLAYDECK Overlays for your L-Bands. For simplicity, we use this transparent PNG over the Video signal. But these can be more complex. See this article on how to create Overlay groups and fade them together.
Click on any empty Overlay Button, then add our Sample PNG:

We now want our Overlay to ONLY play with the Playlist Clip for the “L-Band Feed” Input. For this we select the L-Band Clip and click the Overlay Icon, then add our new Overlay for the whole duration of the Clip:
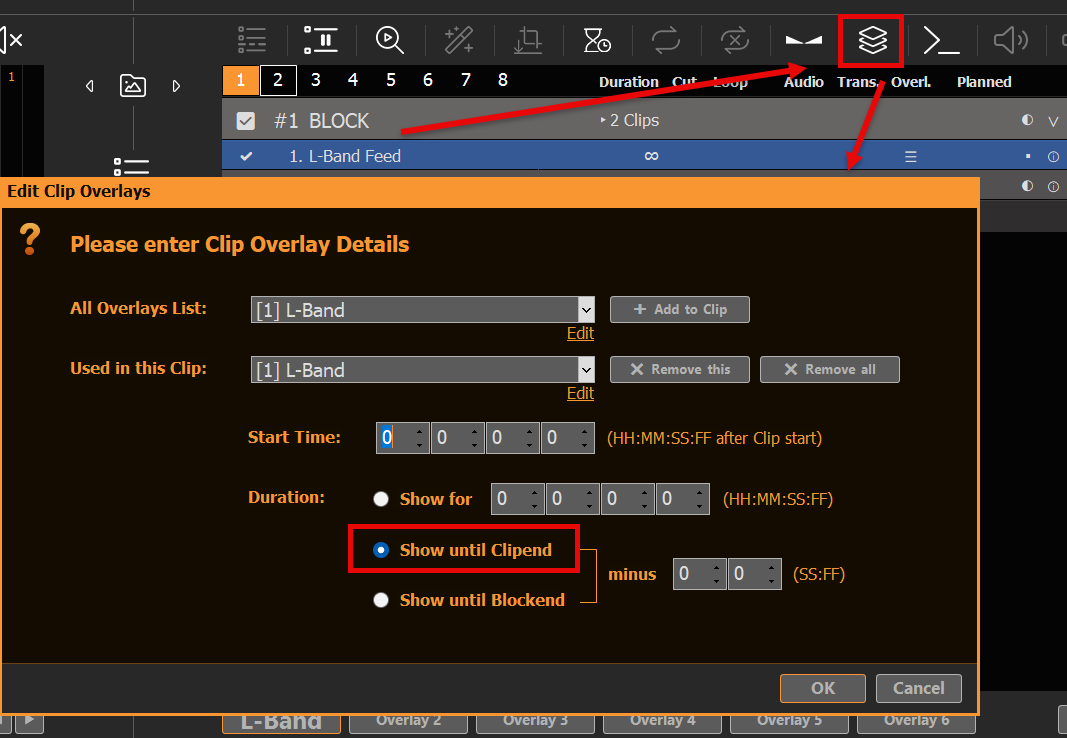
Our L-Band Overlay will now automatically start together with the L-Band Feed:
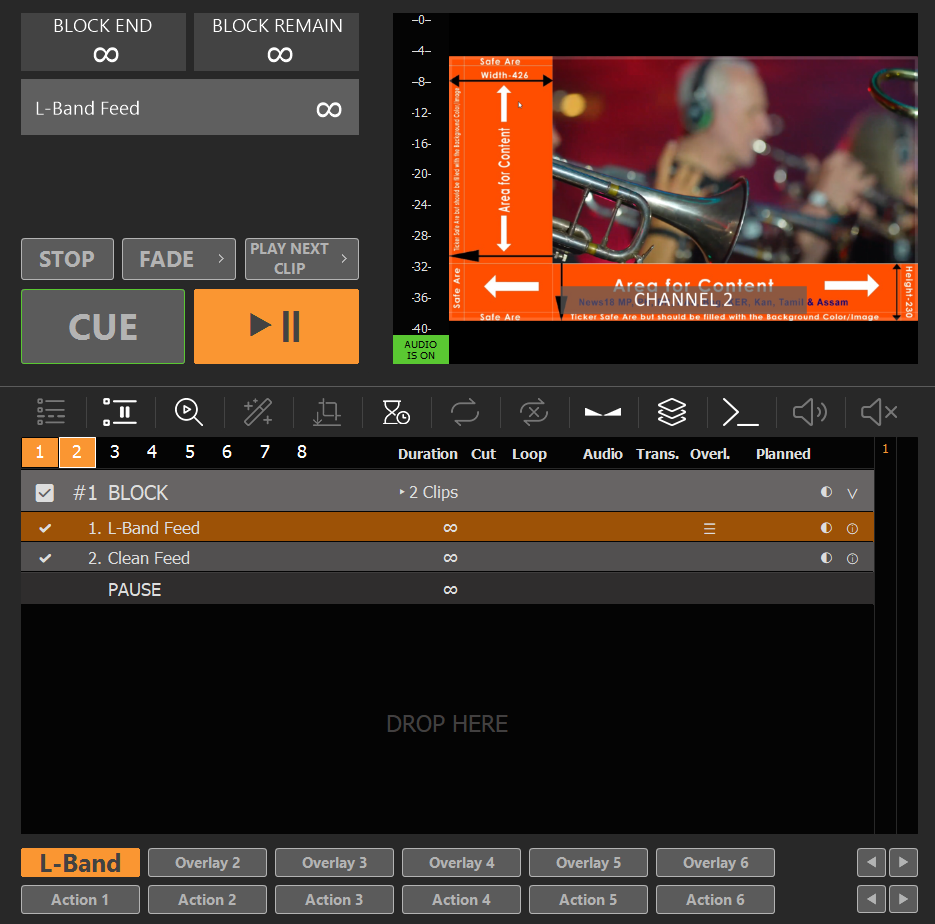
Note: Overlays that are assigned to Clips always have a slight reaction delay. This can be overcome by finetuning Playlist and Overlay Fade Times. You could also split the L-Band Feed and Clean Feed to Channel 2 and 3 and use an external Mixer for Transitions.
Using SCTE for Inputs and Outputs
This article will explain how you can use SCTE for your projects. PLAYDECK supports SCTE-35, which are exclusively used in Streams and SCTE-104, which are exclusively used in SDI Device signals.
Scroll down for SCTE-104. We also recommend to follow-up with this article on sending SCTE-35 to Streaming Server.
In this article:
→ Using SCTE-35 in Streams
→ Using SCTE-104 in SDI
Using SCTE-35 in Streams
SCTE-35 Facts
- Supported for Stream Inputs as well as Stream Outputs. Tested Stream Formats are UDP, DVB and SRT. The selection of the Video Codec does not influence SCTE transport. SCTE transport is always active and does not need to be enabled somewhere.
- PLAYDECK can detect and display incoming SCTE-35 Marker. All incoming and outgoing Marker will be written to an Event Log.
- PLAYDECK can forward incoming SCTE-35 Marker from Stream Input to Stream Output. Cross-Forwarding between UDP, DVB and SRT is supported, e.g. receiving SRT and forwarding to UDP.
SCTE-35 Testdrive
Let us dive into those topics a bit. As a test run we setup our own UDP signal loop. We stream Channel 1 to “udp://192.168.178.42:5000?pkt_size=1316” via UDP (use your local IP). Make sure to enable “embed_scte35” for the UDP Parameter:
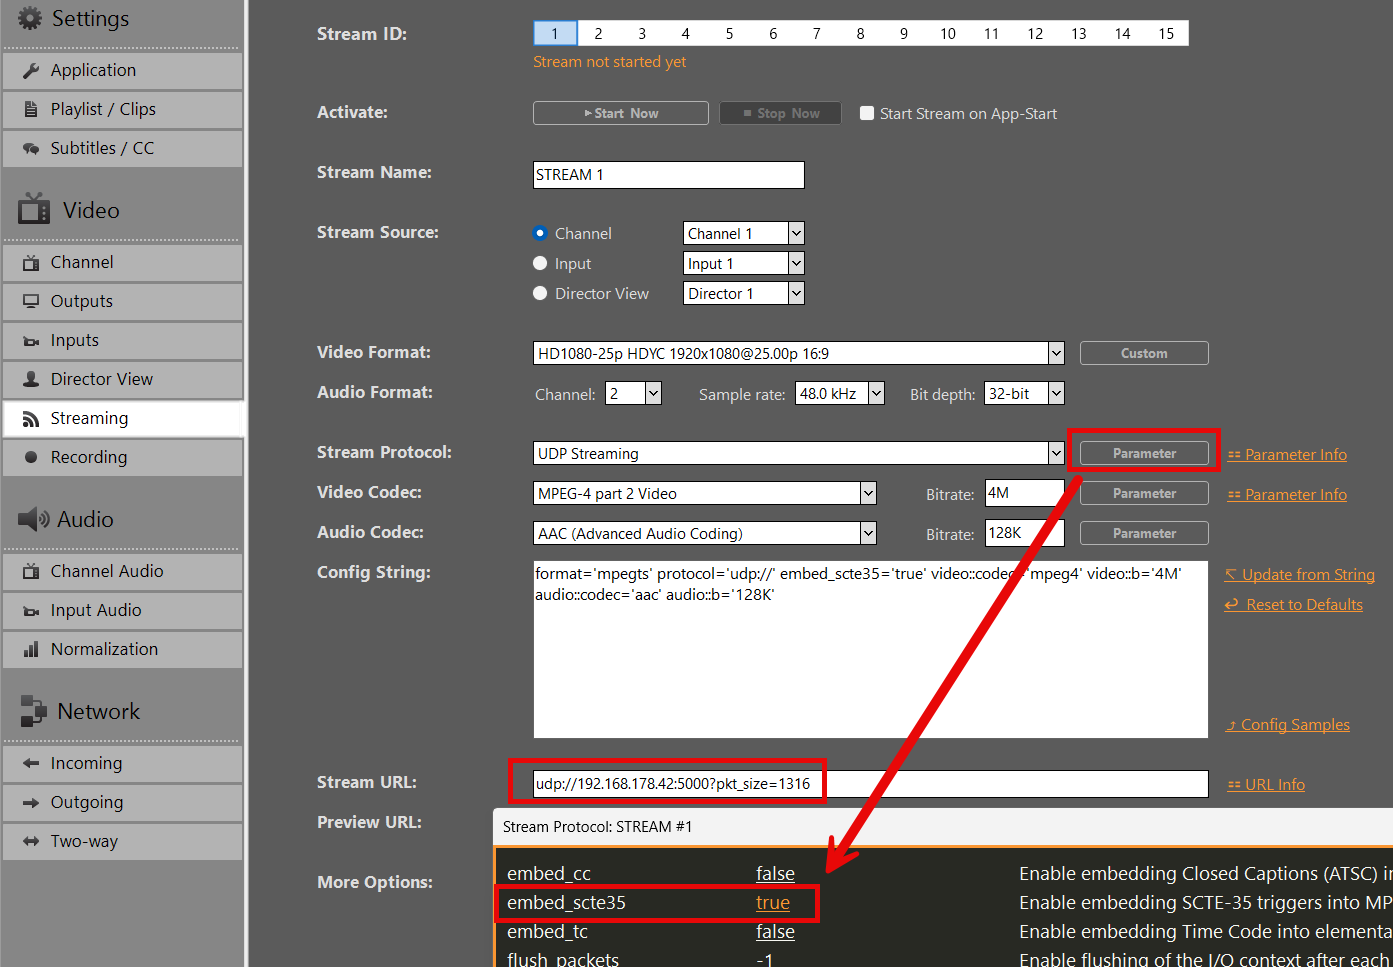
And play the Stream in Channel 2:
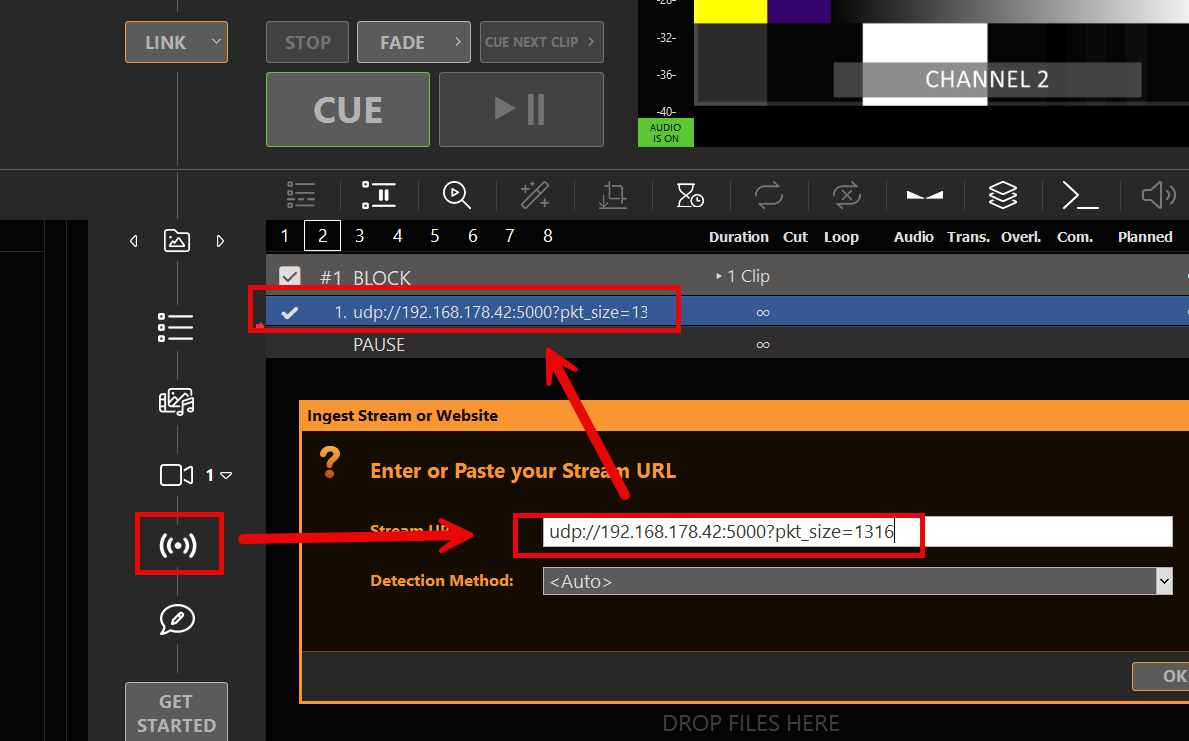
Now we only need a way to send a SCTE-35 marker in Channel 1. So we setup a new Command Action and use the smallest detectable SCTE-35 Marker (of course you can use any other):
<SpliceInfoSection><SpliceInsert></SpliceInsert></SpliceInfoSection>

Make sure Channel 1 and Channel 2 are playing, then hit the Action Button. Then open the SCTE Event Log in the Main Menu under “Logs”. You can see the outgoing SCTE on Channel 1 and the Incoming SCTE on Channel 2.

We even go one step further and setup ANOTHER Stream from Channel 2 to Channel 3 to test the SCTE Forwarding and Cross-over Detection (UDP to SRT). We send Channel 2 to “srt://192.168.178.42:5001?mode=listener” (your IP) and receive in Channel 3 at “srt://192.168.178.42:5001?mode=caller”.
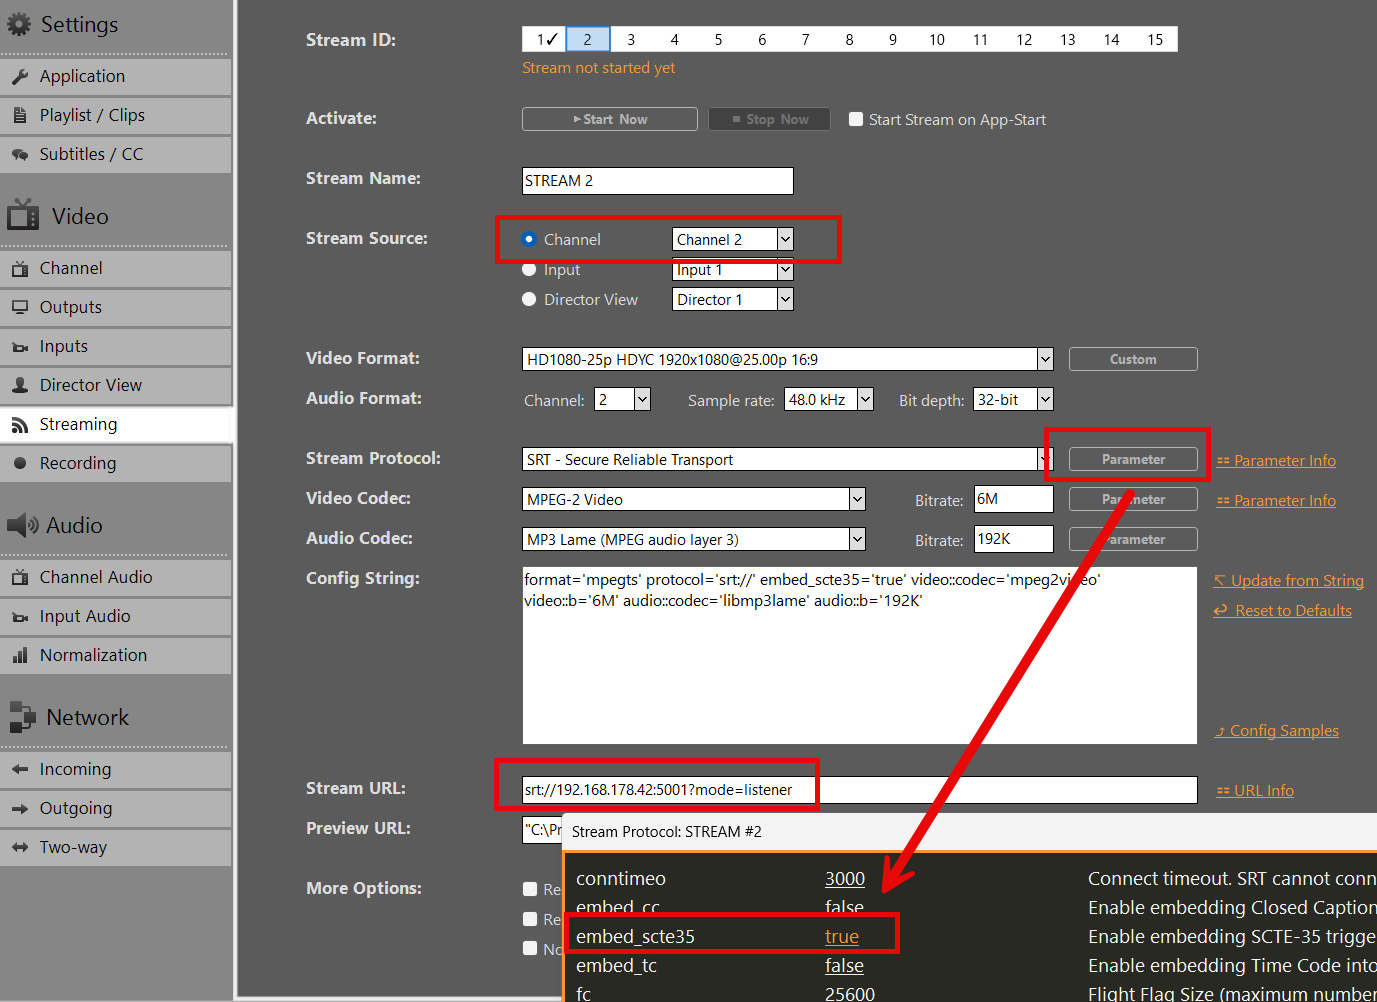
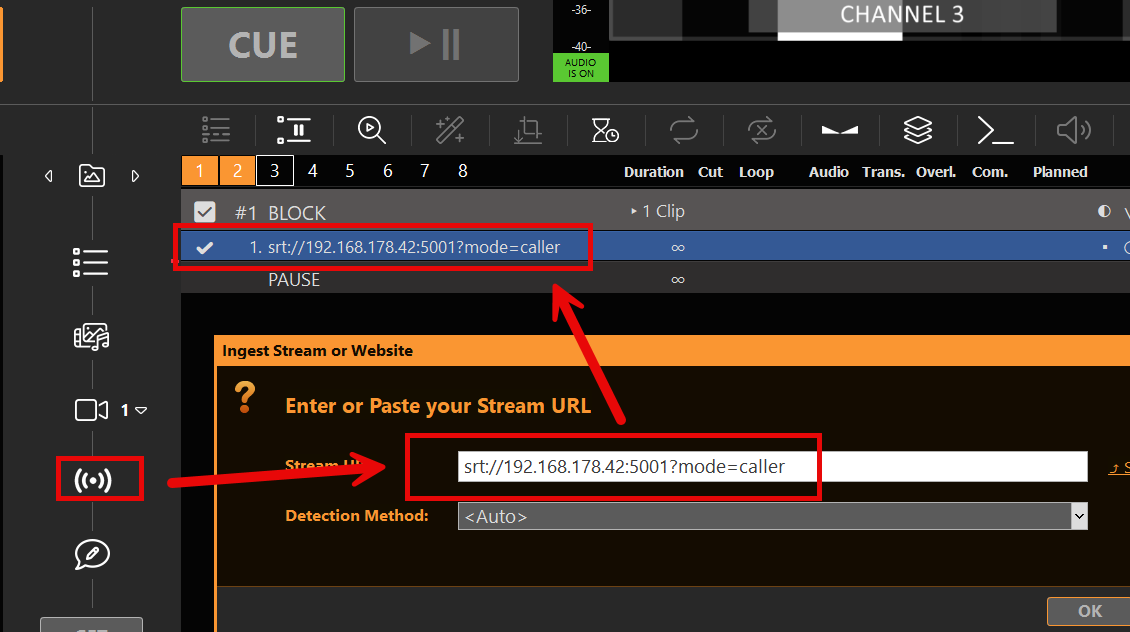
If we now press our Action Button to send the SCTE-35 Marker, we detect it also in Channel 3:

Using SCTE-104 in SDI
SCTE-104 Facts
- Supported for SDI Device Inputs as well as SDI Device Outputs, e.g. Blackmagic DeckLink. SCTE transport is always active and does not need to be enabled somewhere.
- PLAYDECK can detect and display incoming SCTE-104 Marker. All incoming and outgoing Marker will be written to an Event Log.
- PLAYDECK can forward incoming SCTE-104 Marker from SDI Input to SDI Output.
SCTE-104 Testdrive
Let us dive into those topics a bit. As a test run we setup our own SDI signal loop. We use our DeckLink Duo 2 and an SDI Loop Cable:
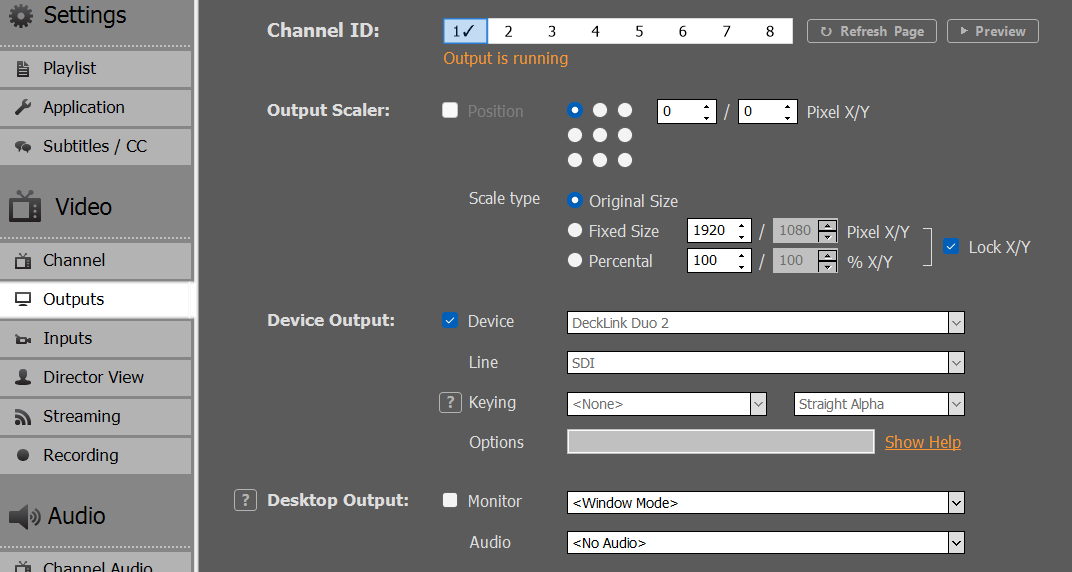
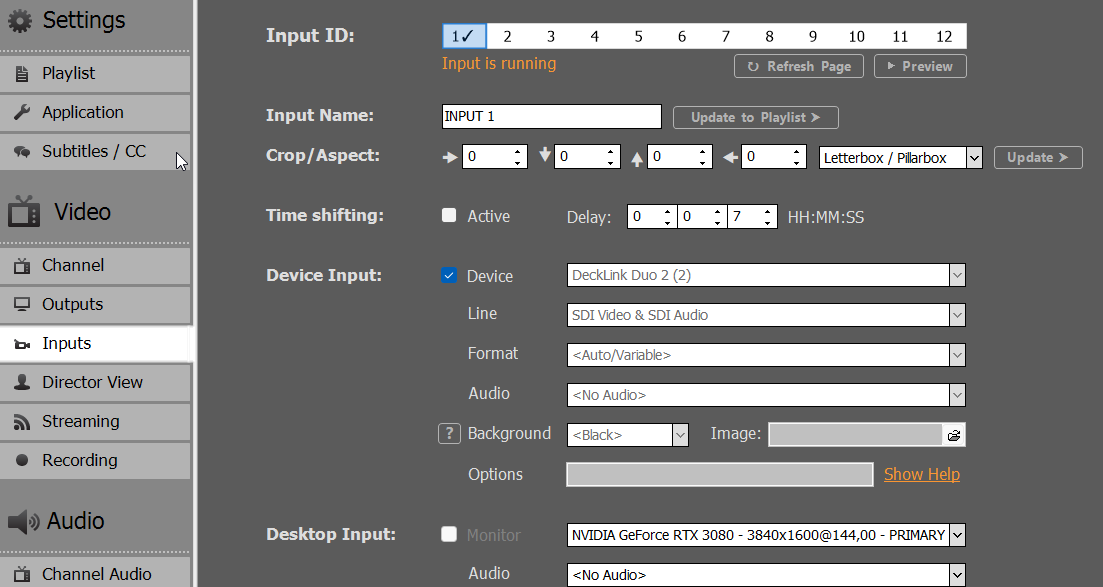
And play the SDI Input in Channel 2:
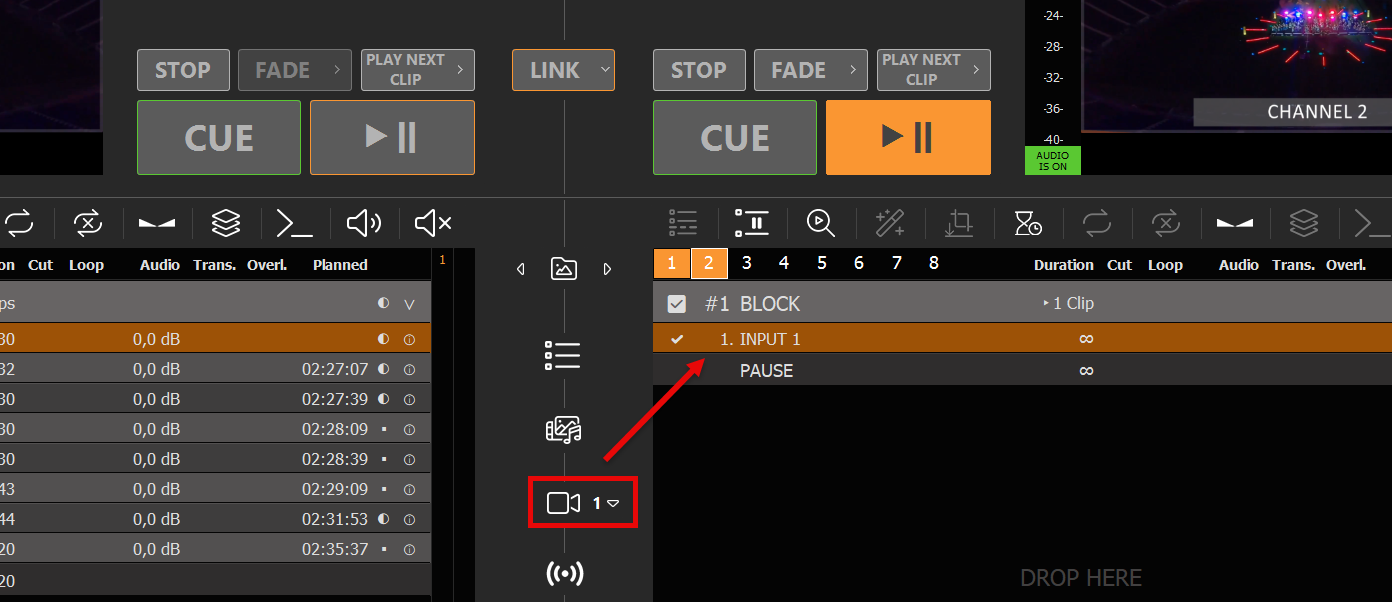
Now we only need a way to send a SCTE-104 marker in Channel 1. So we setup a new Command Action and use the smallest detectable SCTE-104 Marker (of course you can use any other):
<SCTE104><single_operation_message><data>data string</data></single_operation_message></SCTE104>
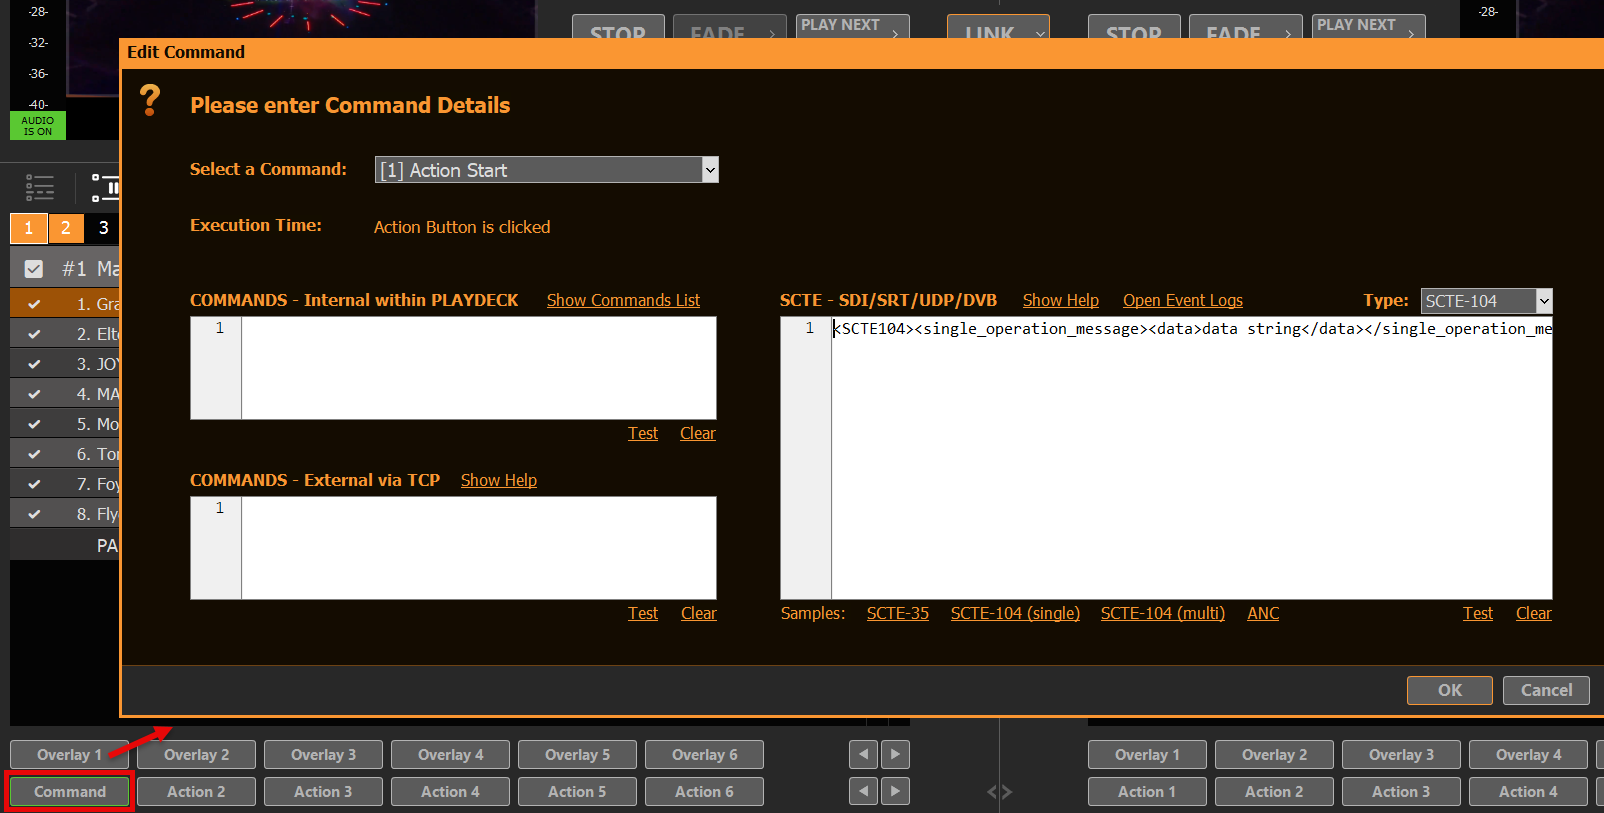
Make sure Channel 1 and Channel 2 are playing, then hit the Action Button. Then open the SCTE Event Log over the Main Menu > Documentation > SCTE:
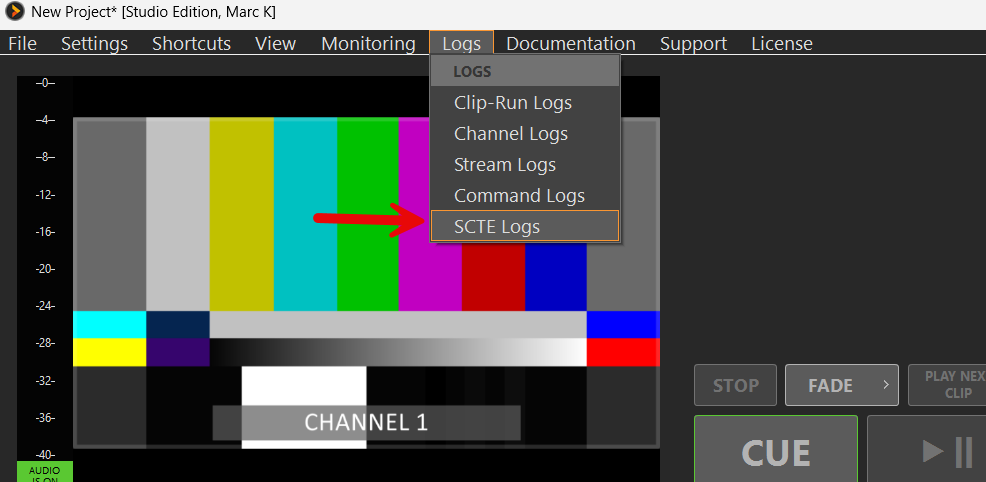
We even go one step further and setup ANOTHER SDI Loop from Channel 2 to Channel 3 to test the SCTE Forwarding:
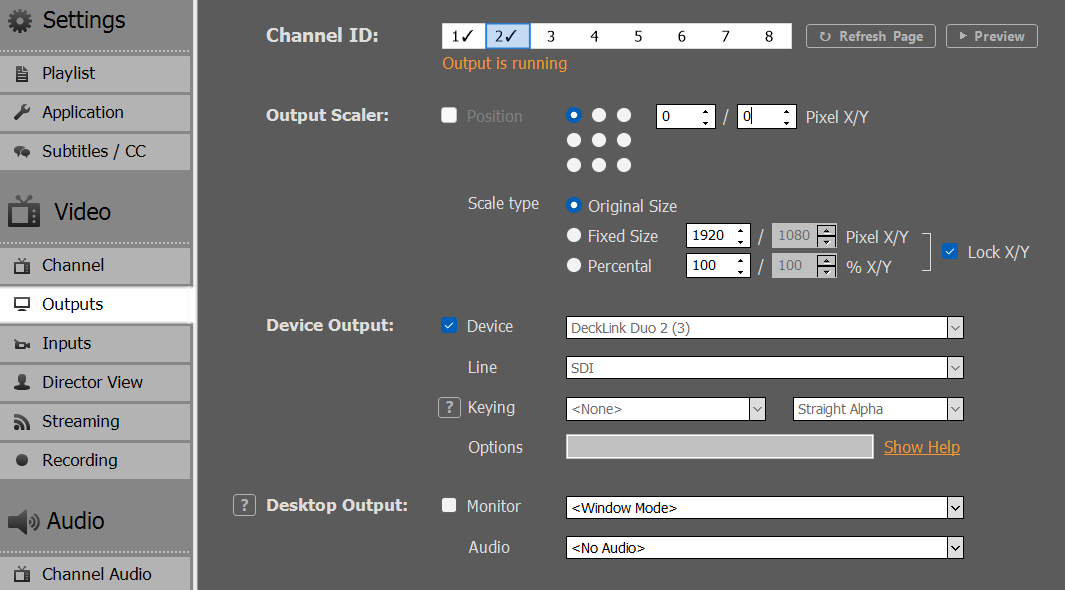
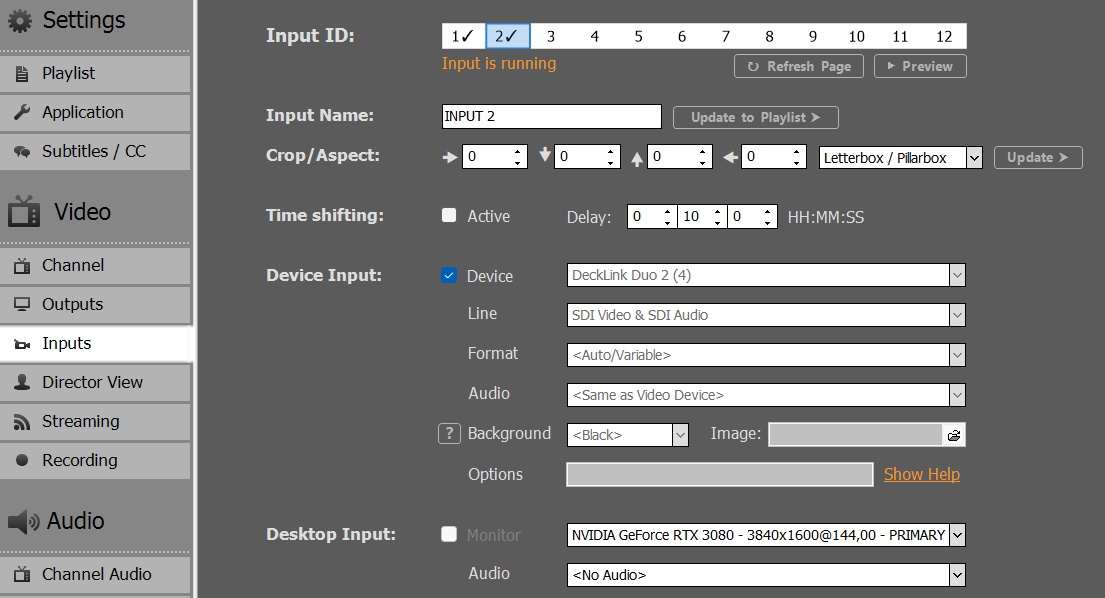
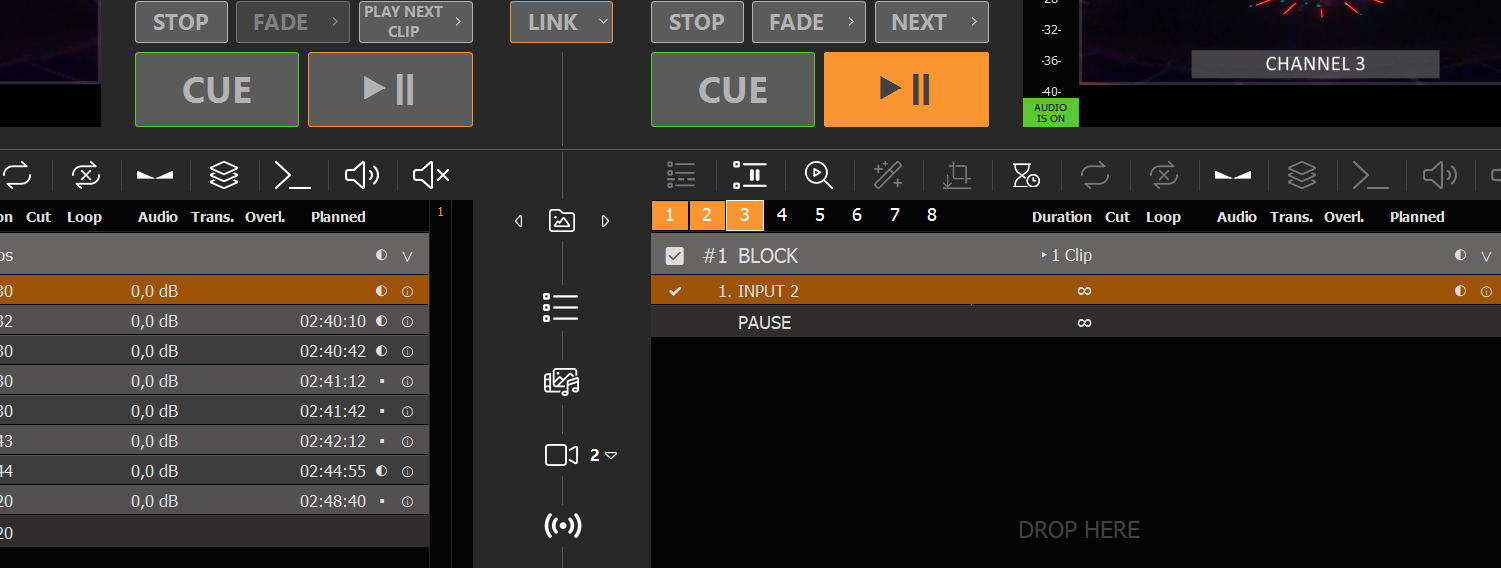
If we now press our Action Button to send the SCTE-104 Marker, we detect it also in Channel 3.
Sending SCTE-35 to Stream Server
SCTE Marker are mainly used to insert Ads into the Video Output by signaling the Receiver (e.g. Streaming Server) at what time to insert Ads and with what Duration. This allows 3rd Party Systems to dynamically pick Ads from a Database. You can read more about SCTE-35 in general on this website.
In this article:
→ Introduction
→ SCTE-35 Marker Examples
→ Test SCTE-35 Marker locally
→ Test SCTE-35 Marker in Nimble Streamer
→ Additional Information
Introduction
We also recommend our general article on SCTE.
You can attach SCTE Marker to 4 different Objects in PLAYDECK:
– Clips (any Position)
– Blocks (Start and End)
– Overlays (Show and Hide)
– Actions Buttons
Instead of providing your with predefined SCTE Marker, we picked a different approach: You have to write your own SCTE Marker. This could mean a bit of a learning curve, but in the end, it is much more flexible. The advantage is, that you will always be compatible to all receiver. For gathering Clip duration and other “variables” we provide certain “placeholder”.
Please note, that SCTE has to be enabled in your Stream options:
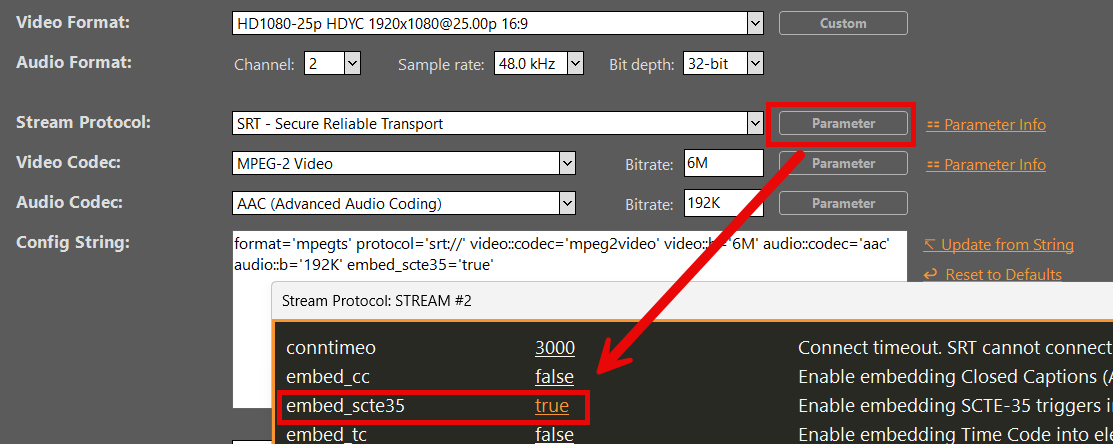
SCTE-35 Marker Examples
Let’s look at some SCTE-35 Sample. It represents the most used form of SCTE-35 called “Splicing”.
Note: The SCTE-35 Format presented here works best with Nimble Streamer (see below). Depending on your Stream Server, the Format might be different. Ask your Provider.
<SpliceInfoSection>
  <SpliceInsert
    spliceEventId="4157"
    outOfNetworkIndicator="1"
    spliceImmediateFlag="1">
    <Program />
    <BreakDuration
      autoReturn="1"
      duration="{clipduration}" />
  </SpliceInsert>
</SpliceInfoSection>
This will insert an Ad and return to your Program automatically after the given duration. The duration will be set automatically by PLAYDECK for your current running Clip. This can be exchanged with {blockduration} or a manual value. If you pick a manual value for duration, the formula is: CLIP DURATION multiplied by 90000 and rounded. The reason behind this is, that 90000 is default Timescale most SCTE Systems use. Example: The Clip is 12.4 seconds, so the SCTE duration would be 1116000.
Instead of sending a duration, you could also send 2 separate SCTE Marker to Start/End the Ad. Those are called CUE-OUT (leaving your Program for Ad) and CUE-IN (return to your Program).
<SpliceInfoSection>
  <SpliceInsert
    spliceEventId="4157"
    outOfNetworkIndicator="1"
    spliceImmediateFlag="1">
    <Program />
  </SpliceInsert>
</SpliceInfoSection>

<SpliceInfoSection>
  <SpliceInsert
    spliceEventId="4157"
    outOfNetworkIndicator="0"
    spliceImmediateFlag="1">
    <Program />
  </SpliceInsert>
</SpliceInfoSection>
As you most likely have observed already, the only difference is “outOfNetworkIndicator” being 1 (CUE-OUT) and 0 (CUE-IN). The SCTE System itself will pair both Marker based on the “spliceEventId”.
Note: The supported placeholder are: {timestamp} {timestampunix} {airtimenext} {airtimenextunix} {plannednext} {plannednextunix} {clipid} {blockid} {blockduration} {clipduration}
Test SCTE-35 Marker locally
Open PLAYDECK. You don’t need to load any Clips yet. Right-Click on any ACTION Button, create a new Action and select COMMANDS/SCTE:
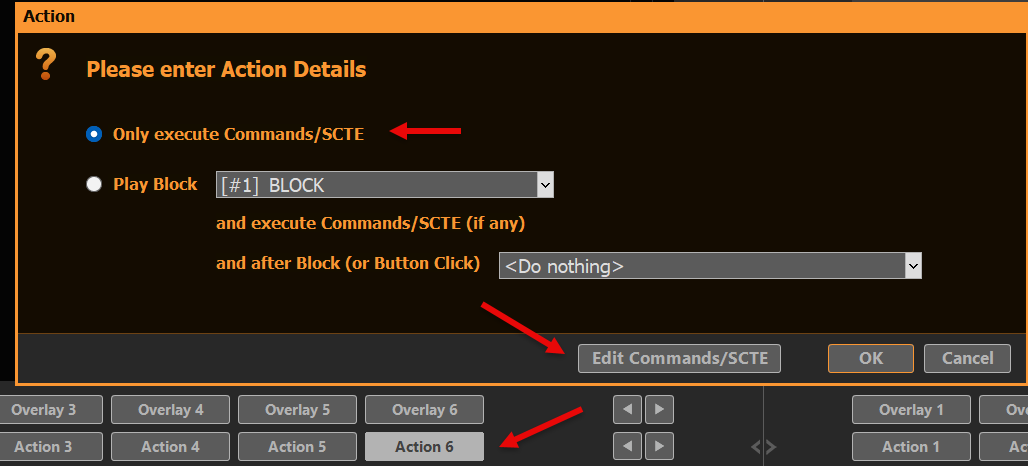
Insert the SCTE-35 Sample Tag by clicking SCTE-35. Close the Popups with OK (twice):
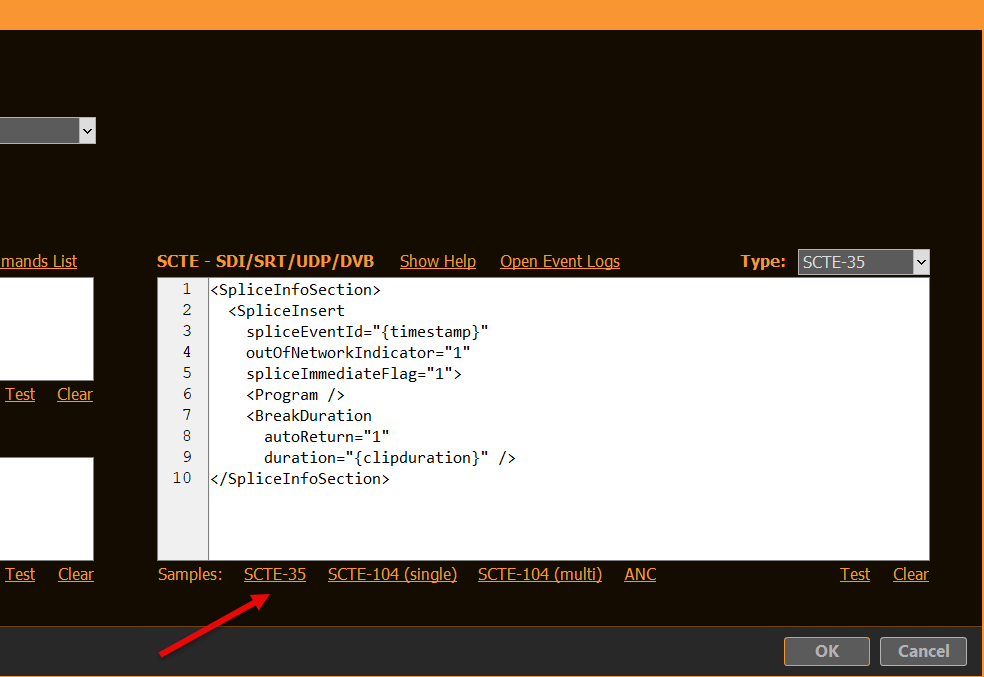
We are now able to send a SCTE-35 Tag to any compatible Stream (UDP, DVB, SRT). If you click the Action now, nothing will happen, as we don’t have a Stream yet.
Let’s create a Test UDP Stream, where we simply send the Output to a File, so we don’t have to hassle with Server Stuff (yet). Copy the Settings as follows and start the Stream with START NOW. Don’t forget to enable SCTE-35 with “Parameter”:
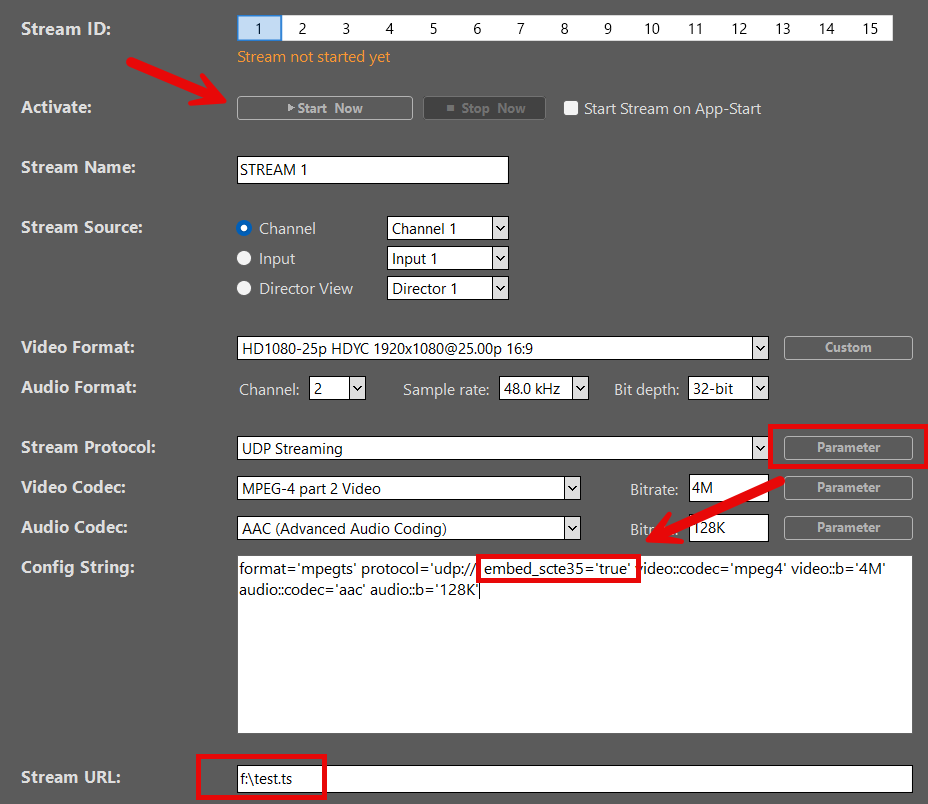
We want to send our Sample SCTE-35 Tag to the Stream now. So close Settings and click your Action Button several Times, then go back to Settings and stop your Stream with STOP NOW.
Your SCTE-35 Tags have been logged by PLAYDECK. You can check the Logs, if you go back to your SCTE-35 Code on the Action Button and click OPEN EVENT LOGS:
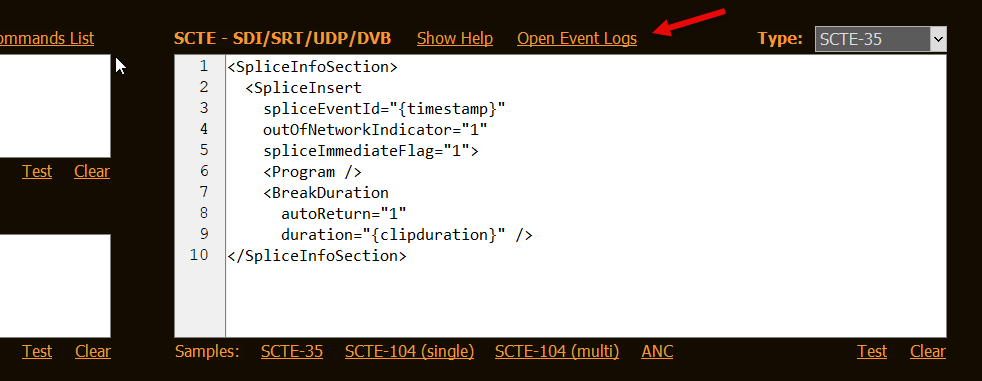
You can also make the SCTE-35 Tags visible, which are in your recorded Stream. For this, we need a separate Tool called “DVBInspector”. This Tool also needs JAVA Runtime, so download both:
This Tool requires JAVA Runtime. If it is not installed already, you can download here:
https://www.oracle.com/java/technologies/downloads/
Now unzip your “DVBinspector-1.18.0-dist.zip” (or similar) and start “DVBinspector-1.18.0.jar”. Then Drag+Drop your TS File onto the Application. Open the Tree as follows to view your SCTE Marker.
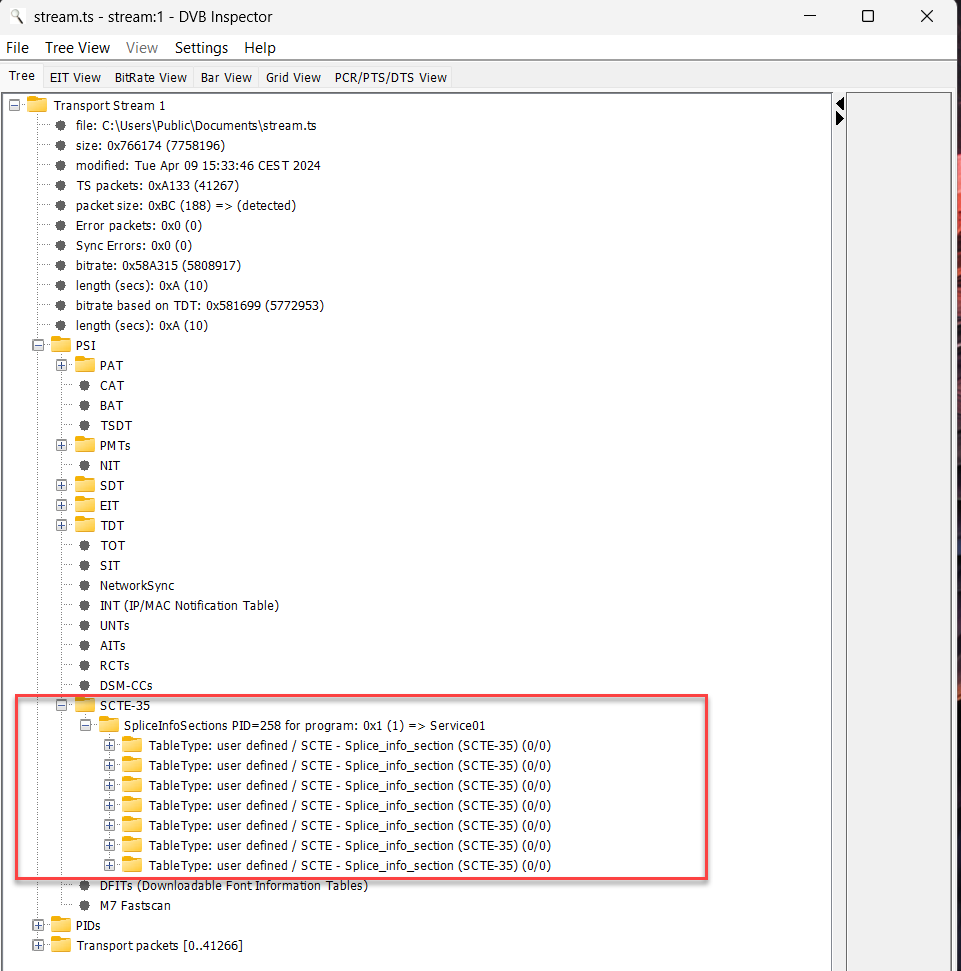
Test SCTE-35 Marker in Nimble Streamer
Nimble Streamer is our Streaming Service of choice. It is cost-efficient, easy to setup and maintain, but still has the depth of complexity for advanced use cases:
Install the 14-day Trial Version of Nimble to the same machine that PLAYDECK is running. This is not a necessity, but makes things simpler, as you don’t have to put up with a network setup. You will also be asked by Nimble to create an account with WMSPanel, which is a web based setup tool for Nimble, as the Nimble Streamer itself installs without User Interface.
INFO: For this SCTE-35 Sample to work, you DONT need to have “Nimble Live Transcoder” or “Nimble Advertizer” PlugIns, if you test this on a Live Installation. They are disabled in the Trial Installation by Default.
Once you got Nimble running, there is one more configuration you need to do manually. Open the Nimble Server Configuration file here:
c:\Program Files\Nimble Streamer\conf\nimble.conf
At the bottom of this file, add the following Lines and save the file.
scte35_processing_enabled = true
scte35_forwarding_enabled = true
hls_ad_scte35_forwarding_enabled = true
hls_ad_marker_format = cue
hls_ad_splice_out_cont_marker_enabled = true
Important: You need to restart Nimble now by either restarting your PC or restarting the Windows Service “Nimble Streamer” manually.
Here are the lines again, but with comments for you (dont use these):
scte35_processing_enabled = true  // Enabled the SCTE module in general. Needed for all other Options
scte35_forwarding_enabled = true  // Allows passing through the SCTE-35 markers via Live Transcoder
hls_ad_scte35_forwarding_enabled = true  // Enables forwarding of SCTE-35 markers into HLS streams
hls_ad_marker_format = cue  // Sets Nimble to use CUE-OUT and CUE-IN markers
hls_ad_splice_out_cont_marker_enabled = true  // Enables automatic insertion of EXT-X-CUE-OUT-CONT
Now let’s set up your Streams in WMSPanel:
First we are going to define our incoming Stream. Go to “Nimble Streamer” in the Menu and select “MPEGTS In” and click the “Add UDP stream” Button, then add the incoming stream like this. You can use any other Port, should 5001 be in use already.
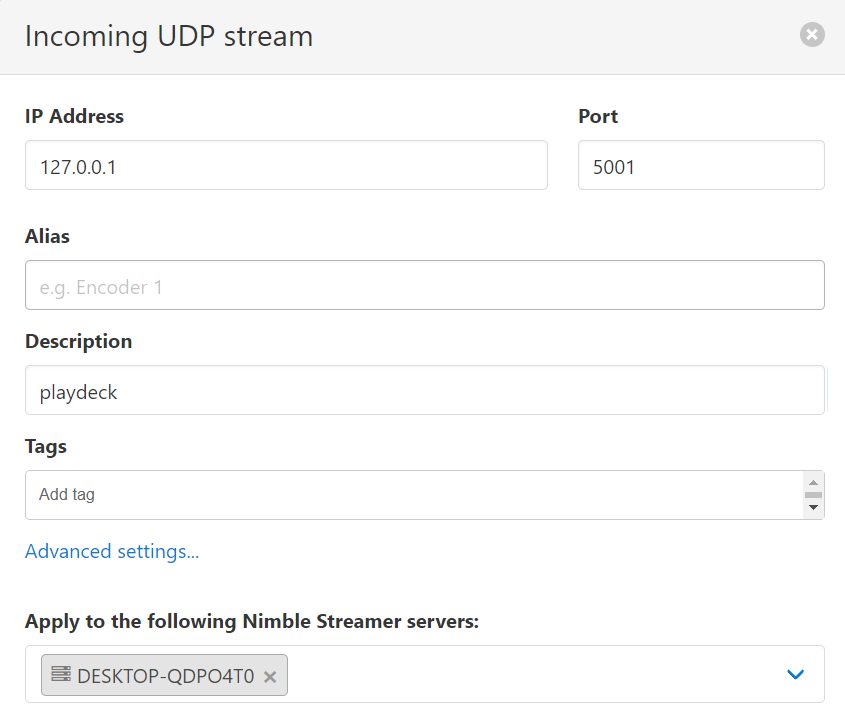
Next we are going to setup the outgoing stream format. We want to use HLS here to demonstrate the conversion of SCTE Marker from UDP to HLS. On the same page, go to “MPEGTS Out” and click the “Add outgoing stream” Button, then add like this. Make sure you select you input stream as video and audio source.
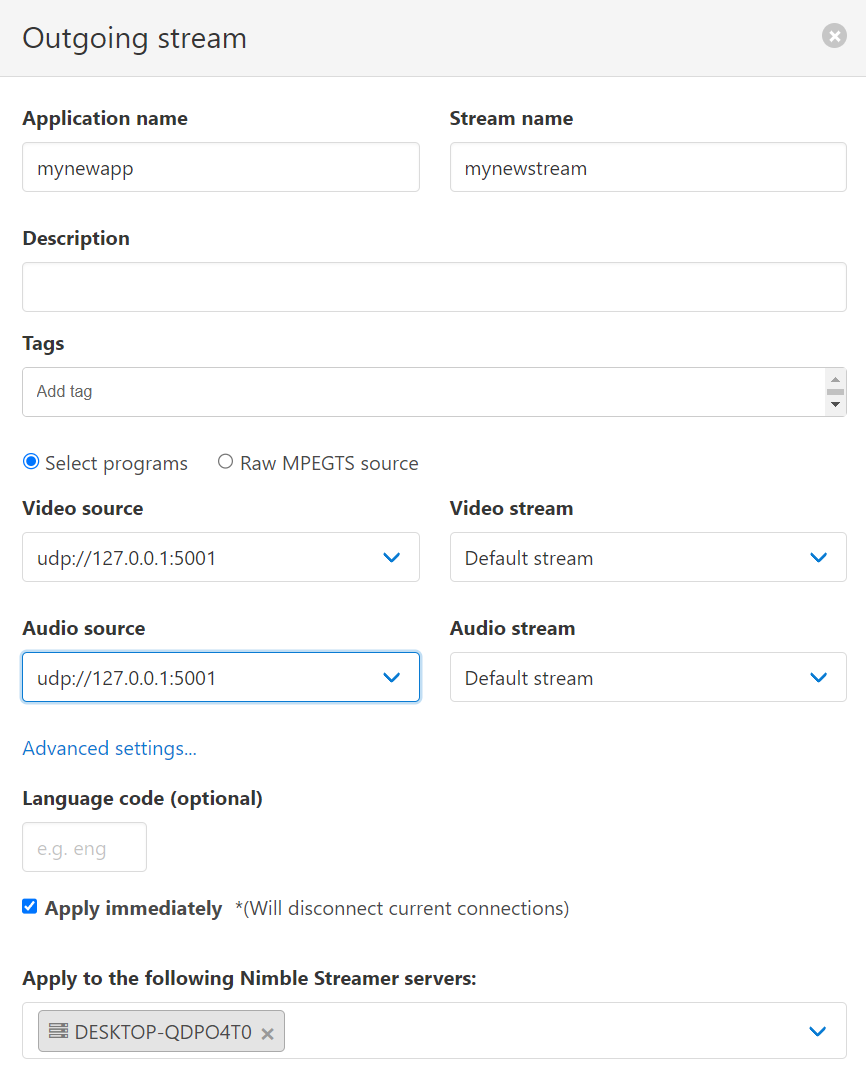
Next we continue our setup in PLAYDECK. Got to the Stream Output Settings and change the Stream URL to “udp://127.0.0.1:5001”.
INFO: You can pick any preferred Video Codec. In this case I picked H.264 to let my NVIDIA GPU do the encoding, which will lower my CPU usage. Also enable SCTE-35 with “Parameter”.
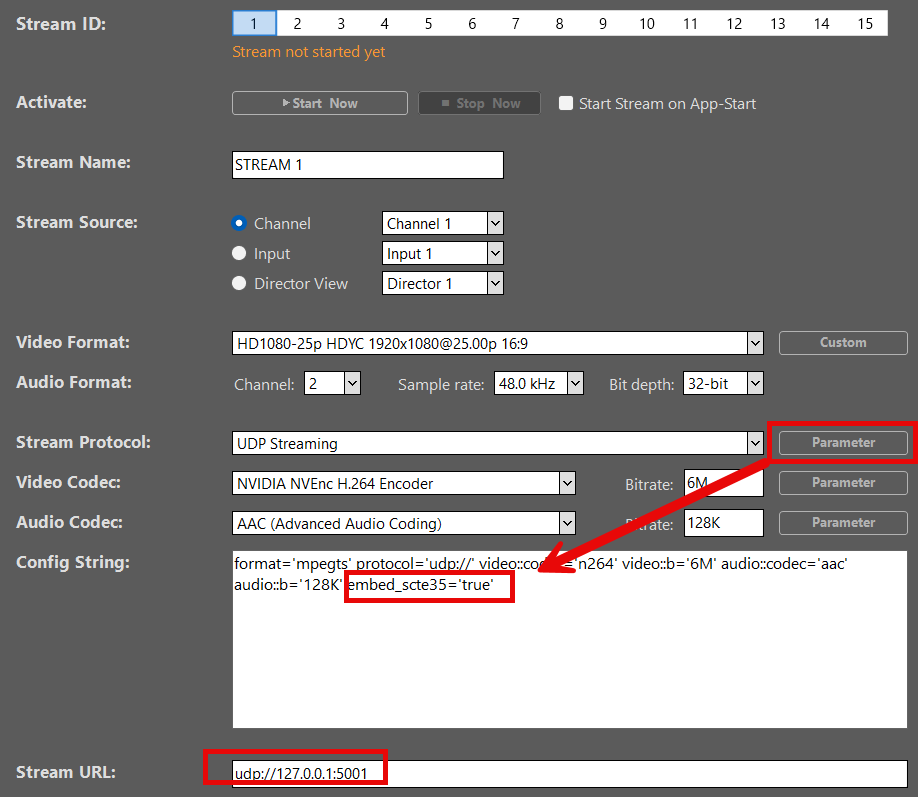
INFO: Please note, that PLAYDECK is not capable to directly stream HLS. If you select “Apple HTTP Live Streaming” as Streaming Format, the output will be written to a file. You therefore need to specify a file target as “Stream URL” e.g. “c:\Users\Public\Documents\stream.m3u8”. Then use that File to stream using any Streaming Server. PLAYDECK is not able to write HLS SCTE Tags into the HLS Manifest file (the *.3u8 file).
Next we want PLAYDECK to automatically send SCTE, not just via a Button, but Clip related. So we insert any Clip and click the COMMANDS Icon in the Toolbar, then add a new Command, select PLAY TIME 0, then insert the SCTE-35 Sample:
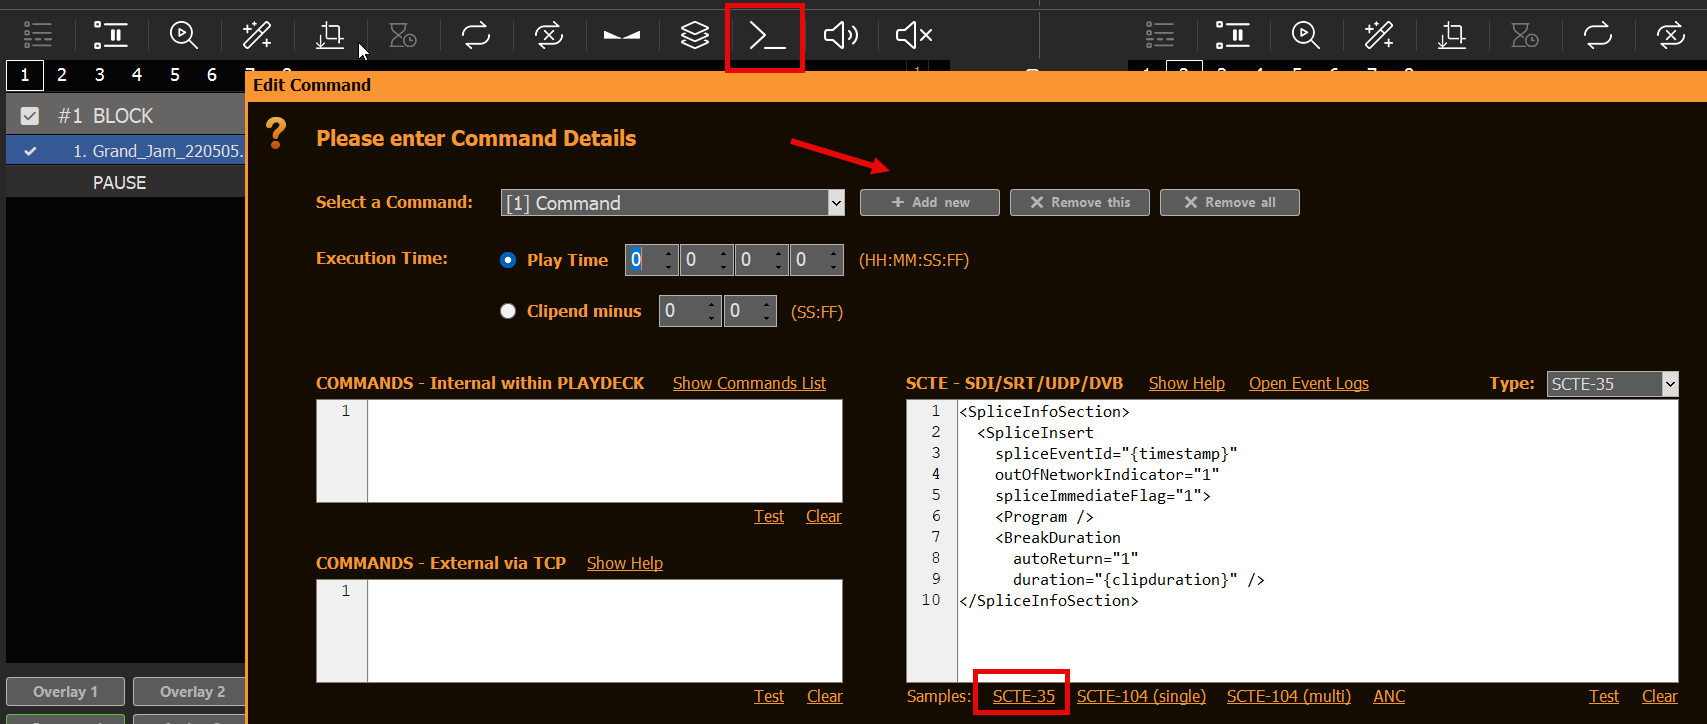
INFO: You can also add SCTE Marker to Blocks, Overlays and Action Buttons.
Now let’s get things rolling: CUE and PLAY the Clip and start the Stream in the PLAYDECK Settings. Hop over to the WMSPanel and open from the Menu “Nimble Streamer” the option “Live Streams”. You will now see 1 running Live stream. Click on it and pick the question mark on the far right like this.
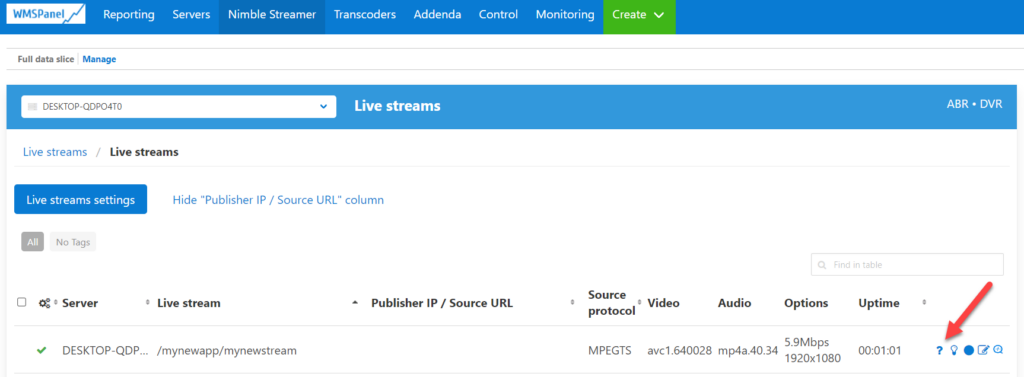
From the list of “URLs to play” select the one with the “playlist.m3u8” ending and click “Copy”. Now paste this URL into any Browser, that has an HLS Player integrated or installed. For this example we use the CHROME Browser with the following HSL Player Extension:
https://chromewebstore.google.com/detail/hls-player-m3u8-streaming/eakdijdofmnclopcffkkgmndadhbjgka
Once you posted that URL into CHROME, you will see your PLAYDECK stream playing immediately. Now let me show you how to monitor your SCTE Marker. In Chrome press F12 to open the Developer Tools. On top click the “Network” Tab. You will now see several “chunks.m3u8”, which are part of you stream. Click on one of the Chunk files (also called HLS Manifest) and select “Preview” next to it. You will now see the HLS SCTE Tag. If it isn’t there, click on another chunk, as we send the SCTE only on Clip Start.
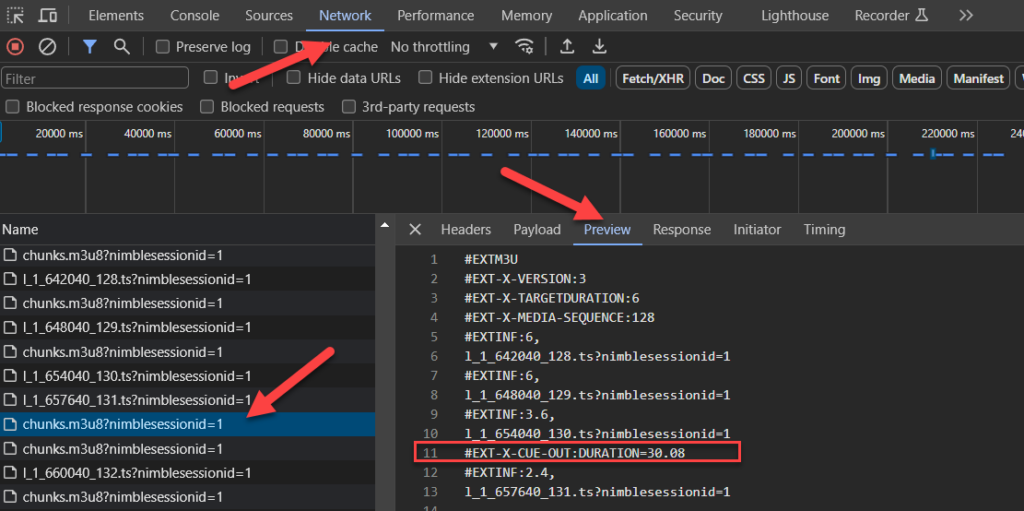
That’s it! We reached our Test Goals. Upcoming are more information which might be relevant to dig into.
Additional Information
Logging in PLAYDECK
We log all incoming and outgoing SCTE Tags. This gives you also the opportunity to test your outgoing SCTE by simply Looping your Output to an Input (SDI as well as Streams), and let PLAYDECK detect your SCTE. You can open the Log Files via the “Logs” Main Menu:

Logging in Nimble Streamer
If anything goes wrong or doesn’t happen as expected, a good start is to review the Nimble Log Files. The Log can be found here on Windows:
c:\Program Files\Nimble Streamer\log
Logging is enabled by default in the Nimble Trial addition, but in case you need to activate it, here are the flags for the “nimble.conf”.
log_access = file
logging = debug
Now open the log file and scan for “SCTE”. You might see something like this, which indicates you have a typo in your SCTE Marker in PLAYDECK:
[SCTE35] unsupported splice command type=6 for [mynewapp/mynewstream]If your SCTE Marker parsed successful in Nimble, it will look like this:
[SCTE35] splice_insert: event_id=4157 oon=1 immediate=1 pts_adjustment=0 pts=0 actual_pts=202593600 duration=2707200 data=0xfc....
Tool: TSDuck
This is a collection of tools and plugins with a large library to manipulate MPEG transport streams. With this you would be able to insert SCTE Marker outside of PLAYDECK based on an algorithm or other complex logic.
Tool: x9k3
This tool can also convert SCTE-35 Marker in UDP Streams or MPEG-TS Files into HLS SCTE Tags. This allows you to install a streaming server, which does not have automatic SCTE-35 to HLS conversion.
Cloud & Remote Productions
Setup Cloud & Remote Productions
Welcome to the Playdeck Cloud & Remote Productions guide. As modern broadcasting shifts toward decentralized workflows, Playdeck allows you to operate seamless playout from anywhere.
Whether you host Playdeck on a cloud virtual machine or feed remote video signals into a local studio, our software adapts to your infrastructure. This guide covers REMI models, pure cloud playout, and hybrid workflows, helping your team collaborate globally with minimal latency and high reliability.
In this article:
→ System Requirements & Network Architecture
→ Remote Inputs
→ Remote Outputs
→ Remote Control & Automation
→ Troubleshooting & Best Practices
System Requirements & Network Architecture
Running a stable remote production requires solid infrastructure and network tuning. Ensure your setup meets the following criteria for a broadcast-ready performance:
Bandwidth: A stable internet connection with at least 15-20 Mbps dedicated upload/download speed per HD stream.
Firewall & Ports: Open specific ports for incoming remote signals (e.g., standard SRT ports) to prevent firewall blocks.
Cloud VMs: When running Playdeck in the cloud (AWS, Azure, vMix Cloud), use instances with dedicated GPU acceleration (e.g., NVIDIA) for fluid video encoding.
Network Stability: Always prefer fixed Ethernet connections over Wi-Fi to eliminate packet loss during live transmission.
Remote Inputs
Bringing external video feeds into your Playdeck playlist from remote locations is seamless with modern IP protocols. Playdeck supports various low-latency input formats:
SRT (Secure Reliable Transport): Use SRT Caller or Listener modes to ingest secure, high-quality video streams over unpredictable public networks.
RTMP / RTSP Ingest: Easily pull live streams from external media servers, hardware encoders, or remote IP cameras directly into your live timeline.
NDI Bridge: Connect separate local networks over the internet to securely share NDI video sources across different physical locations.
Remote Outputs
Playdeck allows you to distribute your playout signal to various cloud destinations and remote monitoring tools simultaneously:
Cloud CDNs: Stream your output directly to major cloud platforms like YouTube Live, Twitch, Facebook Live, or custom RTMP/SRT media servers.
Master Control Switchers: Send high-quality, low-latency SRT feeds from Playdeck directly to remote cloud switchers or broadcast centers.
Virtual Devices: Use virtual camera and audio drivers to route Playdeck’s output into video conferencing tools like Zoom or Microsoft Teams for instant client monitoring.
Remote Control & Automation
Managing your playout from a distance is straightforward using Playdeck’s built-in network features and external integrations:
Web User Interface: Access and fully control the Playdeck application remotely using any standard web browser on your smartphone, tablet, or secondary PC.
API & External Triggers: Connect external software or controllers via HTTP or TCP commands to automate your playback over local networks or secure VPNs.
Companion Integration: Leverage Bitfocus Companion to map Playdeck actions to physical Stream Decks or virtual buttons located anywhere in the world.
Troubleshooting & Best Practices
Ensure a flawless remote production by following these operational guidelines and troubleshooting steps:
Optimize SRT Buffers: If you experience video stuttering over unstable connections, increase the SRT latency/buffer setting to compensate for packet loss.
Monitor CPU & GPU: Keep an eye on system resources when running Playdeck in virtualized cloud environments; ensure video encoding does not overload the instance.
Audio & Video Sync: Use the internal audio delay settings in Playdeck to match incoming remote video feeds that might have different network propagation delays.
Fallback Strategy: Always configure a backup loop or an emergency graphic overlay in your playlist to automatically play if a remote input stream drops out.
Using Companion for Playout Control
This article will show how to use bitfocus Companion together with PLAYDECK. Companion has a ready-to-use module for PLAYDECK. This is the most comfortable way to connect PLAYDECK to your ATEM Mixer or STREAMDECK.
The Companion Module has been developed and is maintained by Nick Semonov. He is a Community Developer and also a great guy to work with.
In this article:
→ Installation
→ Button Page with Presets
→ Custom Commands instead of Actions
→ Custom Button Feedbacks
Installation
1. Start PLAYDECK, so Companion can find it
2. Download and install the latest stable Version of Companion
3. Start Companion and add the PLAYDECK Module
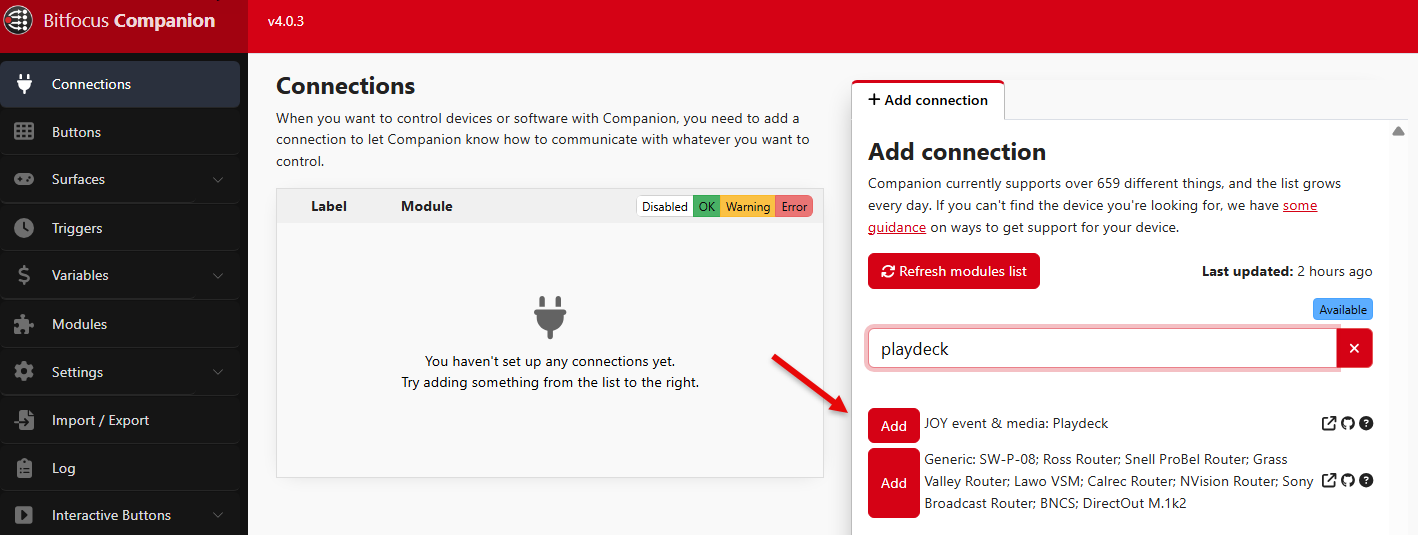
4. You are done, if Companion shows a GREEN Checkmark for this Connection. If you cant get a Connection, please disable your Firewall or allow TCP Port 11411.
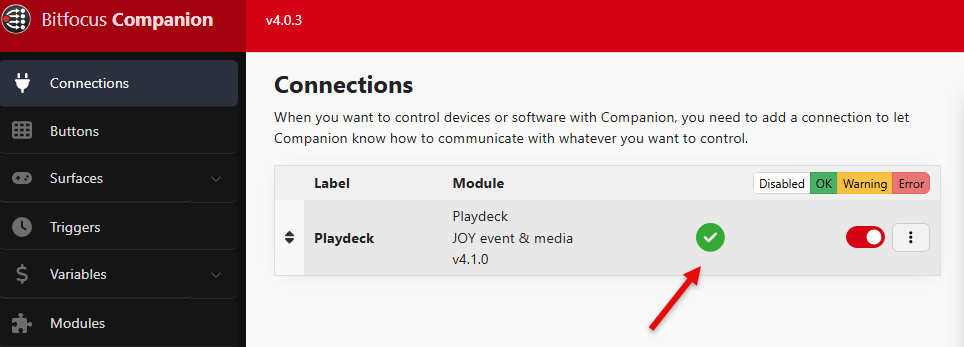
Button Page with Presets
We will use Companion Presets to quickly create a fresh Page of Buttons for a casual Playout Situation.
1. Create a new Page, then go to PRESETS and select PLAYDECK
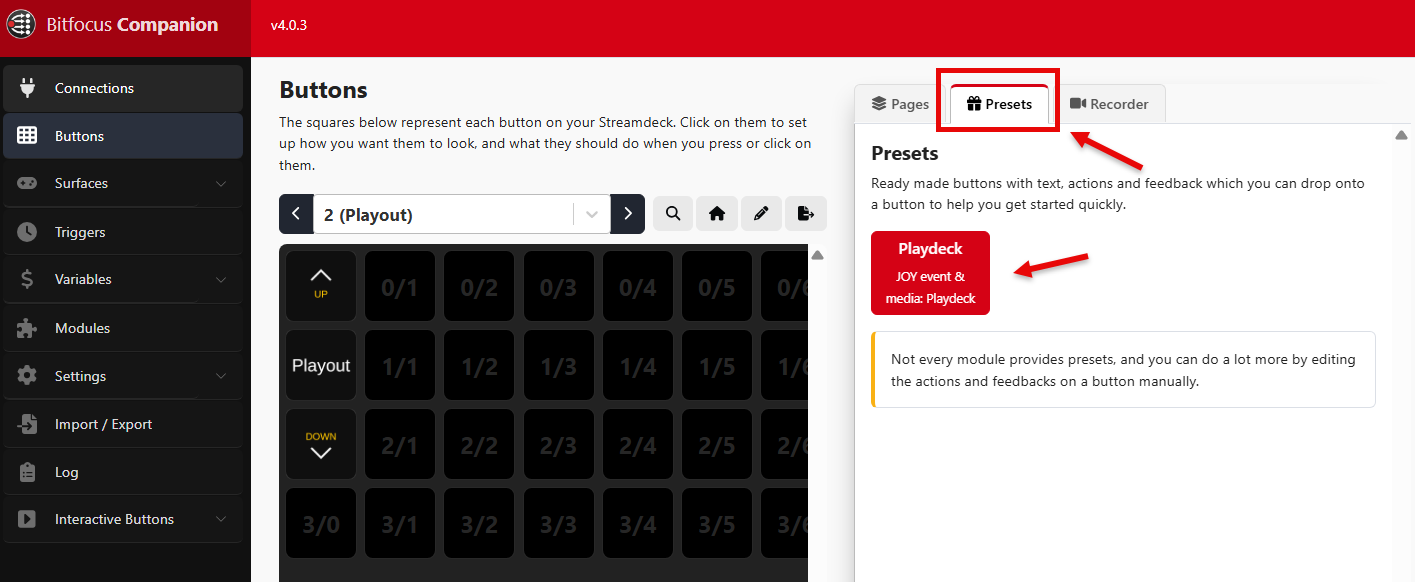
2. For our Sample we specifically want to target Channel 1. You could also use LISTS, which are dynamic and use the visible Channel in PLAYDECK (Left and Right). You could also control your ASSETS (Streams, Recordings). Select CHANNEL 1 to continue

3. With Drag & Drop we create a simple Playout Solution: Play Control with some Overlays. The Buttons are added with FEEDBACKS, meaning: You will get a RED Button according to the PLAY STATE (CUE, Playing, Paused, Stopped).

4. The PLAY Button also shows the remaining Clip Time during Playout:

5. Some Buttons need more Information for you, like the START OVERLAY Button. It needs to know, which Overlay(s) should be started:
Custom Commands instead of Actions
We will add any PLAYDECK Command to a Companion Button. This is useful, if you are more of a “code” type of person or if there a new Commands in PLAYDECK, which are (not yet) available in Companion. Its also possible to add multiple Commands at the same time.
1. We create a new Button and add a new Action. We now select CUSTOM COMMAND and click DONE
2. In PLAYDECK we open the COMMANDS LIST to review, which Command we want to use
3. We decide that we want to start multiple Overlays on several Channel and after that start 2 Streams:
<startoverlay|1|1+3>
<startoverlay|2|1+5>
<startstream|1>
<startstream|2>
4. We wrap up all Commands into one Line and copy it into the COMMANDS Field. If we then press our Button, we start our Overlays and our Streams, as all Commands are executed in the written order.
5. Another good example is starting 2 Channel synchronized:
<cue|1><cue|2><wait|1000><play|1><play|2>
This will CUE both Channel, then wait 1 Second for CUE being ready (Clip Caching), then PLAY both Channel.
Custom Button Feedbacks
Instead of using the pre-defined Feedbacks (e.g. PLAY STATE), you can use Companion VARIABLES to use many more Feedbacks. In this example we will start a specific Block and show its remaining Time on the Button.
1. We add a new Block to Channel #1 in PLAYDECK and rename it “MAIN PROGRAM”
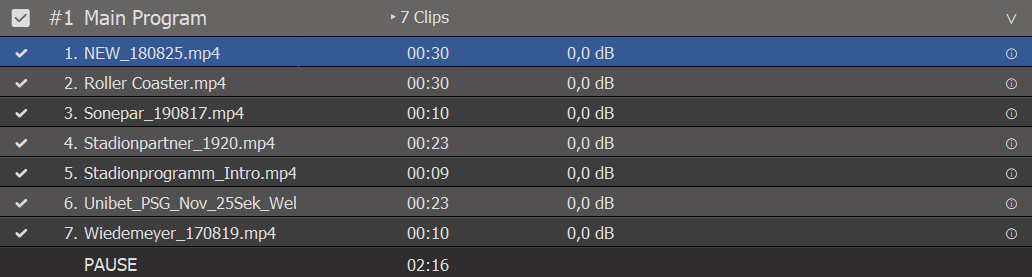
2. Now we add a new Button to Companion and assign the CONTROL PLAY FLEX Action to the Button.
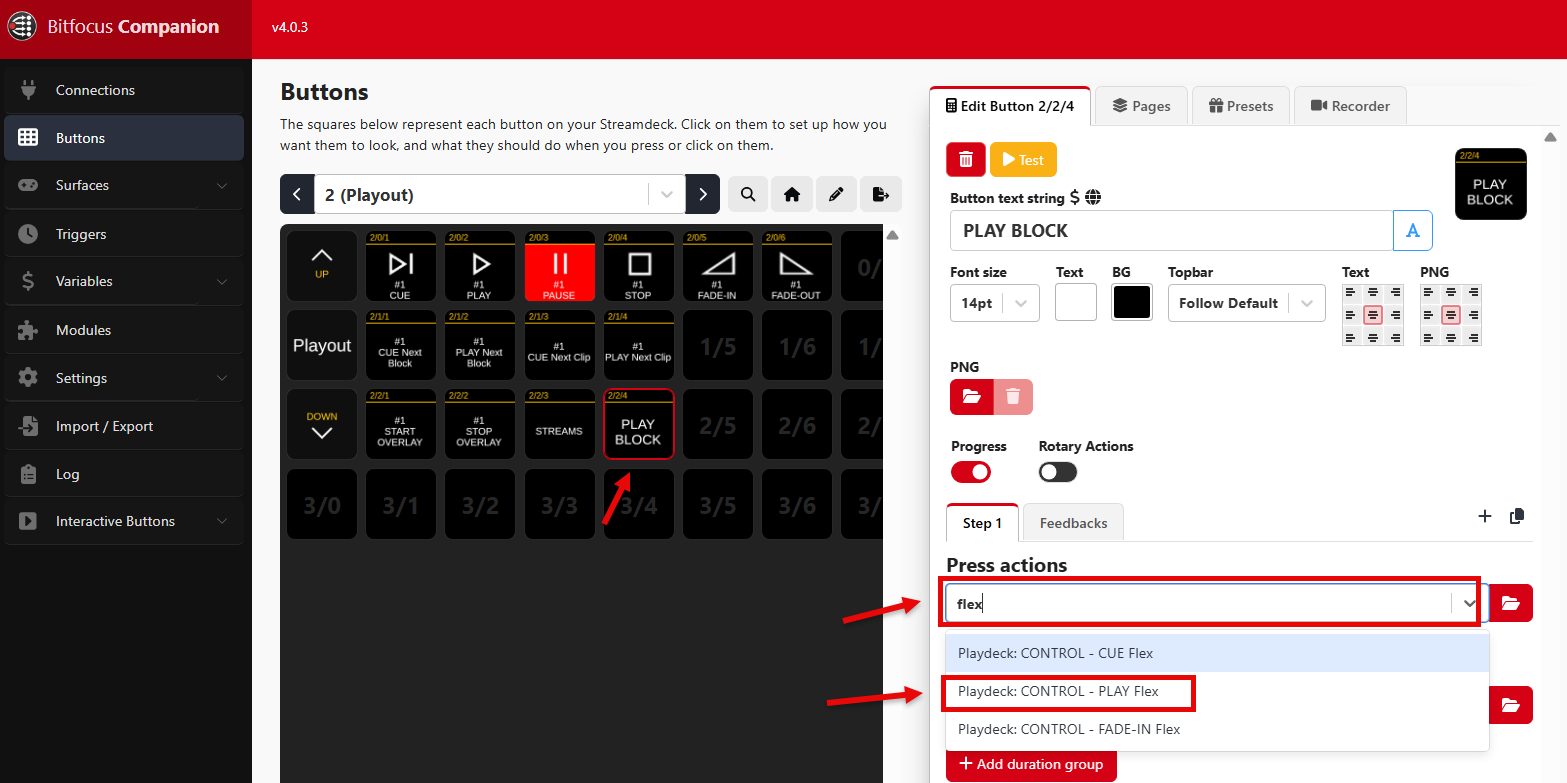
3. The PLAY FLEX Action allows us to play a Block by Name (instead of ID). We use the PATTERN “b:main c#1” to start our Block, as described in the COMMANDS LIST (PLAYDECK > Main Menu > Documentation):
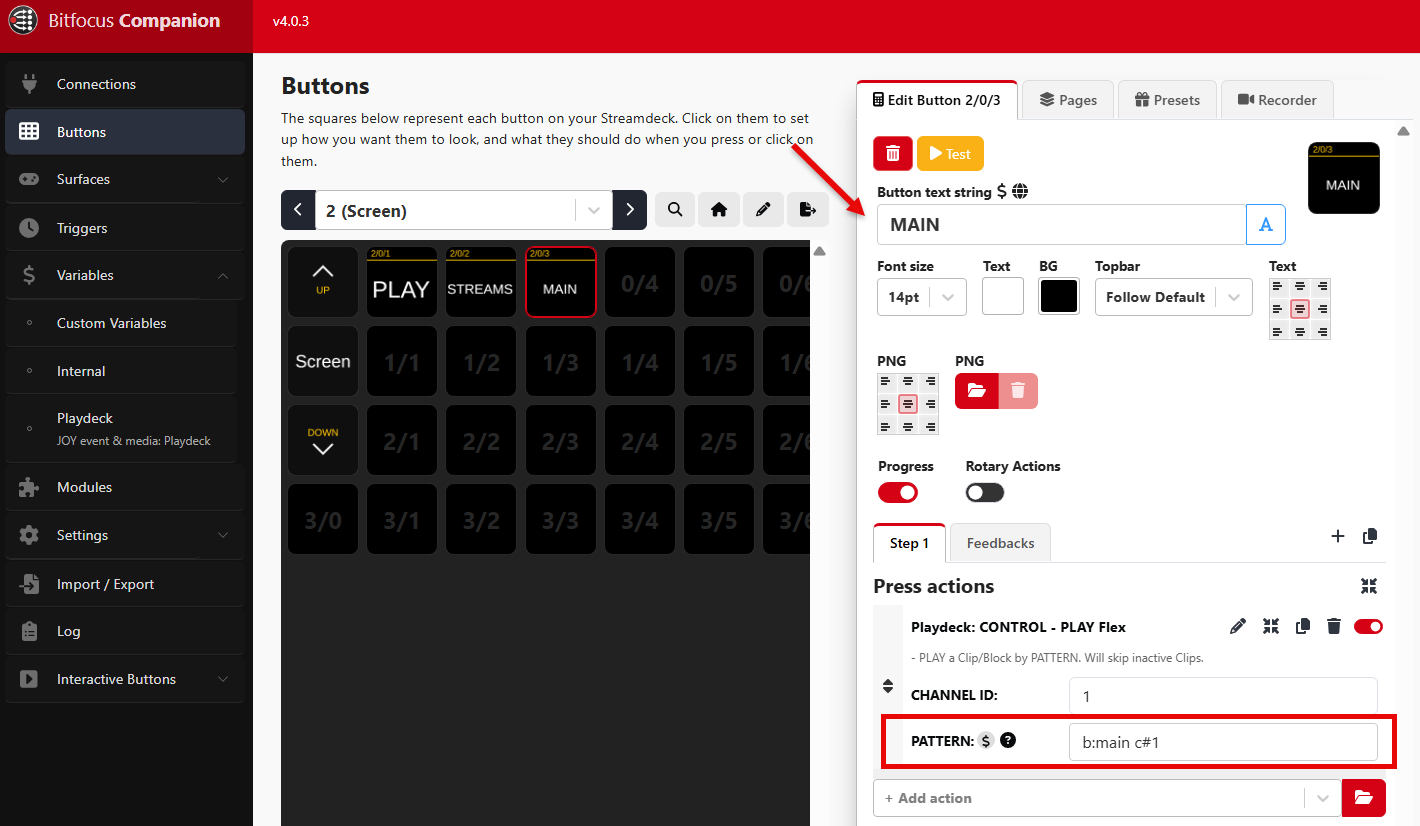
4. We now have a Block Play Button, but we also want the remaining Block Time to display, once the Block is playing. For this we need to add a custom Feedback to the Button, which will check “some” variable and do “something”:
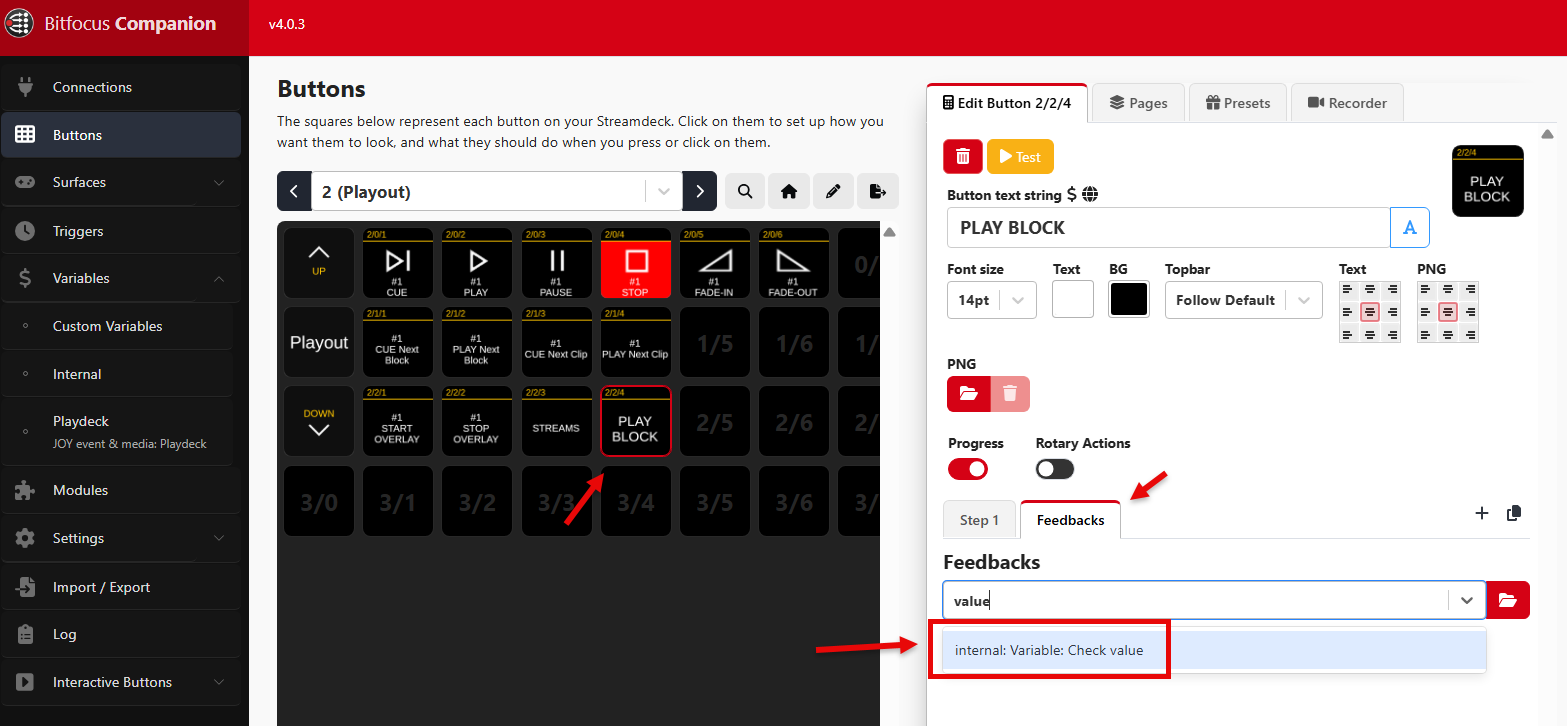
5. We check against the current playing Block by searching for “block name” in the VARIABLE field and add our Block “Main Program” as VALUE:
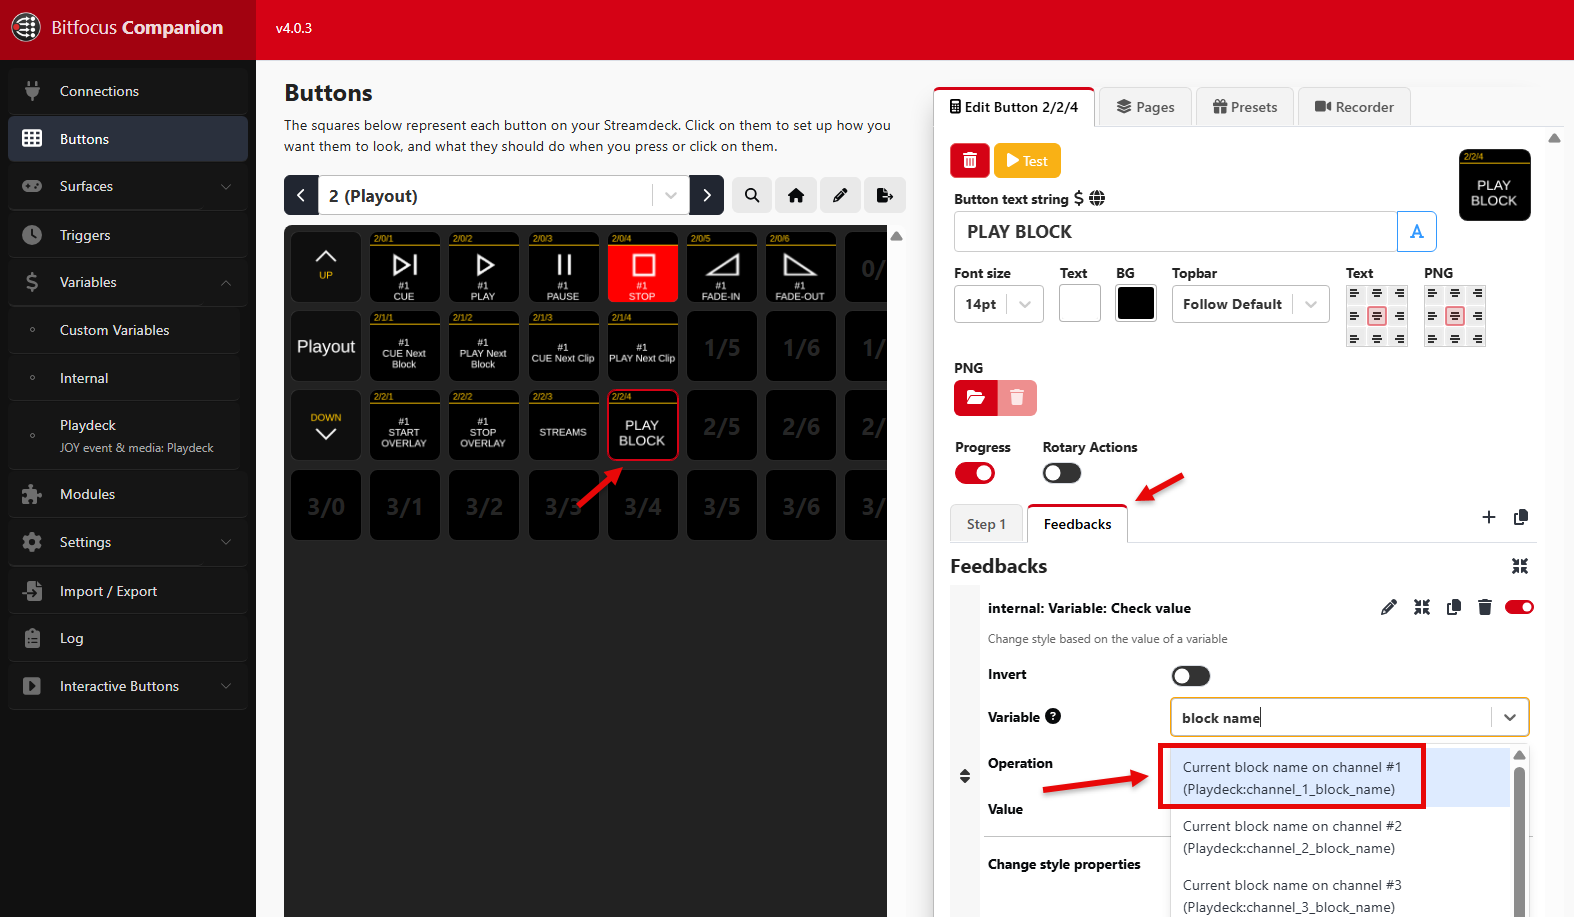
6. We then add TEXT as new STYLE PROPERTY, since our intention is to show the remaining Block Time:
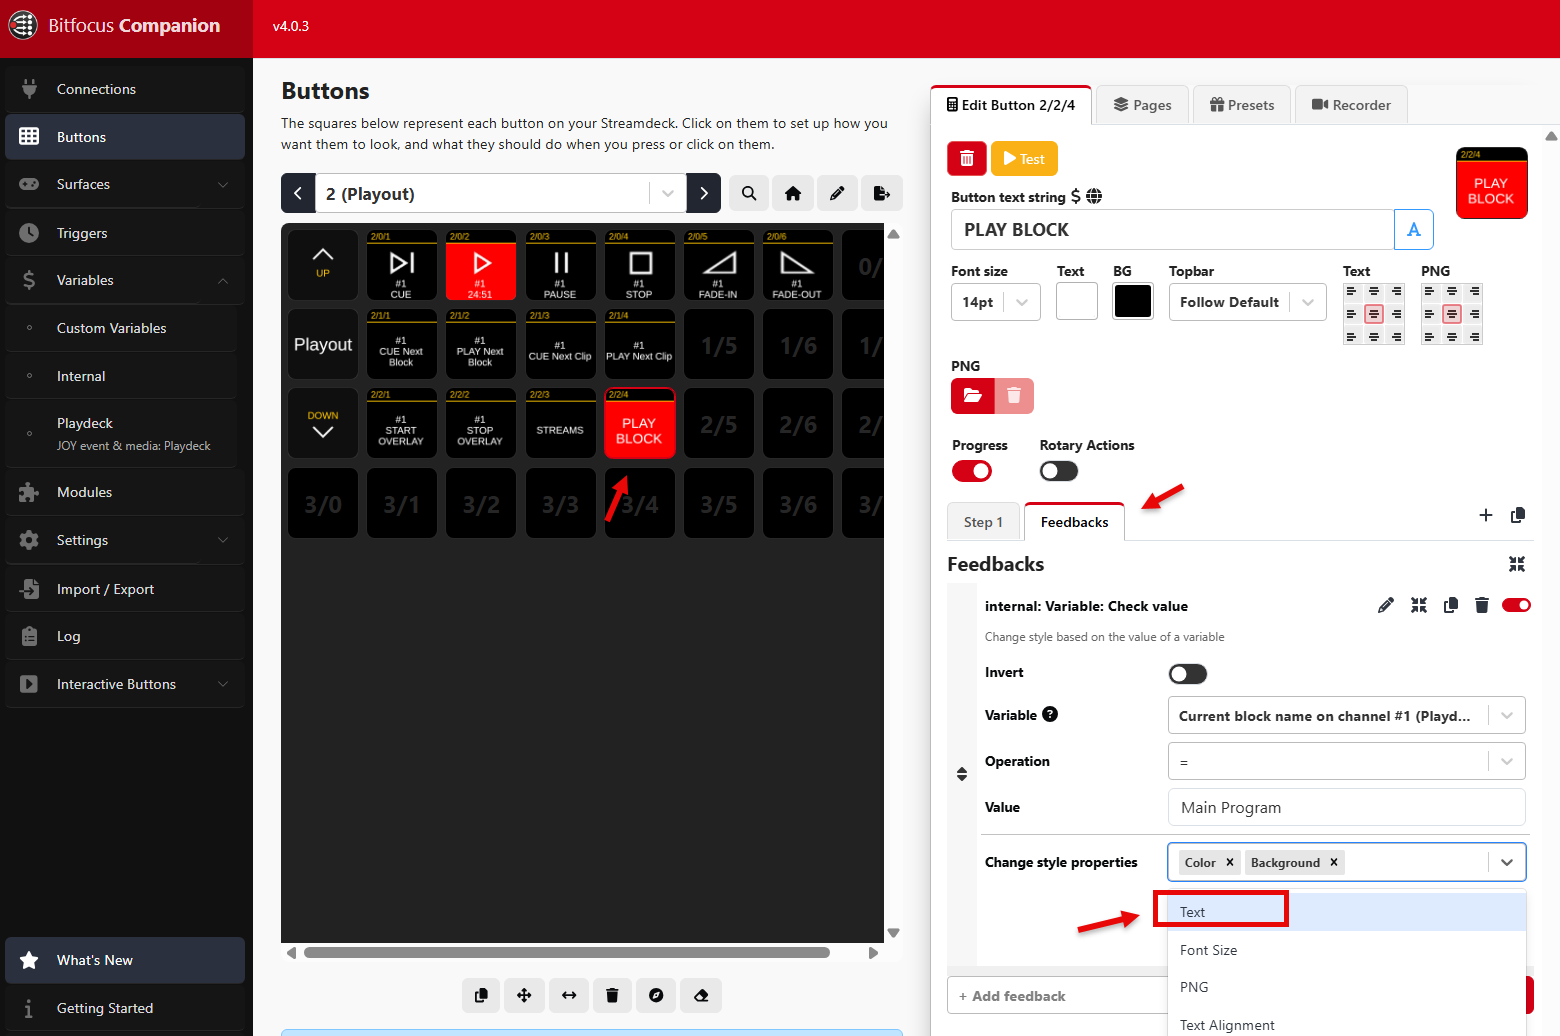
7. Add “$(Playdeck:channel_1_block_remain)” as BUTTON TEXT STRING, and our Button is finished:
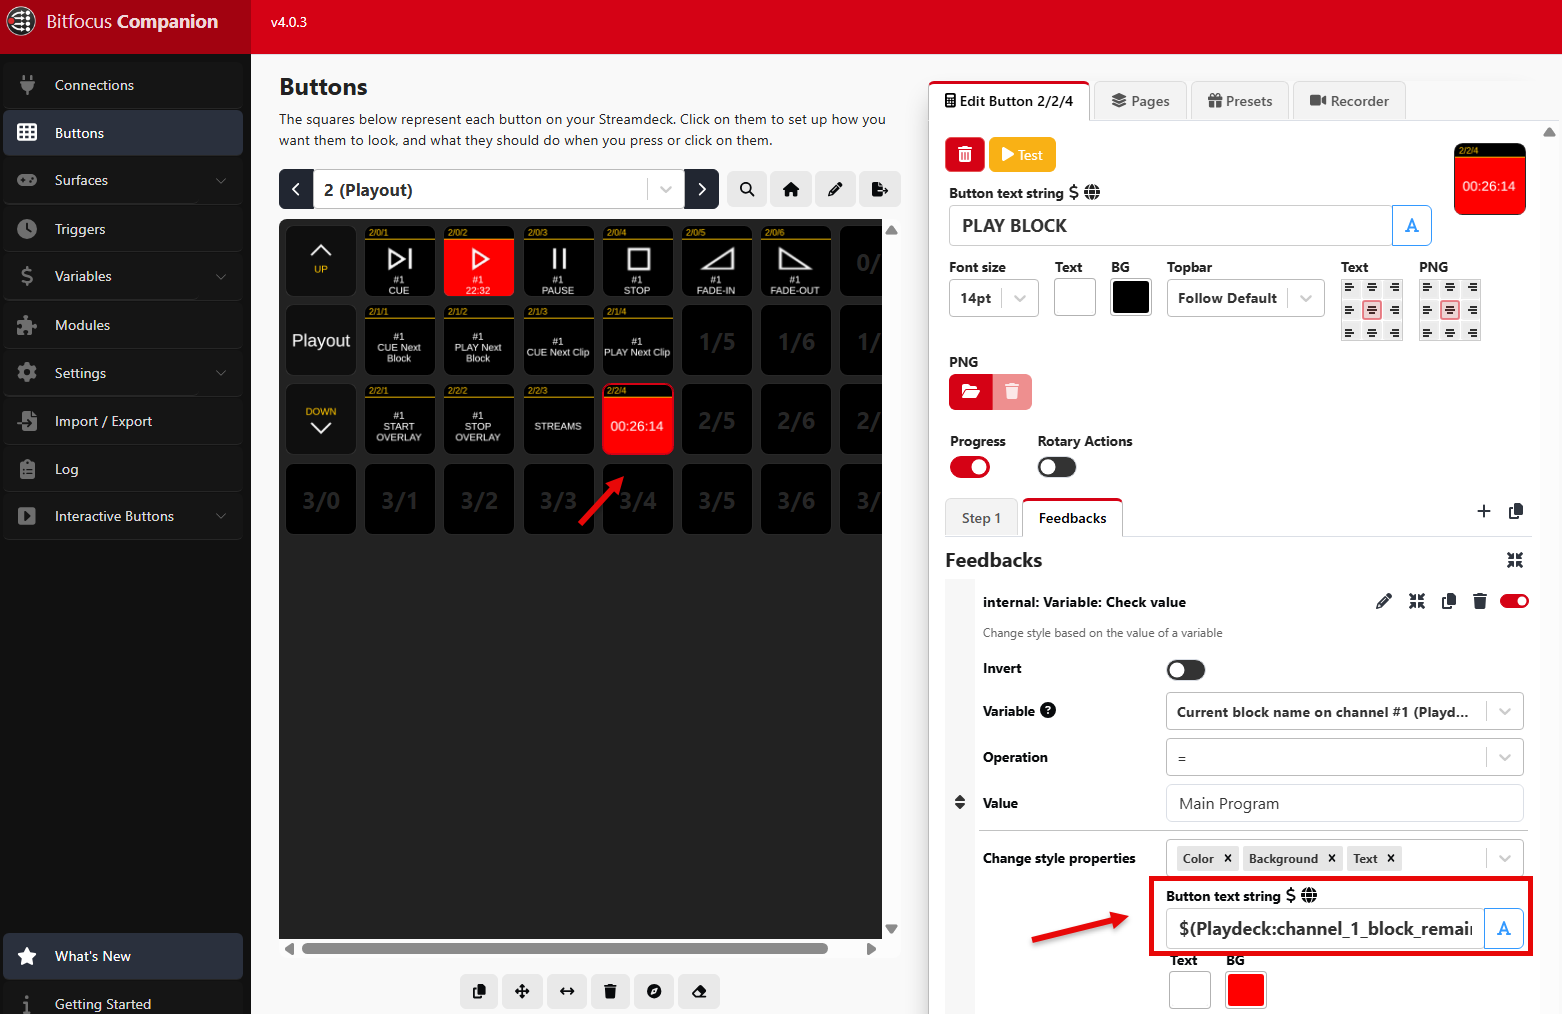
8. But how did we receive our BUTTON TEXT STRING? Companion will show you all available VARIABLES you can use in PLAYDECK. You can then click the small COPY ICON to transport the Variable to your Buttons:
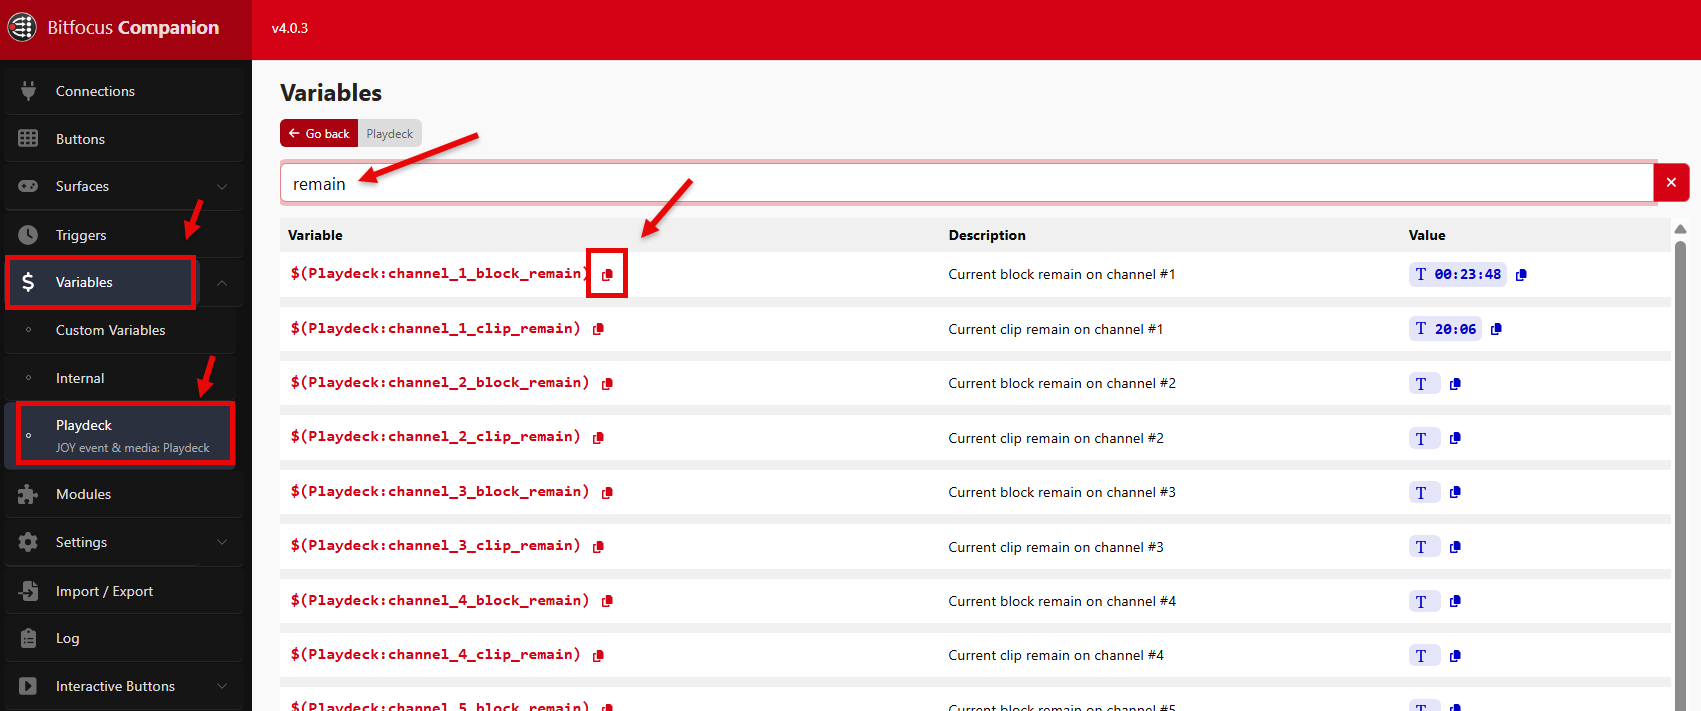
Using Commands for Playout Control
This article will show how to use Commands to control your Playout.
In this article:
→ Example: CUE+PLAY multiple Channel
→ List of all Commands and where to add them
→ Send Commands from other Apps
Example: CUE+PLAY multiple Channel
We want to create an Action Button, which will CUE several Output Channel and PLAY them simultaneously (almost synced).
Create a new Action Button by clicking on it and select COMMANDS, then EDIT COMMANDS:
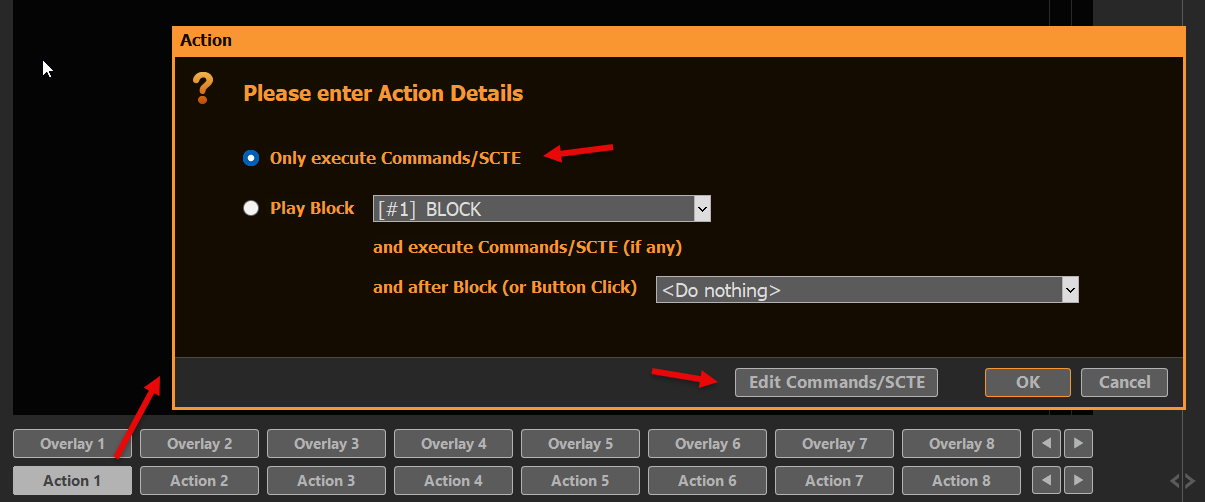
Add this Line under “COMMANDS – Internal”:
<cue|1|1><cue|2|1><wait|1000><play|1|1><play|2|1>
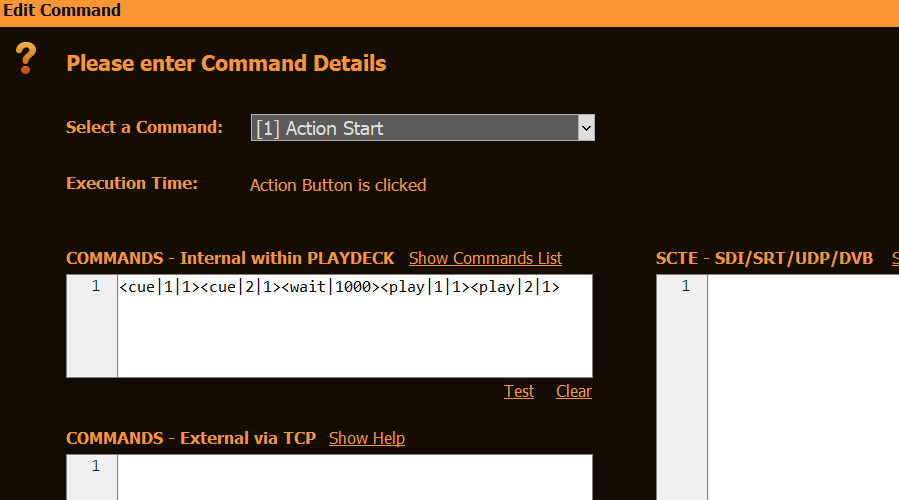
This will CUE Channel 1 and 2 (1st Clip 1st Block), then wait 1000ms (for caching), then PLAY both Channel.
List of all Commands and where to add them
The List of all Commands can be quickly opened over PLAYDECK’s Main Menu:
Commands can be added to:
- Action Buttons (Start, End)
- Overlay Button (Start, End)
- Clips (Any Time)
- Blocks (Start, End)
Mostly via this Icon:

Send Commands from other Apps
We have a separate article on how to control PLAYDECK with Companion.
But what, if it is not Companion, but a different 3rd party App? First, you would need to enable TCP Commands. This will open PLAYDECK up to receive and execute Commands from external sources:
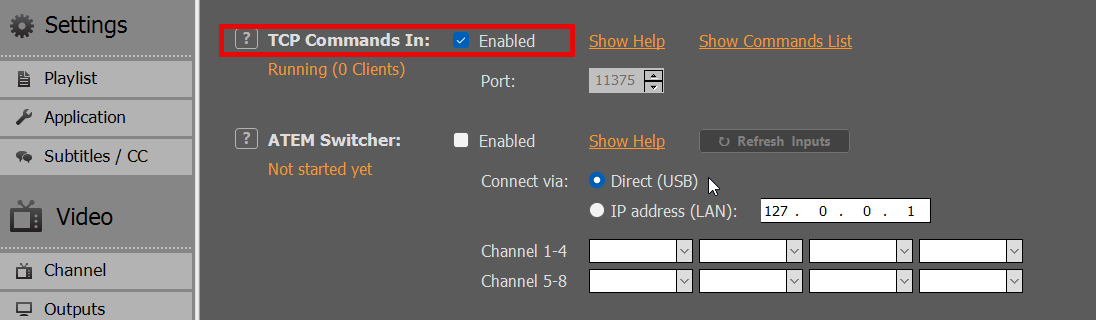
In your 3rd party app, connect to PLAYDECK via TCP and send one or multiple Commands. In this Sample we use Hercules to send a Command, which will start Streams 1 and 2:
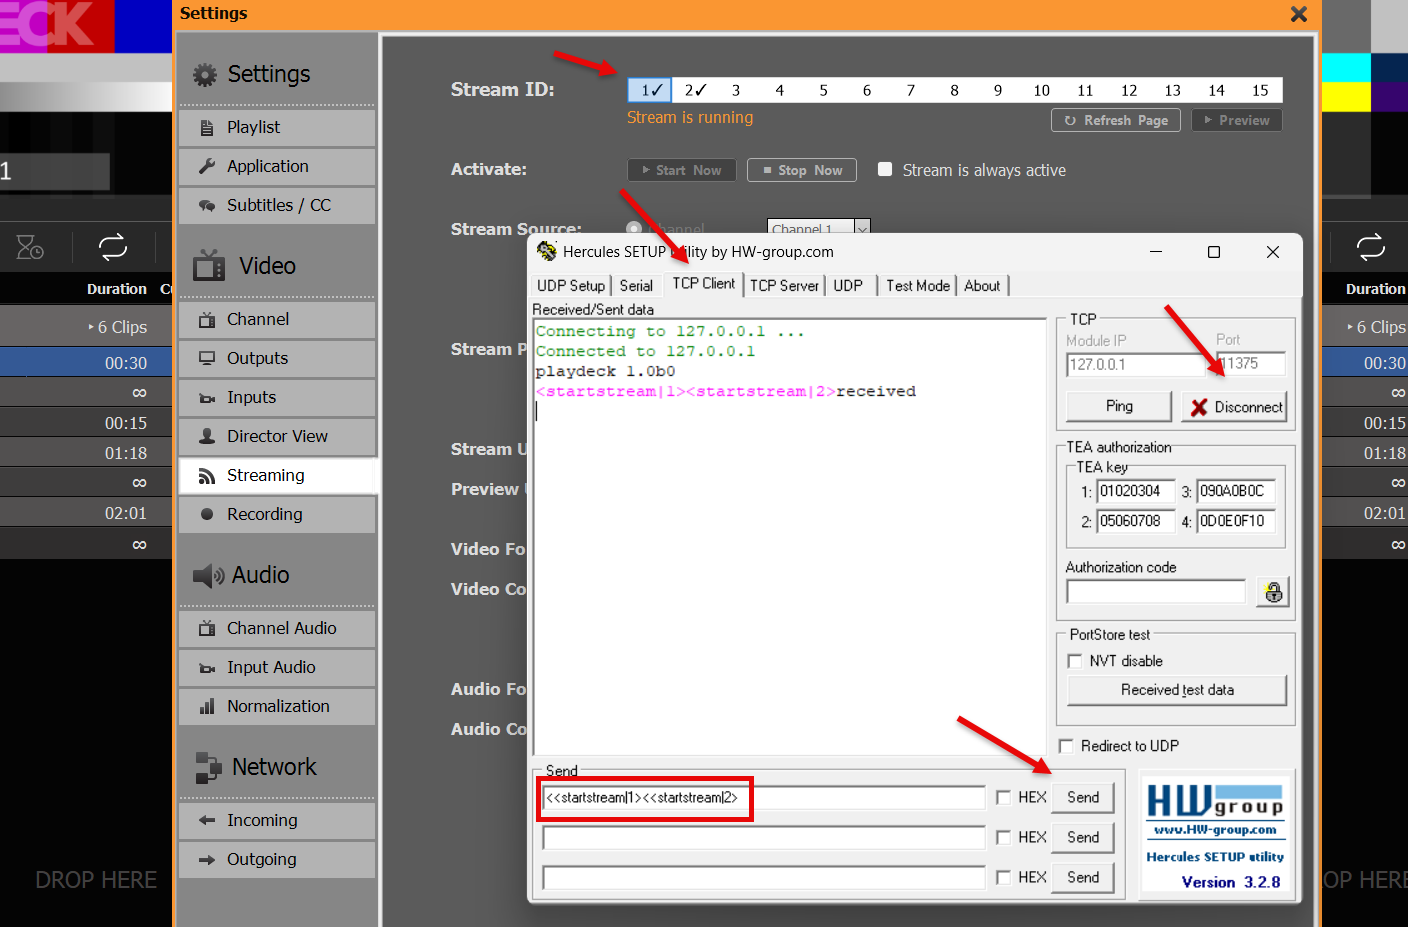
Video from/to OBS Studio
The best way to connect OBS with PLAYDECK (both ways) is NDI. Multichannel Audio is also fully supported.
Since OBS does does not deliver NDI out of the box, you need to install an additional PlugIn, which is a quick and easy process. Download the PlugIn here (scroll down and click on “distroav-6.0.0-windows-x64-Installer.exe”). It is installed like any other Windows application via Installer.
Send Video from OBS to PLAYDECK
The NDI PlugIn inserts a new Option into the Tools Menu. Pick NDI Output and activate it:
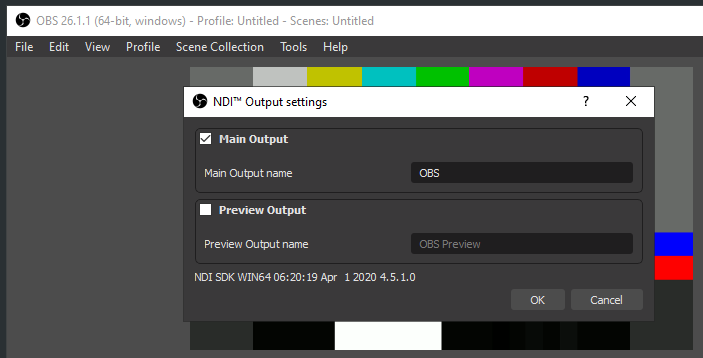
Send Video from PLAYDECK to OBS
Activate NDI Output in PLAYDECK. The OBS NDI PlugIn inserts a new NDI Source, which you can add to your OBS Scene like this:
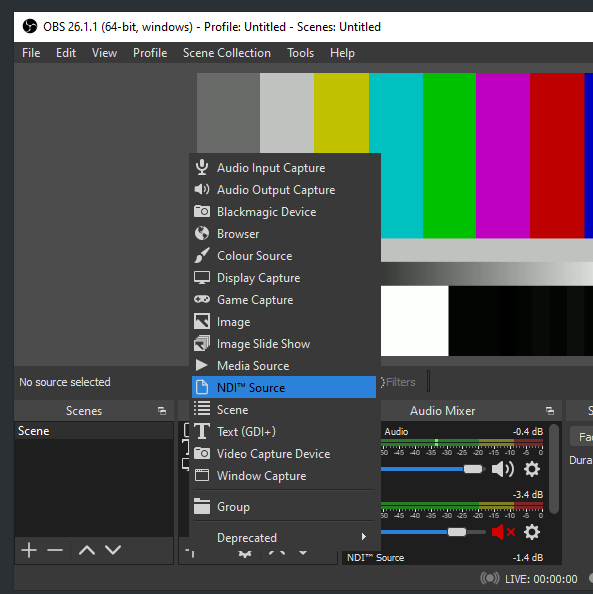

Video from/to vMix
The best way to connect vMix with PLAYDECK (both ways) is NDI. Multichannel Audio is also fully supported as well as Keying.
Send Video from vMix to PLAYDECK
You only need to activate NDI as External Output like this:


Send Video from PLAYDECK to vMix
Activate NDI Output in PLAYDECK and add the NDI as new Source in vMix like this:
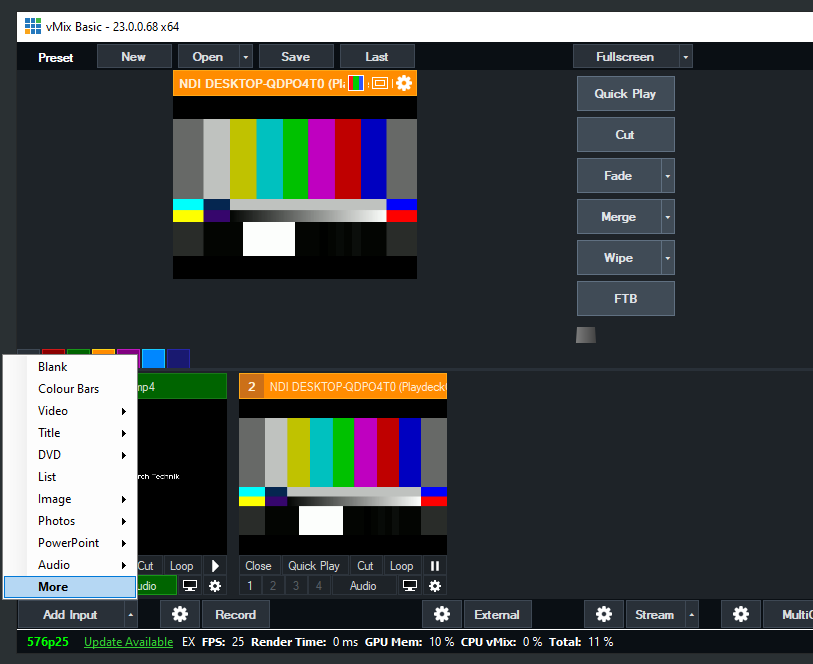
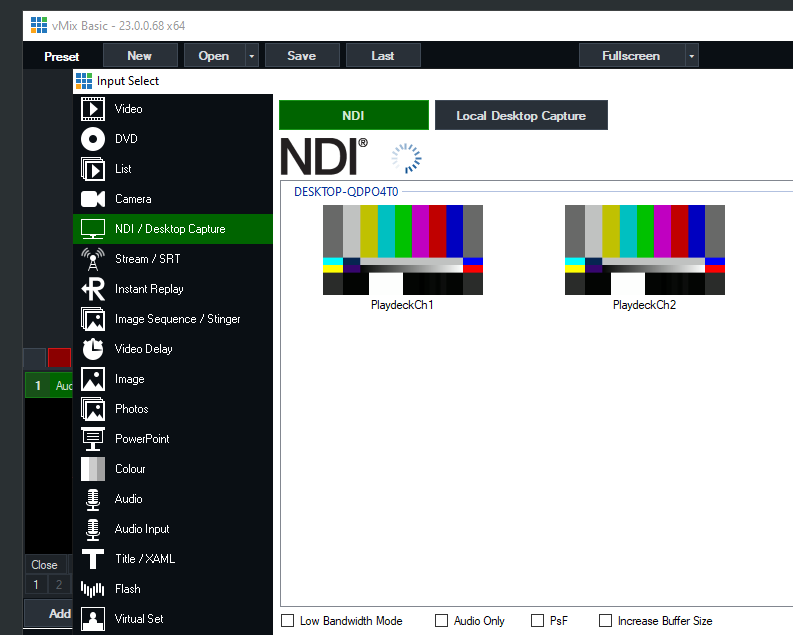
Send Fill Signal with Alpha Channel from PLAYDECK to vMix
Activate NDI Output in PLAYDECK, but this time also activate Keying:
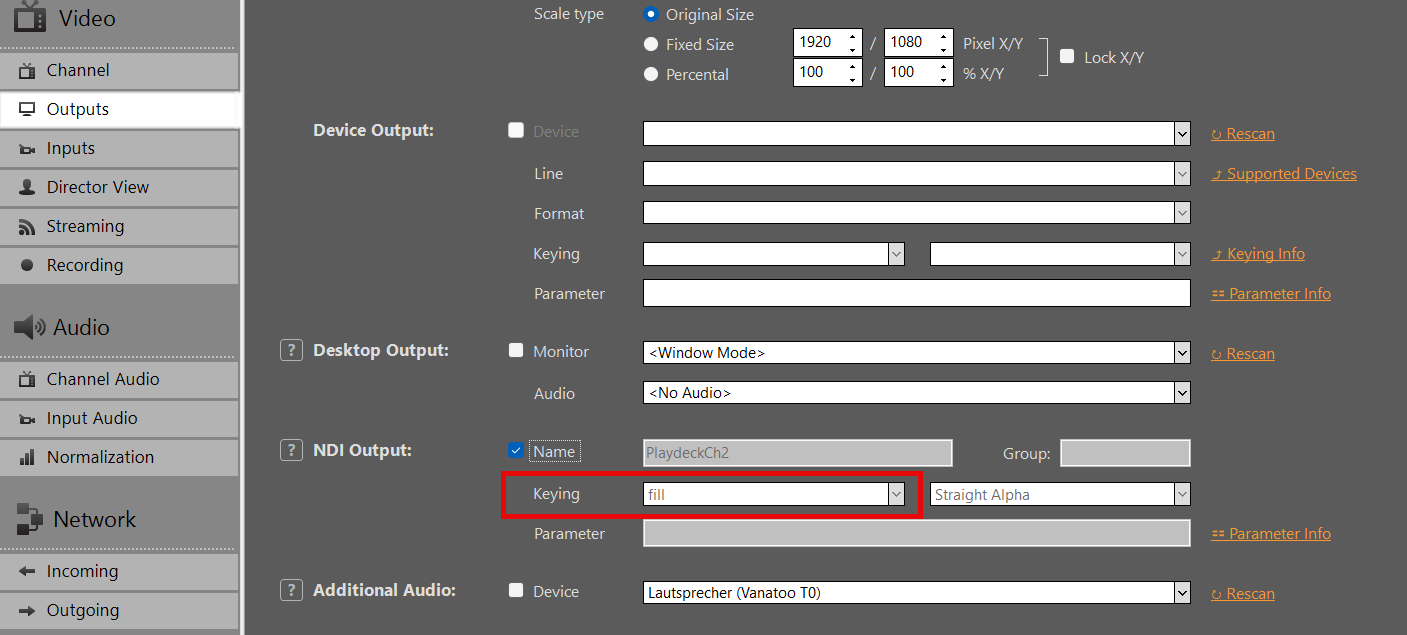
Add your NDI as Input in vMIX:
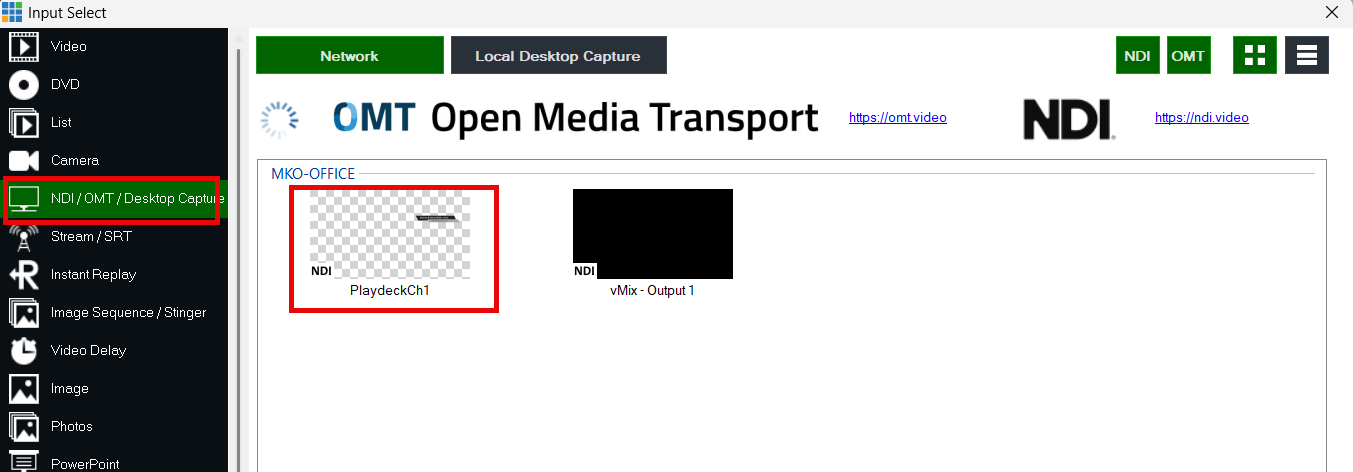
Use the Overlay Buttons to place the Video ontop of the current Video signal in vMIX:
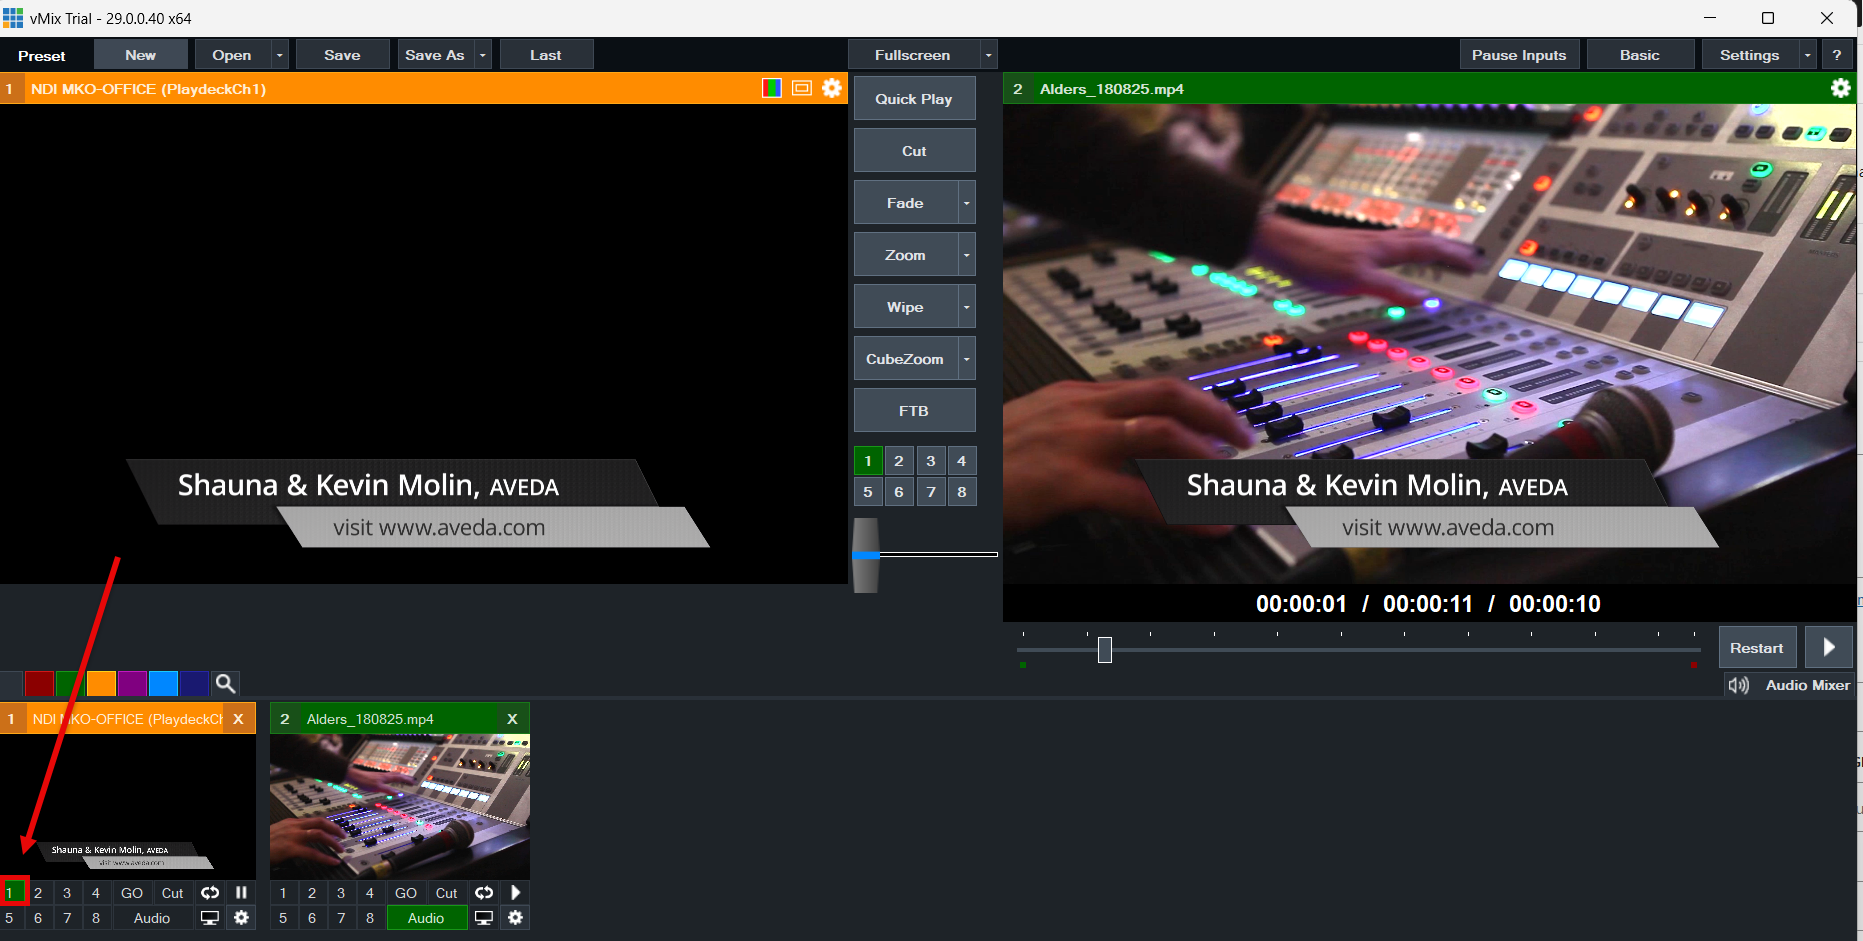
Amazon EC2 Installation
PLAYDECK supports most Amazon EC2 server instances and the NVidia GPU Power they provide. This allows you to setup a cloud based infrastructure for NDI transport or other purposes.
We assume, you have a Amazon AWS Account and basic knowledge of EC2.
First, you pick a new EC2 instance, which supports a PLAYDECK installation:
Windows Server with a virtual NVIDIA GPU and pre-installed NVIDIA driver:
https://docs.aws.amazon.com/AWSEC2/latest/UserGuide/install-nvidia-driver.html#preinstalled-nvidia-driver
A typical instance would be “Windows 2019 / g4dn.xlarge” – It has a Tesla virtual NVIDIA GPU and good enough Specs to run PLAYDECK: 16 vCPUs (Intel Xeon), 64GB RAM, 1 vGPU (NVidia T4) with 16GB GPU RAM.
Now install the Instance via those Links or your EC2 Management Console.
To connect to the instance via RDP you first have to open Port 3389 in the Instance Security Settings.
Once connected, you find yourself unable to download anything via the Browser. Therefore enable Downloads like this: START Menu > Server Manager > Local Server > IE Enhanced Security Configuration > Off
Now download and install PLAYDECK as usual:
https://playdeck.tv/download/
PLAYDECK API
The PLAYDECK API is a construct to allow anyone to interface with PLAYDECK. This article will show how to get started developing with the API:
In this article:
→ Introduction
→ Examples
→ Implement the API
Introduction
The PLAYDECK API is bi-directional: You receive the Playout Status, but you can also send Commands to PLAYDECK.
The API is based on WebSockets: They are a part of JavaScript, so you can develop in JavaScript, or NodeJS, or TypeScript. The WebSocket Port is fixed to 11411 and is always enabled in PLAYDECK.
We decided to go with WebSockets, because:
- It supports both directions: From and To PLAYDECK
- No Installation required: Use any Text-Editor
- No specific Network Security required
- Easy to build own User Interface or Animation with HTML
What can be send to PLAYDECK?
- CUE or play Blocks or Clips, Overlays or Actions
- Start/Stop video assets like Streams
What can be received from PLAYDECK?
- Events (e.g. a Block or Clip has started)
- Playout Status (e.g. What is playing and the remaining Block Time)
- Content (e.g. complete Playlist with Blocks and Clips)
Examples
1) Companion
PLAYDECK API is being used by bitfocus Companion in the PLAYDECK module. This gives you a quick touch+feel about what the API is capable of:
https://playdeck.tv/howto/companion/
2) Director View
The API is also used by the Director View, which is part of PLAYDECK. You can find the HTML Templates here:
c:\Users\Public\Documents\JoyEventMedia\Playdeck\HTML-Templates\Director-View
3) HTML Overlays
The API is also used by some HTML Overview Examples, which you can find here:
c:\Users\Public\Documents\JoyEventMedia\Playdeck\HTML-Templates\Overlay-Templates
Implement the API
We prepared some examples for you to quickly review a working script. Please check them in order, as they build up on each other.
Tip 1: You can double click any HTML File to open in the Browser to start the Script/API
Tip 2: You can edit the File “WebSocketSDK\Version.js” to change the IP Address
1) Native Connection (Without the API)
Let’s start with something very minimalistic:
c:\Users\Public\Documents\JoyEventMedia\Playdeck\HTML-Templates\Automation-And-UI\SampleMinimalistic.html
This will open the WebSocket to PLAYDECK with native JavaScript Code and send a Command to PLAY the first Clip in the first Block.
Another Example is this, where you can click Buttons in HTML to start Playout in PLAYDECK:
c:\Users\Public\Documents\JoyEventMedia\Playdeck\HTML-Templates\Automation-And-UI\SampleUserInterface.html
2) Minimalistic Connection (WITH API)
This example will introduce the API:
c:\Users\Public\Documents\JoyEventMedia\Playdeck\HTML-Templates\Automation-And-UI\SampleMinimalisticSDK.html
It uses the Subfolder “WebSocketAPI” and includes its MAIN SCRIPT “AppInterface.js”, which is kind of the “Loader” for the whole API.
The API will now take care of your WebSocket Connection to PLAYDECK, so you don’t have to code this manually. The API also exposes a Template Framework to JavaScript. The Template name is derived from the Filename, so it needs to match. There are several pre-defined functions available. For this example we only use “Start”: This function will be called by the API, once the WebSocket Connection to PLAYDECK has been established successfully. In this example it will PLAY the first Clip of Channel 1.
3) More Framework Functions
Besides “Start” there are many more Framework Functions available:
c:\Users\Public\Documents\JoyEventMedia\Playdeck\HTML-Templates\Automation-And-UI\SamplePlayRandomClip.html
Please see the comments in the JS File for all available Functions.
If you open the Browser Console (typically with F12) you can see the Feedback of the “console.log” instructions.
4) Parse Project Data
To access all Clips the function “DataProject” is available and this example show how to enumerate the Project Data:
c:\Users\Public\Documents\JoyEventMedia\Playdeck\HTML-Templates\Automation-And-UI\SampleShowPlaylist.html
5) Custom Schedule Sample
The last example shows a full working and complete Script for a Custom Scheduling outside of PLAYDECK:
c:\Users\Public\Documents\JoyEventMedia\Playdeck\HTML-Templates\Automation-And-UI\SampleWeeklySchedule.html
License & Support
PLAYDECK License Options
Simple, Flexible & Transparent:
PLAYDECK is available in three editions and multiple license models to fit your production needs. All prices exclude VAT and can be processed in your preferred currency via our global shop. Choose the plan that matches your independent playout channels and workflow requirements.
→ PLAYDECK Editions
→ Choose Your License Model
→ Free Trial Edition (incl. Limitations)
→ License Activation
→ Support Options
→ License Portability & Backup
→ Special Conditions & Discounts
→ Upgrades, Downgrades & Cancellations
→ Dongle Details
→ Reseller Conditions
PLAYDECK Editions
We offer three editions tailored to your production scale, primarily differing in the number of independent main playout channels you can control simultaneously:
- LITE: 1 independent playout channel – €190.80 per year (≈ €15.90/month, save €132 vs. monthly billing)
- PLUS: 2 independent playout channels – €430.80 per year (≈ €35.90/month, save €288 vs. monthly billing)
- STUDIO: 8 independent playout channels – €994.80 per year (≈ €82.90/month, save €684 vs. monthly billing)
All editions share the same powerful, rock-solid core: native support for virtually every codec and container format, low-latency GPU decoding, professional hardware I/O (SDI/HDMI via Blackmagic, AJA, Deltacast), IP streaming (NDI®, SRT, RTMP), graphics overlays, and automated failsafes.
For a full, detailed feature comparison chart (audio channel routing, recording channels, advanced scheduling, etc.), visit our official Plans & Pricing page: https://playdeck.tv/plans-pricing/
Choose Your License Model
PLAYDECK offers flexible licensing to match different workflows:
Online Shop License (most popular): Tied to your email in a personal License Pool. Requires internet for transfers/check-in/out. Easy portability.
USB Dongle License: Hardware-based (USB stick). No internet needed for daily use/activation. Portable by moving the dongle.
Offline License (special cases): Permanently bound to one specific PC (System ID). No internet ever required. Not portable without re-issuance.
Free Trial Edition (incl. Limitations)
Download and test PLAYDECK completely free—no time limit, no credit card required. Switch editions instantly inside the software via Menu → License → Change Trial Edition.
Limitations:
— Watermark on all video outputs.
— Occasional random short audio mutes (clearly signaled on screen).
All other production features are fully unlocked—ideal for comprehensive real-world testing of your local or cloud setup before purchase.
License Activation
Activation is quick and simple. Access our detailed activation guide here: https://playdeck.tv/activate-license/
Quick Steps:
— Shop / Online Pool: Open the License Manager inside PLAYDECK, log in with your purchase email, and instantly check out your seat from your personal pool.
— Dongle: Simply plug the physical USB security key into the machine—the software auto-detects the license immediately.
— Offline: Paste the machine-bound activation key provided by our support desk into the License Manager.
Support Options
[email protected] – available nearly 24/7, even for trial users or pre-purchase questions.
No forced onboarding. PLAYDECK is built to run easily out-of-the-box. If needed (rare), we can remote-connect via RustDesk to fix issues fast.
License Portability & Backup
PLAYDECK commercial licenses are highly flexible and designed to move seamlessly between production systems:
| License Type | How to Transfer | Internet Required for Move? | Lost / Crash Handling |
|---|---|---|---|
| Shop License (Pool) | Check-in/out via internal License Manager (tied to email) | Yes | Free instant pool reset—simply email our desk. |
| Dongle License | Unplug and connect the physical USB stick to the new computer | No | Hardware replacement options available upon verification. |
| Offline License | Bound to one PC—email your new System ID for secure re-issuance | No | System ID re-issue possible for hardware upgrades. |
Perfect for freelancers, technical rental fleets, and dynamic multi-PC staging environments.
Detailed guide for transfering: https://playdeck.tv/move-license/
Detailed guide for recovery: https://playdeck.tv/recover-license/
Special Conditions & Discounts
- NGO / Educational / Non-Profit: 25% discount on all licenses (any edition/duration). Email [email protected] with proof (e.g., official email/certificate) → we send discount code or invoice.
- Multi-Year Pre-Pay: Up to 5 years with 25% discount on total. Contact support for quote.
- No Lifetime License: We release regular updates for driver/OS/codec compatibility and third-party fees. Lifetime would mean missing critical improvements.
If you like to purchase a larger number of licenses, we can discuss special options – please contact us.
Upgrades, Downgrades & Cancellations
Upgrades & Downgrades: Possible at any time. We issue a pro-rata refund or store credit for your remaining license runtime, allowing you to seamlessly purchase your new tier. Due to automated shop infrastructure, direct mid-term upgrades cannot be processed automatically.
Cancellations: Cancel your subscription at any time via your user account at playdeck.tv or by emailing [email protected]. You will retain full commercial access until the exact end of your current paid billing period. No cancellation penalties apply.
Dongle Details
Dongle licenses share the exact same pricing structure as our annual online plans (minimum 1-year duration required). Extensions and renewals are processed remotely via network updates—no new hardware shipping is required for renewals.
One-Time Hardware Fee: €15 for the rugged USB security key (plus standard local shipping and handling costs).
Key Operational Advantages:
— 100% Air-Gapped Security: Completely offline activation and continuous validation. No internet connection is ever required for daily deployment.
— Instant Physical Portability: Move your license between production rigs instantly by simply plugging the USB key into the active machine.
Financial Example: A PLAYDECK Plus Dongle costs €430.80 per year plus a one-time €15 hardware fee.
Reseller Conditions
Interested in reselling PLAYDECK in your region or integrating it into your media staging catalog? We welcome international B2B partners and keep our referral process straightforward:
— Full authorization to market, promote, and sell PLAYDECK via your digital platforms.
— 25% standard commission per referred sales transaction (processed via custom customer discount codes or direct payout architecture).
— Fast commission claims backed by simple verification of prior customer interaction (e.g., email trail copy).
— Access our unified digital asset deployment kit containing official logos, brand typography, and promotional banners: Download deployment kit.
Email [email protected] to launch your partnership—we keep our partner onboarding highly efficient.
Activate your License
This article will show how to activate your License and remove the Watermark from the TRIAL Edition.
If you already have activated your License and want to know how to MOVE the License to another System, please see this article.
There is no separate “Full Version” Download, you simply transform your TRIAL Edition into a LITE, PLUS or STUDIO Edition. Always download and install the latest Version of PLAYDECK, since we publish regular updates:
https://playdeck.tv/download/
In this article:
→ Shop License
→ Dongle License
→ Offline License
→ Backup License
Shop License
All your Shop Licenses, that you purchased via playdeck.tv, will be stored in your personal Online License Pool. This helps you organize multiple Licenses.
To transfer your license from the Online License Pool to your System, go into your License Manager:
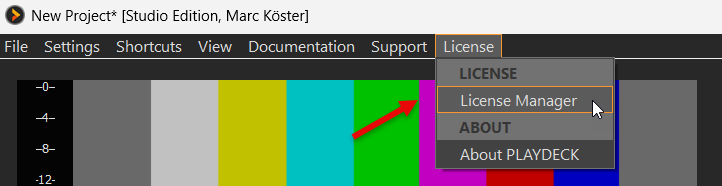
Now login to your PLAYDECK ACCOUNT. Use the email address and password, which you used during CHECKOUT in the SHOP. Use the FORGOT PASSWORD button, if you need to reset your password:
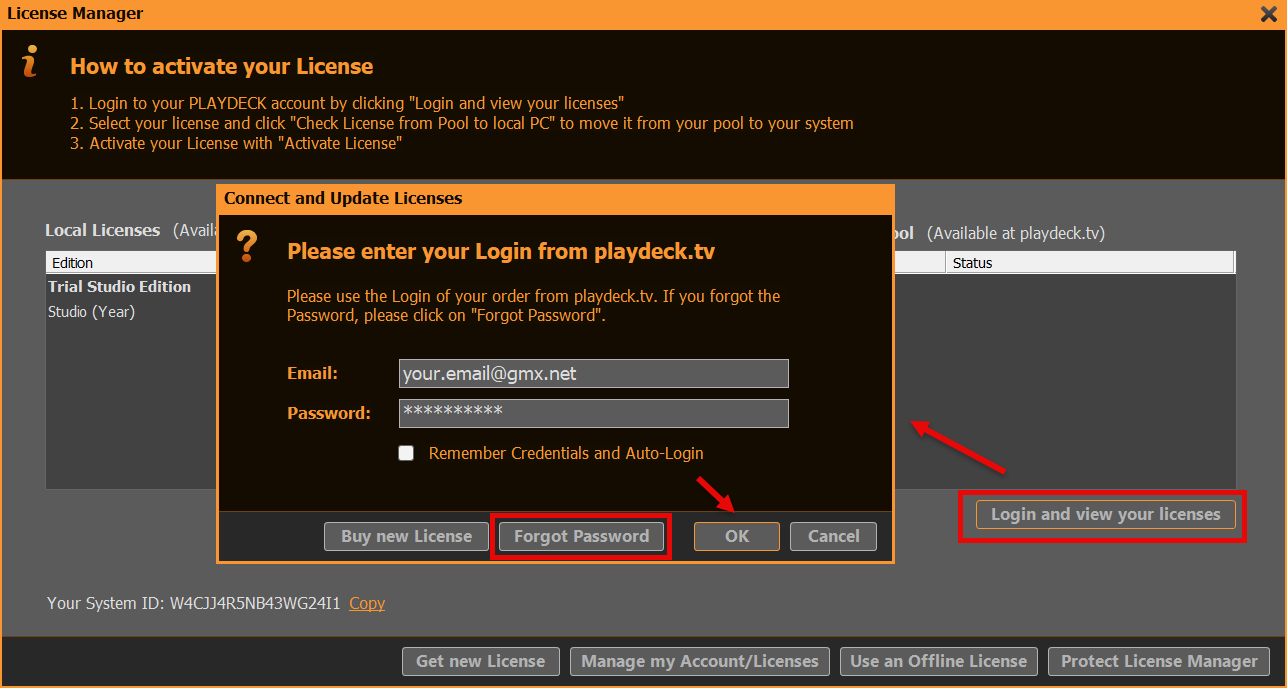
We can now move the License from you RIGHT Side to the LEFT Side with a Button Click (CHECK LICENSE FROM POOL TO LOCAL PC). This means, that the License becomes UNAVAILABLE to other Systems and becomes AVAILABLE on THIS System. PLAYDECK will now offer to activate the License and restart:
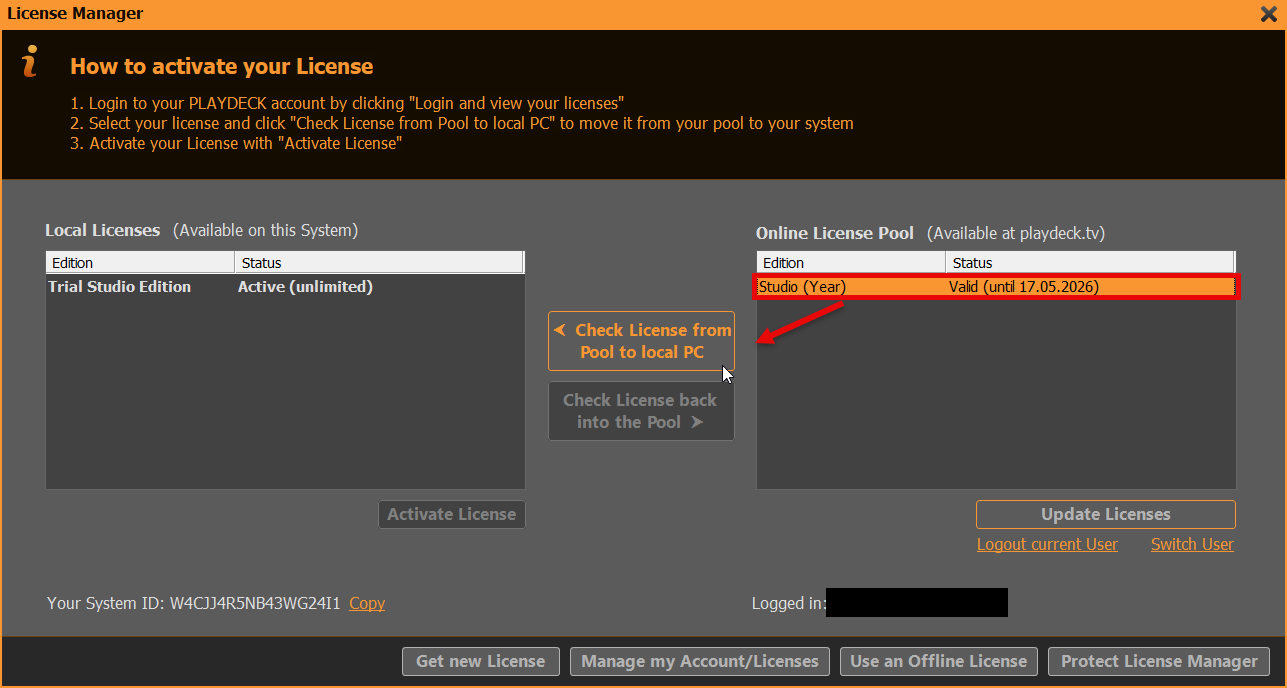
Dongle License
Simply attach the USB Dongle to the PC, then start PLAYDECK on that PC. Please note, that if you detach the Dongle while PLAYDECK is still running, PLAYDECK will close immediately and without prior notice. It is recommended to close PLAYDECK regularly to ensure, that all Data is saved properly.
Offline License
The Offline License is bound to the PLAYDECK System ID and can NOT be moved to another System by the Customer. To activate your Offline License, open the License Manager:
Then click on USE AN OFFLINE LICENSE and copy and paste the Offline License Code into the text field and click OK. PLAYDECK will now offer to activate the License and restart:
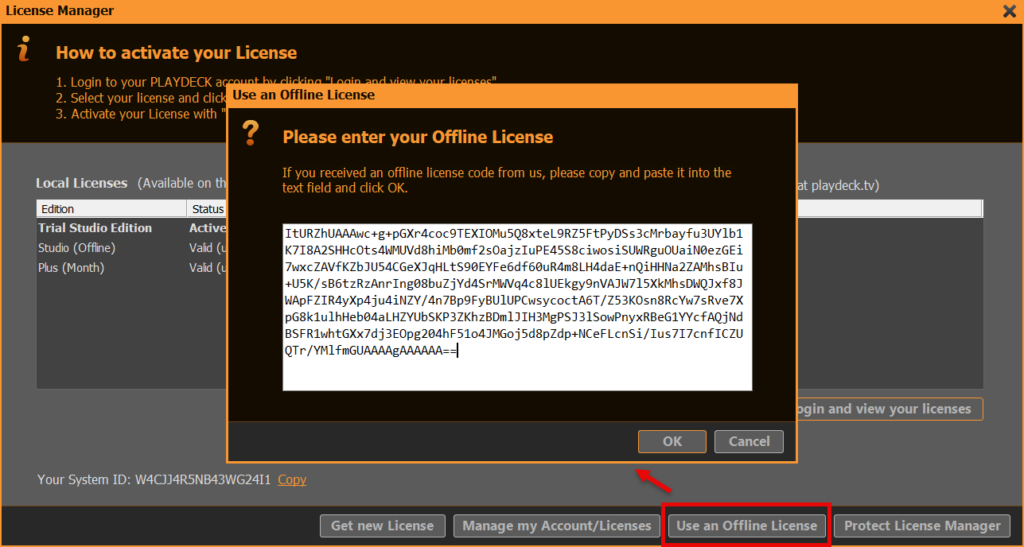
Backup License
We have a separate article on how to use the Backup License.
Free Backup License
This article will show how to use the Free Backup License, which comes with every PLAYDECK License. The Backup License functions as follows:
- Can be used with ANY PLAYDECK License (Dongle, Shop, Offline)
- Can be used on ANY PLAYDECK-PC in the same network
- Multiple Clients are supported
- 24/7 operation is NOT supported (max 24h per session)
1. Setup
On your MAIN System (the one WITH the License), you don’t have to do anything: The BACKUP LICENSE SYSTEM is enabled by default. It will use the WebSocket Port 11411, so make sure this Port is not blocked:
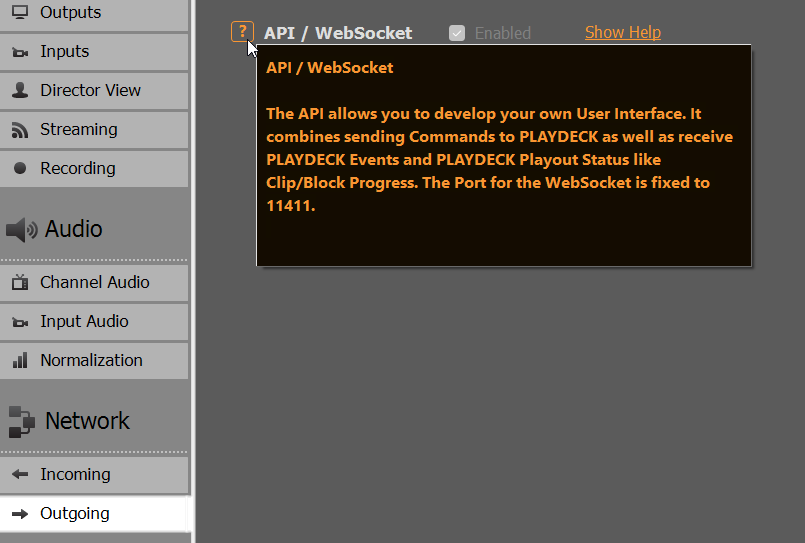
On the CLIENT System (the one WITHOUT the License), you perform a regular PLAYDECK installation, nothing special here: PLAYDECK will not start in TRIAL MODE with the watermark:
Now we need to tell CLIENT PLAYDECK, where to find the MAIN PLAYDECK, by providing the IP address of MAIN. To receive the IP address of your MAIN, you can simply open the ABOUT BOX in PLAYDECK (Main Menu > License > About):
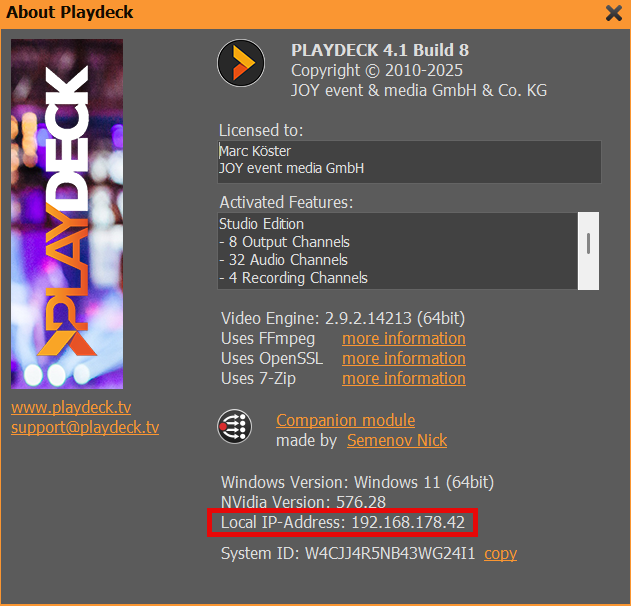
On your CLIENT, go to Application Settings, enter the IP address of MAIN PLAYDECK and click TEST IP NOW. The CLIENT now tests the Network connection and searches for a valid License on MAIN. If you don’t see the following INFO POPUP, please check your MAIN License and your Network connection between MAIN and CLIENT:
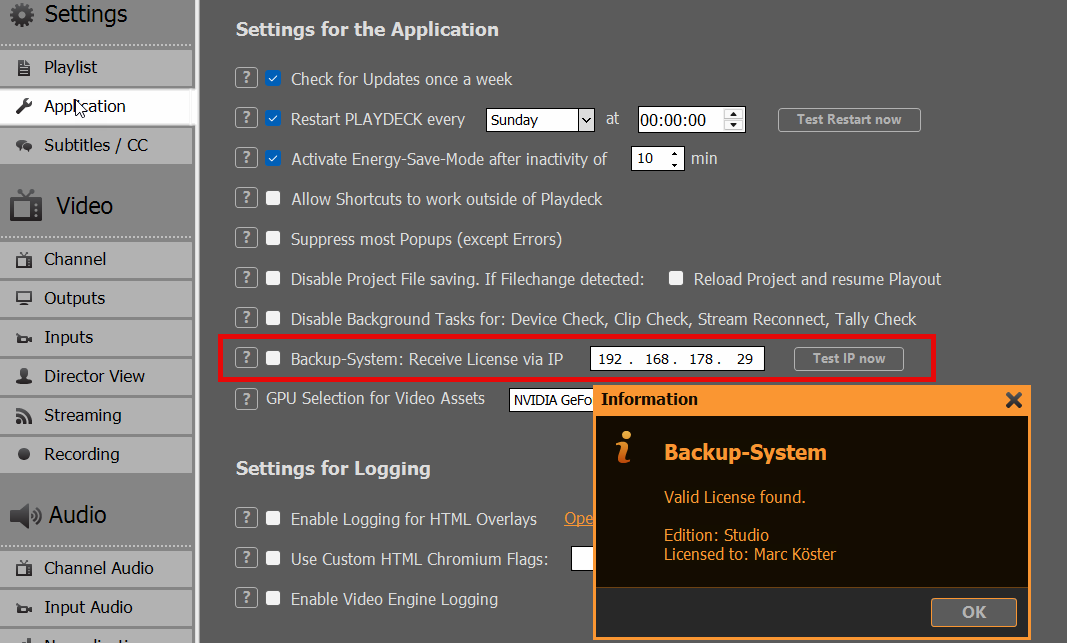
You can now enable the feature by clicking BACKUP-SYSTEM. PLAYDECK will restart now with the exact same License of MAIN. You can verify, the CLIENT is using the Backup License correctly in several Displays:
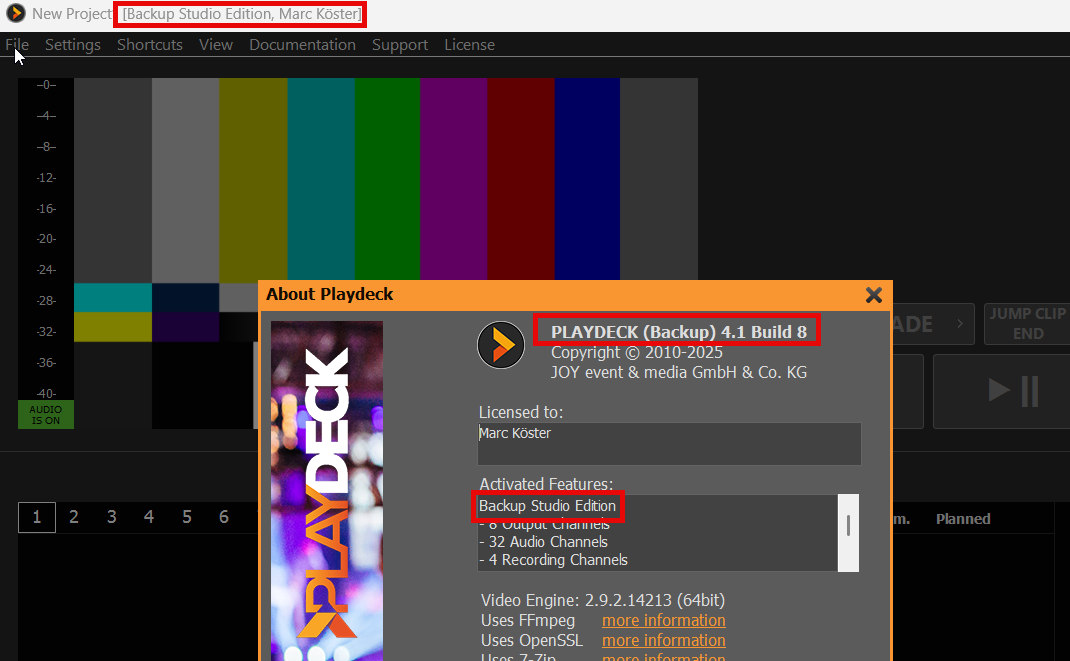
Note: If the CLIENT has a valid License itself, the License of MAIN will NOT be used.
2. Rules of Backup-License
The Backup-License is not meant for 24/7 operation, but to provide a fail-safe for immediate operation, e.g. in a live production, and without the need to buy a secondary license, just to have a backup system for some use cases.
For unattended 24/7 operation, you would need to purchase a secondary license. Please contact use at [email protected], if your next License is for Backup only, and we will provide you with a appropriate discount.
The MAXIMUM RUNTIME of your BACKUP LICENSE will be:
– 2 hours, if the MAIN gets disconnected or closed
– 24 hours, if then MAIN stays online
PALYDECK will terminate the CLIENT without prior warning. So please make sure, to bring the MAIN back online within the 2 hour window, or to restart both MAIN and CLIENT within the 24 hour window.
You can control the remaining RUNTIME in the Settings of the CLIENT:
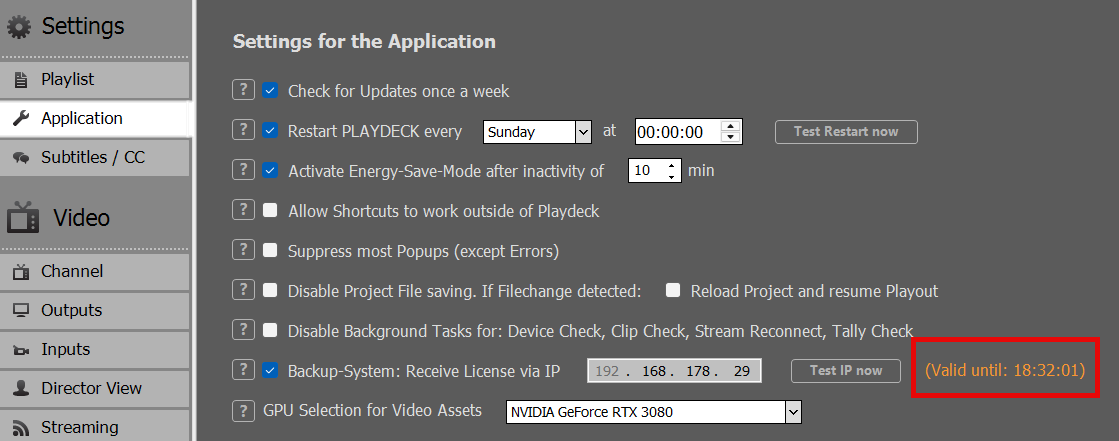
Move License to another PC
This article will show how to move your License from one System to another System.
In this article:
→ Shop License
→ USB Dongle License
→ Offline License
→ Backup License
Shop License
You can move your License via a simple Check-In/Out System. On the System with the active License, go into your License Manager:
First, we want to deactivate the current License: Select the TRIAL Edition and click ACTIVATE, then confirm the restart query:
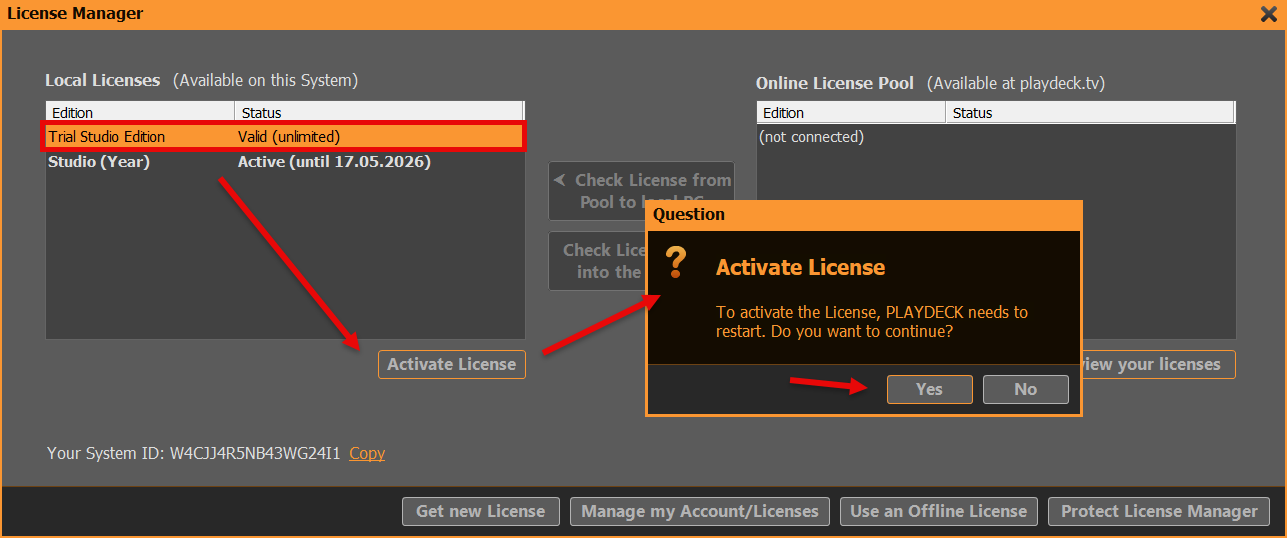
After restarting PLAYDECK, we can now move the freed License back to your Online License Pool. Re-open the License Manager. Now login to your PLAYDECK ACCOUNT. Use the email address and password, which you used during CHECKOUT in the SHOP. Use the FORGOT PASSWORD button, if you need to reset your password:
We can now move the License from you LEFT Side to the RIGHT Side with a Button Click (CHECK LICENSE BACK INTO THE POOL). This means, that the License becomes UNAVAILABLE on the current System and becomes AVAILABLE on ANY other System:
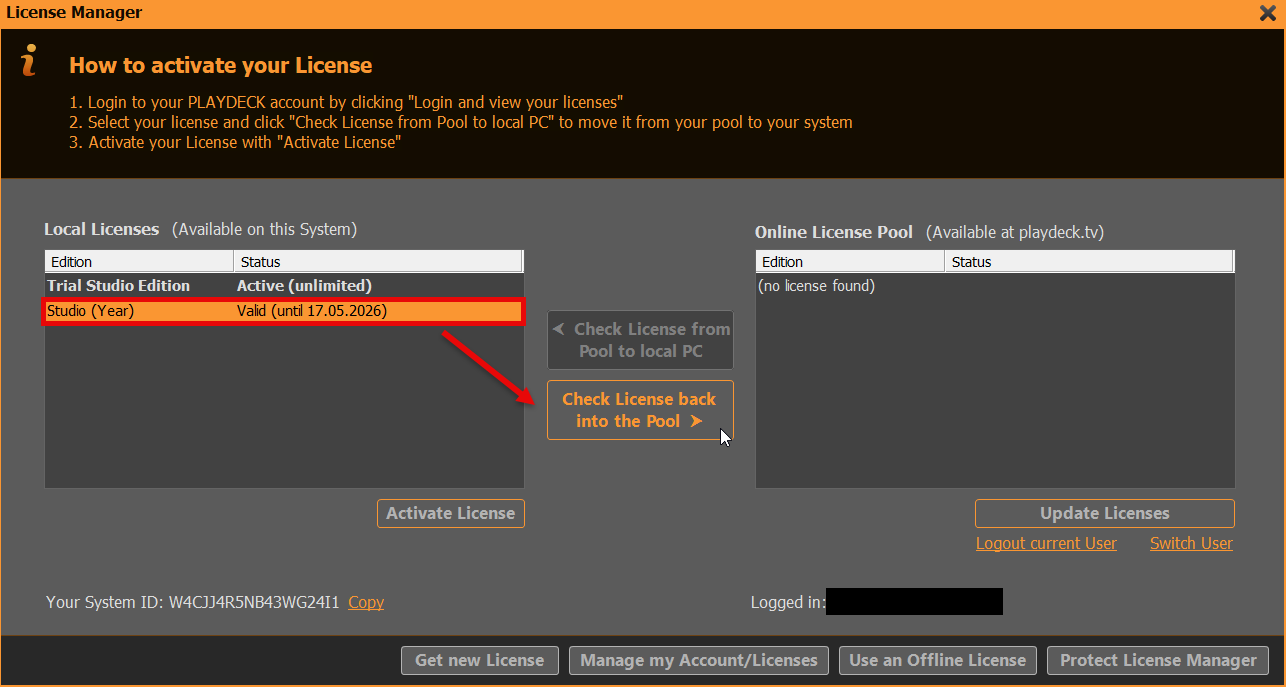
The next Screen shows the OTHER PC after logging into the License Manager. You simply reverse the Process now: Select the License on the RIGHT Side and move it with the Button to the Left Side (CHECK LICENSE FROM POOL TO LOCAL PC). PLAYDECK will now offer to activate the License and restart:
USB Dongle License
Simply detach the USB Dongle and attach it to another PC, then start PLAYDECK on that PC. Please note, that if you detach the Dongle while PLAYDECK is still running, PLAYDECK will close immediately and without prior notice. It is recommended to close PLAYDECK regularly to ensure, that all Data is saved properly.
Offline License
The Offline License is bound to the PLAYDECK System ID and can NOT be moved to another System by the Customer. Please write us at [email protected] to receive a new Offline License.
Backup License
We have a separate article on how to use the Backup License.
Recover lost license
This article explains, how to recover a lost license.
Shop license
If you still can access the PC system with the license, you might be able to recover and move the license by yourself:
https://playdeck.tv/howto/move-license/
But if that PC system has crashed, is lost or you had to re-install windows, you will not be able to recover your license by yourself. In this case, please contact us at [email protected]. We are happy to release the license for you, so it can be checked out again with the license manager.
USB Dongle license
If the USB device is broken or lost, we can replace your Dongle and provide you with a temporary offline license during the delivery time. If the Dongle is still working, we can update the Dongle remotely with an updater-file. Please also contact us at [email protected].
Offline license
The offline license can’t be moved to another PC by default. Please also contact us at [email protected] to receive a new offline license from us.
Send Log Files to Support Team
This article will show how to send you PLAYDECK Log Files to our Support Team.
In this article:
→ Send via Internet
→ Send offline via ZIP File
IMPORTANT: Please always send a message to [email protected], informing us about:
– Log Files have been uploaded
– Your PLAYDECK System ID
– Date/Time of last occurrence of issue/problem
Thanks!
Send via Internet
If you have an active Internet Connection on your PLAYDECK System, open the Main Menu and select SUPPORT and then SEND LOG FILES:
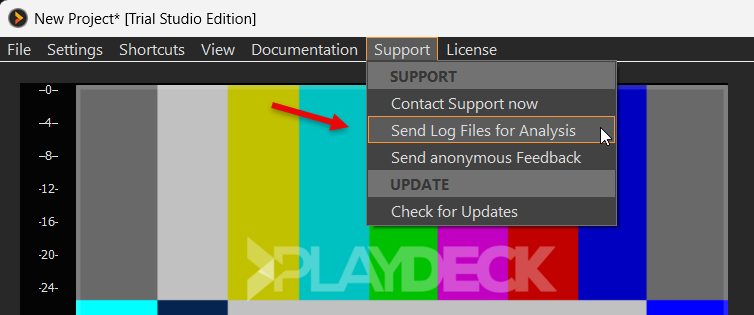
Then select the INTERNET Option:
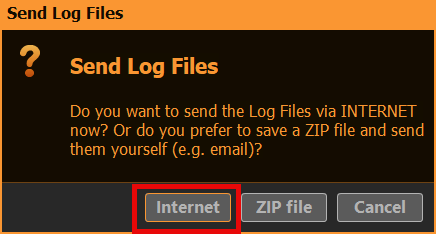
After the upload is complete, please send us a message to [email protected] along with your System ID. If you seen the following Popup, the System ID is in your Clipboard already and you can simply paste it with CTRL+V into your email message:
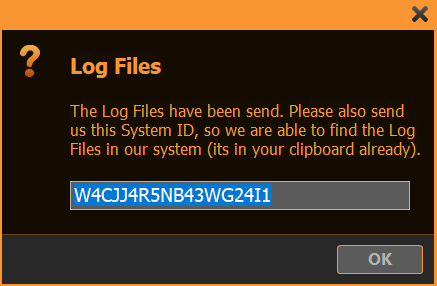
Send offline via ZIP File
If you DONT have an active Internet Connection on your PLAYDECK System, open the Main Menu and select SUPPORT and then SEND LOG FILES:
Then select the ZIP FILE Option:
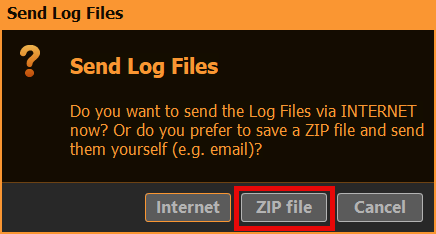
After you pick a destination Folder on your System, a 7-ZIP-file will be written there:

Please send us a message to [email protected] along with your ZIP-file.
If your Email-system doesn’t allow sending Files or the ZIP-file itself is too large (> 5 MB), you can also use our download portal to upload the File.
Note: If you are unable to even start PLAYDECK, please ZIP this Folder manually:
c:\ProgramData\JoyEventMedia\Playdeck\logs
Upload Files to Support Team
This article will show how to upload Files and send them to the PLAYDECK Team.
Open our download portal via this URL: https://download.joy-event-media.de/
You can add your Files now via Drag-drop or file-browser. In our example we already added some PLAYDECK Log-files and a sample video. If you are done adding, please click UPLOAD.
Important: Without the Download-link we cant access your Files. This is to protect Customer data.
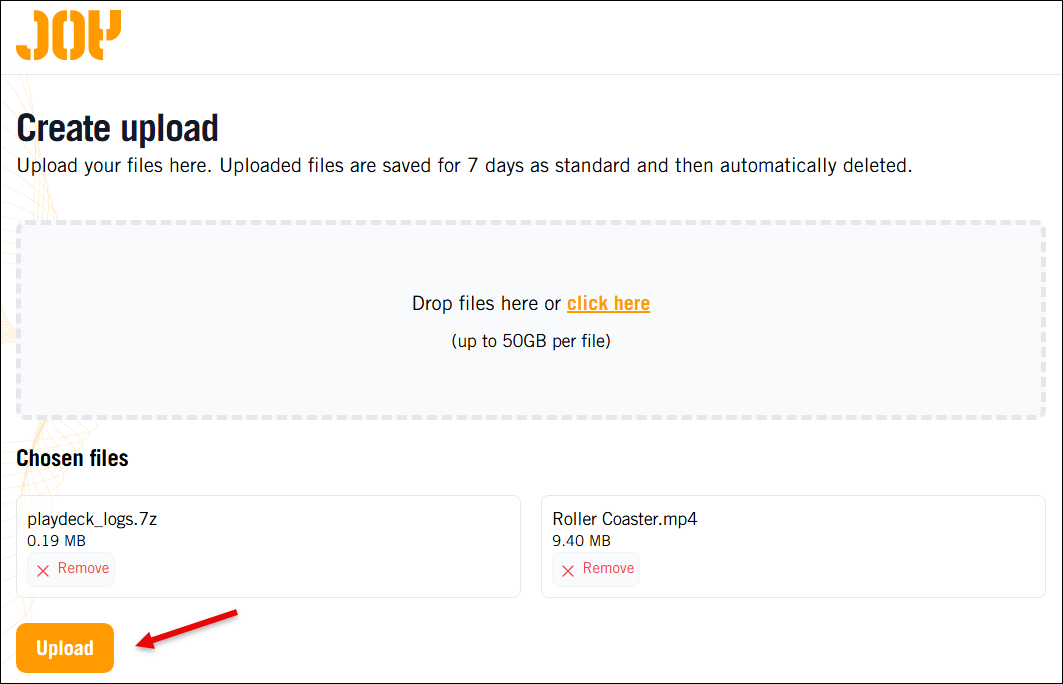
After the Upload is complete, please click COPY to put the Download-link into the Clipboard. Then write us a message to [email protected] along with that Download-link:
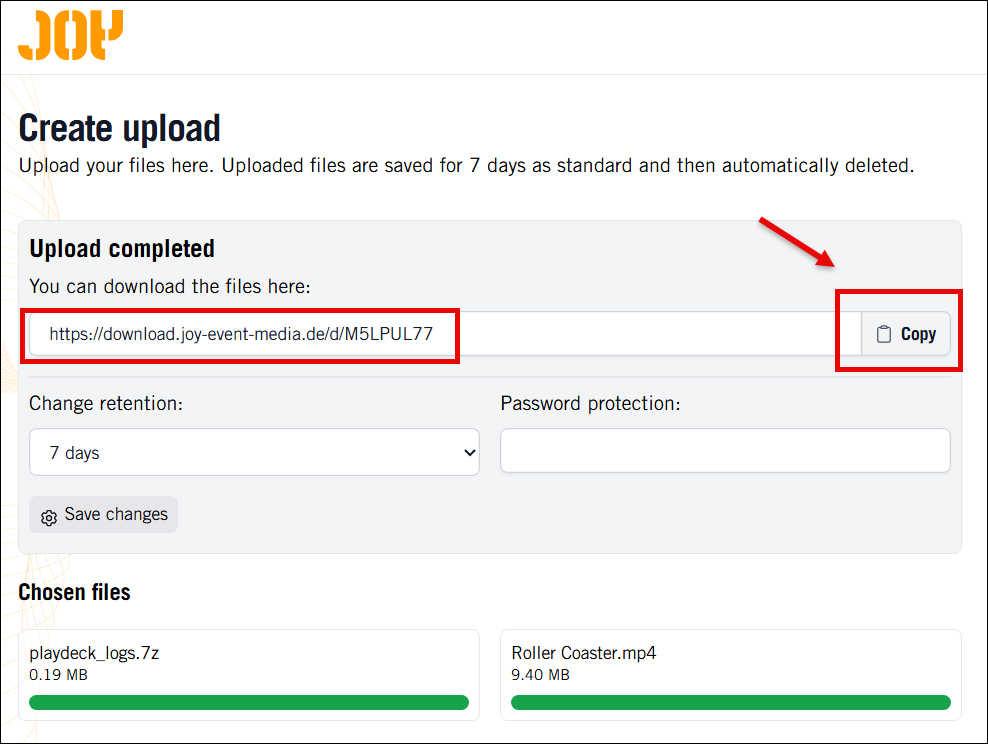
Setup RustDesk unattended Access for Remote Support
RustDesk is a free Remote Destop Software, which we use to login to remote systems. The main advantage of RustDesk over other Remote Desktop Connections is, that is does interfere with installed GPUs (eg. installing a Virtual GPU), therefore not interfering with PLAYDECK during Remote Access.
1. To get started, download our customized RustDesk from our website. This version will use our private RustDesk server (and not the public server) to protect your data and improve the connection speed.
https://get.remote-joy-event-media.de/rustdesk.exe
2. Once you start RustDesk for the first time, you will need to install it. Please deactivate “Install virtual display driver”, which might interfere with PLAYDECK.
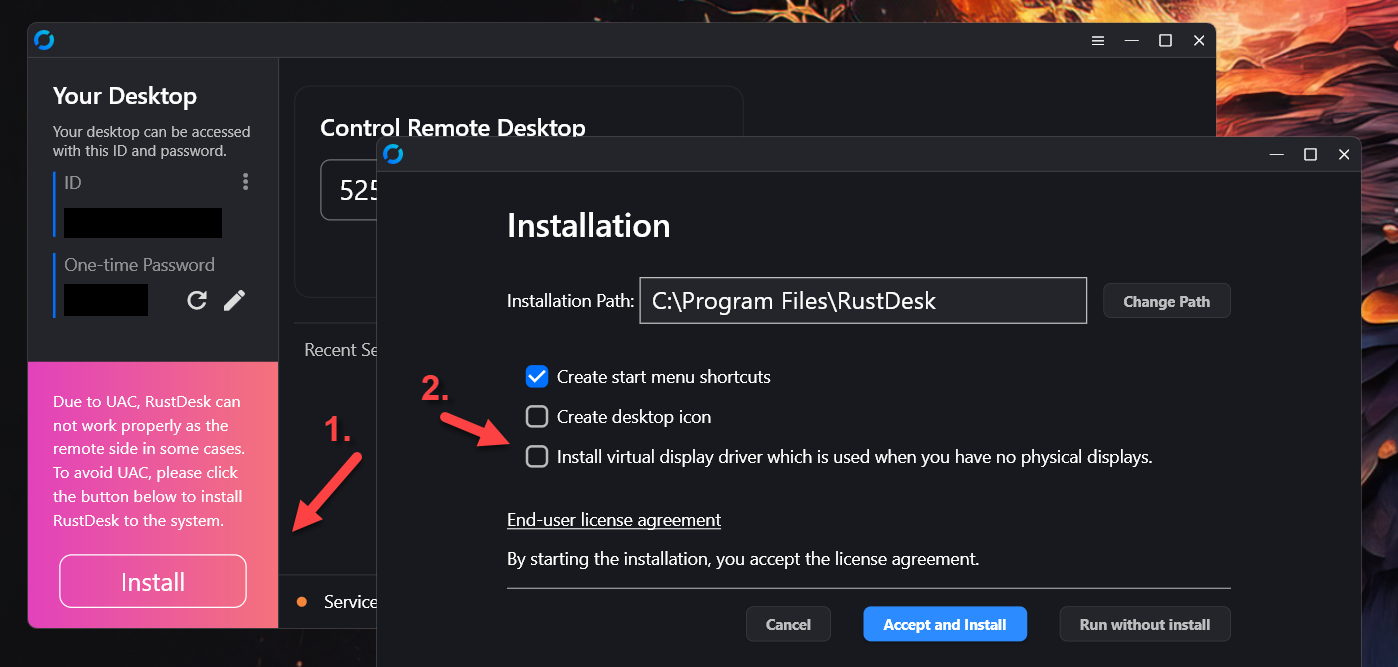
3. After re-starting RustDesk, you will not need to activate “Start Service”. This is important to elevate priviliges to e.g. open the device manager. After that you need to setup a permanent password: Click on the Edit Icon next to “One-time Password”.
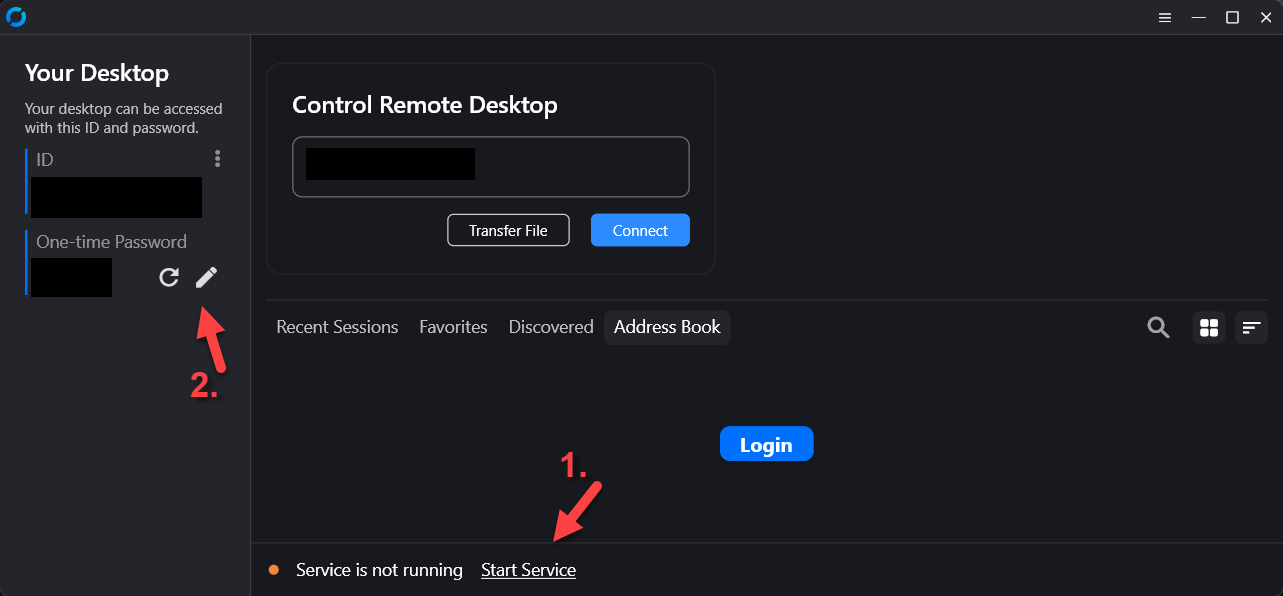
4. Then click on “Unlock Security Settings” and scroll down.

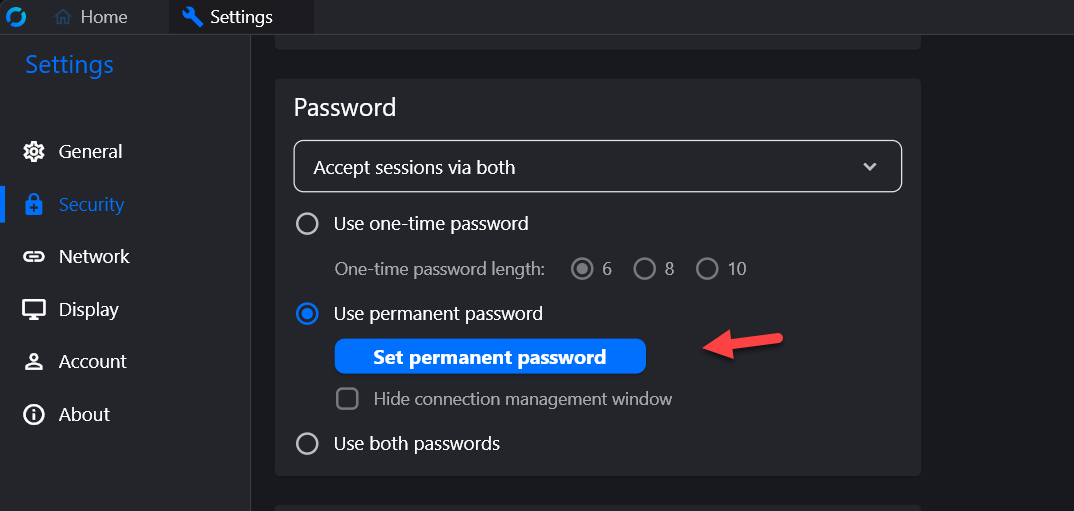
5. Please send us your ID together with your permanent password to [email protected]
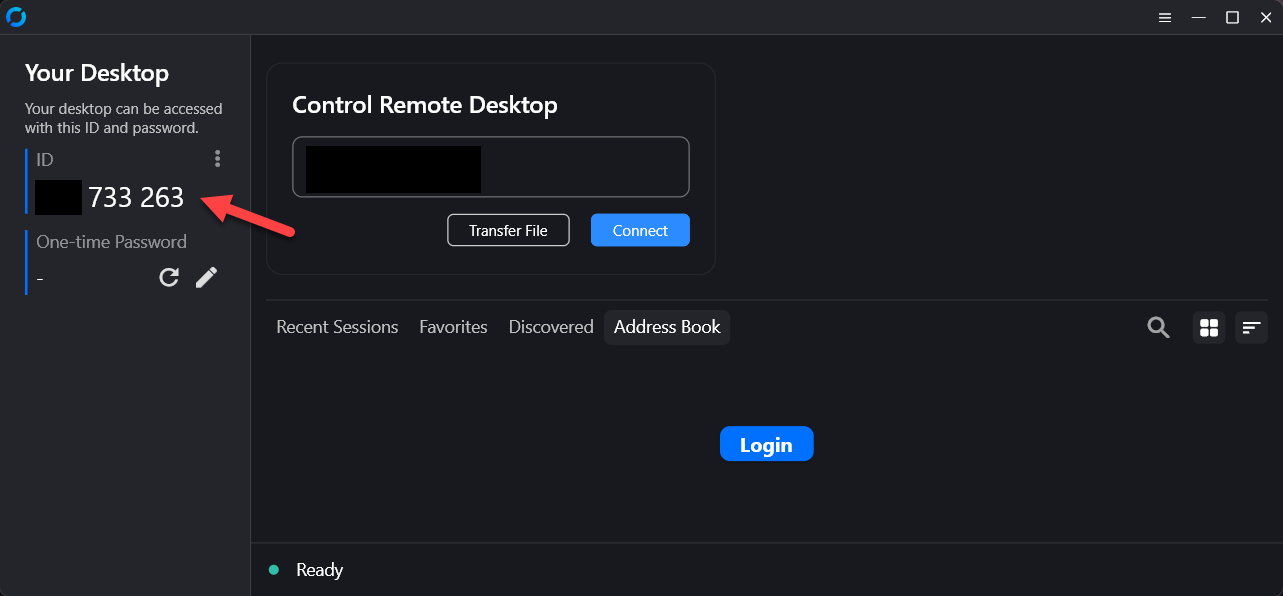
6. (Optional) If possible, please start RustDesk on a secondary PC (No need to install) and test the connection to the System you have setup for remote support. Now thru this remote connection, on the secondary system, please try to:
– Open Device Manager
– Open Task Manager
– Open NVidia Panel
– Copy any File to this Folder: c:\Program Files (x86)\JoyEventMedia\Playdeck\
These tests make sure, that all needed support actions can be done remotely. If is likely, that any Anti-Malware or other Protection software breaks the connection. In that case please de-activate those Tools temporarily for the remote support session.
Video Engine Logging
This article will show how to setup Video Engine Logging.
1. Setup Logging
Start PLAYDECK, open Settings, and select the APPLICATION tab. At the bottom of the page, you will find the configuration options.

Output Folder: Choose your destination directory. This can also be a shared network folder.
Storage Warning: Logs can easily consume up to 1 GB per minute (at Verbosity 0 with all modules enabled). Ensure you have sufficient free disk space based on how long it might take for the issue to occur.
Verbosity: Always start logging with 0 – trace. This ensures the Video Engine developers receive all necessary information.
Modules: Select all to begin with. If the log files become too large, you can reduce their size by focusing on specific modules:
The first thing to setup is your Output Folder for the Log Files. This can be a shared Folder on your Network. Logs can easily consume up to 1 GB per Minute (on Verbosity 0 and all Modules). Plan enough free disc space, depending on the estimated time until Bug occurrence.
The next setup is Verbosity: Please always start Logging with 0 – trace, so the Video Engine Devs have ALL information.
With the Modules setting we pick all to begin with. If Log Files get to big, we can reduce the size by focussing on specific modules:
all: Logs everything.playlist,file,codecs: Covers playout, file decoding, and clip loading/playing errors.writer: Covers streams, recordings, and encoding.network: Covers streaming protocols.renderer: Covers device output and NDI.live: Covers live inputs.device: Everything related to hardware devices.blackmagic: Everything related to Blackmagic Design hardware.
Split Option: This depends on how many channels you are running, as every channel operates on its own process. If you use more than 2 channels, we highly recommend enabling the Split option.
2. Start / Stop Logging
To catch a bug on the fly, you will need to start logging, reproduce the issue, stop logging, and then send the files to the development team.
Timing: You can START and STOP logging at any time. This allows you to prepare your playlist or devices beforehand. Minimize the time between starting and stopping to keep the overall file size manageable.
Session Folder: Once you click START, a new subfolder named after the current timestamp (e.g., 2026-05-16__01-20-00) will be created in your designated logging path.
Stopping: Once the bug occurs, click STOP. Wait at least 10 seconds to ensure all active log processes finish writing to the disk.
Compression: Open your logging path and locate the session folder. Right-click the folder, select Compress to…, and choose 7z (preferred) or ZIP. Compression may take some time depending on the file size.
Now we need to ZIP the contents of the session folder. Identify your session folder by START time. Then right-click your session folder, select Compress to and pick 7z File (if available) or ZIP File. Now lean back, compression could take some time.
3. Uploading Logs
Please upload your compressed log files using our official download portal:
https://download.joy-event-media.de
- Drag and drop your ZIP/7z file into the browser window or use the file browser.
- Click UPLOAD.
- Once complete, click COPY to copy the generated download link to your clipboard.
- Send an email to [email protected] and paste the download link into the message.
Note: Without this specific download link, our team cannot access your files due to data protection policies.
4. Cleanup
Make sure to delete the original log files and session folders after successful compression and upload to free up disk space. PLAYDECK does not automatically delete or clean up old log files.