This article will show how to setup your Output Streams for different purposes.
In this article:
→ Introduction
→ Using Parameter and Config String
→ Config Samples
→ AAC High Quality Audio Streams
→ Color Space and Chroma subsampling and Interlace
→ Multiple Audio Tracks
→ Closed Captions and SCTE
→ Routing Streams over specific IP
→ Monitoring & Troubleshooting
1. Introduction
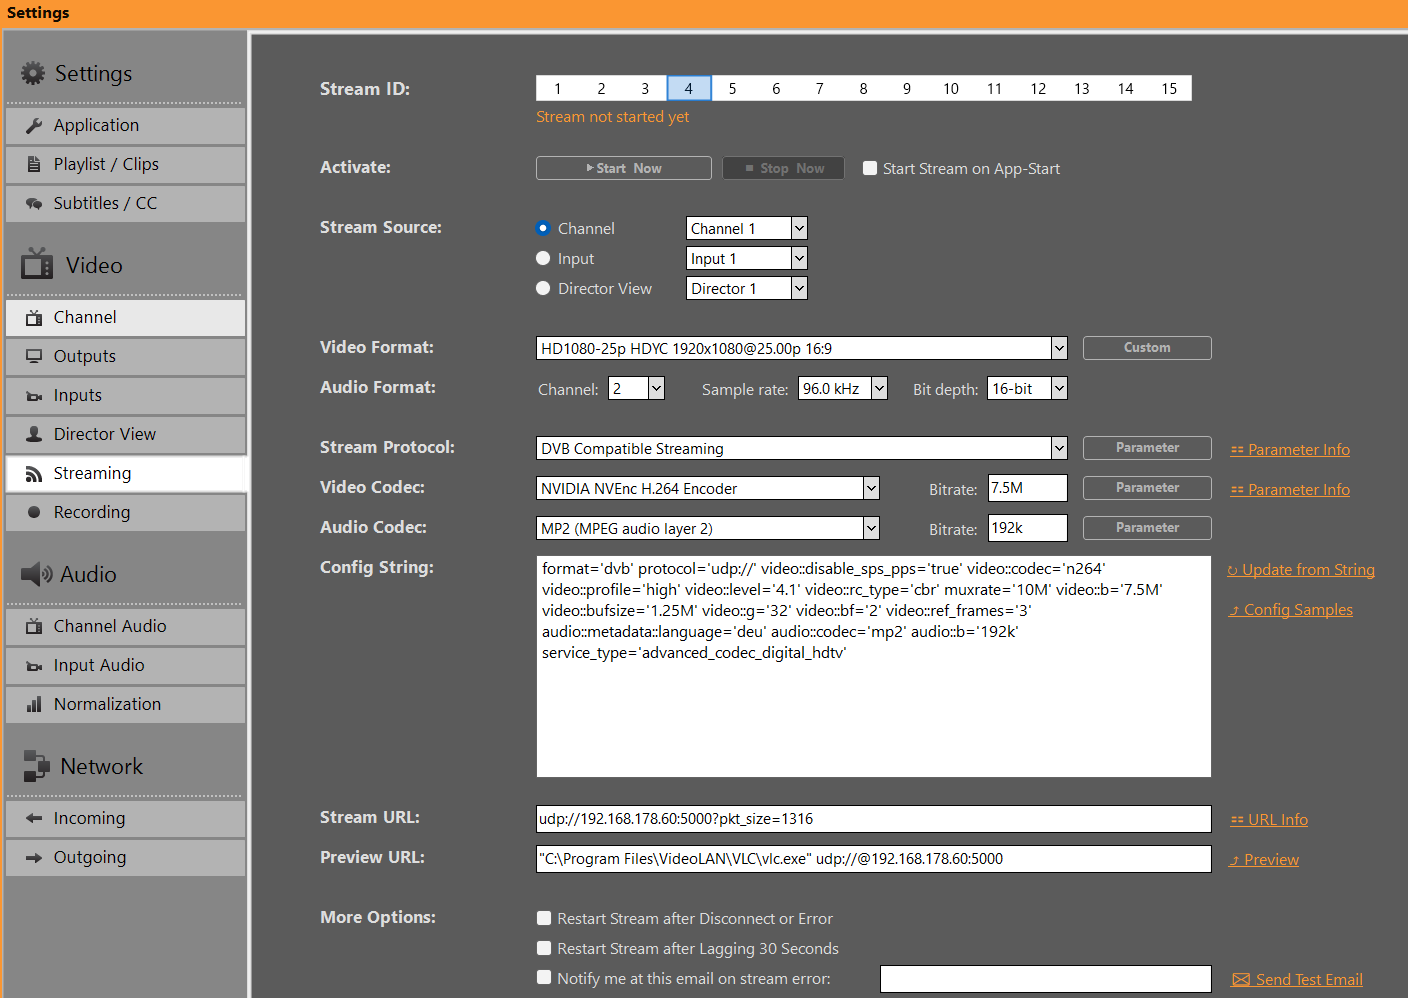
You are able to setup 15 different Stream Configurations for any Source, being Channel, Inputs and Director View. As a default, your Video Format is copied from the Source, once the Stream starts, but you can transcode into any Resolution.
Once you pick your Protocol, the other Fields for Video/Audio Codec and URL will change according to your selection, meaning: Not every Video/Audio Codec will be available for every Stream Protocol.
INFO: NVIDIA Encoder do NOT support Interlaced Formats anymore. Pick Intel QuickSync instead.
Your URL will show a suggestion of the required URL Format. Click on “URL Info” to show more examples, e.g. how to integrate Username/Password. The Preview URL will not be used by PLAYDECK, it’s just for your convenience to open the Internet Browser upon clicking “Preview”.
2. Using Parameter and Config
Further Parameter can be set to Protocol and Codecs, which are specific for your selection. These can be used to finetune your Settings, e.g. make your Stream CBR or add Metadata.
Clicking on “Parameter” will open a Editor, which will only show the possible Settings for your selection. It will highlight any Value that differs from the Default Value.
The “Config String” is a representation of all your Protocol/Codec selection as well as their respective Parameter. The Config String works both ways: You can also copy/paste a Config String into the Text Field, then click “Update from String” to apply the Values upwards. This allows you to simply copy Settings between Stream ID’s or share with other User.
3. Config Samples
Here is a quick selection of recommended Configurations for different purposes. Copy and Paste to PLAYDECK and click “Update from String”.
DVB Stream with CBR and GOP B-frames. No PCR or PTS-DTS or Buffer underrun Error
format='dvb' protocol='udp://' mpegts_start_pid='60' video::streamid='80' video::disable_sps_pps='true' video::codec='n264' video::profile='high' video::level='4.1' video::rc_type='cbr' muxrate='10M' video::b='7.5M' video::bufsize='1.25M' video::g='32' video::bf='2' video::ref_frames='3' audio::streamid='81' audio::metadata::language='deu' audio::codec='mp2' audio::b='192k' pmt_start_pid='100' mpegts_flags='-system_b' rc_buffers='4' pcr_period='35' pat_period='0.1' sdt_period='0.5' tdt_period='10' start_pcr='0' service_name='TEST' service_provider='PD' service_id='1' original_network_id='1' transport_stream_id='201' service_type='advanced_codec_digital_hdtv'
Or in Short Form:
format='dvb' protocol='udp://' video::disable_sps_pps='true' video::codec='n264' video::profile='high' video::level='4.1' video::rc_type='cbr' muxrate='10M' video::b='7.5M' video::bufsize='1.25M' video::g='32' video::bf='2' video::ref_frames='3' audio::metadata::language='deu' audio::codec='mp2' audio::b='192k' service_type='advanced_codec_digital_hdtv'
INFO: Every DVB Receiver is different und you might need different Parameters. Some Receiver will not allow ANY deviancy from official guidelines, and will show BLACK. The most reliable solution to encode DVB signals are Hardware Encoder, e.g. Haivision.
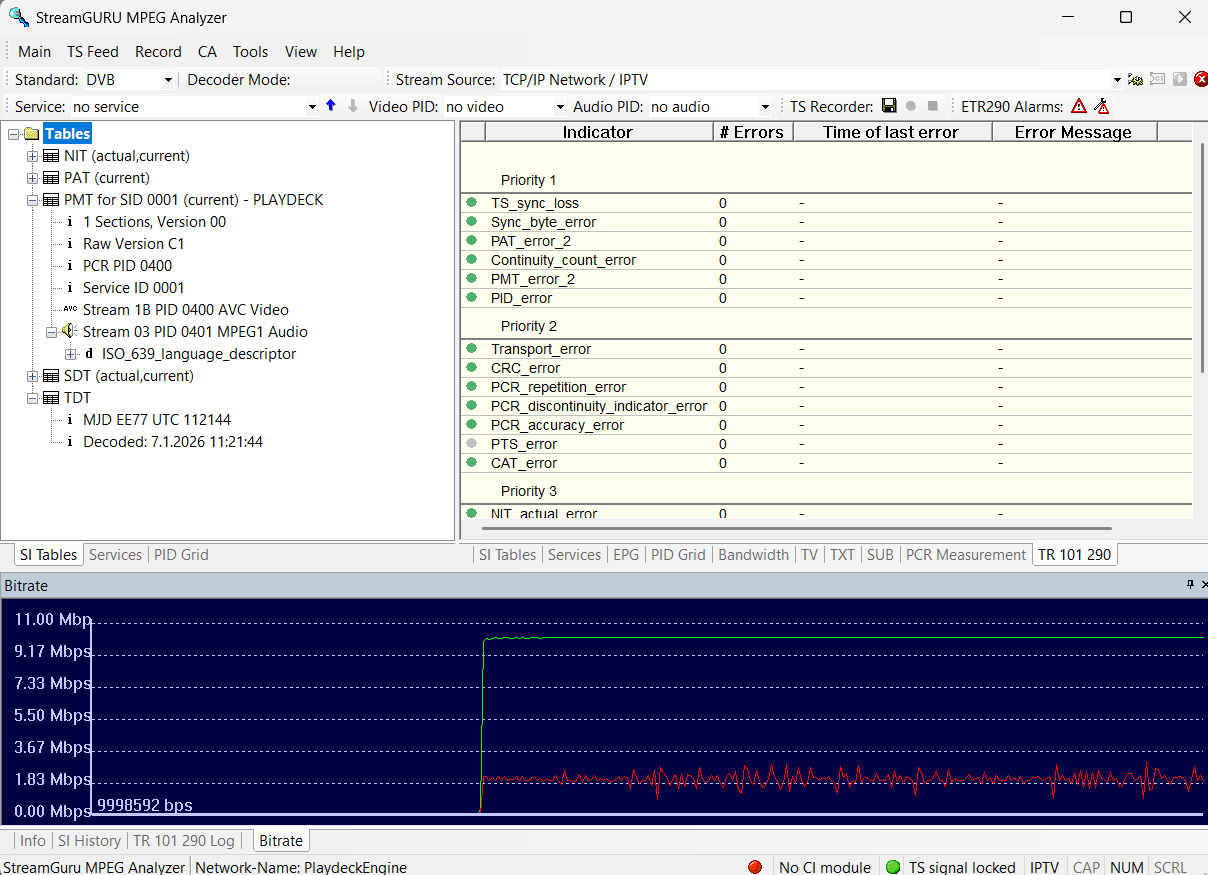
Best practice to test DVB Streams for PCR Error or other, is using one of these Tools:
– DVBControl DVBAnalyzer (costs ~2000 EUR, but is most reliable and detects PTS-DTS Error)
– StreamGURU (costs ~300 EUR, can detect any ETR Error and shows Bitrate Graphic)
– TSAnalyzer (free, but can ingest Stream URL, needs TS File on HD)
– Others worth mentioning: DVBInspector, Elecard Stream Analyzer, StreamXpert
————————————————————
RTMP Stream in CBR for 60 FPS with 2 second-keyframe
The next Sample is for YouTube. Use the YouTube Analytic and Stream Health Tools to test your Stream Satbility:
format='flv' protocol='rtmp://' video::codec='n264' video::b='9000k' video::maxrate='9000k' video::bufsize='9000k' video::g='120' video::preset='veryfast' audio::codec='aac' audio::b='128k' audio::ar='44100'
The next Sample is for Twitch. Use Twitch Inspector to check your Stream Stability and add “?bandwidthtest=true” to your Stream URL to prevent going Live.
format='flv' protocol='rtmp://' merge_tracks='true' video::codec='n264' video::b='5800k' video::maxrate='5800k' video::bufsize='5800k' video::g='120' video::preset='veryfast' audio::codec='aac' audio::b='128k' video::tune='zerolatency' audio::codec='aac' audio::ar='44100' audio::b='128k'4. AAC High Quality Audio Streams
The default AAC Encoder for Stream will be very conservative, meaning: Use as little CPU as possible and leave maximum room for video bandwidth. If your project is to stream music channel, this might not be satisfying enough.
The first thing you might want to consider is dropping video res to 720p30, so you have more bandwidth for audio. Especially if you run multiple streams. Always use a Hardware Encoder for video like H264 NVidia NVENC.
For audio encoding, using AAC is your only true choice for high quality audio. AAC is available in most stream formats (RTMP, SRT, UDP) and has much less compression compared to MP3.
Next, you always want to go with 48KHz and 32 bits as a default, since AAC can use full dynamic.
Here is a sample config, which we will explain in more detail:
format='mpegts' protocol='udp://' video::codec='n264' video::b='4M' audio::codec='aac' audio::b='256K' audio::profile='aac_low' audio::stereo_mode='ms_force' audio::minrate='200K' audio::maxrate='320K' audio::bufsize='640K' audio::aac_coder='0'
Since we saved some bandwidth on video, we can raise our Bitrate to 256K. We set a Minrate of 200K, so silent passages will not sound rough. And we set a Maxrate of 320K to allow for peaks. The Buffer Size of 640K represents approx 2,5s Buffer. If you only run one music channel, you can even go higher on the bitrates.
Now to some very important settings:
The AAC Profile must be “aac_low”, which is AAC-LC and has the highest quality and supports higher bitrates. We force Stereo Audio Encoding with “stereo_mode=ms_force”. We set the AAC Coder to “0”, which means “double encoding run”. Reduce this to “1” (single run), if you get CPU problems. Avoid “0”, which means “single fast run”.
One more thing to mention:
Use source material (clips), which are 48 KHz, 32 bit and high bitrate of at least 320K VBR. This is important to not introduce audio artifacts, which will be amplified by the AAC Encoder later on. If you only run one music channel, you can try lossless audio (PCM) and ~2000K Bitrate.
5. Color Space and Chroma subsampling and Interlace
The Support for certain Color Spaces, e.g. 4:2:2 for DVB, or Interlaced Encoding, depend very much on the Intel CPU or NVidia GPU you are using.
Here is a page for NVidia NVenc and 422 Support and here for Intel Quick Sync and 422 Support.
In basic terms:
1. NVidia Support for Interlaced Encoding:
– Pascal (GTX 10-Serie): Last architecture with interlace support
– Turing / Ampere / Ada (RTX 20/30/40): Hardware support for interlaced encoding was removed
– Blackwell (RTX 50-Serie): Interlaced encoding for H.264 (8-bit and 10-bit) has been re-introduced
2. NVidia Support for 4:2:2 Color Space:
– Blackwell (RTX 50-Serie)
3. Intel Support for 4:2:2 Color Space
– 10th Gen and newer processors offer support for Hardware Accelerated encoding and decoding of HEVC codec on 4:2:2 color sampling via Quick Sync.
– Previous graphics controllers on 9th Generation Intel® Core™ Processors and older were limited to HEVC codec 4:2:0 color sampling for hardware accelerated encoding and decoding.
This is a quick config sample to encode 4:2:2 with Intel Quick Sync (10th Gen+)
format='dvb' protocol='udp://' video::codec='hevc_qsv' video::b='5M' audio::codec='aac' audio::b='128K' video::pix_fmt='yuyv422'
Note: Features such as interlace and 4:2:2 color space are also available in x264 CPU encoders. Since we use an LGPL version of FFmpeg without GPL parts (e.g., libx264), these features are not enabled. It is possible to replace the FFmpeg libraries with your own versions.
6. Multiple Audio Tracks
If you need to send multiple Audio Tracks, e.g. for different Languages or for Director Audio, you can do so with all supported Protocols (DVB, RTMP, UDP and some more). You can also apply different Audio Codecs.
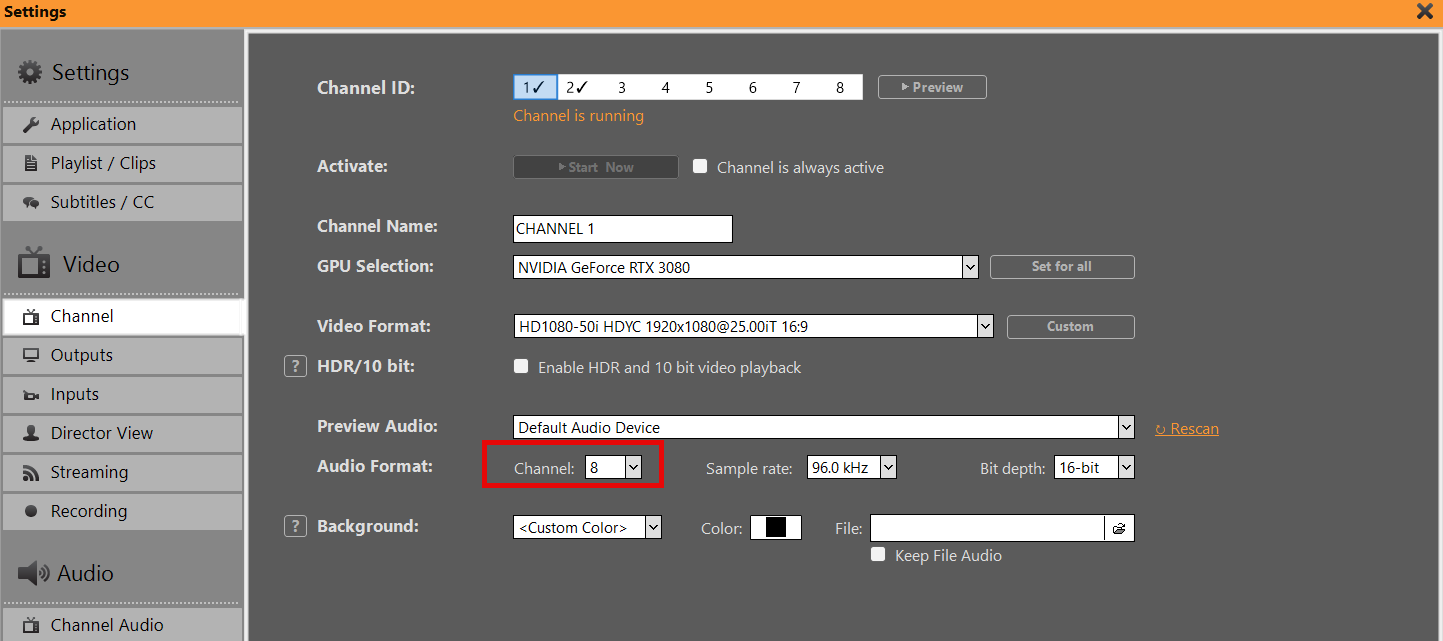
The way this works is, that you have ALL Audio Tracks already active in your Channel, then SPLIT the Audio Tracks for your Stream Output in e.g. Stereo Pairs.
First, make sure your Channel is set to more then 2 Audio Channel:
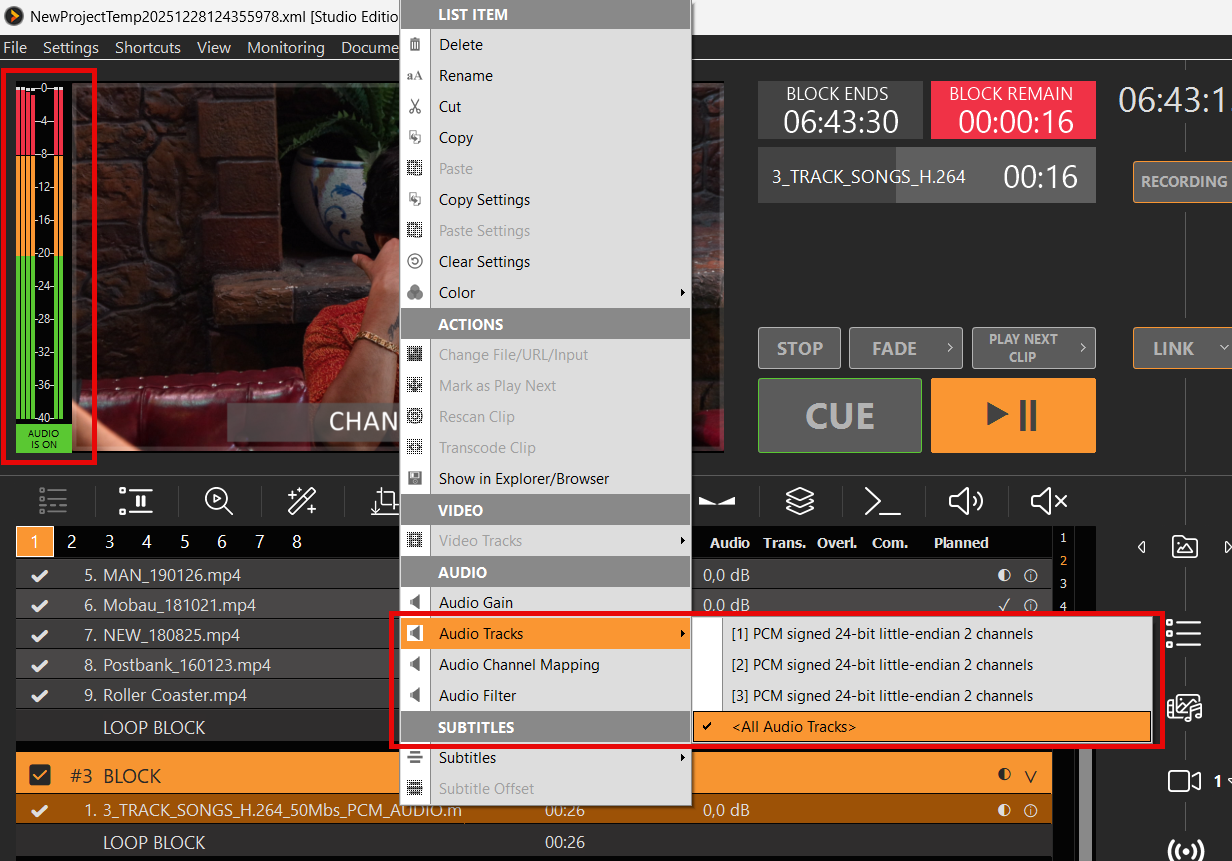
Then “fill” these Audio Channel with Audio Content, e.g. by enabling All Audio Tracks on a Clip or ingesting all Tracks via SDI (up to 16 Audio Tracks). You can also use Audio Mapping to mix up/down your Audio Tracks or use Audio Filter to copy and delay certain Audio Tracks.
Then you open your Stream Settings, especially the Parameter of your Stream Protocol and enable Audio Track Splitting:

INFO: The Number of Audio Channel in your Stream Settings need to stay at 2.
If needed, you can apply different Audio Codecs for the addition Audio Tracks. Please note the added and increasing Numbers for every Audio Tracks after the first one:
audio::codec='aac' audio.1::codec='ac3' audio.2::codec='libmp3lame' audio.3::codec='mp2'
You can also apply a Language Descriptor for every Audio Track:
audio::metadata::language='eng' audio.1::metadata::language='ita' audio.2::metadata::language='fra' audio.3::metadata::language='ger'
INFO: Language Codes must comply to ISO 639-2
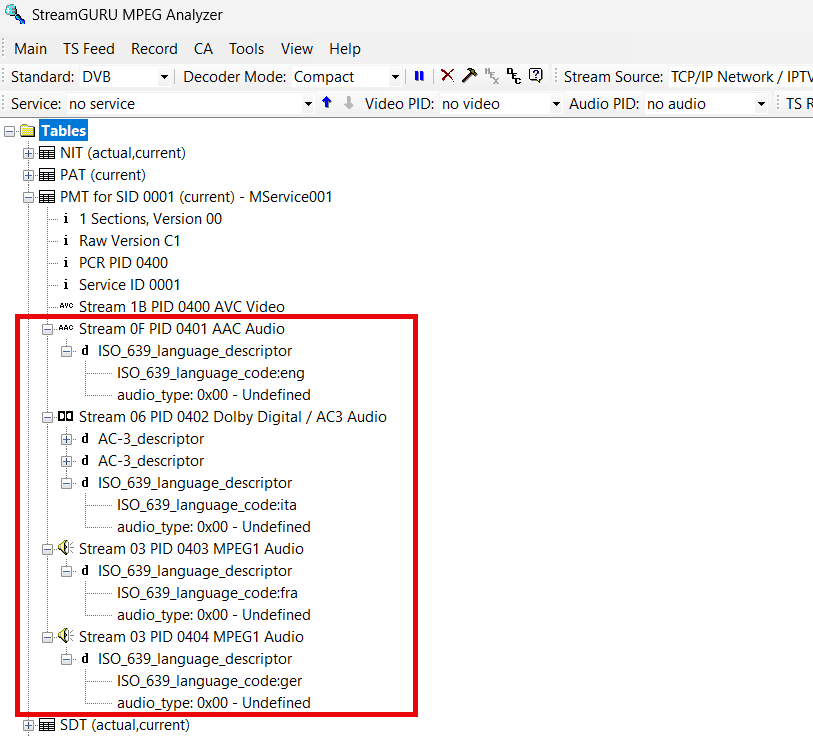
You can then test your resulting Audio Tracks in e.g. StreamGURU:
7. Closed Captions and SCTE
Both can be enabled in the Parameter Settings of your Protocol:

INFO: SCTE-35 is only available for Protocols: SRT, DVB, UDP (any Video Codec). Closed Caption will only work with Video Codecs: MPEG-2, H.264 (any Protocol)
This will require both to be enabled and available in your Channel already. Please refer to the following articles for more information on SCTE and/or Closed Captions:
→ Sending SCTE-35 to Stream Server
→ Closed Captions / Subtitles
8. Routing Streams over specific IP
Your production requires you to send your streams via specific networks. This is mostly used to have a dedicated/reserved line for streaming, so it doesn’t interfere with regular network traffic.
If using UDP Streams you simple add this parameter directly to the URL:
udp://ip:port?localaddr=172.20.10.2
If using SRT Streams you simple add this parameter directly to the URL. This only works in rendezvous mode:
srt://ip:port?mode=rendezvous&localip=172.20.10.2
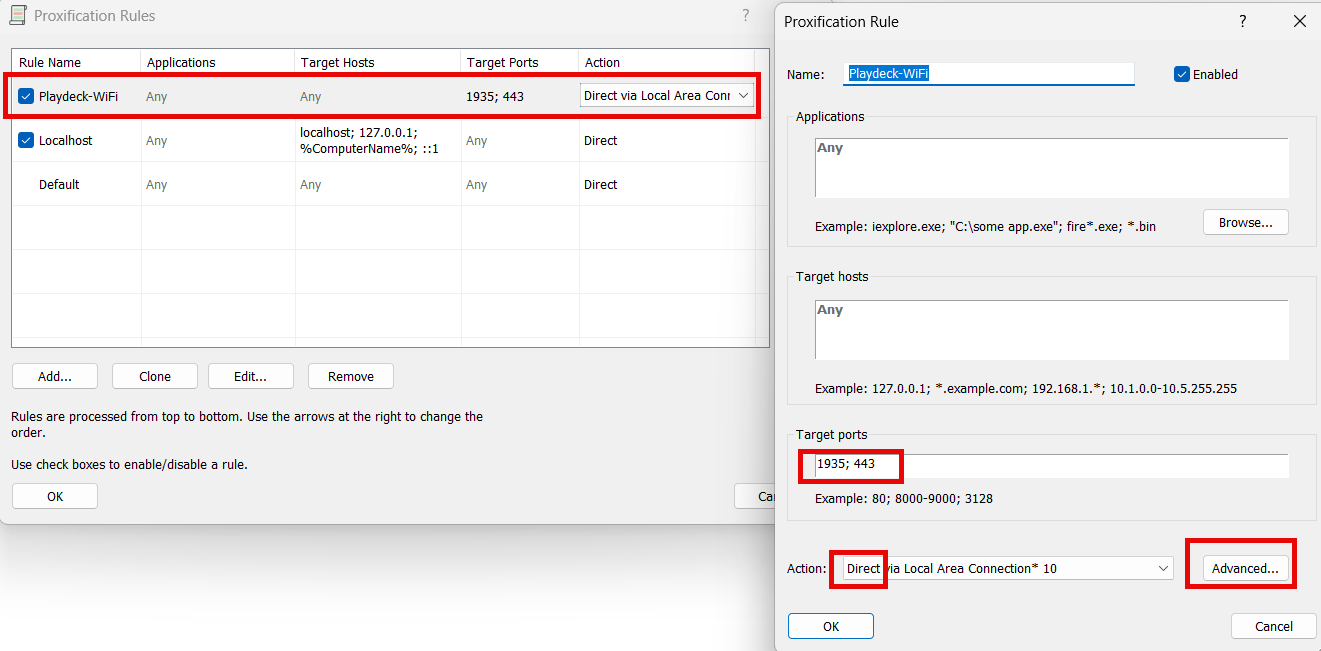
If using RTMP Streams, there sadly is no paramter. You need to route all RTMP outbound traffic manually. For this we use Proxifier. Goto Profile, Proxification Rules, Add new Rule and edit like this and move it to the top if the rules. Pick your desired adapter via “Advanced”.
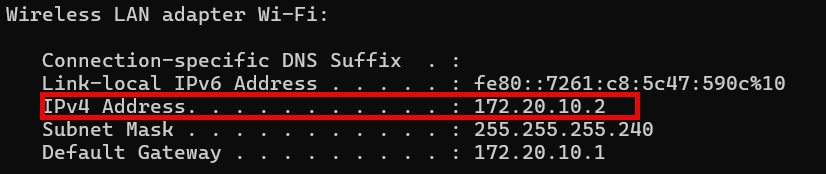
If you want to run a dry test locally without the 2nd line, enable both Ethernet Adapter and Wifi on your PC, then Start a new Hotspot on your Mobile Phone and connect PC Wifi to that Phone. Then open Console (“cmd”) and type “ipconfig”. The IP address you need is there:
You can test your network traffic with wireshark.
9. Monitoring & Troubleshooting
If your Streams are lagging or even stopping completely, you are often in the dark what exactly happened. Here are some pointer to help you identify the problem.
1. Monitoring
Open the Monitor Window in PLAYDECK or open the Stream Logs.
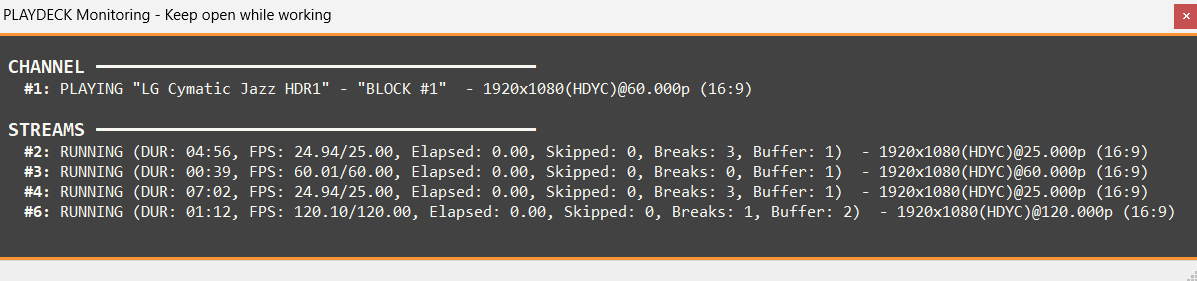
FPS 50/60 (FPS Average/Desired)
Compares the current and average encoding frame rate against the desired level. A drop here indicates the system cannot keep up with real-time encoding.
Elapsed (Frame Waiting Time in Seconds)
Shows Time elapsed after the last Frame has been processed. If this value increases, not frames can be processed due to missing Source, or false settings or no connection.
Skipped (Dropped Frames)
The most critical indicator of performance bottlenecks. If this value increases, the encoder is intentionally dropping frames because it cannot process them fast enough.
Breaks (Frames lost)
If the network is slow, you see Breaks because the Server wants a new frame but it cannot get there in time (for protocols that requires acknowledgement like RTMP or SRT). Breaks can also happen if the Source does not deliver a frame in time.
Buffer (Frames waiting)
Monitors the number of frames waiting in the internal queue. A constantly growing buffer typically precedes skipped frames or Breaks. High Skipped, Low Breaks: This usually means your CPU/GPU encoder is too slow. High Breaks, Low/Zero Skipped: This usually means the network or source is the bottleneck. The writer is ready to encode but the frames aren’t arriving or being “pulled” at the correct time intervals due to the connection lag.
2. Network/Bandwidth Problems
Turn of all your Streams, open your Windows Console (“cmd” in Start Menu) and type
tracert <hostname_or_ip>
Use your Target URLs Hostname or IP Address. If you see any Values >100 ms, this will indicate a slow connection to your Stream Target.
Also keep in mind, that while today Download Speeds with Fibre, Cable or DSL or mostly high speed (>100 Mbps), the Upload Speed could be very much slower than that. Use a Tool like Speedtest to determine your actual Upload Speed.
Also use Bandwidth Profiler on the Stream Server to check, if your desired Bitrate is also received on the Server. Most Provider or Software will provide with Tools to measure the received Bitrate. Ideally it is shown as Graph, which can point out any Gaps during the Transmission. If you have no Tool at Hand, we recommend streaming to YouTube, as it has a build-in Stream Analyzer, which is very useful to diagnose any instable connections.
In addition, please check with your Provider or Service, if the provide any LOCAL Stream Ingest URL’s for your Region or Country. As an example, Twitch provides these Twitch Ingest Endpoints.
