Playlists
In this menu item you can set all parameters for your optimal work with PLAYDECK:
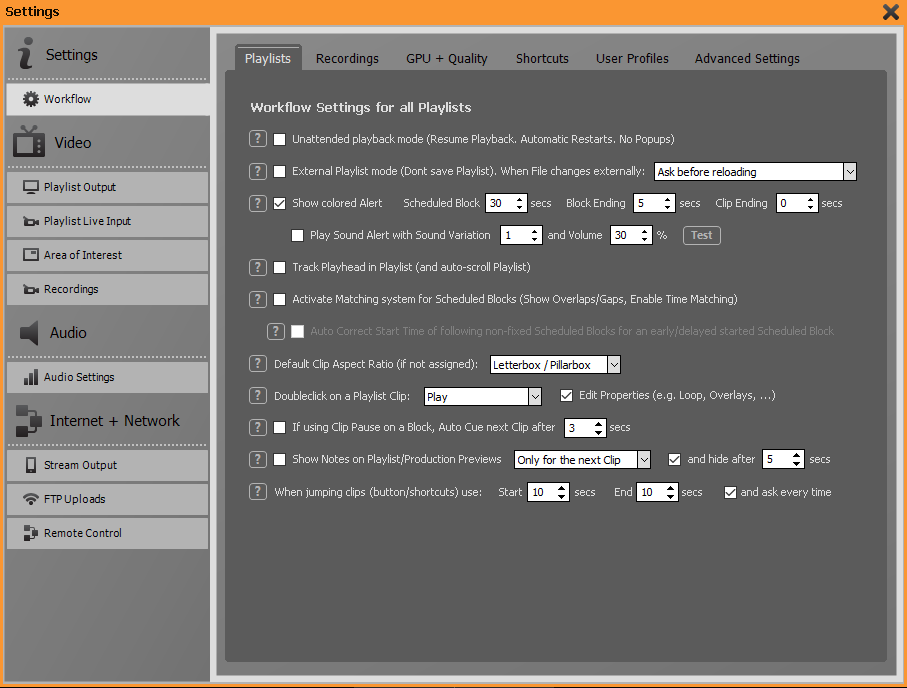

If you activate the first checkbox, you put PLAYDECK into Unattended Playback mode. In this mode, PLAYDECK is automatically restarted in the event of a possible malfunction and playback is resumed at the interrupted point. This mode is particularly suitable for 24/7 operation or for remote access scenarios where access to PLAYDECK should never be interrupted.

Activate this checkbox if the playlist is to be modified by a 3rd party tool. You can set the behaviour of PLAYDECK when the playlist file is changed in the drop-down field: Ask before reloading, Reload Playlist and Resume Playout, Reload Playlist and Restart at Clip 1, or Only Reload Playlist.
If this function is activated, PLAYDECK no longer saves the playlist itself to avoid write conflicts.

Under this menu item you can set whether the progress bars in the navigator for the block timer, the clip timer and the schedule block timer should take on a signal color shortly before the time expires to draw your attention to the approaching end. You can also set the output of a signal tone. This will be output from the standard Windows audio device. You can choose from various signal tones and adjust the volume. With the help of the test button you can check your settings immediately.

If you activate the “Track Playhead in Playlist” function, then PLAYDECK will always align long playlists so that the currently playing clip is centered. This facilitates the overview when working with long playlists. Please keep in mind that this feature may be confusing if you often work on other parts of the playlist while playing a playlist: Each time a new clip is started, the playlist is recentered by PLAYDECK.

This checkbox should be activated if all scheduled blocks of the playlist are to be played immediately one after the other. PLAYDECK now shows gaps or overlaps between the blocks.

By clicking this check box, you activate automatic time correction for the schedule block function: If you start a block to which a scheduled start time has been assigned earlier or later than scheduled, the scheduled start times for all subsequent blocks are automatically corrected by the deviation that has occurred. For more information on the schedule block function, refer to chapter 3.1.

Here you can set the default behavior of PLAYDECK for scaling a video if it has an aspect ratio different from the set video output format:
Letterbox / Pillarbox
PLAYDECK scales the video while maintaining the aspect ratio until the video image just reaches the horizontal or vertical border. Correspondingly, vertical or horizontal black areas are created.
Pan and Scan (Crop)
PLAYDECK scales the video while maintaining the aspect ratio until the entire output image is completely filled with image content. Image contents outside the image are cropped.
Fullscreen with no AR
PLAYDECK scales the video without keeping the aspect ratio so that the whole screen is filled.
The scaling behaviour can be changed individually for each clip and for each action button by right-clicking with the mouse and selecting Aspect/Cut/Crop.
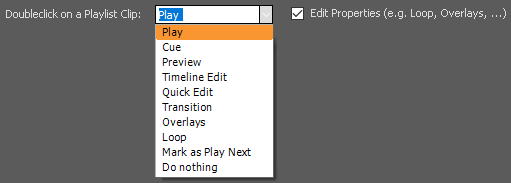
In this section you can set how PLAYDECK should behave when you double-click on an entry in the playlist. By default, a double click starts the playback of the clip.
If the checkbox for Edit Properties is activated, a double-click in the corresponding column leads to the corresponding settings.

By default, PLAYDECK plays all media within a block immediately one after the other. With the Pause after each Clip function, which you can access by right-clicking on the block header, playback stops at the end of each individual clip.
By activating the check box, PLAYDECK holds for the time set here on the last frame of the clip, then jumps to the first frame of the following clip and waits there for the next start command.

To optimally support the operator in the often stressful live operation, PLAYDECK offers the function to fade in notes and reminders on the previews while the playback of the clips from the playlist continues unchanged. In this section, you can set whether the notes should be displayed only during the following clip, until the end of the current block or only for a certain duration.

PLAYDECK offers a JUMP/NEXT button in the Control Section. The Jump function jumps either X seconds before the end of the clip (very useful for a rehearsal when the entire clip is not to be viewed) or X seconds after the beginning of a clip (useful for skipping intros).
In this section, you set the desired times and can also activate that the times are queried each time you press JUMP.
Introduction
Thank you for choosing PLAYDECK! We are convinced that with PLAYDECK you will significantly increase your productivity, whether you produce live events, stadium TV, theatre performances, museums, TV broadcasts or virtual and hybrid streaming events. You can run PLAYDECK both on-site and cloud-based.
PLAYDECK provides you (from the Plus version upwards) with two completely independent output channels in which you can organise your videos, graphics, audio files, live inputs or YouTube clips simply by dragging and dropping. If you like, you can select different resolutions and frame rates for both channels. For example, you can play full-screen videos from channel 1, while animated lower-thirds with alpha channel are sent from channel 2.
PLAYDECK supports almost any codec and converts all content to the selected output format in real time. The output is completely flexible via dedicated output cards (e.g. from Blackmagic, AJA, Bluefish, …), via the extended desktop or via NDI.
In the Studio Edition, an additional recording channel is also available. The recorded signal can be edited while the recording is still running (edit-while-ingest, e.g. highlight editing), played back with a time delay or streamed. For maximum flexibility you can choose from a wide range of different recording formats.
But PLAYDECK (depending on your licence) is much, much more than a simple playout system:
You can trim and crop your content, you can automatically adjust the volume, you can schedule the start of your contributions, you can control the playlist externally, you can start playback via your video switcher, you can transfer closed captions, you can completely customise PLAYDECK with advanced scripting functions, you can…
You are welcome to inform yourself about the incredible functionality of PLAYDECK in the following chapters. We are sure you will love it!
Playlist Area
The largest area of the user interface is available below the control section for the playlist and its configuration. Here, you will find all clips that you have prepared for playback with PLAYDECK, clearly arranged in the respective playback blocks. A playback block consists of the block header with block name and information about scheduled start times, one or more lines of media (videos, still images, audio tracks) or live inputs with the associated information, and a block end that defines the behavior of PLAYDECK when reaching the end of a block. To keep track of longer blocks, the view of the playlist can be customized in many ways. For more information about working with playlists, please refer to chapter 3.
Overlay and Action Buttons
Below the playlist you will find the buttons for controlling the overlays and the actions.
Overlays can be graphics or videos (with or without transparency), text overlays / text crawlers or HTML websites or templates, which you can place manually or automatically over the output video signal during playback from the playlist.
Actions are individual media files in direct access. Pressing an action button interrupts the current playback and starts the stored media file. You can set how PLAYDECK should behave after the action file has finished playing. Action buttons can also send internal or external TCP commands. Please refer to chapter 4.2 Working with Actions for more details.