Your Professional Video Playout & Playback Software for Windows
– MADE IN GERMANY –


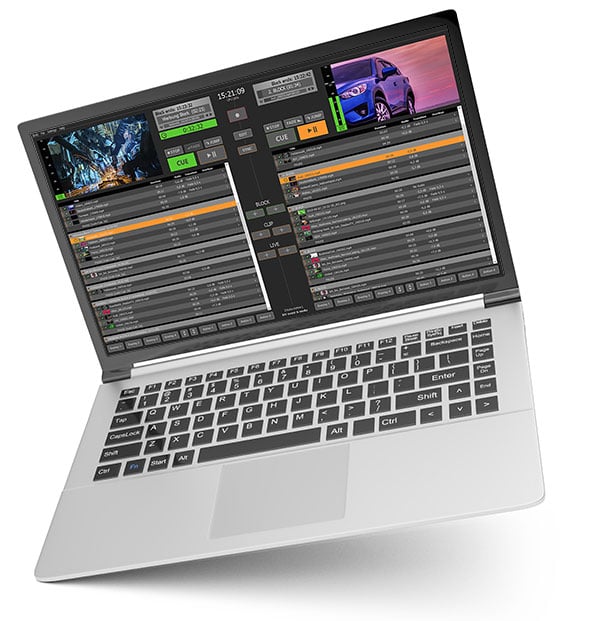
Professional Video Playout, Playback & Loops for Live Events
State-of-the-art, Windows-based media playout software engineered for seamless video playback, automatic slideshows,
and cloud-based remote productions. Perfect for touring, corporate events, and rental businesses.
Mix videos, graphics, audio tracks, YouTube videos, SRT streams or even live inputs within your playlist.
PLAYDECK is available in: Chinese, English, French, German, Hindi, Italian, Japanese, Portuguese (Brazilian) and Spanish
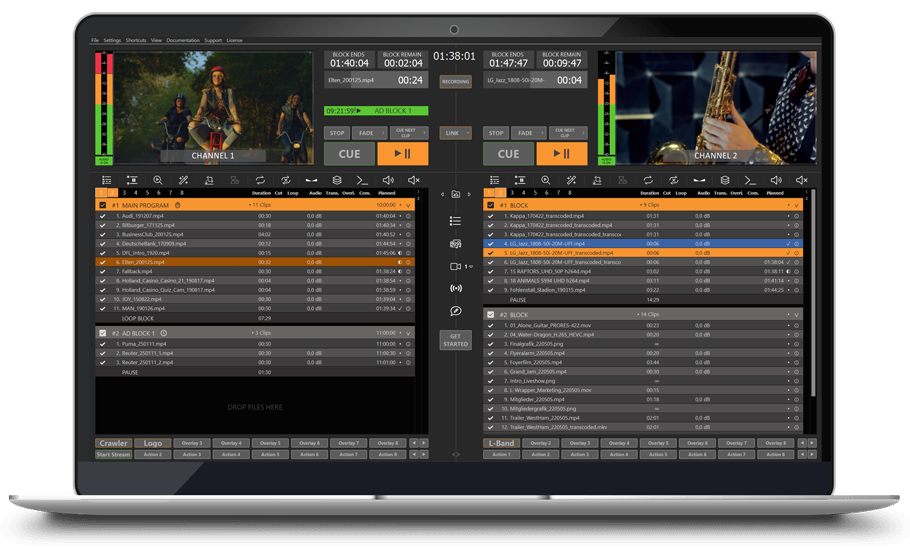
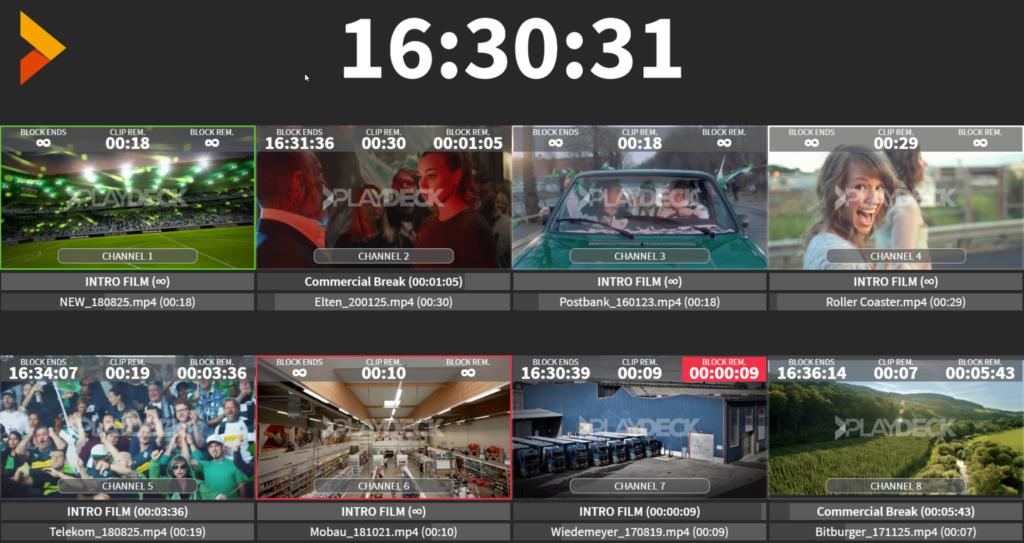
Use 8 independent playback channels with different resolutions and refresh rates up to 8K-60p including alpha channel support for output.
PLAYDECK supports all common containers and codecs and resolutions up to 8K (including H.264, H.265/HEVC, AV1, HAP, NotchLC, Prores and many, many others)
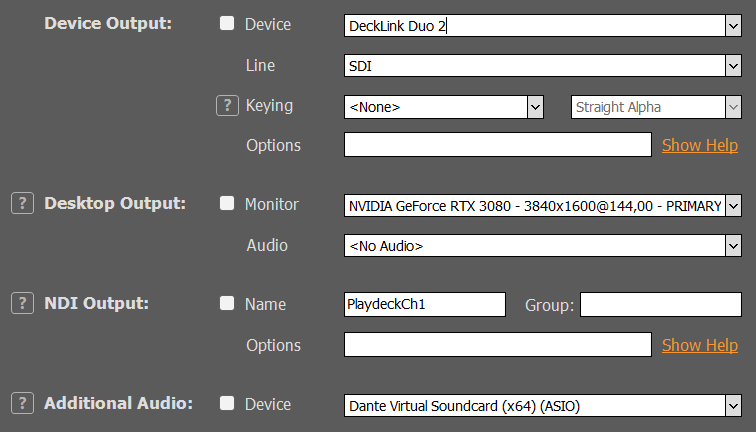
Playback via dedicated playout cards, e.g. from Blackmagicdesign, AJA, Bluefish444, via NewTek NDI or via the extended desktop
In the Studio version, PLAYDECK lets you record an incoming live signal in a codec of your choice and edit and export clips while recording is still in progress. With this function, a broadcast delay of any duration can also be created very comfortably.
You can set a live input (incl. Newtek NDI and SRT/UDP) for each channel that you can use as a playback element in the playlist. Just as if the live input were a video clip on your system.
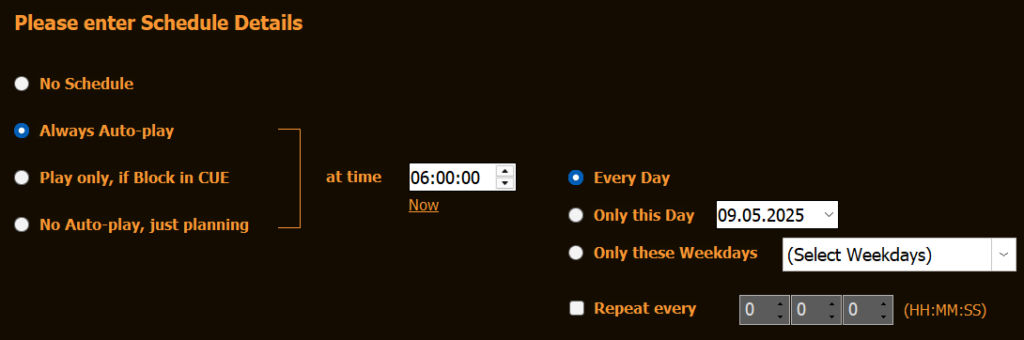
For each playback block in your playlist you can decide individually whether playback should be started manually, remotely or automatically.
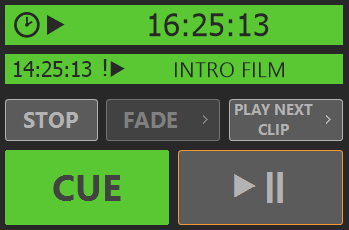
Clear and concise displays on the user interface provide a quick overview of the planned show sequence.
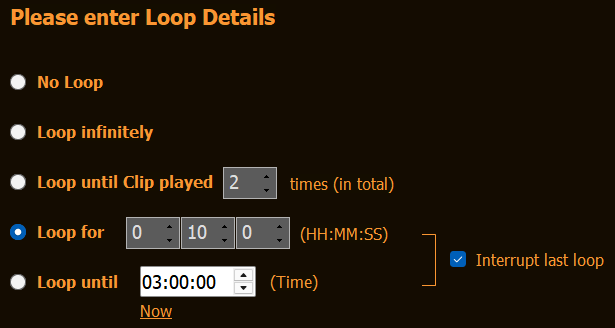
For each clip you can separately define whether playback should loop Infinitely / x times / for x minutes / until xx:xx (time).
Furthermore, you can certainly loop a whole block or only the last x clips of a block for ultimate flexibility.
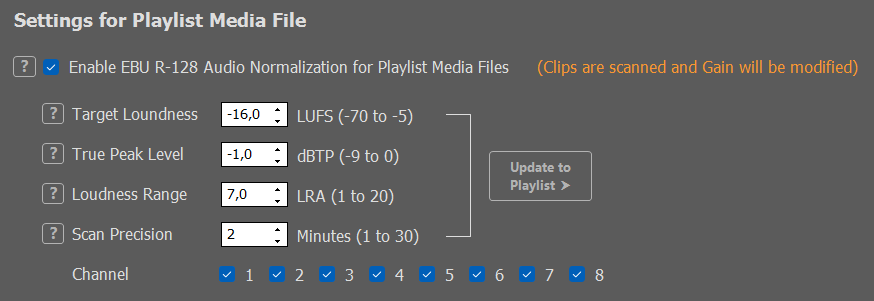
Analyses the audio track and automatically adjusts it to the same perceived loudness without affecting the original file.
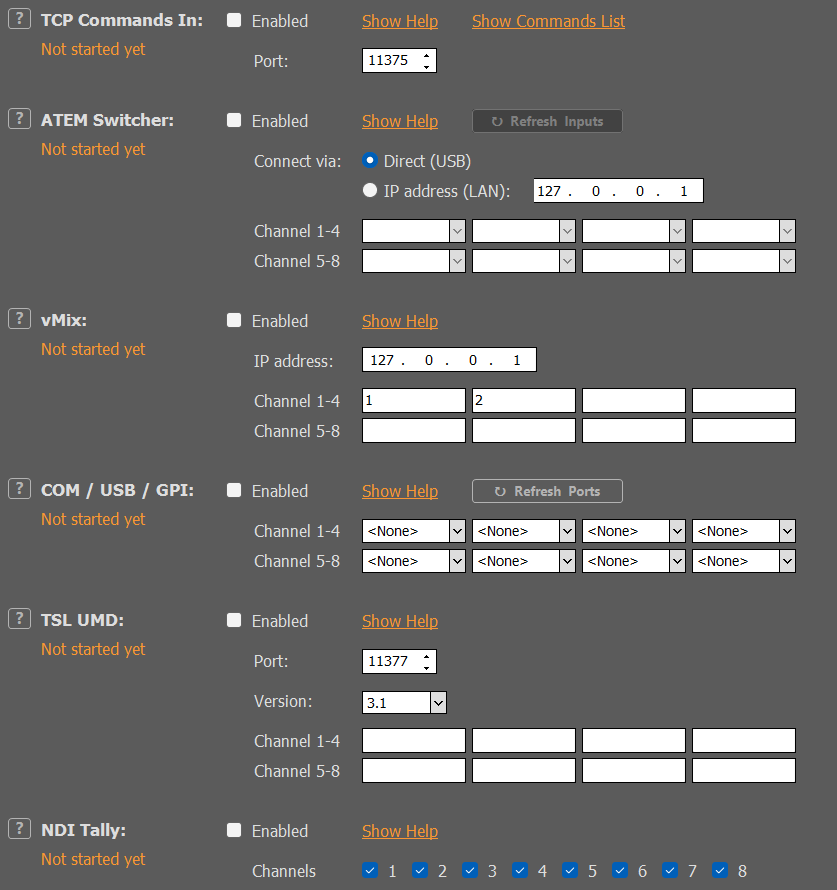
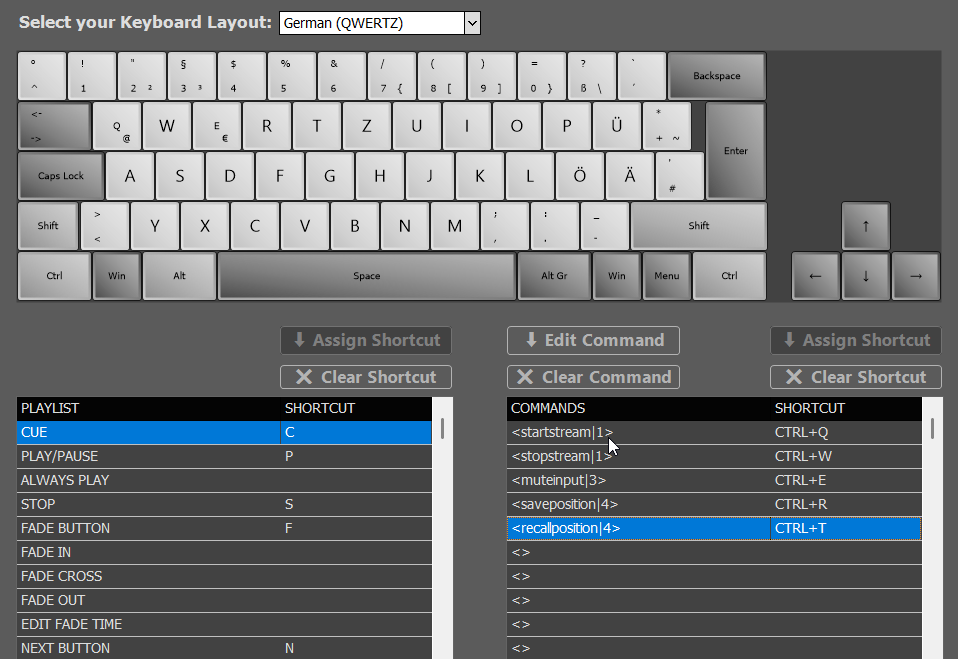
Control your PLAYDECK via TCP/IP, especially convenient with Universe Show Control or Bitfocus Companion, or just use an Elgato Streamdeck.
Automated Remote Start is supported directly via Blackmagic ATEM Switcher Series, via vMix Software, via NDI Tally State or via TSL protcol.
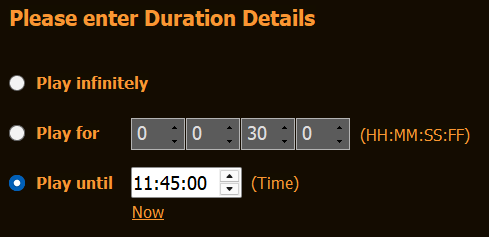
For each still image, select whether to display the image for a specific duration, up to a specific time, or infinitely.
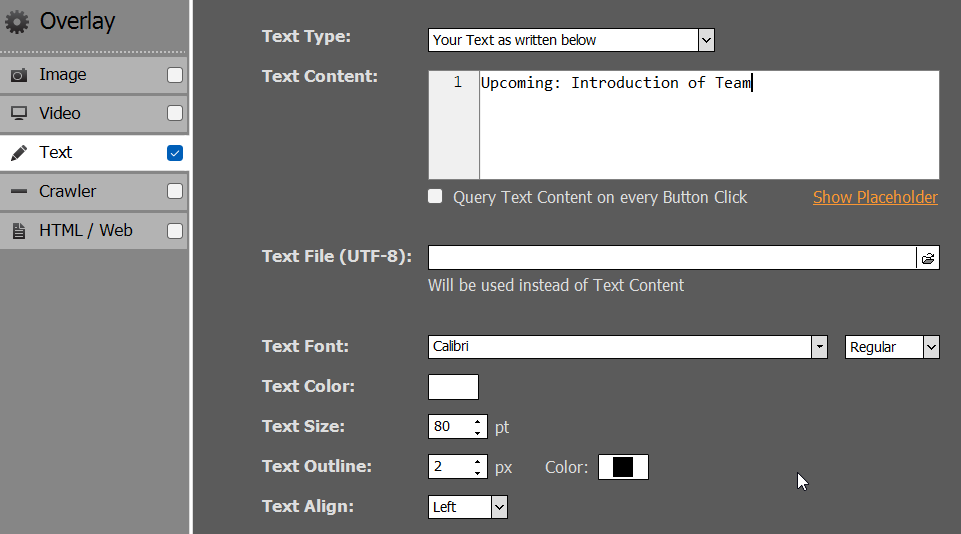
Up to 30 overlays (graphics, text, crawlers) with alpha channel support for e.g. lower thirds at the touch of a button or even automated incl. individual scaling, positioning and timing parameters.

Export a playback block as a single clip in a codec of your choice or convert a clip to another format.
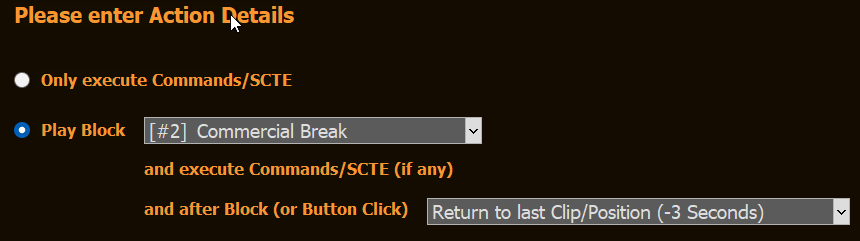
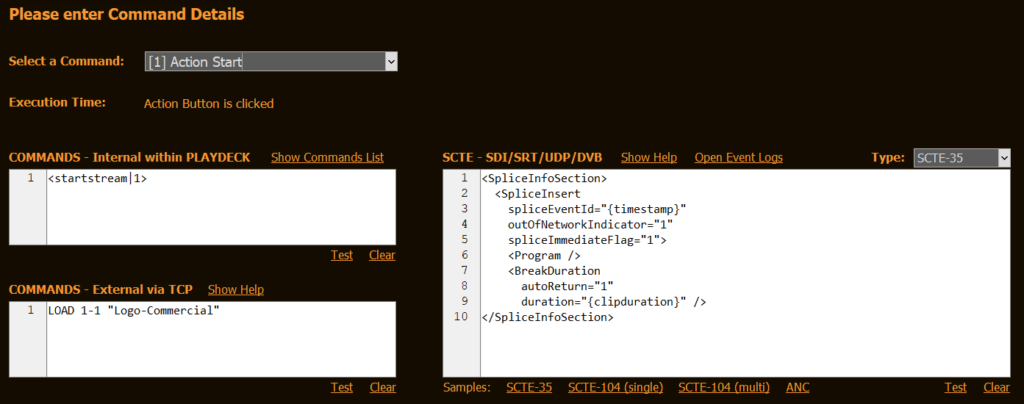
Action Buttons are designed to trigger a variety of custom Actions: Play Blocks and return to the previous position. Start/Stop Streams. Send Remote Control Trigger to external Hardware. Send SCTE Tags to your Streaming Provider.
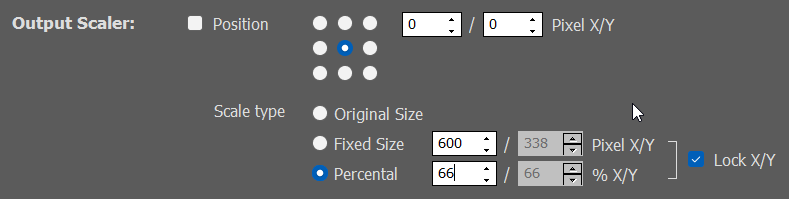
With PLAYDECK you can freely scale, position and crop your output video signal within the selected output resolution. Ideal for direct use on LED walls.
Some hardware scaler manufacturers also call this feature “Pan & Zoom”.
Shows a test pattern, a black/blue/white screen, a still image or a looping video file when no clip from the playlist is played back. Works on both playback channels.
Fades in a playlist clip from the background and back into it.
Set In and Out points for each clip without changing the original file or adjust the size of a clip canvas and choose between different scaling options.

CPU saving decoding, encoding and rendering with compatible graphic cards
„Collect all media files“ compiles all items from the playlist into a zip folder for easy transfer to another PLAYDECK system.
Freely customizable, easy switching between different shortcut sets
The director view allows you to keep your crew members up to date at all times: various layouts are available for you to display the current time, the remaining clip time, the upcoming clips and the tally status.
The output is easily done via the extended desktop, via SDI or NDI or by using the built-in streaming function.
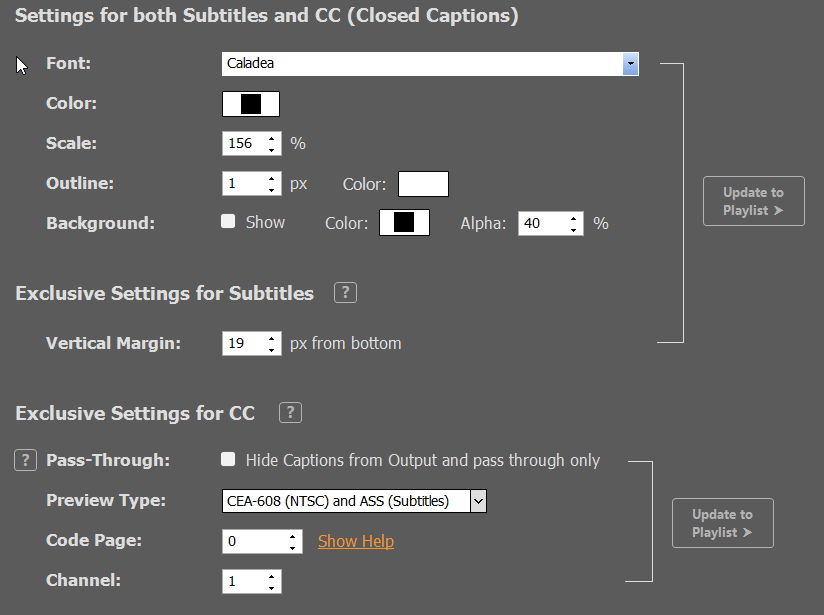
Closed caption support is available on all live inputs and outputs.
Closed captions can either be embedded in the signal only or additionally displayed on the previews for control purposes.
You can add new clips to the playlist at any time using Drag & Drop from the built-in file explorer, even during playback.
and much, much more…
Why you should definitely try out PLAYDECK
Because with PLAYDECK you will significantly increase your productivity, whether you produce live events, stadium TV, theatre performances, museums, TV broadcasts or virtual and hybrid streaming events. You can run PLAYDECK both on-site and cloud-based.
PLAYDECK provides you with 8 completely independent output channels in which you can organise your videos, graphics, audio files, live inputs, SRT Streams or YouTube clips simply by dragging and dropping. If you like, you can select different resolutions and frame rates for both channels. For example, you can play full-screen videos from channel 1, while animated lower-thirds with alpha channel are sent from channel 2, and background music loops from channel 3.
PLAYDECK supports almost any codec and converts all content to the selected output format in real time. The output is completely flexible via dedicated output cards (e.g. from Blackmagic, AJA, Bluefish, …), via the extended desktop or via NDI.
In the Studio Edition, an additional recording channel is also available. The recorded signal can be edited while the recording is still running (edit-while-ingest, e.g. highlight editing), played back with a time delay or streamed. For maximum flexibility you can choose from a wide range of different recording formats.
But PLAYDECK (depending on your licence) is much, much more than a simple playout system:
You can trim and crop your content, you can automatically adjust the volume, you can schedule the start of your content, you can control the playlist externally, you can start playback via your video switcher, you can transmit closed captions, you can completely customise PLAYDECK with advanced scripting functions, you can…
We invite you to try the free trial version and see for yourself the incredible features of PLAYDECK!
We are sure you will love it!


What’s new in PLAYDECK v4.3
- 100% Re-Engineered Video Engine: Optimized performance for high-end 8K playout and rock-solid 24/7 video loops.
- Global Language Support: Fully available in 9 languages with localized user interfaces.
- Massive Audio Power: Up to 8 output channels managing up to 32 independent audio channels, now featuring native ASIO & Dante Virtual Soundcard device support.
- Advanced Multi-Channel Recording: 4 dedicated recording channels featuring near real-time input time shifting and Edit-while-Ingest clip generation.
- Broadcast & IP-Stream Ready: Full support for SRT Stream Input/Output, DVB Stream Output, and ST 2110 / ST 2022 standards.
- Loudness Normalization: Built-in ITU 1770 input loudness calibration for smooth, seamless audio transitions between clips.
- Fail-Safe Reliability: Free Backup-License included for unlimited clients to guarantee seamless redundancy on live events.
- Latest Hardware Drivers: Updated native integration for Blackmagic Design (BM), Deltacast, AJA, and NDI®.
20+ YEARS
LIVE EVENT EXPERIENCE
Engineered by highly skilled production professionals in Germany.
Frequently Asked Questions about PLAYDECK
Q: Can I rent PLAYDECK for a single project or just one month?
A: Yes, absolutely. We offer highly flexible rental models. You can easily rent PLAYDECK for a short-term project or for exactly one month—ideal for temporary events, festivals, trade shows, or private functions.
Q: Is PLAYDECK suitable as a reliable video player for corporate or private events?
A: Yes, PLAYDECK is engineered for rock-solid, glitch-free operation. Unlike standard Windows media players, our software guarantees that the Windows desktop never flashes, taskbars remain hidden, and videos or playlists transition seamlessly without any technical lag.
Q: Does the software support automatic slideshows and seamless video loops?
A: Yes. You can effortlessly mix image and video playlists, set up seamless loops for exhibition booths or museums, and define precise start times. PLAYDECK handles all common formats and ensures a professional workflow without manual intervention.