Cloud Based Remote Productions

COVID-19 has given a huge boost to cloud-based remote production. More and more TV production companies rely on virtual OB vans and perform the image mixing online. So it is only logical that the video playout system is also located in the cloud. PLAYDECK is equipped with NDI inputs and outputs and thus integrates into almost every modern broadcast environment.
PLAYDECK runs smoothly on Amazon EC2 Systems and thus offers a wide range of possible applications.


Easy Highlights Editing: Recording with Edit-While-Ingest Functionality

Creating match highlights for a football game or best-of scenes from an event has never been easier: In the Studio Edition, PLAYDECK provides a recording channel and another playback channel in addition to the two output channels for the playlist. On top of outputting videos from the playlist, you can record an incoming video signal and create any clips from the recording while recording is in progress.

Of course, all editing functions can be operated via keyboard shortcuts, as you know from your NLE editing program. All clips can be subsequently edited, moved to one of the two playlist channels, and even exported to a finished video.

Various codecs are available for recording, so you can set the optimal parameters for you.

Useful additional features such as the Timeline Reset (this sets the timeline to 00:00:00 at the beginning of the show, for example) or the Timeline Offset (this sets the timeline to 45:00:00 at the start of the second half of a football match) make PLAYDECK a very easy-to-use and comfortable highlights editing system for your live production.

Find out for yourself: All the functions of the Studio Edition are unlocked for you in the free and unlimited trial version of PLAYDECK!


Easy Integration with Playback Remote Control

These days, this is almost standard on a production: various devices communicate with each other and are partially coordinated by a central control computer. PLAYDECK supports several remote-control options, which we’re constantly expanding:

Control via Keyboard or Elgato Streamdeck or Companion

Nearly every function on the PLAYDECK interface can be assigned with an individual keyboard shortcut. This means that frequently used commands can be executed with the touch of a key instead of a mouse click. And you can easily assign PLAYDECK with the same shortcuts from a previous editing program that you’re familiar with, so that you don’t have to get used to new shortcuts during first use.

So that different operators have their personal shortcut set quickly available on any PLAYDECK system, it can be exported and copied to any other PLAYDECK system. A PLAYDECK system can store any number of shortcut sets which can then be switched between with a simple mouse click.

And if you crave even more comfort, just use an Elgato Streamdeck with the stored shortcuts.

Or you simply download bitfocus Companion, which has a PLAYDECK module build-in.

Control via Network Commands TCP/IP

If you want to integrate your PLAYDECK system into a real media control system, then you can easily use TCP commands for this. This way, you can automatically integrate PLAYDECK into a complex show process and control all functions from one central control computer. And if you use Universe Show Control as the media control system, PLAYDECK is already integrated into the device library for you.

Control via Tally Interface

The PLAYDECK built-in Auto-Cue feature allows you to play a full show with virtually no operator intervention. It is especially easy to start a clip when the start command is automated from the image mixer. PLAYDECK supports control over the tally jack from practically any video mixing console on the market. This requires a COM port on the PLAYDECK computer or an inexpensive USB interface.

Control Directly via Blackmagic Design ATEM Switcher

Now, Blackmagic Design devices are found almost everywhere in video production. In order to make the use of the Auto-Cue function particularly easy and comfortable for users of Blackmagic Design ATEM Video Switchers, your PLAYDECK system can easily be connected to your ATEM Switcher via the network. You only need to assign which input channel of the ATEM the two playout channels should react. As soon as the corresponding channel is switched on by your video operator, PLAYDECK starts playback almost instantaneously.


Intelligent Special Functions for Video Playout

The small, clever extras are what distinguish a good video playout software from an exceptional one! Who hasn’t had to deal with the following typical situations in everyday production?

The Director View

The live show has just started, the first video player is running. And the director immediately begins the countdown via the intercom: “One more minute until the end of the video”, “another 45 seconds”, “another 30 seconds”, etc. It would probably be enough for three-quarters of the trade, if the corresponding warning came five seconds before the end instead. But: How should the person in charge know the personal preferences of each operator?

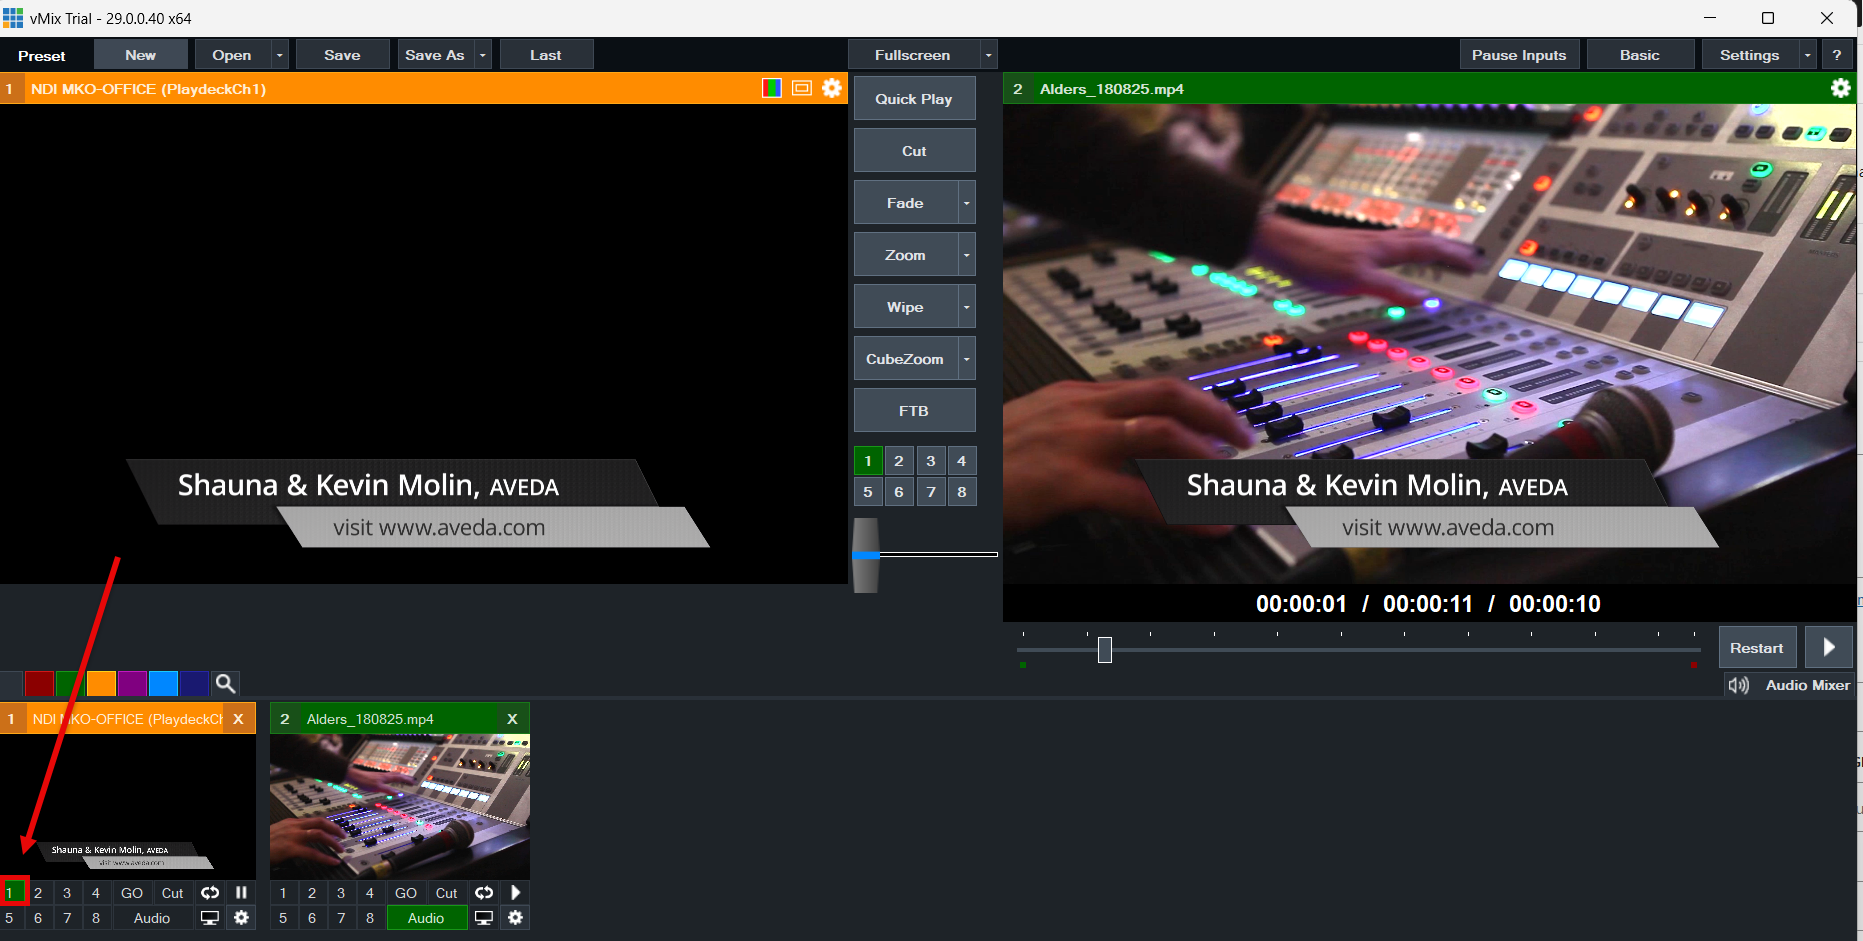
With PLAYDECK, they don’t have to. Instead, they just provide all parties with a compact preview of both channels, indicating the remaining time and upcoming clips, available via the local HDMI output of the PLAYDECK system, cutting out the announcements completely. This is the Production Window. Try it out for yourself! You’ll be amazed!

The Schedule Block Function

Particularly with tightly timed productions, the operator’s gaze always wanders back and forth between the current time, the directorial schedule, and the remaining time of the currently playing video clip. What’s better than collecting this information in one place? In PLAYDECK, the scheduled start time can be taken from the schedule and stored for each playback block from the playlist using the Schedule Block function. PLAYDECK then displays a clearly visible countdown to this time on both the user interface and the production window. At a glance, the director can see how they are doing for time. And if a program point takes less time than planned and the next video must be brought forward, PLAYDECK automatically adapts the start times of all subsequent pieces accordingly.

Sounds too good to be true? We promise you: It’s true! And it’s better than good, it’s great!

The Auto-Cue Function

If everything goes exactly as planned during a production, then life as a video operator can be quite comfortable: start the video, wait to make sure after the end of the clip the mixer has switched to the right camera, place the next clip into the cue, wait, etc. You might ask: is an operator needed for such productions at all, or could they be doing something more meaningful with their time? Yes, they can, if they use the auto-cue function! With this useful feature, at the end of a playback block, PLAYDECK waits on the last frame of the clip (for a freely adjustable time set by you) to allow the image mixer a steady fade. Then PLAYDECK jumps to the first frame of the next clip and waits for the start command. And if this comes automatically from the video mixing console (via Tally Interface, or directly via LAN if you use a Blackmagic ATEM image mixer), then no one is actually needed for the regular operation of PLAYDECK.

Preparing a Show

This is also not an unusual scenario: The production system is already loaded on the truck and there are still some videos, sometimes altered, sometimes completely new. As operator, you would like to play them for testing purposes, update the playlist, and maybe the videos also need to be cropped. Not a problem with PLAYDECK: Even without a license, you can test and prepare your entire show with the trial version. Connected hardware can be accessed too. The only difference compared to the licensed version: A watermark on the output signal.


The Perfect Video Playout Software for Windows


Just how long were we on the lookout for the optimal video playout solution before we started developing PLAYDECK? Some programs were simply not professional enough, others didn’t run reliably, then there were those not suitable for Windows PCs, and finally there were the big media servers, which are just too time-consuming and expensive for a lot of tasks.

So, the big question right at the beginning of the development of PLAYDECK was: Though it’s subjective, what would the perfect video playout software for Windows be like?

General Requirements for a Video Playout Software

In many talks with friendly colleagues and technicians, the following points came up, which almost everyone considered essential and which we kept in mind throughout the entire development of PLAYDECK:

  • Top reliability when running video playout software on Windows.
  • Videos should be processed in as many codecs as possible and at different resolutions/frame rates and scaled to the output format during playback.
  • Still images and graphics should be playable, each displayed with a separate duration.
  • For smaller productions on a budget, video output should be possible via a local HDMI output (extended desktop). For larger productions, via the use of separate video playout cards (e.g. Blackmagic Design, AJA, Bluefish, etc.).
  • The user interface should be clean and easy to use, yet still have all the advanced features readily accessible.
  • The video playout software should be easily remotely controllable.

Special Requirements for a Video Playout Software

And then we heard a series of wishes, usually beginning with “It would be great if…”, which we also kept in mind during the developmental stages of PLAYDECK:

  • Playout from 8 independent channels with the ability to output different resolutions or frame rates. For example, videos can be played from the one channel, while lower-thirds with an alpha channel are played from the other. Or channel 1 plays all backgrounds, while channel 2 plays all video clips. Or channel 3 can be used to play music. The use cases in a live production are almost unlimited.
  • A wide variety of available licenses, depending on the specific application: online licenses for unrestricted transferability between different systems of a company, USB dongles for dry-hire use, hardware-linked offline licenses for fixed installations, theaters, museums, and sport arenas.
  • Individual clips or entire playback blocks can be looped with different settings: Unlimited loop, loop for X amount of times, loop for X amount of minutes, loop up to XX:XX hours.
  • When no clip is playing from the playlist, the video playout software can display a background graphic or a looping background video.
  • When clips with different volumes are loaded into the playlist, PLAYDECK analyzes their loudness levels and adjusts all levels automatically.
  • Clips can be trimmed with in and out points, as well as resized, without making changes to the original file. There are different scaling options available in PLAYDECK.
  • Changes to the playlist on the video playout software can be made within seconds, even during operation, by using drag & drop from the integrated File Explorer.
  • Each clip in the playlist can be previewed in a separate preview window, even when playback of the playlist is taking place simultaneously.
  • Graphics and videos can be assigned to separate buttons (Overlay Buttons and Action Buttons) so that they can be accessed directly and played at the push of a button.

The easiest way to find out whether PLAYDECK is the perfect video playout software for Windows is by trying out our free unrestricted trial version: Just click here.


License Manager

To remove the watermark from the trial version and use PLAYDECK without restrictions, you need a valid license. On the website www.playdeck.tv you can choose between different licenses (Lite, Plus or Studio version) with a duration of one month or one year, with or without automatic renewal.
After the purchase you will automatically receive an e-mail with your access data for the online license pool. If you do not receive this mail within a few minutes, please check your spam folder.
To transfer your license from the online license pool to your system, please open the License Manager under the menu item Help.

PLAYDECK Professional Video Playback Playout Software for Windows * License Manager Control

If you have not yet transferred a license to your system, the left list (Local Licenses) will only show the trial version. To connect to the online license pool, please press the Connect and Update Licenses button.

PLAYDECK Professional Video Playback Playout Software for Windows * License Manager Connect Update License Login Online Pool

Now enter the e-mail address you used to register and the password you received and click OK. If you ever forget your password, simply request a new one by clicking Forgot Password.

PLAYDECK Professional Video Playback Playout Software for Windows * License Manager Checkin Checkout License Online Pool Local System

After PLAYDECK has successfully connected to the online license pool, you will see an overview of your available licenses in the right list. Select the license you want to transfer to your local system and click Checkout.

PLAYDECK Professional Video Playback Playout Software for Windows * License Manager Automatic Activation after Checkout

You will now be asked if you want to activate the checked out license for immediate use. If you click Yes, PLAYDECK will restart and activate the new license, if you select No, the license will still be available for later activation in the left list of local licenses.

PLAYDECK Professional Video Playback Playout Software for Windows * License Manager Activate License

You can switch to another of the local licenses at any time by selecting it and then pressing Activate License.

PLAYDECK Professional Video Playback Playout Software for Windows * License Manager Offline License Activation

If your system is not connected to the Internet and you therefore cannot or do not want to use the online license pool, another option is to use a so-called Offline License. This license is not available in the webshop. Please contact our support at [email protected].
In order to send you a valid license key for your system, we need the System ID, which is displayed here.
You will then receive an e-mail from us with your license code, which you should copy into the window below. After successful verification of the license code (no Internet access is required) your offline license will appear as usual on the left side of the licenses stored locally on your system and can be activated exactly like an online license.

PLAYDECK Professional Video Playback Playout Software for Windows * License Manager Password Protection

If you want to protect access to the license manager from unauthorized access, you can set up a password. To remove the password protection, you must enter the password again. If you ever forget the password, please contact our support at [email protected].


Audio Settings

One of the most convenient features of PLAYDECK (from the Plus version upwards) is the automatic adjustment of the playback volume of each clip. This means that the viewer will perceive them as equally loud.
Please set your desired Target Loudness as well as the True Peak Level. PLAYDECK will now ensure that the maximum level is not exceeded even during peaks.
As a rule, you should leave the Loudness Range value as it is.
By default, PLAYDECK scans a maximum of the first five minutes of each video file to estimate the volume distribution of the clip. If you often use significantly longer files with a strongly fluctuating volume, you should set a longer scan time. However, this increases the time needed to determine the correct level.

You can set separate values for output volume or input sensitivity for the two stereo channels of all outputs and inputs.
You can also output the two playlist outputs as a mono summed signal and mute the output via the Windows standard audio device. The latter is useful to avoid slightly shifted audio playback from the video output card if it is inadvertently selected as the Windows default audio device additionally.

A maximum of 16 audio channels are available for output. You set these in the menu item Playlist OutputAudio Format.

PLAYDECK does not make any changes to the audio channel routing by default (no entry in the lines), but allows you to intervene manually. Please enter the desired mix pattern in the two lines for Playlist 1 and Playlist 2, separating the channels by commas.

To apply a changed audio routing to the clips in the playlist, press the Update Clips button.

Here are a few examples:

1+2,1+2 (Mono Mixdown)
2,1 (Swap left and right channel)
1,2,1,1 (Copy channel 1 to channel 3 and 4)
0,2 (Mute channel 1)
0,0,1,2 (Move channel 1 and 2 to channel 3 and 4)
1+3+5+7,2+4+6+8 (Stereo mixdown of 8-channel-track)


Control Section

PLAYDECK Professional Video Playback Playout Software for Windows * Playlist Control
The control section of PLAYDECK contains previews, control buttons and timers

In the control section there is a preview window for each of the two playlist channels with adjacent buttons for operating playback.
Above these buttons you will find several timers that help you to keep track of the timing of your show.
In the middle are the buttons for recording start and stop, for opening the SmartClips window and for SYNC operation of both playlist channels.

Channel Previews

PLAYDECK Professional Video Playback Playout Software for Windows * Playlist Preview Channel Name

The Channel Previews always show the currently playing video signal. Next to it there is a VU meter with a clear indication whether the audio output is muted or not.

Left mouse click on the green field Audio is ON will mute the audio output and the display changes to a red field Audio is OFF.

Right-clicking on this field leads you to the audio settings in a very easy way:

Mute in Windows disables sound output via the default audio device defined in Windows. If playback is done via a dedicated playout card, e.g. from Blackmagicdesign, then this sound output is not affected by this setting.

Audio Settings directly takes you to the corresponding menu (see chapter 2.1.6).

In the lower section Options you can select which number of channels the VU meter should display. Important: You can only display more than two channels if you have selected an audio format with more than two audio channels for the corresponding output channel in the Settings under Playlist Output (see chapter 2.1.2.1).

If you right-click on the preview window, the following context menu opens:

If you would like to view the contents of the preview window in full screen, please select Fullscreen. You can leave the fullscreen mode again by performing a single mouse click.

If you would like to display a channel name in the preview window (just like Giant Screen in the example above), please select Show Channel Name. To hide it, select Hide Channel Name. You can edit the channel name by selecting Change Channel Name.
The channel name is also displayed in the Director View. Of course it is not visible in the actual video output.

If you have connected PLAYDECK to a compatible device (e.g. Blackmagic ATEM series switcher, NDI receiver, vMix or TSL-enabled switcher), you can display a green (preview) or orange-red (program) tally frame around the preview window. To do this, select the menu item Show Tally Lights.

To display closed caption texts in the preview window, please activate the function Show Closed Captions.

Control buttons

PLAYDECK Professional Video Playback Playout Software for Windows * Playlist Control
PLAYDECKs playback control buttons

STOP stops the current playback and displays the content you selected in the menu item Background under Settings – All Settings – Playlist Output – Channel 1/2.

FADE fades a clip in or out of the background. The clip to be faded in must be selected in the playlist, but must not yet be in the CUE.

CROSS FADE, on the other hand, fades the currently running clip into the next clip.

Right-clicking the FADE button opens a menu where you can set the effect duration for fade-in and fade-out for both channels or change the fade mode to Cross-fade:

The JUMP function is particularly useful during rehearsals. With the help of JUMP you can easily skip the first X seconds of a clip or show only the last X seconds of a clip. You can set how many seconds are skipped at the beginning or displayed at the end of the clip under All Settings – Workflow – Playlists (see chapter 2.1.1.1).

Alternatively, the button can be assigned with the NEXT function. This way, you can put the next clip in the CUE, start it immediately or start the next block at the touch of a button.

You can set the function of the button via the context menu, which can be accessed by right-clicking on the button.

The control looks as follows when NEXT is activated:

PLAYDECK Professional Video Playback Playout Software for Windows * Playlist Control

Note: If you want to use both the JUMP and NEXT keys in parallel, please use keyboard shortcuts or remote control.

The CUE button prepares a selected clip for playback and waits for the PLAY command on the first frame of the clip. If there is a clip in the CUE, this button is filled in green.
However, CUE does more than that:

  1. If you put the first clip of a block into CUE and this block has been assigned a scheduled start time (see 3.1 Block Header Functions), the countdown timer is automatically displayed.
  2. When you put any clip into CUE, PLAYDECK waits for remote start commands to arrive, either from connected tally interfaces or directly from connected Blackmagic ATEM switchers, vMix Software, NDI receivers or TSL-enabled switchers (see 2.1.9.1 Incoming Remote Connections).

The PLAY/PAUSE button toggles between playback start and stop. During playback, the button turns orange.
If you want to start a clip from the playlist without putting it into the CUE first, you can simply double-click on this clip if you have set this function (see 2.1.1.1 Settings – All Settings – Workflow – Playlists: Double-click on playlist clip).

Block Timers and Countdown Timers

Block Timers

In the area above the control buttons you will find the Block and Countdown Timers.
The grey coloured Block Timer shows you from top to bottom

  1. the time at which the block will end (as long as a clip is in the CUE, this end time is continuously updated)
  2. the remaining duration of the currently played block, and
  3. the remaining duration of the clip currently playing with a separate Clip Timer. Within the Clip Timer, you can jump to different positions within the clip with a single mouse click.

The block and clip timers can take on a signal color and can also play a warning sound when a preset remaining time is reached (see 2.1.1.1 Settings – All Settings – Workflow – Playlists: Show Colored Alert).

Use the small clock icon in the lower left corner to toggle between the remaining and the elapsed clip runtime.

The left and right arrows move the playhead one frame back and forward.

Countdown Timers

If you use the Schedule Block function (see 3.1 Block Header Functions), additional Countdown Timers are displayed:

When you put the first clip of a block to which you have assigned a scheduled start time into the CUE, the upper larger countdown timer will appear. This counts down to zero and then automatically starts playback (shown by a triangle next to the clock icon), or it just counts down to zero and then up again without starting the clip (depending on the setting made in 3.1).

The countdown timer may change to a signal color if a certain time is reached before the scheduled start time (see 2.1.1.1 Settings – All Settings – Workflow – Playlists: Show Colored Alert). It will always turn red as it counts up.

If you have provided a block with an autostart command that should be executed in any case (regardless of the current playback status of the playlist), you will receive an additional, smaller countdown timer as a warning.

SYNC Button

If you activate the SYNC button (it turns orange), you control both playlist channels together.
To prevent unwanted synchronous operation, an orange border is displayed around all control elements when the SYNC function is activated:

PLAYDECK Professional Video Playback Playout Software for Windows * Playlist Control Sync

A right click on the SYNC button opens a selection menu with which you can determine which functions are to be sent to both playlist channels in SYNC mode:

If you do not see the SYNC button, you have either not activated the second playlist channel or you have deactivated the display of the button under menu item View – Show Sync Button.

REC Button

In the Studio version of PLAYDECK, the Edit-while-Ingest function is available. By pressing the REC button you start recording an incoming video signal (the button turns red). Pressing the REC button again stops the recording.

If you right click on the REC button, a menu opens where you can program the automatic recording start and open the recording settings:

EDIT Button

Pressing the EDIT button opens the Editing Workspace with the Edit-while-Ingest function.
For more information on the Editing functions, see chapter 6 The Editing Workspace.


Overview

PLAYDECK Professional Video Playback Playout Software for Windows * User Interface with two Playlists, Control Section and Overlay and Action Buttons
The user interface of PLAYDECK is divided into three main areas: Control Section, Playlist Area and Overlay/Action Buttons

Menu Bar

The menu bar takes you to the basic settings of PLAYDECK.

Under the menu item File you will find the commands for creating, opening or saving a playlist, the functions for importing and exporting a playlist as well as for generating a clip run log file.

The menu item Settings takes you to the sub-menu All Settings, where you can make the most important settings. You will find more detailed information in chapter 2.1. Furthermore, you will find the menu item Scripting, where you can extend and individualise the functionality of PLAYDECK with the help of various Java Script files. In addition, you can define keyboard shortcuts for almost every command via the sub-item Keyboard Shortcuts to adapt PLAYDECK perfectly to your usual workflow (see chapter 2.2).

Under the menu item View, you can adjust the visual appearance of the user interface to your personal preferences. For example, you can adjust the line height of the playlist, show thumbnails of all playlist clips or hide the overlay and action buttons.

The menu item Streams lets you start and stop the streaming playback for the two playlist channels and the Production Window and displays the stream status.

Under the menu item Help you can check for available updates, get access to the license manager and get in contact with our support team.

Control Section

In the upper area of the user interface you will find a preview window of the currently output video signal including audio level for each channel, the buttons for controlling the playout, and a number of time specifications for the playlist (end of playback of the current block, remaining time of the current block and the current clip, countdown to blocks for which the Schedule Block function has been set). Furthermore, between the two playlists you will find the button to start recording and open the edit window, as well as the button to activate the synchronous operation of both playlist channels.

Playlist Area

The largest area of the user interface is available below the control section for the playlist and its configuration. Here, you will find all entries that you have prepared for playback with PLAYDECK, clearly arranged in the respective playback blocks. A playback block consists of the block header with block name and information about scheduled start times, one or more lines of media (videos, still images, audio tracks, Youtube clips) or live inputs with the associated information, and a block end that defines the behavior of PLAYDECK when reaching the end of a block. To keep track of longer blocks, the view of the playlist can be customized in many ways. For more information about working with playlists, please refer to chapter 3.

Overlay and Action Buttons

Below the playlist you will find the buttons for controlling the overlays and the actions. Overlays can consist of videos or graphics (with or without transparency), text, scrolling text, web pages or HTML code, which you can show manually or automatically over the output video signal during playback from the playlist. Actions are individual media files in direct access. Pressing an action button interrupts the current playback and starts the stored media file. You can define how PLAYDECK should behave after the action file has finished playing. Please refer to chapter 4.2 Working with Actions for more details.


Keyboard Shortcuts

Most of the control commands for the operation of the two playlists, the overlay and action buttons as well as the editing window can be easily and flexibly assigned with keyboard shortcuts:

Menu for assigning keyboard commands to a variety of control functions

First, define your keyboard layout. Then select the control command you want to assign a shortcut to from the three categories and then press the corresponding key combination on your keyboard.
If you want to use keyboard commands that interact with Windows shortcuts, please activate the function Disable Keyboard Input to Main and SmartClips Window under Settings – All Settings – Workflow – Shortcuts.

For some functions it is helpful to be able to execute the command repeatedly while holding down the key. For example, you could assign the Next Frame command to a shortcut in the SmartClips window. If you press the corresponding key once briefly, the playhead jumps to the next frame. You might want the playhead to continuously jump to the next frame after a certain delay while you hold down the key until you release it.
You can set this up by selecting the corresponding function and then pressing the “Repeat” button:

When you have set up all your desired shortcuts, it is useful to save your shortcut set.
PLAYDECK allows you to save and load any number of different shortcut sets.
The Fastswitch dropdown field allows you to switch between the last used sets at lightning speed.